
 Kusanagi Motoko’s setup was made using an in-house tool that I wrote in 2014 which is a variation of an auto-rigging tool that I made around 2008. The character setup was made to be simple yet useable so sending data to other teams will not require a lot of effort or conversion because native Maya nodes were used.
 It’s also capable of squash/stretch and even bendy joints were implemented but we never really use those because of the nature of our projects. Another reason for keeping the rig simple and robust is because we wanted it to be able to accept data from MotionBuilder without a lot of conversion work. Keeping things simple is the way to go.


The rigging done for Motoko was partly featured on CG World magazine. The picture to the right shows the team who worked on this including the motion capture crew and the producers, composers, artists and director. Thank you for this memorable project!
Automated Rigging Tool:
This tool allows me to work fast because the setup is automated. The rig can be done in one-click as opposed to a day when doing it manually. This will ensure consistency and productivity. There are many scripts that I wrote around this workflow to allow me and the animators to work faster such as a picker with a UI and other “click-savers” that can make the animators work more efficiently.
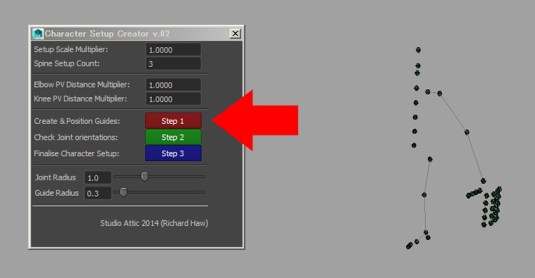 This is the interface for the auto-rigging tool that I wrote. It’s made with the 1-2-3 method wherein you only have 3 steps to think about when creating a rig. Step 1 requires you to position the automatically created nodes where the joints should be. This is easier to do instead of manually creating joints and rotating/positioning into position. There are also options here that you can set such as the height of the rig and how many spines you want on the character. You can also set the size of the nodes here if you want for easy viewing.
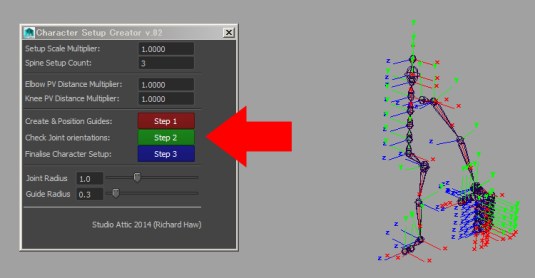 Once you are happy with the position of the nodes, simply click Step 2 to initialize it. This will create actual joints out of the nodes we had in the previous step. Since all the joints were created procedurally by code, this step requires you to manually fix the orientation of each joint. It may sound tedious but it’s really simple. The joint orientation rules are Y-up, X-forward and Z-curl. Following this rule will make it easy for animators because all joints and controllers will follow the same scheme. This will make it convenient to work with the keys in the Graph Editor. There are no second-guessing which axis does what.
 Step 3 will finalize the setup. It will automatically create the controllers and other related nodes like selection sets and cleanup whatever junk was left by the process. The controls are color-coded to make it easier to see and identify each controller. You can also set the distance of your pole vector controllers if you have to. This tool is a timesaver and makes me handle projects that are otherwise too big for me to finish on my own. The animators prefer this over HumanIK because of the speed and predictability.
Mocap Transfer:
I had motion capture transfer in mind when I made this tool that’s why I made this to be as simple as possible without sacrificing too much in terms of features. The joints have to be extracted from the Maya rig (automatically) and sent to MotionBuilder so that motion can be transferred to those joints then sent back to Maya to transfer to the Maya rig.
 Motoko’s rig was made using the same tool I just explained in the previous section. She has motion capture data that was processed in MotionBuilder and we can utilize that for her animation. All you need to do is drag-and-drop the .fbx data into the scene to import it. It is very important that the character is set to the default pose.
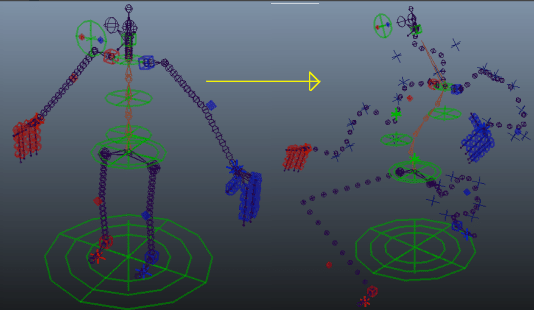
 The imported .fbx data is basically a copy of Motoko’s skeleton. The animation data from MotionBuilder will drive our Maya rig using the special tool that we see on the picture.
 Just like the rig, we need the .fbx joints to be in the default pose to initialize or else this won’t work. You should set the first frame to be the default pose or else this won’t work.
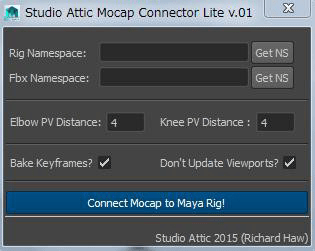 This is the interface of the mocap connector tool. This is a much simplified version of the one we use in-house and is meant for our offsite team. We have fields to input the assets’ namespaces, the distance of the pole vectors from the joints and checkboxes for options such as baking keyframes to the rig and disabling viewport refresh to make things as fast as possible. You can disable this option to see the code at work if you want to debug.
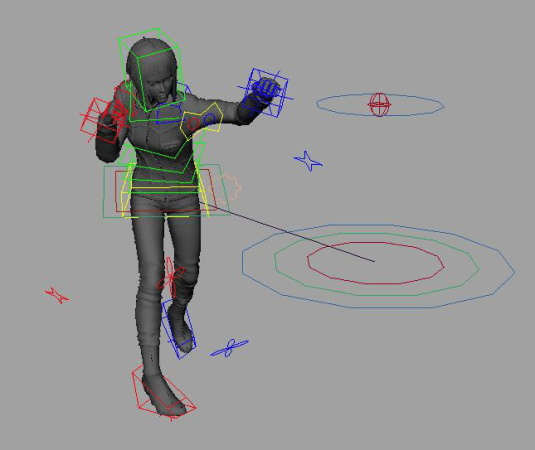 Here is what we have after the motion capture data has been baked into the Maya rig. It’s a lot faster for the animator to work with a Maya rig than HumanIK so all of the keys are baked into the controllers to allow that happen. Since we’re working with densely-spaced keys, a recommended workflow for this is to use animation layers for tweaking.
Cannon Arm Gimmick:
While the automated rigging tool can generate the basic biped rig for you procedurally, I will still need to manually rig the additional stuff that comes with the character. Things such as hair and other accessories will have to done one-by-one. As far as Motoko’s setup is concerned, the most complicated this is her cannon arm so I will talk about it here.
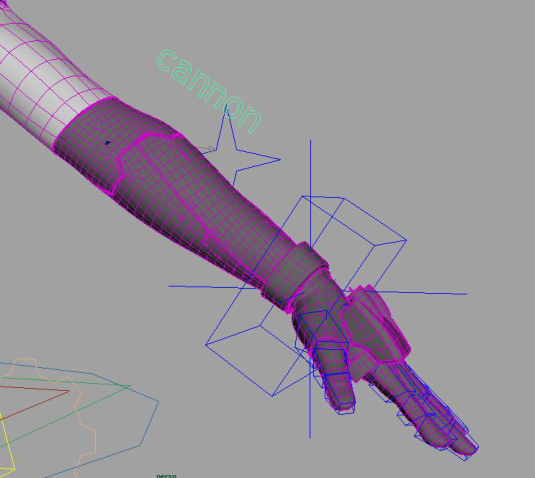 Motoko’s “optic suit version” has a gimmick wherein the left arm turns into a cannon. It’s a gimmick that can be shown by using a switch (a slider) on the forearm.
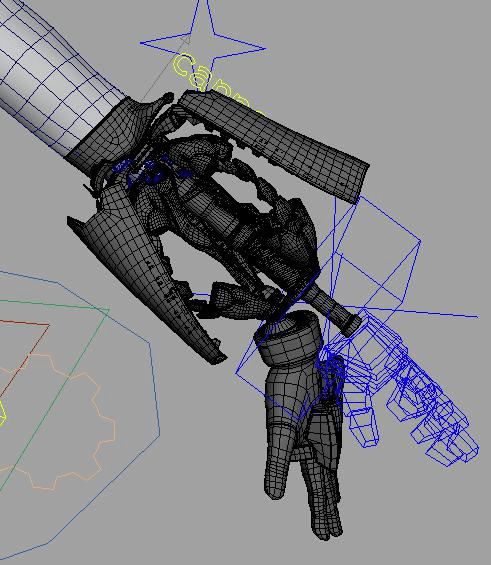 Setting the slider to 100 (from 0.0) will transform her arm into the cannon version. There are many things involved in this so the joints were set driven to prevent me from getting insane. If I recall it properly, there are dozens of parts here and it was a tedious process.
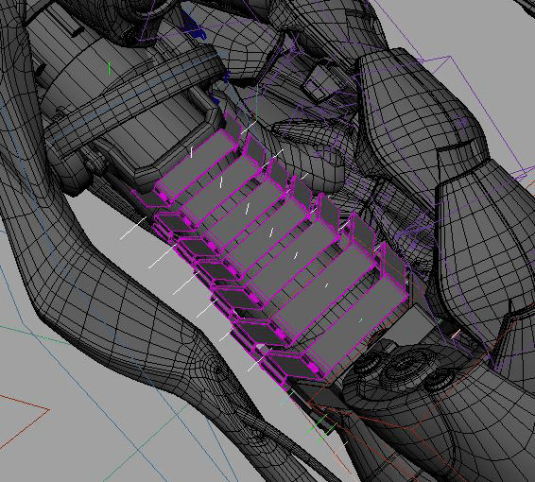 You also have the option to show/hide these independent controllers for tweaking your pose to suit the art direction and to fix penetrating geometry if needed. This allow for a finer degree of control for animators. Shame that this only appeared only once.
I really enjoyed working on project this despite having only a handful of days to work on each character. If I recall, I only had about a week for each one and I had to setup Bato, 2 versions of Motoko and manage the rigging assigned to us in just a around month’s time.
