
Adjusting a lens’ focus is important. If it couldn’t focus properly to infinity it won’t be useful at all and the distance and depth-of-field scales do not mean anything. I will show you how to do this properly using simple tools under a DIY setting. This article is mostly relevant to manual lenses, autofocus ones are calibrated in the same manner but the guidelines differ a bit.
What’s Happening:
A lens’ ability to focus at infinity accurately is important. The depth-of-field and distance scales rely on that. You couldn’t do hyper-focus without it. You should be able to get it to focus on something distant such as the moon and the results should be sharp and the infinity symbol should be centered. It’s crucial for a lens to do this accurately specially if it’s longer than 35mm. It’s pointless to use a telephoto lens that couldn’t do this properly. Some lenses were designed to focus-past infinity so you could turn it beyond the infinity symbol. I usually see this for longer telephoto lenses, it is for compensating the resulting difference when certain lens elements expand when they are hot. Some optical glass expand when used under-the-sun for a long time so this was done in order to make the scales relevant when this happens. This does not apply to autofocus lenses, they focus-past infinity since the camera and its autofocus module will focus it accurately for you. The slack is only to give it more room to work with.
Manual lenses need to be able to focus at infinity accurately. This building is about 1.2km from where I was. This is not enough, look for test subjects that are distant such as communication towers that are close to the horizon. The moon is also fine but it’s not always possible to see it clearly. A wider lens is going to be a lot more forgiving since the wider depth-of-field will be able to compensate for any inaccuracy.
How important is this? If the lens actually focuses at 5m then it should show the same information on the scales, too. The scales should accurately reflect it since there’s no way for you to view things through the film aperture. The advent of mirrorless cameras and live-view helped somewhat but those are not solutions to the problem at all.
You may be wondering how a lens could lose its calibration.
- It has suffered shock like being dropped or knocked hard-enough.
- The focusing ring has become loose due to wear or damage.
- It was “serviced” but reassembled incorrectly.
- The helicoids has been realigned and calibration has to be done.
A lens can be calibrated so long as there are adjusters, many older lenses do not allow you to do this since they were made-to-fit, meaning its parts were adjusted permanently by-hand. You just leave them alone since you have no choice but to accept what was done at the factory.
If a lens could be adjusted any inconsistencies can be corrected as long as it is not beyond-repair. A damaged part can be repaired or replaced, anything that’s misaligned can be corrected.
I’m only going to discuss points 2 and 4, anything beyond them will have to be corrected first by replacing or repairing the broken parts.
For cameras with fixed lenses or when you don’t have a digital camera you can read this article to get an idea about how it’s done. I don’t trust adapters for mirrorless cameras since they can be inaccurate themselves so I just use this technique to check my rangefinder lenses.
Tools:
The best way to see if a lens was adjusted properly is with a camera. Be sure that it is accurate, has never been tampered and reliable. It’s no good if you can’t rely on it to give accurate results. It’s best if you have a digital camera, a film camera will also be fine but it would require a little bit more effort. It is also good if you could use a sturdy tripod for your tests. I’ll only show you the tools that I use which are easily-accessible to you. I’ll update this section in the future and include more things.
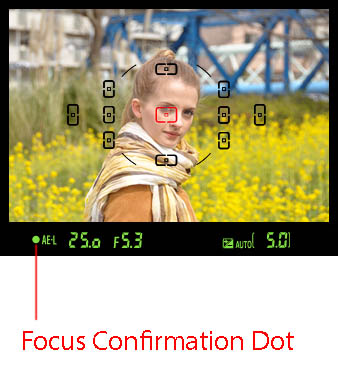
Nikon’s electronic rangefinder is our most accessible tool, it’s accurate and it gets the job done. There’s a dot that lights-up when you get your focus right. It even has arrows that tell you which direction you should be turning your focusing ring. You then check the film-plane with using a special tool. This is how it works with film cameras but it’s more convenient with digital Nikons since all you do is shoot a photo and look at it at high-magnifications. This is even easier with live-view or mirrorless cameras since you see it update as you adjust the lens.
One thing you should be wary about is the quality of the adapters if you are using a mirrorless camera for adjustments. Majority of the adapters are not accurate, they were made by no-name-brands from that country that we all know. Using them won’t give you the best results, it’s a waste of your time. It will be frustrating to adjust your lens again just because your results aren’t accurate because you’re using an adapter of dubious quality. The best one I can recommend is the Nikon FTZ or the Nikon FT1 if you’re shooting with a Nikon 1 series camera. They were made to higher-standards compared to a product from some shady manufacturer.
Older Nikons only have a single focus point but that is enough, you will only need the one at the center where it’s most accurate. For non-F-mount lenses I use a focusing screen coupled with a magnifier loupe. You can read about it in this article. Just open the film door, set the shutter to T and fire it so the shutter remains open. Look through the open film-aperture to check if your lens is adjusted properly.
A more reliable way for the DIY crowd is to use a pair of cameras, each one facing the other. I will show you how this is done once I have the time. The method I described above is more than adequate for most cases.
Where to Adjust:
For lenses that can be adjusted there will usually be a couple of places that’s going to allow us to do this. There’s usually a mechanism that constrains the focusing range, you may have to adjust 1 or even more things in order to get it right. It all depends on what type of lenses we’re talking about. It’s simple to adjust a prime lens but a zoom will require a bit more than that. I’ll show you a couple of places where you could do it in this section.
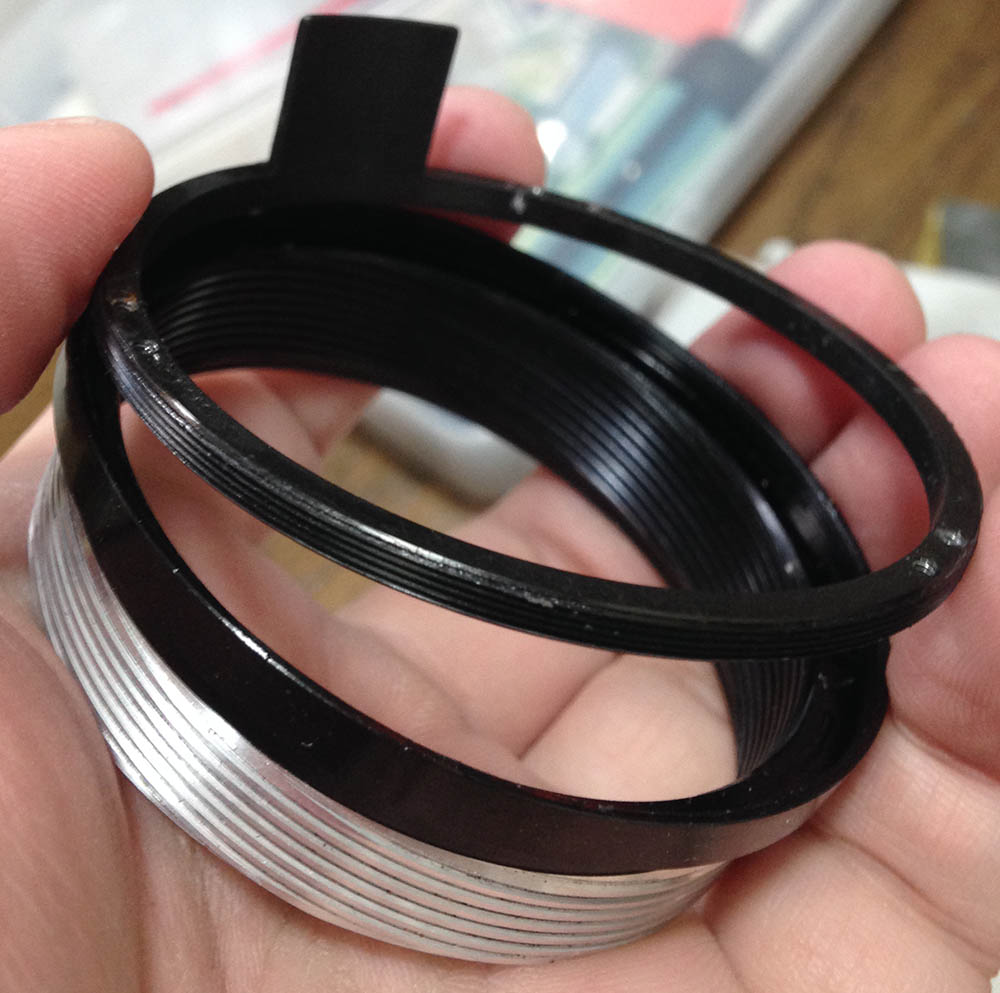
Some lenses have a 2-step procedure for adjusting focus. The one shown in this photo has an inner ring which I call the adjuster ring. You usually get it to constrain the range of the helicoids so it stops exactly at infinity. You then adjust the focusing ring so that the infinity symbol aligns perfectly with the centerline. This is the most common type for Nikkors made from the middle part of the 1960s up until the late 1970s.

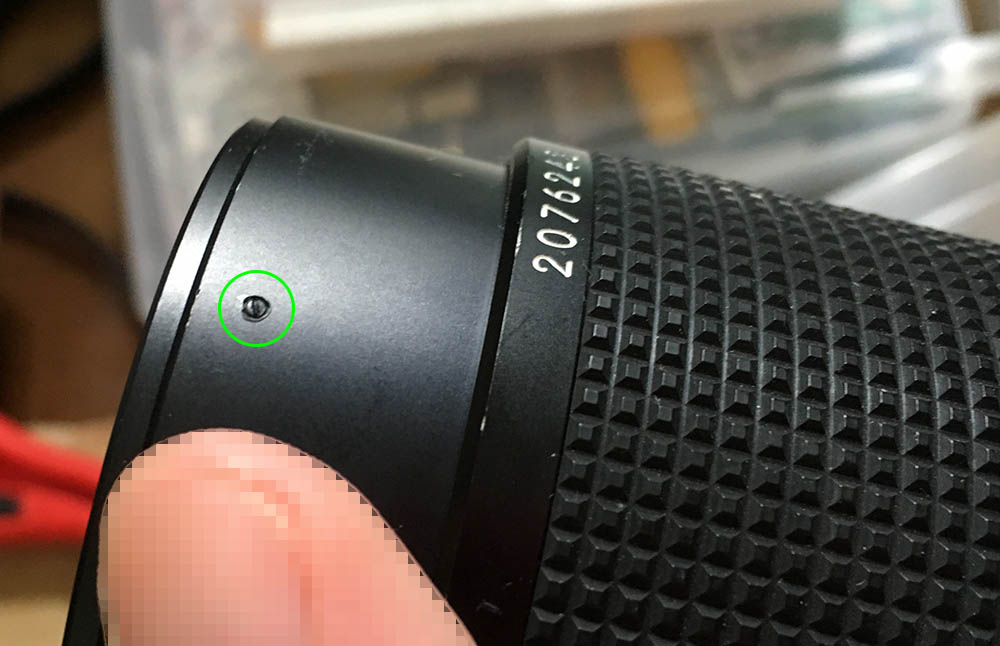
Many Nikkors will allow you to adjust their focus by simply loosening these screws found under the bezel of the focusing ring. You adjust the helicoids so they focus perfectly at infinity then align the focusing ring. The focusing ring is the one constraining the range of the helicoids in this case. This is an elegant way to adjust a lens’ focus as you only need to adjust a single part to get things done.
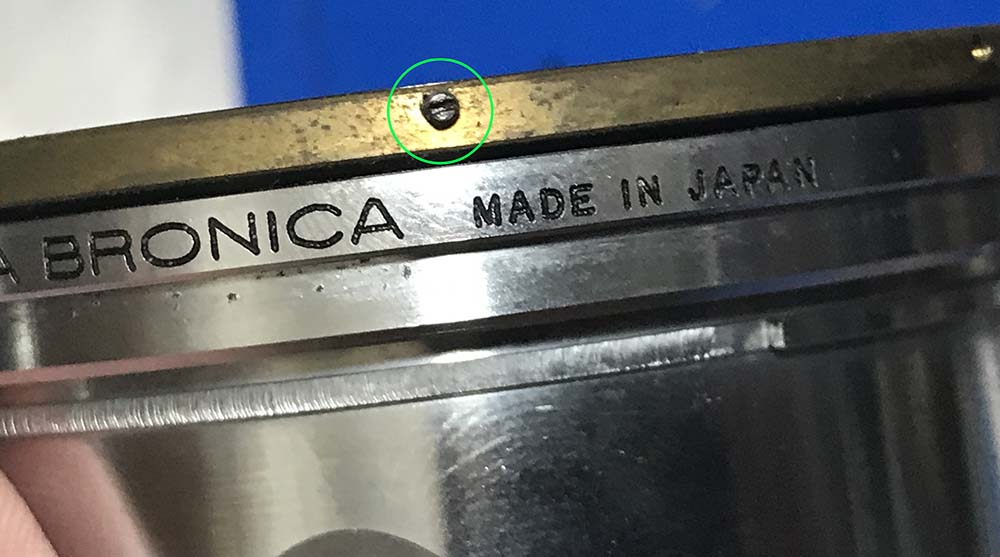
The Bronica’s helicoid could be adjusted by loosening these and rotating the brass ring. Read my article on how to service the Bronica S2 helicoid to find out more about this.

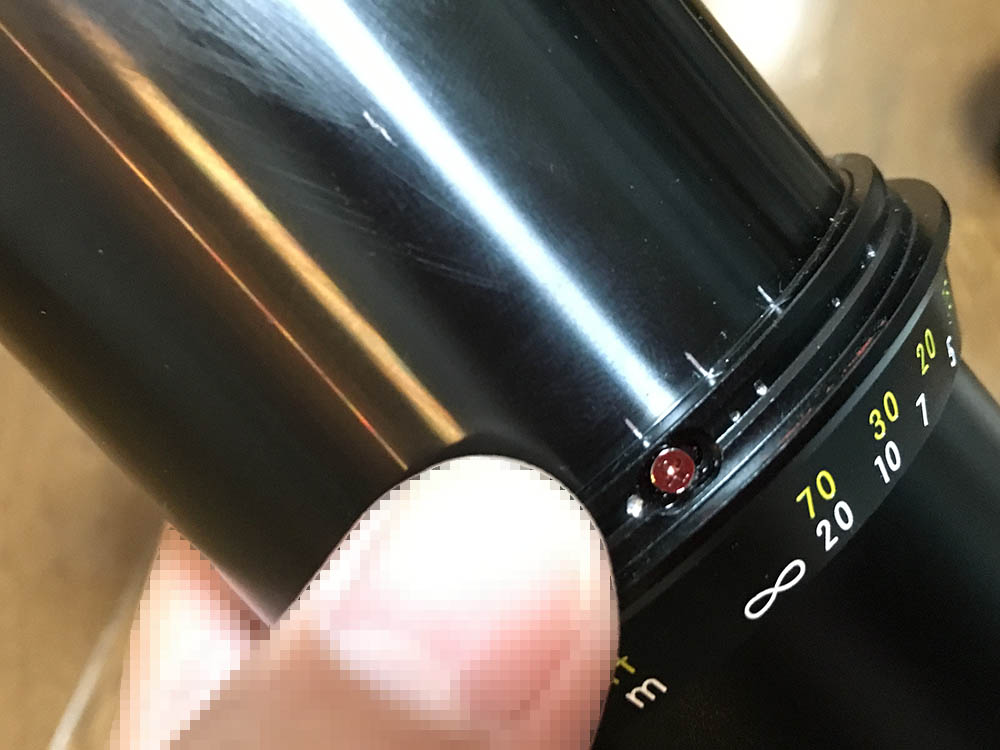
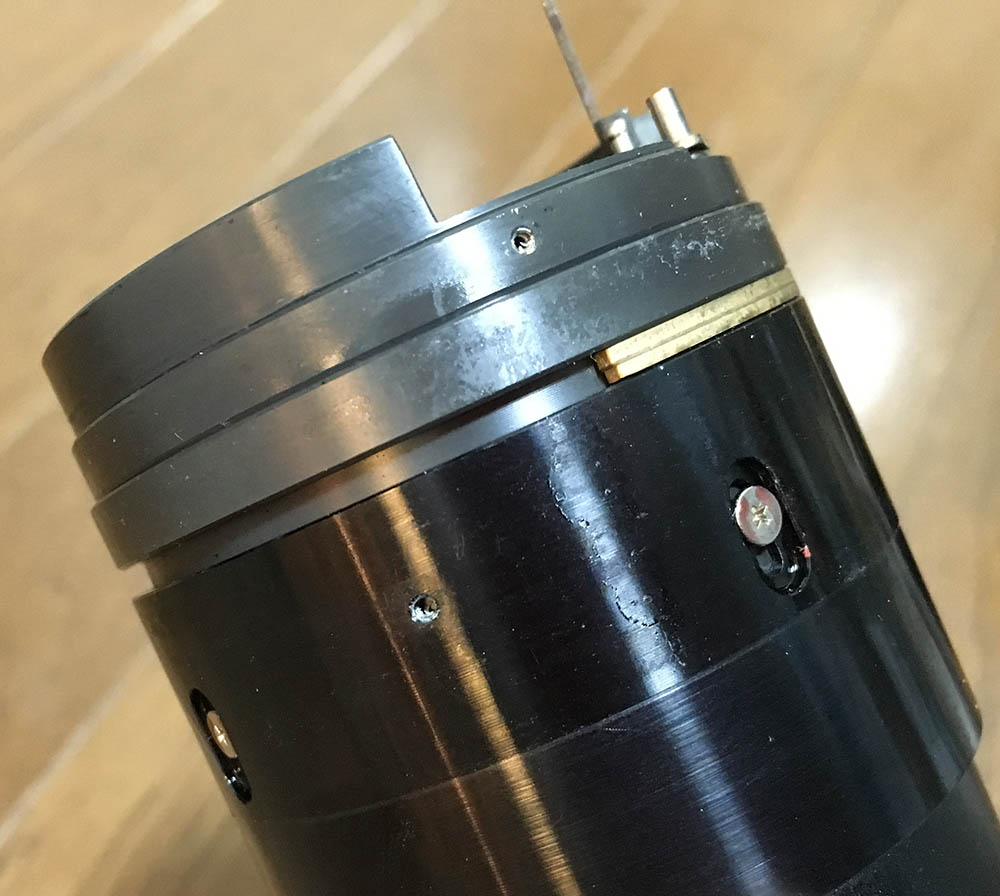
You’ll need to adjust the helicoid stop on some lenses. Loosening the screws will allow you to adjust this, you turn the helicoids so they focus perfectly at infinity and then move these to finalize the helicoids’ range. This is common with some telephoto Nikkors manufactured in the 1970s, in this case it’s the Nikkor 200mm f/4K/Ai.

This is similar to the one shown previously but it’s a little bit simpler. This is from the Nikkor 135mm f/2.8K/Ai.

Some lenses have a separate distance scale for adjustments. You can do that by loosening these.
Some Nikkors made in the 1980s only use scotch tape to secure the focusing adjusters. You turn the focusing ring until your lens could focus perfectly at infinity then you turn the adjuster and distance scale to match it. You place a strip of tape to finalize your adjustments. This is for cutting-corners and to make the barrel lighter. The one shown here is from the Noct-Nikkor 58mm f/1.2 Ai-S which is very ironic since it’s one of Nikon’s legendary lenses. This is quite common in many Ai-S Nikkors.
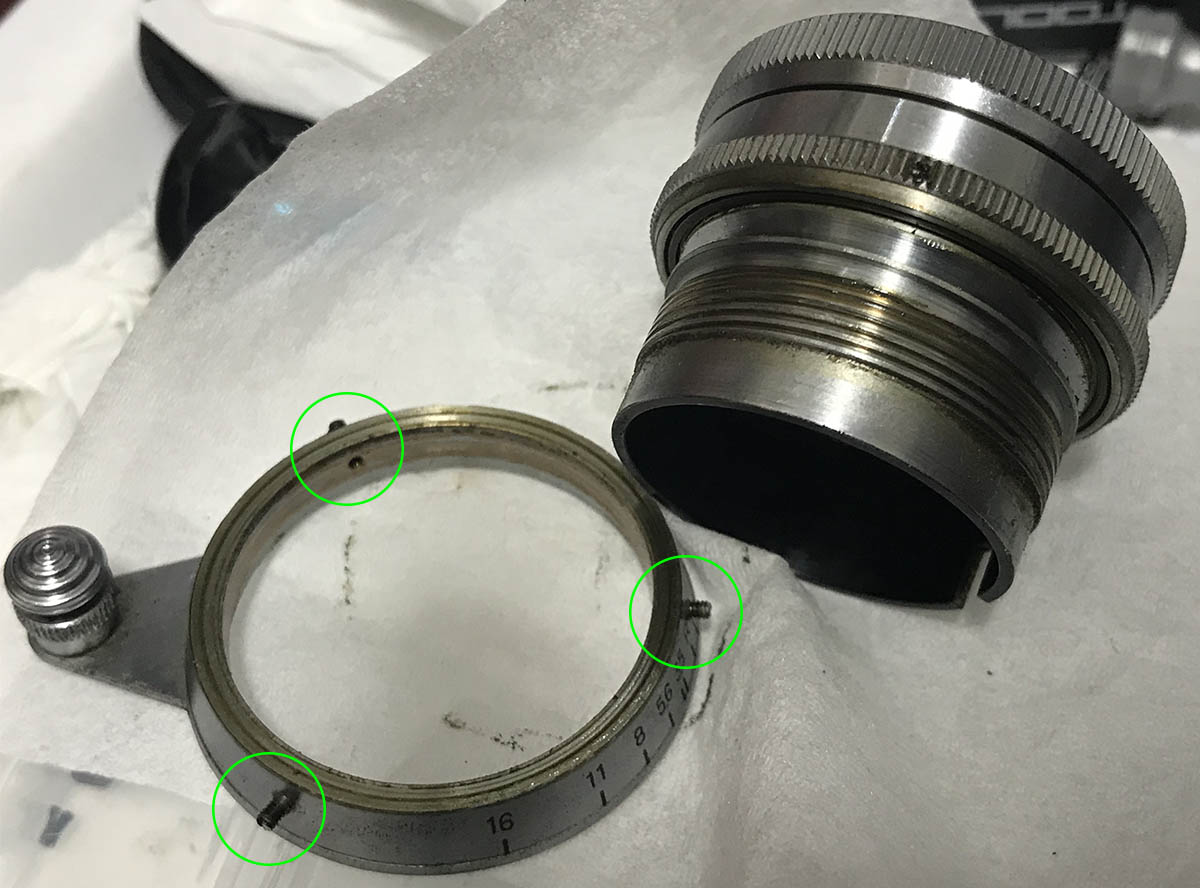
This is a similar concept to the one shown above but it’s from an older LTM Nikkor. You loosen the screws then adjust the scales.

If you’re feeling adventurous, you can even adjust lenses that don’t allow it. This can be done by adjusting the thickness of the objective’s shim. You don’t modify the original one by making it thinner, you make one from scratch. If you need more height you simply insert a thin material on top of the spacer to make it thicker. You never modify the original part, ever. The lens shown here is the Nikkor-H.C 5cm f/2.
Autofocus lenses lenses are more complicated, you’ll have to get things right at 2 places, the front and rear-focus. It’s easy to do this on some lenses while it can be quite difficult with others. Whichever the case is you’ll still have to adjust both-ends and constantly them both since adjusting one end will also affect the other-end. Getting both-ends to focus perfectly is very difficult to achieve in a DIY setting so just balance the results with both-ends and you’ll be fine. Not all zooms will allow you to adjust the rear-focus, some will only require you to adjust the front one.
Adjusting the front-focus is simple, you usually loosen a screw and turn the front optical assembly together with its helicoid.
Some Zoom-Nikkors will even allow you to do that by adjusting the focusing ring, this is a simple, more elegant procedure.
The rear-focus is more difficult to adjust. They are usually situated near the throat of the lens near the bayonet mount. What you do is you push-or-pull the whole barrel until you could get a sharp image at infinity. You may find a few screws there like what you see here, some will have shims instead or some may even have both.
What you should do is adjust one end at the longest focal length then check the wide-end and see if it’s still sharp without turning the focusing ring. If it is off by quite a bit you adjust the other end, usually the rear-focus and get it right. You check your focus again at the long-end and see if things are still the same. If it’s off then you should repeat all the steps until it’s satisfactory. You should favor the long-end because it’s more critical to get it right there, the broader depth-of-field at the wide-end will compensate for any mistakes so long as it’s not too big of a difference.
So long as you find a mechanism which allows you to modify how much the helicoids turn or the ability to adjust the focusing ring, these are the places where you should adjust your lens’ focus, at least that’s the main concept.
How to Adjust:
Shoot through an open window, it’s helpful if it’s sunny outside since you’re able to use faster shutter-speeds to negate vibration. A sturdy tripod will be useful but not essential. Prepare your tools so you can reach them easily.
Locate something discernable at a distance, something that is quite far and around the horizon will be great. A building, pylon or a tower will be great. It should be static and you should not see heat-shimmers. Haze or pollution may affect your view as well so make sure that everything is clear. If you’re not able to find ideal, clear conditions then anything that is at a distant will work and they should not even be at the horizon. Something that’s 6km or so away will do for now.
Attach the lens to your camera and focus on your distant subject. Make sure that the iris is wide-open for accurate results. Select a fast shutter-speed and make sure to use the fastest one available to you. Shoot a picture and check your results. Adjust the focus if you’re not satisfied and repeat the process. I usually do this several times to be sure.
If using a camera with a digital rangefinder isn’t possible or you’re shooting with a film Nikon, see your results through the film-plane using the gadget I mentioned in this article.
Once you are satisfied with the results at infinity, check and see if it focuses correctly on closer distances. Locate something with a known distance from your setup. An object that is exactly 2m from you will be great. Focus on the thing and see if it indeed shows 2m on the focusing ring. It should not be off by quite a lot, minor differences should be fine. If it’s off by quite a bit then you’ll have to repeat the previous procedure again until you get it right. You may have also reassembled the lens incorrectly if nothing seems to work at all, check your repair notes and see if you get things correctly. Once you are satisfied, tighten the adjusters to finalize your changes.
Be careful not to knock anything out of alignment while tightening anything or your adjustments won’t be reliable. Test again and shoot more photos to check if things are still the same. If things are off you will have to backtrack a bit. If things are the way they should, seal the adjuster and its screws with lacquer. A small amount of nail polish works perfectly.
Conclusion:
The procedures mentioned here aren’t as accurate as what you can get from a factory or a well-equipped workshop but it’s enough in most cases. You’re able to accurately adjust your lens to your satisfaction and you won’t need a lot of money or space to do it. In fact, I’m merely doing this from my kitchen through a window.
This article sounds technical but I have simplified it for my readers. If your lens needs to be adjusted, bring it to a real repairman with the right tools. It is important that you send it to somebody reputable since there are people who could butcher your gear just to earn a living.
Thanks for following my work, if you liked this article please share this with your friends so it will get more views. This site earns around $0.30 a day, it’s totally reliant on views. You can also support this site, it helps me offset the cost of maintenance and hosting. You are also helping me purchase, process and scan film. This site promotes the use of film so we’re all in this together. See you again in the next article, Ric.
Help Support this Blog:
Maintaining this blog requires money to operate. If you think that this site has helped you or you want to show your support by helping with the site’s upkeep, you can make a small donation to my paypal.com (richardHaw888@gmail.com). Money is not my prime motivation for this blog and I believe that I have enough to run this but you can help me make this site (and the companion facebook page) grow.
Buy me a roll of film or a burger?
Thank you very much for your continued support!
$2.00
Helping support this site will ensure that this will be kept going as long as I have the time and energy for this. I would appreciate it if you just leave out your name or details like your country’s name or other information so that the donations will totally be anonymous. This is a labor of love and I intend to keep it that way for as long as I can. Ric.

May 15, 2018 @ 17:30:28
Very honorable Mister Haw!
I have read with interest your article about the infinity setting of Nikon lenses. The reason for the test was that I newly purchased a 25-50 Ai-s 4.5. This lens has an error. If you want to focus right in infinity, you have to set the focus ring by 3m. So I started testing my other lenses that have been in my possession for many years and that I have always treated with care. A 50mm 1.8 Ai, 35mm 1.4 AI-s, 24mm 2.8 Ai, 105mm 2.5, 200mm 4.0 Ai, 35-70mm 3.5 Ai. I tried to focus on a 10 km distant antenna mast and had to realize that not a single lens could 100% exactly right in infinity. The microprism ring was – if you were very very precise – a tiny blur. The only lens that could focus in the infinite was the 25 – 50 mm, only this can be in the setting of 3 m focus at infinity. Do you have any explanation? Or it is now necessary for me to do infinity focus calibration for every of my lenses? Thanks for Your honorableexpertise. Thanks for your very interesting articles, which are the only reason I can use my lenses further in the next years.
Sincerly Michael Hopferwieser from Vienna, Austria
Jul 07, 2018 @ 17:47:08
Hello. Have you tried doing this with a DSLR? These have accurate rangefinders. It’s OK if it’s a bit off by a bit. It may be because your prism may not be calibrated properly or the mirror is not aligned. Ric.
Jun 12, 2018 @ 16:30:07
Very honorable Mister Haw! Some time ago I wrote a commet to you. I have found the mistake by myself. Thanks a lot.
Sincerly Michael Hopferwieser from Vienna, Austria
Jun 21, 2018 @ 16:03:17
Hello, Mike.
Sorry for the late reply. I am very busy at my new job. Do you know what happened? Maybe you can share to us. Ric.
Nov 12, 2018 @ 18:06:38
Hi Richard,
The thought occurred to me while I was calibrating my self repaired and manual Nikkor 50mm Ai f1.8 lens – that it may just be possible that both FX and DX-framed DSLR cameras may not be entirely precise concerning their sensor-to-flange distance. Why? – well auto-focus of course where (I assume) some contrast detection mechanism is employed. I have noticed that my NIKKOR 35mm f/1.8G DX lens on manual setting will back focus at ‘infinity’ if I want it to.
Incidentally, I still use film cameras – Leica M/OlympusOM/Nikon FM/FE etc and have a Canon 5D MK1, and various DX framed Nikon DSLRs.
Regards
Eric.
Nov 15, 2018 @ 04:33:38
Keen observation, Eric.
It does work with contrast as with almost all of Nikon’s cameras, film or digital. This is the reason why I don’t trust the DOT alone and also do a series of pictures. Ric.
Nov 15, 2018 @ 16:47:18
Re: Manual lens focusing on Nikon (DX) DSLRs
.
Concerning the focusing indicator or dot, I have found that there is a difference between (clockwise) focusing as the dot flickers ‘on’, it’s mid-point ‘on’, and continuing the turn of the lens at the point of the dot flickering ‘off’. Worth investigating for manual lenses if you have not done so already Richard. Not really any issues with my current AF-S (in auto-focus mode) DX lenses though.
Eric.
Nov 24, 2018 @ 16:35:25
Here’s a point of interest Richard – since I don’t have a full framed Nikon DSLR, I resorted to using my ‘old’ Nikon D80 when calibrating infinity focus for my self-serviced Nikkor Ai 50mm f1.8 lens. I assumed the D80 is correct to within minute margins? Only just recently today I decided to test the lens on another ‘old’ Nikon D40 – and the result for the D40 was that the image was back-focused slightly – beyond any margin of doubt. I didn’t have to ‘pixel peep’ to see that the D40 has a shallower flange-sensor distance. I may when I get the opportunity examine my other Nikons … D3200 and D3100 for discrepancies. My ‘infinity’ object is a transmitter some 3.5Km away from my front bedroom window, not ideal but good enough I think.
Eric
Jan 10, 2019 @ 01:21:24
Hello, Eric.
I am not sure. I assume that the flange distance to be standard and immutable. It is possible that the older camera had to be adjusted. It can be done by a small nut in the mirror box. the most accurate way it with prism and a film camera. Ric.
Jul 09, 2020 @ 00:10:48
I have this problem on my Olmypus Zuiko 55mm f1.2. Infinity focus doesn’t make it to focus properly. The focus ring turns all the way to the middle of the infinity symbol, but the split screen doesn’t snap into focus, it’s just short. No adjustment screws that I can see.
Jan 21, 2021 @ 15:39:43
Spent 2 or 3 days just dismantled my nikkor ais 35mm f1.4 and putting it back again to make sure that everything is in right place but the focus still went past infinity. Later I realized I can just simply tape the focus ring where the lens focus to infinity and that solved everything. hahha phew
Mar 08, 2021 @ 01:11:59
Sir I need to contact you. I have a Nikon 85mm f1.4 and it has a infinity focus problem. I do not know what to do and I’m afraid to do it myself!
Can you help with what to do… please it’s my favorite lens.