
Hello, everybody! I hope that all is well with you. I was not feeling well this whole week and I’m a bit sick as I write this post but thinking about my readers and seeing my page view spike during the weekends because of people anticipating a new post gives me the encouragement to write this. Imagine Hulk Hogan rising up again after getting pinned by André the Giant in Wrestlemania III (after hearing the crowds cheer). I know how it feels now. I also made a Facebook page so that people can follow any updates that I made on this blog as well as serve as a venue for people to ask and talk about Nikkors and their maintenance. Just click on this link and “like” the page.
Introduction:
Today, we are going to discuss the “legendary” lens that started the small mid-range zoom trend, it’s the Zoom-Nikkor 43-86 f/3.5! You can find many reviews on the internet for this lens so I’m not going to discuss its performance here in detail. Besides, that is not the goal of this blog as we’re more interested in the mechanical side of things but I’ll at least show you some sample pictures that were shot with this lens to help illustrate my point and to give you a better understanding of how to use this lens, something that most reviews for this lens won’t show you.
This was designed in the early 1960s to be used with the entry-level Nikkorex cameras as a built-in lens. Later, Nikon decided that this lens was worthy enough to carry the Nikkor name so it finally debuted as a separate optic for the F-mount. This is said to be the best selling zoom lens of all time and only to be outdone in sales volume by the very popular Nikkor 24-70 f/.8 AF-G (which I owned) lens several decades after.

People are divided when it comes to this lens, some say that this is the worst that Nikon made while some say that it’s respectable in a way so it deserves more respect. I fall into the latter because it was revolutionary, it’s responsible for pioneering new concepts in photography. Having this alone gave the 1960s photographer the freedom to change focal-lengths without changing lenses. It replaces a 50mm and 85mm lens in your bag and it also didn’t cost a lot, too. This meant that journalists and amateurs won’t lose a shot just because the wrong lens was attached to their camera.
The lens has the integrated one-touch zoom and focus ring (push-pull) that I like a lot and is ergonomically great. The balance is good and it feels substantial in your hands. I know this sounds silly but all this will give you more sense of confidence when you take a shot. The same thing can be said for a well-balance bike or sword, you have total control over your tool as if it is a natural extension of your body. Ergonomics matters a lot but there is one thing that I don’t like with this lens and that’s the unusually-long focus throw and the long minimum focusing distance of 1.2m. This will persist up to the last version that was made many years after this was introduced, the Zoom-Nikkor 43-86mm f/3.5 Ai of 1977.

It handles quite well on smaller cameras like this Nikon FE2. The focusing-zoom barrel makes it easy to use, it enables you to focus-and-zoom with just one hand which is great for action photography. A “pumper-zoom” is comfortable to use if you’re not shooting them with a camera on a tripod.
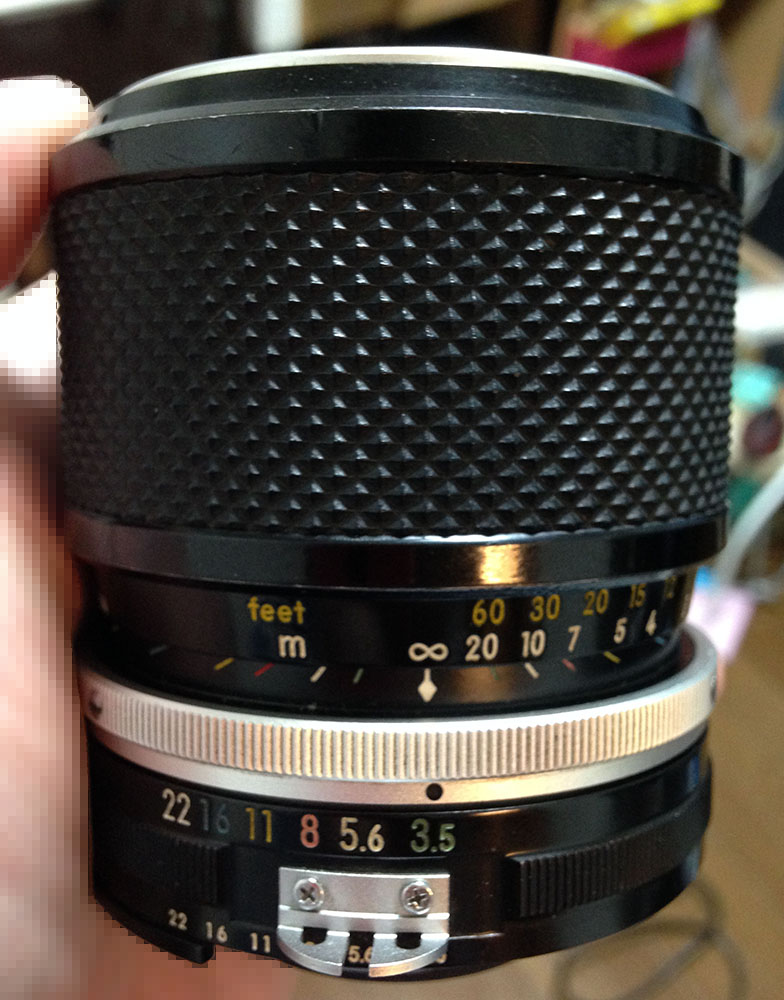
The focus-throw is long which makes it a bit difficult to use on the wide-end but you will get used to it. Shown here is the factory Ai-ring, you should get one that has it if you intend to use them with newer Nikons. This is mandatory because using a non-Ai one will damage your camera and it will cost $300.00 at least to get it fixed.

It’s quite colorful, the engraved information is not only pretty, they’re informative, too. This attention to detail sets Nikon apart from the rest. The attractive markings will surely help you attract potential mates at a bar.

It balances well with my Nikon F2, a Nikon MB-3 helps make everything a lot more stable, too. You will want to use a screen that’s suited for use with slower lenses because using the regular split-prism ones could make the viewfinder dark when there’s not enough light.

This lens class has several versions, here are 2 of them. If you’re curious about what are the major variants go and check the list below, there are more minor variations but I didn’t include them here.
- Zoom-Nikkor 43-86mm f/3.5 Auto, the lens in this article (1963-1971).
- Zoom-Nikkor 43-86mm f/3.5 C Auto, improved coatings, etc. (1974-1976).
- Zoom-Nikkor 43-86mm f/3.5K, new barrel and optics (1975-1977).
- Zoom-Nikkor 43-86mm f/3.5 Ai, this is the last version (1977-1982).
Roland’s amazing magnum-opus shows all of the versions in detail, refer to his work to help you identify what version your lens is.
Knowing how to use a lens is very important because you’ll know how to mazimize your gear by using its strengths and avoiding its weaknesses. While it’s true that the quality of your equipment is only just as good as your skill, you will need to have something that is at least half-way decent in order to produce something “good” and this lens is not so bad in this regard because you can still use this lens to produce beautiful images as long as it was used in the correct environment and lighting. You can even use its “flaws” to create a style for yourself which you can benefit from.

(Click to enlarge)
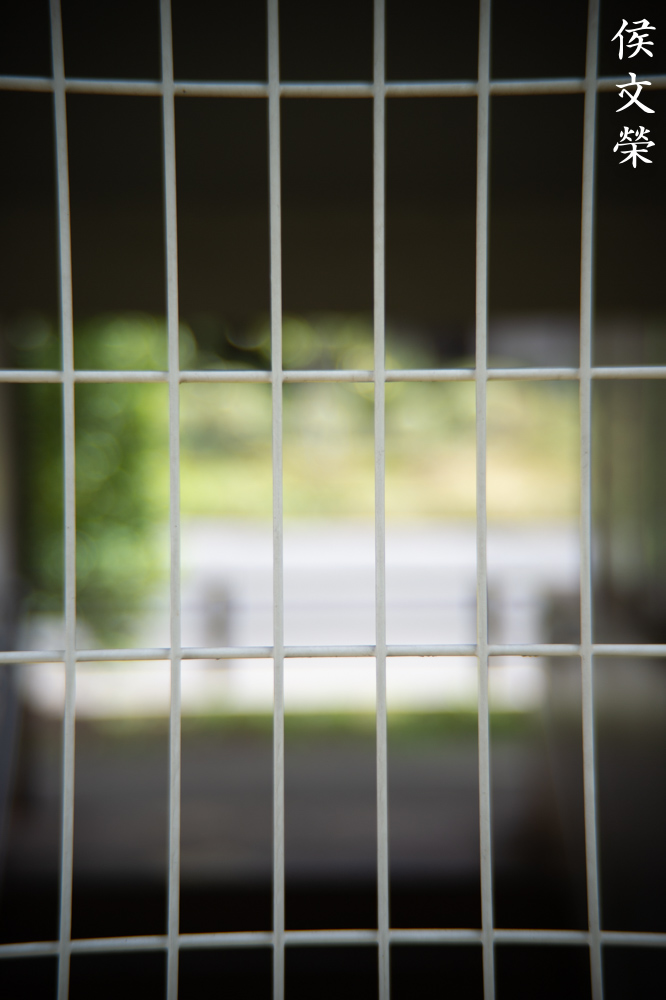
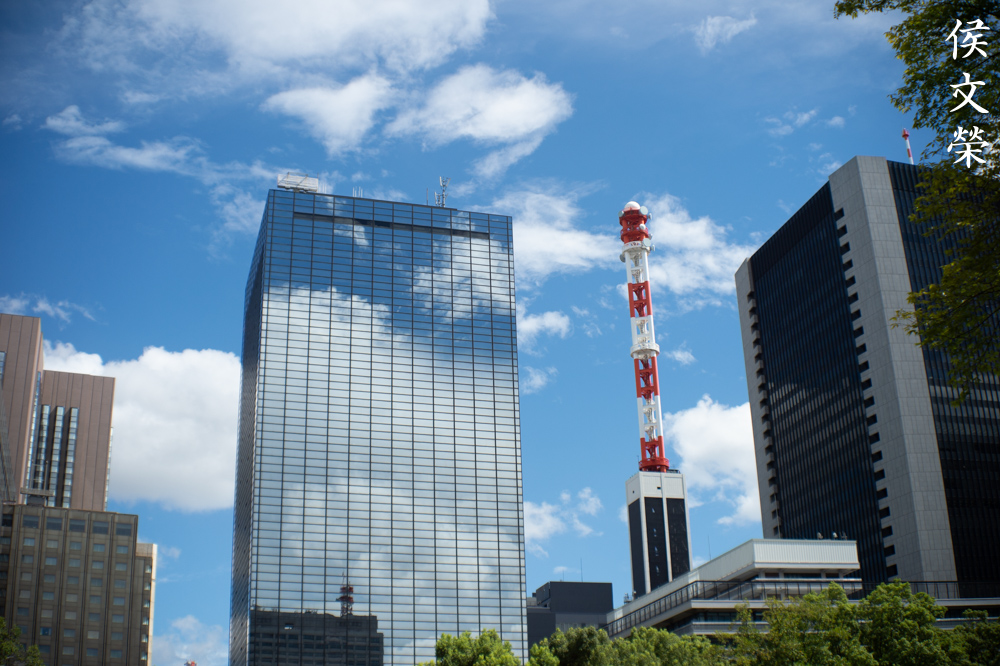
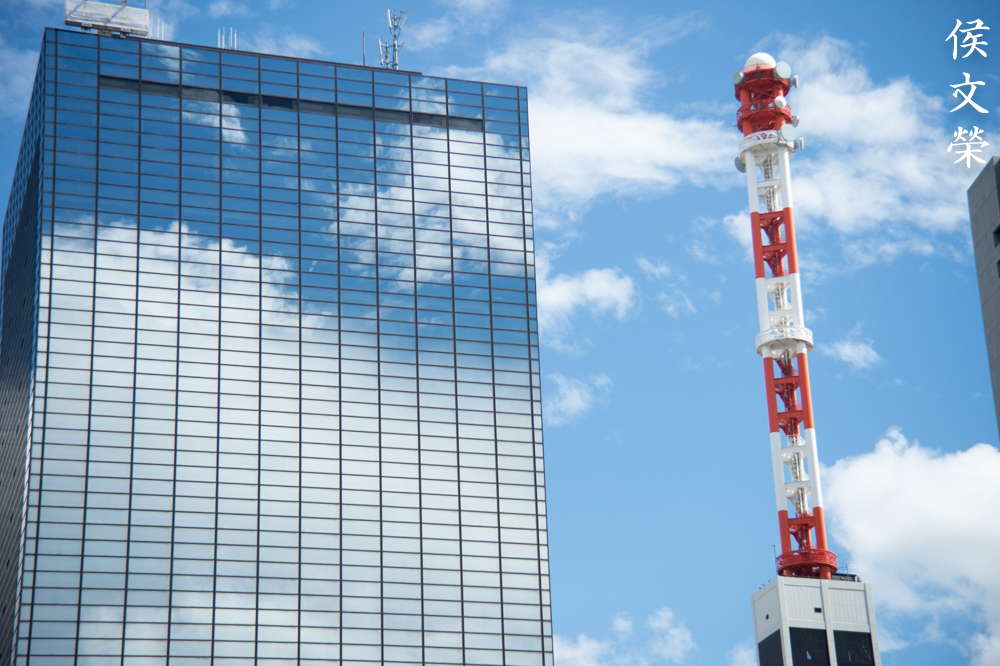
Distortion is one of the biggest issues of this lens. If you have straight lines in your frame it will bow and bend terribly. This lens is not suited for shooting architecture even if the middle-ranges such as 60mm have less distortion. You won’t notice this if you’re shooting poirtraits with an irregular background. Seeing how the distortion looks, you can use the effect to make your subjects look thinner or chubbier. This is how those puppy pitctures were taken to make them look cute, you exploit the fact that barrel distortion can make the center bulge and use it to your advantage. Some people even use a fisheye lens just to get this effect on their portraits.

See how the roof bends in an unnatural way, it makes this hut look like a “burger house”. I will never use this lens to shoot geometric lines or fine art unless I have no choice.


(Click to enlarge)
You don’t use this lens for the “bokeh”. While it’s not terrible in some instances, it’s ugly to say the least in most cases. This lens was made to satisfy a segment of the market where the quality of the bokeh isn’t such a big deal. These were shot at 43mm and 86mm.
The next sets of pictures were shot from f/3.5, f/5.6 and f/8 so you can study how this lens performs at its most-used apertures. These apertures also show the most changes in the lens’ characteristics.


(Click to enlarge)
Vignetting is also a big problem of this lens. It’s terrible wide-open and it improves a bit by f/5.6 but it only goes away by f/8 and you only see it at the far-corners of the frame. It is also interesting that the vignetting is drastically terrible at the widest end as you can see in the 2nd set of pictures. I intentionally took these pictures to highlight this problem and you won’t notice this in your pictures unless you’re shooting the sky or subjects with even tones. I am not implying that this won’t show-up in your pictures, all I am saying is this problem won’t be too obvious if you know how to work around this problem. Good for us that the vignetting is somewhat even because if it isn’t then we’ll have really dark corners in our frame when we shoot this lens wide-open.


(Click to enlarge)
Flaring and ghosting is also another problem of this lens but some people see this as an added bonus because they can use this for creative purposes. Using a hood can help you avoid this problem but there’s nothing much you can do it the sun is close to the edge of your frame. While flaring isn’t much of a problem, it’s interesting to see how it turns to streaks when you stop the lens down to f/5.6 and then goes away by f/8. This is weird, It’s something that I haven’t encountered in other lenses. This is probably the worst lens that I have ever used when it comes to ghosts. Each element renders a unique reflection and you can even count all of the lens elements by counting their ghosts. This won’t go away and stopping the lens down only makes it worse. Now that you know how to produce it, you also know how to avoid it. If this is what you’re after then this lens is for you! This is the defining character of this lens family and it was somehow corrected in later versions of the same production variant. Newer coating technology helped a lot to ease this issue by the time the Zoom-Nikkor 43-86mm f/3.5 C Auto was released. This problem was fixed by the time the Zoom-Nikkor 43-86mm f/3.5 Ai was introduced. It’s a totally-new design so it benefited from from the advancements in optical engineering in the years that passed.


(Click to enlarge)
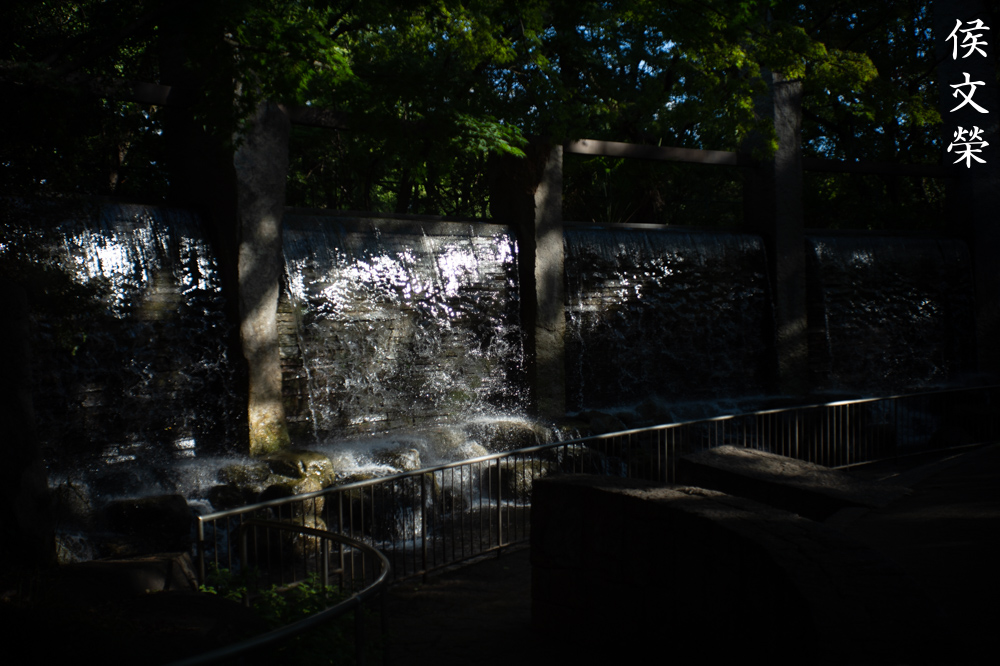
Chromatic aberration shows up wide-open but I have seen more severe cases than these. It really doesn’t do away even by f/8 but it will only show up in certain circumstances. It’s usually appears when you focus on subjects that are further into the frame but the funny thing is it doesn’t show up in subjects that are really far from you, weird. I shot the water falls because this is where the problem shows its worst. It was intentionally shot like this so we will see just how bad this issue can be. Notice that the highlights on the water still looks purple by f/8, this should have been fixed by f/5.6 but the problem persists up to the smaller apertures. Avoid shooting really shiny highlights like what we have here and you won’t see this happen.


(Click to enlarge)
The first set was shot at 86mm and the second set was shot at 43mm. Sharpness is poor at f/3.5 but it’s far from being totally useless. Contrast is lacking but it’s not really that bad. I don’t see any magenta-colored fringing here in my samples which is good news. Stop the lens down to f/5.6 and everything starts to pick-up, sharpness and contrast improves by a lot but resolution didn’t improve by much. Stopping it down to f/8 will only make it look a bit better in terms of sharpness and contrast, resolution is still at the low-side and it will not improve by much as you stop it down further. I love using this lens from f/5.6 to f/8, I avoid using this wide-open if I can help it. Details at the corners look terrible and it won’t improve no matter what you do. This lens wants you to use the center of the frame at all times because that’s where all the nice stuff happens.
Here are some pictures that were shot in real-world scenarios. There’s no point in taking test pictures and then judging a lens’ value with it. This is what many reviewers do and people just accept their observations without giving the lens a chance to prove itself in the field. While scrutinizing a lens’ performance this way is perfectly fine, it’s one-sided and you won’t see the other side to help balance everything up. I will try my best to show you the full-spectrum by also showing samples that were shot with film.

I said that I won’t use this lens to shoot architecture but I didn’t mention that I won’t be using it to shoot travel photos. You can see the effects of pin-cushion distortion here at 86mm but it’s not obvious because the lines are broken into several segments. The ugly corners are obvious but it won’t matter if you’re printing small pictures. This was shot at f/8 I think so the details look decent.

This was shot wide-open, you can see some spherical aberration here but the details look OK for a cheap lens if you zoom-in to her eyes. Resolution is lacking but it is reasonably-sharp where focused. This was shot at 86mm and she is closer to me so the background is blurred really-well. The corners look terrible as usual but we can’t do anything here.

Another picture that was shot wide-open at 86mm. I missed my focus by 2.5″ or so and so the hat was in-focus! Despite lacking in resolving power, the lens is sharp when given the right conditions. The bokeh isn’t so bad at all here but that has more to do with framing than the actual performance of the lens. This just shows that even a lens that many look-down on can produce a decent picture if you know what you’re doing.


(Click to enlarge)
Stopping it down to f/5.6 to f/8 will you much-better results. The pictures has that vintage look to them which makes the pictures look a bit more interesting. These aren’t bad at all and for this lens’ target crowd in the 1960s this is more than OK. It’s not something that a pro would use if he wanted a technically-perfect picture but is he wanted to take pictures so he can have something to show to his editor then this lens does the job. Remember the fact that this lens is the first of its kind and it was made in the early 1960s under a strict budget-constraint! The strenght of this lens is its practicality and cost.


(click to enlarge)
As you can see from the pictures above, this lens provides a very natural normal-to-wide FOV at 43mm while also giving you the reach and compression an 86mm lens would give at the long end. This is very versatile for street photography and the only problem I can see is the rather long minimum focusing distance of 1.2m. I would often focus all the way down to 1m and take a picture of my subject’s face that close. While this is never a deal-breaker for me it does affect the way I shoot street in many subtle ways.


(Click to enlarge)
These were shot with film. In fact, all of the pictures after these were all shot with film. I used Fujifilm Industrial 400 and had it scanned using the Fuji Frontier SP-3000. I like the results with film even better than the results that I got when using digital with this lens.

This was shot at f/5.6, I think. The details look nice but the contrast feels a bit lacking but that may be due to this being over-exposed a bit.

This was shot wide-open. The center looks nice and the bokeh is OK. The far-corners look terrible but you’re focused on the center because her face is there and the vignetting will also lead your eyes to the bright spot in the picture. This is what I was talking about, you won’t notice the vignetting and terrible corners much when you use this lens is practical situations like this. You should make the lens work for you and not let it disctate you by telling you what you can’t do with it because people say that it’s Nikon’s worst lens.

I think this was shot at f/5.6. The corners don’t look dark and the details look much better but the bokeh looks terrible. Foliage is a great tool in revealing a lens’ bokeh quality. You can see that the center looks nice but the corners still look terrible. Just look at the edges of the picture and see the details on her sleeve and the top of her crown and you will see what I am talking about. Just like the first picture, our eyes are focused on what’s sharp or bright so we don’t notice the poor quality of the corners. The bokeh is distracting here in this picture and that also takes our attention away from her face.


(Click to enlarge)
Here are some more samples with the lens stopped-down. I am beginning to like this lens a little bit more because it has earned my respect after seeing these pictures from the lab. I am not sure if that picture of the matron queen was shot at f/5.6 but it sure looked like it was. I love the results that I got with this lens when shot with film and we don’t see all of the flaws that we saw with digital here. If I were a pro 50 years ago and I was only given one lens to bring on an assignment I’ll certainly use this lens when there’s enough light, I will just bring a flash to compensate if the light isn’t enough. These pictures are certainly more than useable for small editorial pictures in a tiny magazine like Reader’s Digest.


(Click to enlarge)
Here’s the rest of the set. Please click on the thumbnails and view the larger version. The pictures should tell you how useful this lens is in the hands of somebody who knows how to use it. It may not be the sharpest knife in the kitchen but it certainly isn’t the dullest. It was nice to use and the practical zoom range was very helpful so I got more keepers in a roll of 36! If you’re printing 4R or 5R prints then these are more than enough. This lens was marketed to people who won’t print huge pictures anyway like your usual mom and dad who just want a family photo. The people who make a big fuss out of it are those that expect a cheap 1st generation zoom to perform just as good as primes. Will you expect a VW Beetle from the 1960s to perform just as good as a Cadillac from the same year? That is unreasonable so saying that this lens is one of Nikon’s worst is the same. Pardon me for my strong feelings but I feel that this lens deserves a little bit more respect.
Sharpness is not so bad in my opinion. It’s useable in digital and certainly OK for film so don’t worry too much about this. It is acceptably sharp at f/3.5 and it looks decent at f/5.6 and good at f/8. My pictures above aren’t good examples for sharpness since I shoot while walking past my subjects in a very fast manner and a bit of motion blur is acceptable in my technique.
The biggest weaknesses that I can think of is the rather poor flare and ghost reduction as well as the terrible distortion that this lens has throughout its range. I may be asking too much from a lens that was made in the early ’60s! I’m going to say this – Just enjoy it and take it for what it is, that is what many people did. Star Wars actually used some Nikkors in its production and the humble 43-86 is one of those lenses that were modified for cine use. Why? I don’t know.
There are 3 major updates to this lens with the last one being a completely different lens that was redesigned from the ground up and for this reason, I will separate this article into 3 separate posts. The 2nd version is the Zoom-Nikkor 43-86mm f/3.5 C Auto and it’s a slightly modified version of this lens internally and is similar enough that you can work on it using this guide but I will make a separate blog post for it so that everybody can see the differences and appreciate the lens better in the engineering sense. The last version’s the best one and it’s the Zoom-Nikkor 43-86mm f/3.5 Ai. It has a totally different design so you can consider it as a different lens.
Is this lens for you? If you want some trippy effects and a fun lens to use then go ahead and buy one. The lens used in this review is an early production model so it still has all the flaws working against it. A lens that was built a few years later than this one will be better in some aspects. If you want a 43-86/3.5 that has much better performance then it’s the Zoom-Nikkor 43-86mm f/3.5 Ai that you’ll want. To be frank, I will only recommend the last version for people who want to use this lens outside of it being a historical piece of equipment. It’s not that I am telling you not to buy this but you will also have to look for one with an Ai-ring just like mine and that’s a bit rare at times. The price for the last version is also cheaper and the performace is better. The rendering is a lot different and it will be the deciding factor on which one you choose. Read my article on all the other versions and I hope that will help you decide which one is best for you. If you’re one of the people who value edge-to-edge sharpness in a zoom then you should look elsewhere because this lens will not give you that. This lens is for people who enjoy using a lens for fun and historical reasons. There are many zooms that were made in recent decades and they are being sold for not a lot of money and most of them will perform much better in almost every aspect. I hope that this long introduction will help people give this a second chance and help dispel some of the bad press that this lens has gotten over the decades.
Before We Begin:
If this is the first attempt at opening a lens then I suggest that you read my previous posts regarding screws & drivers, grease and other things. Also read regarding the tools that you will need in order to fix your Nikkors.
I highly suggest that you read these primers before you begin (for beginners):
Reading these primers should lessen the chance of ruining your lens if you’re a beginner. Also, before opening up any lens, always search for articles on Youtube and the internet. Information is scarce, vague and scattered (that’s why I started the blog) but you can still find some information if you search carefully.
I highly recommend that you read my working with helicoids post because this is really important and getting it wrong can ruin your lens. If I can force you to read this, I would. It’s that important! For more advanced topics, you can read my fungus removal post as a start. This post has a lot of useful information here and there and it will be beneficial for you to read this.
Disassembly:
This lens is a bit on the complicated side and I wouldn’t recommend this for beginners to fix as their first lens. The engineering that went into this little lens is amazing, some of its parts work like a jigsaw puzzle and the precise alignments of the internal parts are also crucial for this lens to perform properly after you reassemble it. It took me several nights the first time I tried fixing one. I can now average 4 hours a lens now since I am familiar with the design after repairing several samples from this lens family. Make sure that you take plenty of notes and pictures so you will know how to put things back together again. If you can measure tolerances and other things before you remove them then that’s even better. Zoom lenses can be tricky and the rear elements assembly as well as the one just under the front lens elements assembly are used to adjust the sharpness of the lens that’s why I won’t recommend this lens to any novice.
The disassembly of this lens can be divided into 3 convenient sections: the exterior parts, the internal parts and the objective (which won’t be discussed). I apologize for excluding the objective’s disassembly as I did not have any need to clean mine and the objective’s construction seems pretty straight-forward anyway. For those of you who are following my blog the disassembly of the objectives should be easy and it is in some ways similar to the Zoom-Nikkor 80-200mm F/4 Ai-S. You can use that as a hint to help you get your way around the construction of the objective.
I will repeat this again. I would also like to advise you to take plenty of pictures and notes when working with this lens, especially before you remove anything that is a part of any adjustable assembly. Mark and measure things if you have to because there’s no way of knowing the tolerances and how the part comes off after the fact that you have already dismantled it. This is especially true for the internal parts that are involved in the zoom cam so be careful! Getting this wrong will not only result in a lens that will not zoom in or out properly but it can also affect your image quality so you end up with a funky lens and all the people with the beard, sunglasses and toy cameras will contact you and give you an offer for the lens! I was just kidding, I did not mean to offend. I have facial hair, sunglasses and plastic film cameras as well (but not dinky ones).
Disassembly (External Parts):
Dismantling the external parts is pretty easy and straight-forward. You need to be careful with the helicoid, that’s all. Make sure that you use the correct tools when working with the screws and use alcohol to soften the glue if they’re stuck. The small set screws can be brittle and easily ruined so that’s also one of the things that you should watch out for. It’s an old lens so some of the parts can be brittle due to corrosion or damaged by a previous attempt. Despite having all the tools and skill, there are situations that will get you stuck and this is where experience come in to save the day.
As with most lenses, always focus it out to infinity and work with it in that configuration as your reference point. This pointer becomes more important with zoom lenses because of their more complicated engineering.
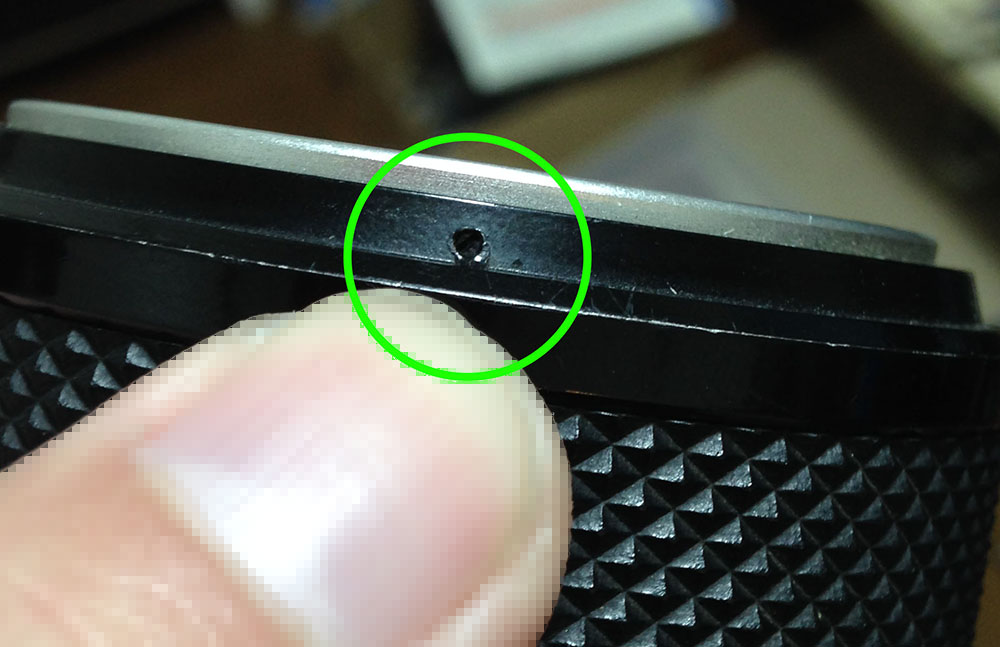
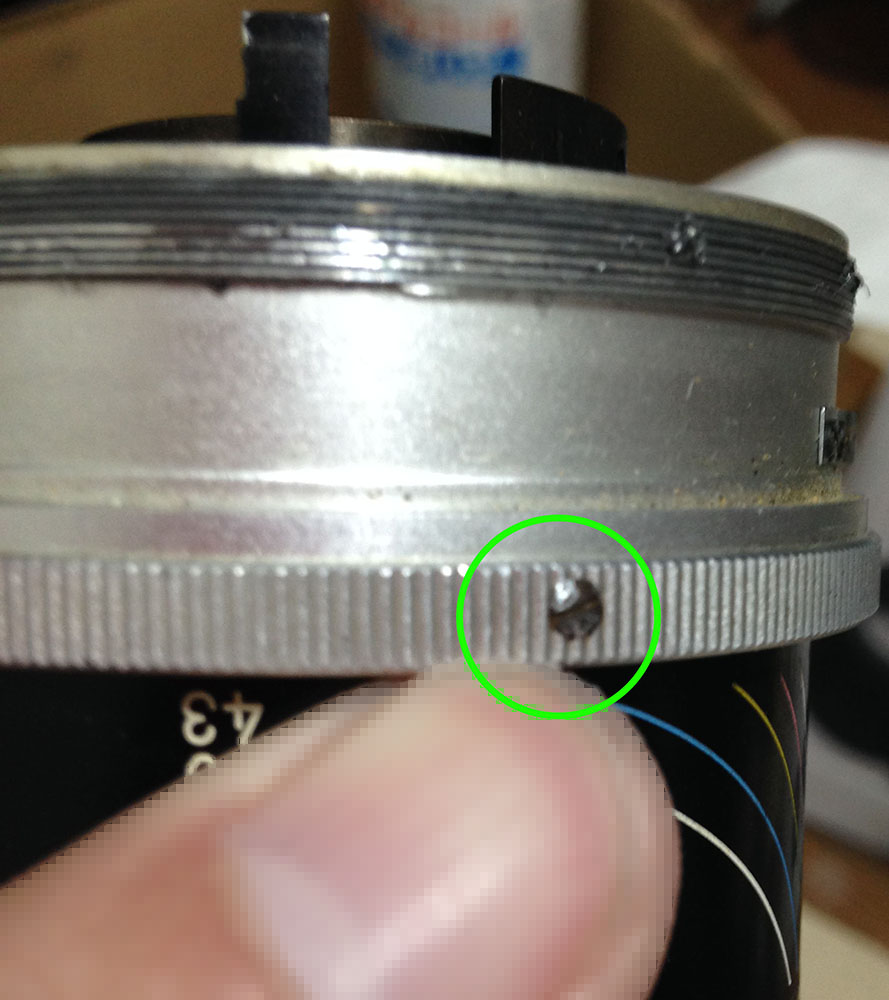
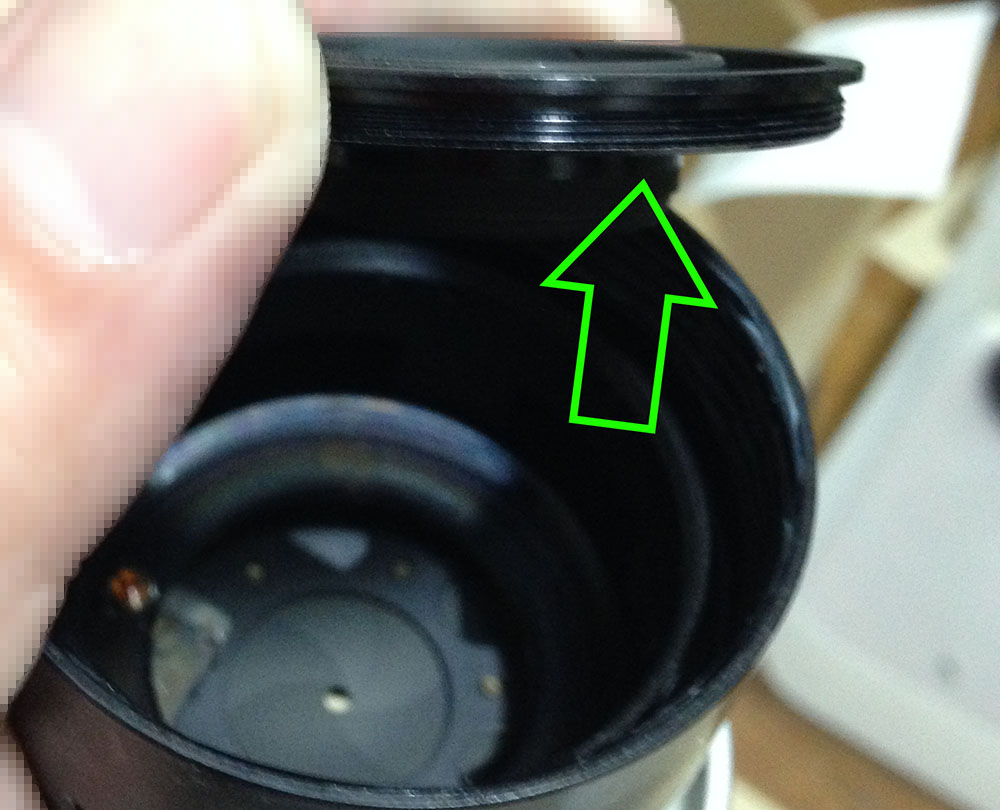
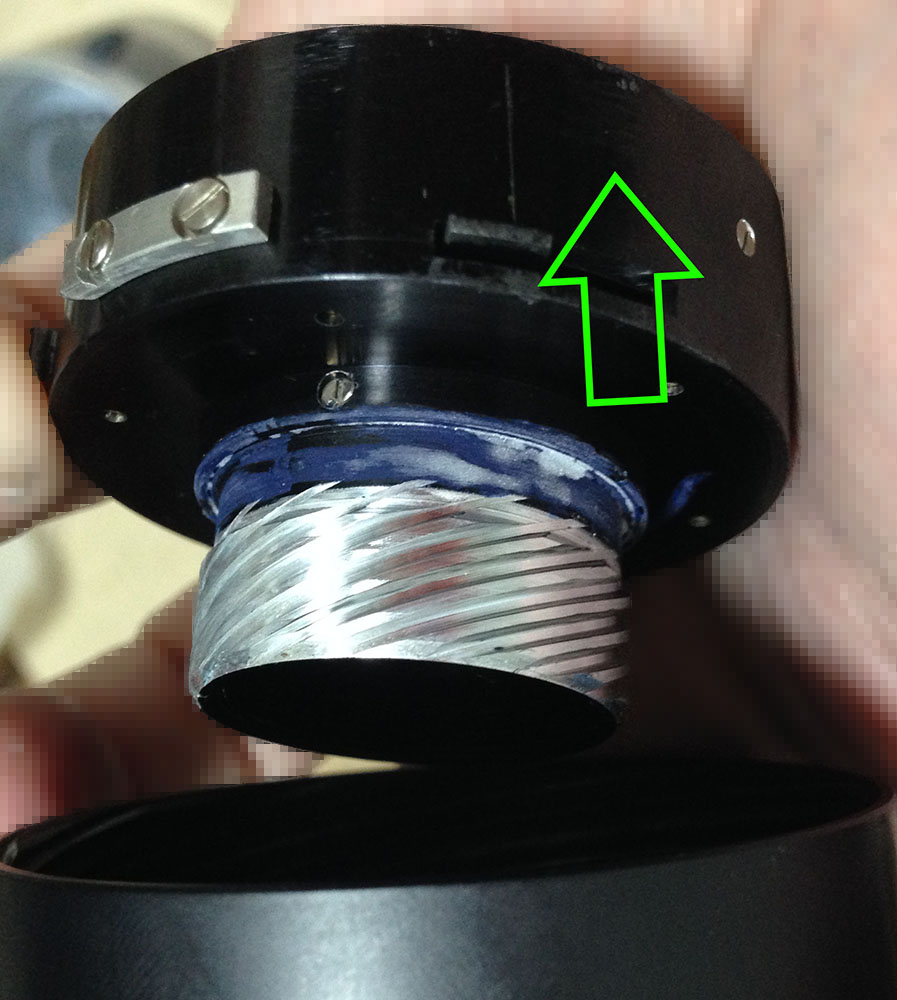
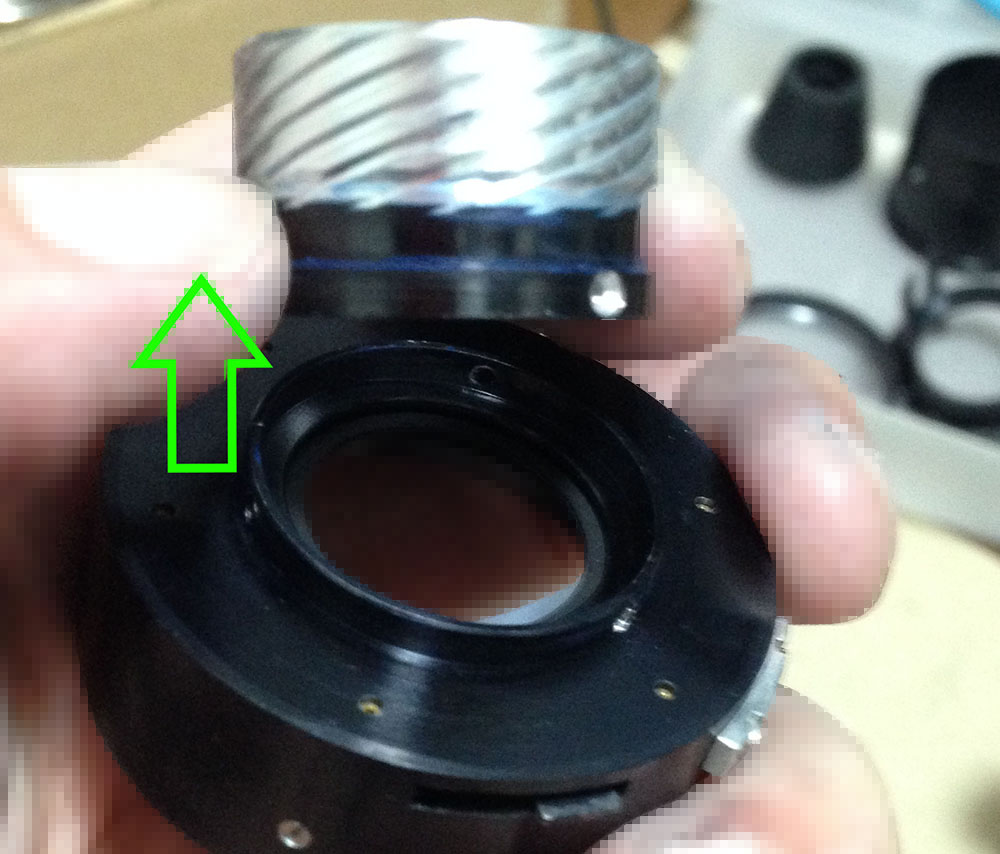
We start by removing this set screw and be sure not to lose it. This part is usually secured by paint or glue so be careful.

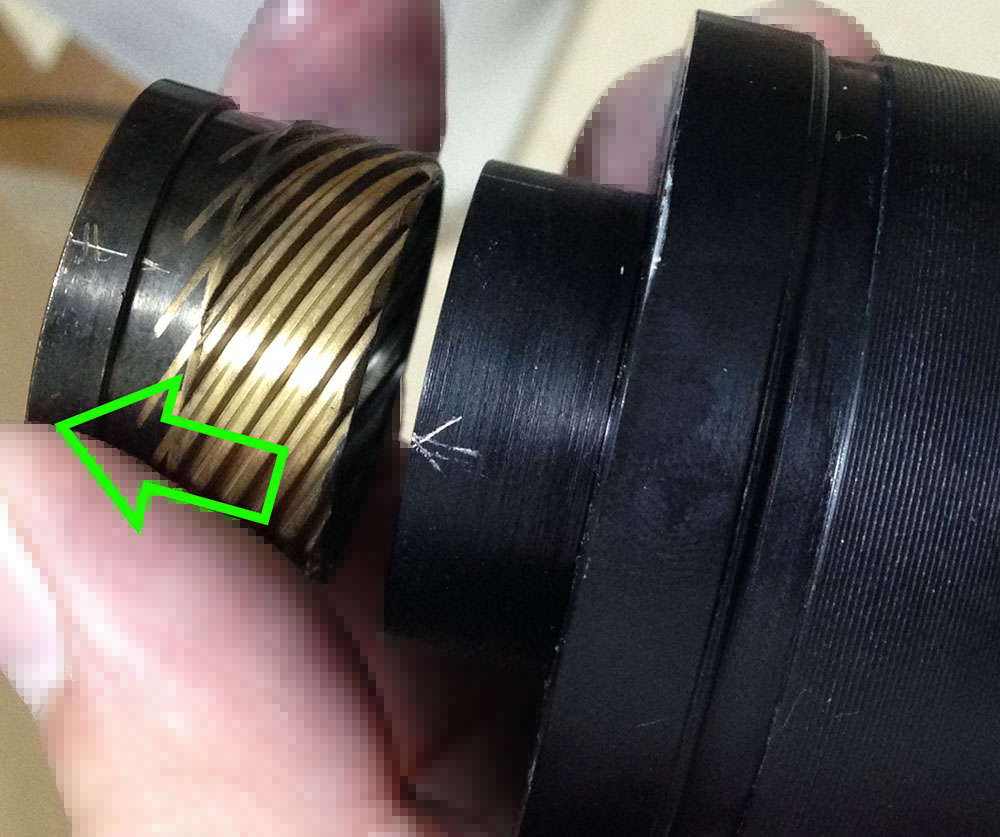
You can can also remove the front elements assembly now butbe careful about that brass ring under it as you do not want to lose or damage it. It’s a shim washer that’s important to how this lens was calibrated back in the factory.

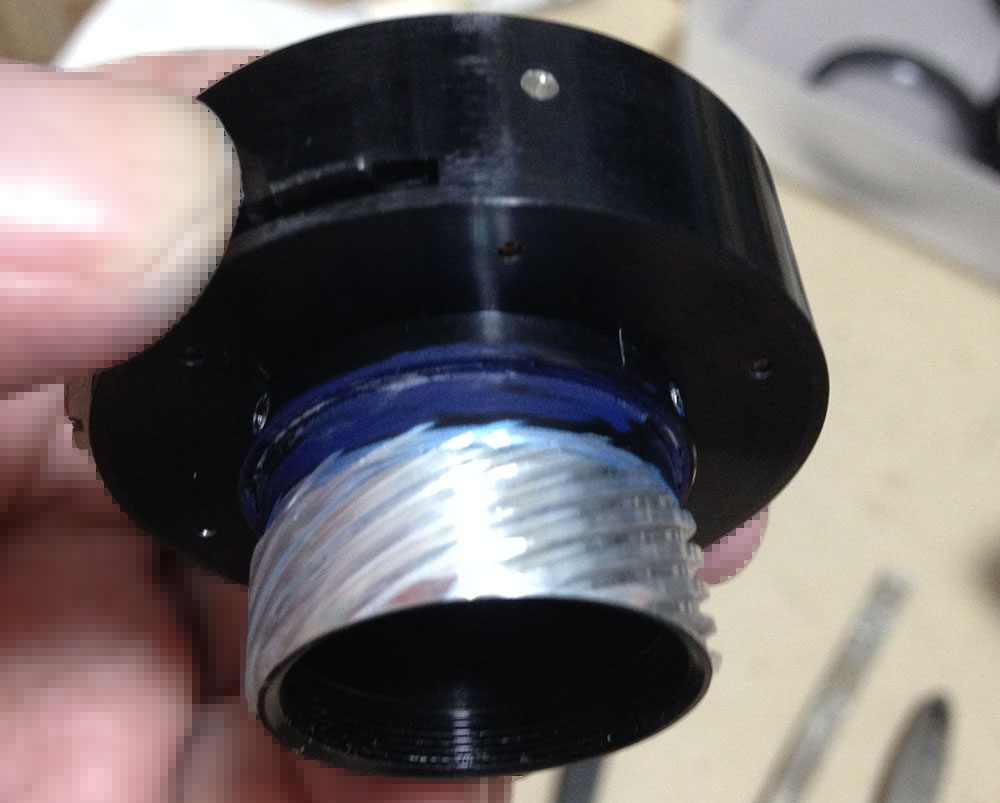
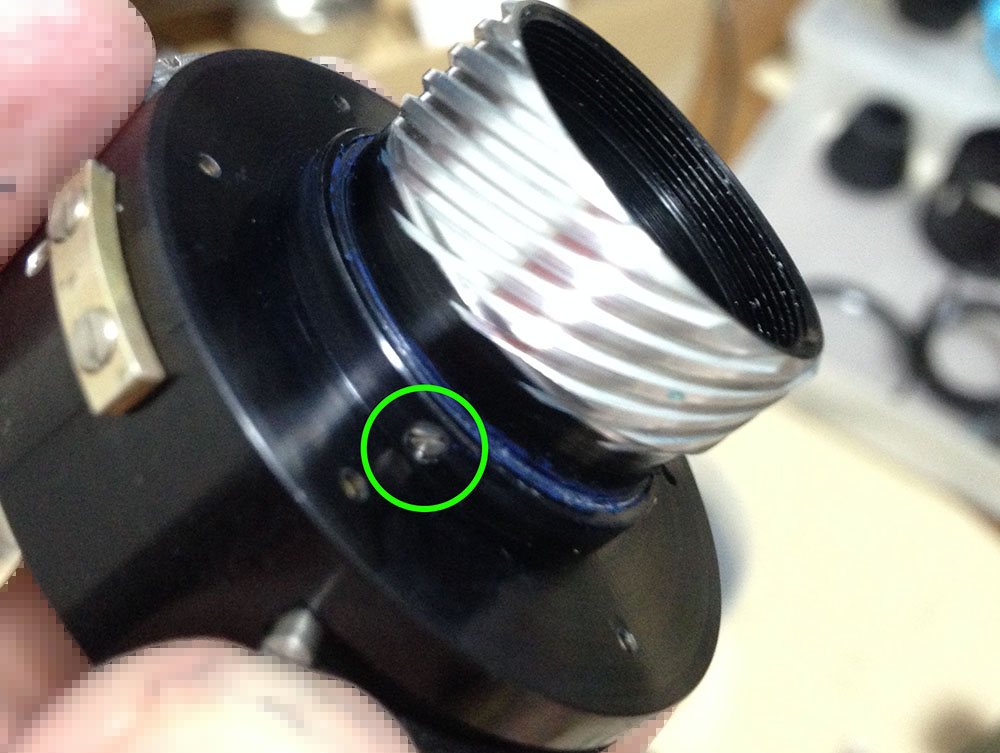
Next, remove this screw to so that you can get rid of the focusing ring. This screw secures a small nut under it and it’s responsible for keeping the push-pull cam aligned.

Carefully slide the focusing ring off from the the lens. This part is usually held by glue so place a drop of solvent into the seams in front of the lens or into the screw hole for the set screw. Mine took some effort to take off, I even used a rubber mallet to lightly tap it.
You can safely remove the helicoid from the rest of the lens at this point. Be sure to mark where it separates as well as the infinity point before you remove it as there is no going back after you have removed it! If you haven’t read my article about helicoids then read it now before you begin working on your lens.
You shouldn’t separate the helicoids while the focusing ring is still attached. If you did it (like me) then it will require some guesswork to find out where and how it separated. It’s very frustrating even for the experienced repairer. I’m making the mistakes now for you so you can avoid them later.
This is the nut that I was talking about. Be sure not to lose this little thing. When it is time to reassemble this back, be sure not to over-tighten the little screw that holds this or you will end up with a squeaky lens each time you pump it.

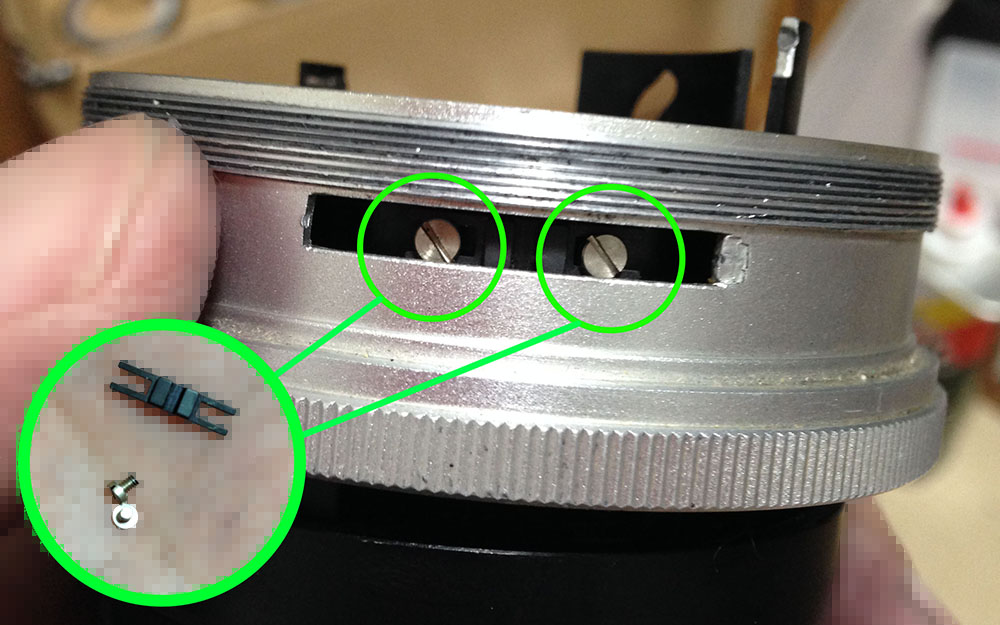
To remove the guide ring, remove these 2 rollers. Rotate the it until you find these. Here’s one near the minimum focusing distance.

Here is another one near the infinity mark. These can be hard to remove because these were epoxied at the factory so be careful. You do not want to misplace or damage any of these since they were specially milled at the factory and finding a replacement part will be impossible unless you salvage one from another lens. It can snap if you’re not careful, the only way to soften epoxy is to heat it. Use a soldering bolt and be careful not to use it while the glass elements are still inside.
You can now remove the guide ring. The rollers that we removed in the previous 2 steps were screwed to the holes inside the slot (see picture) and each time you push or pull the lens, it drives a cam inside the barrel and it moves the middle lens elements assembly up or down along a path like a piston.
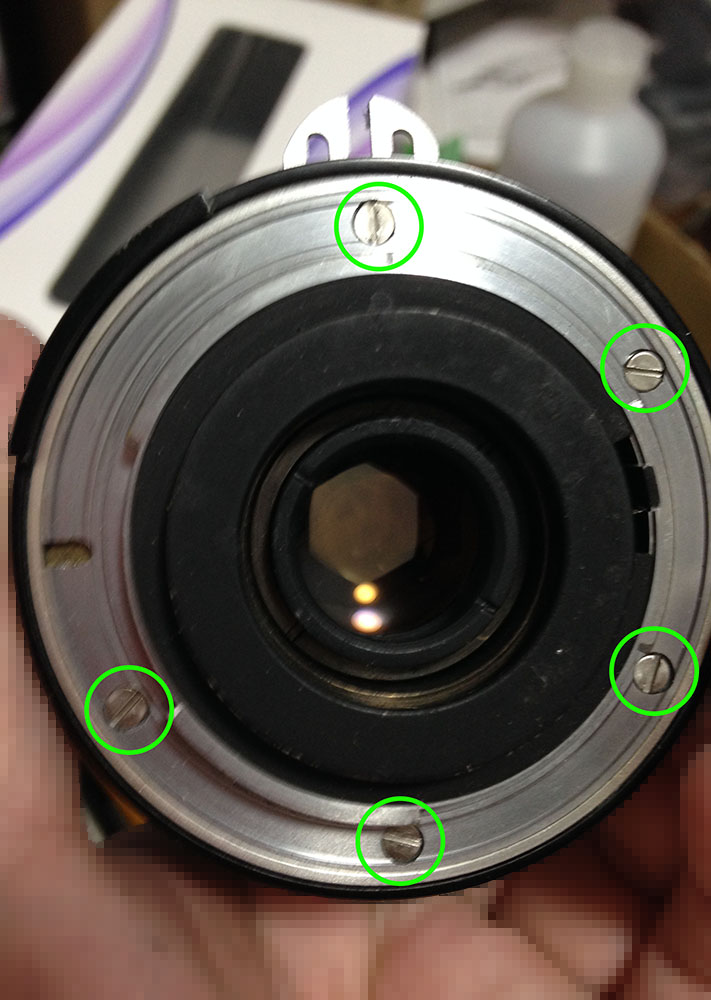
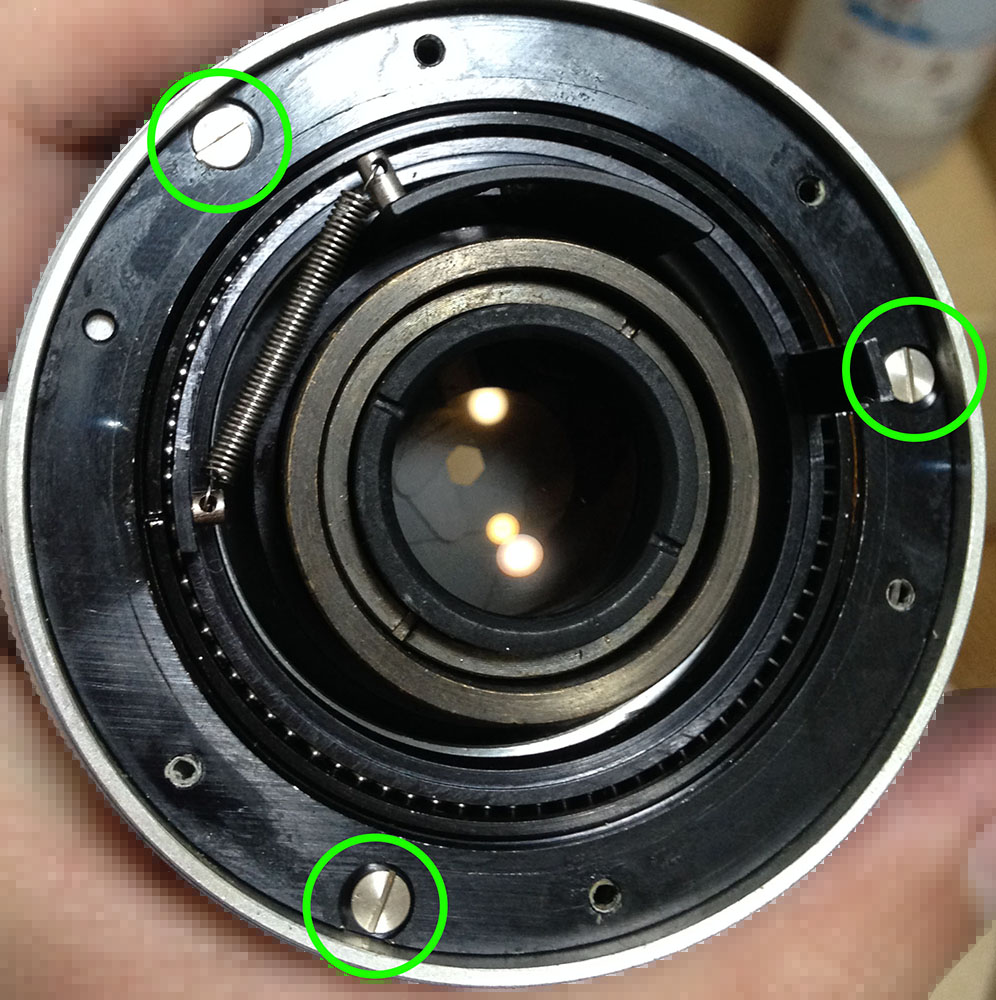
We’re now done with the front part so it’s time to move on to the rear. Remove these five screws from the bayonet. Many people who are new to lens repair get stuck because they ruined the screws by using the wrong tools. To prevent that from happening, read what I wrote about working with a lens’ bayonet screws.

Carefully remove the bayonet from the rest of the lens. Be careful not to harm the brass shims, spring and other delicate parts inside. Remember where these brass shims are placed, you should put them back in the correct order.
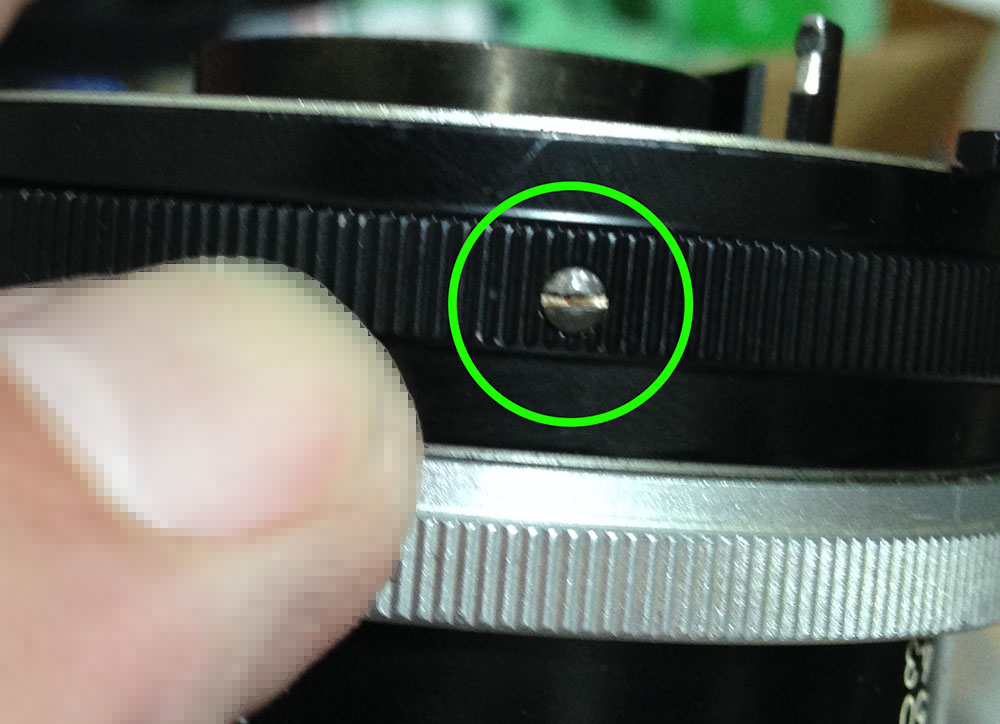
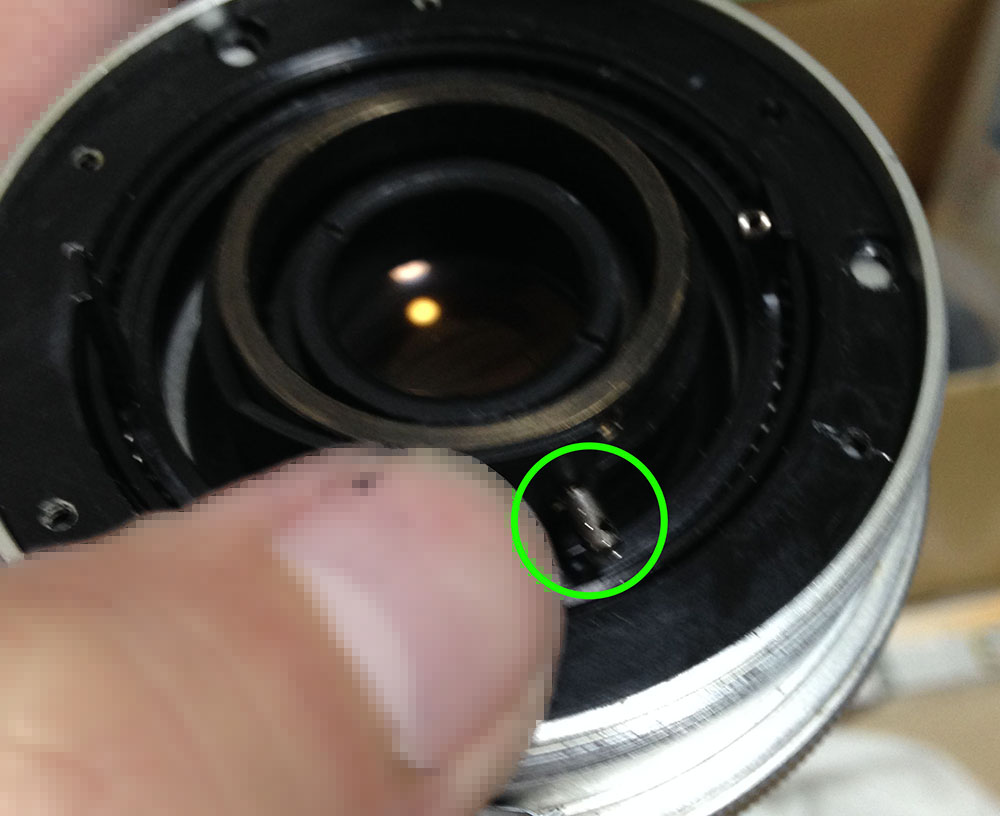
Before you can proceed, you should remove the aperture ring. Unscrew this M1.7 screw and keep it safe. Be careful not to cross-thread this, this screw acts as a pin that couples to the aperture fork inside the barrel via a mechanism that you will soon see.

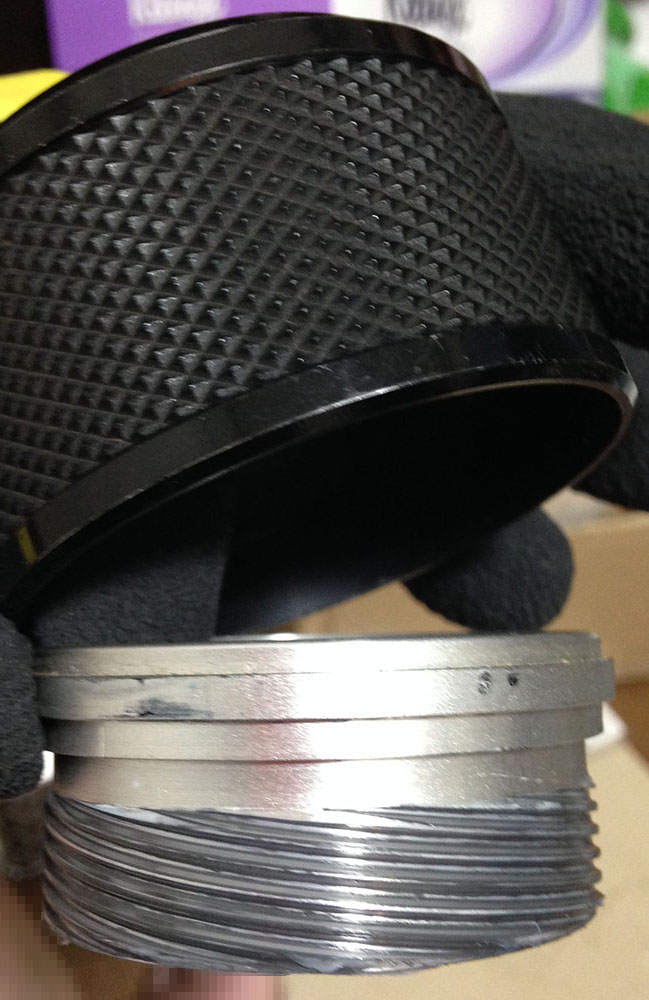
With the screw gone, gently unscrew the aperture ring from the lens. Again, be careful not to damage the threads as it is easy to cross-thread this part because the aluminium alloy is soft. I forgot the exact term but aluminium has a tendency to “bind” when cross-threaded.
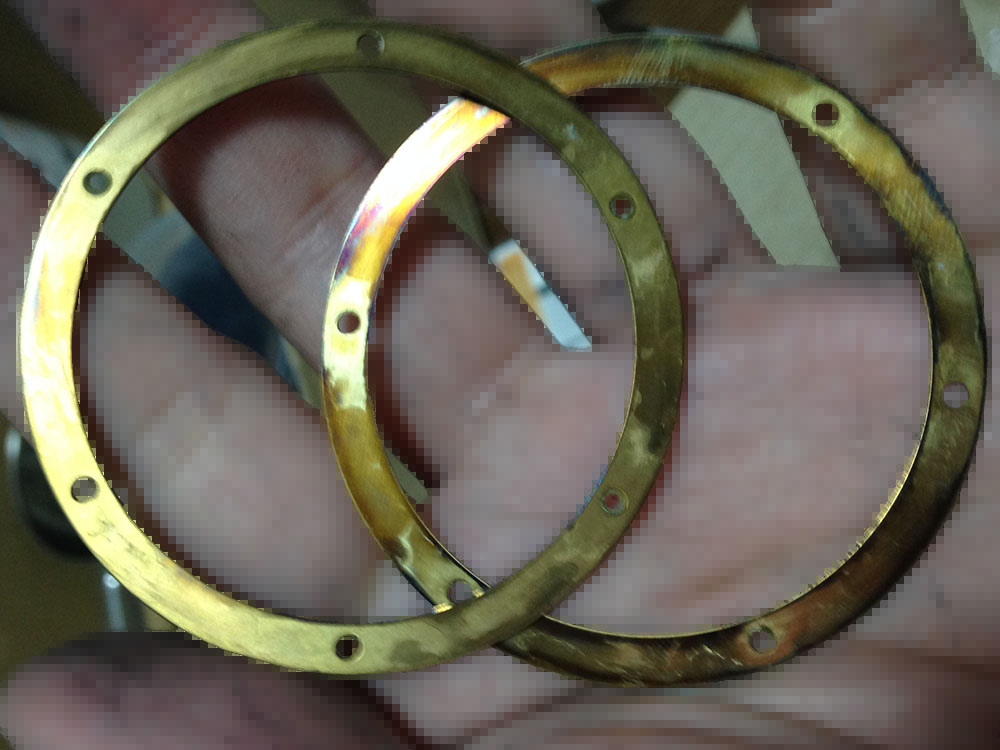
These brass shims are fragile and will warp easily. Mine came in 2 separate pieces.
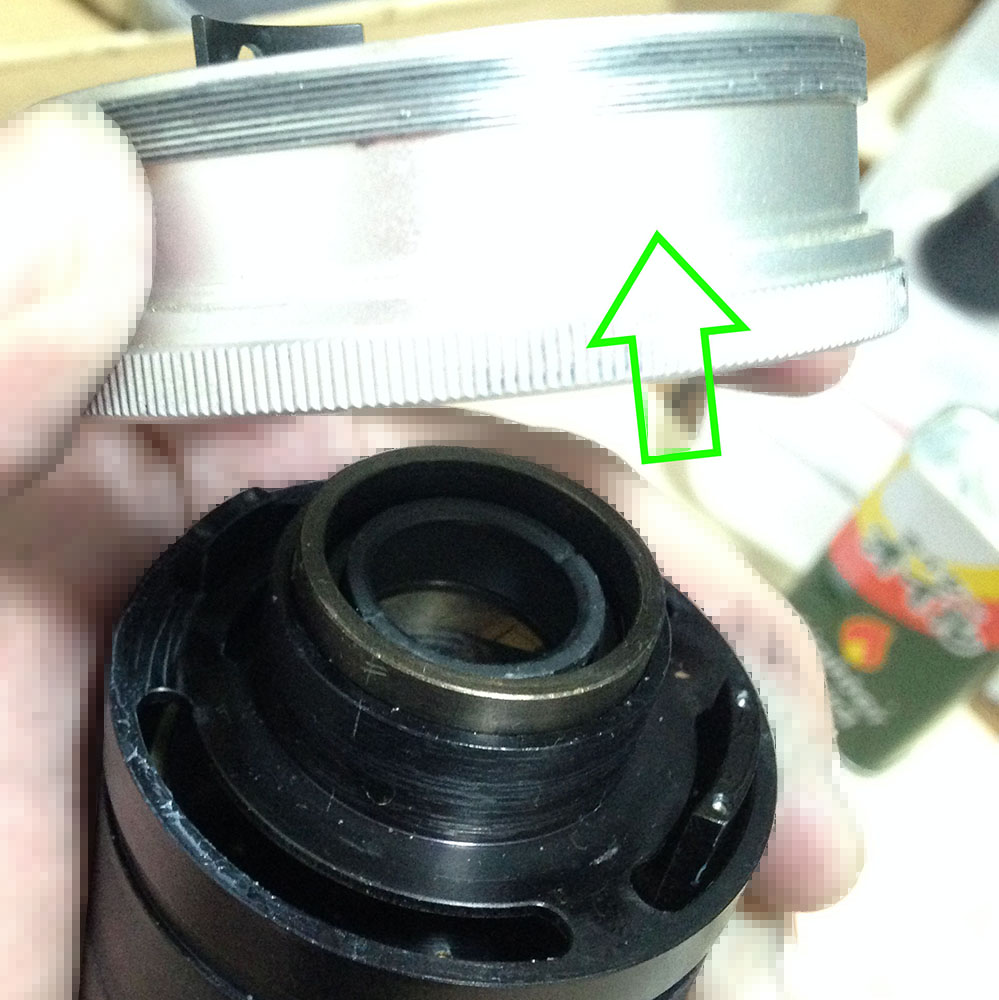
In most lenses the shiny metal grip is just a cosmetic part but on this lens it serves as the crucible where everything is connected to and is the most substantial part of the lens. It can easily make up 15-20% of the lens’ weight and was probably milled from a billet of aluminium alloy. You can use this to hurt somebody by smashing this into his forehead! Remove these screws to remove it.
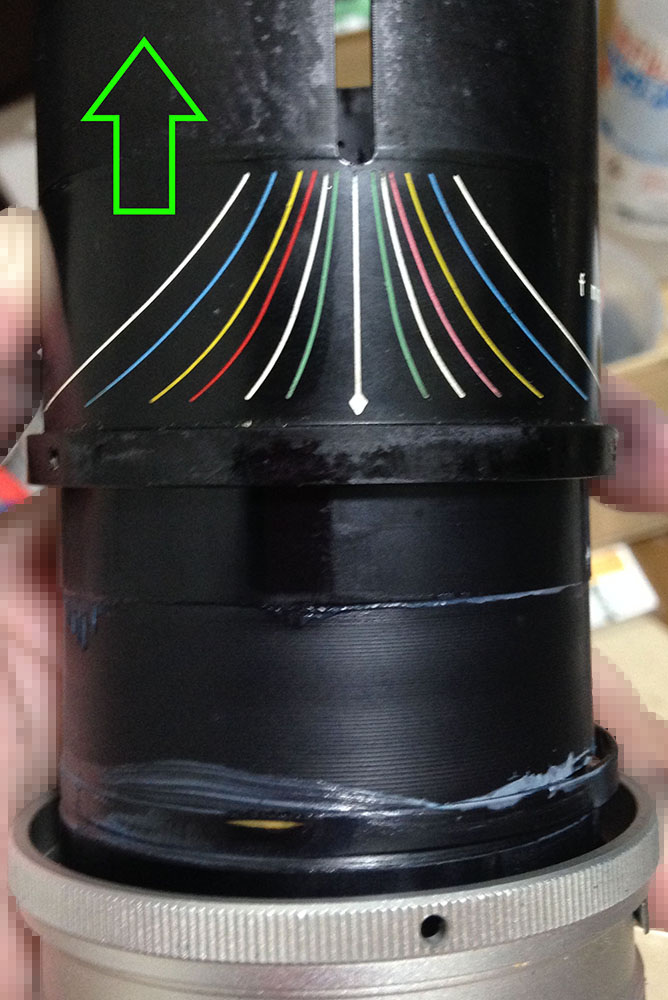
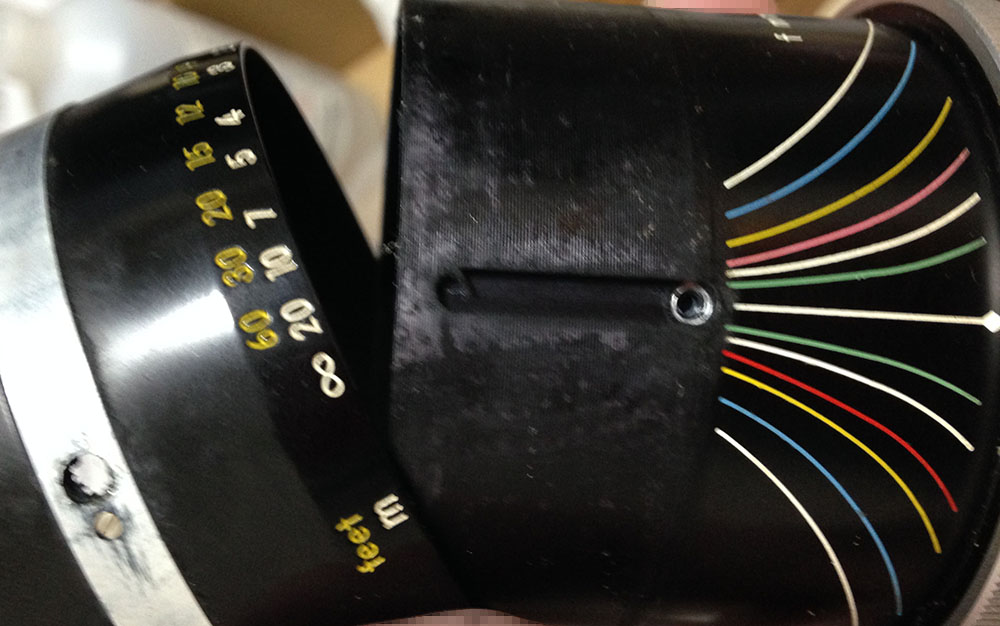
Gently separate the outer barrel from the lens. I really like the useful ornate engravings on the focusing scale. I focus using the scale when I shoot and this is very handy for me as it shows plenty of apertures on the scale. The later models of this lens has fewer lines. See that white lithium grease? That’s a cheap grease used by many DIY repairers here in Japan and is colloquially called “white grease” here. It’s not bad but I hate it. Seeing it on this lens indicates that this was serviced not too long ago as the grease looks fresh.
That’s it for the external parts. We’re now going to start with the difficult part of the lens. Clean every part very well, I scrubbed everything with warm water and detergent. That’s going to remove the caked gunk but before you do that, wipe all of the grease away using solvents and lots of tissue paper. You don’t want to leave any residues so this is essential.
Disassembly (Internal Parts):
We have gotten rid of the external parts, we are now free to move-on to the inside of the lens where all of the action takes place. The internal parts are difficult because of all the precision alignments that you should take note of as well as the amount of parts involved in it as you’ll soon see. Some of the parts are not easily accessible so you need to remove and reassemble each part in the correct order. This is Nikon’s first small-sized zoom lens and the engineers really gave a lot of effort designing this lens.
You will appreciate the effort even more after you realise that this lens was designed in the early 1960s (originally for the Nikkorex). Show it to anybody who has a machine shop and he will tell you that the parts for this lens are difficult to mill and each part is a work of art depending on how you see it.
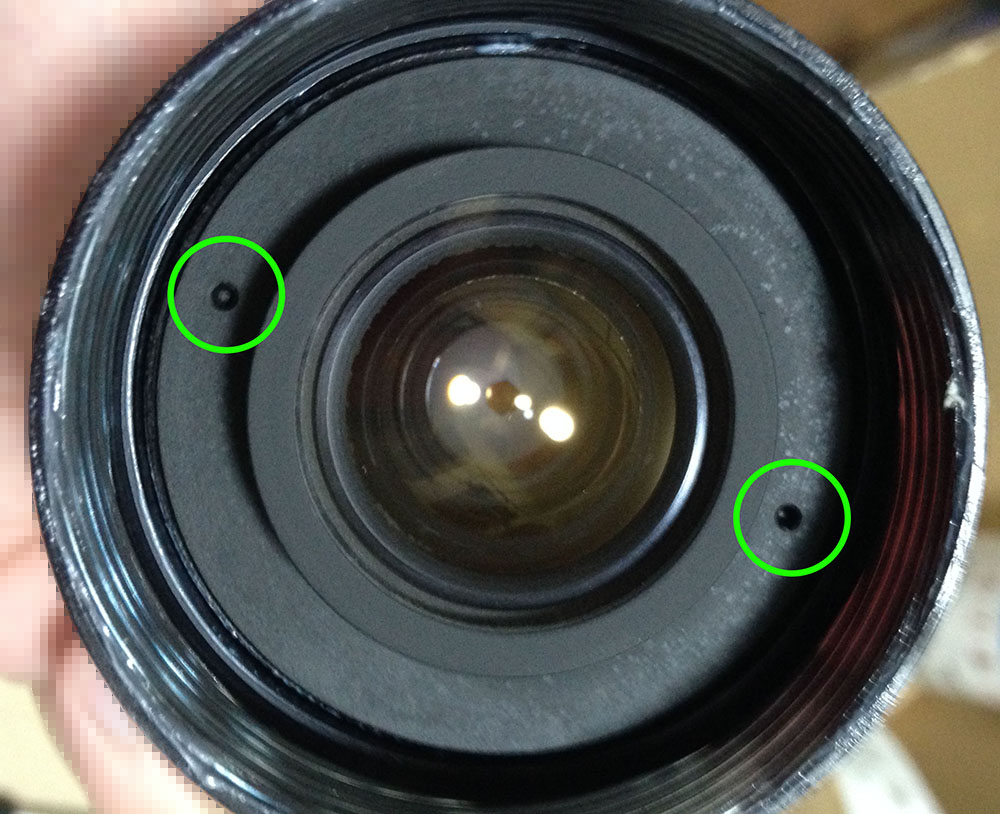
Remove the 2nd elements assembly by using a lens spanner. These holes should give you a hint on which tool to use.

Be careful not to harm the glass, use a lens sucker to remove it. In my case, I got lazy so I just used my fingers to pull it out. There is a raised lip where I could hold on to anyway.
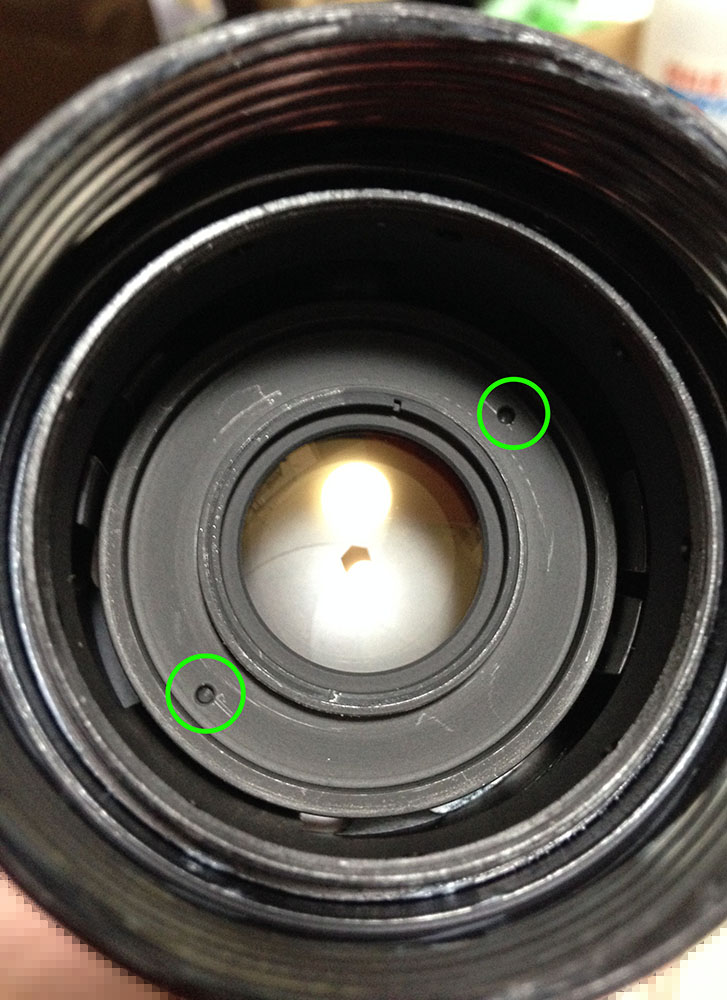
Remove the 3rd elements assembly using a lens spanners with long bits/tips but this time around you definitely need to use a lens sucker because this part is situated deep inside the barrel.
And off it goes, that was easy. we are just warming up!
Carefully remove this guide screw but before doing so, take measurements and pictures so that you will know how much this part should go into the slot later on when it is time to reassemble the lens. The barrel where it is connected is a small helicoid so you should do your best to document it’s position before you dismantle anything.
Pushing and pulling the barrel will give you hints on how far this thing moves within its slot and it will also show you how the other mechanisms work. Be sure to work on this lens while it is focused all the way out to infinity.
Remove these screws to separate the black plate where the aperture fork and stop-down lever are both attached to. Be sure not to foul-up the bearings or you’ll have to overhaul that as well and it is never fun to repack bearings!
It’s time to remove the plate but oops! The plate will not separate because the post for the spring is obstructing it.
Carefully remove and store the spring and its post in a safe place. The post is delicate and you should only remove it with the proper tool. The closest thing I have at the moment is a 0.9mm driver so I inserted the tip into the hole and slowly turn this counter-clockwise until the post is free. It’s very easy to damage to the threads on this part so be careful.
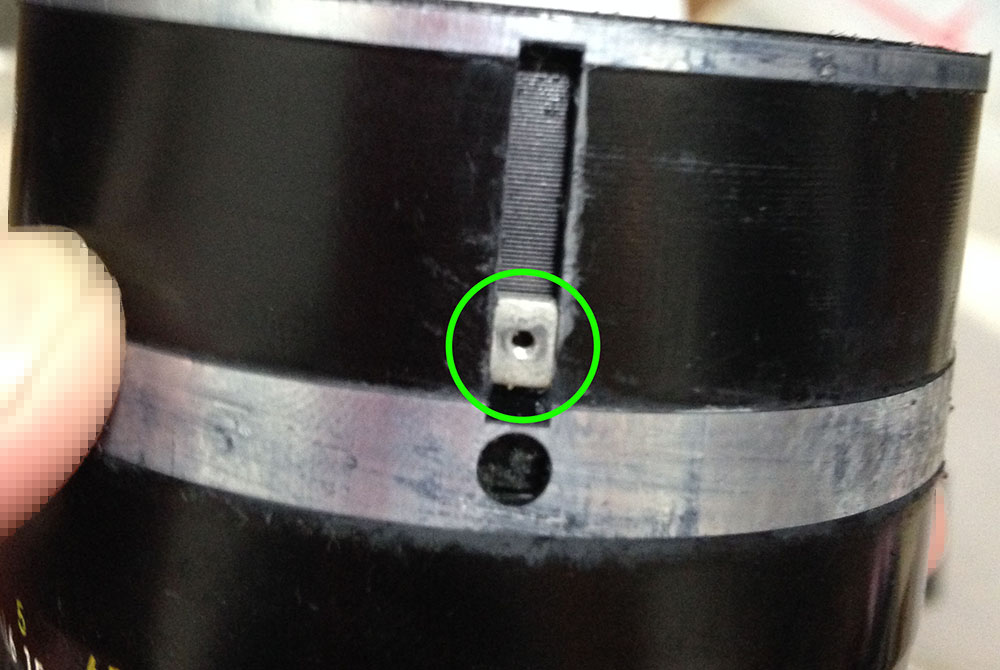
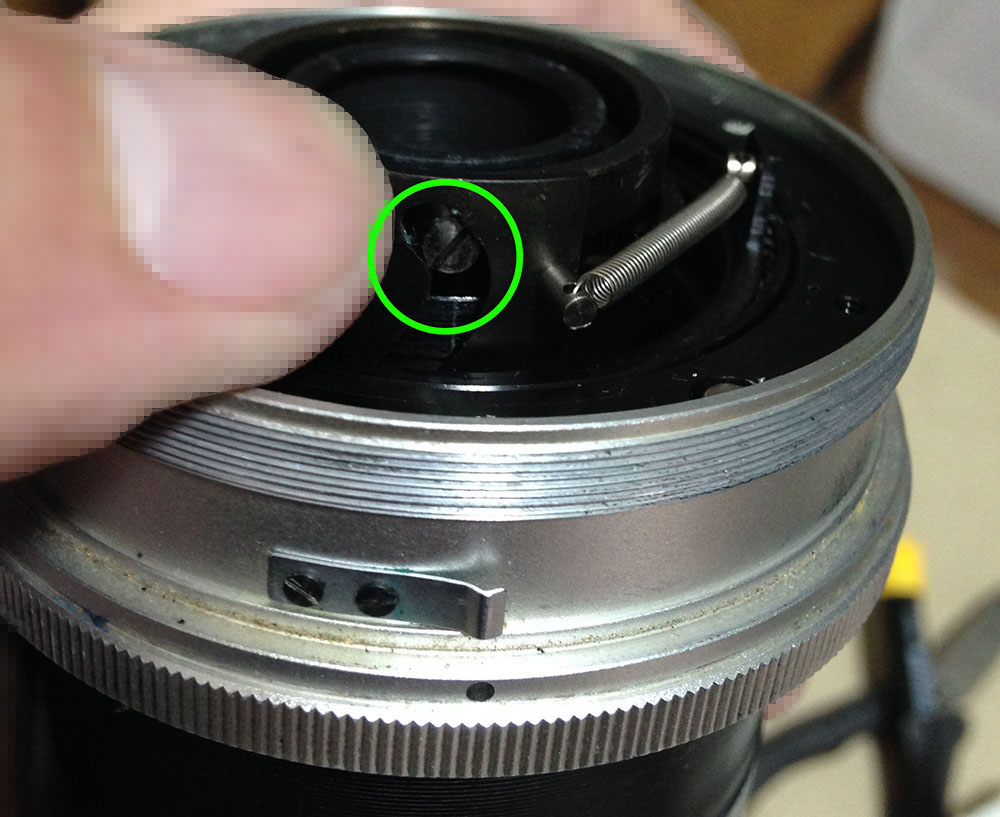
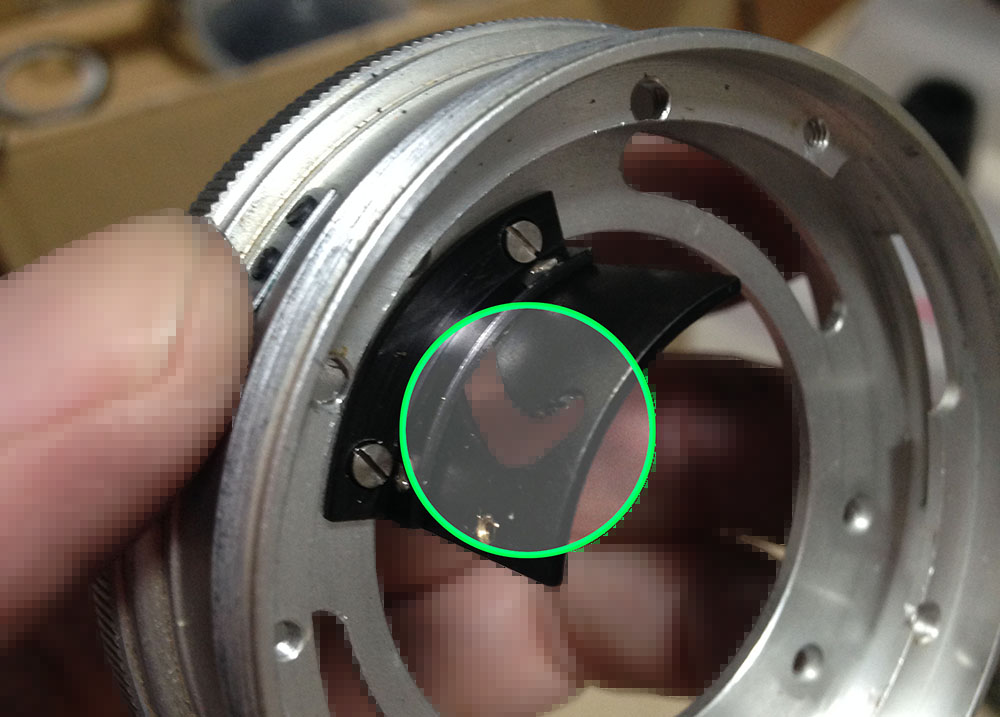
Next, remove the 2 screws that you will see inside this slot. These 2 screws secure a small metal prong that has a slot in the middle. This slot is where the pin of the aperture ring rests so the alignment of this part is important. Adjusting this part left or right will offset the iris’ opening, making it bigger or smaller than spec. It is best to mark where this part should rest, take pictures of it before you remove it so that you’ll have a reference of its tolerances. I simply scrape it with the tip of a screw driver so all I need to do later when it’s time to reassemble it is to simply align the scratches that I had made before.
There is a way to remove the plate without going through this step but you will need a lot of patience because you will have to rotate the plate until this prong aligns with the hole in the huge aluminium grip and that will allow the prong to slip out. I hate to bother with that and I am doing a thorough overhaul anyway so I simply opted to remove this.
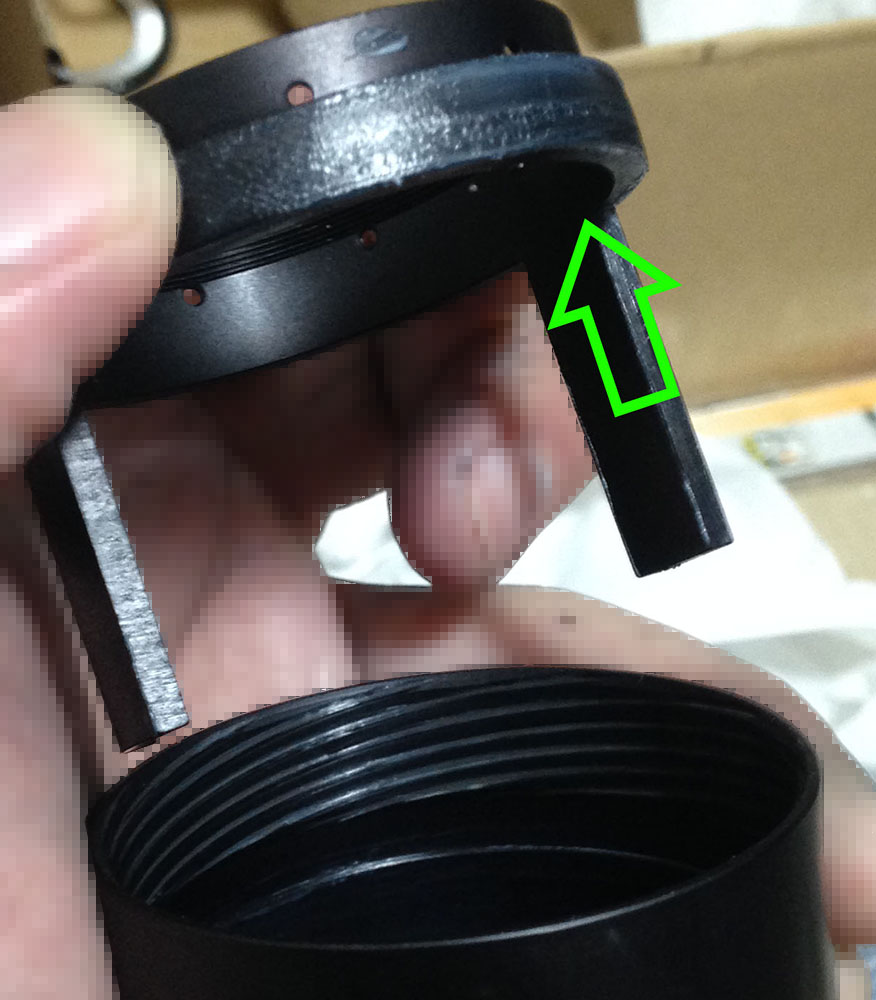
With all the obstructions gone, you can pull that plate containing the aperture fork and aperture stop-down fork away. Feels good doesn’t it? Now is the time to document or take more pictures of that helicoid before you dismantle it. This is a really tricky part so pay attention to how things are connected and by how much (tolerances).
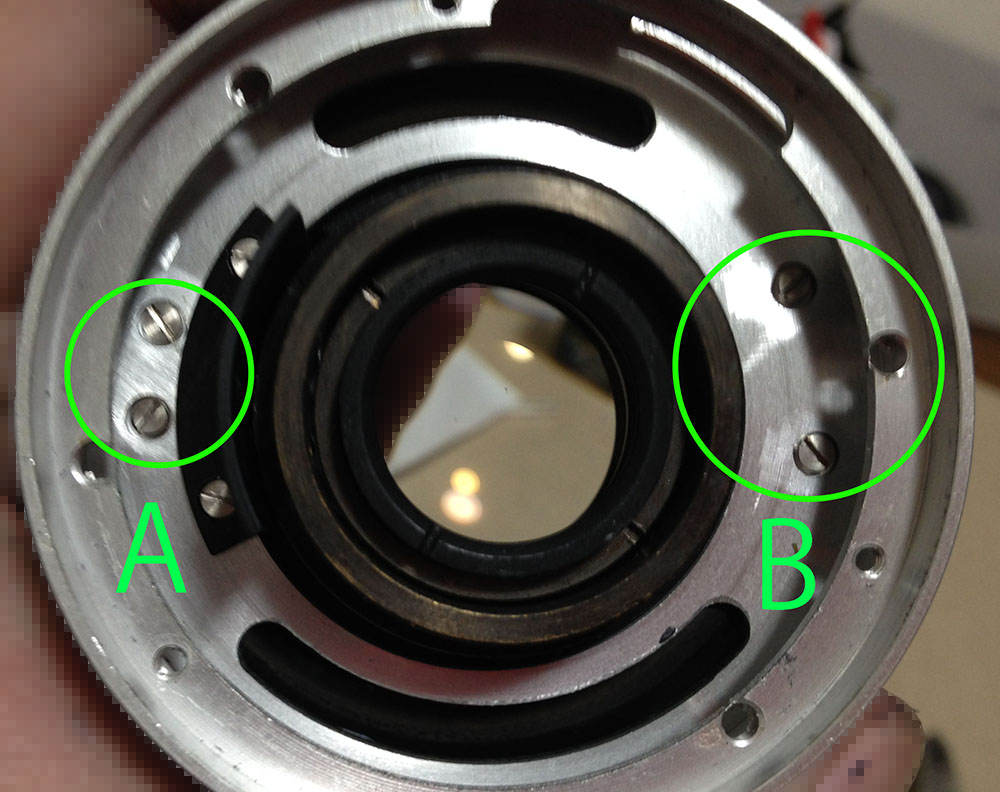
Remove these screws to free the shiny aluminium grip from the rest of the lens. Note that A and B aren’t the same as one is wider than the other. This is important to note later on when you reassemble the lens so that you know which post goes where. The screws are attached to 2 pillars underneath it. The pillars are part of the basket that hold the middle lens elements assembly.
Simply remove the aluminium grip from the rest of the barrel after removing the screws.
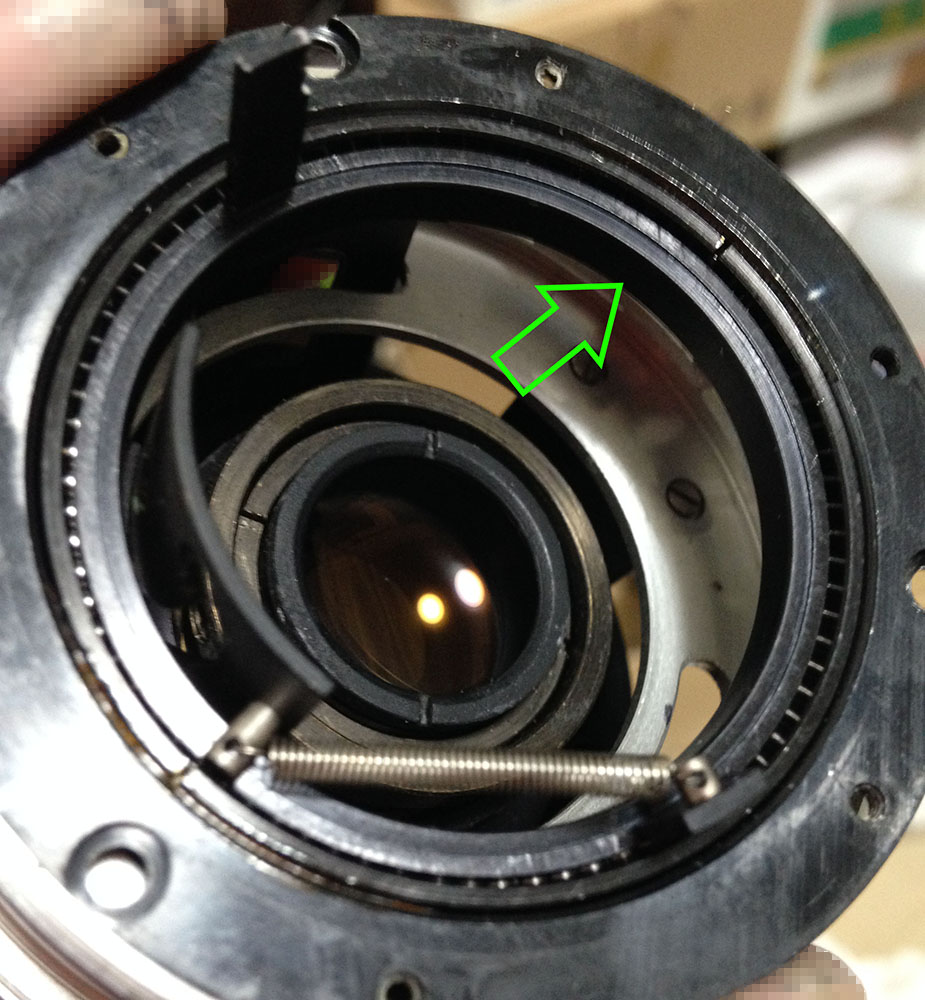
Highlighted in this picture is the slot where that big guide screw should be. We got rid of that a couple of steps before. Also notice the fine scratches that I made to mark how the guide screw should be when the lens is collapsed to it’s minimum length.
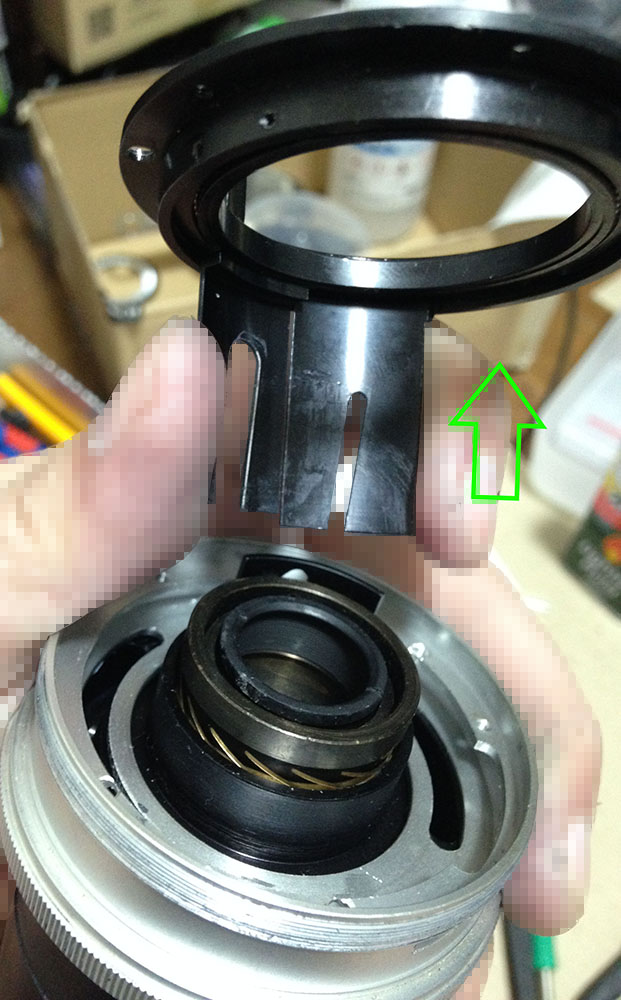
The basket can now be removed from the cup. Also mark one of the holes where one of the pillars go through so that you know which holes these pillars should slide through, if you got it wrong then you will spend a lot of time later in reassembly. Also note that the ridge of the basket’s rim is lubricated. This means that you will need to lubricate this part later. The cup is a single piece of aluminium alloy, just think about how difficult that was to mill.

Examine the bottom of the cup and take notes before you proceed. Next, remove the rear elements assembly by using a lens spanner.
Be careful not to drop the rear elements assembly as it’s a bit heavy. Note the scratch that I made on the bottom lip of the cup. I use it as a reminder to know where that screw hole should be when I reassemble the lens. Make as many marks as you need so long as it will make sense to you later on. Your marks shouldn’t be as big as mine, a small 1mm scratch is more than enough and be sure to make them as shallow as possible. I sometimes use a fine sandpaper to clean the scratch so it’s smooth.
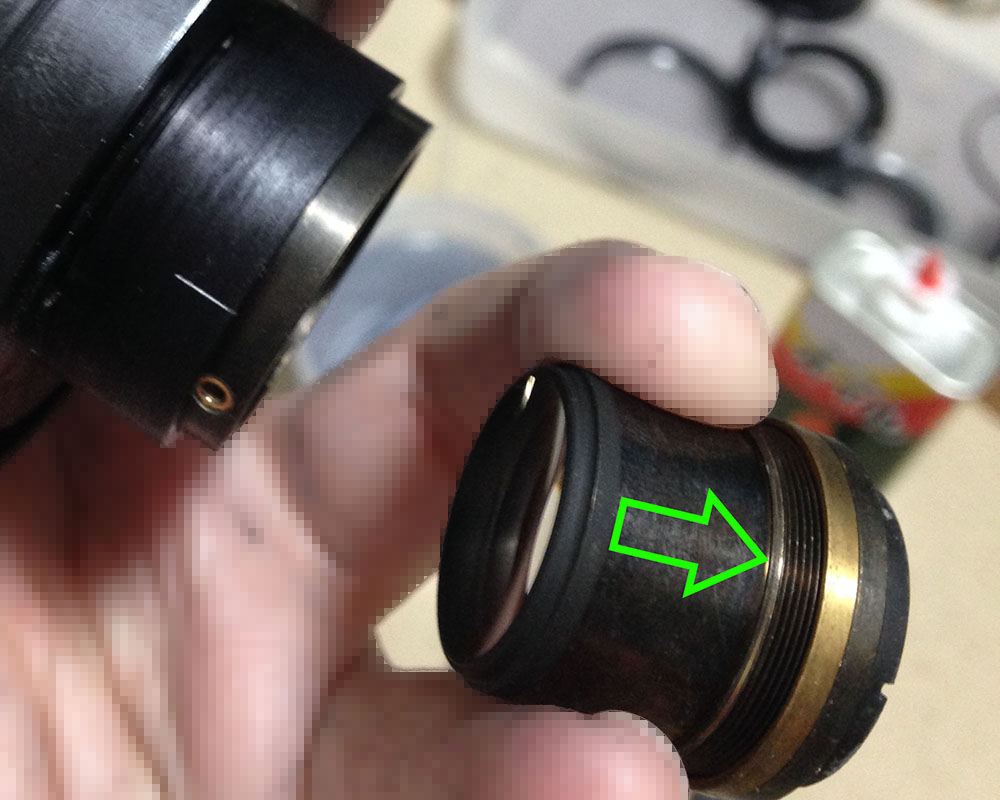
To separate the rear helicoids, simply twist the iris assembly until it separates. Again, get a sharp tool and mark where they separate. This part is going to be the most difficult in the whole lens because you need to get this right or else you will get a soft-focusing lens that is only good as a paper weight. My technique for this is to rotate the brass helicoid until its limit and then I simply twist this thing off from inside the cup after taking some pictures and measurements. This ensures that the brass rear helicoid is not moving at all and my reference point is not rotating.
With the iris assembly and its helicoid gone, you can now twist the rear brass helicoid off and be sure to mark where it separated. If you examine the pic above, you can see that I scribed an arrow and a line on both surfaces to remind me where these should mate. I can tell you from experience that even if you took adequate notes and pictures, this part is going to be frustrating to reassemble so never underestimate this.
Just take a look at that caked-up grease, yuck! Again, some scratches made by me so that I know how these things should align later.
Locate this tiny screw and remove it.
With the screw gone, you can now separate the helicoid from the iris assembly’s housing. Be careful not to put too much grease into this part later, the grease can easily migrate to the iris blades and you will end up with an oily aperture problem sooner or later.
This is the most frustrating part of working with this lens. If you successfully overhauled this one then you will be better-prepared next time you work on another one. It was fun and I learned a lot from working with this lens. Part of the fun was seeing just how good these things were made. They were either casted or milled at the factory and the quality and tolerances are exquisite, they don’t make lenses like these anymore! Carefully clean each part before you reassembly them. Don’t use too much grease here like what’s on the pictures in this article. I don’t know who worked on this thing but he did a mess.
From The Readers:
“Hugh” says:
“The newest version came to me as an Ai lens, with a factory aperture/diaphragm ring, and it has had one of Bjørn’s U-type metering chips/pcbs added by myself. This was a very straightforward enhancement as this version of the lens has an older thin walled bayonet mount and fortunately its diaphragm spring is attached to the aperture lever well away from where the contact block is situated. Its Serial No. is 963237. Either of Bjørn’s U-type pcbs (that fits into a long contact block), or one of his I-type pcbs (that utilises the short 5-pin block) can be easily fitted to this lens. (The L-type pcb might possibly be fitted with a large amount of bending and contortion to the print – however my present skill level is certainly not up to using the L-type print in this way on this.)
The other lens is much older and is similar to yours; it was non-Ai when it left the factory. It has been very roughly Ai converted by a previous owner and the diaphragm spring is anchored right in the middle of the area where the contact block for a metering chip would be placed. So for older versions that are to be cpu enhanced, this spring must be re positioned to clear way for the contacts – similar to how the late models of the 43-86mm lenses are done and it looks very easy to do space-wise. Once this re-positioning of the spring is done, it will be just as easy to “chip” as the Ai version. The serial no for my old version of the lens is 478237, and is similar internally to the one that you have worked on Richard (Serial No. 479154). Its aperture/diaphragm ring is also one of the very early screw on types, as is yours is I see.”
Conclusion:
This lens actually took me a lot of time to dismantle and put back together the first time I opened up one of these because I didn’t know where or how things should separate that’s why I hope that you will learn from my mistakes here. This is the only repair resource on the net that talks about the repair of this lens in-detail so despite the production quality or the lack of it, having this article is still better than not having anything at all.
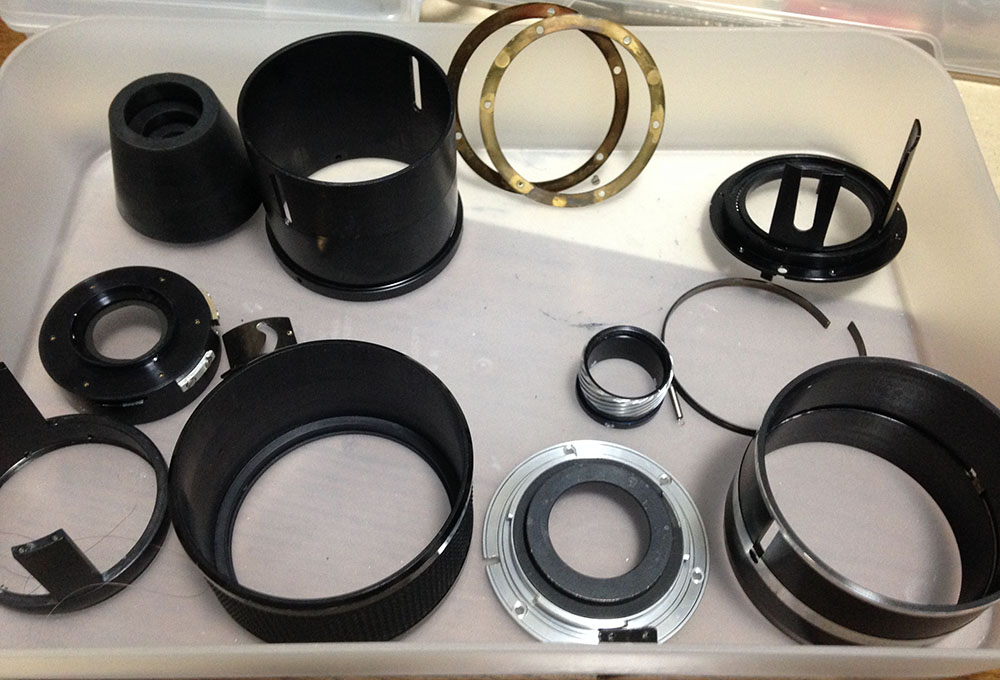
The picture shows some of the lens’ parts after a thorough cleaning. I reassembled it by back-tracking on my notes until I got every thing back together.
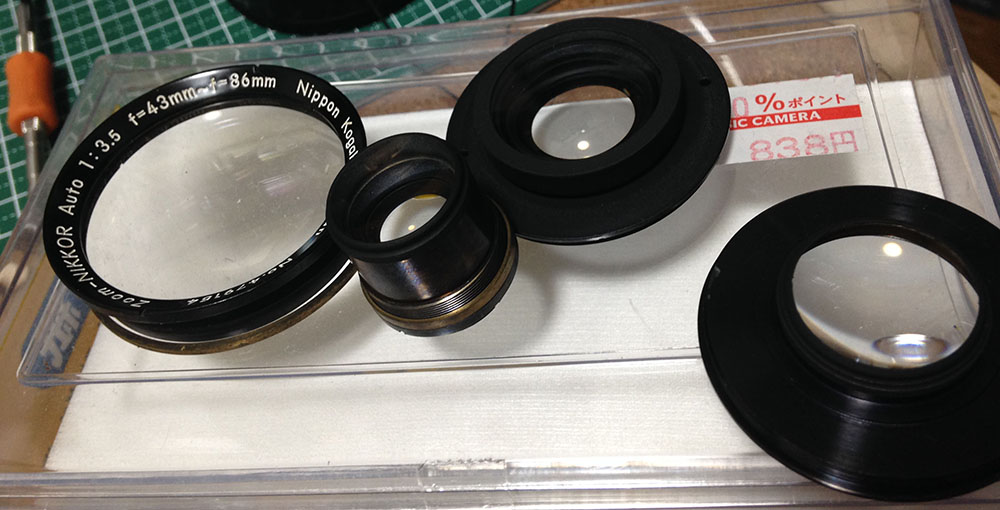
Here are lens elements assemblies. Mine are clean anyway so there was no need to open them up. They are simple to open up if ever you need to clean yours. Just read up on my previous articles and see how I opened up and cleaned the other lenses to give you ideas on how to open these up.
The only stressful part of this lens is the helicoid for the rear elements assembly because it’s complicated and inaccessible. The later versions of this lens will simplify and correct this issue and this alone makes it easier to work on by 20% or so if you count repair time.
Focusing adjustment for this lens is done by rotating the focusing helicoid until you get your infinity focusing right. Do this before you attach the outer focusing ring back to the rest of the lens. This is typical of many Zoom-Nikkors from the first one (this) to the ones made in the 1980s so bear that in mind. Read my article on how to adjust your lens’ focus if you haven’t read it because it contains many important details to help you do this.
Also, be very careful about applying grease on this lens as applying too much will cause the grease to migrate into the optics and iris. Some of the inner parts do not need any at all. What I do is I just scrub the surfaces that come into contact with each other with my brush and I do not even dip the brush into the grease so I end up with an extremely thin coat of grease. That much is enough.
I hope that you enjoyed reading this post and please read part 2 and part 3 so you’ll read about how this lens evolved into its last version. It’s interesting to see how Nikon and her engineers improved this design. It’s also good to know how the other versions perform compared to this one. See you again in the next post and if you enjoyed this one, please share this with your friends at social media! Thank you very much, Ric.
Help Support this Blog:
Maintaining this blog requires money to operate. If you think that this site has helped you or you want to show your support by helping with the upkeep of this site, you can simple make a small donation to my paypal.com account (richardHaw888@gmail.com). Money is not my prime motivation for this blog and I believe that I have enough to run this but you can help me make this site (and the companion facebook page) grow.
Buy me a roll of film or a burger?
Thank you very much for your continued support!
$2.00
Helping support this site will ensure that this will be kept going as long as I have the time and energy for this. I would appreciate it if you just leave out your name or details like your country and other information so that the donations will totally be anonymous it is at all possible. This is a labor of love and I intend to keep it that way for as long as I can. Ric.

10 Comments (+add yours?)