
In the previous article we’ve outlined most of the essential tools for repair and maintenance of classic Nikons and Nikkors. Now, we’ll be discussing the best application for these tools so that you’ll less likely to destroy your gear by stripping or snapping a screw.
Just like everything else in life, you may mess up in your first few projects and that is okay. In my case, I messed up a few projects since there are not a lot of online material for this and any useful information out there are scattered or can be irrelevant at times. The lack of proper tools when I first started is a big contributor to my failed projects since I thought that it would be as simple as fixing a kitchen appliance. The good thing is I have managed to fix the failed projects now and I’ll show you how to prevent messing up your project from my experiences.
This guide isn’t going to be organized in any order, I’ll be updating this from regularly as I find new ways or remember anything that I have done in a previous project. A good deal has already been discussed in the previous article so please refer to that as well and I will try not to repeat anything that can be found there.
Screws and Drivers:
The rule is to use the right type of driver for the right head type. If the tip of the driver won’t fit the head properly and there is play then you are using the wrong driver. Forcing your way will just strip the head so stop and find the right size or modify one to fit. This is simple for slotted drivers, cross-point drivers are a bit tricky and you should only buy ones that will fit the slot. Of equal importance is the direction in which you’re turning your driver. clockwise for tightening, counter-clockwise to loosen, always remember:
lefty-loosey, righty-tighty
This is not a rule because you’ll find left-handed threads where the reverse is true. This occurs more with cameras than lenses, those screws are usually found near the advance mechanism of a camera. It’s rare to find one and it’s difficult to determine which one should go which way without ever trying.
For the plus (+) drivers (cross-point), if you stick to the JIS standard you will be just fine most of the time, the slots for JIS screws seem to be the same across the board, hence the JIS standard. I have never heard of anybody having a need to modify the JIS drivers in any way.
Things can be tricky for minus (-) drivers, the slots seem to come in varying widths and lengths. If the tip won’t fit the slot perfectly then the tip is too loose and to make it fit properly you’ll need to grind the tip a bit until it does. Just make sure that you grind it carefully so that you won’t grind away too much metal from the tip and end up with a tip that’s too big to fit. Be sure to make the walls of the tips as parallel as possible, a wedge-shaped tip will damage the slot as you turn it. The walls of the slots are parallel so your drivers should be as well. You’ll need a micrometer for this, or you can just buy the expensive ones.
The shorter drivers are used for precision and comfort so that you will have more control and your wrists will have less strain since you are using your fingers to turn them, but you will not have enough torque.
The longer drivers are for larger screws that have seized, sealed, dirty or corroded. They will provide more torque because you are using your wrists to turn them instead of your fingers.
Always press on the screw with the proper amount of pressure. If there isn’t enough there’s a chance that you will strip the head of your screw. Putting too much pressure will lead to slippage too as you will lose control of the driver and that will leave a scar on any surface the tip will scratch.
The older Nikkors have the tendency of having excessive amounts of sealant used on the screws and you should be very careful when working with these. There will be times when you will need to put a drop of acetone on the thread to soften whatever they have used and just apply the correct pressure and torque to loosen them. I sometimes heat the screw with a butane torch to burn whatever sealant there is on the screw but since I started using the longer shafted VESSEL drivers, I don’t find this necessary anymore. This screw burning practice is a very common hack for auto mechanics (specially on rusted screws). There will be times when the only way to loosen a screw is to heat it but keep that to a minimum.
Be aware that screws come in different sizes in accordance to their use as was discussed in the previously. Below are illustrations of these screws and where they are usually found.

Above is a picture of M1.7 screws used for extra-strength, usually found in these parts, the helicoid keys are a common place for these. Longer or bigger lenses usually have these instead of the more common M1.4 ones. These are commonly found in parts of the cameras (and lenses) where stability is important, they are usually found in the chassis or the advance mechanisms, for example.
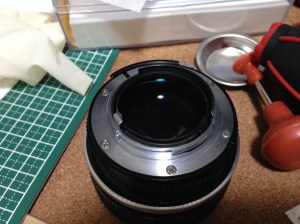
The M2 screws are usually found in the bayonet but they can also be found in other places. Larger and longer lenses will have more of these in key parts of the barrel where there is a need for more stability. Cameras have plenty of these, you will need to find this out for yourself.
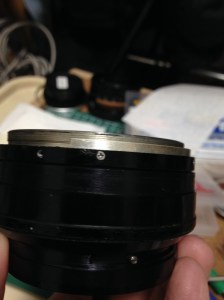
The M1.4 screws are generally used for the rest of the lens and camera. This is the standard size for most smaller Nikkors. These can be found in more delicate parts of a camera such as the rangefinder assembly or the timing mechanisms (or just about anywhere else).
Note that I burnt part of the paint of the aperture ring while I was heating it. I was in an awkward position and I can’t see very well without my glasses. This is the sort of thing that can easily happen when you are not careful so I hope that this will serve as a warning to you. Botching up a repair is easy. Please read this article on how to work with Nikon bayonet screws (it’s mandatory that you do).
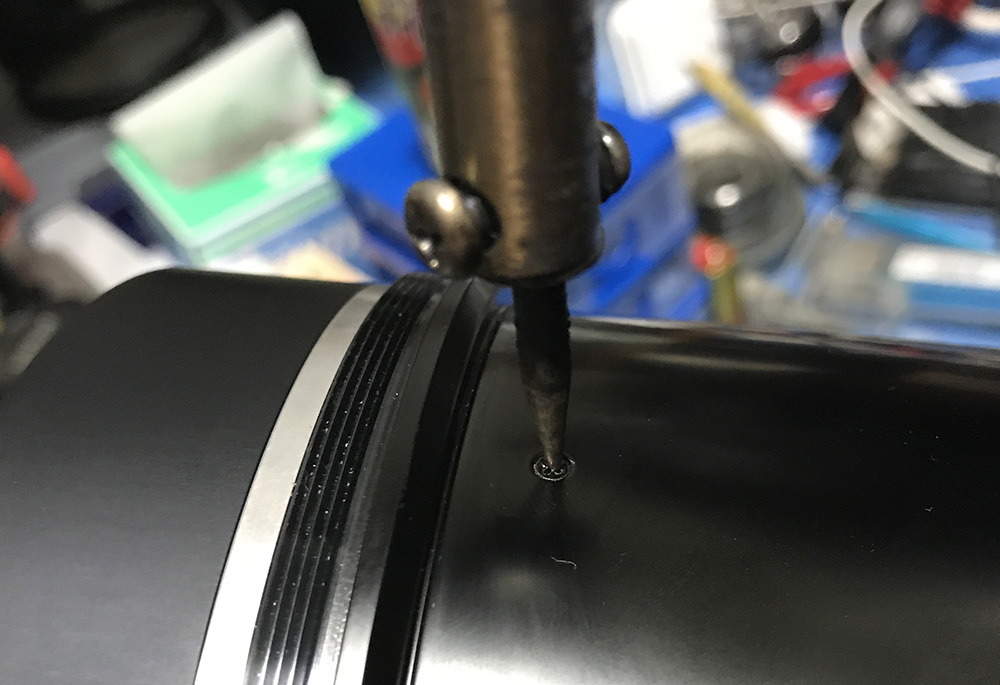
If a screw is difficult to remove, use a soldering bolt, heat the screw until it is too hot for you to touch. It’s going to soften the sealant or gunk and enable you to unscrew it without damaging the head.
Below is an illustration from Conex, it shows the different types of heads.
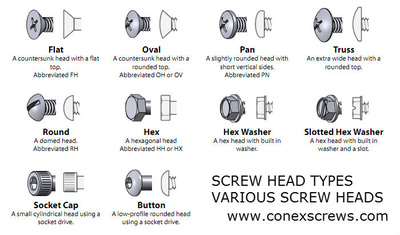
Generally, internal screws should be of a flat-head type so it’s flush with the surface. The oval ones are for the outer cosmetic parts such as the aluminum grip. Pan-head ones can be found occasionally. The rest of the types shown are rarely used.
The materials used for the screws come in different types, too. Nikon uses good quality stainless steel and brass screws back in the day and later used softer, inferior screws in their later lenses and cameras.
You should be careful about the pitch of the threads. Pitch is the space between ridges of the threads. An M1.4 screws will usually be 0.3, an M1.7 screw will be 0.35 and an M2 screw will be 4.0. Using the incorrect pitch will result in a stripped thread.
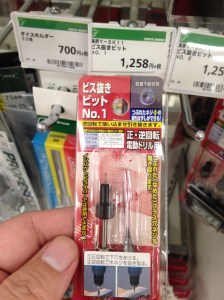
If your screw’s head is badly corroded or you’ve stripped one accidentally, you should only use a screw or bolt extractor to remove it. Always remember to buy the right type regardless of brand. The best one I’ve used is this in the picture below.
To use it, simply drill a hole on the screw that is 1mm–1.5mm (and into the shaft). Also make sure that you lubricate the spot with WD40 so the drill bit will not overheat or else it will dull the tip of the drill or snap. Drilling too deep into the screw will result in flaring of the screw and its hole when you use the extractor so be careful. Next, put the extractor on a hex handle and twist it the opposite way. The extractor will bite into the drilled hole and use friction and torque to force the screw out. If used properly, you can even get a headless screw out. This is the best way to remove stuck screws. Avoid using gimmicky tools like Moody Tools’ extractor. They’re a waste of money (I bought a set) and it doesn’t come with any documentation at all. It may work for some people but for what we want, it’s useless and over-priced.

This is so clean, this is the best way that I know of. It won’t work all the time but it’s worth a shot.
The extractor that we’ve just discussed can be bought in Rakuten. You can use similar ones, just be sure it is the 1mm type and is similar to what I have here.
In this, our dear fried Kenneth shares his technique for removing screws. You may want to try this is you’re not able to purchase a small extractor like the one I have. You may even want to try this out first before it is required to use my method. Please subscribe to his channel.
To extract screws with exposed heads that are taller than 1mm, use nejisaurus screw extraction pliers. It does a quick, clean job. Just make sure that you purchase the smallest one. They are special pliers with a notch in the front part of the jaw to grab screw heads. I have managed to remove a headless screw with this once. So long as there is something that is exposed and is tall enough to grab, the nejisaurus will get it out.
For screws that are too corroded that twisting them will result in the heads snapping-off and leaving the rest of the screw’s shaft inside the hole, start by drilling a hole with a bit that is slightly smaller than the hole or screw. As an example, use a 1mm bit for a 1.4mm hole, it will bore-through the shaft. Next, use a hand-tap that’s equal to the size of the hole to clean-up any stuck material or left-over screw parts and to finally repair the damaged threads.
An alternative to the techniques I’ve described above, you can also drill the hole with the correct diameter and tapping it with a slightly larger standard size. For example, for a 1.4mm screw hole, use a 1.4mm drill bit and tap it with the next bigger-sized screw (1.7mm). Doing this will turn the hole into a 1.7mm hole so the screw’s size will also change. You can also do this for the threads that are so badly worn that the right sized screw turns up being too loose it won’t even engage the threads, resulting in a free-turning screw. If you have to use the original screw, you can insert new material into the hole and use a tap that’s similar in size to the original screw and make a new hole. This is an advance technique and is difficult to master.
Just remember that these techniques are best done on parts and surfaces of your gear that won’t be seen since they will obviously look improvised and should be used as a last resort.
There are times when the correct screws can’t be obtained and you are only left with modifying a screw to-fit. The easiest way is to mill your new screw from an existing one but there are cases when I had to make new ones with a die. This is more hardcore than it sounds and you’ll need special tools for this task.
That’s all for this article. Screws and drivers sound so elementary but you’re in for a surprise because you can write a whole book about them. These are the fundamentals of any camera and lens repair skillset, you should master these in order to proceed to more advanced skills.
Help Support this Blog:
Maintaining this site requires resources and a lot of time. If you think that it has helped you or you want to show your support by helping with the site’s upkeep, you can make a small donation to my paypal.com at richardHaw888@gmail.com. Money isn’t my prime motivation for this blog, I believe I have enough to run this myself but you can help me make this site grow.
Leave me a tip?
Thank you very much for your continued support!
$2.00
Helping support this site will ensure that it will be kept going as long as I have the time and energy for this. I’d appreciate it if you just leave out your name or details like your country’s name or other info so that the donations will totally be anonymous. This is a labor of love and I intend to keep it that way for as long as I can. Ric.

Dec 29, 2015 @ 05:17:15
Useful & interesting, thanks!
Dec 29, 2015 @ 06:46:08
How can I follow your blog? Looks like you have some interesting stuff there.
Jan 09, 2016 @ 16:54:57
Thanks Rick. Did you manage it? There should be a button somewhere… 😉
Jan 09, 2016 @ 21:30:09
Yes i did. It was hidden under the cluttered ui
Dec 29, 2015 @ 06:45:06
Thanks!!! The next one will be on the topic of lubrication. I will see if I can write it tonight. (If I finished repairing the 80-200 f/4 ai-s early)
Dec 29, 2015 @ 19:25:39
Great stuff, thanks Richard 🙂
Dec 30, 2015 @ 01:37:12
Thanks,Ron. Doing P2 now as the baby sleeps.
May 16, 2017 @ 21:38:33
Hello Richard
You should also be careful with the pitch of the screws. Pitch is the space between ridges in the screws threads. Usually, M1.4 screws will be 0.3, M1.7 screws will be 0.35 and M2 screws will be M4.
Let me ask a question about this sentence: “M2 screws will be M4”. Is this correct ?
What is usually the thread for the M2?
Thanks
Carlos
May 17, 2017 @ 01:26:55
Hello, Carlos!
M2 screw is basically 2mm screw diameter. The pitch is the spacing between the threads. Those are very important. Ric
May 18, 2018 @ 20:48:30
Thanks for the informative article. I was trying to disassemble my nikon 28-70 lens and stripped a few screws. Can you tell me is the screw extractor available anywhere in the US ? Also where can I get the M1.4/M2 screws ?
Any help/advice would be much appreciated.
Thanks
Susheil
May 18, 2018 @ 20:50:14
Hi
Thanks for the useful article. Wish I had read it before trying to open up my 28-70 lens. As a result I have couple of stripped screws. Can you tell me where I can get the screw extractor and also where can I get replacement screws ?
Any help/advice in this regard would be really helpful
Thanks
Susheil
Jun 21, 2018 @ 16:12:17
Hello. Check ebay for “SK11” screw extractor 1mm. Ric.
May 21, 2018 @ 10:19:26
Very good article! We are linking to this particularly great article on our website.
Keep up the good writing.
Jun 21, 2018 @ 16:11:27
Hello. What site and which article? Please don’t link my work, it’s not easy writing these FYI. The least you can do is redirect people to my site. I take this very seriously because people don’t know how much effort I put into this. Ric.
Nov 21, 2019 @ 07:43:52
Truly no matter if someone doesn’t understand after that
its up to other visitors that they will assist, so here it happens.
May 19, 2020 @ 06:13:52
Your articles have been such a great help! I’ve been trying to find a proper screw extractor for awhile now but it seems none are small enough. Do you think a left handed drill bit would work?
Oct 10, 2020 @ 20:06:49
Hi, I am desperately looking for a 1mm screw extractor. Unfortunately, Rakuten Germany do not appear to stock and the US company does not want to trade with Europe. I would really appreciate your help! Thank you, Julian