
Hello, everybody! How are you today? I am busy today and my head is painful but I have to write something for you today. I am currently busy with work so I cannot maintain the blog like how I used to and it doesn’t make any sense for me to do so I will be writing less than usual from now on but I will keep this blog online as much as I can. Now, for more light-hearted news, I will continue with our Nikkorex F series today in this article so read it to know more aout what’s going on inside this little camera.
Introduction:
In part 1, we talked about how to clean the camera inside-and-out. While we will only do minimal cleaning and lubrication, it’s enough to make this camera work again and it’s a good exercise for those who wanted to get into camera repair as these cameras are cheap and simple to take-apart. In this part, we’ll go deeper and work on the mirror box. This is a common problem with many older cameras because the lubricants may have dried up or the wrong type of oil or grease was used by anybody who opened the camera before. I had to dig-deep into this camera to extract the mirror box in order to clean and oil it but it’s still relatively easy compared to the Nikkormat series of cameras.
 Here’s the camera with the Nikkor-P 10.5cm f/1.25 Auto, it’s the “tick-mark” version of this lens and it makes a good partner for the Nikkorex F because both of them represent early Nikon F-mount products. While the lens is certainly of a slightly-older vintage this combo is still representative of that exciting era in 35mm photography history when the Nikon F showed the world what’s possible with the “small” format.
I am sure that this series isn’t as popular as the one that I did for the Nikkormat or any of my lens repair articles but I had to do this in order to give you a better understanding of Nikon’s history and what goes on inside the cameras. Having said that, this is more of an article made for historical purposes that anything else but I hope that you will get some important tips from it. Let’s now begin with the repair section.
Before We Begin:
If this is the first attempt at opening a lens then I suggest that you read my previous posts regarding screws & drivers, grease and other things. Please also read what I wrote about the tools that you will need in order to fix your Nikkors.
I highly suggest that you read these primers before you begin (for beginners):
Reading these primers should lessen the chance of ruining your lens if you are a novice. Before opening up any lens, always look for other people who have done so in Youtube or the internet. Information is scarce, vague and scattered (that is why I started this) but you can still find some information if you search carefully.
I highly recommend that you also read my working with helicoids post because this is very important and getting it wrong can ruin your day. If I can force you to read this, I would. It is that important!
For more advanced topics, you can read my fungus removal post as a start. This post has a lot of useful information here and there and it will be beneficial for you to read this.
Disassembly:
What I am about to show you here should rarely be done in a properly-working camera but if you have a camera that’s really dirty or if the mirror isn’t flipping back then this is probably what you’ll have to do in order to fix the parts that lay deeper inside the chassis of the camera. The steps shown here should only be done by an accomplished repairer or if you don’t mind destroying a working camera in order to learn a new skill. I’m going to show you this method not because this is the proper way to achieve this but this is what I think is the easiest way to reach the mirror box without removing too many parts from it and it saves me more time so I can do more important things. If you need to work on the shutter then this won’t be much help and you will have to dig-in deeper into the camera.
 The bottom cover can be removed by unscrewing these.
 Dirt and other nasty stuff can settle underneth this thing and it’s important that you wipe and remove anything here. I also replaced the paint because the original one has lifted. It is important that you remove clean the charging mechanism very well because any foam that found their way into it can jam the whole thing. The foam on the Nikkorex F can be a pain because they crumble into small pieces when they turn bad. Now that this is gone it is easier to clean the camera because any dirt that you blow-away won’t be left inside.
Watch this video to see how everything should work.
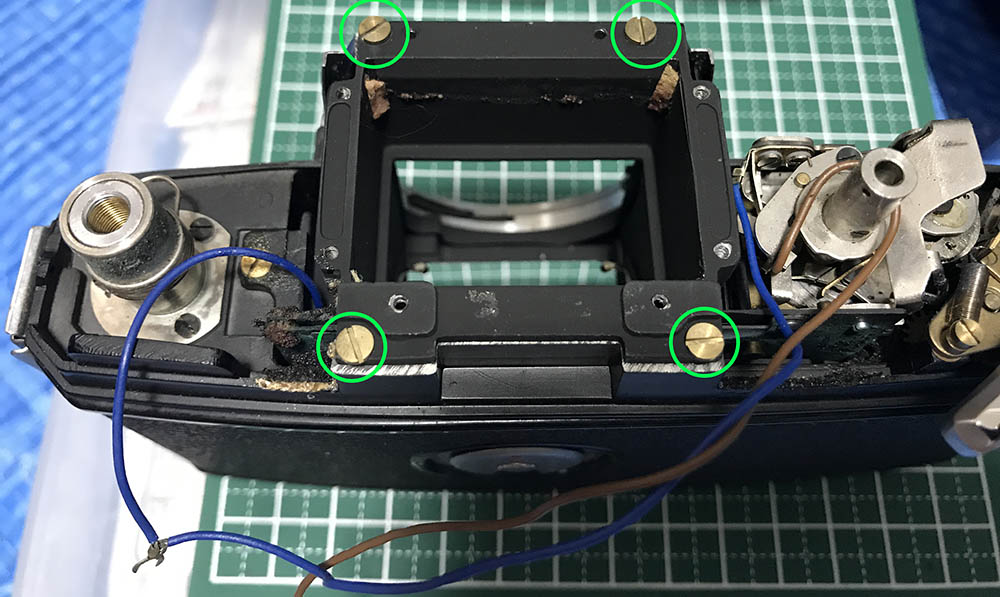 In order for you to remove the mirror box assembly you will have to remove a couple of screws at the top, here’s 4 of them.
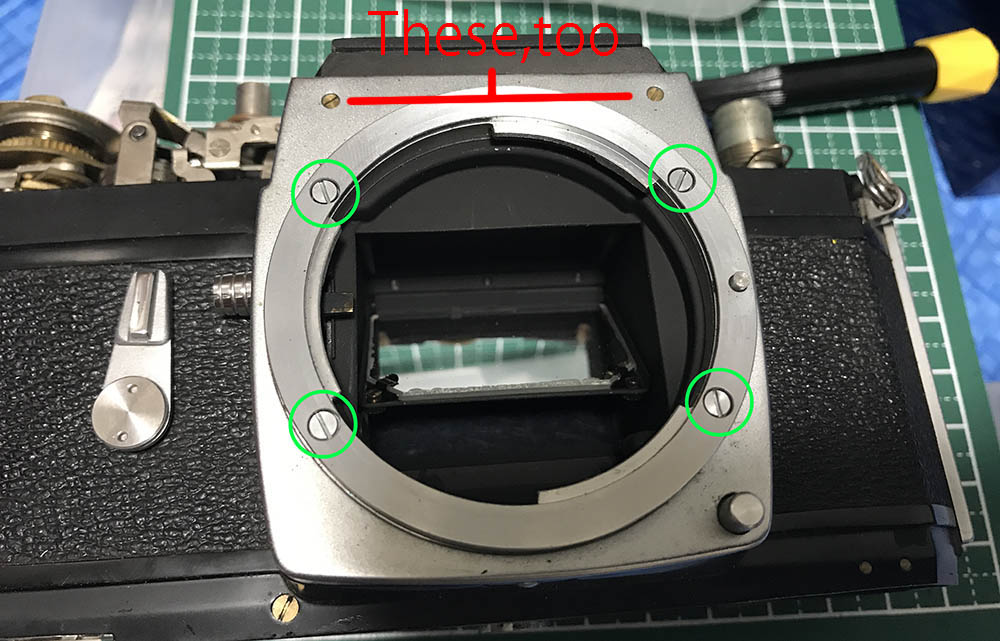 There are 6 screws that you have to remove at the front. There are 4 screws that hold the bayonet mount to the front casting and you should carefully remove these. They can be a bit stiff so use a driver that will perfectly fit their slots or apply some solvent to the heads and let that stay for some time for it to soften the glue. The 2 tiny brass screws secure the apron of the camera.
 The bayonet mount can easily be removed as soon as its screws are gone, be careful not to lose any shims under it because these are used to correct the flange distance so it is as accurate as possible on all 4 sides that are measured at the factory. These shims have to be put back to their original place so mark their positions so you can return them back to their original positions.
 The apron can now be safely removed. Clean it very well and whatever is underneath it.
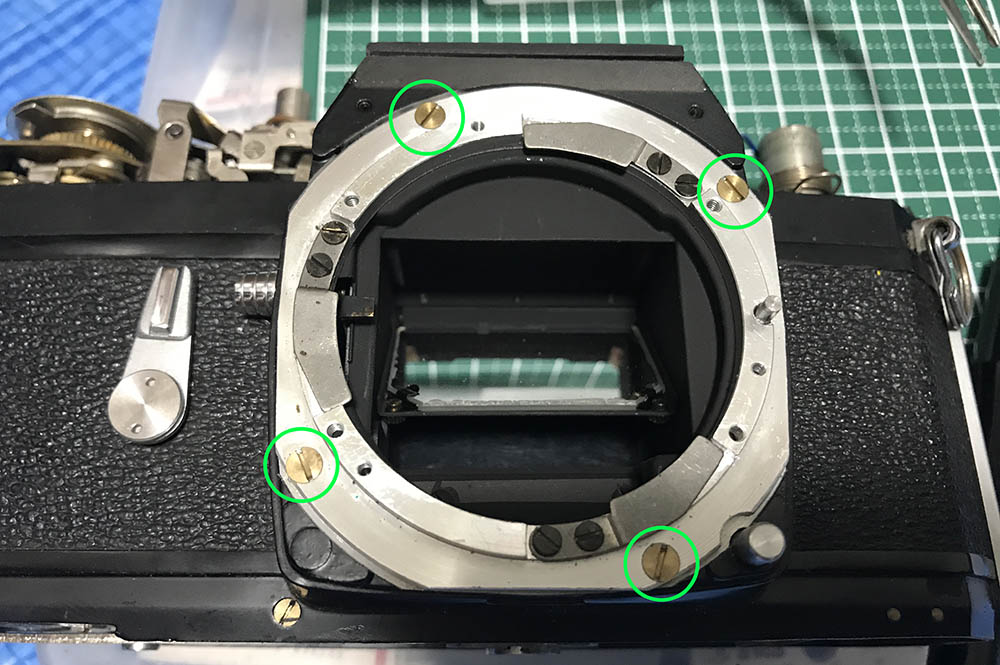 These 4 screws secure the mount’s base. This camera has this because Mamiya sells these to different companies and they all have different lens mounts and this will allow cheap and easy techniques in manufacturing to make cameras that accomodate different lens mounts.
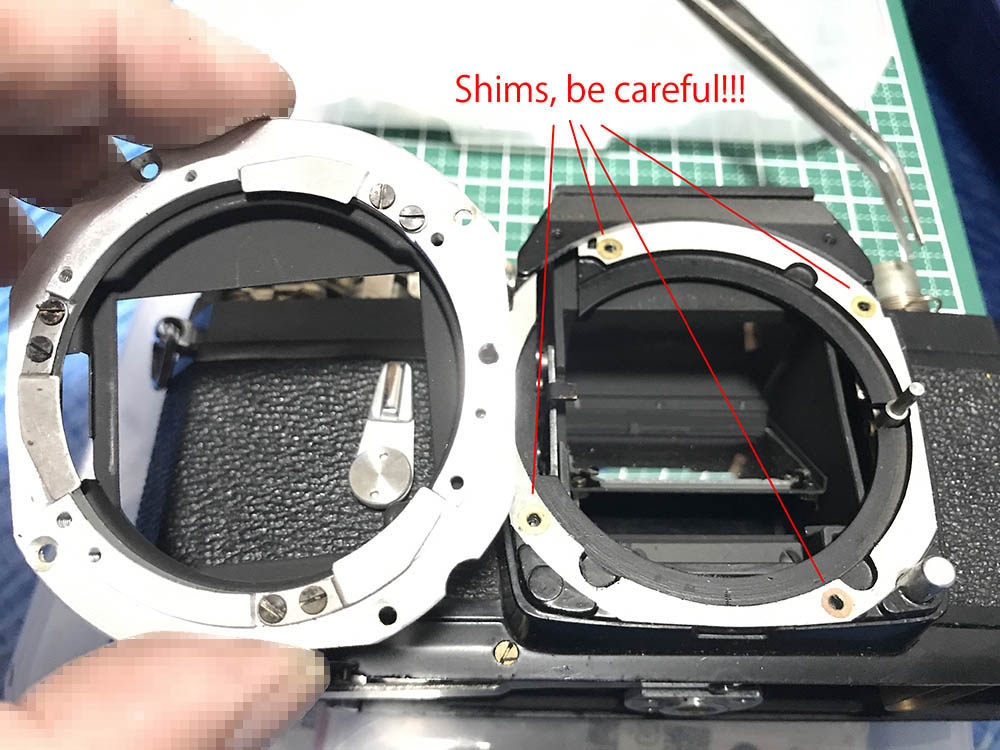 Again, there are shims underneath this so make sure that you treat this the same as you did with the bayonet mount.
 This is what I do to so I won’t get confused later as to where these shims needed to be.
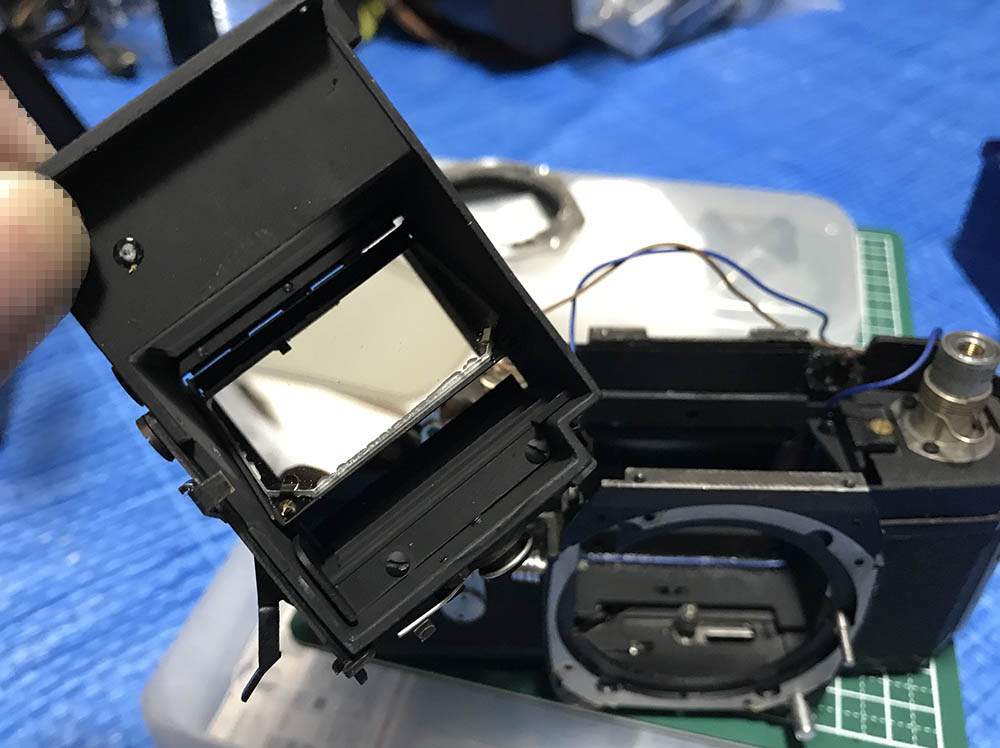 The mirror box assembly can safely be removed. It can be a little bit tricky when you use this method because the front casting is in the way but at least you won’t have to remove too many things in order to get to this thing. You may have to press levers and buttons to clear some of the parts here and it may take you several tries until you get it. The biggest thing to remember is don’t force it when it’s not working according to your plans. Just go out for a smoke and try to figure out how which is preventing you from pulling this out and think of clever solutions to solve your problem.
Here’s a video with me and my sense-less commentaries.
 The mirror box is dirty on this camera but is otherwise OK. Clean the old grease and put a thin layer of fresh grease where it’s needed. Flush the pivots with naphtha and apply a small amount of oil and make sure that everything is moving freely. Applying too little is better than applying too much when it comes to lubricating precision machines like this.
 The frame counter dial can be removed as well so you can clean the gear train under it. I usually flush the cogs clean and brush away any dried grease before I apply a fresh coat, this will make sure that the new grease won’t get contaminated.
 The pressure plate is dirty and scratched in this camera. I had to remove it to clean it and to polish the scratches so they won’t scratch any film that passes-through it. You will need some metal polish and a cotton cloth do achieve this, simply rub it with the compound in a circular motion with your fingers. Never use any motorized tool since you don’t have a lot of control with it and you’ll risk removing too much material if you’re not careful.
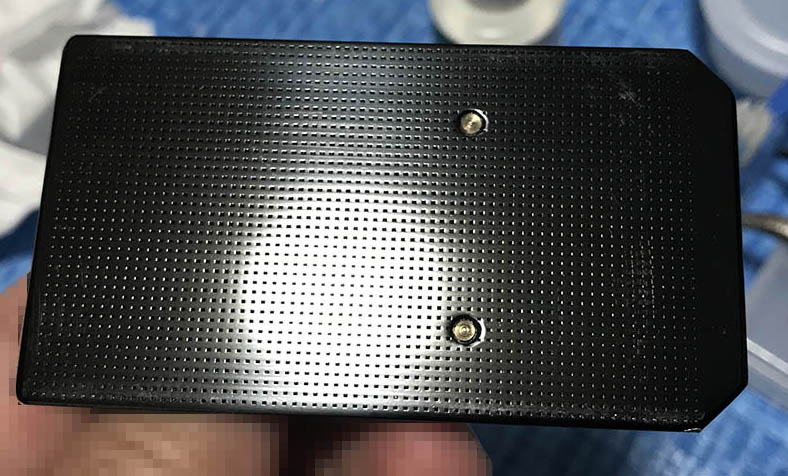 Here’s how it looks like half-way into the process. The larger scratches are now gone but I will have to deal with the superficial ones near the edges of the plate. Notice how shiny it is now compared to how it originally looked like.
 See how clean everything is now? I applied some grease on the parts that need it and the pivots have been cleaned and oiled. The camera now feels great when you wind it.
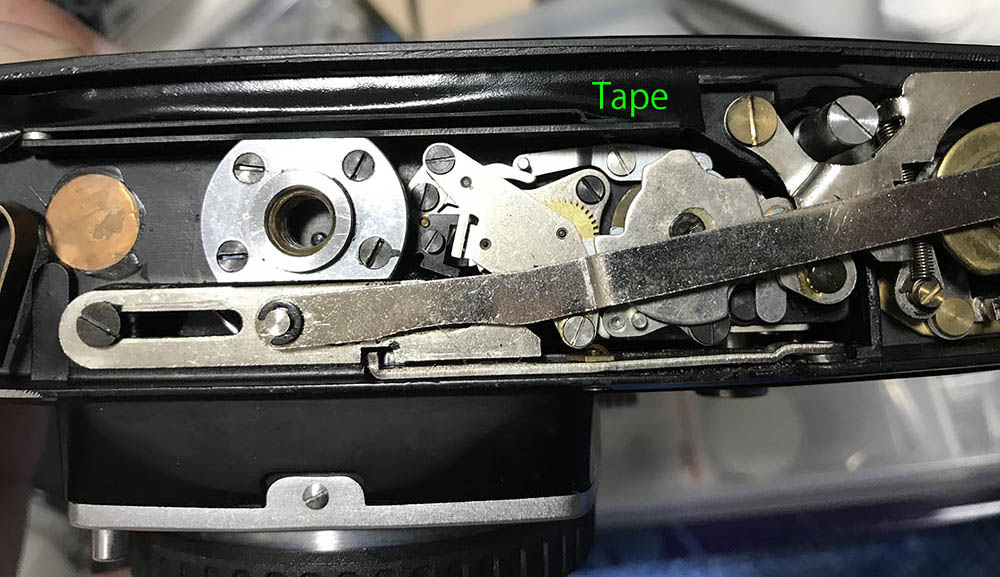 In order to prevent a mess again in the future I replaced the old foam with tape. This will not help with baffling the sound of the shutter but it’s good-enough to protect it from dirt and stray light.
 You will want to make sure that the counter dial is square with the indicator line. This is your last chance to do it, simply loosen its screws and nudge it until you get it right.
This is all that I cared to do. I can open the camera further and do a more thorough job in the shutter and the insides of the camera but I don’t think that’s going to be productive. I don’t intend to use this camera as a daily shooter and I only wanted this just for fun and I was just curious as to how the original Copal Square S shutter worked. For most cases, it’s enough to just follow what I did your camera should work fine again so long as nothing’s seriously wrong with it.
Conclusion:
That was easy isn’t it? I only did a half-assed job with this camera so I only spent a night on it. After 2 hours or so of cleaning I was able to begin putting everything back together again. All I did was back-track through all of my steps and making sure that everything is working properly before I put the top back again.
 Here’s the camera after spending some time at the “Nikon Spa”. It’s now shiny and clean! I replaced the original dented top with a new one from a non-working camera. It looks as clean and shiny as it did when it was new!
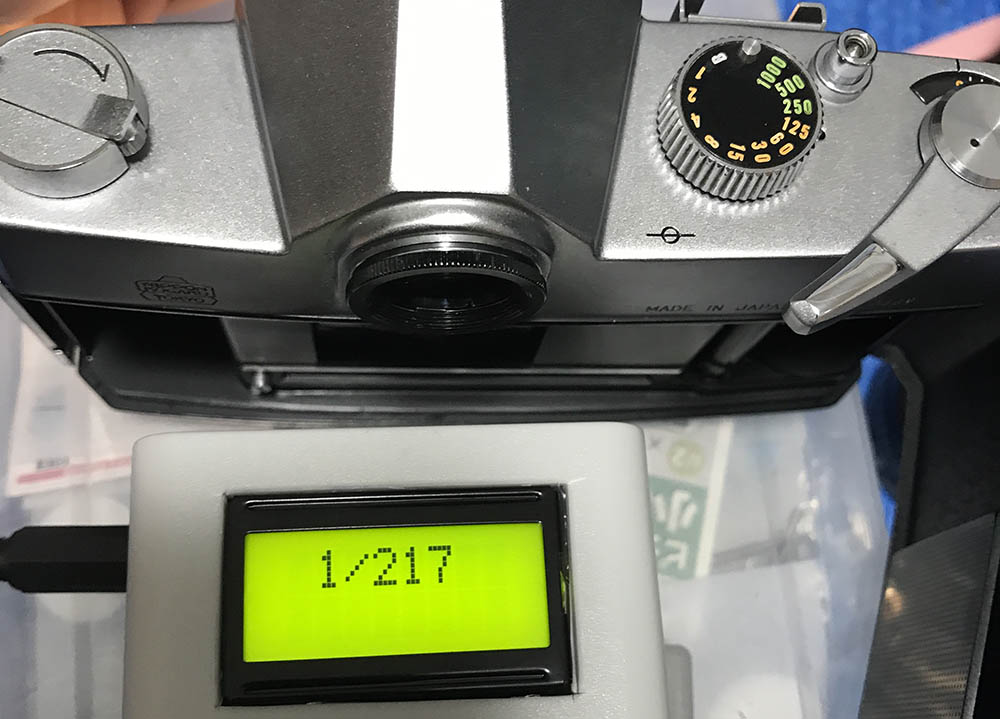 Checking the shutter should be done before putting everything back but I didn’t care a lot for that for this camera since I only wanted to play around with it. I used a simple type of shutter tester to see how accurate the shutter is. Everything speed is consistent which is a good sign that nothing is wrong with it but every speed is firing a bit slower than what is standard and this is due to corrosion or lack of lubrication. It’s close-enough for me so it’s time to run a test roll with it.
 Here’s how it should be at 1/500s. I am not bothered at all to be honest and I don’t mind it firing a bit slower. This is still within my 1/3 stops tolerance and the good thing is that it’s mostly consistent so all I have to do is remember that it’s firing a bit slower at all speeds rather than remember that it’s firing slower or faster at certain speeds. I usually shoot at 1/125s plus 1-2 stops around it so it’s not a big deal at all.
Here’s a video of the whole test in case you are wondering how everything went. This is a simple shutter tester in the video and it only accounts for the center part of the aperture, a better tester should have sensors at each edge and one at the center. This is minimal in terms of equipment when you want to fix cameras, shutter testers that rely on sound or other gimmicks can’t be trusted. If somebody tells you that you can trust your ear for this then quickly turn away and leave. The reason why I am using this tool for this is because it’s difficult to make this type of shutter to exhibit tapering from grossly-unequal speeds from either the closing or opening curtain and I will show you why in the future.
Did you like part 2? If you think part 1 is too simple for you then I hope that this satisfied your curiosity. There’s nothing much to these cameras, they’re simple and easy to repair if anything is wrong with them. Truth be told, I actually spent more time cleaning it than anything else because of the sub-standard foam they used that crumbled into pieces. This is the one thing that I will remember from this project and that is probably the only thing that turned me off from these in terms of build. Sure, these are not up to Nikon standards but they’re still better-built than the flimsy Canon 7. If only they spent more money using better materials then this camera would have gained more points for me. I may open this again in the future and oil the shutter if I am in the mood or maybe replace the ugly tape that I used with rubber foam to help suppress the shutter’s noise and I will update this if that happened so you’ll see what I did.
I hope that you enjoyed this article. Please don’t forget to come back for more because I’ll be writing another article for this and I will show you more stuff related to the shutter. If you really liked this article or my work in general please feel free to support this blog. It’s what’s keeping this blog alive. Thanks again and see you again next time, Ric.
Help Support this Blog:
Maintaining this blog requires money to operate. If you think that this site has helped you or you want to show your support by helping with the upkeep of this site, you can simple make a small donation to my paypal.com account (richardHaw888@gmail.com). Money is not my prime motivation for this blog and I believe that I have enough to run this but you can help me make this site (and the companion facebook page) grow.
Leave me some tip?
Thank you very much for your continued support!
$2.00
Helping support this site will ensure that this will be kept going as long as I have the time and energy for this. I would appreciate it if you just leave out your name or details like your country and other information so that the donations will totally be anonymous it is at all possible. This is a labor of love and I intend to keep it that way for as long as I can. Ric.

Jul 17, 2020 @ 03:09:13
hi is there a way to release the mirror without taking out the mirror box? the insides-have removed the base plate and the insides are free of muck.D
Jun 06, 2025 @ 14:56:41
I also own a preloved Nikkorex F, but not slightly as smooth as yours. But I love it and still in one of my Nikon series collection. It has already repaired including cleaned the dust and the shutter speed also already calibrated. When I bought it first from eBay the cocker was stucked. I never repaired or opened camera before, so I put it to camera repair station to fix it. It was a unique camera and the classic taste of out looking yet modern feel in hand is one of the extra reason I love. Nice to your info about repair and maintenance of Nikkorex F. It is a very usefull information to help me to maintain my Nikkorex in order to long lasting use.