
We had a lengthy commentary on screws and drivers on the previous post, the next important subject to consider is lubrication. If you’ve read any of Nikon’s repair manuals you’ll see that Nikon uses different types of grease and lubricants on different parts of their lenses and cameras. While this is the best practice in camera manufacturing, it isn’t practical for DIY repair for a lot of reasons, some of which are:
- It is expensive to keep an inventory of various lubricants.
- It is not cost-effective if you are just fixing your own stuff.
- You may accidentally mix lubricants.
With the above considerations outlined, we will now start discussing about the most important lubricants in camera and lens repair.
Preparation:
Before applying fresh grease to your helicoids you’ll definitely need to clean the helicoids first and remove the old, dirty grease. This is also true for any camera and lens parts that once had lubricants applied to them.
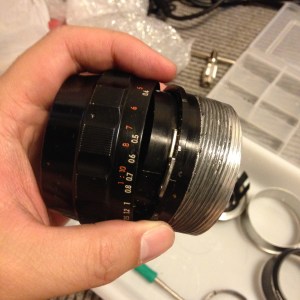
Just take a look, looks like the grease has not been replaced since 1965! This has to be cleaned and never leave any residue.
To clean your helicoids, you’ll need to dismantle them. Next, you’ll need to have these things ready:
- stiff-bristled brush
- Strong, concentrated dishwashing detergent
- lens wipes or Kleenex
- denatured alcohol in a deep container (alcohol bath)
- sharp toothpick (for picking-out hardened grime)
- Dremel with pig-bristle wheel (optional)
- bulb blower
- lapping compound (optional)
Go to a place where it’s OK to create a mess on the floor. You would also like to work on one helicoid at a time. Wipe-away the grease with Kleenex, get as much grease off as you can. Prepare a solution of your detergent and make sure that it’s strong. Pickle your helicoids in that solution for a few hours up to a day depending on how the grease reacted to it. Brush the helicoids once you’re satisfied that the pickling has done its job. Scrub them really well, it’s a very tedious job and you may want to change to a stronger detergent now. I use a borax-based detergent occasionally for this step.
Wipe the helicoids after rinsing them very well in running water. Soak the helicoids in an alcohol bath to remove any remaining residue. This step is crucial and may take a few hours. Wipe the excess alcohol and pick-off any hardened grime with a sharp toothpick. A pig-bristle wheel for polishing is a good way to remove any stubborn dirt, you will be surprised at how much dirt is still there. The thin film of dried grease is bad news and the wheel is a necessary tool to remove that.
If the helicoids doesn’t feel smooth when you dry-turn them, apply a small amount of lapping compound, mate the helicoids and then exercise them to polish the threads. Don’t over-do this or you’ll end up with loose helicoids. It is usually sufficient to do it for a couple of turns depending on the strength of your lapping compound. When you’re happy with your results, clean the helicoids very well and you should end up with a smoother set of helicoids. This is an advanced technique and should only be reserved for experts. Do not leave any residue, the helicoids should be as clean as can be.
Brush the helicoids really well with a clean brush to remove any fibers. The small fibers left from your tissues are enough to foul the helicoids. Use your blower to remove any fine particles and set your helicoids aside.
Grease:
There’s a variety of types available to you but only a handful is suitable for our purpose. Some people are actually using the common red bicycle grease for their helicoids with lots of success but we want something that is made specifically for our needs and the qualities we are looking for are:
- Temperature resistance (to prevent running or solidifying).
- Consistency (should have the right resistance).
- Longevity (will not change properties over-time).
- Cost (reasonably affordable).
- Stability (no tendency to migrate).
- Non-evaporating type (or else it will fog your glass)
Luckily for us, in recent years greases with all of the above properties can be had for little money through the internet and they come in various types like silicon or lithium. It is said that the grease that Nikon currently uses is NPC’s FC-4. You can Google it and look for repacked sellers since these are usually sold to industrial clients and workshops by the tub, that is definitely more than a lifetime’s worth of grease if all you are doing is restoring your own lenses. Grease that is specifically made for lenses can also be used for cameras, too. I will discuss the different types of grease that I use for both.
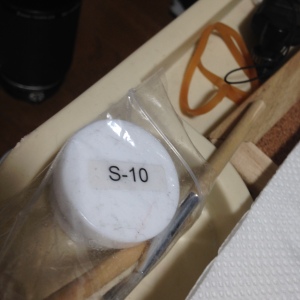
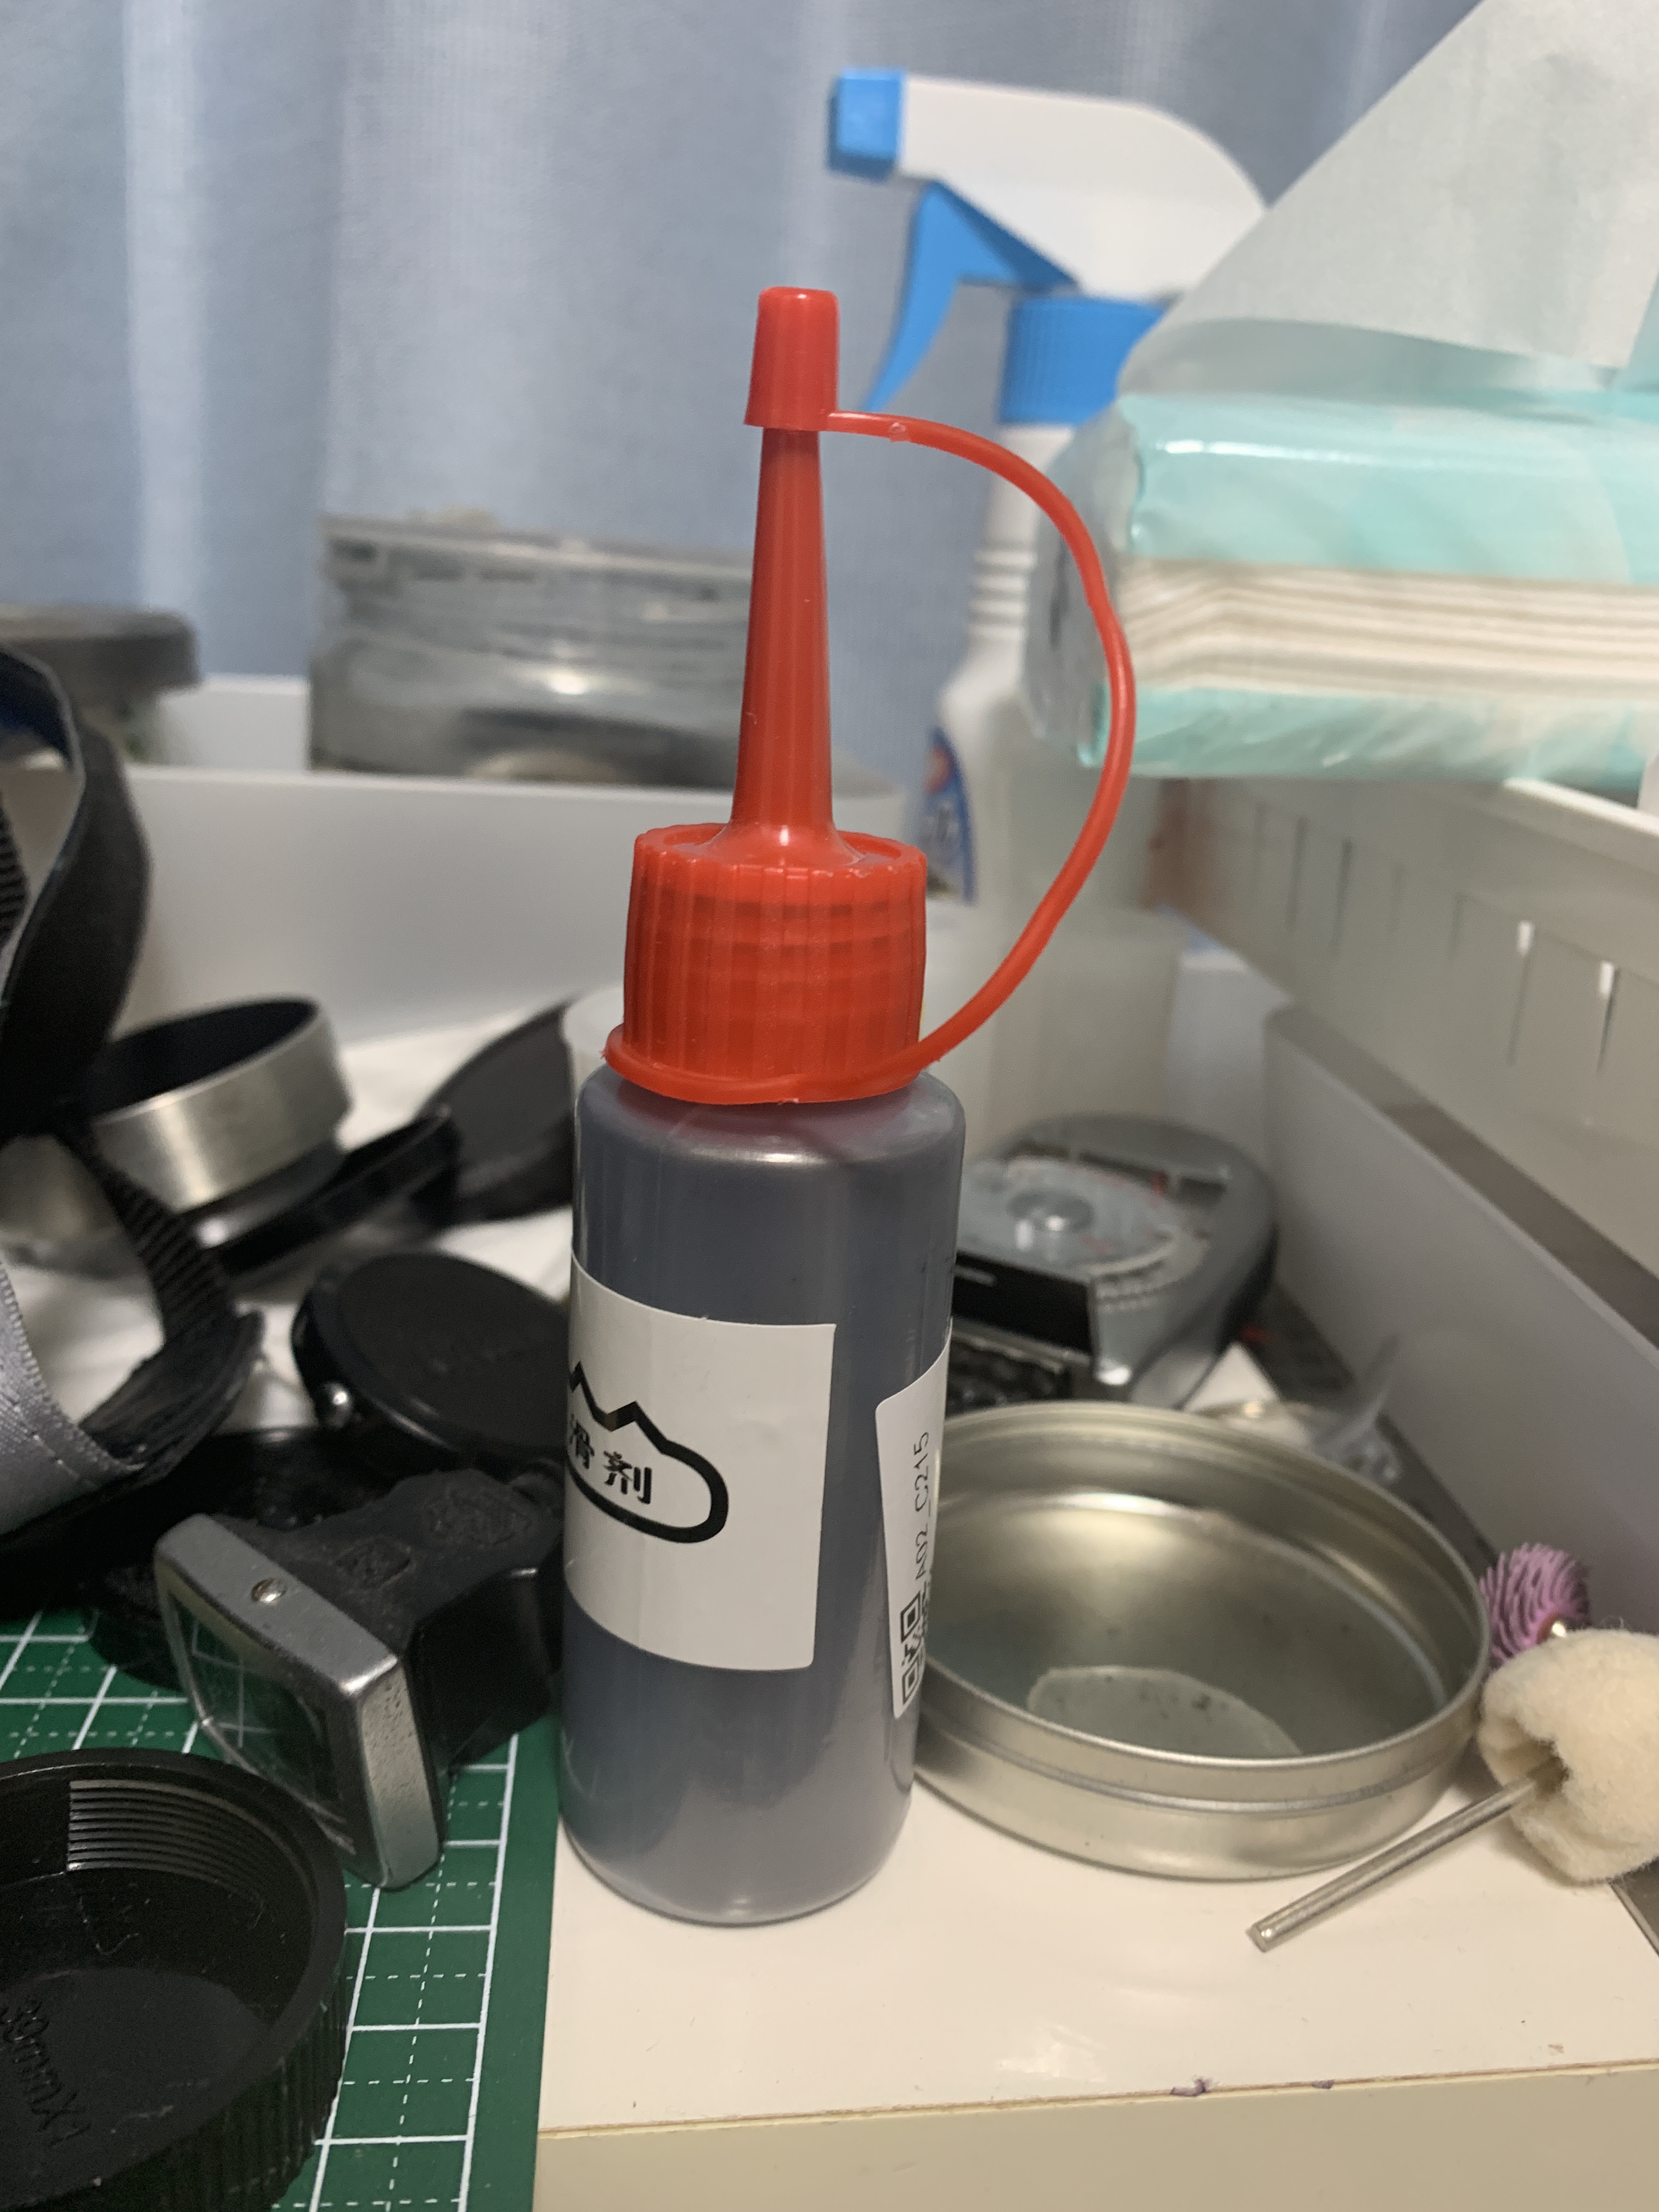
My small tub of S-10 helicoid grease, S-30 is thicker and is better-suited for wider lenses or lenses with very-fine threads. It’s difficult to determine the right type of grease to use when you’re just starting-out in this hobby but it will be second-nature to you once you’ve got more experience.
I love these readily-available and affordable S-10 & S-30 greases that can be bought in most camera sections of larger camera shops. The S-10 grease is for general lubrication while the S-30 has more resistance and thus, better suited for lenses that have a shorter focus throw. You do not want to use the wrong type of grease that is why you need to think about which type to use beforehand.
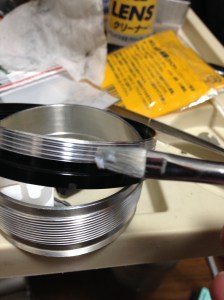
Application of the lubricant should be done with a wide, flat brush for even coating, we want to coat each surface with a thin film. Putting too much of it will result in a mess, putting too little will result in dry-feeling helicoids.
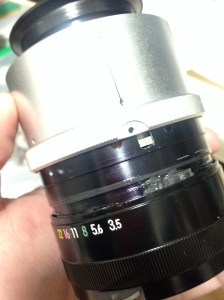
Adding too much grease will also result in oil seepage/migration because all that excess grease has to go somewhere. Look at the photo above and you’ll see what I mean.
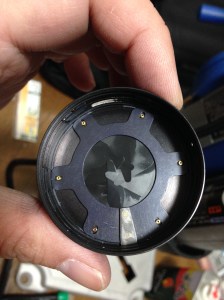
The most obvious result of grease migration is oily aperture blades. Simply cleaning the aperture blades alone is not going to be enough since the real cause was not taken cared of. If you see oily aperture blades, be prepared to overhaul the whole lens, too.
It’s also important that you lubricate any part that comes into contact with another part to reduce friction such as:
- the aperture ring’s inner surface.
- the aperture click slots under the aperture ring.
- the sides of the helicoid keys and its slot.
- zoom mechanisms.
Before lubricating these you should take care to remove any old lubricants in them. If you have dismantled your lens to this point chances are you’ve cleaned them up, too. If you have failed to do this then all that friction will cause early wear to the parts involved, it will also make your focusing feel rough and dry every time you turn your aperture ring or zoom in-and-out. Avoid lubricating anything that is related or close to the iris. These things do not need any lubrication and will function fine without them. Try to use the same grease you have used for your helicoids and lubricate these to ensure that the helicoids won’t get contaminated with another type of grease.

I use molybdenum grease for my cameras. They dry into a powdery-crust, it is easy to clean it off when that happens. Using silicon or lithium grease will result in a mess that’s annoying to clean. This will depend on your taste, I’m biased towards this for metal-to-metal surfaces. Avoid using this when your mating surfaces has plastics in them, silicon will be a better choice for that. Molybdenum is controversial, some consider it a carcinogen so use it with a lot of caution. Never use this with lenses, this type of grease is only good for cameras and should only be applied sparingly, a thin film is enough.
There are many types of grease available to you but I will only discuss these for now because these are the most common ones that I use. You should not go cheap when it comes to grease because using the wrong ones will impact your equipment in the long run and you may even have to repair your gear again just to replace the cheap grease you’ve applied or repair the damage it has caused.
Dry Lubricants:
How about lubricating the iris? Never lubricate the iris with grease or oil. It should operate dry and the only way to do that is to apply dry lubricants. It is important that you don’t apply these while the part you want to lubricate is attached to the camera because the powder may foul whatever lubricants you have already applied elsewhere. It can be messy, too.
The best solution is powdered graphite. Buy the best you can afford because these will last you more than a lifetime. They come in many grades, the less-expensive ones are used for door locks and the more expensive ones are for more precise use like fine machinery.
Sprinkle some of it into the iris and exercise the iris to get the powder into the nooks and crannies of the mechanism. Blow any excess powder off and exercise it some more. This is also useful for the in-body helicoids for some types of cameras like the Zeiss Contax and the Nikon S rangefinder series of cameras. Lens-shutters will also benefit from these, too. A good way to put these into smaller places is to mix this with naphtha and apply the slurry to a brush, make sure that it’s thin-enough to flow and let capillary action take the mix into the mechanism. I rarely do the latter technique, it’s not as safe as I would like it to be since you have no control over where it will end up.
Oils:
There is a variety of oils available on the market today but only buy those that were made specifically for precision instruments. Stay away from the ones that some hacks in the internet are toting as “miracle oils”, WD40 and other things that has nothing to do with precision instruments. I will make a list for you and you choose whichever ones suit your budget.
NyOil is amazing but make sure that you get the right one. They’re cheap, I saw a big bottle online and they don’t cost much. I first encountered this at the hobby shop when I was a teen. Model railroad fanatics love it.
Fine watch repair oils are better, they’re a bit more expensive but you will be sure that you’re getting the right stuff. They come in different grades so ask the seller which one is the best for your application.
Launa oil is the best I have used, radio-control hobbyists love them and the Japanese manufacturers use them, too. It’s used by Japanese electronics and precision instruments manufacturers. It is not cheap but it lasts a very long time. Read the instructions very well and follow it.
Oils are generally not used with lens repair but they are essential in camera repair and maintenance. I usually apply them with a syringe, diluted or not. An applicator can be made by grinding-off half of a sewing needle’s eye. Let it soak the oil from the pot and the U-shaped eye will carry the oil. I learned this technique very early in life, as a young boy, I spent most of my time at the watch repair business of our family and this is one of the things that the repairmen taught me.
Diluting oil is sometimes needed in order for the oil to reach some parts. It’s important to use the right type of thinner. There should be instructions for this and if not, only use a non-polar agent such as benzine. Benzine isn’t the same as benzene which is a controlled substance and is a carcinogen. Don’t mistake the two, benzine is a safer solvent and can contain anything, these are sold under many different names but their common component is just toluene. While less-harmful, these still post health risks so be careful using these and make sure that there’s enough ventilation in your desk.
As a rule, you don’t want to apply too much of this. It’s never a good idea to put too much because they will spatter, creating a mess inside the camera. I only apply oil to the pivots and holes depending on the case, I then exercise the parts to help the oil coat the pivots better. A drop goes a long way. Oil is thin and it will coat whatever in due time that’s why you don’t want to put more than what’s needed. It’s best that you apply oil to cleaned parts but it’s sometimes impractical and the best solution is to flush the parts before you apply the oil. Never mix oils, fresh or otherwise. That’s why it’s important to clean the parts that need them.
Conclusion:
Determining which parts of a camera requires oil or grease is difficult for a beginner, you’ll only get to know them once you get more experience. Some parts don’t even require any lubrication at all! I don’t have a hard-fast rule for this but anything that’s operated by the power of your hand needs to be greased while anything that travels automatically from kinetic energy have to be oiled. Contact parts will benefit from a thin layer of grease such as the spinning pawl of a Leica-type shutter or shutter brake mechanisms. Lenses in general never require oil except those that have clockwork mechanisms in them.
Store your tiny pots of grease and oil in room temperature, keep them away from direct sunlight and pets. You’ll also need to place them inside separate plastic bags so that they don’t contaminate each other. Store the tools for oil and grease separately, too. Each grease or oil variety should have their own sets of tools, never mix them. Never leave a grease’s tub open and exposed.
That’s it for lubricants. These are the basic types of lubricants that I use and there are a few more types that I haven’t mentioned here since they are not essential, just situational. You don’t have to buy these all at once, you can go and buy them as you need them. They’re great investment because they will last you a long time. Please don’t listen to the hacks in the internet, not only will they confuse you but their advice will cause damage to your gear, your money and your health. See you in the next part, Ric.
Help Support this Blog:
Maintaining this blog requires money to operate. If you think that this site has helped you or you want to show your support by helping with the site’s upkeep, you can make a small donation to my paypal.com (richardHaw888@gmail.com). Money is not my prime motivation for this blog and I believe that I have enough to run this but you can help me make this site (and the companion facebook page) grow.
Buy me a roll of film or a burger?
Thank you very much for your continued support!
$2.00
Helping support this site will ensure that this will be kept going as long as I have the time and energy for this. I would appreciate it if you just leave out your name or details like your country’s name or other information so that the donations will totally be anonymous. This is a labor of love and I intend to keep it that way for as long as I can. Ric.

Jun 03, 2016 @ 09:01:50
I used molycote DX grease for helicoids on Nikkor Micro 55 f/3.5.
No oil separation or any other issues after 1 year of use.
Jun 03, 2016 @ 09:08:23
Hi, Charlie! I will look that up on the net, see if it is lithium or silica type. Many use the ones for fishing and bicycle gears with success and they are cheap so the repair shops use them. I am not recommending it, just saying that some people use it as I cannot recommend something that I have not tried yet for myself. Cheers!
Jun 04, 2016 @ 13:50:10
Molykote DX is lithium based, here is a datasheet http://www.dagmita.lt/uploads/file/Tepalai_en/Pastos_en/DX%20TDS.pdf
Silica greases are good for static o-rings, but they are unacceptable for moving components
Jun 04, 2016 @ 13:52:45
Thanks, Charlie. How come? is it because silica grease is heavier? I use them for short throw lenses which is awesome
Jun 09, 2016 @ 16:51:00
Silica and bentonite thickened greases usually have worse wear and oil separation properties, they are typically used for high temperature applications, where other thickeners fail.
Jun 10, 2016 @ 03:31:43
Hi, Charlie. If you get the chance buy the NPC brand grease that I mentioned in the blog. that is what Canon and Nikon uses. I am trying to find one in small volumes.
Jun 10, 2016 @ 10:37:37
At the moment of repair, i already had a tube of molykote from my other hobby, watchmaking.
Jun 10, 2016 @ 14:50:51
I see. I used to apprentice for the family’s watch repair shop. going back to the grease, my silicon grease is the thick one so the consistency will prevent it from migrating. i am more concerned at the vehicle as it tends to separate when left at the same position for a long time.
Sep 28, 2017 @ 16:49:42
I sort of touched on this in a comment on cleaning fungus with washing-up liquid so I’d better make it clear I don’t have shares in Unilever however having encountered some seriously horrible gunge on a helical and struggling to break it down with alcohol (all I got) I applied a couple of drops of neat w/up liquid, scrubbed for two minutes, rinsed in hand hot water and it came out clean as a whistle – as did the brush! If its good enough for an oil spill its good enough for Nikon’s old grease.
Oct 01, 2017 @ 02:03:11
Hello, Norman.
Yes, dishwashing liquid dissolves grease! We use it for automotive stuff,too. Ric.
Jul 09, 2019 @ 08:08:09
Richard,
Could you do a short video, demonstrating how much grease to apply? Is very difficult to tell from your articles how much greese should be used. Your articles are very helpful.
Sep 15, 2019 @ 21:30:40
I think what you posted was very logical. However, consider this,
suppose you were to create a killer headline?
I am not suggesting your information is not good., however suppose you added a headline to possibly get a person’s attention? I mean Fundamentals:
Grease and Lubrication (2/3) | Richard Haw's Classic
Nikon Repair and Review is kinda plain. You might glance at Yahoo’s home page and see
how they write news headlines to grab viewers interested. You might try
adding a video or a picture or two to get readers excited
about what you’ve written. In my opinion, it might make your posts a little bit more
interesting.
Nov 22, 2019 @ 01:33:01
Hi outstanding blog! Does running a blog like this require a large amount of work?
I’ve virtually no knowledge of computer programming however I was hoping to
start my own blog in the near future. Anyway, if you have any ideas or tips for
new blog owners please share. I understand
this is off subject but I simply wanted to ask. Cheers!
Nov 29, 2019 @ 23:10:31
As an update to the earlier posts the “Molycote 33 light” factsheet specifies its suitability for use with photographic equipment. Its a lithium soap/silicon oil grease with an NLGI thickness rating of 1 (which is just above semi fluid) and with care works well even with the 55mm 2.8 micro. Its reasonably priced and a ‘medium’ version (NLGI 2) if you want something thicker.