
Hello, everybody. It’s a rainy day today here in Tokyo, it’s actually very bad timing since it is the annual Asakusa Samba Carnival today! I was hoping for good weather last night but it seems that nature listens to nobody. Oh,well…maybe it’s going to be sunny next time.
Introduction:
Today, we are going to talk about how I fixed the locking mechanism of my Nikon FE’s film door. My Nikon FE is supposed to be sold but I accidentally soiled the camera so it’s going to stay with me for now. I also fixed some other things on this camera and I will show you what I did next time. This is going to be a series like the one I did for my Nikon F.
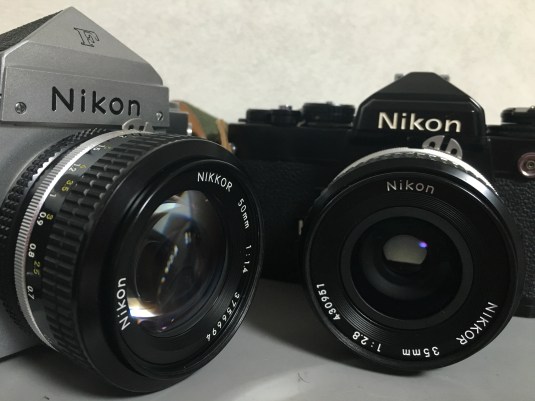 Here is the Nikon FE along with the Nikon F. Notice how small it is but I assure you that this camera is very capable. In fact, I would say that it has most of what the legendary Nikon F3 has when it comes to features.
My Nikon FE was bought as a junk from a Malaysian living here in Tokyo. It was dirty and it had lots of problems that needed to be addressed before you shoot a roll of film with it. It has one problem that has always bugged me and that is the lock of the film back and it is kind of stiff sometimes and it sometimes doesn’t go back to when you turn it. This doesn’t give me enough confidence as I may accidentally open the film back and ruin a roll of film accidentally so I need to fix this before I do a test roll on this camera.
Before We Begin:
If this is the first attempt at opening a lens then I suggest that you read my previous posts regarding screws & drivers, grease and other things. Also read regarding the tools that you will need in order to fix your Nikkors.
I highly suggest that you read these primers before you begin (for beginners):
- Essential tools
- Best practices 1
- Best practices 2
- Best practices 3
- Ai conversion
- Working with Helicoids
Reading these primers should lessen the chance of ruining your lens if you are a beginner. Also before opening up any lens, always look for other people who have done so in Youtube and the internet. Information is scarce, vague and scattered (that is why I started this) but you can still find some information if you search carefully.
I highly recommend that you also read my working with helicoids post because this is very important and getting it wrong can ruin your day. If I can force you to read this, I would. It is that important!
For more advanced topics, you can read my fungus removal post as a start. This post has a lot of useful information here and there and it will be beneficial for you to read this.
Repair:
Fixing this part doesn’t require any special skills but you need to have the proper tools or else you will risk ruining some of the parts here. Before you begin, you should have a small C-ring opener. C-rings can also be pried open with a pair of pliers but this is risky as well as time-consuming so you might as well just buy the right tool for the job.
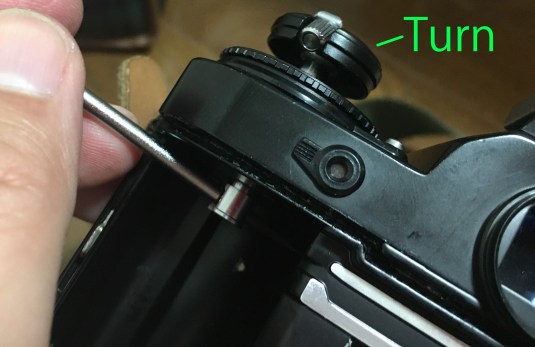 Start by removing the film rewind lever housing. Use a screwdriver, dowel or a wooden peg and stick it in between the fork inside the film chamber. This screwdriver or whatever you chose to use will lock the whole mechanism in place while you turn the film rewind lever counterclockwise to unscrew it. Do not unscrew it by using the lever itself. Instead, grab the housing and use your fingers to twist it off.
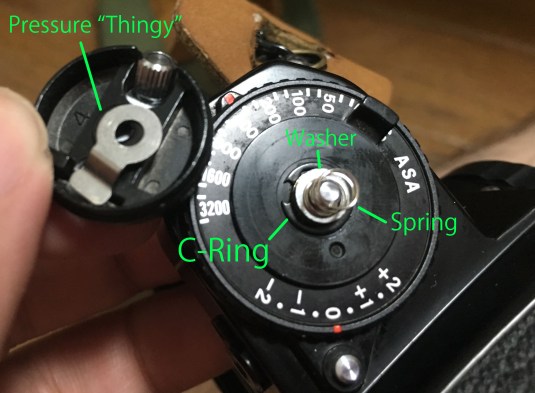 Once the housing is removed, slowly remove it from the camera because there are a couple of loose parts there that you do not want to drop and lose. From the picture above, you can see the pressure plate thing that keeps the rewind lever in place, a spring and a washer as well. Put aside these little parts and clean them up properly with lighter fluid to get rid of any dried up dirt or lubricant just in case.
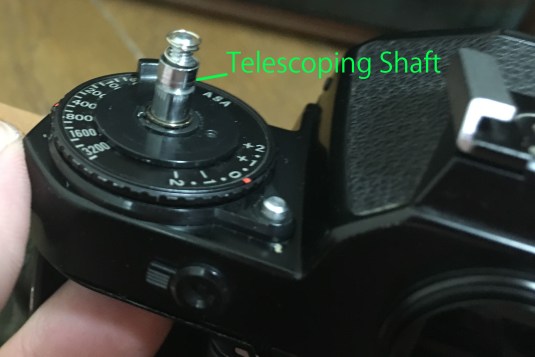 The shaft is telescoping and is made up of 2 parts. You can simply pull it out of the camera and clean that one of you wish. Be careful not to damage this part.
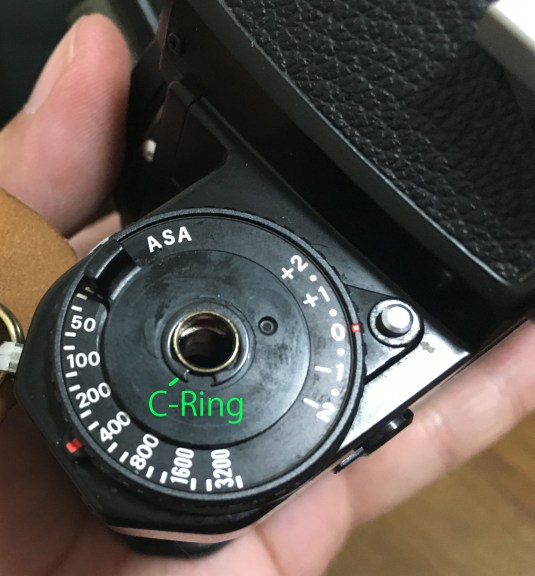 This is one of those instances when you would need a C-ring / E-ringremover. Be careful not to damage this part and the plastic dial under that thing. I cleaned the plastic dial with an alcohol wipe to remove the dirt.
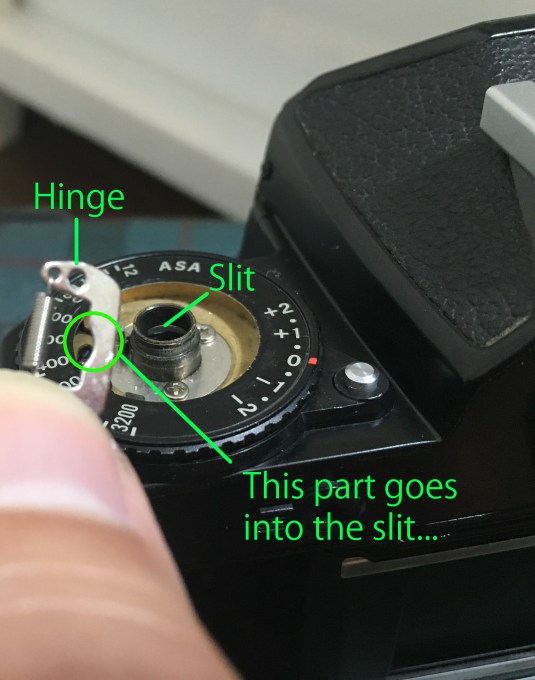
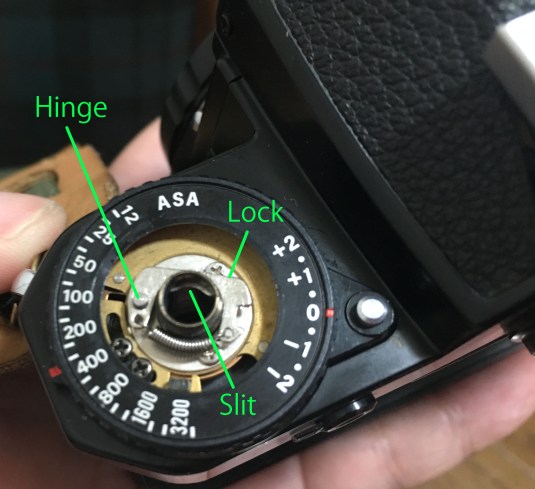 With the dial gone, you can now access the delicate parts under it. Please study the picture above to understand how this mechanism works. The lock is basically hinged to something and the spring is in charge of keeping it in place as well as making the dial that is linked to this via the slot return each time you turn the dial. A small part of this lock goes into a slit in the tube underneath it. This is how the locking action works so that you will not pull the whole thing by accident and ruin a whole roll of film. Smart, huh?
 You can simply remove the lock with your hand but be careful not to damage that spring. I then wiped these parts carefully with lighter fluid and I also saturated a Q-tip with alcohol and used it to clean the tube inside and out. It got really dirty after several years of doing nothing somewhere.
Clean these parts with a Q-tip and solvent. Lightly lubricate the parts that get in contact with each other with spindle oil or a very light grease. Avoid over-lubrication because if the lubricant caked-up again you will have to open this thing again. What I do is dip the tip of a small precision screwdriver into a pot of spindle oil and just touch the parts that I wanted to lubricate. It’s that simple.
Conclusion:
This project took me a little under 30min to fix. While I had the parts accessible, I cleaned away the dirt and grime with a Q-tip or a toothbrush and now this part of the camera seem to function perfectly. I did however noticed that the film advance mechanism is a little off so I will have to open that part up as well just in case. I hope that you enjoyed this post and if you liked it, please feel free to share this. Ric.
Help Support this Blog:
Maintaining this blog requires money to operate. If you think that this site has helped you or you want to show your support by helping with the upkeep of this site, you can simple make a small donation to my paypal.com account (richardHaw888@gmail.com). Money is not my prime motivation for this blog and I believe that I have enough to run this but you can help me make this site (and the companion facebook page) grow.
Helping support this site will ensure that this will be kept going as long as I have the time and energy for this. I would appreciate it if you just leave out your name or details like your country and other information so that the donations will totally be anonymous it is at all possible. This is a labor of love and I intend to keep it that way for as long as I can. Ric.

Sep 09, 2016 @ 10:25:31
Hi Ric,
Do you have any experience with Nikon FE2? I have one with a stuck mirror. Im planning to repair it soon but dont know where to start.
Sep 09, 2016 @ 14:00:27
Hello, Angel. How are you? Check this out:
This is for the FE but I believe that this should not be too different from the FE2. The FE’s advance mechanism can be accessed easily by removing the bottom plate after removing the 3 screws. Check and see if the interlock is stuck. I just cleaned mine. Ric.
Mar 01, 2017 @ 03:00:09
Hi Richard–Thank you taking the time produce an interesting and informative website! I just wanted to point out that the photo showing the pressure “thingy”, washer, c-ring, and spring shows the spring on top of the washer. According to the repair manual, the washer should be on top of the spring. If assembled as the picture shows, the film rewind lever housing will not tighten down far enough.
Mar 01, 2017 @ 03:32:48
Thanks, Tom!
Yes, I screwed that up! I will fix that as soon as I can. probably this weekend. Thanks a lot! I hope that I didn’t confuse anybody. Ric.
Aug 20, 2017 @ 04:23:37
thanks. I was needed this. I’m gonna repair battery department of my FE. it was very useful.