Hello, everybody! I had dinner and the star was the stew we had last night. Many people don’t know it but I’m quite the cook, too. I sometimes leave a stew to ferment overnight and serve it to people. The result is better since you give the gravy enough time to marinate the meat, tenderizing it. You’ll also notice some enhanced flavors depending on the spice you used. There are times when something gets better when you reheat it. Nikon knew that as well so they updated some of their classic lenses and sold them as new.
Introduction:
The New-Nikkor 105mm f/2.5 was made from 1974 to 1977 as an upgrade to the Nikkor-P•C. 105mm f/2.5 Auto. The optics remained the same but a new barrel was designed for it. Nikon updated the majority of their lenses so the brand’s image look modern, most of the updates are merely redesigning of the barrels but some came with totally-new optical formulas. This new line of lenses are called “New-Nikkors” or simply “K” versions which stands for “kai” (改), it means “modified” or “improved”. The New-Nikkors all have the now-standard rubber grip, fewer bare-metal surfaces and a modern look. I love these lenses as they’re quite tough, certainly a lot tougher compared to the later Ai-S ones.
It still feels quite dense despite losing the all-metal construction of the older version. The rubberized grip makes it easier to use in colder climates, your fingers won’t feel uncomfortable touching it. The one shown here does not have an Ai-ring so you shouldn’t mount it on a Nikon that has a rigid Ai-tab, doing it will damage the camera and it will cost you a lot of money to fix it.
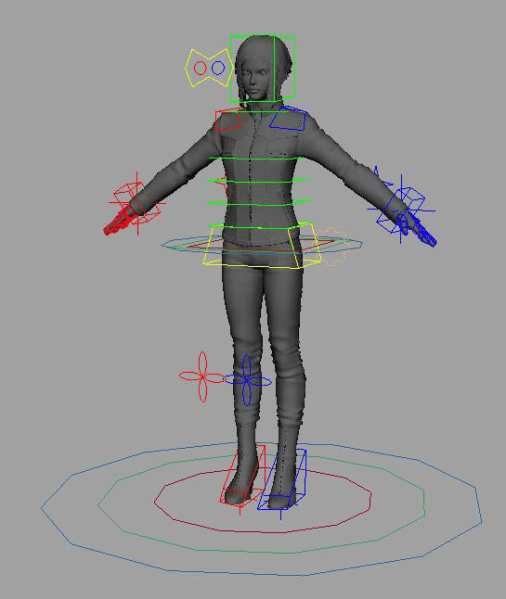
Kusanagi Motoko’s setup was made using an in-house tool that I wrote in 2014 which is a variation of an auto-rigging tool that I made around 2008. The character setup was made to be simple yet useable so sending data to other teams will not require a lot of effort or conversion because native Maya nodes were used.
It’s also capable of squash/stretch and even bendy joints were implemented but we never really use those because of the nature of our projects. Another reason for keeping the rig simple and robust is because we wanted it to be able to accept data from MotionBuilder without a lot of conversion work. Keeping things simple is the way to go.
The rigging done for Motoko was partly featured on CG World magazine. The picture to the right shows the team who worked on this including the motion capture crew and the producers, composers, artists and director. Thank you for this memorable project! More
Adjusting a lens’ focus is important. If it couldn’t focus properly to infinity it won’t be useful at all and the distance and depth-of-field scales do not mean anything. I will show you how to do this properly using simple tools under a DIY setting. This article is mostly relevant to manual lenses, autofocus ones are calibrated in the same manner but the guidelines differ a bit.
What’s Happening:
A lens’ ability to focus at infinity accurately is important. The depth-of-field and distance scales rely on that. You couldn’t do hyper-focus without it. You should be able to get it to focus on something distant such as the moon and the results should be sharp and the infinity symbol should be centered. It’s crucial for a lens to do this accurately specially if it’s longer than 35mm. It’s pointless to use a telephoto lens that couldn’t do this properly. Some lenses were designed to focus-past infinity so you could turn it beyond the infinity symbol. I usually see this for longer telephoto lenses, it is for compensating the resulting difference when certain lens elements expand when they are hot. Some optical glass expand when used under-the-sun for a long time so this was done in order to make the scales relevant when this happens. This does not apply to autofocus lenses, they focus-past infinity since the camera and its autofocus module will focus it accurately for you. The slack is only to give it more room to work with.
Manual lenses need to be able to focus at infinity accurately. This building is about 1.2km from where I was. This is not enough, look for test subjects that are distant such as communication towers that are close to the horizon. The moon is also fine but it’s not always possible to see it clearly. A wider lens is going to be a lot more forgiving since the wider depth-of-field will be able to compensate for any inaccuracy.
How important is this? If the lens actually focuses at 5m then it should show the same information on the scales, too. The scales should accurately reflect it since there’s no way for you to view things through the film aperture. The advent of mirrorless cameras and live-view helped somewhat but those are not solutions to the problem at all.
Hello, everybody! It’s starting to get cold here in Tokyo as we get closer to December. The temperature is beginning to get too cold for me to develop at home so I use this chance to digitize my film instead. Today, I am going to show you my film digitization workflow. I’ll also be sharing with you any settings that I use in post and I hope that you’ll like this one.
Equipment:
I’ve been getting questions on how I digitize my negatives using Nikon’s Picture Control. Hardware-wise, the technique that I use seems to be pretty popular and it was pioneered by somebody else nearly a decade ago but what makes what I do a little different is the use of Nikon Picture Control to invert the previewed images on the LCD. This makes this tedious task a little easier because you can gauge how much light you need to illuminate your negatives. I am not saying that this is the best way to do this task but I just want to show you guys a slightly different way of doing things that may appeal to some of you.
In order to digitize your slide using the technique I use you will need these:
Nikon DSLR (ideal) but any digital camera with a TTL view will do.
Flash that you can trigger remotely.
Macro lens that can reach 1:1 magnification.
Sturdy tripod.
A setup to hold/secure your film strip or slide.
This is how everything works together. The macro lens has to be capable of achieving 1:1 magnification so you can fill the frame. The Nikon ES-1 is handy for digitizing mounted slides but I use a modified one for my strip film or else the spring on the stock Nikon ES-1 will ruin my strip film. Finally, a Nikon SB-700 flash is used to provide the high-powered illumination required for this kind of job. You can swap the tripod with a copying stand if you prefer to do it that way. Check out my article on the Micro-Nikkor-P 55mm f/3.5 to know more about the lens in the picture. I love this lens for this kind of work.
Hello, guys! A few weeks ago, I made a short post showing how the Nikon D850’s negative digitizer mode work. My iPhone’s video wasn’t working properly at that time that is why my accompanying video didn’t have any audio so people have to read my commentaries to get what’s happening. I would like to make it up to you so I went to Nikon’s office this afternoon and borrowed a Nikon D850 so I can show you how this feature works and this time I brought along with me a frame of C41 negative to use as a sample to help you guys see what’s really going on. There are many quirks on how this thing works and I really hope that this video will help shed some light on this feature.
Please forgive my speech, I have sore throat today that’s why I pause from time to time. More
Hello, everybody! I’m busy lately so I am writing a short blog post this time. Today, we’re going to talk about making a special tool to remove the lock/retainer for the A/R ring. It’s the ring or collar around the shutter button of the Nikon F, Nikon F2, Nikon SP, Nikon S3 and the Nikon S4. This ring is notorious for being difficult to remove as you will require a special tool to remove it and many beginners (and even “professionals”) botch this job by using the wrong set of tools to remove this. I will admit that I also botched my first try by using poorly-made tool that I DIY’ed but thankfully the damage wasn’t severe I ended up with some scratches instead of terrible scars on the surface of the A/R ring. I do not wish for that to happen to you and that is why I started this blog.
The A/R Ring has a retainer that has 2 slots milled on it. Many people botch this by using brute force to remove this with inappropriate tools such as a pair of screwdrivers,etc. It’s used for switching between “advance” and “rewind” that’s why it’s called the A/R ring. On the Nikon F2, this part is used to switch between T or L (locked). More
Help support this site by donating to richardHaw888@gmail.com over at Paypal! If you want to buy me a beer or a roll of film then that would be great,too!


 Kusanagi Motoko’s setup was made using an in-house tool that I wrote in 2014 which is a variation of an auto-rigging tool that I made around 2008. The character setup was made to be simple yet useable so sending data to other teams will not require a lot of effort or conversion because native Maya nodes were used.
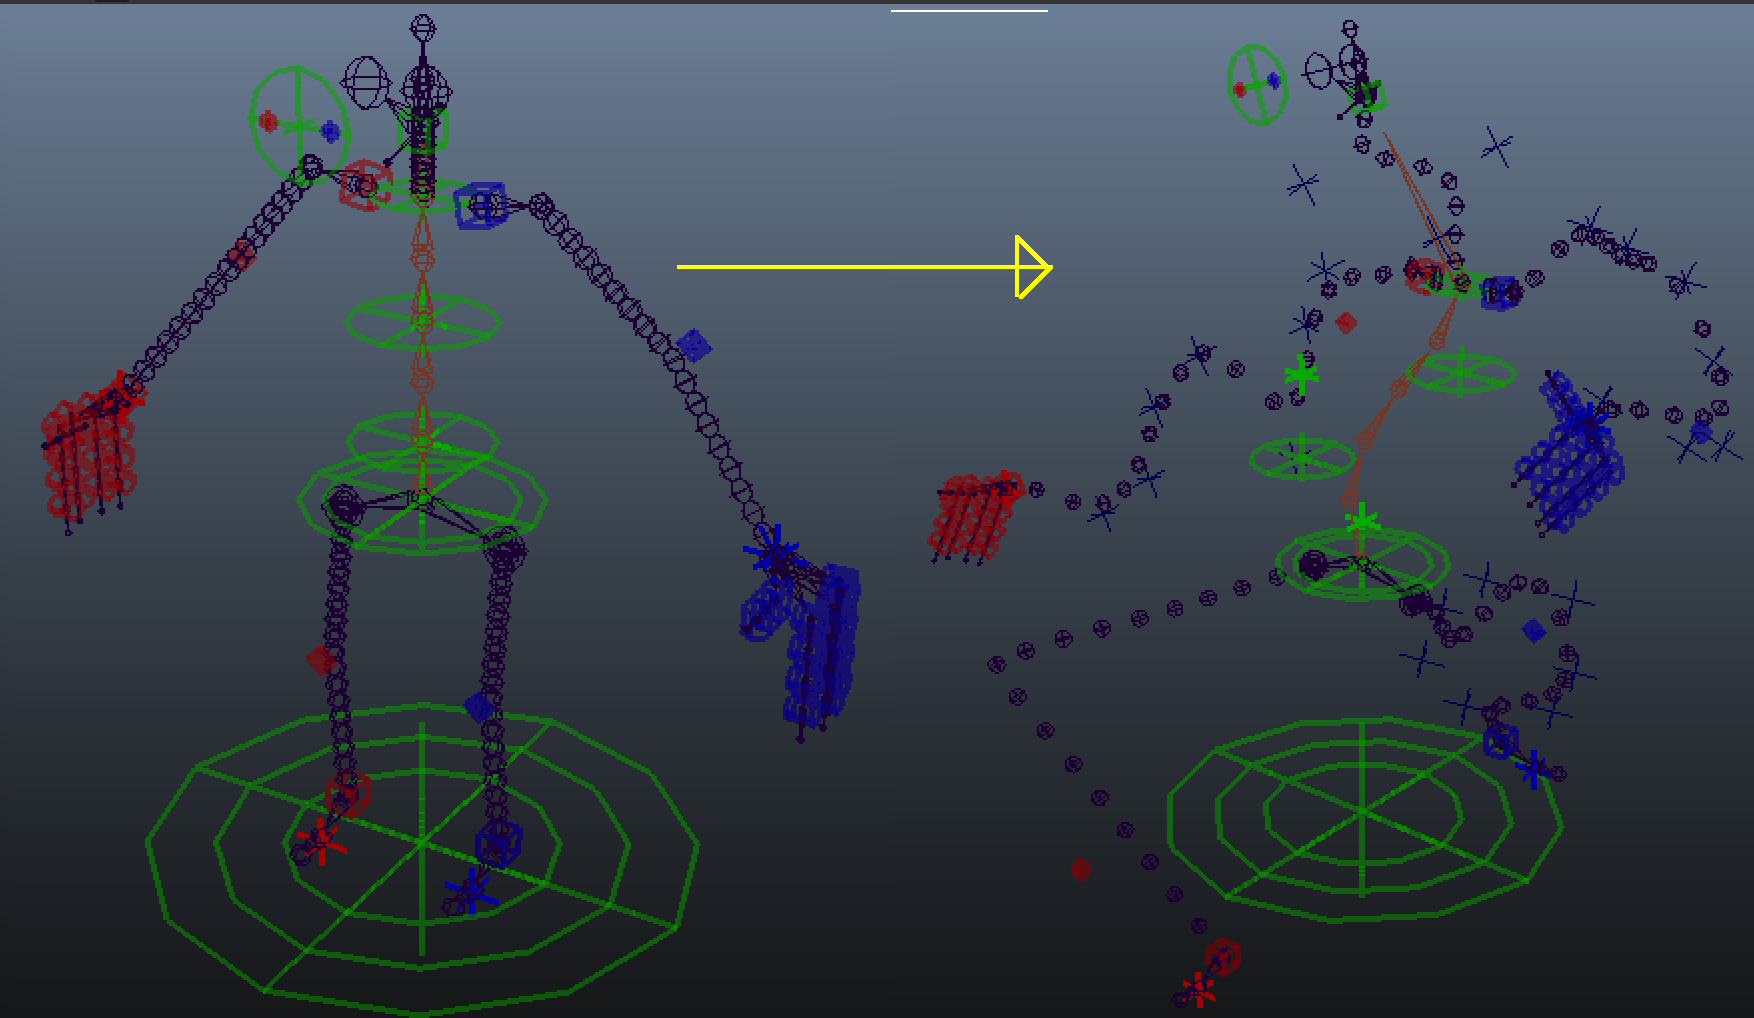 It’s also capable of squash/stretch and even bendy joints were implemented but we never really use those because of the nature of our projects. Another reason for keeping the rig simple and robust is because we wanted it to be able to accept data from MotionBuilder without a lot of conversion work. Keeping things simple is the way to go.

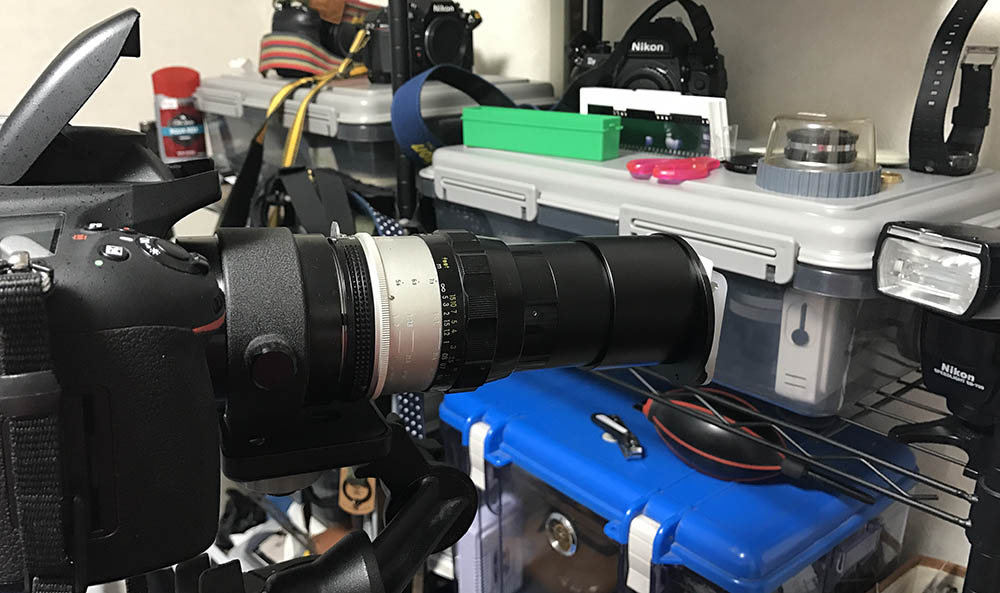 This is how everything works together. The macro lens has to be capable of achieving 1:1 magnification so you can fill the frame. The Nikon ES-1 is handy for digitizing mounted slides but I use a modified one for my strip film or else the spring on the stock Nikon ES-1 will ruin my strip film. Finally, a Nikon SB-700 flash is used to provide the high-powered illumination required for this kind of job. You can swap the tripod with a copying stand if you prefer to do it that way. Check out my article on the
 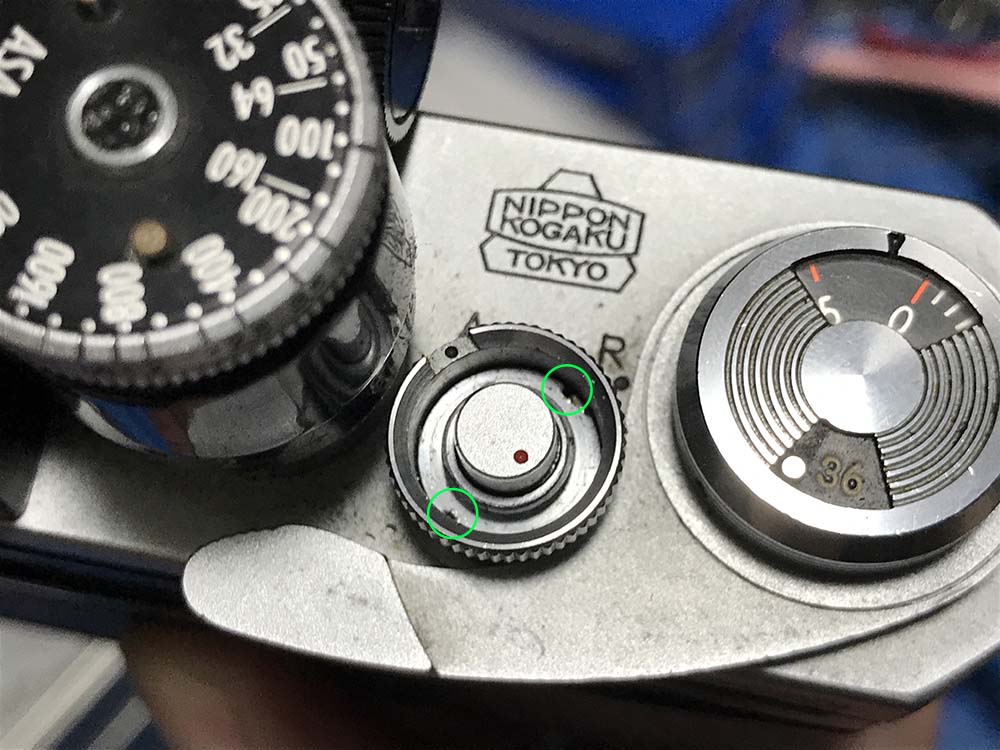 The A/R Ring has a retainer that has 2 slots milled on it. Many people botch this by using brute force to remove this with inappropriate tools such as a pair of screwdrivers,etc. It’s used for switching between “advance” and “rewind” that’s why it’s called the A/R ring. On the Nikon F2, this part is used to switch between T or L (locked).