
Hello, everybody! It’s starting to get cold here in Tokyo as we get closer to December. The temperature is beginning to get too cold for me to develop at home so I use this chance to digitize my film instead. Today, I am going to show you my film digitization workflow. I’ll also be sharing with you any settings that I use in post and I hope that you’ll like this one.
Equipment:
I’ve been getting questions on how I digitize my negatives using Nikon’s Picture Control. Hardware-wise, the technique that I use seems to be pretty popular and it was pioneered by somebody else nearly a decade ago but what makes what I do a little different is the use of Nikon Picture Control to invert the previewed images on the LCD. This makes this tedious task a little easier because you can gauge how much light you need to illuminate your negatives. I am not saying that this is the best way to do this task but I just want to show you guys a slightly different way of doing things that may appeal to some of you.
In order to digitize your slide using the technique I use you will need these:
- Nikon DSLR (ideal) but any digital camera with a TTL view will do.
- Flash that you can trigger remotely.
- Macro lens that can reach 1:1 magnification.
- Sturdy tripod.
- A setup to hold/secure your film strip or slide.
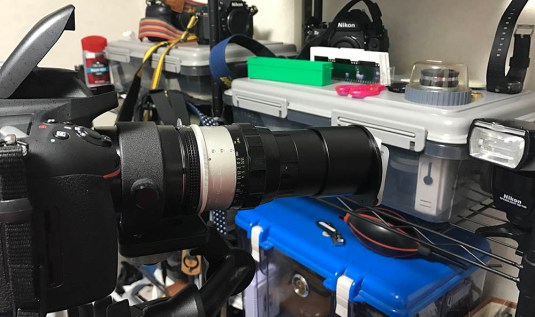 This is how everything works together. The macro lens has to be capable of achieving 1:1 magnification so you can fill the frame. The Nikon ES-1 is handy for digitizing mounted slides but I use a modified one for my strip film or else the spring on the stock Nikon ES-1 will ruin my strip film. Finally, a Nikon SB-700 flash is used to provide the high-powered illumination required for this kind of job. You can swap the tripod with a copying stand if you prefer to do it that way. Check out my article on the Micro-Nikkor-P 55mm f/3.5 to know more about the lens in the picture. I love this lens for this kind of work.
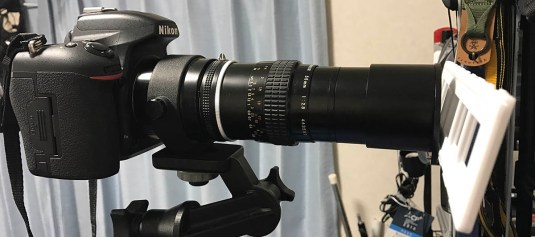 Here is my modified Nikon ES-1 in action. As previously mentioned, I modified this thing so it will not crumple my strip film. The lens used is a Macro-Nikkor 55mm f/3.5 lens. You can any macro lens that can achieve 1:1 magnification but for this type of job, a shorter focal length is ideal for flatness of field but the most important thing is that your slides or negatives will be closer to your setup. While a longer focal length is ideal for bugs it will be too long for our purpose. A long setup will be awkward to use and it can be unstable.
 Here is a stock Nikon ES-1 and a film strip holder. As you can see, the holder’s frames are not level with the hole on the Nikon ES-1 but we will modify this to make it fit properly. I like the Nikon ES-1 because it fits any lens with a 52mm filter diameter and because it is telescoping, you can use it to fine-tune the magnification to your satisfaction.
 Here is the front view of my modified Nikon ES-1. The front of the Nikon ES-1 can easily be taken apart by removing the nameplate and removing the 2 big screws. I replaced the screws with longer ones from my spares. The metal thing you see around each screw are springs. This will allow the white part to provide pressure while move back and forth.
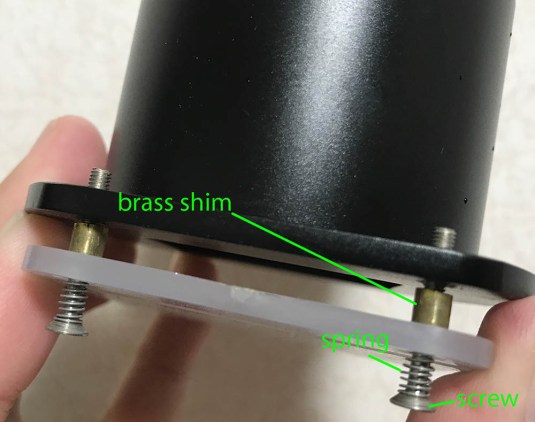 Here is a closer view of my modified Nikon ES-1. The shims are just a bit thinner than the film holder and I cut them from a length of brass tubing. You can see how the spring and the screws were setup here and how it applies pressure towards the film holder. I made it this way so that the film holder won’t fall by itself. The original springs that come with the Nikon ES-1 were of no use for me so I stored them somewhere for scraps.
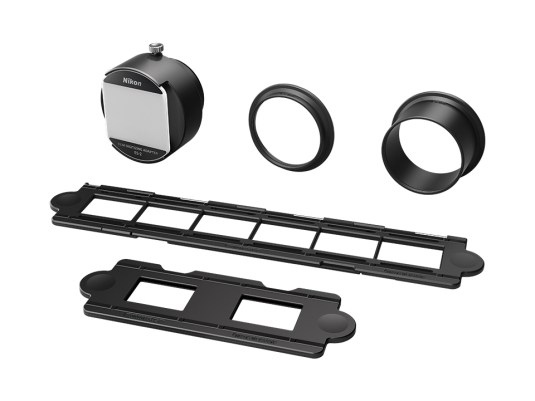 This is the new Nikon ES-2. This is an upgrade of the old Nikon ES-1 and it now features a locking nut on the main tube. It also comes with various goodies like tubes that come in different diameters and the all-important film holders. The Nikon ES-2 costs a lot and I’ll won’t bother ordering one for myself because I’m OK with my current DIY setup. While it comes with beautifully-made attachments, I just cannot justify spending $160.00 on this.
That’s it as far as equipment is concerned. I trust that the majority of my readers already have most of the required equipment so this should be easy! If you don’t have any means of securing your film, you can easily make a simple holder from stiff cardboard. Just cut away some holes for your frames and sandwich your film in-between the cardboard film holder that you just made. An improvised alternative to the Nikon ES-1 can easily made with hard cardboard tubing or plumbing. Just make sure that the diameter is big enough to fit over your lens. If there is some space and it wiggles, just use some thick tape or the foam from an old mousepad to make the fit snug. You also want to saw-off a slot near the end of your tube in order to fit your cardboard film holder. I don’t have any illustrations for this so just use your imagination for this.
Nikon Picture Control:
This portion is more specific to Nikon users so if you use a different system, you can skip this section and move to the next section. This is a very convenient feature for Nikons so I advocate the use of this technique if you shoot with a Nikon. As mentioned earlier, I use this feature to preview my capture on the camera’s LCD and this helps me leave much of the guesswork out. This saves me time to get the proper settings going and it makes this so much more intuitive. If your post-processing software supports the in-camera settings changes done by Nikon Picture Control then this will also carry over to post, saving you plenty of time from applying a setting to invert the curves in the software. For those who exclusively shoot JPEG, this will help you get there even faster.
I use this website to make my custom settings. What I do is open up a setting and then do some manipulation with the curves so my results will be inverted. You can also play with the curves to give the results that you want in terms of contrast or brightness. There are also some other settings in the interface that you can mess around with but I will leave it up to you and your imagination/taste. I advise you to research more on this subject if you want to get deeper into this.
The succeeding pictures shows how the interface of nikonpc.com looks like. You can also use a picture from your gallery as the preview image so long as it’s uploaded somewhere on the net. Just paste your picture’s url into the preview image field. When you are done with playing around with the settings you can even export what you have as your own custom settings to be used on your camera – very ingenious!
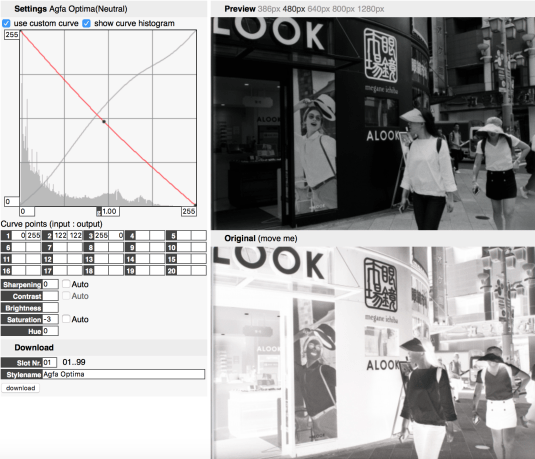 This is the basic setting that I use wherein a monochrome image is inverted. This is just a simple trick wherein the curves are inverted in order to produce a positive image. I then set the saturation to a negative value to remove any tint from the negative. Here is a link to what I did, just play around with it to your liking or use your own picture to preview.
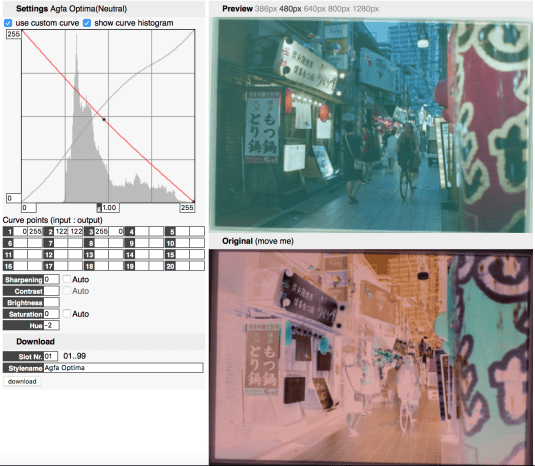 This is the one that I use for my C41 negatives. It’s basically the same thing as the settings above but the saturation was left to 0 but the hue was set to -2 to counter the strong tint from the C41 film. It’s not perfect but at least it’s good enough for a starting point. To see what I did, click on this link. You may want to modify the hue to your taste by the way.
Download these settings (.zip) and install them on your camera. Don’t ask me how this is done, read your camera manual or search online! These settings are basically identical to the ones you see here. Feel free to play around with these to your liking.
Taking Photos:
Taking the actual photos is easy enough but you will have to remember a few things.
- Use the fastest allowable shutter speed/maximum sync speed.
- Stop-down for deeper DOF, I usually shoot from f/8-f16.
- Only use your flash in manual mode and change the power accordingly.
- Fill the frame and then focus on your negative.
- Only use 1 type of white balance setting; in my case I use the “flash”.


Here are a few samples of how you want the exposure to be. If you are using a Nikon, the work described on the previous section will be helpful in determining your exposure. It’s very important not to have overblown details or a dark negative. Remember that you are shooting a negative so adding more light will make your exposure darker when you flip it and and having less light will make it brighter. If you have a certain workflow, you will know how much light you need just by instinct. To change how much light hits your film, only change the flash’s power manually. This is the reason why I use manual mode and if I use an automatic mode for this then I will have less control over my exposure settings.
Users of mirrorless cameras may find it difficult to focus while the lens is stopped-down unless your adapter allows for automatic actuation of the iris. If you have a native lens for your mirrorless camera then this should not be a problem. You will soon get the hang of it anyway and by the time you shot your 2nd batch, you’re already so used to it that it’s not an issue anymore and you will shoot through the entire roll faster than you think.
Lightroom:
This section’s applicable to all digital cameras that can shoot RAW files irregardless of the manufacturer unlike the previous one which is exclusive to Nikon. If you are shooting in RAW then the natural thing to do is to play around with your RAW files in an editor. I use Adobe Lightroom so I’ll not talk about other editors. If you use another software to do this then just read along and get the basic idea and implement that on whatever software you are using. I am pretty sure that every competent editor out there is capable of this.
I will share to you now my Lightroom preset templates so you will have a starting point. Download and unzip the package and then follow Lightroom’s instructions on how to do this. How I usually use these presets is I apply these during import, meaning to say if my current import consist of only monochrome film then I will specify “BW_Standard” as my preset and Lightroom will apply the said preset to every image it will import. This saves me time applying the presets to individual images. The package contains 2 presets by the way, one for monochrome called “BW_Standard” and another preset for C41 film called “C41_Standard”. You can share this with your friends but please tell them where it came from and who made it, maybe that will generate more clicks for for the nice guy! 🙂
If I were you, I will modify these templates to fit your style and film stock and then save them as individual settings with the name of the film stock you use it with. This way, you will have a nice collection of settings each time you import your capture. Please share it with us so that more people will benefit from it! This is how our community grows.
 Here is a simple comparison of how my Lightroom preset works after I reset the settings back to the defaults. It works pretty well with daylight-balanced film in my opinion and if you have another film stock that’s balanced differently then you can just customize it to your liking and save that under a different preset name. I will not be showing samples for monochrome since it’s so simple that it’s not worth my effort and your time.
The presets were made by simply resetting all values to their defaults and then inverting the curve to make a positive image. They only differ in that the monochrome one was set to BW and then the C41 counterpart had the white balance tweaked a bit to get rid of the very strong amber cast typical of C41 film. The white balance is not accurate and it was not made to be accurate so you will have to play around with it a bit later.
 OK, this is probably a poor example but I will just use this photo as an example just for the sake of illustrating how this is done. What you want to do is move the ends of your curve so that they line-up with the ends of your histogram. In our sample above, the end of the left side of the histogram is clipped on the red line but the curve is set to green line at 0 as a default value. Moving the left-most point (green) will make the contrast better.
 All we need to do is click on the node (green) and carefully move it right. This will crunch your levels make your image more contrasty. You don’t need to be very precise with this, just put it close enough and you will be fine. Putting it over the histogram (with values or peaks) will clip whatever information is there. Again, this photo is a bad example but it’s only here for the sake of illustration. If there are any visible changes that you can see on this sample they are on the brighter parts of the image, they now look a bit brighter.
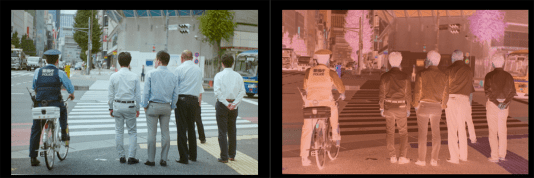
 Now, here is a better example. Notice how the colours looks washed-out? We will do the same thing with the histogram but notice that there are areas with little or not values at all on both ends of the histogram as indicated by the red lines that I drew. Just like on the previous sample, move the end nodes of the histogram closer to the bounds of where the values seem start and end. When doing so, be careful not to move the nodes vertically or click on the curve and accidentally make a new node. For our purpose, we only want two nodes on each end. Curve manipulation outside of what’s covered here can be found on plenty of resources online so please do a search and read or watch videos for this topic.
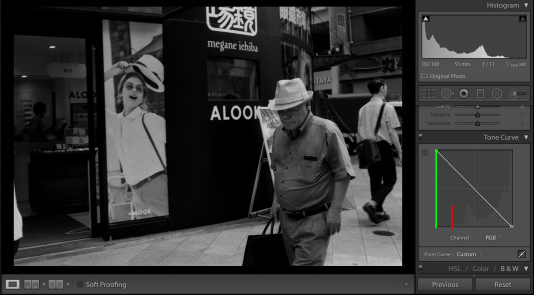
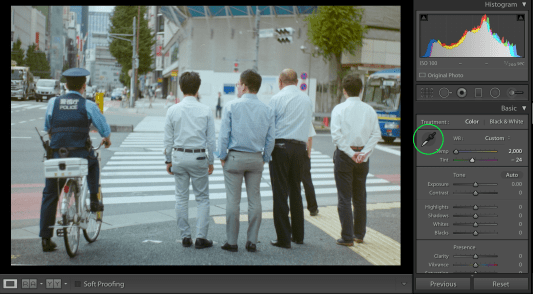 Here is what we have right now. Notice how the image looks more natural? Finally, you’ll want to manipulate the white balance of your picture by clicking on the eyedropper icon and click on something that resembles neutral grey. In our sample, the traffic lights and the compartment on the bike will make good candidates. Further adjust the Temp or Tint values to your satisfaction after you have acquired a good starting point by using the eye dropper tool. The colours can be further manipulated by going to each RGB channel but I will not be discussing that here. I do that all the time at work and this is a very long topic in itself. Again, go online for further reading or experiment with this on your own.
Conclusion:
That’s it for now! I hope that you enjoyed this blog post. I am sure that by now there will be many of you that are asking yourselves why you should do this. Well, you shouldn’t! I am just sharing what works for me and what’s cool for me may not be cool for you. I will bet that people who already own a digital camera will find this useful especially if they just got started with film. The initial cost for doing this is lower compared to purchasing a dedicated film scanner and it will be cheaper in the long run as opposed to having this done by a lab. You also get to do this your way, freestyle!
Another benefit to this method is that you get the advantage of using the flexibility of the RAW files. Some people don’t give any importance to this and that’s fine but for me, RAW gives me more freedom to tweak the curves to get the look that I want.
Now, what about using dedicated scanners? Sure, you can do that,too! In fact, I’m looking into purchasing one for my 120mm negatives. The method that I wrote about here is fast and is generally more than good enough for 35mm film but since 120mm film is bigger, I would want to use a dedicated scanner just for that. The downside of using a scanner is the initial cost of acquiring one, the space needed to store it, the slow working speed and while the quality is generally good you will need to spend plenty of money for the best in the business. One more thing that bugs me is compatibility with future releases of the OS you’re running on and it’s common to see old film scanners being sold for cheap online just because it’s not supported by most current OS’s and you will have to find drivers and hacks just to make them work. This is a very polarizing subject so judge which method’ll work for you by putting space, cost, quality of the results and compatibility into the your equation. Once you have pondered on these variables, you can easily decide which way you will want to go. There is no right or wrong here, just what works for you now at the cheapest possible price. There will be purists everywhere and if you are one then this is definitely not for you. This is only for people who would like to maximize whatever they have at hand and save money along the way until they decide on a permanent method.
Thank you very much for patronizing my blog. If you liked this, do share this with your friends at social media and if you really want to help then you can contribute to the site’s paypal account (richardHaw888@gmail.com). Seeing my stats grow monthly gives me joy and motivation. If I can hit 20,000 views per month by the end of this year then that’ll be a very good Christmas gift for me. We are currently standing at 17,000 views per month and while that isn’t shabby, I intend to have more views considering the effort and time I put into this. Thank you very much again and see yo guys again next post! Love, Ric.
Help Support this Blog:
Maintaining this blog requires money to operate. If you think that this site has helped you or you want to show your support by helping with the upkeep of this site, you can simple make a small donation to my paypal.com account (richardHaw888@gmail.com). Money is not my prime motivation for this blog and I believe that I have enough to run this but you can help me make this site (and the companion facebook page) grow.
Helping support this site will ensure that this will be kept going as long as I have the time and energy for this. I would appreciate it if you just leave out your name or details like your country and other information so that the donations will totally be anonymous it is at all possible. This is a labor of love and I intend to keep it that way for as long as I can. Ric.

Oct 15, 2017 @ 18:45:52
Hi Richard. Love your work, but a question re the Picture Control.
Are you using the Picture Control from Nikonpc.com on the camera, or on that site alone?
On my cameras up to the D800, I can’t get them to work at all.
They only achieve tone inversion, but can’t do colour inversion, even tho they appear to do colour inversion via the actual site.
These custom PCs don’t work on the Nikon software either.
I don’t know what’s happening, but can never get them to work effectively with colour reversal at all, other than the rendering on the actual site.
Would love to know if you have used them successfully either on camera or in Nikon’s software.
Loading the Picture Control to the camera is very easy:
On the memory card(if dual, doesn’t matter) make a folder called [NIKON] within that folder make another folder called [CUSTOMPC] no brackets, just capitals for the names, no spaces.
In that CUSTOMPC folder place your custom PC, do not rename it. leave it as PICCONxx(whatever number xx is)
Via the camera:
Go to shooting menu: look for Manage Picture Control
(immediately under the Set Picture Control menu item) you will need to come to this one afterwards.
In the Manage Picture Control menu, scroll down to Load/save.
Within the Load/save menu use the copy to camera menu item.
If you’ve saved the file into the correct location on the card and card into camera, the camera knows which directory to look into.
It also knows the actual name of the file you’ve used. ie. if you used that Agfa Optima start file and inverted the tone curve, the PC will appear as Agfa Optima on the PC file name in camera(even tho it’s name is PICCONxx on the card)!!
The only way I’ve been able to do the conversion on NEF files successfully has been CNX2 only. LR doesn’t save to NEF file, but have also used it as you’ve shown.
Note that if you use Nikon’s software like ViewNX2 of ViewNX-i, it loads Nikon’s Picture Control Utility which does all the PC edits correctly as per the camera(ie. no colour inversion as per that site)
if you have any info contrary to my understanding of the processes, I’d love to hear about them. This has bothered me for years! :p
Thanks,
Arthur.
Oct 28, 2017 @ 04:52:16
Hello, Arthur!
Yes, mine works fine! I am using the one that I made using the site then download it to my camera. Unfortunately, it doesn’t translate to LR. If it did that would have been fantastic for me. This is very helpful when shooting straight to jpeg and is a much more flexible way of working than the D850’s flawed approach. I will check if it works with viewNX. Ric.
Oct 20, 2017 @ 06:13:23
Why can’t you simply place a negative on a light box, photograph it using raw or Jpg and then invert using Lightroom or Photoshop?
Oct 20, 2017 @ 06:56:43
Hello, mr. Tan!
I do something similar,too. Check out my latest blog post. It has free LR presets in there,too. Ric
Nov 03, 2017 @ 13:55:26
Do you remain yourself, doing your job, or is it a PR move?
Mar 22, 2018 @ 01:25:51
Can I use Nikon AF-S 60/2.8G Micro OR do I have to go for an older Nikon 60MM Macro?
Apr 13, 2018 @ 15:11:42
Just a quick question. You mentioned that ES-2 won’t allow saving images in RAW. format. However, can’t you simply open the RAW processor on a JPG file listed under FILTERS in PS CC? Maybe I am missing something? Please send reply to my email as I don’t know when/if I will be back here relatively soon. Many thanks.
Apr 22, 2018 @ 04:20:48
Hello, Gordon!
The ES-2 is just a “dumb” metal extension, it’s the Nikon D850’s negative digitization mode that only saves to JPEG. I process my RAW files in LR for this. Ric.
Apr 22, 2018 @ 10:44:44
Thanks for the reply. My point was that even though the d850 creates a jpg file you can still open it with the the raw editor in PS. I think that will work ok. BTW, I do not use Lightroom. I started with PS about 18 years ago and mever looked back.
Gordon
May 10, 2018 @ 13:21:13
Very cool post. I’m not anywhere close to doing photography at this level, but maybe some day 🙂
May 10, 2018 @ 14:34:07
Thanks, Shane! Glad you liked it!
Jan 13, 2019 @ 17:16:48
Ric, Thank you so much for this tutorial and all the suggestions for where to look for additional information! I have two questions: 1.) Where did you get those nice white plastic film strip holders? and 2.) Do you have any suggestions for digitizing medium format (120) negatives and positives using a Nikon FX body (I only have a D800E and a D3X, no 850 for me for awhile)? It seems to me that an FX shot of a 6×6, 6×7 or 6×9 frame would still be better than using an inexpensive flatbed, but I don’t know. Thank you again for generously sharing your techniques and processes with the rest of us! With kind regards, Mark H.
Feb 08, 2019 @ 03:49:23
Hi, Mark!
I use a Pentax copy stand to scan medium format and use an iPad as a light source.
I will admit that I hated doing this as this requires preparation so I just send it to the lab these days.
You can get nice film strip holders from old projectors. I even got a really nice metal one from an old projector.
Ric
Jun 01, 2019 @ 18:39:03
While this is a very quick method to digitize you negative images, it’s extremely challenging to do even a satisfactory inversion from negative to positive, consistently. Even Phase One with their amazing iXG Camera system, that is sort of designed for this purpose, will admit that the inversion on a color negative to positive is really challenging to do properly.
The best software available for this right now is the “Negative” module of the “Color Perfect” software but even that will sometimes make certain colors simply the wrong color altogether while leaving flesh-tones and neutrals spot on.
This approach in this article is fine for down and dirty quick digitizing but not anywhere near on par with a proper film scan. A high end professional raw file that has weird color values is only so useful.
All that said, the author here does mention there’s still a place for dedicated film scanners for larger formats, but there’s also a very good place for dedicated film scanners when you want your 35mm negatives to look their best. This isn’t the way to do that.
Dec 16, 2019 @ 05:14:56
Hi Richard,
Just came across this blog, I have tried using nikonpc.com but can’t get it to load one of my own images which is on the web. Any ideas?
Regards,
Steve
Dec 21, 2019 @ 03:16:49
Hello, I have no idea. must be your firewall settings?
Dec 21, 2019 @ 04:17:28
Thanks Richard, I have received a reply from the site owner, it appears you need to use a direct url to the image, not via a web page (html). ATM I don’t have any images online that I have a direct url to. No real problem for me, I can create my own picture control using the Picture Control Editor. I then load that into the camera or use it directly in Nikon s/w such as Capture NXD or NX2