
Hello, everybody! I’m craving for some doughnuts today. I like them a lot, it can be eaten with breakfast, lunch or dinner. They can also be served from the simplest of settings up to the fancier presentations that can be found at the expensive restaurants. They also come in many different flavors, too. If you don’t prefer sweets like me, you can just enjoy the plain and un-glazed version which I consider to be the best because it’s the most versatile. I love that version a lot and I judge a shop by how delicious their plane version is. If you can’t make one the right way then there’s no point masking the taste with other flavors. Speaking about the basics and versatility, I’ll show you a lens today that’s the pinnacle of simplicity and and it does the basics right. It’s so good at the latter that it was used as the lens to judge other lenses in terms of sharpness. Its versatility cannot be denied and it does everything really well. Let me present to you one of the best Nikkors ever made.
Introduction:
The Micro-Nikkor-P 55mm f/3.5 Auto is one of the most influential Nikkors. It was so successful that it influenced a lot of copy-cats from other brands and its legacy still lasts to this day in the AF-S Micro NIKKOR 60mm f/2.8G ED. It’s one of Nikon’s best contributions to the photography world since it turned a specialized lens into something that you can use regularly for taking almost everything thanks to its practical design. Its predecessor is the Micro-Nikkor 5.5cm f/3.5 which is exceptional in its own right but its use is limited due to its quirky handling. It does not have an automatic iris but it can focus down to 1:1 magnification but it’s tricky to use outside of its own field and you’ll have to make a lot of compromises. It can’t be coupled to a camera’s meter, too. These were addressed by the Micro-Nikkor-P 55mm f/3.5 Auto. It turned it into a more useful lens but it lost the ability to focus down to 1:1. This was remedied by the included M-ring that’s sold with it as a kit. It’s just a simple extension tube but it allows the lens to be coupled to the camera’s meter. Its length is enough to get you down to 1:1 so you don’t lose anything with this new setup so long as you have the M-ring with you.
 The build is perfect, it can withstand the tortures of professional use. It can last for generations so long as you maintain it properly. It’s so simple that it can’t get broken in the field so long as you keep it clean. Its core design did not change much from its debut in 1963 to its last version that came out in 1979. Even the Micro-Nikkor 55mm f/2.8 Ai-S which is still being made today didn’t deviate much from this design. The design lasted the test of time and I don’t see any point in changing it because simplicity akin reliability.
Specialized lenses used to do specialized things and one such task is macro phorography where these are expected to perform at their best during high magnifications. To achieve this, photographers back then had to use bellows and some kind of high-performance enlargement optic specially-made for a single task and nothing else. Nikon tried to bridge the gap by designing the epoch-making Micro-Nikkor 5.5cm f/3.5. There was an earlier lens for the S-mount but it was made for the Nikon-S line of rangefinders (in Leica fit, too) and it’s called the Micro-Nikkor 5cm f/3.5. You can use it like a regular 50mm lens when mounted on a camera but you should use bellows in order to use it for high-magnification photography. That lens is the mother for all Micro-Nikkors and it was designed to resolve micro-film so its resolving power has to be exceptional. This trait was passed-on to every Micro-Nikkor to this day.
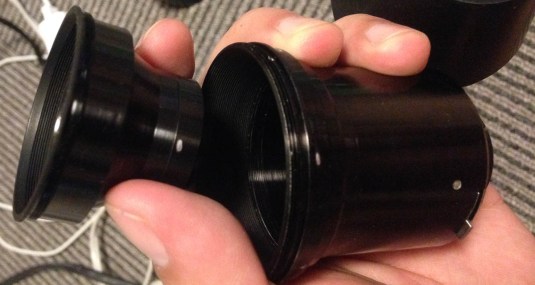
 We have the Micro-Nikkor 5.5cm f/3.5 to the left and the the Micro-Nikkor-P 55mm f/3.5 Auto beside it. I’ll explain the big jump in the design philosophy between the two lenses . The older lens can go all the way to a 1:1 (life-size) magnification ratio on its own but in order to achieve that the barrel has to extend to great lengths, this makes for an awkward-handling lens. Since the objective is situated so far from the lens mount, a reliable way to actuate the iris automatically was impossible to engineer and implement at that time so this lens had to be a preset-aperture type, this means that you have to stop it down manually before you shoot. This is really cumbersome, you compose your shot first and then manually stop down the iris before you click and in the field this can mean a lost shot. It’s not so bad because it has a very good optical design that just needed a new and more practical solution for it to be more useful and easier to market to people who want a more versatile tool.
The solution was to do away with the 1:1 native magnification ability that’s the root cause of this problem and since not everybody shoots at this high magnification on a regular basis it was decided that 1:2 is good enough. This allowed for a more robust lens design and the most important part is it now has an automatic iris, in-line with most F-mount Nikkors. Through-the-lens focusing made the SLR the dominant camera design decades ago because it allows you to focus accurately and the ability to actuate the iris remotely is important to its success.
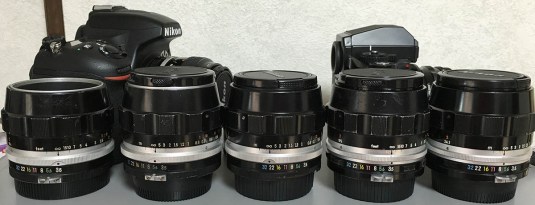
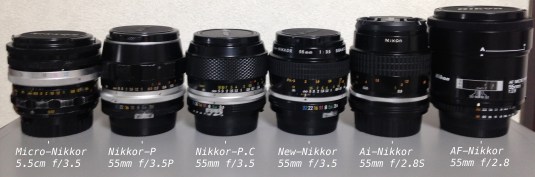 Here are the major models of the 55mm Micro-Nikkor family, from the first one on the left all the way to the last one to the right. You can also consider the other Micro-Nikkors with a normal focal length to be part of the line but we’re strictly referring to the 55mm Micro-Nikkor family in this section. The Micro-Nikkor 5.5cm f/3.5 is the oddest member here because it doesn’t have an automatic iris. The AF-Micro-Nikkor 55mm f/2.8 is the last version of this long lens line and it’s the basis for the AF-Micro-Nikkor 60mm f/2.8D which is still being made new to this day.
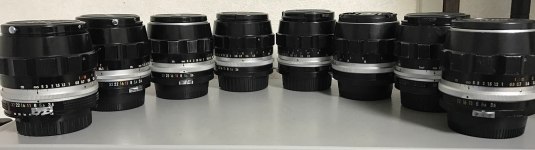 Here are all of my Micro-Nikkor-P 55mm f/3.5 Autos. Some people collect or hoard shoes, watches, etc. For me, this is my thing. I need to have these little gems and all of its versions. What you see in the picture represents all of the known variations of this lens that went on sale. The main differences can be found in the engravings, color schemes and minor mechanical differences.


(Click to enlarge)
The lens extends quite a bit when it’s fully-extended. Its focus throw is long which is perfect for precise-focusing. This is a precision instrument and the engineering reflects it. The decision to cut the native 1:1 magnification ratio of the Micro-Nikkor 5.5cm f/3.5 is missed by some people but it was realized again when the AF-Micro-Nikkor 55mm f/2.8 came out 2 decades after. It has since stayed to this day.
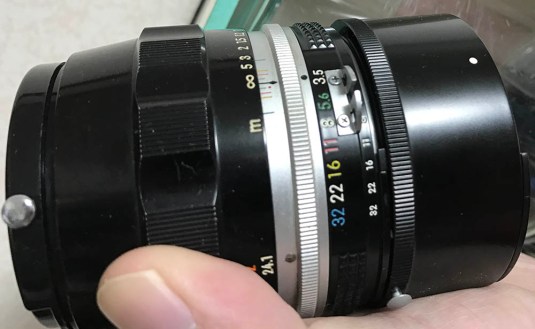
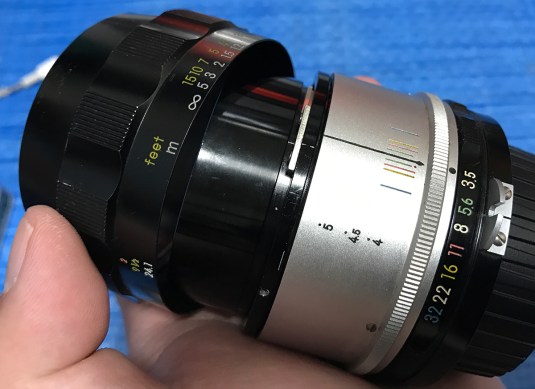
 This is an earlier version with the silver front barrel. I like this a lot because it looks really cool specially when mounted on a silver and black camera. Its main barrel has engravings that show the magnification ratio and relevant details pertaining to close-up use. This is helpful for precise work like taking photos of documents and other reproductions.
This is also nicknamed the “compensating version“. It is called by that name since the lens was engineered so that the aperture opens up as you focus it closer to compensate for the lost light due to the elongated lens barrel. This was important back in the day but is obsolete so the next version did away with it. I’ll show you how Nikon achieved this in the disassembly section so I hope that you will read the whole article.
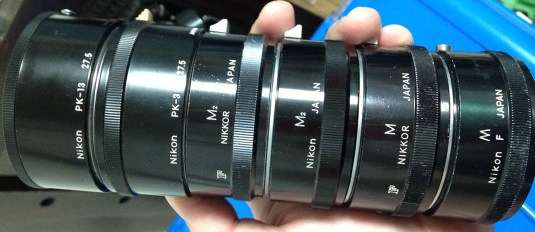 In order for this lens to achieve 1:1 magnification, you will need to have one of these. These were sold together with the lens as a kit when you buy them new back in the days. If you are lucky, you can even find one in the original box and bubble case along with its manuals. These are called M-rings but its later versions are called PK-rings. Some people collect these, too.
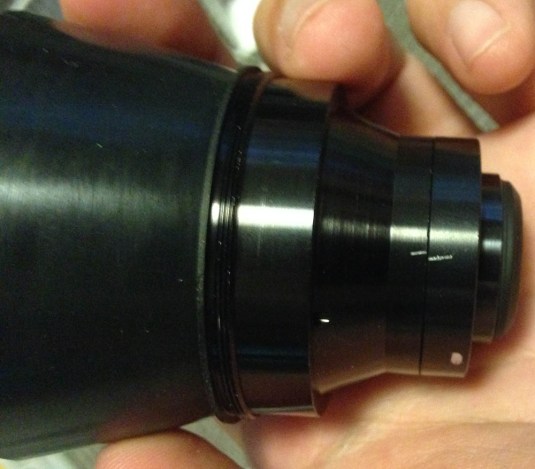
 These lenses also come with an Ai-ring. It’s rare to find one with a ring but I will tell you that it’s easy to get one from it’s successor with the rubber grip and then attach it to this lens since both share the same ring design. This is how the lens looks when the M-ring is attached.
This lens can be impractical to use on the field at 1:1 magnification because you have to be really close to your subject in order to get that magnification ratio. Not only will you be getting in the way of your lighting but you’ll also scare away shy bugs. I am not saying that this lens is useless in the field but I am just saying that it will have limited use for that purpose. This lens has a nice flat field and is incredibly sharp so it has another use for many – slide and document photography. Coin and stamp shooters will also like it as well where having a flat field is non-negotiable for obvious reasons.
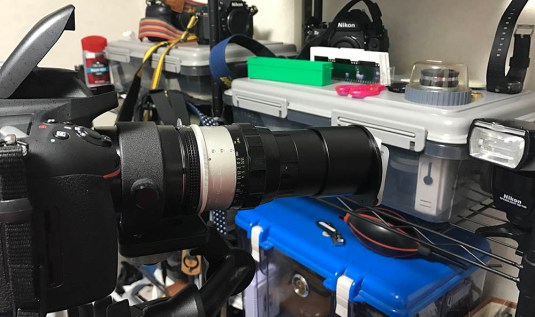 Here is my setup for copying slide/strip film. I use a Nikon ES-1 for slides, a modified ES-1 is needed for strip film to avoid damaging the film. Read my article on digitizing film with a Nikon DSLR to know more about this. In case you’re wondering, that is a Nikon PN-11 extension ring.
Knowing how a lens performs is key to maximizing it. You’ll know how you can avoid its weaknesses and exploit its strengths. This will help you decide if it goes in the bag or it gets left in the box. I used a Nikon Df for the photos, I took the pictures from f/3.5, f/5.6 and f/8 because these are the usual ones that people will want to use this lens with. These are also the apertures that the lens shows the most differences in rendering. While this lens isn’t one of those that exhibit different rendering characteristics as you stop it down, it is still interesting to see how it looks at those apertures. It’s a technical tool first and foremost, the artistic side of it isn’t a priority, it’s a macro lens.


(Click to enlarge)
Vignetting can be observed wide-open but is gone by f/5.6 and beyond. The field curvature is rather flat which makes it great for taking pictures of flat objects like documents. Sharpness is good for subjects that aren’t too far. It is said that this lens isn’t that great for subjects at infinity but who uses this for taking pictures of mountains anyway? I made a few tests a long time ago and I don’t remember it to be that bad at infinity. In fact, it’s quite good. I’m not sure if people are talking about chromatic aberration or anything else but sharpness is tops at infinity, at least it is on my sample.


(Click to enlarge)
I really should take sample pictures at 1:1 but I hated using this lens at that magnification without a flash so let’s make-do with its native ratio or less. It is a sharp lens wide-open as you would expect from a macro lens. The color palette looks rich and saturated but I can see a very slight hint ot chromatic aberration wide-open, it’s difficult to see but it’s there. You can consider that to be as-good-as-none at this level. The lens is optically-perfect by f/5.6 and it is performing at its peak sharpness by f/8. Resolution is quite high, this lens can still out-resolve most modern sensors on the market today. I used to use this with my Nikon D750 and Nikon D800 to shoot bugs and it’s perfect. I just had to use a special lighting setup because at high-magnification this lens is going to get in the way of your lighting. At 1:1, you only have a few inches to work with before the front of the lens hits your subject. This is challenging, even when shooting dead bugs on a studio.


(Click to enlarge)
It’s great for subjects that are a bit further from you. It’s sharp and you get a lot of detail thanks to the high resolving power of the lens. Some people will prefer a lens with more “character” for this but macro lenses aren’t the best tools for this because they were designed for optical perfection since they’re precision tools to begin with.


(Click to enlarge)
Pardon the compression but these pictures look really sharp on my monitor that I can see the grainy details of the white flowers’s petals. The quality of the bokeh is nice which is typical for many macro lenses.


(Click to enlarge)
It can be challenging to take nature photos at this magnification because a slight gust of wind will throw everything off. Some people are good at this, while some just don’t have the patience for this.
 The colors that you get with this lens is amazing, this renders like a modern lens in this regard. The front element is deeply-recessed inside the barrel so it’s shielded from stray light coming from the sides and that also helps with the image quality as well because it won’t flare as easily.


(Click to enlarge)
Here are some more pictures, this time using a Nikon D750 and a modified Nikon D70s with an infrared low-pass filter. Some people like shooting with infrared-modified cameras so here’s some examples for you. People say that this lens isn’t really good for subjects at infinity, I didn’t do any tests because I don’t see myself using this lens at those distances so it doesn’t matter at all to me. What really matters is diffraction and it’s best to avoid shooting-pass f/16. Just stay around f/11 and you should be fine.
Let’s now see some pictures that were taken with film. Pictures taken using film have a unique look that’s difficult to simulate with a digital camera. It’s film grain and how light reacts with chemistry that makes it look different. Since this lens was made for film it’s important that we see how it performs using its intended medium and this will help us assess it fairly. I took these photos with Fujifilm Industrial 100 on a Nikon F6.
 The high saturation is perfect for film. Some films render reds beautifully, I like Fujifilm for this because. If I wanted better yellows then I’ll use Kodak.
 This lens is probably too sharp for portraiture. I’m not saying that you can’t use this for it but there are better tools out there. It’s still good because this lens can also double as a normal lens thanks to its 55mm focal length which makes it more practical for regular use.


(Click to enlarge)
This lens is perfect for travel photography because of its practicality. You do not need 2 separate lenses in the bag for macro and normal 50mm pictures. The maximum speed is kind of slow at f/3.5 but that’s not an issue when you are shooting in bright and sunny days.


(Click to enlarge)
Amazing performance! I can’t see any traces of chromatic aberration. Bright highlights will easily trigger that but I can’t see any of that here. Saturation is quite high without making the pictures look like kids’ cartoons. The colors and rendering looks natural.


(Click to enlarge)
I hate wasting film shooting pictures like these because it’s difficult to shoot things like this with film where the keep-rate is quite low. This is probably what macro photographs looked like in the age of film. Macro photography is one of the disciplines that benefitted the most from digital photography, it has a very low keep-rate digital cameras are more practical for it. I’ll admit that I didn’t shoot macro photography in my film days because I don’t have the gear for it so it’s nice to see some macro photos taken with film.
I highly recommend this lens to everybody. It’s a tough little lens that won’t let you down in the field. It’s not as fast as the Micro-Nikkor 55mm f/2.8 Ai-S but it’s more reliable thanks to its simpler construction. You won’t get the dreaded stuck focus problem with this lens because of that. When you are looking for one of these, make sure that it comes with the Ai-ring unless you intend to use it with mirrorless cameras or older Nikons that allows the use of pre-Ai lenses. Using a pre-Ai lens with an Ai-capable Nikon will damage it and the cost of repairing the camera isn’t cheap. Some Nikons have a folding Ai-coupling tab and these will allow you to use pre-Ai lenses safely. You will also want to buy one that comes with the M-ring because that’s the complete setup. It’s still useable without the M-ring but having it nice. You can get one of these complete with the ring for not a lot of money but prices vary a lot. I sometimes see them for as high as $250 for a complete set in mint state and the beater ones for as little as $30. For about the same amount of money it’s also a good idea to buy the Micro-Nikkor-P.C 55mm f/3.5 Auto. It’s the same lens basically with minor cosmetic upgrade and better coatings. The optical formula has been tweaked slightly to yield sharper pictures at infinity but I can’t see any differences when I tested both lenses. You can’t go wrong with any of them.
Before We Begin:
If this is your first attempt at repairing a lens then I suggest that you check my previous posts regarding screws & drivers, grease and other things. Also read what I wrote about the tools that you’ll need to fix your Nikkors.
I suggest that you read these primers before you begin (for beginners):
- Essential tools
- Best practices 1
- Best practices 2
- Best practices 3
- Ai conversion
- Working with Helicoids
Reading these primers should lessen the chance of ruining your lens if you are a novice. Before opening up any lens, always look for other people who have done so in Youtube or the internet. Information is scarce, vague and scattered (that is why I started this) but you can still find some information if you search carefully.
I highly recommend that you read my working with helicoids post because this is very important and getting it wrong can ruin your day. If I can force you to read this, I would. It is that important!
For more advanced topics, you can read my fungus removal post as a start. This post has a lot of useful information and it will be beneficial for you to read this.
Disassembly (Front):
The lens itself is simple to repair but you will need special tools to open the front parts of the barrel. Make sure that you have a good set of rubber cups, drivers and lens spanners before you work on this. You will also require the basic skills for lens repair so practice on cheaper lenses from other brands first before you work on this.
I will break the disassembly down into several sections due the differences between the early and later models. The differences don’t matter much but I just wanted to be sure that I’m clear about everything so you won’t screw this up.
As with most Nikkors, we will prefer to extract the objective first so we can work on the barrel without having to worry about scratching the glass. This is easily done and I will show you how in this section.
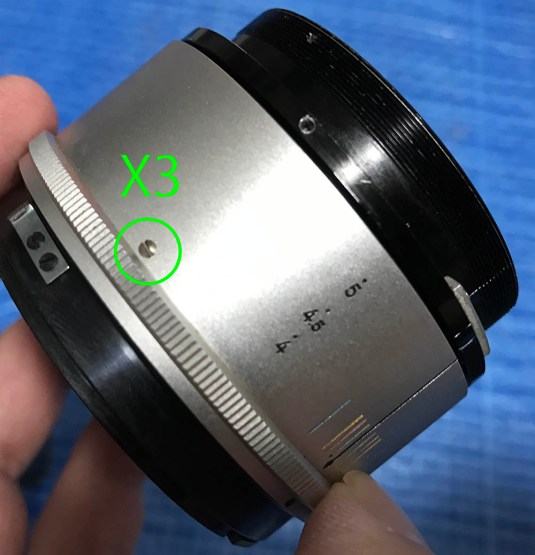
 Remove these 3 screws securing the focusing ring.
 The focusing ring should come off easily.
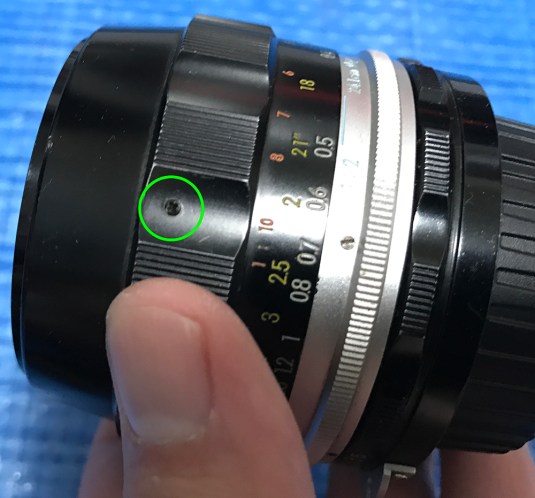
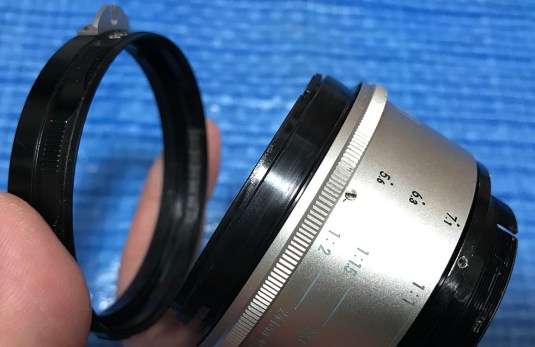
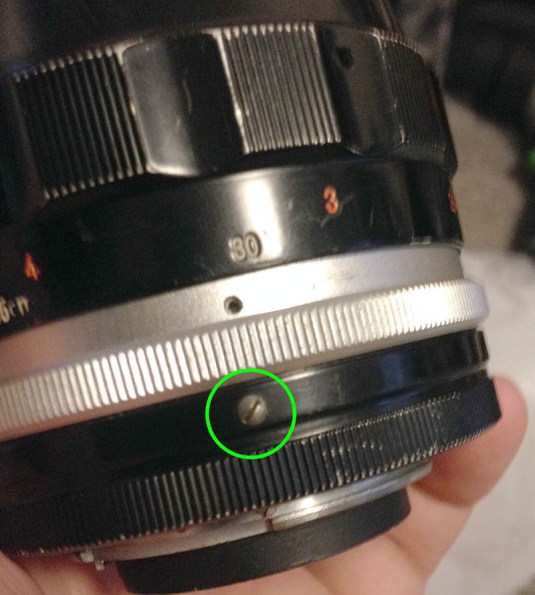
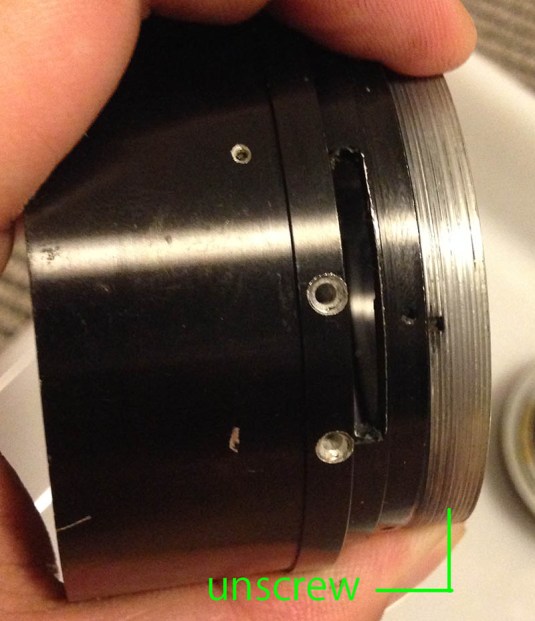
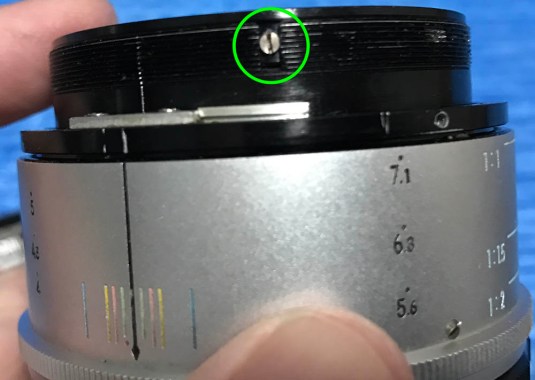
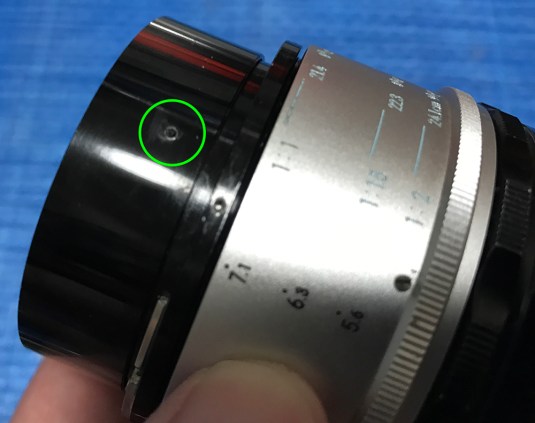 Remove this set screw so you can unscrew the front barrel off.
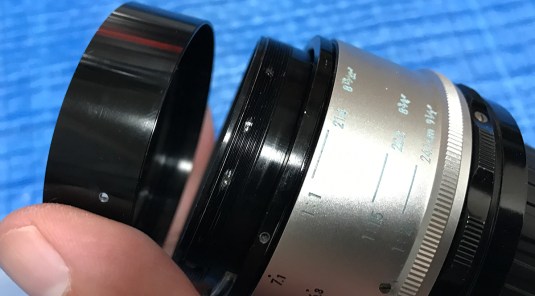 This shouldn’t take any effort to unscrew. If yours is stuck, simply place a bit of solvent to its threads via its screw hole and let that soften the seal.
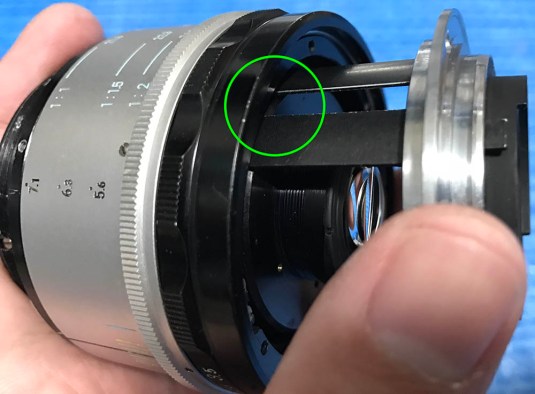
 Extract the objective and be careful not to scratch the rear element.
 The objective is secured by three screws on the early version, remove those first before you extract the objective. Note that the front barrel screws-in to the objective’s casing instead of the inner helicoid.
From here on, I will switch between the early and late version of this lens. I will tell you which version is shown in the pictures so don’t worry, just read the commentaries carefully so you won’t get confused.
Disassembly (Rear):
The difference between the 2 versions is most obvious at the rear where the bayonet mount is situated. Early F-mount Nikkors do not have screws on the bayonet mount’s exterior for a variety of reasons.
I’ll first show you the late version. It’s simpler to work on it since there are less things to think about. Skip this if you have an early version and head to the next section unless you want to read this.
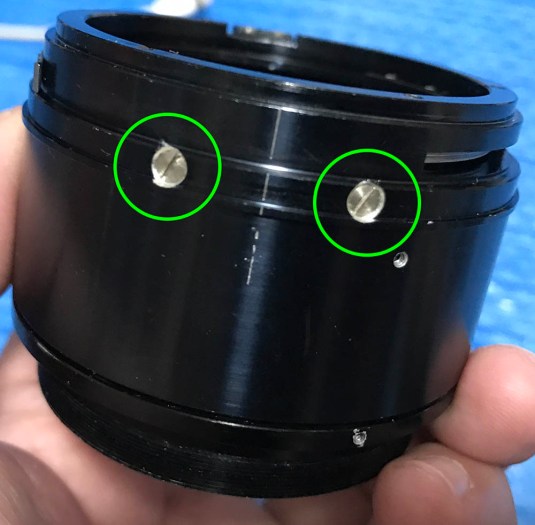
 Remove these screws. Many people get stuck here because they don’t know how to remove these the right way. To prevent any trouble, please read my article on removing bayonet screws and buy the right tools.
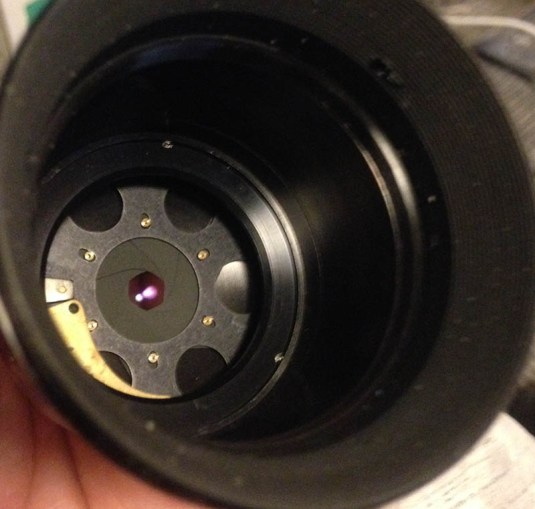
 With the screws gone you can now pull the bayonet off. Look at the baffles, Nikon wants to make sure that you don’t damage that delicate bulbous rear element. I do not advise that you take this apart unless you had to.
 Before you begin removing the aperture ring, be sure to remove this screw first. It couples the aperture ring to the iris.
 You can now safely remove the aperture ring once the screw is gone.
The early version looks elegant and neat without all those screws. It is also more expensive to produce because there are more steps involved to make it. This section is useless for people who have the later version but if you’re interested then just hang around and see what’s different.
 No screws! I will show you how to open it in this section.
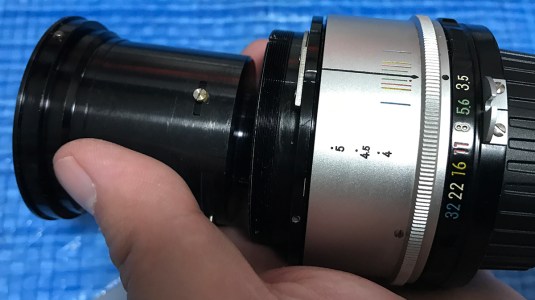
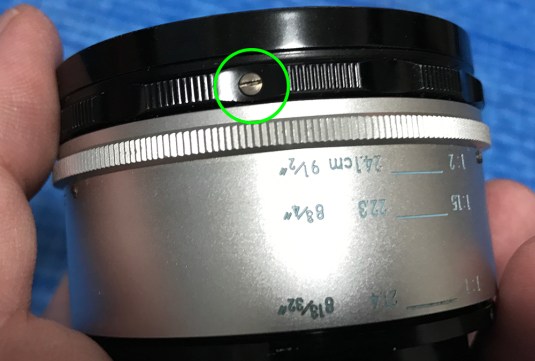
 Begin by removing this screw, it couples the aperture ring to the iris.
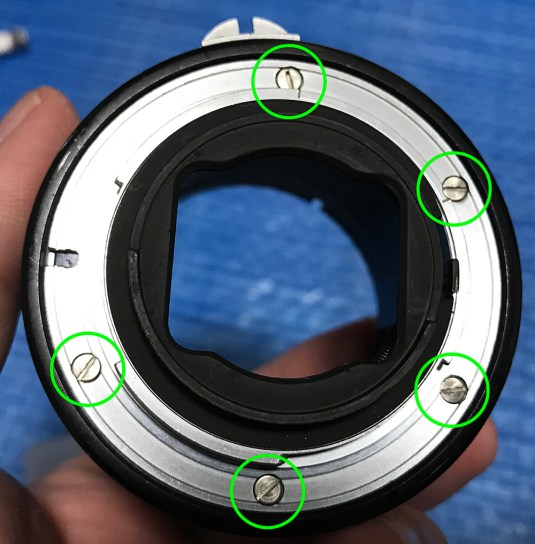
 Unscrew the aperture ring and count how many times it took you to remove it because you’ll want to put it back the right way again later. Be careful not to damage the threads or it won’t work smoothly again. Now that the ring is gone you can now access the screws underneath it. These are usually sealed and heating them will make them easier to extract. Use drivers that fit their slots and heads perfectly so you won’t damage the screws or the threads. It’s easy to ruin them so be careful. There are 5 or even 6 of these screws, if you can’t see the others, just clean the threads to reveal them because they may be covered by grease.
 With the screws gone, you can now pull the bayonet off.
Clean the bayonet mount carefully and don’t open the bearing unless it had to be re-packed. The bearing balls are tiny and they’re difficult to put back. I rarely dismantle the bearing myself and I avoid doing that if I can help it.
Disassembly (Main Barrel):
Working on the main barrel is similar for both versions despite not having the identical parts so I’ll show you how to work it using the later version.
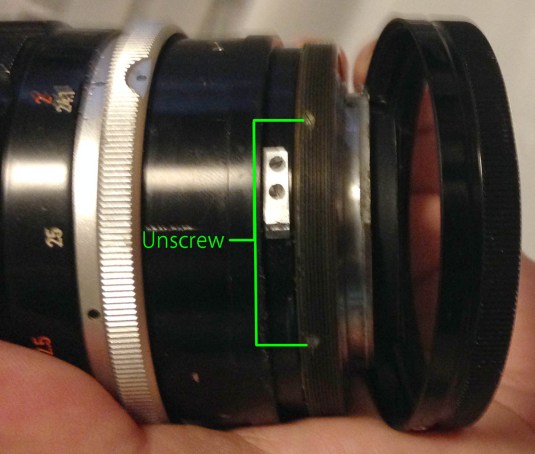
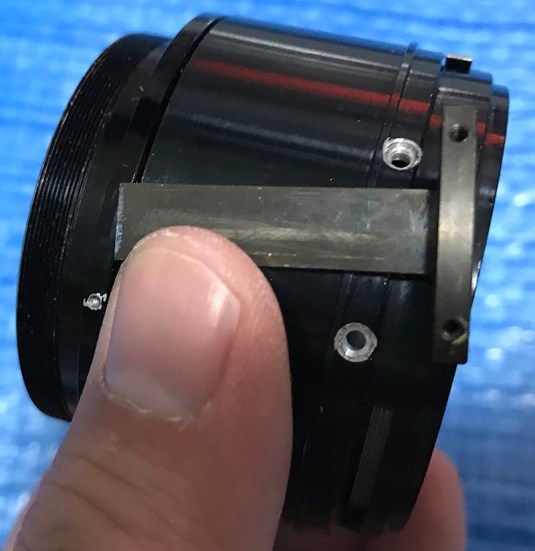
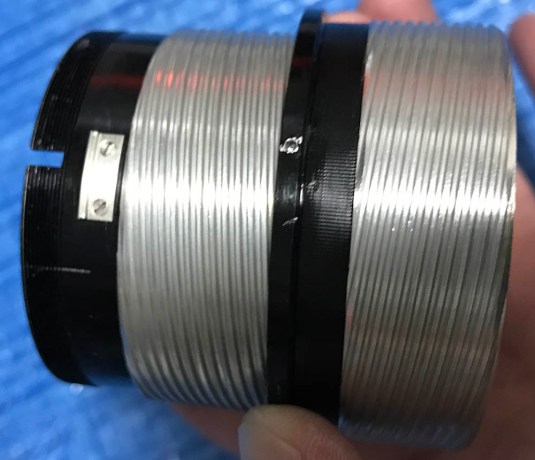
 Carefully remove these screws to slide-off the sleeve. Make sure that you do not scar or scratch the screws and their surroundings.
 The sleeve comes off just like this after the screws are gone.
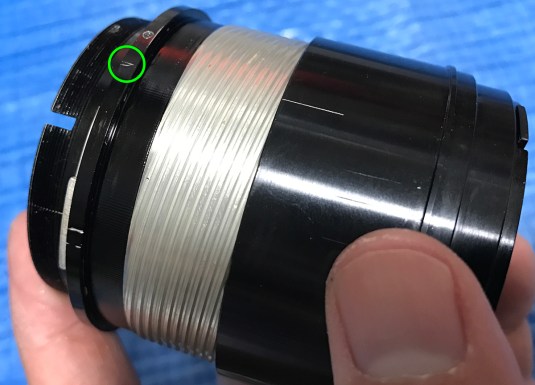
 Before separating the helicoids, I made a line on the outer wall of the outer, central and inner helicoids so I’ll know how the alignment should be later when I reassemble the lens. You make your marks and take your notes with the barrel collapsed all-the-way like when you’re focused to infinity. This is going to be helpful because you have a point of reference.
 To dismantle the helicoids you will need to remove the long helicoid key. It’s secured by these large screws and they’re usually sealed with epoxy so you will have to heat them using a torch to soften the epoxy and unscrew these while they’re hot.
 The helicoid key makes sure that all helicoids turn at the same rate and this is how the lens extends or retract. Be sure to study how it works first before you remove it. Never damage this or the surfaces it gets in contact with.
 Separate the central helicoid from the outer one and don’t forget to make a small mark to remind you where they separated. Many get stuck in this step because they forgot to do this, to prevent this from happening to you please read my article on how to work with helicoids and follow it carefully.
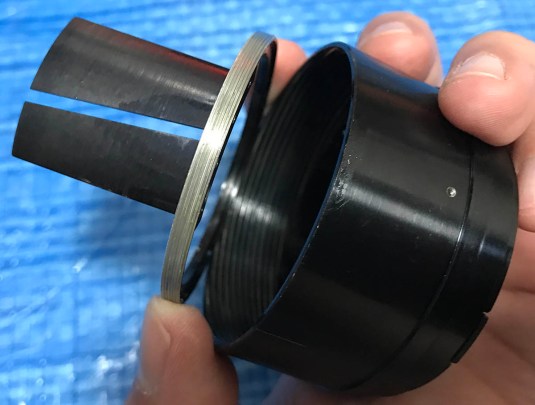
 Do the same for the inner helicoid.
 The aperture fork and its rail can easily be removed for the later version. It regulates the size of the iris because this is coupled with the aperture ring.
 For the later version, you simply unscrew the whole thing and it comes out from the front of the barrel.
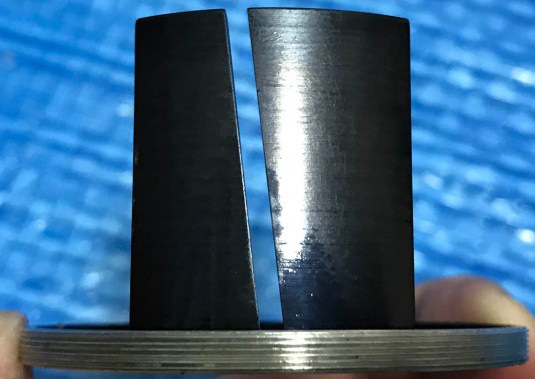 Notice that the slot on the aperture fork is slanted instead of straight. This is necessary so that as you focus your lens closer, the iris opens up. This clever trick is used to compensate for the lost light as the lens gets longer and this is the reason for the unofficial nickname of “compensating” that people give to this lens.
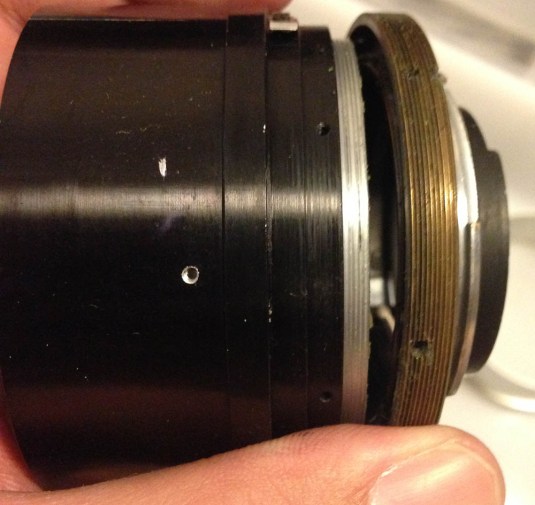
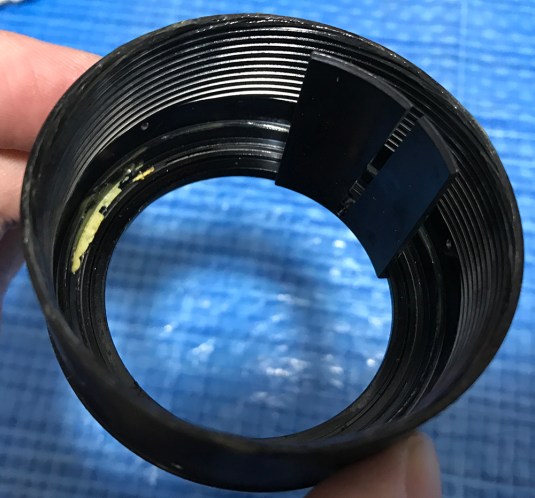
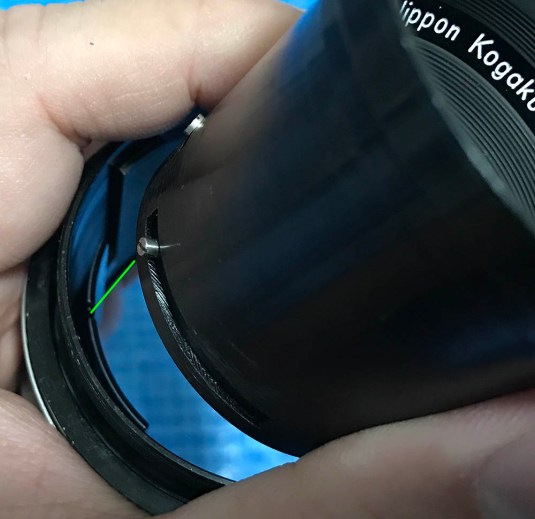
 The difference for earlier version is the aperture fork assembly exits from the bottom of the barrel. If you zoom-in you will see a lot in the threads. It’s the slot where the pin of the aperture ring should slide-into. Be careful later during reassembly because you can ruin the threads when re-installing the pin if they slot isn’t aligned properly to the hole in the aperture ring.
Here’s a tip when putting back the aperture ring and its pin and this works for both versions. Before you put the pin back, see if the slot for it is aligns with its hole in the aperture ring first by passing a thin rod through it. They should line-up perfectly and if they don’t then you just have to turn the ring until the slot aligns perfectly with the hole. Try and screw-in the pin and see if it goes into the slot smoothly, stop if it doesn’t because you risk destroying the threads. This is easier than it sounds, it only takes a few minutes for me.
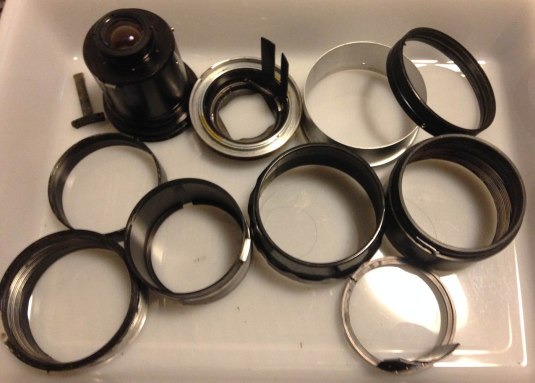 You should have something similar to this. Clean the helicoids very well. It’s important to leave no residue and the best way is to clean them with strong detergents and brush them very well. You can also soak them in an alcohol bath and leave them there for a day to dissolve any stubborn dirt. Pick them if they’re really tough, a toothpick works really well for this. Clean the other parts really well before you put everything back.
I used a lighter type of grease for this lens because of the long focus throw. I never apply too much grease on all of my Micro-Nikkors since I do not want them to develop oily iris problems when excess grease migrates to the iris.
Disassembly (Objective):
The objective is nearly-identical on both versions and the differences don’t matter much unless you’re a collector. With that said, I’m only going to use the early version as our example here in this section.
 The housing of the objective is big but the optics only occupy 1/3 of it.
 The rear element is vulnerable so we’ll want to remove it first. The rear lens assembly houses the 4th and 5th elements and you can easily unscrew away its housing with your hands. Removing a retention ring will allow you to get to the lens elements. Use a lens spanner for this and be sure not to scratch it as you go. The rear elements group is the most important part of the optics in this lens design.
 To remove the front elements group, apply some alcohol to the seam so that will soften the seal first. Use a rubber cup to unscrew this. The name ring is screwed to the baffle and can be removed by the rubber cup, that’s ok since you will want to remove this to clean it anyway. Depending on the lens, this can be an easy task or one that requires repeated application of alcohol and plenty of hours waiting for the seal to soften. In my experience, this is stuck in most cases and this usually takes the most amount of time.
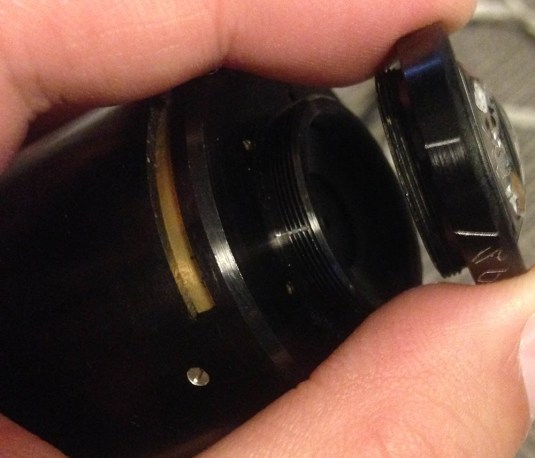
 This is how the front assembly comes off, be careful with the 3rd element at the rear of the assembly when removing this.
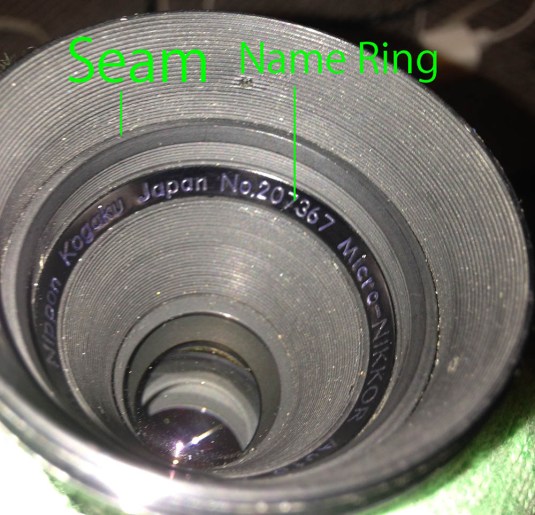
 To open up the front elements assembly, simply separate it along this seam. As you see in the picture above, somebody else worked on this lens before and he left a mark there along the seam. If it was glued, you should place a drop of alcohol to soften up whatever was used on it. Normally, this thing can be unscrewed with your hands.
 Be careful when you separate these as you might scratch the glass. Some of the elements were sealed in place so don’t bother removing them. The part to the left of the picture houses the 2nd and 3rd elements and they’re both cemented together to form 1 lens group. This lens group is usually glued to its casing so don’t bother getting it off. The part to the right houses the front element and it is also sealed to its housing. You don’t need to remove either one of them because both surfaces can be accessed easily.
 The iris looks clean so I’ll just leave it alone. If yours needs repairing, just go and search on my blog for a lens that has a similar iris design and use that as a guide instead.
Clean the glass really well before you put them back. This lens is one of the easiest ones to repair for me because the elements are small and few. It will only take me several minutes to service them.
Conclusion:
I am very familiar with this lens, you can even say that I am an authority on repairing this! I never get tired repairing these because I love these lenses. I usually spend around 3-4 hours on one of these with most of that time spent on cleaning the parts and the rest is easy.
When re-assembling this, it’s best to install the bayonet last. You will have to adjust some parts first and the bayonet will only get in the way. You do not adjust the focus of this lens because it’s just not possible. If your lens doesn’t focus properly then you got the helicoids wrong.
 This screw on the iris mechanism should slide-into the slot of the fork.
 For the later version, make sure that this screw on the objective’s casing is sitting squarely in its slot. You never touch this because its an eccentric, it’s for adjusting the objective’s housing so its position will alter the how much the iris opens or closes.
 Once you got the objective’s sitting securely, slide the stop-down lever inside and make sure that it catches the tab for the iris.
 It can now join its siblings! These are some of the best-looking Nikkors ever designed. I love how they look and their utility is un-matched in its class.
We’re done with this article and I hope that you liked this one. I really love this lens a lot that’s why I put-in a little extra effort for this. If you liked this article, please share it with your friends at social media. That will help with spreading the word about this blog. See you again next time, Ric.
Help Support this Blog:
Maintaining this blog requires money to operate. If you think that this site has helped you or you want to show your support by helping with the site’s upkeep, you can make a small donation to my paypal.com (richardHaw888@gmail.com). Money is not my prime motivation for this blog and I believe that I have enough to run this but you can help me make this site (and the companion facebook page) grow.
Leave me some tip?
Thank you very much for your continued support!
$2.00
Helping support this site will ensure that this will be kept going as long as I have the time and energy for this. I would appreciate it if you just leave out your name or details like your countrym name or other information so that the donations will totally be anonymous. This is a labor of love and I intend to keep it that way for as long as I can. Ric.

Apr 12, 2017 @ 13:23:33
What are the differences to the Ai model?
Apr 12, 2017 @ 14:53:15
Hello, Bent!
Optically, not by much but this one is sharper at 1:1 but the Ai is better at infinity. You will not notice much when you stop-down. Ric.
Dec 23, 2024 @ 07:58:13
Hi nice reading youur post