Repair: Helicoids

Helicoids are essential for focusing a manual lens. While it is a joy to focus with one, it is a big pain to repair for beginners and it can really be a show-stopper if you do not know how and where these things should mate when reassembling a lens.

IMG_1160

Helicoids are a thing of the past for the AF (autofocus) generation but for connoisseurs like us who enjoy and appreciate older (or current) manual focus lenses, the helicoid is the soul of the lens when it comes to focusing because this is the one thing that affects us the most as we turn the focus ring left and right.The helicoids are also the source of frustration and the root cause for their lens’ problems for many. Lenses that were poorly kept and maintained will exhibit some form of focusing problem ranging from a seized helicoid to dry focusing sensation.

IMG_1467

The helicoids or rather the grease used on them can be the source of other problems like oily aperture blades. Using the wrong lubricant or using the right one in excessive amount will leave you with this problem.

IMG_1564

Excess grease can also result in disgusting situations like this as well. The focusing on this lens was very well damped but opening the lens showed that the grease has migrated and is now on parts where it should not be in.

The helicoids are also a source of frustration for many inexperienced repairmen when they have failed to document the process properly and this blog post is going to teach you how to prevent this from happening to you as well as refresh the helicoids so that they perform optimally for more decades to come!

Before We Begin:

If this is the first attempt at opening a lens then I suggest that you read my previous posts regarding screws & driversgrease and other things. Also read regarding the tools that you will need in order to fix your Nikkors.

I highly suggest that you read these primers before you begin (for beginners):

Reading these primers should lessen the chance of ruining your lens if you are a beginner. Also before opening up any lens, always look for other people who have done so in Youtube and the internet. Information is scarce, vague and scattered (that is why I started this) but you can still find some information if you search carefully.

Before You Begin (Tools):

Servicing the helicoids themselves doesn’t require a lot of tools but it pays to use the right one for the task. Most of these can be bought over the counter so you should not have any trouble getting them.

Toothbrushes: You will need at least (2) of these. I just buy the cheap, hard and broad ones.

Kleenex: You will need plenty of these.

Lighter fluid: Just use any generic Zippo lighter oil. A stronger alternative is kerosene but I have a baby at home so this is a big no.

Grease: Use the right type of grease for your helicoids. Please read my grease blog post.

Flat brush: A cheap broad brush for painting is fine. I use these to apply the grease.

Cotton buds: These are useful for accessing those hard-to-reach corners.

Dremel: I would need a Dremel with wire brush occasionally for those caked grime that just won’t go away with simple wiping.

Flat screwdriver: You will need this to scribe marks on the surface of the metal parts.

Denatured alcohol: I use this as bath to soak my helicoids in. Place it inside a container with a cover.

Bulb blower: You should have one at this point. Get a good one with a powerful burst.

Newspaper: Just to make sure that you do not soil or ruin the floor.

As with anything chemical or combustible, always handle these with care and always work in a well ventilated place. I will not be responsible for any result or accidents.

Before You Begin (Taking Notes):

Before you begin dismantling the helicoids, make sure that you took sufficient notes of it. Using your phone’s camera is probably the most convenient way to do it, the workers at my family’s watch repair shop used to write and draw the notes on a notebook.

These marks will also indicate that a lens has been previously serviced if you find existing ones when you open them. They can also be made by the manufacturer themselves during the milling process.

IMG_2054

Another way is scribe shallow marks with a sharp tool on the surface. Sometimes, I would turn the helicoids until it is completely compressed and then scribe a thin diagonal mark on the surface of the 2 helicoids so that I will have a visual reference later to see if I have mated the helicoids properly. If the line aligned then I did a good job.

IMG_1670

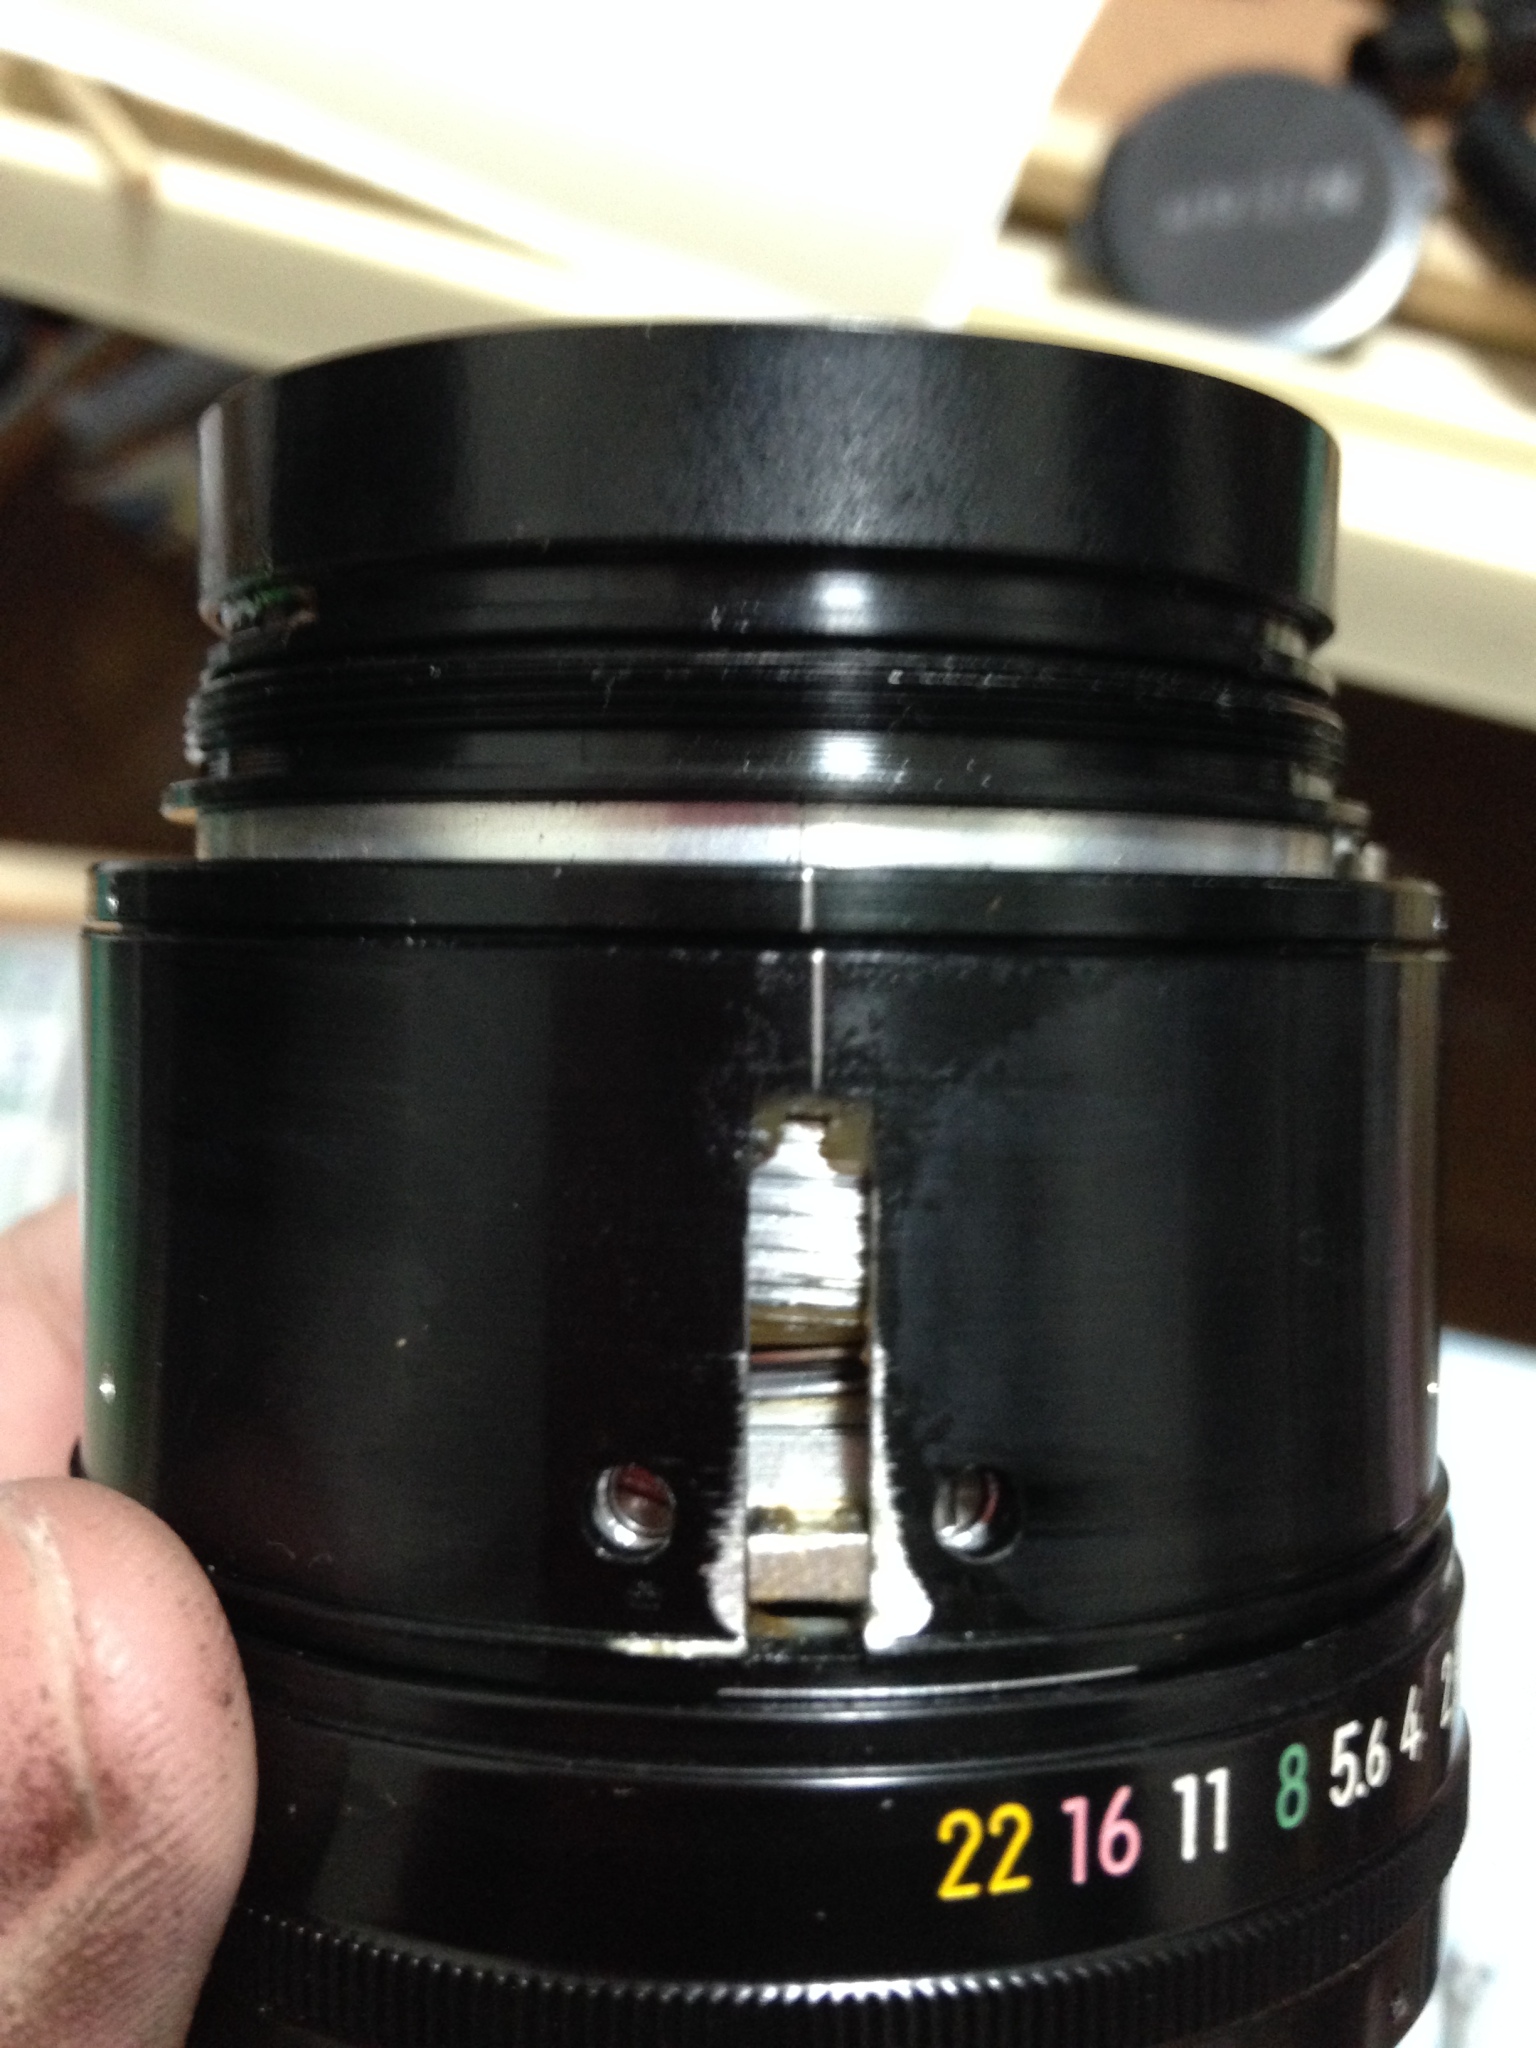
Be sure to mark the centreline (infinity line) of the parts so that you know how they should align when focused to infinity. The line in the picture is a bit off because I have rotated it by a few millimetres.

Not leaving any repair marks on any of the internal parts is a sign of a skilled repairman. While I agree with that statement, I would rather be on the safe side. Since I own most of the stuff that I service it’s OK. I am sure that the people who I have cleaned for won’t mind as well.

Separating and Marking:

This step is the most important part of the overhaul process (for the helicoids) so please read this carefully. Messing up this step will ruin your experience and make your time with this lens miserable.

helicoid1

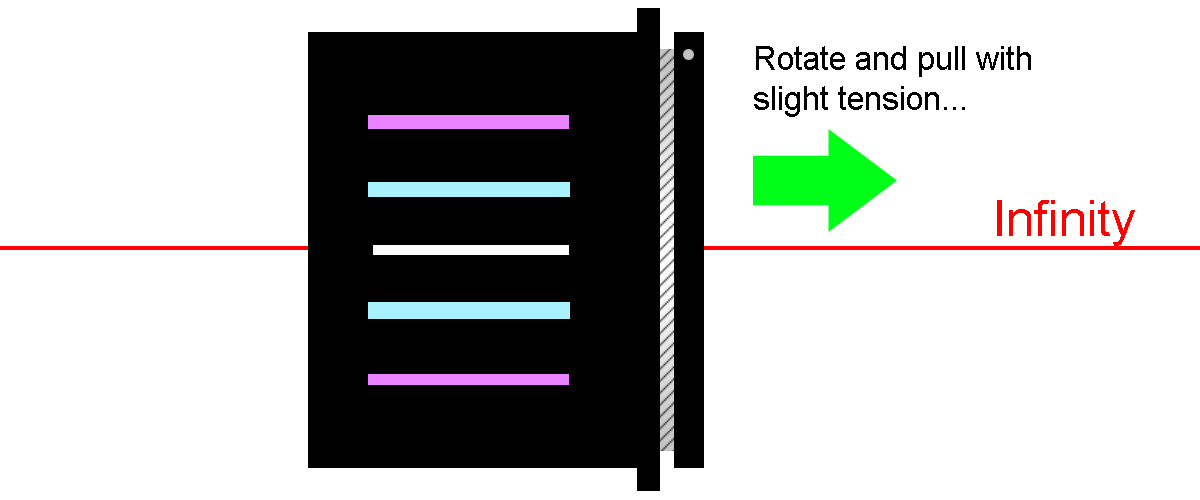
Rotate the helicoid while maintaining a light but even tension. Be careful with it and go slowly, pausing and checking the helicoids as you go so that you know how much more it will take before it separates.

It can be deceiving sometimes as it may seem that you still have a long way to go but the reality is you are only a few degrees away before they separate! Go slowly and gently as if you are a bank robber opening the safe to the national treasury.

Always use the median line of the lens (where the infinity mark line is) as a landmark so that you have a constant point of reference. The infinity line is also convenient because it is easy to remember.

helicoid2

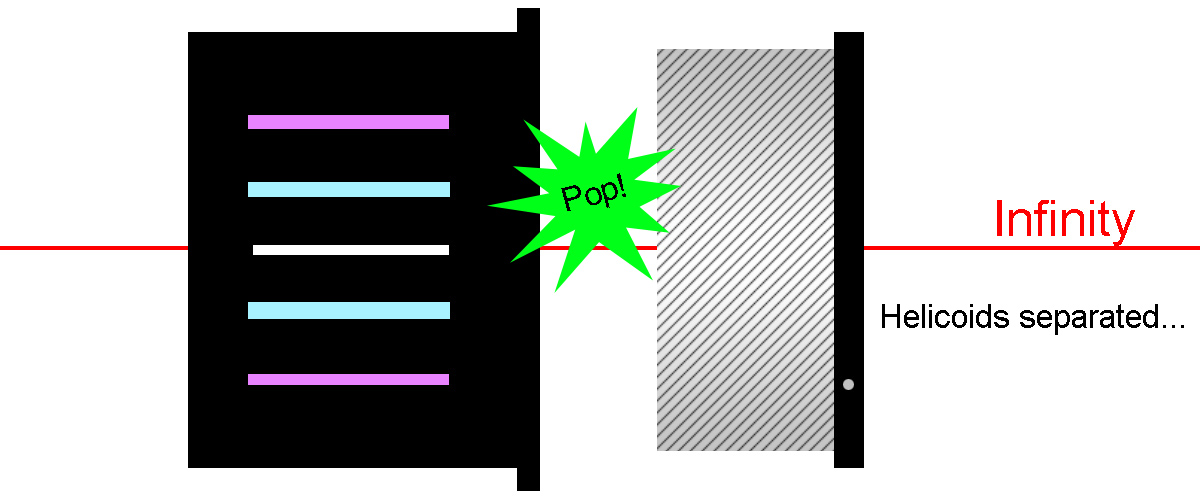
The tension that you are applying is to give you some indication wether the helicoids have separated or not. As the helicoids separate, you will feel a slight pop as an indication that you should stop turning your helicoids.

IMG_2257

The illustration above is just an exaggeration of what actually happens (to illustrate a point), in reality what you will have is closer this picture. The pop is more like a sensation of the helicoids separating.

Examine and take note where they have separated. This is a very important step so please take your time, missing this or getting this wrong will cost you a lot of time later on when you reassemble your lens!

Remember which part of the helicoid coincides with the infinity line of the main helicoid. There are times when Nikon would give you hints as to where these are. These hints will usually coincide with something else in the lens like the infinity line, a screw hole, a mark or engraved letter in the lens, a groove, etc. Be on the lookout for these!

Common hints are:

  • a clean hole that serves no purpose
  • a scratch made by Nikon or a repairman
  • the helicoid stop
  • slots and canals

In the absence of any of the above, sometimes the stain and grime left on the surface of the helicoid are what I use to remind me of the separation position. Anything goes!!!

helicoid3

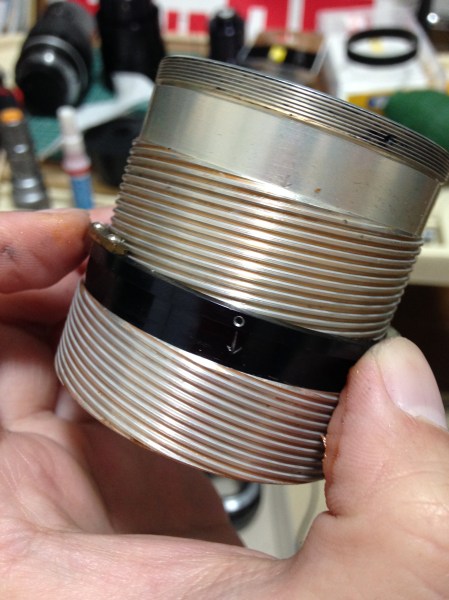
Be sure to mark the position by scratching a fine mark on the surface of the helicoid. Just be sure that the mark is small but clear enough for you to see and understand. Also make sure that the mark is not on the grooves or threads of the helicoid itself or in any moving mechanical part that comes in contact with that surface because it will interfere or make your focusing feel rough.

IMG_2055

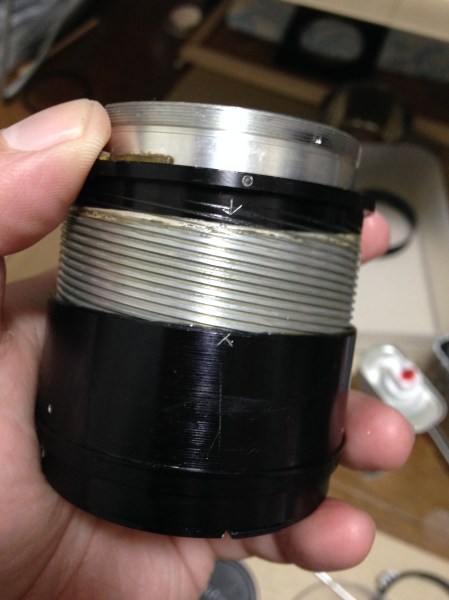
This is a real life example of how it should look like. Notice that the arrows align and mark where the helicoids separated. This is also the position that these should be in when you mate them back together again later.

You can also read this blog post with a video of me working on a set of helicoids. I’ll show you my workflow for guessing where a helicoid’s mating point it. It won’t work if you do not have any reference points or pictures of it before you separate them or pictures of it in it’s infinity position. Having any of those will help you guess where it should be.

IMG_1538

For lenses with CRC floating elements, be sure that you mark and measure the tolerances carefully because this is a precise alignment. Document everything that you can before you disassemble anything like this.

Finally, make sure that your mark is placed somewhere that will not be seen when the lens is reassembled.

Cleaning:

Once you get them separated, it is time to clean the disgusting stuff from the helicoids and replace them with fresh grease! Yeah!

IMG_1046

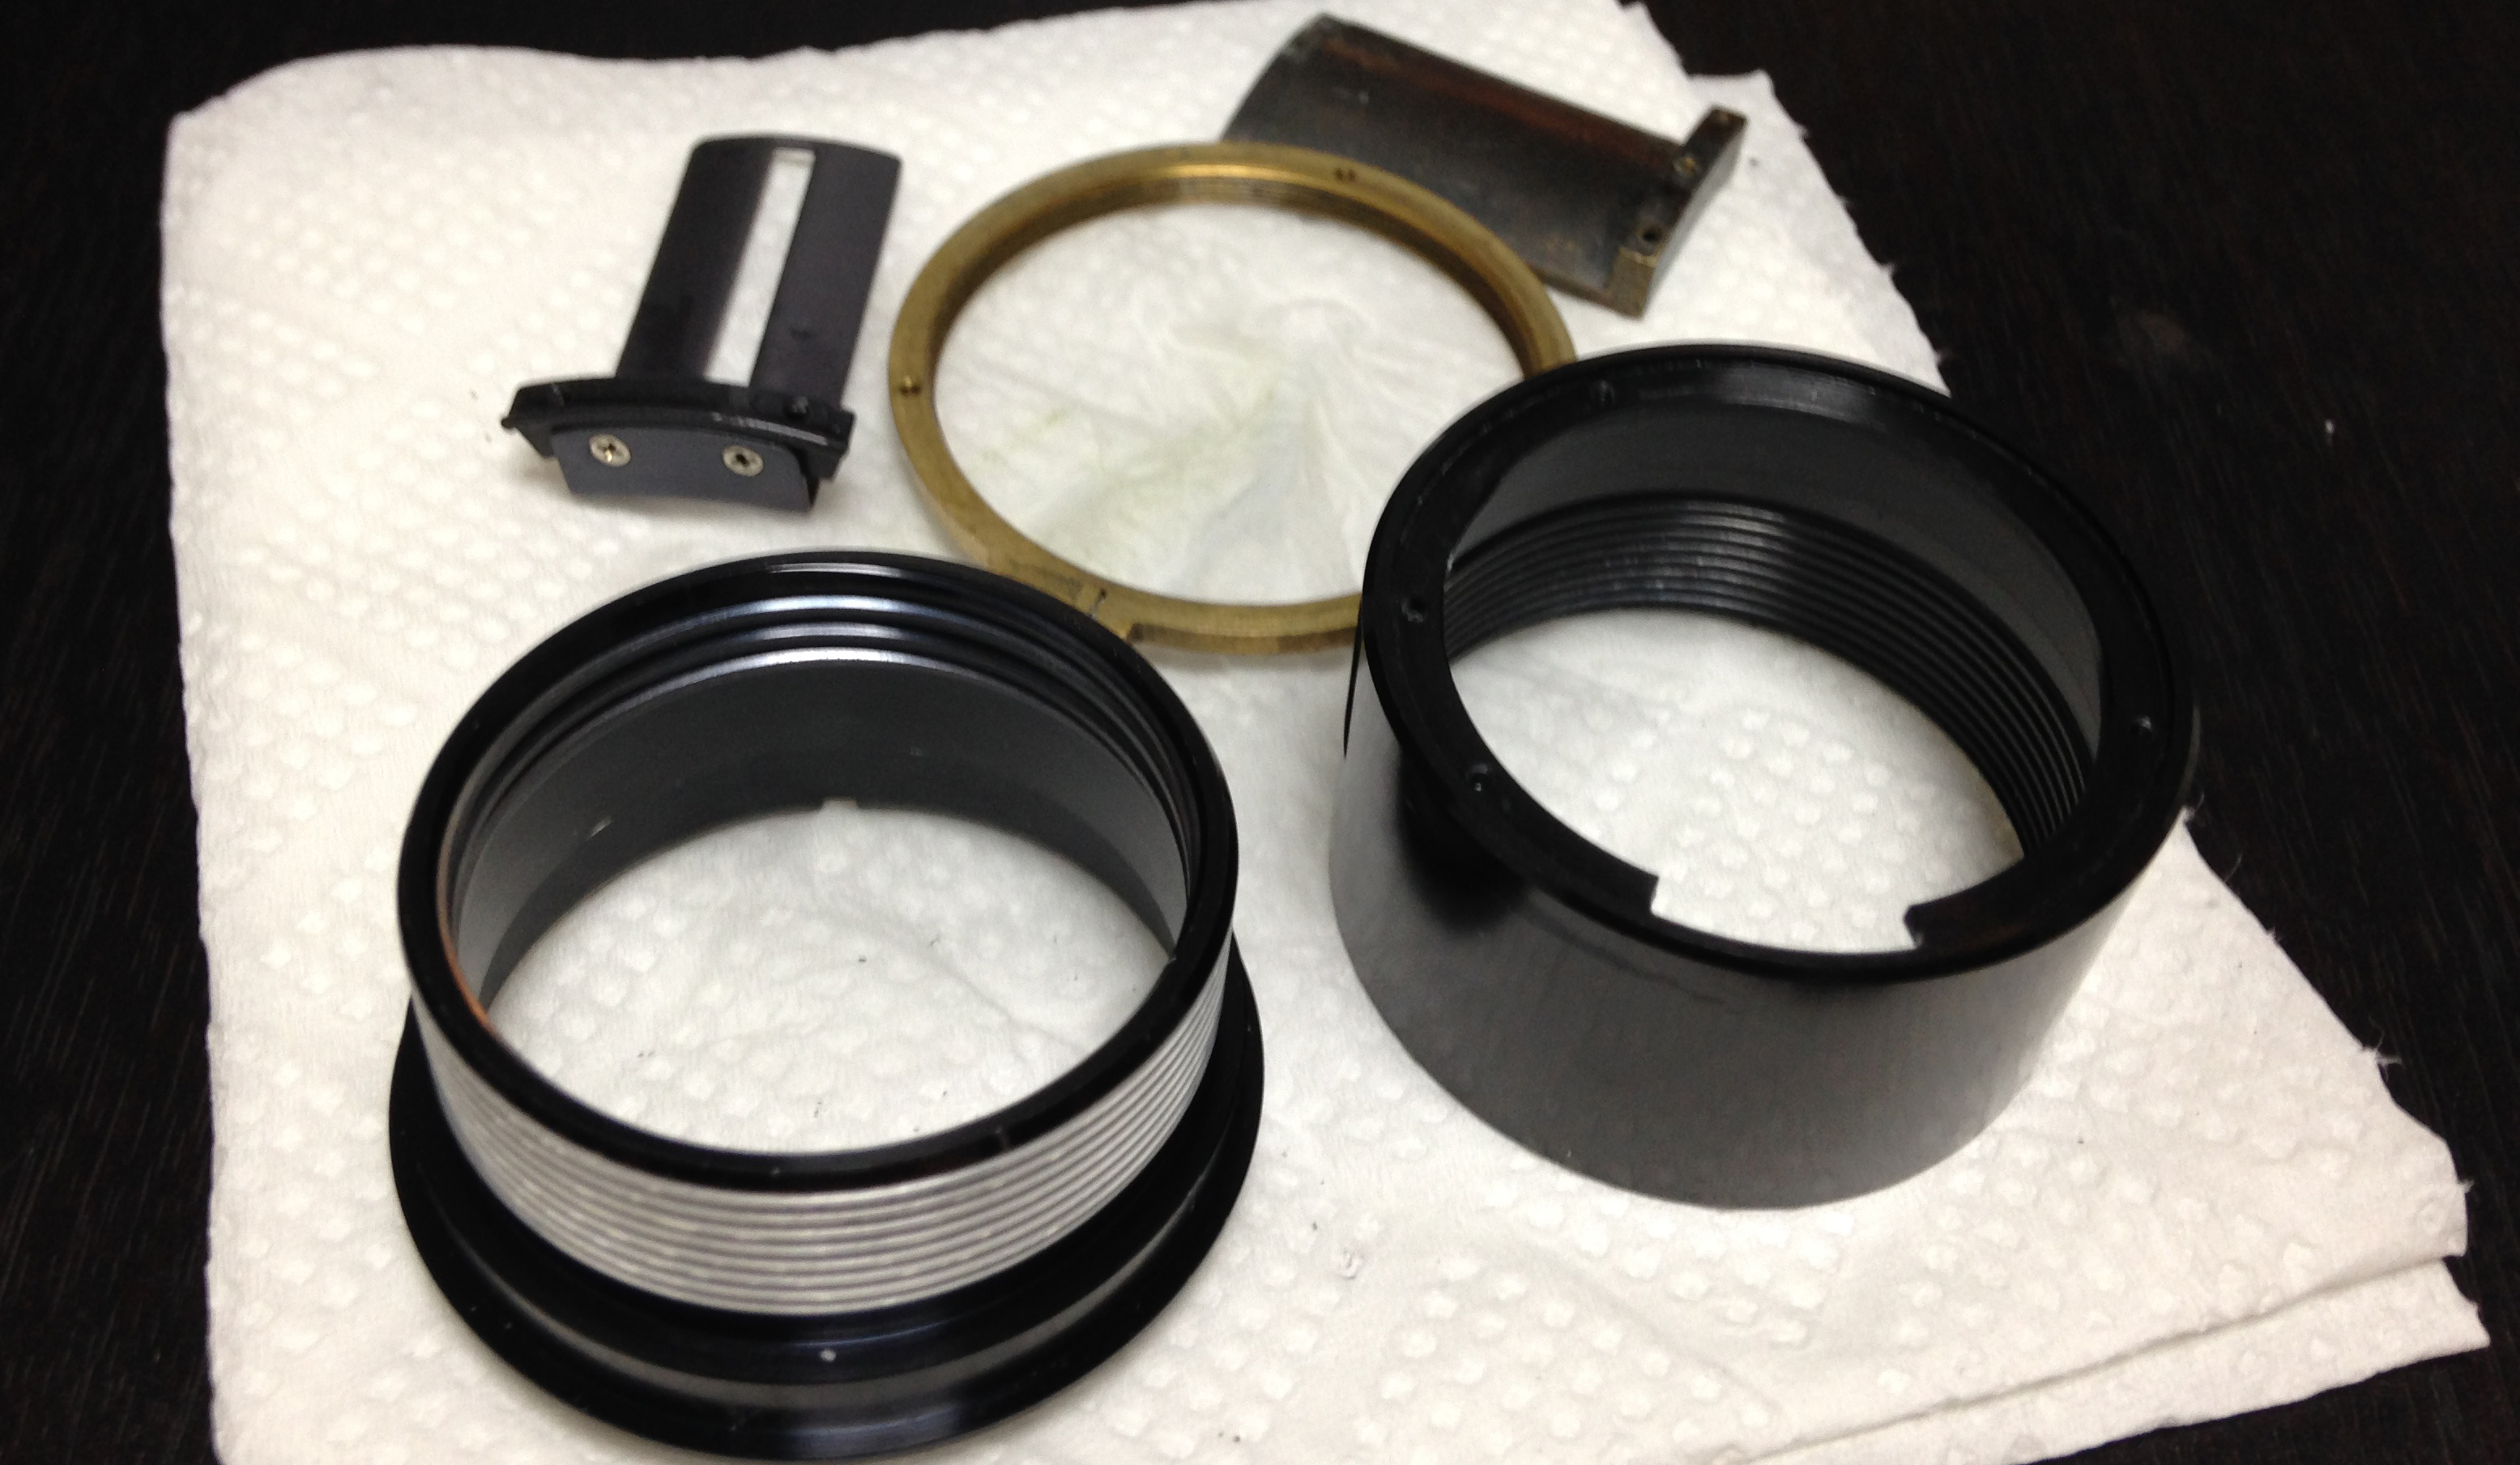
Prepare your helicoid so that they are safe from scratches. Any damage to the threads will be felt each time you turn your focusing ring and will even prevent you from mating these together again.

Start by wiping as much of the old grease from each part using Kleenex. You may use up to (4) sheets on a single helicoid so be sure that you have enough of it. This is the dry part of it. Next, apply some lighter fluid on the Kleenex and wipe the helicoids until most of the gunk is gone.

Now, go to your garage (I do this on the toilet) and scrub each helicoid with a toothbrush and some lighter fluid. You will make a mess on the floor so be prepared. Make sure that you do not leave any grime on the helicoids. For really stubborn and caked grime, a Dremel with a wire brush should do the trick. Just make sure that you use the soft type so you will not damage the threads of the helicoids. Never use this brush to clean anything else!

After all of the helicoids are cleaned mechanically with a brush, dunk these in a container with alcohol and leave it there for a couple of hours. This will remove any leftover dirt and it will soften the adhesive marks and other stuff so that you can simply wipe them off with a tissue later on. This is generally harmless to the helicoids and any of the metal parts of your lens but I got a case where the alcohol actually ruined the enamel of my lens, weird.

Wipe the helicoids dry with clean tissue until you do not see any dirt on the tissue after you wipe it. You do not want any of the old dirt to mix with the fresh grease! Use a bulb blower to blow away any fibres from the helicoids left by the Kleenex. Use a clean dry toothbrush and scrub the helicoids for the last time to make sure none of the grime is left on them.

IMG_1454

Make sure that your helicoids are dry and clean before you apply fresh grease. Mix the new grease first with a toothpick and then apply it with a flat brush. Do not apply too much of it or you will end up with an oily lens, too little and your focusing will not be damped.

Reassembly:

Simply align the helicoids to the marks that you have made when they separate and turn to the direction of the thread. Be careful and go gently on this step because if you use too much force you will wear the teeth down and mating the helicoids will be a tough job for you since it does’t “bite” anymore.

Rebuild your lens until you have reached the same point as you started. You should check the tolerances very well by referencing from the notes and markings that you made.

Conclusion:

I hope that you have enjoyed and learned from this blog post and if you have any ideas or experience that you would like to share, please leave me a comment and I will add it to this post. See you next time and thank you very much for following my blog, Ric.

Help Support this Blog:

Maintaining this blog requires money to operate. If you think that this site has helped you or you want to show your support by helping with the site’s upkeep, you can make a small donation to my paypal.com (richardHaw888@gmail.com). Money is not my prime motivation for this blog and I believe that I have enough to run this but you can help me make this site (and the companion facebook page) grow.

Buy me a roll of film or a burger?

Thank you very much for your continued support!

$2.00

Helping support this site will ensure that this will be kept going as long as I have the time and energy for this. I would appreciate it if you just leave out your name or details like your country’s name or other information so that the donations will totally be anonymous. This is a labor of love and I intend to keep it that way for as long as I can. Ric.

180 Comments (+add yours?)

  1. Trackback: Repair: Zoom-Nikkor 43-86mm f/3.5 (1/3) | Richard Haw's Classic Nikkor Maintenance Site
  2. Trackback: Repair: Nikkor 135mm f/2.8K/Ai/Ai-S | Richard Haw's Classic Nikkor Maintenance Site
  3. Trackback: Nikkor 200mm f/4 K/Ai | Richard Haw's Classic Nikkor Maintenance Site
  4. Trackback: Repair: Nikkor-Q 135mm f/3.5 | Richard Haw's Classic Nikkor Maintenance Site
  5. Trackback: Repair: PC-Nikkor 35mm f/3.5 | Richard Haw's Classic Nikkor Maintenance Site
  6. Trackback: Repair: Nikkor 35mm f/2.8 Ai | Richard Haw's Classic Nikkor Maintenance Site
  7. Trackback: Repair: Micro-Nikkor 5.5cm f/3.5 (1/2) | Richard Haw's Classic Nikkor Maintenance Site
  8. Trackback: Repair: Nikkor 50mm f/1.2 Ai-S (Dust Removal) | Richard Haw's Classic Nikkor Maintenance Site
  9. Trackback: Repair: Nikkor-Q 135mm f/2.8 | Richard Haw's Classic Nikkor Maintenance Site
  10. Trackback: Lens Repair (4): Coming from the front – My Take on Photography and Diving (Underwater Photography Mostly)
  11. Trackback: Mod: Nikon Df Split Prism | Richard Haw's Classic Nikkor Maintenance Site
  12. Trackback: Repair: Noct-Nikkor 58mm f/1.2 Ai-S | Richard Haw's Classic Nikkor Maintenance Site
  13. Trackback: Internet Nikon Repair Resources – My Take on Photography and Diving (Underwater Photography Mostly)
  14. Trackback: Mod: Alternative Ai Conversion Method | Richard Haw's Classic Nikkor Maintenance Site
  15. Trackback: 36~72mm f/3.5 Nikon Lens Series E Disassembly and Cleaning – My Take on Photography and Diving (Underwater Photography Mostly)
  16. Trackback: Repair: Zoom-Nikkor 43-86mm f/3.5 (2/3) | Richard Haw's Classic Nikkor Maintenance Site
  17. Trackback: Repair: Nikon PN-11 Extension Tube | Richard Haw's Classic Nikkor Maintenance Site
  18. Trackback: Repair: Nikkor-O 35mm f/2 | Richard Haw's Classic Nikkor Maintenance Site
  19. Trackback: Repair: “Shneideritis” & Edge Separation | Richard Haw's Classic Nikkor Maintenance Site
  20. Trackback: Repair: Nikkor 85mm f/2 Ai-S | Richard Haw's Classic Nikkor Maintenance Site
  21. Trackback: Repair: Nikon FE Camera Back Lock | Richard Haw's Classic Nikkor Maintenance Site
  22. Trackback: Repair: Nikon F Eye-Level Finder | Richard Haw's Classic Nikkor Maintenance Site
  23. Trackback: Repair: Nikon F Photomic Ftn (Foam) | Richard Haw's Classic Nikkor Maintenance Site
  24. Trackback: Repair: Nikkor-S 50mm f/1.4 | Richard Haw's Classic Nikkor Maintenance Site
  25. Trackback: Repair: Zoom-Nikkor 80-200mm f4 Ai-S | Richard Haw's Classic Nikkor Maintenance Site
  26. Trackback: Repair: Nikkor 50mm f/1.8 Ai-S | Richard Haw's Classic Nikkor Maintenance Site
  27. Trackback: Repair: Auto-Nikkor-Q 200mm f/4 | Richard Haw's Classic Nikkor Maintenance Site
  28. Trackback: Project: Ai Conversion | Richard Haw's Classic Nikkor Maintenance Site
  29. Trackback: Repair: Micro-Nikkor 55mm f/2.8 Ai-S | Richard Haw's Classic Nikkor Maintenance Site
  30. Trackback: Repair: New Nikkor 55mm f/1.2 | Richard Haw's Classic Nikkor Maintenance Site
  31. Trackback: Repair: Nikkor 28mm f/3.5 Ai-S | Richard Haw's Classic Nikkor Maintenance Site
  32. Trackback: Minolta MD Zoom 35-70mm f/3.5 Disassembly and Cleaning – My Take on Photography and Diving (Underwater Photography Mostly)
  33. Trackback: Repair: Nikon DE-1 Eye Level Finder | Richard Haw's Classic Nikkor Maintenance Site
  34. Trackback: Repair: Nikkor 50mm f/2K (New-Nikkor) | Richard Haw's Classic Nikkor Maintenance Site
  35. Trackback: 80-200mm f/4.5 Zoom-Nikkor.C Disassembly and Cleaning – My Take on Photography and Diving (Underwater Photography Mostly)
  36. Trackback: Repair: Nikkor-Q 20cm f/4 | Richard Haw's Classic Nikkor Maintenance Site
  37. Trackback: Repair: Micro-Nikkor-P 55mm f/3.5 Auto | Richard Haw's Classic Nikkor Maintenance Site
  38. Trackback: Repair: Zoom-Nikkor 43-86mm f/3.5 Ai (3/3) | Richard Haw's Classic Nikkor Maintenance Site
  39. Trackback: Repair: Micro-Nikkor 105mm f/2.8 Ai-S | Richard Haw's Classic Nikkor Maintenance Site
  40. Trackback: Repair: Nikon S2 Front Overhaul | Richard Haw's Classic Nikkor Maintenance Site
  41. Trackback: Repair: Nikkor-S.C 55mm f/1.2 | Richard Haw's Classic Nikkor Maintenance Site
  42. Trackback: Repair: Nikon Bayonet Screws (Video) | Richard Haw's Classic Nikkor Maintenance Site
  43. Trackback: Fujinon 55mm f/1.8 M42 (Early Version) Disassembly and Cleaning – My Take on Photography and Diving (Underwater Photography Mostly)
  44. Trackback: Nikon 50mm f/1.4 Ai Disassembly and Cleaning – My Take on Photography and Diving (Underwater Photography Mostly)
  45. Trackback: 50mm f/1.8 Nikon Lens Series E – Disassembly and Cleaning (updated 1 Apr 2017) – My Take on Photography and Diving (Underwater Photography Mostly)
  46. Trackback: 28mm f/2.8 Nikon Lens Series E – Cleaning – My Take on Photography and Diving (Underwater Photography Mostly)
  47. Trackback: Repair: W-Nikkor 3.5cm f/3.5 | Richard Haw's Classic Nikkor Maintenance Site
  48. Trackback: Nikon 35-70mm f/3.3-4.5 AiS Disassembly – My Take on Photography and Diving (Underwater Photography Mostly)
  49. Trackback: Repair: Auto-Nikkor-P 105mm f/2.5 | Richard Haw's Classic Nikkor Maintenance Site
  50. Trackback: Repair: Auto-Nikkor-P.C. 105mm f/2.5 | Richard Haw's Classic Nikkor Maintenance Site
  51. Prakash
    May 07, 2017 @ 17:20:02

    I have a beautiful Rokkor 40 f2. (M mount) while in the process of cleaning managed to get the helicoid out and am struggling to put it back. Could this be fixed?

    Reply

    • richardhaw
      May 08, 2017 @ 02:00:58

      Hello, Prakash.
      Please try the trick that I am showing in the video and guess it for yourself. It is going to take you a lot of time but that is what you get for not taking any notes. Good luck, Ric.

      Reply

  52. Trackback: Repair: Nikon SP/S3/S4/F Shutter Speed Calibration | Richard Haw's Classic Nikkor Maintenance Site
  53. Trackback: Repair: Nikkor-P 180mm f/2.8 Auto | Richard Haw's Classic Nikkor Maintenance Site
  54. Trackback: Review: Fujifilm Natura 1600 | Richard Haw's Classic Nikkor Maintenance Site
  55. Trackback: Repair: Nikkor-H.C 5cm f/2 RF | Richard Haw's Classic Nikkor Maintenance Site
  56. Trackback: Repair: RF-Nikkor-P.C 105mm f/2.5 | Richard Haw's Classic Nikkor Maintenance Site
  57. Trackback: Repair: Nikon MD-4 | Richard Haw's Classic Nikkor Maintenance Site
  58. Trackback: Repair: Nikkor-S 5.8cm f/1.4 Auto | Richard Haw's Classic Nikkor Maintenance Site
  59. Trackback: Repair: Nikon MD-3 Noisy Gear | Richard Haw's Classic Nikkor Maintenance Site
  60. Trackback: Repair: RF-Nikkor-P.C 8.5cm f/2 | Richard Haw's Classic Nikkor Maintenance Site
  61. Trackback: Articles Index | Richard Haw's Classic Nikkor Maintenance Site
  62. Trackback: Oily Aperture Cleaning – Minolta MC Rokkor-PF 58mm f/1.4 – My Take on Photography and Diving (Underwater Photography Mostly)
  63. Trackback: Repair: Nikon 100mm f/2.8E | Richard Haw's Classic Nikkor Maintenance Site
  64. Trackback: Repair: AF-Nikkor 50mm f/1.8D | Richard Haw's Classic Nikkor Maintenance Site
  65. Trackback: Asahi Pentax 55mm f/1.8 Super-Multi-Coated Takumar – Disassembly and Clean-up – My Take on Photography and Diving (Underwater Photography Mostly)
  66. Trackback: Asahi Pentax 150mm f/4 Super-Multi-Coated Takumar – Disassembly and Clean-up – My Take on Photography and Diving (Underwater Photography Mostly)
  67. Trackback: Repair: Testing and Cleaning Junk Cameras (Nikon FE2) | Richard Haw's Classic Nikkor Maintenance Site
  68. Trackback: Repair: W-Nikkor 3.5cm f/1.8 | Richard Haw's Nikon Maintenance Site
  69. Trackback: Repair: Bronica Helicoids | Richard Haw's Nikon Maintenance Site
  70. Trackback: Repair: Nikkor 105mm f/2.5K | Richard Haw's Nikon Maintenance Site
  71. Trackback: Repair: Nikkor-N 24mm f/2.8 Auto | Richard Haw's Nikon Maintenance Site
  72. Trackback: Repair: Tokina 28-70 AT-X PRO | Richard Haw's Nikon Maintenance Site
  73. Trackback: Repair: AF-Nikkor 70-210mm f/4 | Richard Haw's Nikon Maintenance Site
  74. Trackback: Repair: AF Micro-Nikkor 60mm f/2.8D | Richard Haw's Nikon Maintenance Site
  75. Trackback: Repair: Nikkor 20mm f/3.5 Ai-S | Richard Haw's Nikon Maintenance Site
  76. Trackback: Repair: Micro-Nikkor 105mm f/4 Ai | Richard Haw's Nikon Maintenance Site
  77. Trackback: Private: Repair: W-Nikkor.C 2.8cm f/3.5 | Richard Haw's Nikon Maintenance Site
  78. Trackback: Repair: Nikon SP 1/3 | Richard Haw's Nikon Maintenance Site
  79. Trackback: Repair: Nikon SP 2/3 | Richard Haw's Nikon Maintenance Site
  80. Trackback: Repair: Nikkor-T 10.5cm f/4 | Richard Haw's Nikon Maintenance Site
  81. Trackback: Repair: Nikon SP 3/3 | Richard Haw's Nikon Maintenance Site
  82. Trackback: Repair: Nikkor 105mm f/2.5 Ai-S | Richard Haw's Nikon Maintenance Site
  83. Trackback: Repair: Nikkor-Q.C 13.5cm f3.5 RF | Richard Haw's Nikon Maintenance Site
  84. Trackback: Repair: Nikkormat EL | Richard Haw's Nikon Maintenance Site
  85. Trackback: Repair: Nikkor 28mm f/2.8 Ai-S | Richard Haw's Nikon Maintenance Site
  86. Trackback: Repair: Nicca 3S (part 1) | Richard Haw's Nikon Maintenance Site
  87. Trackback: Repair: Nicca 3S (part 2) | Richard Haw's Nikon Maintenance Site
  88. Trackback: Repair: NIkkor 135mm f/3.5 Ai | Richard Haw's Nikon Maintenance Site
  89. Trackback: Repair: New-Nikkor 85mm f/1.8 | Richard Haw's Nikon Maintenance Site
  90. Trackback: Repair: AF-S DX NIKKOR 18-200mm f/3.5-5.6G ED VR II | Richard Haw's Nikon Maintenance Site
  91. Trackback: Repair: Nikkor-H.C 5cm f/2 (LTM) | Richard Haw's Nikon Maintenance Site
  92. Trackback: Lens Repair (5): Helicoids – My Take on Photography and Diving (Underwater Photography Mostly)
  93. Trackback: Nikon 35mm f/2.8 AiS – My Take on Photography (Lens Repairs Mostly)
  94. Trackback: Repair: Nikkor 85mm f/1.4 Ai-S | Richard Haw's Nikon Maintenance Site
  95. Trackback: Poor-man’s Summicron (貧者ズミクロン) Ricoh XR Rikenon 50mm f/2 – My Take on Photography (Lens Repairs Mostly)
  96. Trackback: Rikenon XR 50mm f/2 S – Fungus Cleaning – My Take on Photography (Lens Repairs Mostly)
  97. Trackback: Repair: Zoom-Nikkor 80-200mm f/4.5 | Richard Haw's Nikon Maintenance Site
  98. Trackback: Private: Repair: Zeiss Ikon Contax 2 Part 1 | Richard Haw's Nikon Maintenance Site
  99. Trackback: Repair: Zeiss Ikon Contax 2 Part 2 | Richard Haw's Nikon Maintenance Site
  100. Trackback: Private: Repair: Zeiss Ikon Contax 2 Part 3 | Richard Haw's Nikon Maintenance Site
  101. Trackback: Repair: Micro-Nikkor-P.C 55mm f/3.5 Auto | Richard Haw's Nikon Maintenance Site
  102. Trackback: Repair: Nikkor-H 300mm f4.5 Auto | Richard Haw's Nikon Maintenance Site
  103. Trackback: Repair: AF-Micro-Nikkor 55mm f/2.8 | Richard Haw's Nikon Maintenance Site
  104. Trackback: Repair: Nikon S (Part 1) | Richard Haw's Nikon Maintenance Site
  105. Trackback: Repair: Nikkor 180mm f/2.8 ED Ai-S | Richard Haw's Nikon Maintenance Site
  106. Trackback: Repair: W-Nikkor・C 3.5cm f/2.5 | Richard Haw's Nikon Maintenance Site
  107. Trackback: Repair: Nikon 35mm f/2.5 Series E | Richard Haw's Nikon Maintenance Site
  108. Trackback: Repair: Nikkor 35mm f/2 Ai | Richard Haw's Nikon Maintenance Site
  109. Trackback: Repair: GN Auto-Nikkor 45mm f/2.8 | Richard Haw's Nikon Maintenance Site
  110. Trackback: Repair: New-Nikkor 50mm f/1.4 v1 | Richard Haw's Nikon Maintenance Site
  111. Trackback: Repair: New-Nikkor 50mm f/1.4 v2 | Richard Haw's Nikon Maintenance Site
  112. Trackback: Repair: Nikkor 85mm f/2 Ai | Richard Haw's Classic Nikon Repair and Review
  113. Trackback: Repair: Nikon EM | Richard Haw's Classic Nikon Repair and Review
  114. Trackback: Canon 50mm f/1.8 FD SC (Version I) Overhaul – My Take on Photography (Lens Repairs Mostly)
  115. Trackback: 5cm f/2 Nikkor-S Disassembly – My Take on Photography (Lens Repairs Mostly)
  116. Trackback: Repair: Nikkor-S.C 5cm f/1.4 | Richard Haw's Classic Nikon Repair and Review
  117. Trackback: Repair: Nikkor-Q.C 5cm f/3.5 | Richard Haw's Classic Nikon Repair and Review
  118. Trackback: Repair: W-Nikkor.C 3.5cm f/3.5 (LTM) | Richard Haw's Classic Nikon Repair and Review
  119. Trackback: Repair: Nikon FM2n | Richard Haw's Classic Nikon Repair and Review
  120. Trackback: Repair: Nikon 50mm f/1.8 Series-E | Richard Haw's Classic Nikon Repair and Review
  121. Trackback: Repair: Nikon FE | Richard Haw's Classic Nikon Repair and Review
  122. Trackback: Repair: Nikkormat FTn part 1 | Richard Haw's Classic Nikon Repair and Review
  123. Trackback: Repair: Nikkor 35mm f/2.8 Ai-S | Richard Haw's Classic Nikon Repair and Review
  124. Trackback: 200mm f/4 K Disassembly, Overhaul and Clean-up – My Take on Photography (Lens Repairs Mostly)
  125. Trackback: Nikon 135mm f/2.8 Nikkor-Q (and -QC) – My Take on Photography (Lens Repairs Mostly)
  126. Trackback: Repair: Nikkormat FTn part 2 | Richard Haw's Classic Nikon Repair and Review
  127. Trackback: Repair: Nikkorex F part 1 | Richard Haw's Classic Nikon Repair and Review
  128. Trackback: Minolta 50mm f/1.7 MD Rokkor – My Take on Photography (Lens Repairs Mostly)
  129. Trackback: Repair: Nikkorex F part 2 | Richard Haw's Classic Nikon Repair and Review
  130. Trackback: Mod: Converting Gadgets to Use 1.5v Batteries | Richard Haw's Classic Nikon Repair and Review
  131. Trackback: Repair: Nikkor-H 50mm f/2 Auto | Richard Haw's Classic Nikon Repair and Review
  132. Trackback: Repair: Nikkor-H•C 5cm f/2 LTM (collapsible) | Richard Haw's Classic Nikon Repair and Review
  133. Trackback: Repair: Nikkor 28mm f/2.8 Ai | Richard Haw's Classic Nikon Repair and Review
  134. Trackback: Repair: New-Nikkor 35mm f/2.8 (Early Ai) | Richard Haw's Classic Nikon Repair and Review
  135. Trackback: Repair: Nikkor-H.C 28mm f/3.5 Auto | Richard Haw's Classic Nikon Repair and Review
  136. Trackback: Repair: Nikon S2 part 1 | Richard Haw's Classic Nikon Repair and Review
  137. Trackback: Repair: Nikkor-Q•C 5cm f/3.5 (Collapsible) | Richard Haw's Classic Nikon Repair and Review
  138. Trackback: Repair: Nikon S2 part2 | Richard Haw's Classic Nikon Repair and Review
  139. Trackback: Repair: New-Nikkor 135mm f/2 | Richard Haw's Classic Nikon Repair and Review
  140. Trackback: Repair: Nikon S2 part 3 | Richard Haw's Classic Nikon Repair and Review
  141. Trackback: Repair: Nikon S2 part 4 | Richard Haw's Classic Nikon Repair and Review
  142. Trackback: The Chinese Biotar: Haiou-64 海鸥 58mm f/2 (SR) – My Take on Photography (Lens Repairs Mostly)
  143. Trackback: Repair: Nikon 75-150mm f/3.5 Series E | Richard Haw's Classic Nikon Repair and Review
  144. Trackback: Repair: W-Nikkor•C 2.8cm f/3.5 (LTM) | Richard Haw's Classic Nikon Repair and Review
  145. Trackback: Repair: Micro-Nikkor 5.5cm f/3.5 (2/2) | Richard Haw's Classic Nikon Repair and Review
  146. Trackback: Repair: New-Nikkor 20mm f/4 | Richard Haw's Classic Nikon Repair and Review
  147. Trackback: Repair: Nikkor 24mm f/2.8 Ai-S | Richard Haw's Classic Nikon Repair and Review
  148. Trackback: Repair: Nikon S3/S4 part1 | Richard Haw's Classic Nikon Repair and Review
  149. Trackback: Repair: Nikon S3/S4 part 2 | Richard Haw's Classic Nikon Repair and Review
  150. Trackback: Repair: Nikon S3/S4 part 3 | Richard Haw's Classic Nikon Repair and Review
  151. Trackback: Repair: Nikon FG | Richard Haw's Classic Nikon Repair and Review
  152. Trackback: Repair: Nikkor 135mm f/2.8 Ai-S | Richard Haw's Classic Nikon Repair and Review
  153. Trackback: Repair: Nikon FM3A | Richard Haw's Classic Nikon Repair and Review
  154. Trackback: Repair: Nikkor-T 10.5cm f/4 (S-Mount) | Richard Haw's Classic Nikon Repair and Review
  155. Trackback: Repair: Nikon S3/S4 part4 | Richard Haw's Classic Nikon Repair and Review
  156. Trackback: Repair: Nikon S3/S4 part 5 | Richard Haw's Classic Nikon Repair and Review
  157. Trackback: Repair: Canon 7 part 1 | Richard Haw's Classic Nikon Repair and Review
  158. Trackback: Repair: Canon 7 part 2 | Richard Haw's Classic Nikon Repair and Review
  159. Trackback: Repair: Nikon F part 1 | Richard Haw's Classic Nikon Repair and Review
  160. Tom Wasilewski
    May 08, 2020 @ 17:32:24

    Hello Richard.
    Thank God I found your blog!
    My problem is that I’ve got a stripped-down lens with unbranded helicoid settings. The lens “broke” during the inspection and I don’t know how to hit the right settings. This is a copy of the Vivitar 200mm f/3.5 T-mount with 18 leaf aperture, Dollonds-S to be exact. Could you suggest anything? My amateur enthusiastic knowledge has just fallen on a thousand infinity tests.

    Kind regards,

    Tom

    Reply

  161. Trackback: Repair: New-Nikkor 135mm f/2.8 | Richard Haw's Classic Nikon Repair and Review
  162. Trackback: Repair: Nikon F part 2 | Richard Haw's Classic Nikon Repair and Review
  163. Trackback: Repair: Nikon F part 3 | Richard Haw's Classic Nikon Repair and Review
  164. Trackback: Repair: Nikkor 50mm f/1.8 Ai-S (Long-Nose) | Richard Haw's Classic Nikon Repair and Review
  165. Trackback: Repair: Nikkor 135mm f/3.5 Ai-S | Richard Haw's Classic Nikon Repair and Review
  166. Trackback: Repair: Nikkor-H 85mm f/1.8 Auto | Richard Haw's Classic Nikon Repair and Review
  167. Trackback: Repair: Nikon D3 (Foggy LCD) | Richard Haw's Classic Nikon Repair and Review
  168. Trackback: Repair: Zoom-Nikkor ED 360-1200mm f/11 Ai-S | Richard Haw's Classic Nikon Repair and Review
  169. Trackback: Repair: Nikon L35AF/AD | Richard Haw's Classic Nikon Repair and Review
  170. Trackback: Repair: Zoom-Nikkor 35-70mm f/3.3-4.5 AF (N) | Richard Haw's Classic Nikon Repair and Review
  171. Trackback: Repair: Ihagee Exa | Richard Haw's Classic Nikon Repair and Review
  172. Trackback: Nikon 35mm f/2.8 K Tear Down and Overhaul – My Take on Photography (Lens Repairs Mostly)
  173. Trackback: Nikon 135mm f/2.8 Nikkor K – a repair that was most challenging! – My Take on Photography (Lens Repairs Mostly)
  174. Trackback: The Legendary 105mm f/2.5 Nikkor K Tear Down and Overhaul – My Take on Photography (Lens Repairs Mostly)
  175. Trackback: Nikon 50mm Repair Guide f1.8 AiS - High 5 Cameras
  176. James Macnamara
    Nov 18, 2023 @ 14:27:05

    So…I found this after I was having problems with re aligning everything in the Helicoid assembly, I did some googling and realised I should have made a lot more marks. Is there a way I can get it back to how it was before I disassembled it? The lens I have is a second generation Super Takumar 50mm f1.4. Thanks.

    Reply

  177. Trackback: Nikkor-H•C 5cm f/2 (Leica Thread Mount) | Richard Haw's Classic Nikon Repair and Review
  178. Trackback: How not to attempt the repair of a vintage Auto Revuenon 55mm f1.4 lens - Fokuspoint Photography
  179. Trackback: Repair: Seiki Kogaku S (part 1) | Richard Haw's Classic Nikon Repair and Review

Leave a comment