
Hello, everybody. I would like to apologies for not posting much these days and I also can not answer your questions as fast as I used to because I am suffering from hay fever. It is difficult and it affects everything I do. In fact, I was supposed to cover CP+ for you but it’s too much trouble for me to go there in this state. The medication helps but I get dizzy if I take it and I feel like I am looking-through a large aperture lens. Everything is “bokeh” in my vision and it’s not fun. Speaking of bokeh, I’ll show you a nice lens for that in this post and it is the type of bokeh that will make you happy. Stay with me and listen.
Introduction:
Today, we will talk about a lens that was considered by many people to be one of Nikon’s original “bokeh kings” in the past. They can be had for cheap because many of them does not come with the Ai-ring upgrade and so many people poo-poo manual focus lenses in favor of the newer autofocus or VR equipped lenses. I will show you why this lens is worth hunting and how it can be of great use to you creatively when you know how to use this lens.

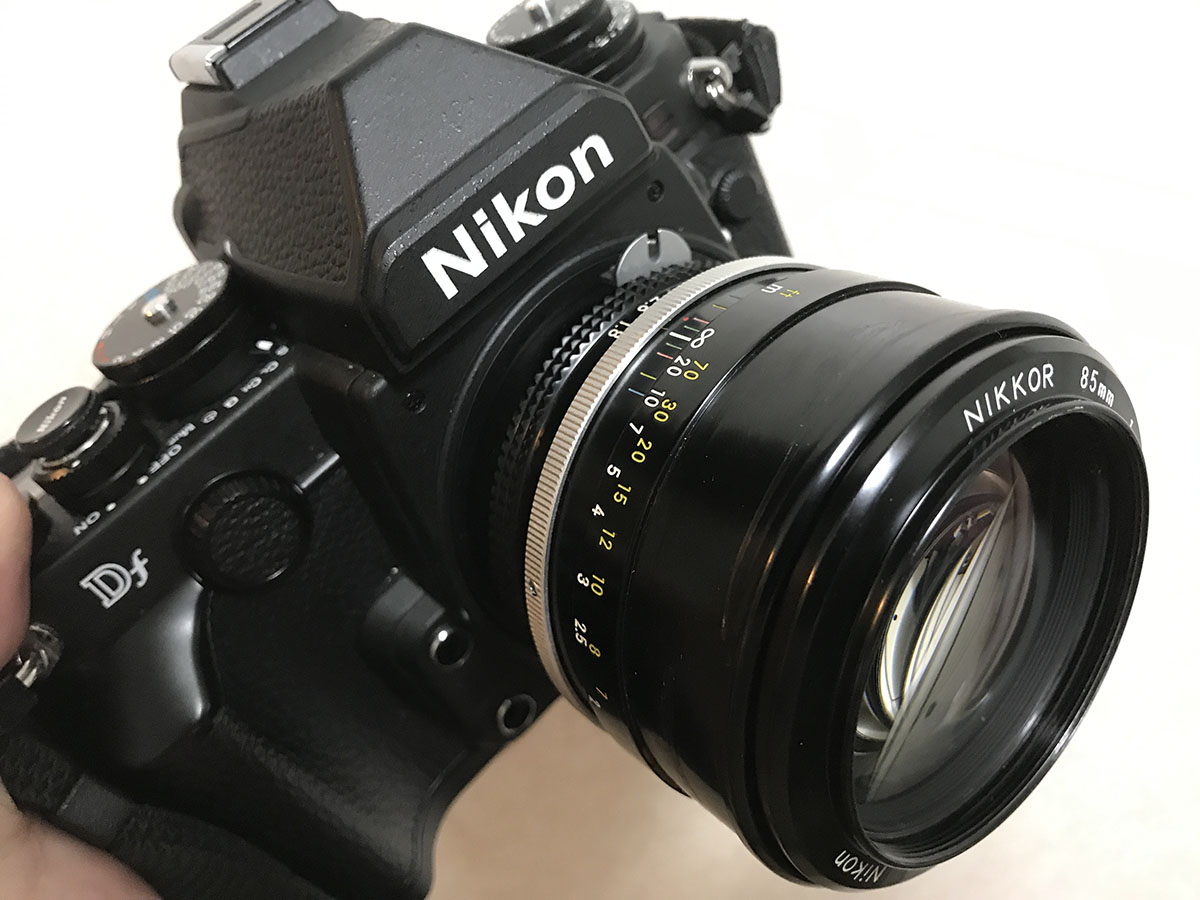
The New-Nikkor 85mm f/1.8 is considered to be a classic. It is a good upgrade to the lens it replaced (Nikkor-H 85mm f/1.8 Auto). It has a new barrel to be consistent with the New-Nikkor theme which also improves handling. Nikon made a masterpiece when they designed this lens and it was a difficult act to follow. In fact, it kept its place in many photographers’ bag even if it was replaced by the Nikkor 85mm f/2 Ai and the Nikkor 85mm f/2 Ai-S that came after it. Many consider that the slight drop in lens speed is a downgrade and despite the fact that the newer ones are smaller, many people still love this one a lot because of how well it performs and the unique look of the photos taken with this lens.
The Nikkor-H 85mm f/1.8 Auto is an amazing lens, it filled the missing focal length for the F-mount. Nikon has the Nikkor-P.C 8.5cm f/2 for the S-mount but there was no 85mm lens for the F-mount until the Nikkor-H 85mm f/1.8 Auto debuted and it quickly became a hit. The lens in this article is not only a cosmetic upgrade but was also re-calculated so it can focus closer and give better results at closer distances. This is big and heavy but it’s well-balanced even when mounted on smaller cameras like the Nikon FM.
The optical formula of this lens is simple, it only has 6 elements in 4 groups and that’s a big thing since you have less air-to-glass surfaces. Lenses with less elements will give you a more natural look in general because light gets “processed” and “filtered” on each element it passes through. Less elements also means that it is less vulnerable to flare and ghosting because there are less surfaces for light to reflect from. While improvements in lens coatings negated this advantage somewhat it’s still an important factor to consider.
Some people claim that this lens is superior to the lenses that succeeded it, I can say that it is not without basis that such a claim came to be. I shoot with all lenses in the 85/2 and 85/1.8 family and I can say this has a different look to its rendering and the performance can even be better in some cases.
The following sets of photos were shot at f/1.8, f/2.8 and f/4 respectively. This should give you an idea of how this performs and which aperture to use to get the look that you want. I’ll use the word “look” a lot in this introduction because I use this lens just for the unique rendering it gives to my pictures. I choose lenses like I choose my airbrushes or paint brushes, it all depends on what kind of look I’m after. The good thing about it is this lens changes character as you stop it down and this will help you a lot when it comes to making artistic decisions. Some people just want to shoot a lens wide-open and while that is OK, you will want to examine and learn to use your lenses by seeing how it performs under every useful aperture. This will help you determine if a lens is rubbish or if it’s worth keeping. Gladly for this lens, I can confidently say that this is a keeper! Look at my samples and judge this lens for yourself.


(Click to enlarge)
I shot these boring photos above to show you how this lens performs when it comes to chromatic aberration and similar artifacts. Lenses with faster or larger maximum apertures tend to fare poorly here but on the other hand it also means that these lenses have better “3D pop” because the uncorrected “flaws” add to the unique look of the photos. Wide-open, you can see a bit of magenta or green tinting on the highlights which quickly goes away by f/2.8 and you will also notice a little bit of blooming at the highlights which you can use to your creative advantage. This lens is sharp even wide-open and it will get even better as you stop it down to f/2.8. It’s performing at its peak by f/4 or f/5.6.


(Click to enlarge)
People buy this lens for the bokeh and it doesn’t disappoint here. The bokeh balls look pleasing wide-open but the 6-sided iris quickly shows its ugly face at f2.8 and by f/4 the balls look polygonal. Some like this polygonal look and to be honest, I prefer this look sometimes. This all depends on your creative taste and direction.


(Click to enlarge)
This set reminds me of the opening scene of the Welcome to the Jungle MTV. You get a bit of elongated bokeh balls near the edges with this lens because of the huge front element. The good thing is the balls look even so you don’t get any harsh edges or concentric rings on the bokeh balls. It all looks very natural and delicate to say the least.


(Click to enlarge)
This lens shines when it comes to shooting subjects at closer distances. The center is sharp wide-open but the very thin DOF makes it difficult to focus. The subject seemingly pop in front of you and the vignetting also helps give you this illusion. It gets better as you stop it down a bit and the background still looks nice and creamy. The vignetting is now gone and the frame looks evenly-bright. I shot this against the sky just to show you how the vignetting looks, nobody takes these kinds of pictures unless your shooting birds.


(Click to enlarge)
I shot some foliage in the background on purpose so we can see if this lens is capable of making terrible bokeh. Foliage is notoriously difficult to shoot when not in-focus and it will show if a lens has terrible bokeh quality or not by exhibiting what I call the “double line” effect and smudging. Just like our previous photos, the lens performed great in this set and is very consistent. I had to over-expose my shots at f/1.8 to help mitigate the vignetting. Lenses with larger apertures tend to behave like this so it can’t be helped.


(Click to enlarge)
These were shot with Fujifilm Industrial 400 and this should show you how bad the flare is when you shoot this with film. These were probably shot at f/5.6 and you can see that it flares terribly when not using a hood. You can use this for your creative license though.


(Click to enlarge)
As previously said, this is great when shot near its minimum focus distance. It’s sharp and focusing close amplifies the lens’ ability to produce a very soft background. I like it for that painterly-effect and natural-looking rendering. The photos that come out of this lens look neutral and it doesn’t have a color cast as far as I can see.


(Click to enlarge)
This is perfect for use in low-light applications. These were shot at ISO1600-3200 and it’s nice how this lens performs in this environment. Shooting this lens wide-open is what this lens is all about, just click on the image to zoom-in at the teeth of the mask to see what I mean.


(Click to enlarge)
Some more samples using Fujifilm Industrial 400. Click on the photos to see the larger versions. These were taken from f/2.8 to f/4 or so and you can see just how nice this lens is. The rendering of the pictures looks really natural and “organic” compared to the modern lenses that top the charts with their sharpness and other metrics. You shouldn’t judge a lens using numbers and charts alone, the “intangibles” make a lens special (or not). I can say that the pictures have a delicate feel to them, the bokeh quality is also exquisite and smooth. The patterns of the straw hats rendered beautifully, a lens with bad bokeh quality will render them terribly and the lines will smudge.

Here’s a picture with some straw hats in the background. Patterns with high frequency will render terribly if a lens has poor bokeh quality. The blurred chin straps will also look smudged, it looks nice here and it does not exhibit the ugly “double-line” bokeh. This is a term used for describing long objects that have been blurred but the blurred line looks like it has split into 2 lines and hence, “double-line”. Take a look at the details of the lady’s hat and here eyelashes. Her skin also looks nice with a subtle glow at the highlights, this is due to spherical aberration that was deliberately calculated into the lens’ design. If this wasn’t intentional then it should’ve been gone by now since I took this at f/4 I think. I love this shot a lot. Some people will pay plenty of money for a German lens just to get something like this!

This picture is exquisite! I think I took this at about f/4 or so, the details look so crisp and I love how the lady simply “pops” because of the nice 3D effect. If only I can show you the negatives, you can feel the depth of the pictures and seeing scanned pictures give it no justice to say the least. Also note that the lens is really well-corrected since chromatic aberration is not present in this picture in areas of high contrast.

Some people like polygonal highlights and some people hate it. This has a 6-bladed iris and the bokeh balls will look hexagonal even if you stop the lens down a bit. I would prefer it to be 7-sided since an odd-numbered iris looks more organic to me. The focus was off by a bit but you can still see how nice this lens renders skin. This lens is really good for shooting portraits because it is sharp but not too-sharp as to render every detail in your subject’s skin. This makes for more flattering portraits, it can help make your models look younger. I love how this lens separates the subject from the background, it’s how you can make your subject stand-out from the background.


(Click to enlarge)
Contrast looks very nice but not overwhelming like some of the Zeiss lenses from the post-war years tend to do, it still looks natural while retaining nice contrast. The color is saturated but it doesn’t look “cartoonish” at all. When I said “cartoonish”, I was just describing how “fake” the colors look like. Your choice of film also has a big role here but the lens is half of the equation.


(Click to enlarge)
The photos above should give you a good idea on how this lens performs in real-world use. The photos all look very natural and pleasing. The rendering is “soulful” and look very unique in such a way that the images look “dense” and thick with environmental effects. Environmental effects is a jargon we use at work to imply that an image has the “look” and it doesn’t look flat like a computer-generated image. This is why we are using older lenses because newer lenses are usually so well-corrected that we lose these small, delicate things that make an image look unique and natural.


(Click to enlarge)
The samples above were taken with Fujifilm Industrial 400. Having seen my test shots, can you tell which picture was shot using which aperture? I love how it performs and it shows here in these pictures. This was calculated for use with film so it makes lots of sense to take my samples with it. Even with a bottom-shelf film, the lens renders beautifully. The details are sharp and the tones are rich. These were scanned at a shop with a cheap scanner and even with that the photos looks really nice, I love it!
This is probably the most holistic review of this lens on the net. Not only did you observe how this lens performed with digital but you also saw how this lens works with film. There aren’t a lot of folks online talking about this lens and whatever information is available is spread around the net. I hope that I can generate some interest with this article.
That’s all for the introduction. I took plenty of photos because I wanted you to see what this lens can do. Again, you shoot this lens for the unique look of the photos and not for things like super-sharp centers wide-open. Although this lens can also be sharp wide-open, it is no-match for modern lenses that almost peak at the center when used wide-open, ask yourself this question: do the modern lenses have this unique look? Maybe not a lot of the modern lenses can do this and this is where this lens comes in. You can get these for not a lot of money these days but they’re still a bit expensive compared to a vast majority of vintage Nikkors that are more common. When looking for a lens, make sure that it has the factory-supplied Ai-ring. This will allow you to use it safely with most modern Nikons. They’re just a bit more expensive but it’s worth it. Also check for any defects such as oily apertures or broken or dirty glass. Let’s now begin with the repair article.
Before We Begin:
If this is your first attempt at repairing a lens then I suggest that you check my previous posts regarding screws & drivers, grease and other things. Also read what I wrote about the tools that you’ll need to fix your Nikkors.
I suggest that you read these primers before you begin (for beginners):
Reading these primers should lessen the chance of ruining your lens if you are a novice. Before opening up any lens, always look for other people who have done so in Youtube or the internet. Information is scarce, vague and scattered (that is why I started this) but you can still find some information if you search carefully.
I highly recommend that you read my working with helicoids post because this is very important and getting it wrong can ruin your day. If I can force you to read this, I would. It is that important!
For more advanced topics, you can read my fungus removal post as a start. This post has a lot of useful information and it will be beneficial for you to read this.
Disassembly (Lens Barrel):
I got this lens from the junk section of Alps-Do Camera and despite having a stiff focusing ring, the optics looked clean with only traces of fungus or dirt. It’s obvious that it was used heavily by the previous owner and that’s a good sign because I know that this lens was a keeper for him.
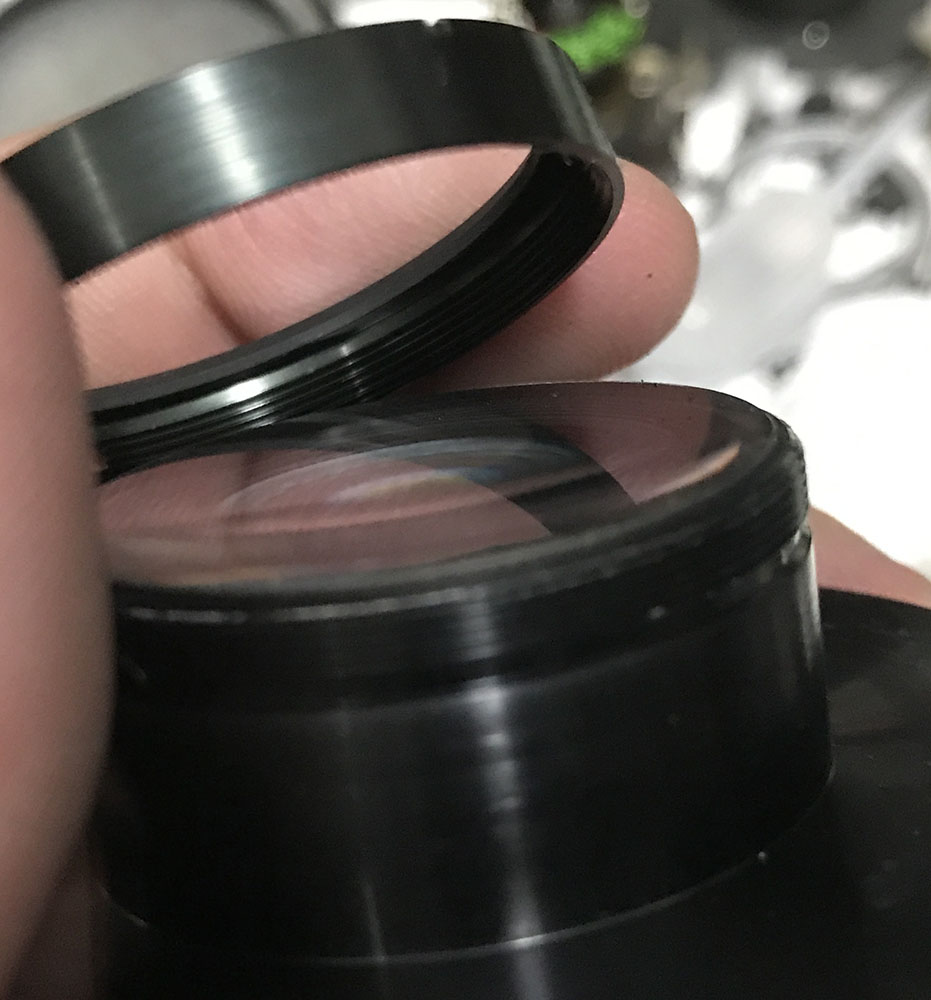
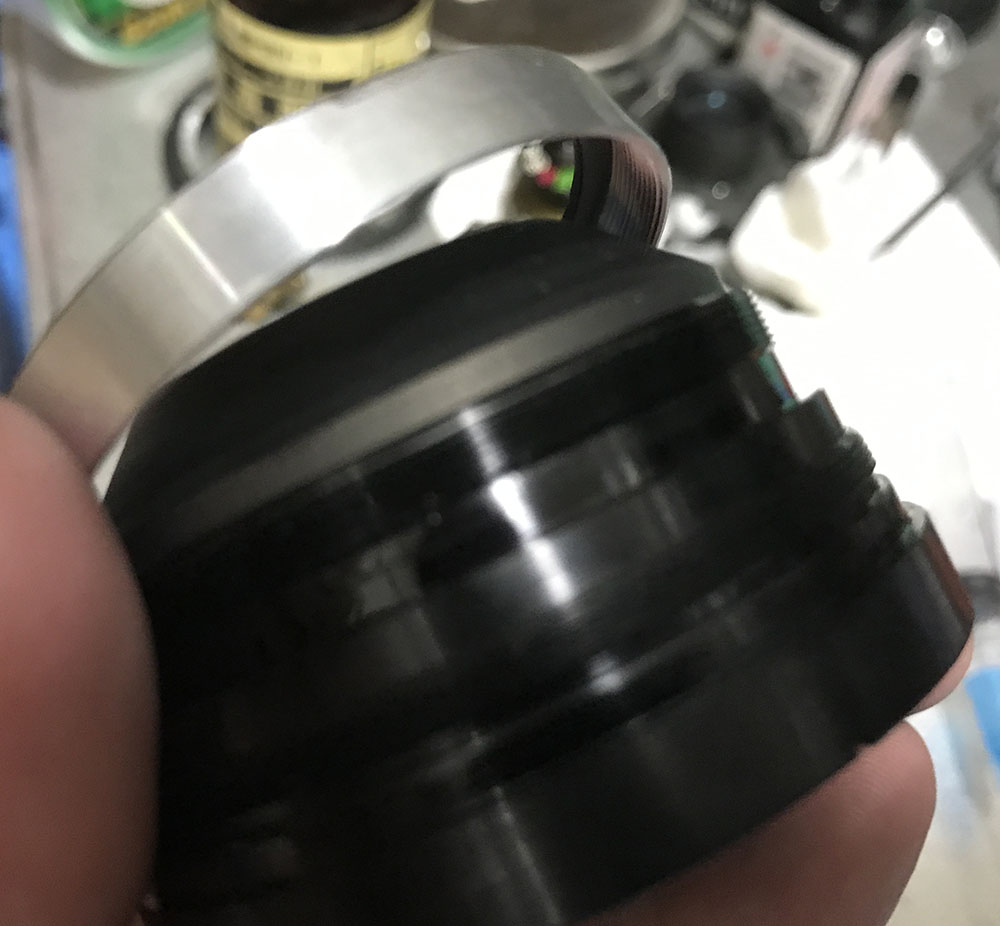
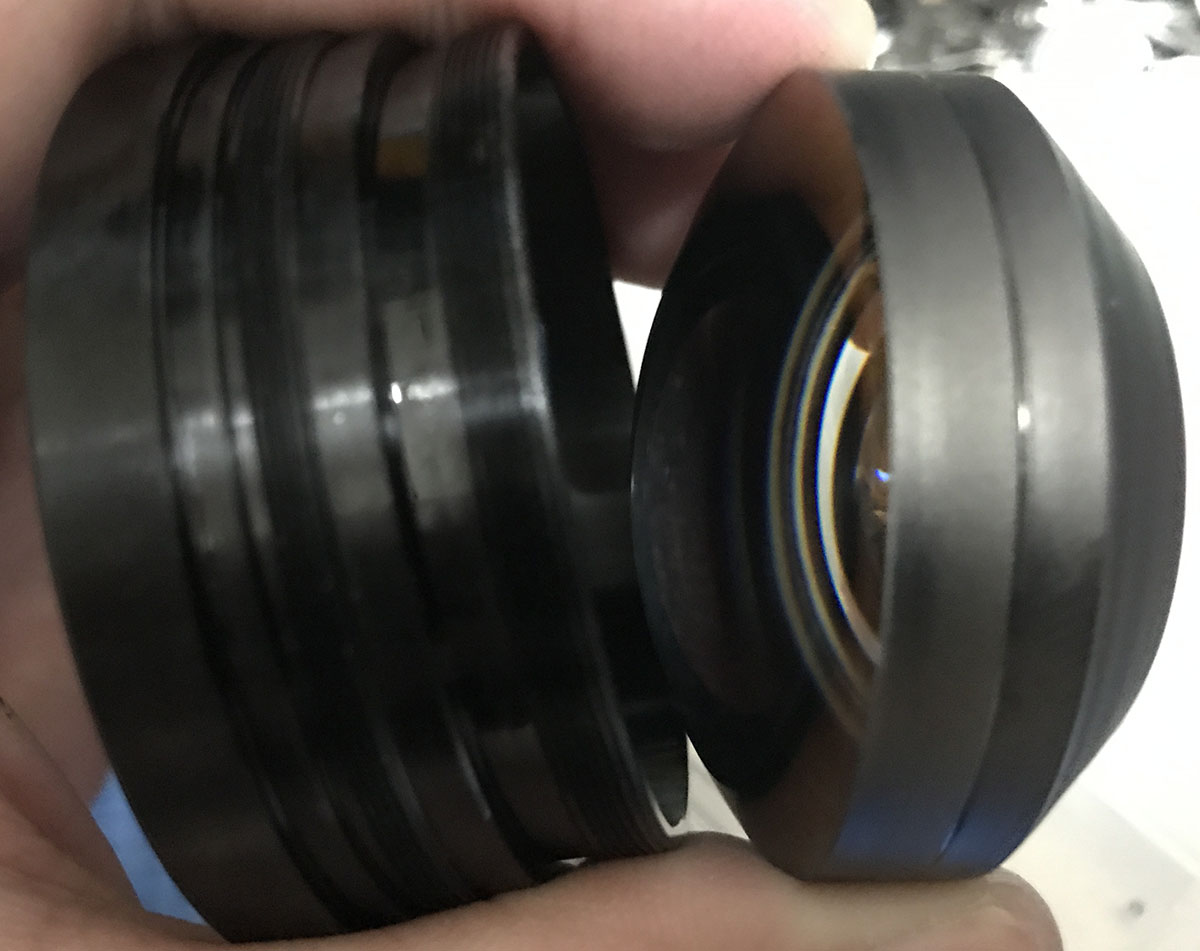
Just like most smaller Nikkors, you’ll want to extract the objective and keep it in a safe place while you work on the barrel. The barrel is simple enough for somebody with decent experience to work on but there are some things that you will have to pay attention to so please follow this article carefully.

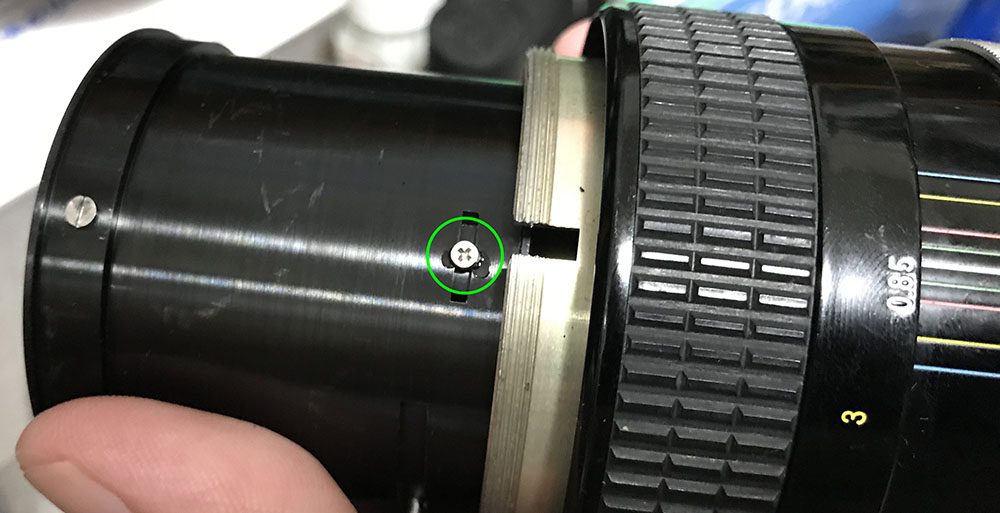
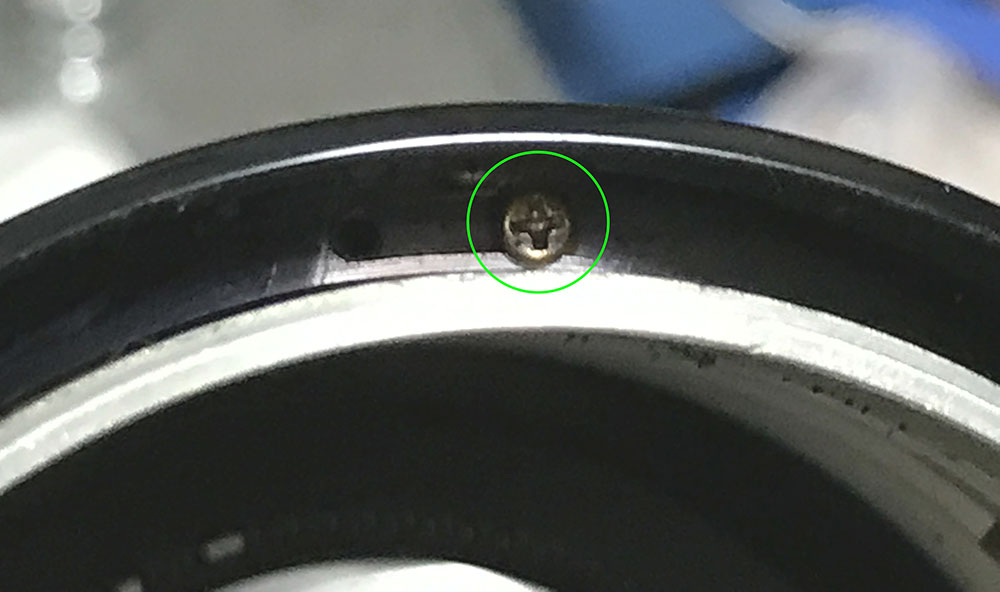
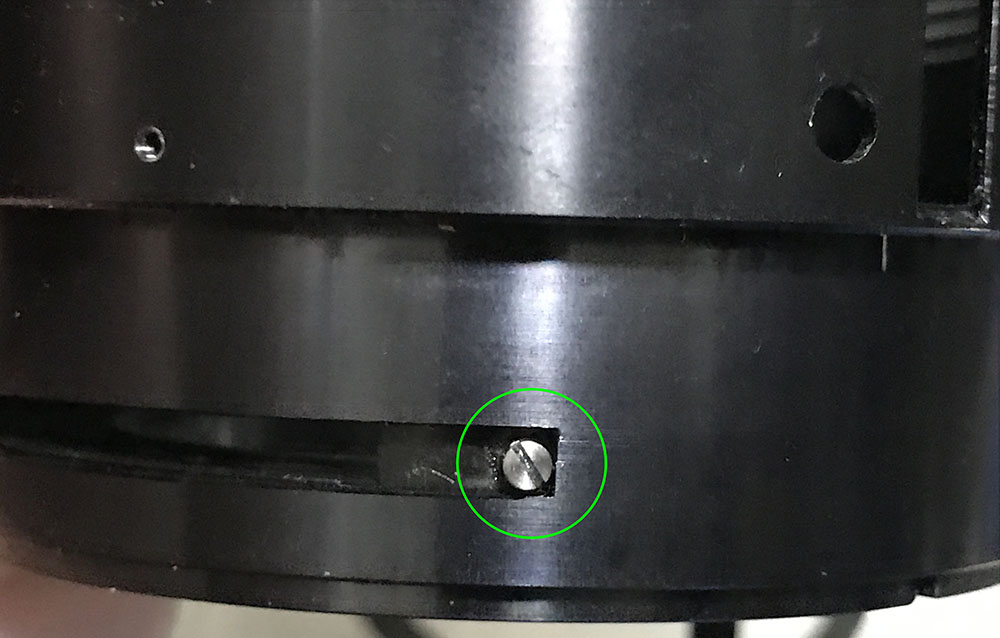
Look for the small set screw in the front ring and carefully remove it. It may be sealed or glued with lacquer so place a drop of alcohol first to dissolve it just in case, wait a while and then unscrew it using the correct-sized driver.

The front ring should come-off easily. If yours is stuck, repeatedly saturate the screw hole from the previous step with alcohol and then use a pair of rubber gloves to help you grip it better. Nikkors made in this era uses plenty of cement to seal seams and screws.
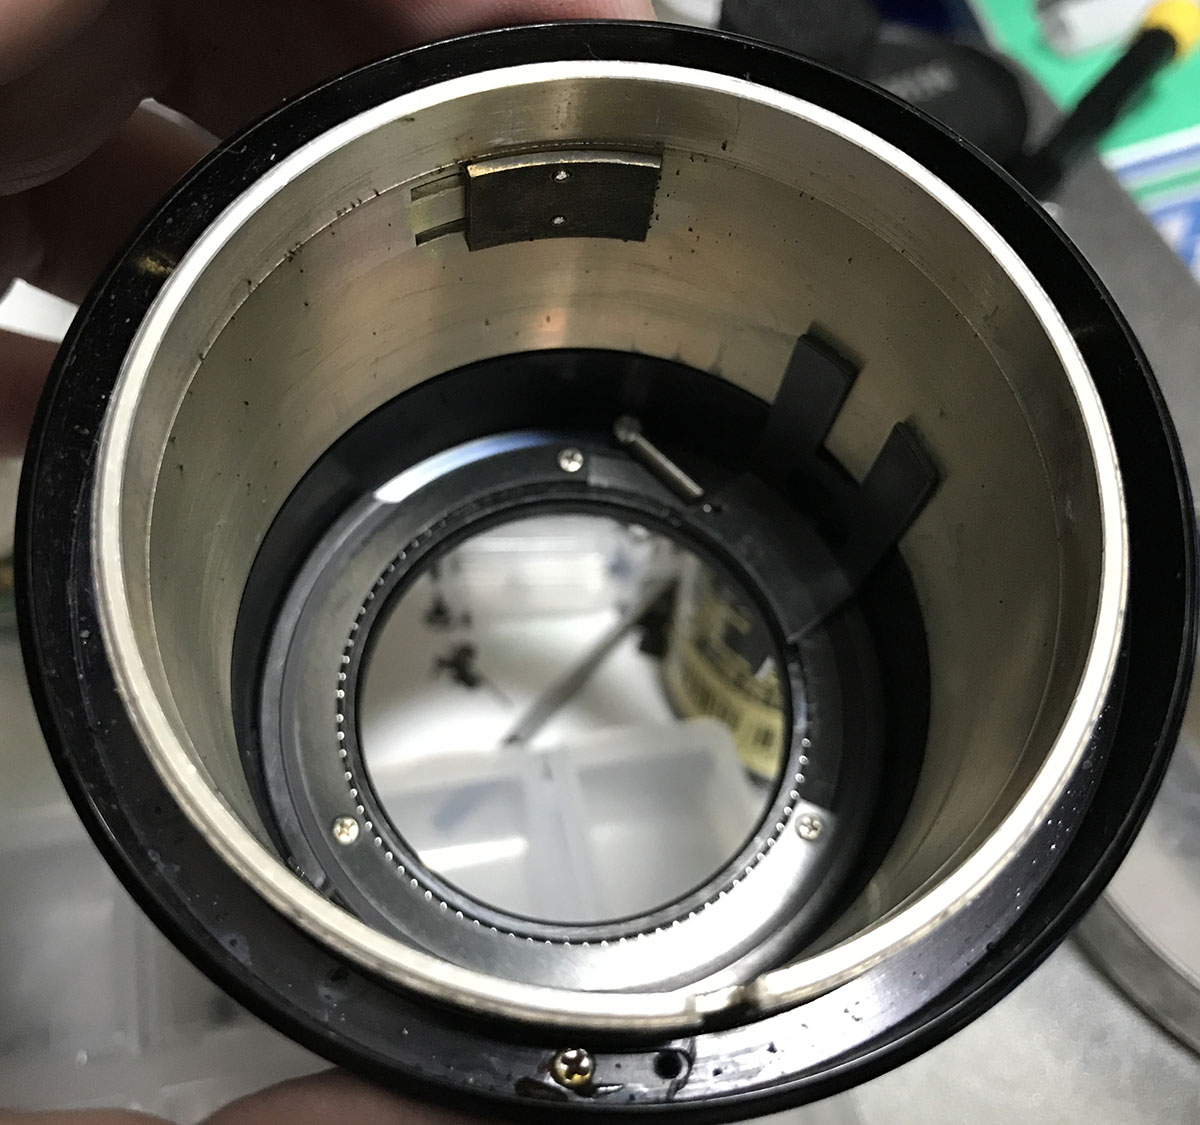
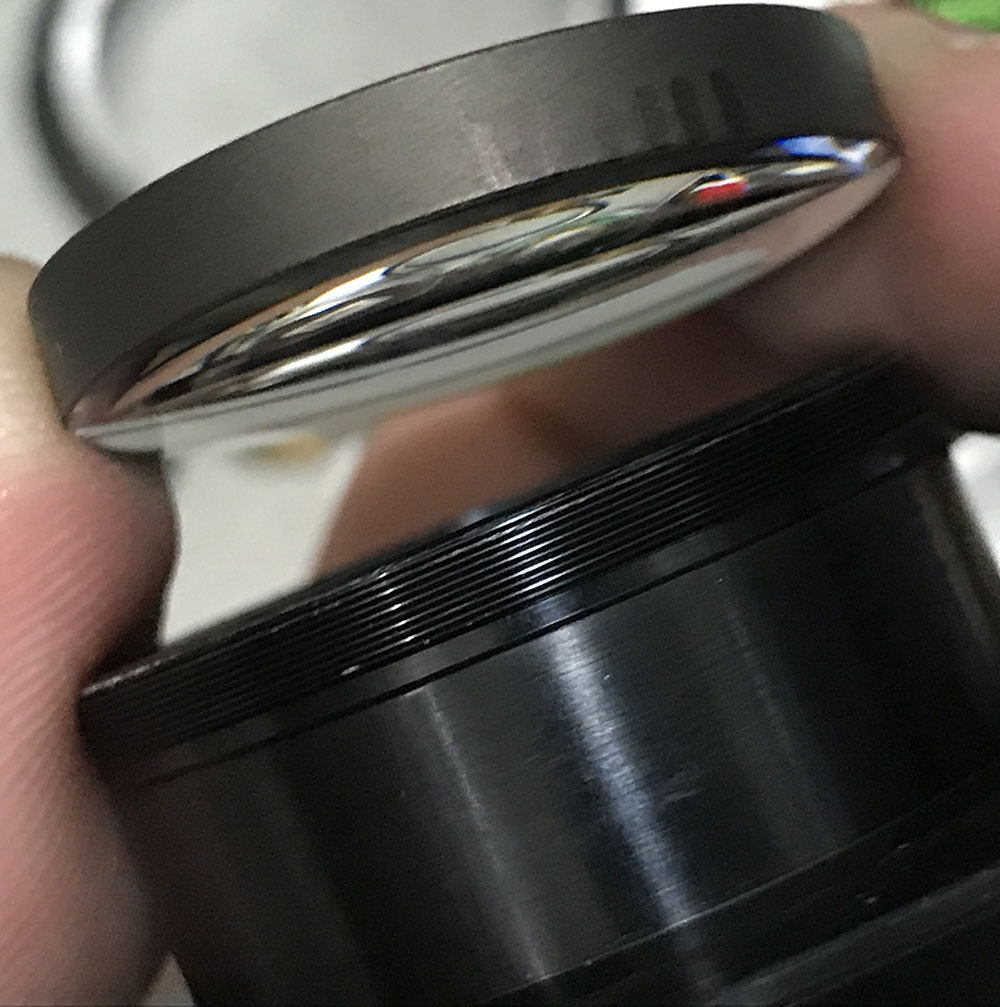
The front ring secures the objective so you can extract it as soon as it’s gone. Please do not remove the screws near the rear end of the objective’s casing because this is how the iris mechanism is adjusted. You adjust your iris’ size by loosening these screws and turn the iris’ housing until you get the proper iris opening size. This was set at the factory and make marks to remind you how they should go back should you decide to dismantle it for cleaning.

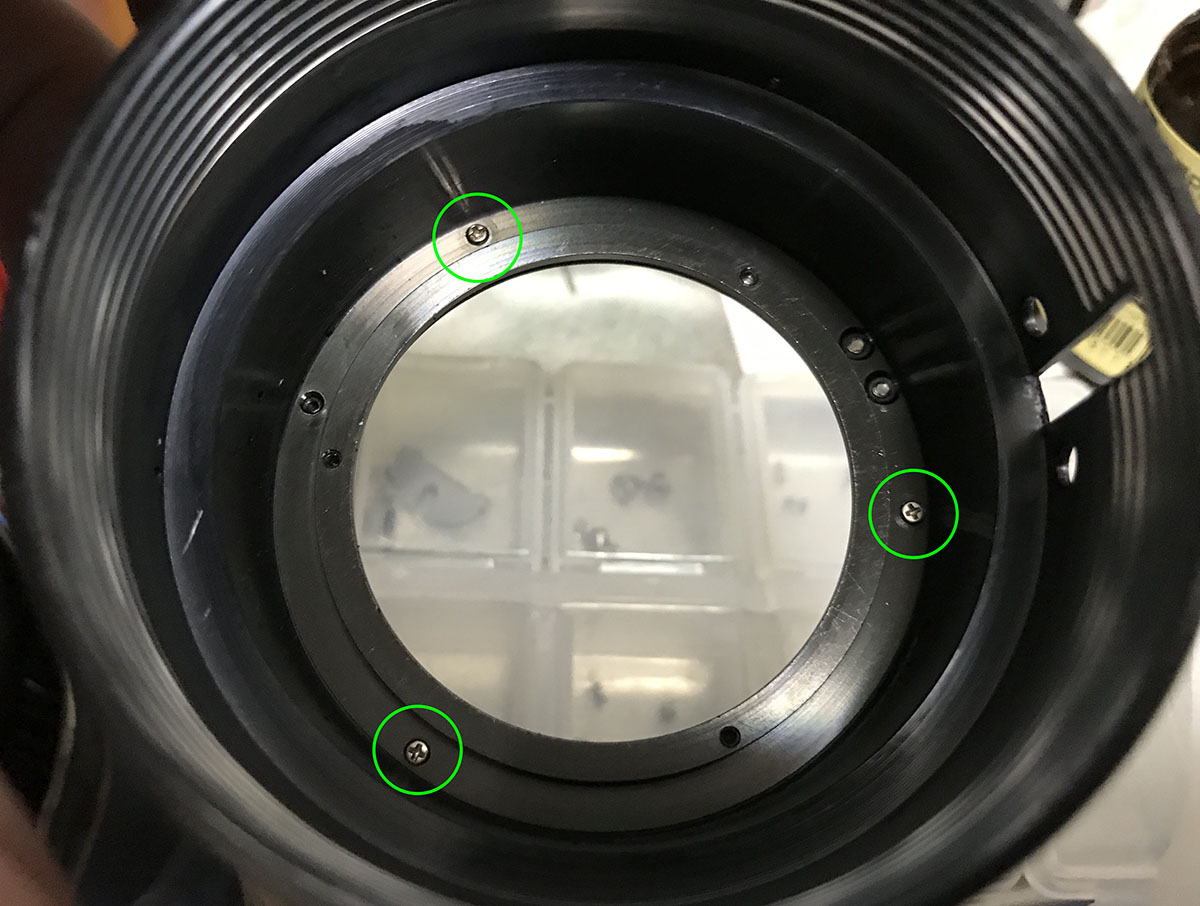
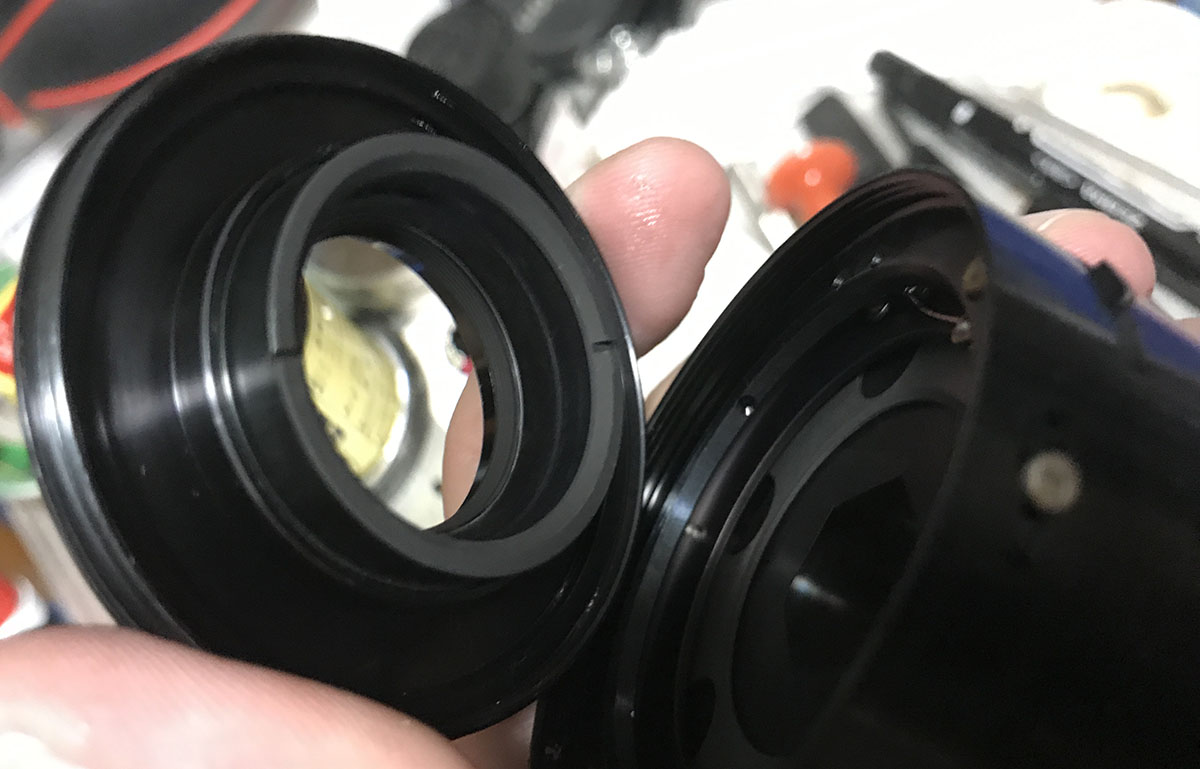
Now that the objective is gone, you can now safely work on the main barrel without being afraid of damaging the glass. To dismantle the barrel further, remove these screws from the bayonet mount. If you are new to this, please read my fundamentals on working with screws. These are sometimes glued so be careful and always remember to use the correct JIS screw drivers for these. Japanese lenses DO NOT use Philips screws!

The bayonet mount can now be safely removed. There is nothing connected to it so don’t be afraid to pull it away.

The aperture ring can now be extracted. Clean it really well because germs and dried lubricants tend to accumulate under this.

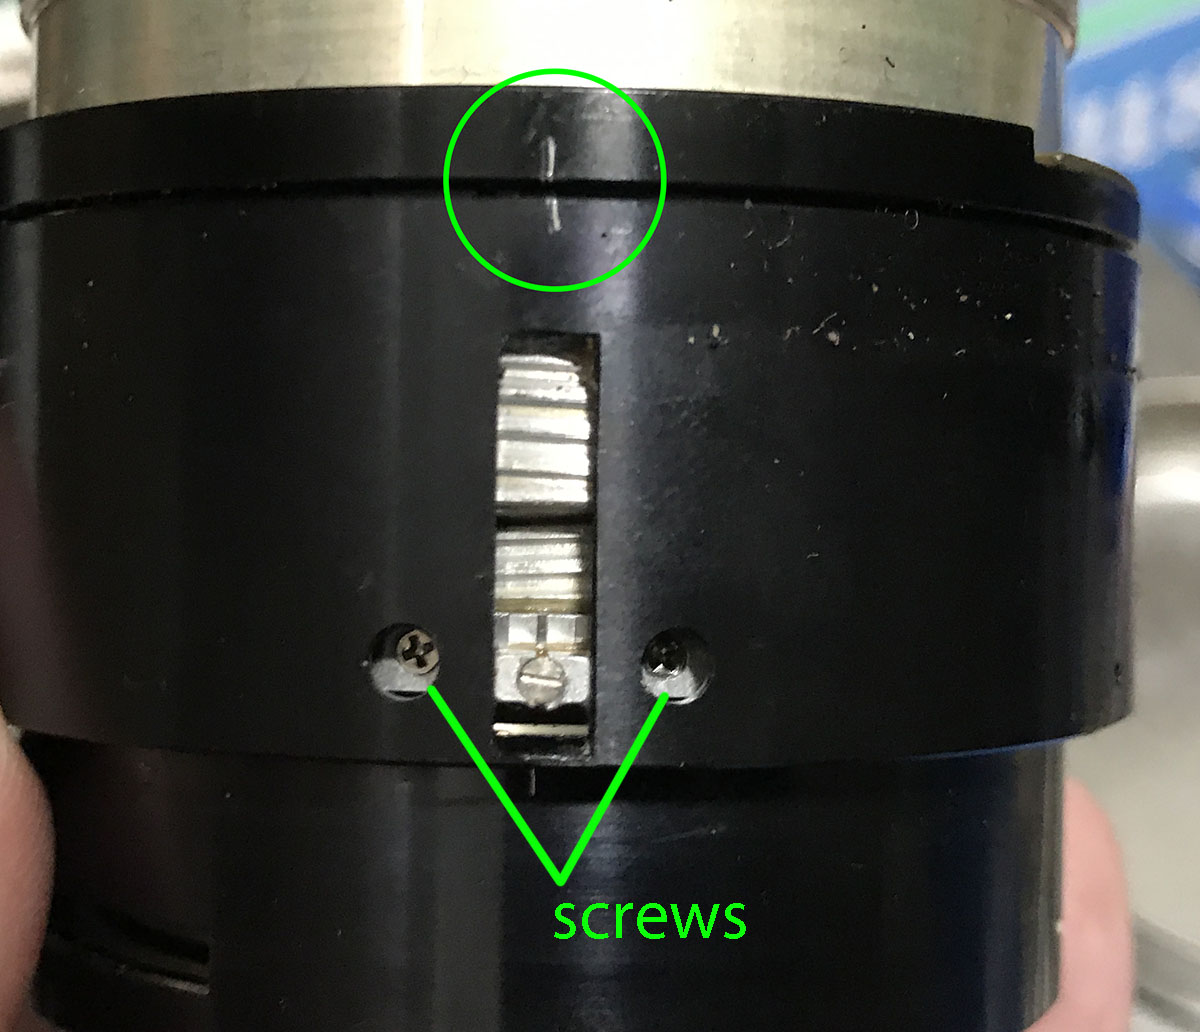
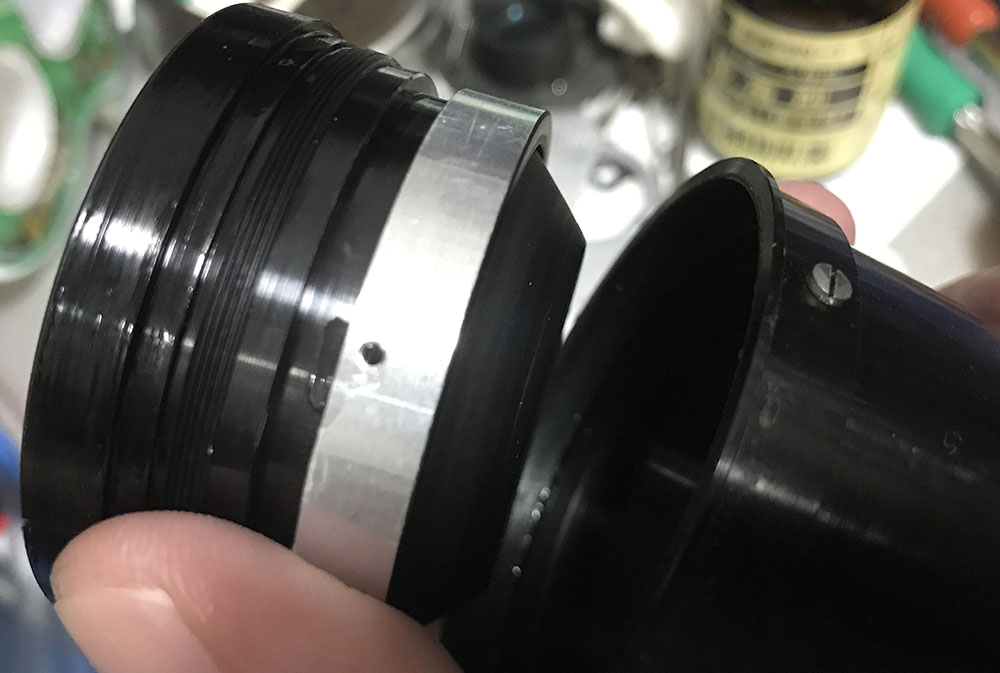
The metal grip is secured with these screws. Carefully remove them using a driver that’s a perfect fit for them because using a bigger one will damage the beautiful knurling and a smaller one will strip the heads.

The grip can now be safely removed. The sleeve can also be removed at this point but it’s sometimes glued with contact cement and if that’s the case just use solvents and saturate it at its seams.

The rubber grip can be removed easily but be careful not to damage it. The front bezel of the focusing ring is removable so you can safely remove the rubber ring but that front bezel is almost-always glued and it’s more trouble removing it that just outright removing the rubber grip while it is still there.
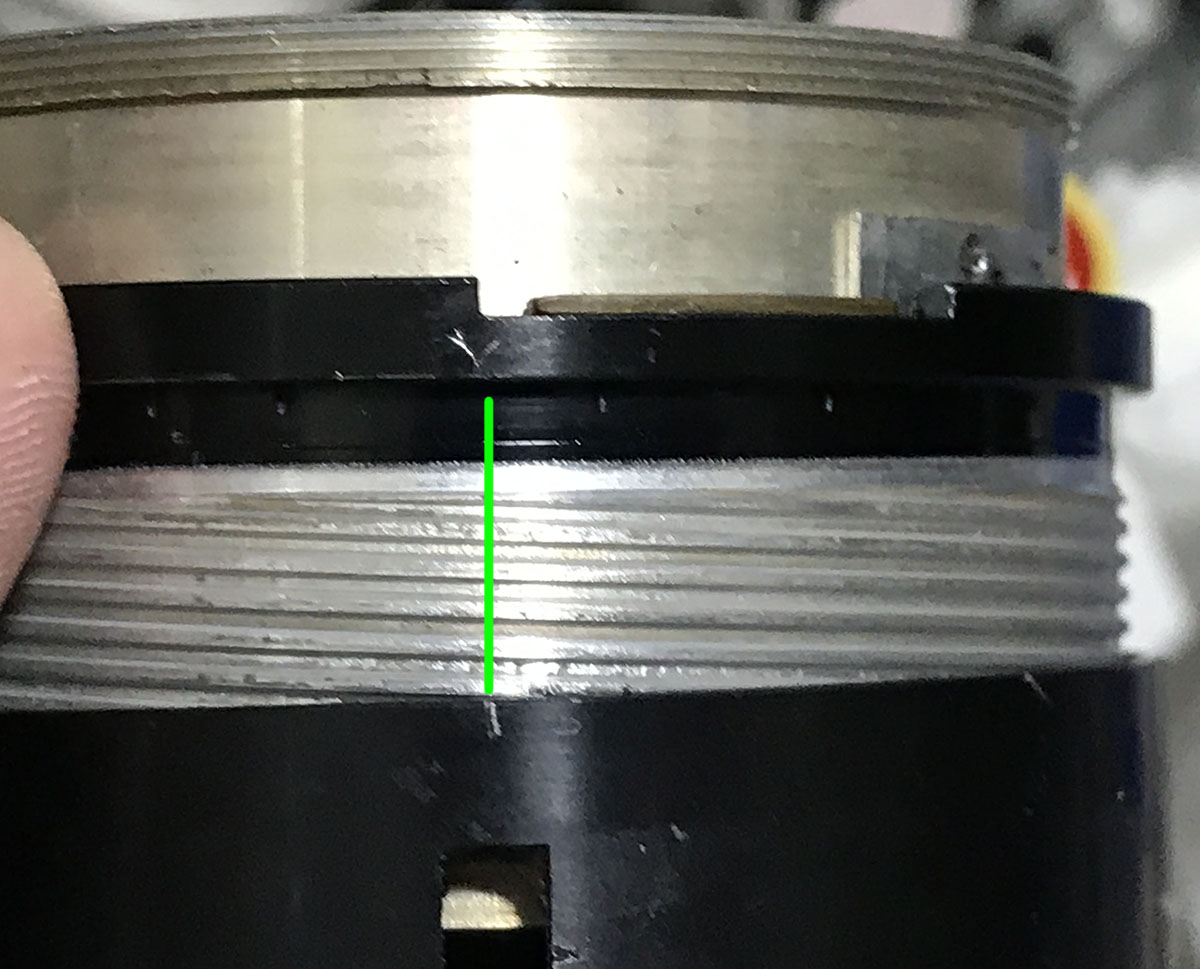
At this point, be sure that your lens barrel is set to infinity and keep it that way while you work with the lens barrel. The focusing ring can be adjusted as you can see here. Take a lot of notes and pictured before you proceed.
The focusing ring is secured by these 3 screws. Carefully remove them after taking notes and pictures of the focusing ring’s position.

The focusing ring can now be safely removed.
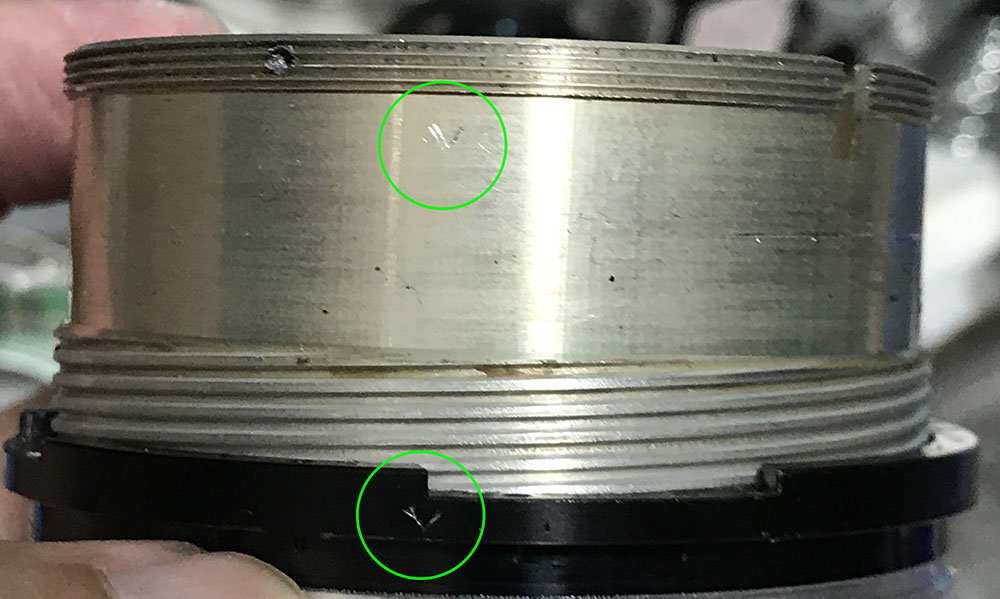
Before I proceed I made a scratch to remind me how the helicoids should be aligned and positioned while the lens barrel is focused to infinity, this will be of great help later when it is time to re-assemble this thing. The helicoid key keeps the helicoids in-sync as you turn the main helicoid, it also secures the helicoids and it can be removed by extracting these 2 screws. Take note of which side of the helicoid key is facing the front of the lens. It is also very important to take note of the inner helicoid’s position at this point.
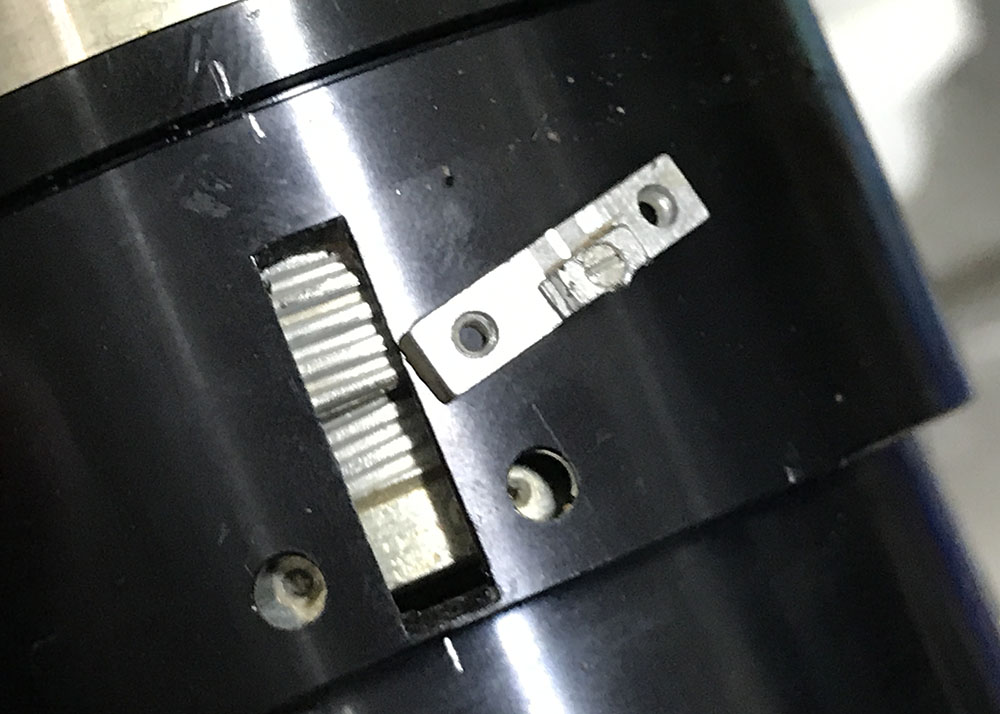
The helicoid key can now be removed. This slips under one of the helicoids. That tiny screw at the middle is used to widen the helicoid key’s tongue. Do not remove it.
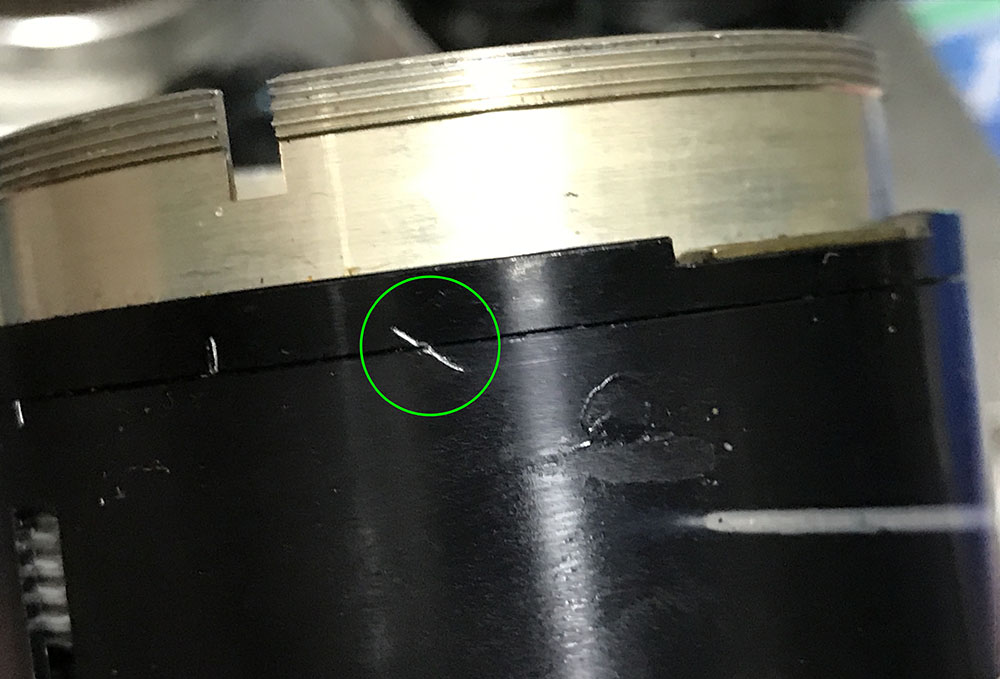
Now that the helicoid key’s gone, the helicoids now turn beyond their range set by the helicoid key. Turn the main helicoid until the lens barrel collapses all the way and make a diagonal mark to remind you that this is how far the main helicoid can go. Later when you re-assemble these, you should get the same thing or close to it by a factor of less than 1/3 of a mm. This will help you determine if you re-assembled it properly or not.
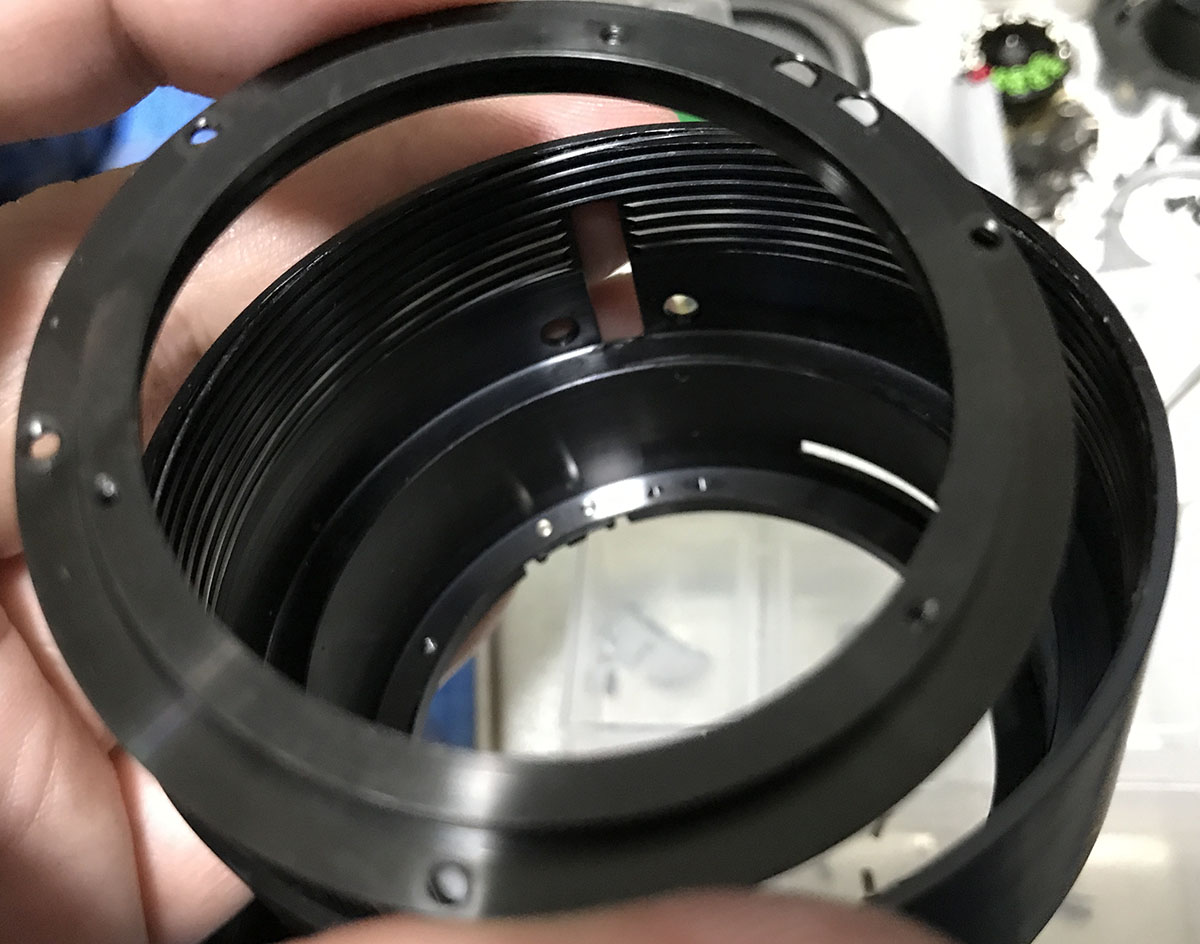
Time to separate the helicoids. Begin by separating the main helicoid from the outer one. Mark where they separated because this is also the same spot where they should mesh. I highly recommend that you read my article on how to work with helicoids. Many people get stuck here because they failed to mark where their helicoids separated.
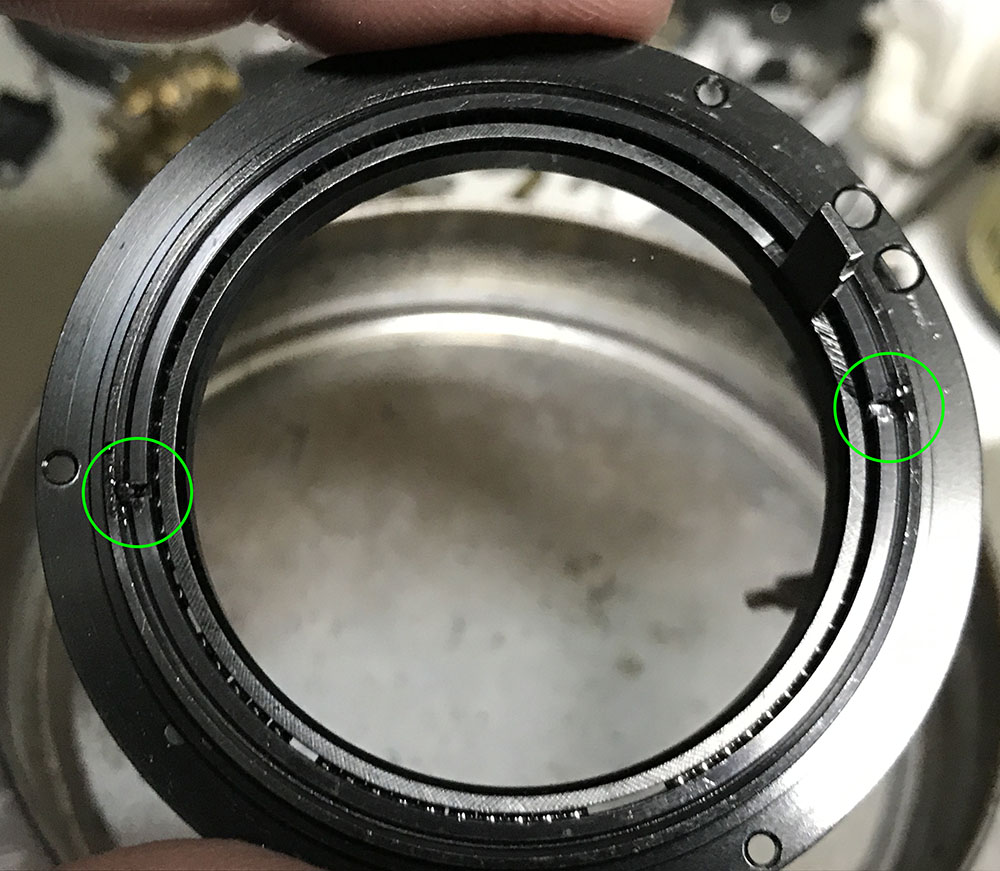
The inner helicoid’s movement is constrained by these two stops. Carefully remove these so you can proceed but do take notes on which stop should go where so you won’t jumble these during reassembly. These are sometimes not identical and is sometimes adjusted at the factory with a file.
You can now remove the inner helicoid. As usual, always mark where these separate.
Don’t remove this thing. It comes into contact with the stops and you adjust this so that your lens can focus to infinity. Just forget about this for now and worry about it later on.
This is the rear view, remember not to damage this thing.

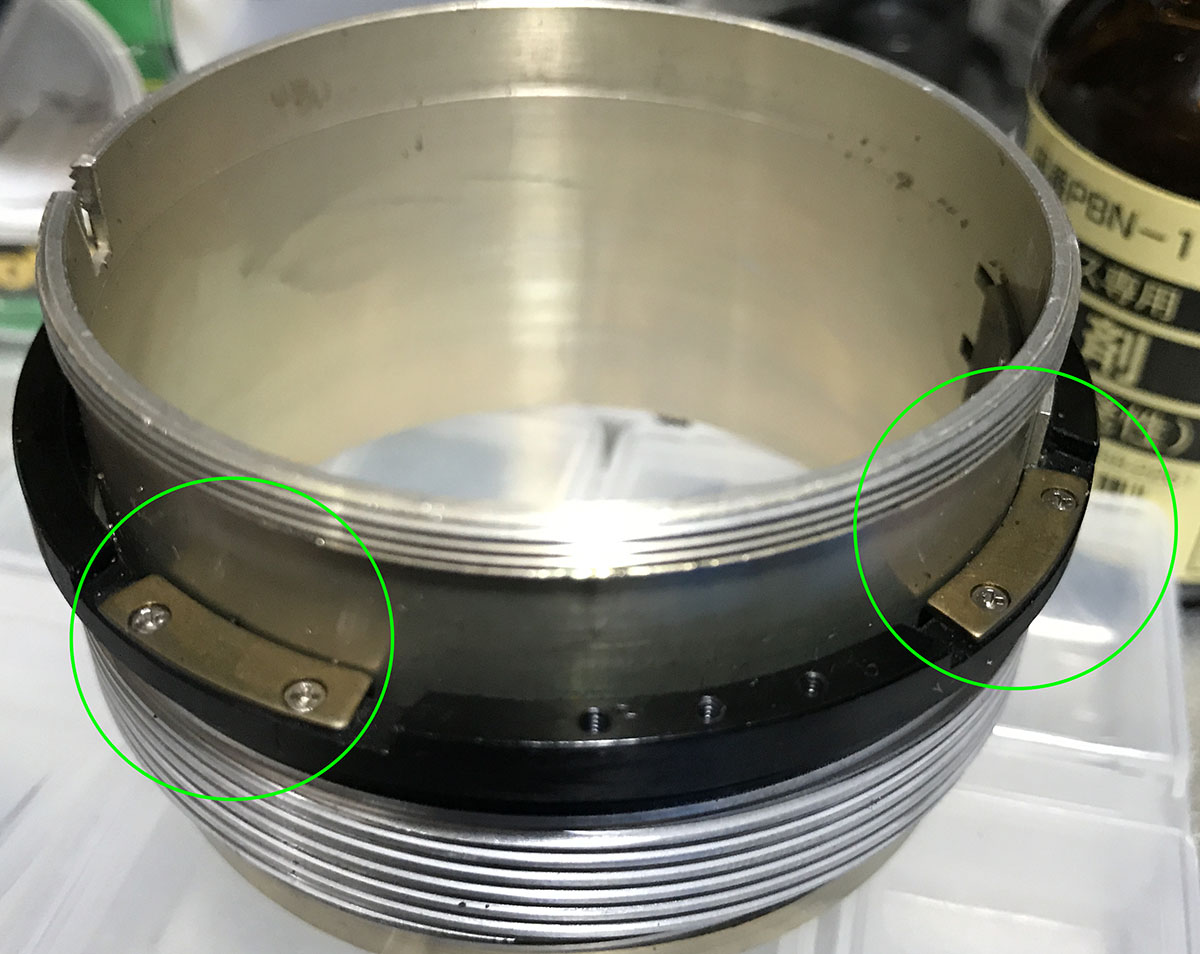
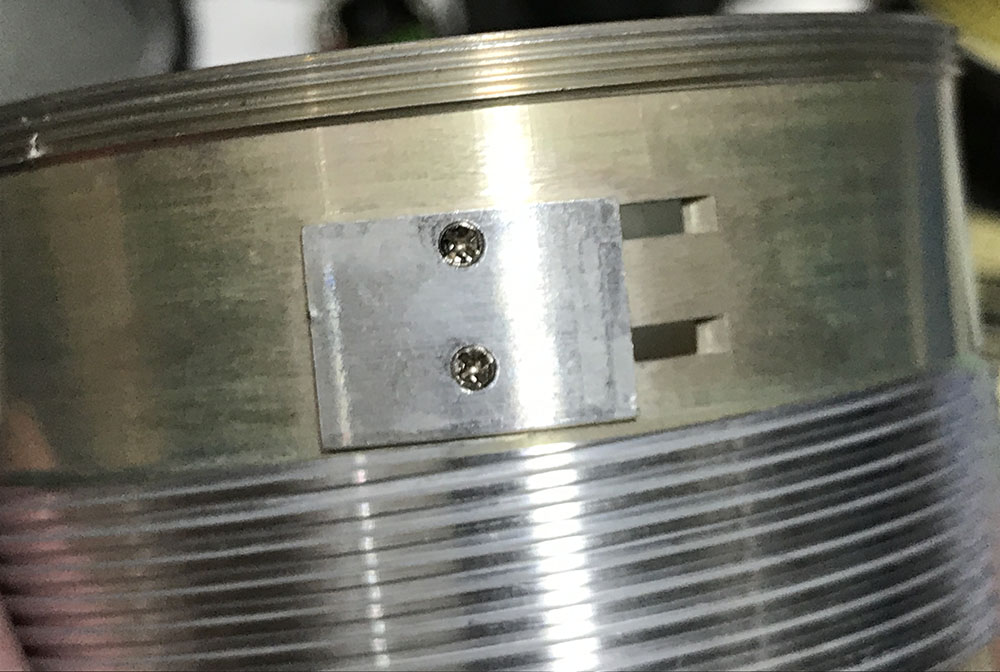
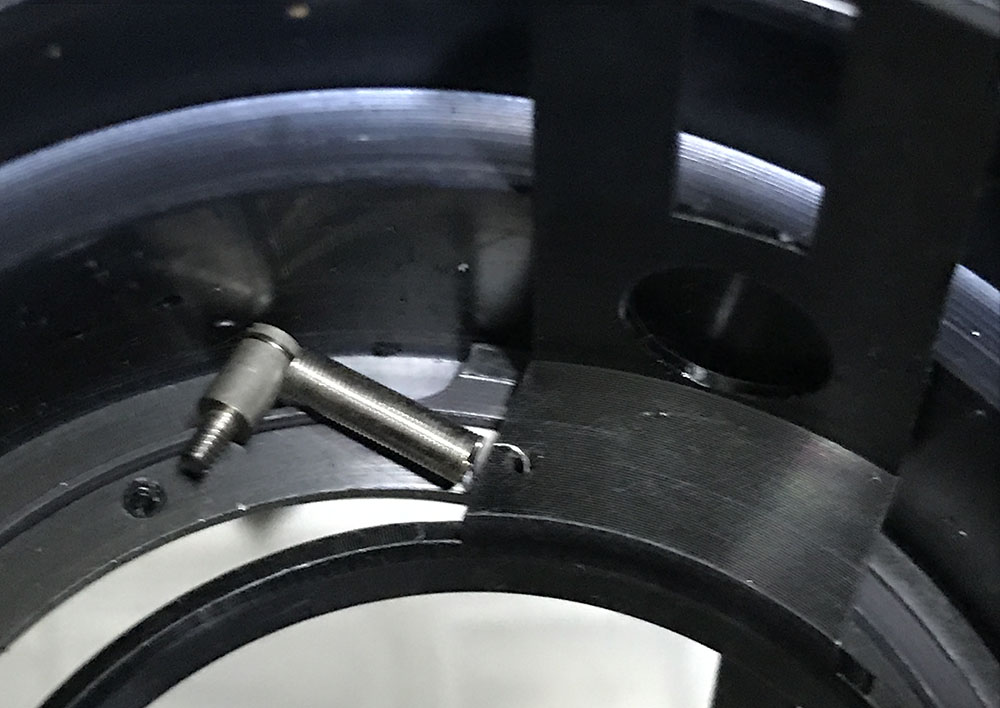
To remove the coupling forks of the iris you must first remove the plate that secures the assembly by extracting these 3 screws.
Carefully remove this. This screw is delicate and it couples the aperture ring to its fork inside the lens barrel.

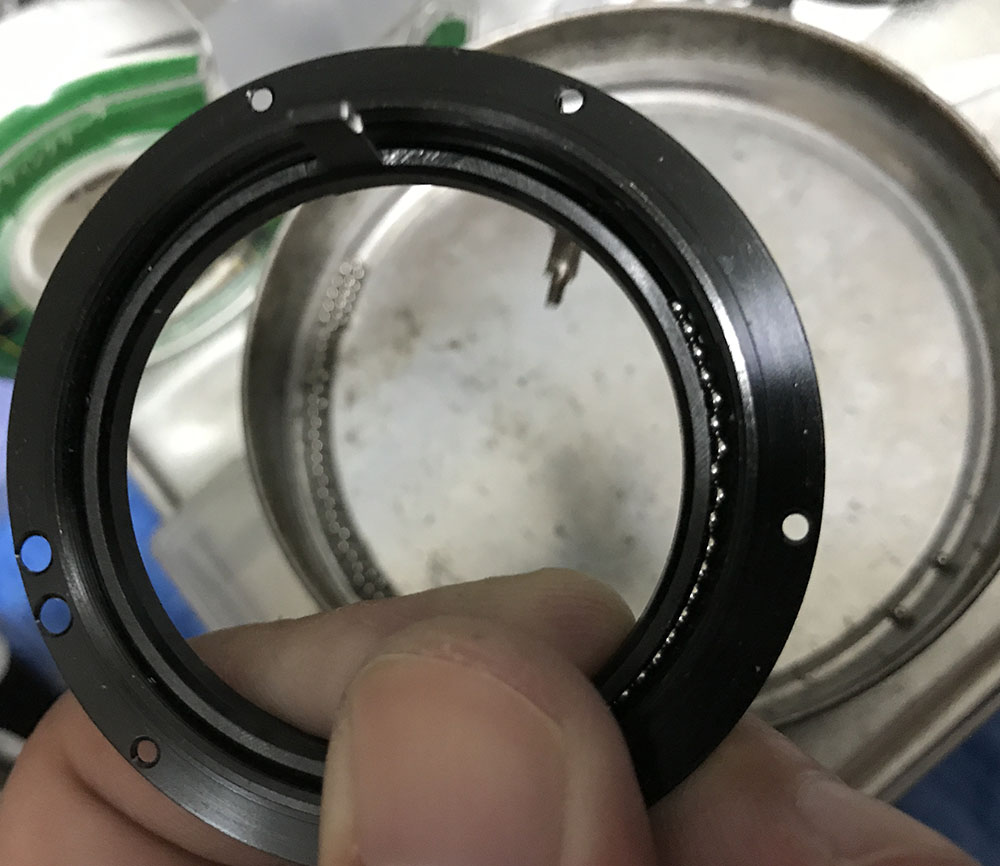
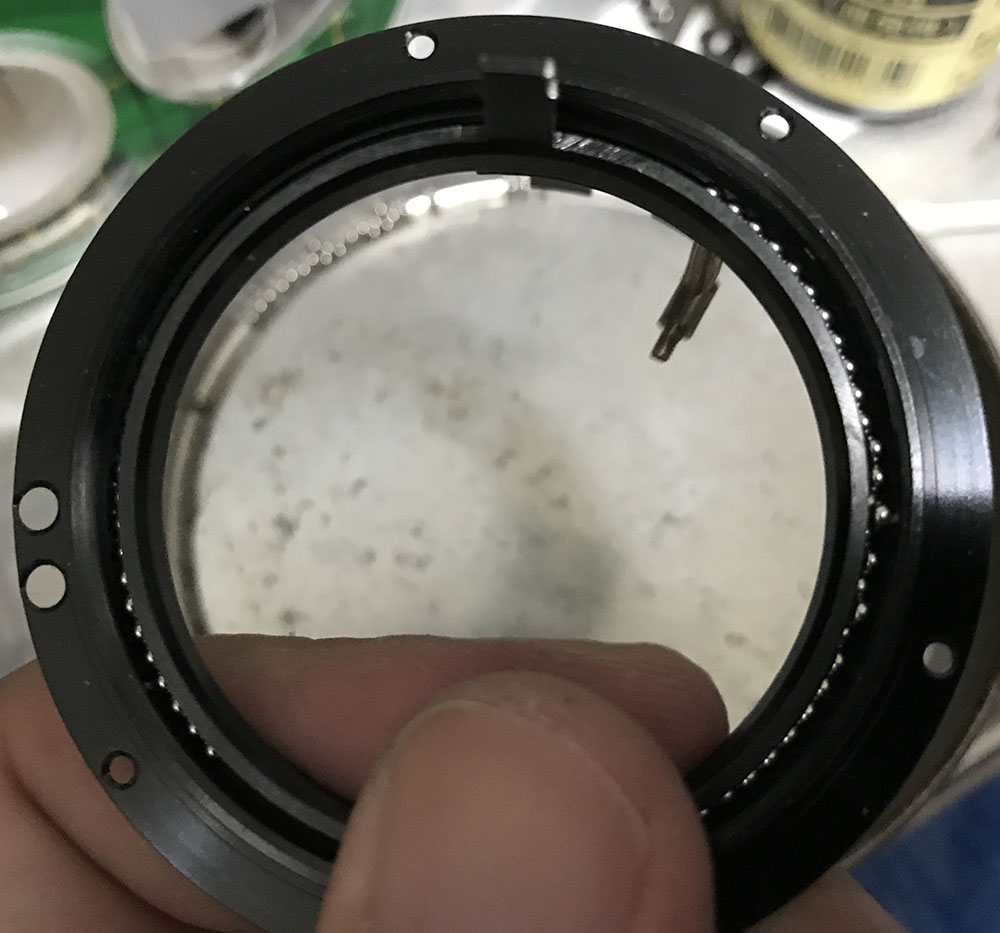
This retainer can be removed using a lens spanner. Do not remove it unless you know what you are doing because this ring secures those tiny bearing balls. This lens needed a thorough cleaning to kill the germs so I had to do this, otherwise I would just skip this.

See what I mean? To prevent me losing any balls, I placed a pan underneath so it will catch anything that fell from the lens barrel.
Unscrew this abutment so you can prevent any damage to the spring.
Everything can now be safely removed.
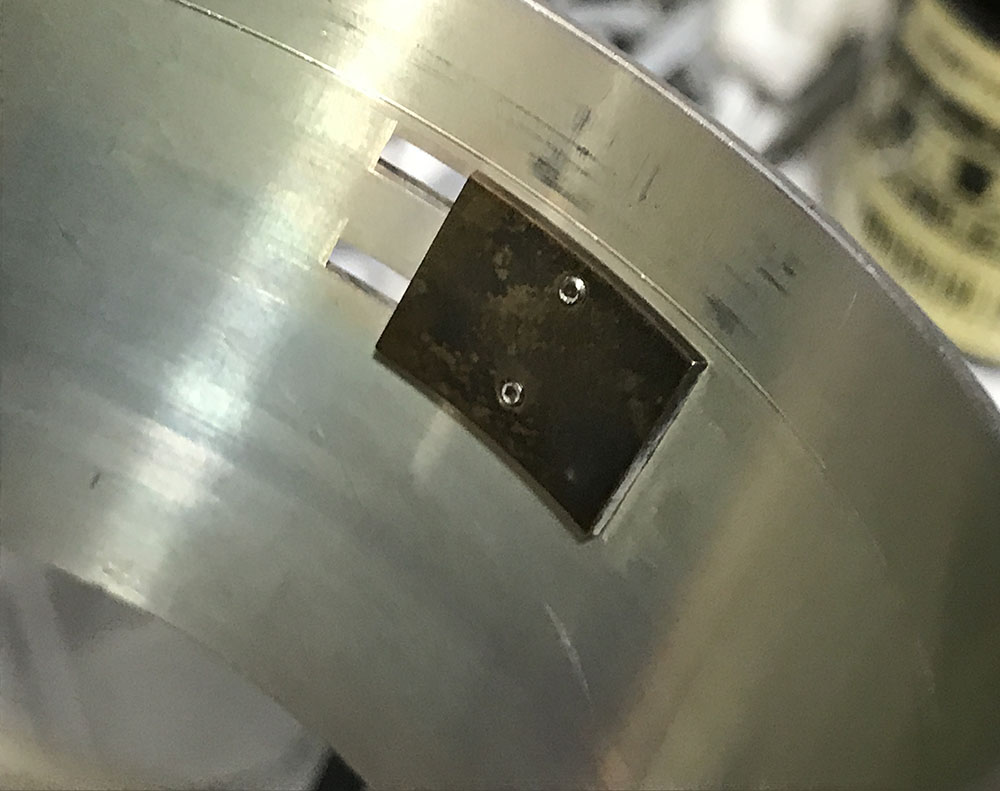
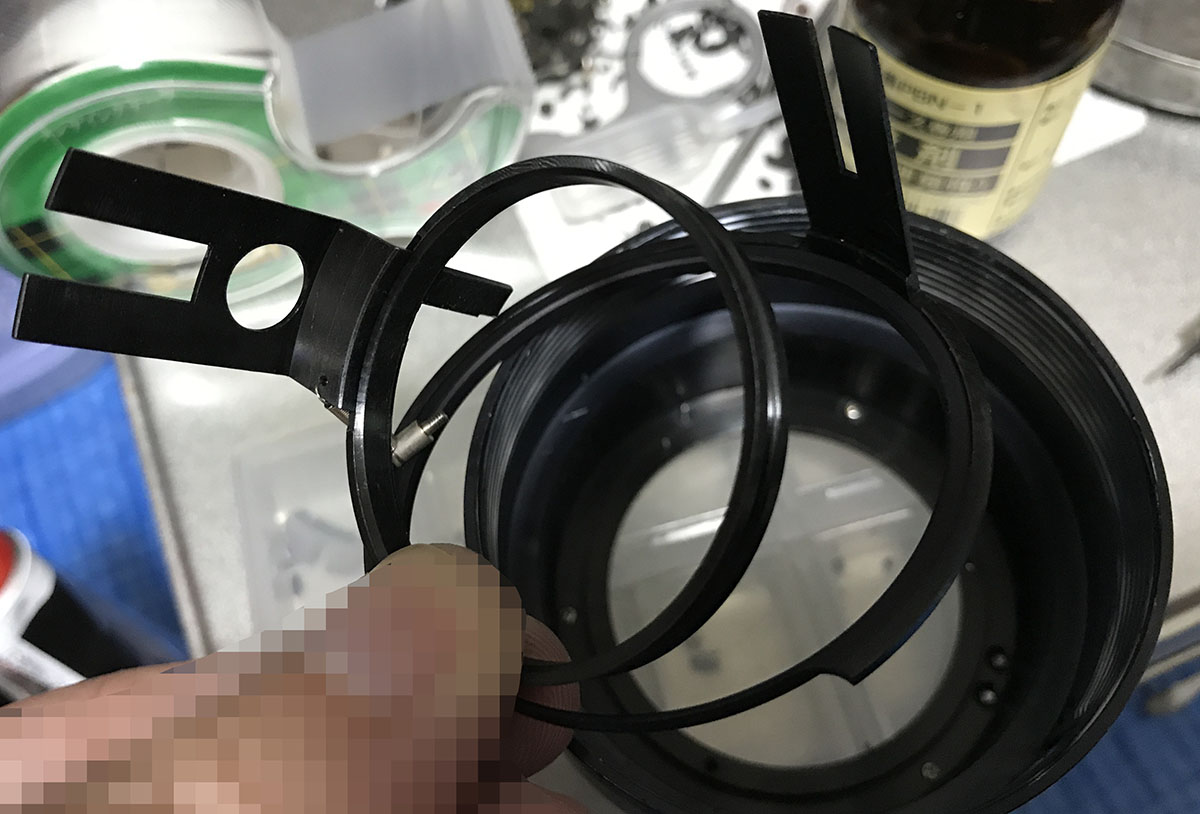
This plate can be removed by extracting these screws. If you didn’t remove the retainer for the bearings then you can remove the whole assembly by just unscrewing these.
The plate can now be removed. Take note of its position before you remove it.
I was expecting it to be of a more conventional design but this is a bit more complicated than I expected and is more in-line with the more expensive lenses of the era just like the New-Nikkor 55mm f/1.2 lens. This makes sense because this used to be a premium lens in its day. Thankfully, disassembly was pretty straight-forward and it was an easy lens for me to work on. It took me about an hour to completely dismantle the lens barrel and do a thorough cleaning of every important part (excluding the ball bearings).
Disassmbly (Objective):
The objective is of conventional design and it should be easy to work with. Just be careful with the big, heavy glass elements and be patient because just like the lens barrel, it’s also glued at the factory on most parts. Use the proper tools to clean and open this and it should be fine. I didn’t work on the iris mechanism because mine’s clean anyway. if you have an oily iris problem then you should look for other lenses in my Lens Repair list and look for one that has a similar-looking iris mechanism and then use that to help you get it done. I will admit that I was tempted to open it but I got lazy.
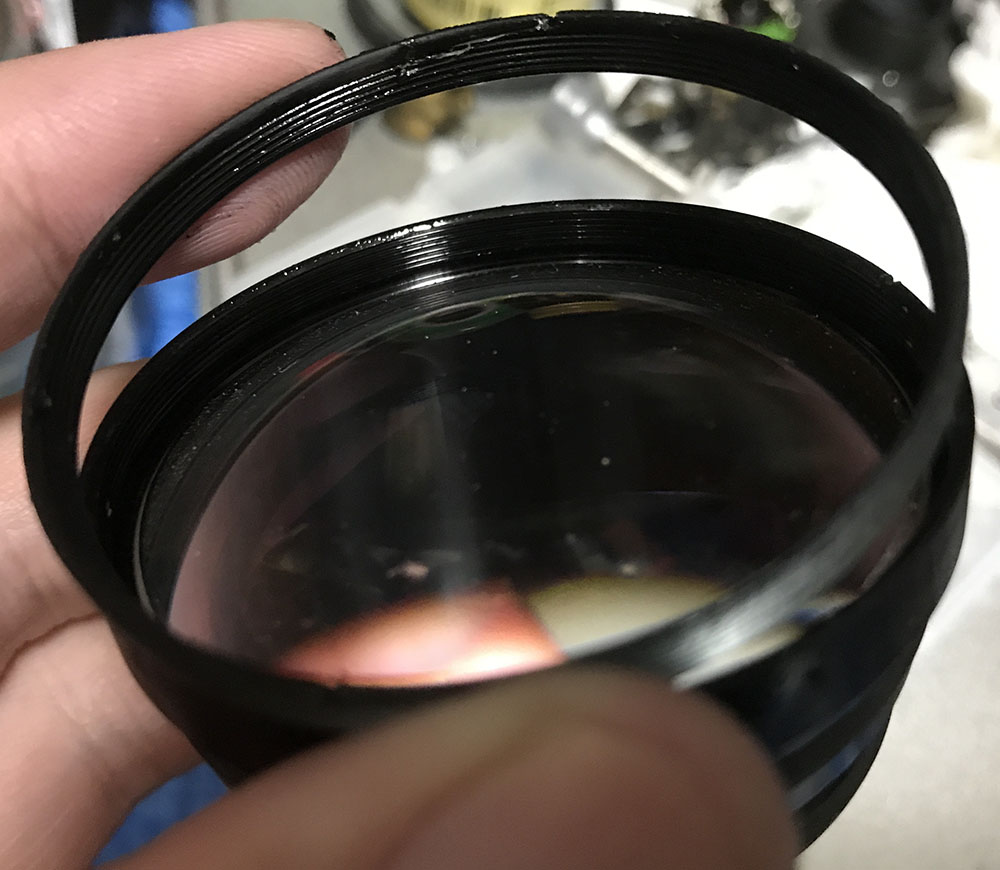
The rear element is secured by this collar and it can be removed with your bare-hands.
Carefully extract the rear element with a lens sucker and note which side is facing front. Notice that I marked mine with a Sharpie. I also made 6 lines to note that this is the sixth lens element. The marks were made at the leading edge of the element so I will easily see which side should be facing where. Never ever put a lens element back the wrong way!
The rear optical block can be removed just like this.

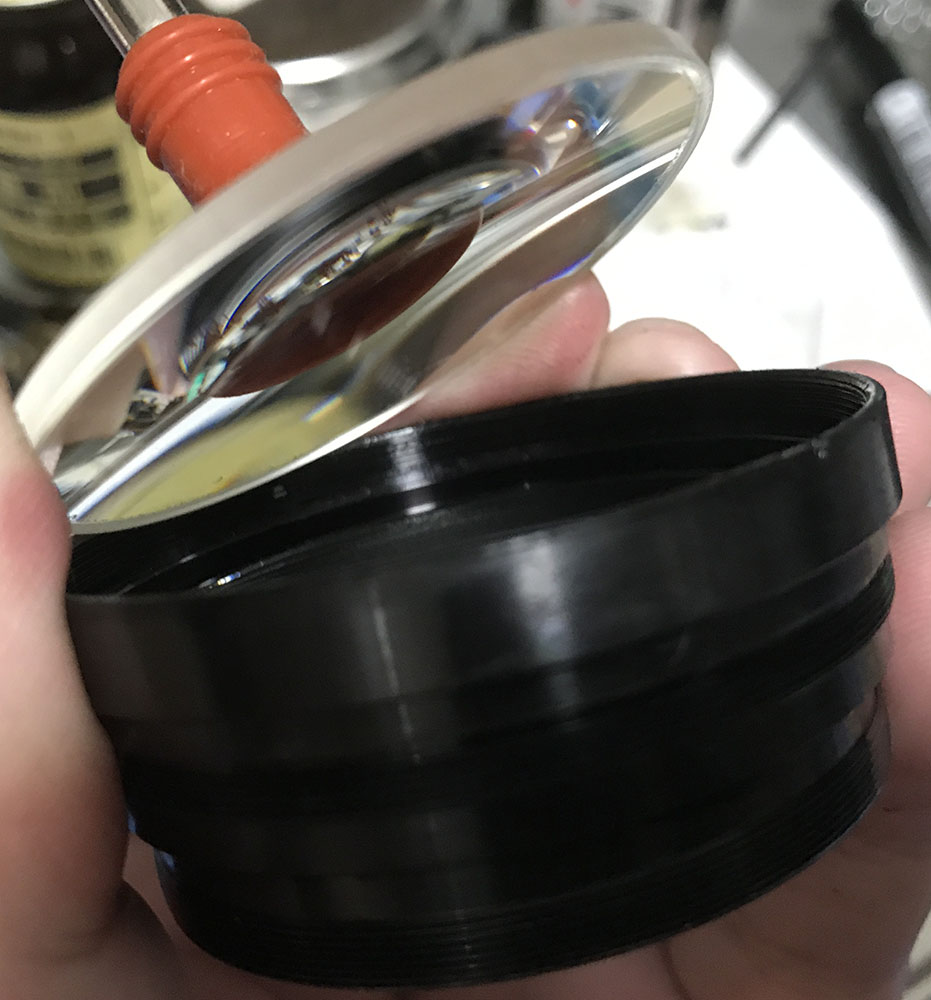
The front element is secured with a retention ring. Mine was glued so I had to use lots of alcohol to saturate it before I could remove it. I will get back to it later and let the alcohol do its thing and soften the glue for me.
The front optics assembly comes off like this. I used a rubber friction cup to unscrew it.
Its collar can be unscrewed just like this. It is sometimes glued so be careful.
Remove the doublet and be careful not to touch this with alcohol or solvent. Those will dissolve the cement and it will cause a bigger problem that is not easy or cheap to fix. This can be very tight at times so don’t force it. It can be set so tight it is possible to create a vacuum. If this happened, just open the front elements to break the seal and release the air pressure. You can also push the element out from the front, too.
At this point, the glue on the front element’s retainer ring has softened and it was easy to remove it with a lens spanner.
Extract the front element with a lens sucker.
Always remember to put things back in the correct direction or order and it should be fine. It doesn’t matter if you start from the rear or front. If yours is clean or it just has a little bit of dust, just leave it alone.
Conclusion:
This took me the whole night to work on. This took me more time to finish due to the fact that I had to put those annoying bearing balls back in their rails. Remember, if it isn’t dirty or if you don’t have the skills for this thing just leave the bearing alone.
Re-packing the ball bearings is very time-consuming. Begin with a few balls until you reach this point.
Carefully fill the race with balls until you can barely move the ring. If that happened, slip one ball at a time by wiggling the ring and letting the ball fall into position.
Once you’re done, secure this by putting the ring back. Don’t tighten it to the point where the balls cannot move freely. I also secured it by applying some lacquer to the ring so it won’t undo itself accidentally.

Here it is now, nice and clean, no more fungi!
Re-assemble your lens but skip the focusing ring for now but don’t forget to re-install the front ring so the objective won’t drop to the floor. Adjust your lens’ focus by adjusting this thing. Read my post on how too adjust your lens’ focus if you are new to this. Once your lens is able to focus to infinity, make sure that the stop is secured by tightening its screws and make sure that the helicoids will stop turning as it reaches infinity. Remove the front ring and reinstall the focusing ring. Make sure that the infinity symbol is dead-center with the focusing scale before you tighten the focusing ring’s screws.
Here is the lens now, it is now squeaky-clean. All I need to do is to reinstall the rubber grip. It’s important that you adjust your lens so that it can focus to infinity perfectly. It’s important because if you got it wrong your lens will not focus properly down the whole range of its distance scale.
That’s all for today. I was considering skipping this weekend or just posting something a bit shorter but I just can’t let you down. This blog is a big part of my life and I put a lot of effort in maintaining this. See you guys again in the next blog post. I will do a couple of Contax-related articles next so I hope that you stay for it. I consider the Contax (and Zeiss) to be Nikon’s ancestor when it comes to design and philosophy (sort of) so it’s very important that we also look into this if you’re really serious about studying Nikon’s history and how things came into being. Thanks for being there and I would like to tell you that we are hitting more than 30,000 views consistently! It is a big achievement for a small blog with very limited readership. My goal is to hit 50,000 by the end of this year, can you help make it happen? Thanks again and I promise that I’ll do my best to keep this blog going despite being busy or sick. Ric.
Help Support this Blog:
Maintaining this blog requires money to operate. If you think that this site has helped you or you want to show your support by helping with the site’s upkeep, you can make a small donation to my paypal.com (richardHaw888@gmail.com). Money is not my prime motivation for this blog and I believe that I have enough to run this but you can help me make this site (and the companion facebook page) grow.
Buy me a roll of film or a burger?
Thank you very much for your continued support!
2.00 $
Helping support this site will ensure that this will be kept going as long as I have the time and energy for this. I would appreciate it if you just leave out your name or details like your country’s name or other information so that the donations will totally be anonymous. This is a labor of love and I intend to keep it that way for as long as I can. Ric.

Mar 04, 2018 @ 16:41:41
I’m a 72 year old man and a very amateur photographer who loves reading your stuff. Have arthritis in my hands. Had to switch from my nikkormate cameras to the Canon auto focus, but love my EL- FT2-FT3 and my very favorite X-700 do not like digital love film, will donate have a nice bugger on me. Thanks Dan Hoffman
Mar 04, 2018 @ 16:50:59
Glad you liked it, Dan! Thanks, Ric.
Nov 09, 2018 @ 00:08:47
Hey Ric, I’ve been reading your articles for a while and have greatly appreciated and enjoyed the content. I have repaired at least a dozen lenses because of your help. However I recently picked up a Nikkor H auto 85mm 1.8 non ai in good cosmetic and optical condition. I have successfully disassembled and cleaned it it but the aperture is in bad shape; only 4 of the 6 blades have the pins left, the other 2 must have snapped or fell off and therefore can not be used. I tried using 3 blades just to see, but it is an undesirable look for me. Do you know of any cheaper lenses that I could steal the aperture blades from? The lens is in good shape otherwise and I would like to save it if possible. I was going to use some from a Nikkor q 135mm 3.5, but the blades were too short (I’m guessing the focal length and max aperture play a great role). Hope your doing well and thanks again for the great content
Nov 09, 2018 @ 00:43:06
Hello, Bob.
The blades are usually unique to their lenses. If you still have the pins you can restore them with care. A very small amount of solder can help. With the right technique you can supply the solder in a very thin manner and coat the junction ONLY. This trick requires that you heat the pin for a couple of minutes so the tin will glide on its surface. do use some flux. Ric.
Jul 10, 2020 @ 20:11:11
Hello Richard – your work is fantastically helpful – thank you ! My question to you is this: which if the mf Nikkor 85’s is best for mid to long distance photography, such as landscapes ? You say the K version was redesigned optically to improve IQ for closup portrait work, so does that mean the previous H or H-C models are sharper and more contrasty at longer distances ? How about the f2 AIS version ? Is that sharper for mid to long distance work ?
Oct 10, 2021 @ 14:27:16
I have 1.8 k type and tested it for landscape together with tamron 90 f2.5 adaptall. It is great, not flat as tamron-which is strongly warm colorcast,nikkor has more vivid colors (both lens are very good) nice microcontast etc. Never had a chance with 1.8H to compare nor the f2 nikkor.
Jan 02, 2025 @ 14:38:40
Hello Ric.
The visual impact of this new K lens stands out, thanks to your work here. It’s certainly less feminine or diluted than its successor. It feels more like a “big eye” wide open, compared to the “green tea eye” vibe of its 2.0 counterpart. One is mine since ! Nice job.