
Hello, everybody! We bought some pearl shakes from a shack this afternoon because the little one likes it a lot. This tapioca and tea drink originated from Taiwan but you can see them everywhere across asia these days. I also heard that they’re quite popular in other regions and it’s young people who consume them the most these days. I can consider the humble tapioca tea to be a classic in this regard since it has remained almost unchanged and people still buy them to this day. The only things that changed so far is the inclusion of tapioca balls and flavoring. You now get to choose from a wide spectrum of flavors like fruits, chocolate, dairy, vegetables and other things. This makes the whole thing complete unlike the original ones which were basically just based on tapioca. Today, I’ll introduce to you a camera that many considered to be near-perfect but Nikon pushed the limits and gave us a masterpiece that has endured the test of time.
Introduction:
The Nikon FM2n is one of Nikon’s longest-selling cameras. It was introduced in 1983 as an update to the very popular Nikon FM2 and the differences are subtle but important. The flash sync is now 1/250s, an improved mirror box assembly was also installed and a new type of focusing screen replaced the older (dimmer) one and a host of other changes that are too minor to point out but improves the handling and reliability of the older design. I love this camera a lot and it’s easy to see why this camera became one of the best designs that ever came out of Japan. You can still find professional photographers today using it as a “hobby camera” and kids these days prefer using these over other models because it has a “modern” feel despite being a true manual camera. Its popularity is also its curse as these are often sold at inflated prices and are usually priced as much as a Nikon F3 for a nice sample with minimal surface blemishes and no defects. I was lucky to find one for a decent price, sold by a friend to me. It wasn’t in perfect shape but it is working properly and there aren’t any serious defects that needs to be repaired, all it needed is a thorough cleaning and changing of all of its foam seals and dampers. I will outline what I did here in this blog and I hope that this will help you see what’s inside of this camera.
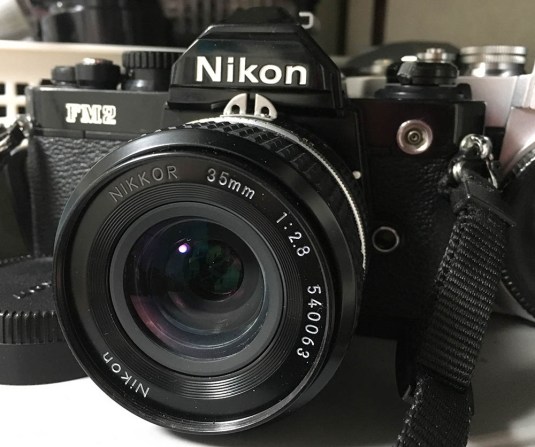 The Nikon FM2n’s lines are simple and elegant. It’s a robust little camera that was mostly made using brass and aluminium alloys but some of the details and fittings were made of plastic. This is a departure from the Nikon Nikkormat series where it derived from since the Nikon Nikkormat cameras has nearly no plastic parts that you can find externally. It’s a small sacrifice to make since the new cameras are much smaller and lighter so they’re going to be better as all-day carry cameras since your neck won’t get as stressed.
As far as Nikon is concerned, the the “n” in Nikon FM2n stands for “new” and sets it apart from the model it replaced. For all intents and purposes, both cameras handle almost the same and you won’t notice the slight increase in flash sync speed unless you’re serious as a strobe user. The extra speed will allow you to use a slightly faster aperture on a sunny day without using a really dense ND filter to help darken ambient light. I used to shoot a lot of flash photography and this small amount can mean an over-blown highlight on the model’s forehead or some motion blur in your pictures.
At the heart of the Nikon FM2n is a shutter made by Copal that’s designed by Nikon. It has titanium shutters for the early models but later models post-1989 all have the aluminium shutters that are more reliable in cold weather and are tougher in most cases. The older type of shutter will be replaced with the new ones if you brought it to Nikon for a shutter repair. The SOP for most shops is to replace the whole shutter aseembly with a fresh one when something happens to the shutter because you need special jigs and equipment to work on the Copal shutters. It’s not impossible to fix one yourself but it just requires a lot of time and many businesses can’t afford to do that, including Nikon itself. It’s not a black box at all, it’s easy to understand how it works and I will make a video about it one day.
 The Nikon FM2n is rugged and can take plenty of punishment before tapping-out. This is what sets this camera apart. It has no need for batteries for the shutter to work properly, the batteries are only for the light meter which doesn’t influence the shutter’s operation at all. They’re easy to repair and will work perfectly after being serviced by a competent repairer. Mine has signs of being serviced before I got it but it works perfectly so I’m not at all concerned with its reliability. These are so rugged that the Soviets used a couple of these in space, just think of that! Being all-manual means that you do not have automatic exposure control like the one on the Nikon FE2 so you are forced to slow yourself down a bit more. The good thing is that there aren’t a lot of electronic parts that can go wrong so you aren’t at the mercy of the camera’s battery or electronics. It will work as long as it is in good condition and the lubricants are still good.
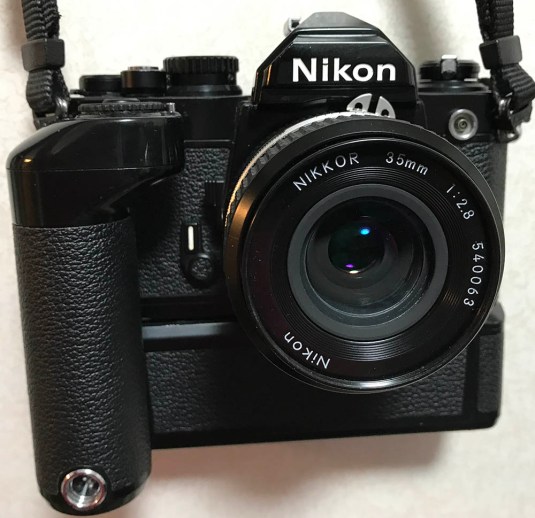 Mating it with the Nikon MD-12 makes it a great setup for general photography. Shooting events is easy with this combination. You can even replace the back with a data back for imprinting information on your film for documentation purposes. It makes your setup a bit bigger and the added weight of all those batteries can strain your neck if you carry it all-day but that’s a small price to pay for convenience.
In case you guys are wondering, this video should show you how the Nikon MD-12 works when you fire it in continuous burst at 3.5 fps. The camera shown is the Nikon FM but it’s not too different from the Nikon FM2n so it should be a good-enough example. The older Nikon FM has lower specs such as a 1/1000s maximum speed and a flash sync of 1/200s. I sometimes prefer the Nikon FM because it has a fold-able Ai-coupling tab so you can use your pre-Ai lenses with it. It’s also cheaper so it may be more appealing to some people.
Owning one of these is a must if you’re a Nikon photographer. If you don’t have one yet, I suggest that you look for one online or head to the nearest camera store and check it out yourself. Test everything and see if all of the functions work. The main things that needs to be checked are the slow and fast shutter speeds, the meters accuracy, the operation of the dials and levers, the movement of the mirror and the overall state of the camera. The flash sync should be tested if you will buy one to use for flash photography. I usually just ignore it since I don’t shoot with flash as much as I did these days. If you want to buy the special models then you can get a Nikon FM2T with a titanium body. It’s the same camera except for titanium shell. The Nikon FM2n commemorative versions are much rarer such as the “Year of the Dog” and the “Year of the Dragon” editions but the rarest of them all is the “Lapita version”. This model was made for Lapita (a Japanese magazine), it’s a limited edition camera with bright orange faux leather and these were made in small numbers. I would love to own one but they usually sell for $400,000 or so, way above my pay-grade.
That’s it for the introduction. It wasn’t necessary to introduce such a popular camera but I had to write a small introduction for it for people who just knew about it from my blog. These used to be very popularly seen around student’s necks but you usually see them in the setup of hipsters these days (bless them). They keep film and the Nikon FM2n alive so it’s still a relevant camera today as the day it was released. It has been replaced by a very capable camera – the Nikon FM3A but I don’t see this camera getting less popular anytime soon. In fact, it has quite a revival in the past couple of years and I am sure that we’ll see this camera still being used in the decades to come.
Before We Begin:
If this is the first attempt at opening a lens then I suggest that you read my previous posts regarding screws & drivers, grease and other things. Please also read what I wrote about the tools that you will need in order to fix your Nikkors.
I highly suggest that you read these primers before you begin (for beginners):
- Essential tools
- Best practices 1
- Best practices 2
- Best practices 3
- Ai conversion
- Working with Helicoids
Reading these primers should lessen the chance of ruining your lens if you are a novice. Before opening up any lens, always look for other people who have done so in Youtube or the internet. Information is scarce, vague and scattered (that is why I started this) but you can still find some information if you search carefully.
I highly recommend that you also read my working with helicoids post because this is very important and getting it wrong can ruin your day. If I can force you to read this, I would. It is that important!
For more advanced topics, you can read my fungus removal post as a start. This post has a lot of useful information here and there and it will be beneficial for you to read this.
Disassembly (Top Panel):
The good thing with this camera is that there’s nothing wrong with it, all it needs is some cleaning and replacement of foam seals. The meter is accurate so far according to what’s specified in the factory repair manual and all of the speeds seem accurate. This article is only going to be useful for minor repairs and cleaning so it won’t be useful if your Nikon FM2n has a serious problem. I’ll write a separate article if ever I encounter a camera that has a serious problem related to the shutter or mirror box and I’ll share what I did to fix it here in the blog. The good news is you rarely have to adjust the shutter. Flushing it will usually be enough to bring a tired one back to life and applying a small amount of watch repair oil at the right pivots can bring the speeds close to factory-standard, assuming that the shutter hasn’t been tampered by a previous repairer. This is how tough the Copal is.
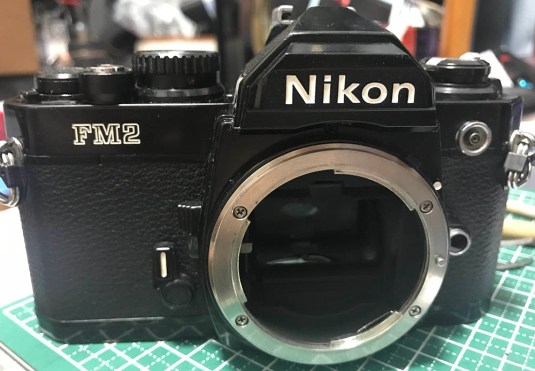
Serious problems usually mean that you should remove the top panel or top cover. More serious problems can only be fixed by removing the front casting which is not the easiest thing to do so try and fix what’s wrong by through the top or bottom. Luckily, my camera doesn’t have anything wrong with it apart from needing a thorough cleaning. Trouble in the mirror box or the aperture coupling tab is best avoided because those will mean that you should open the front casting. A filthy viewfinder, faulty meter, jammed advance or anything related to the flash and shutter speed selector can all be fixed by removing the top panel. Except for a spanner, you won’t need any special tools to remove the the top panel and put it back.
 Cover the aperture with a piece of cardboard to protect the shutters from your fingers or tools. Mine has the older titanium curtains and they are known to be quite fragile so this will ensure that they’re safe. Remove the rear door by sliding the pin at its hinge.
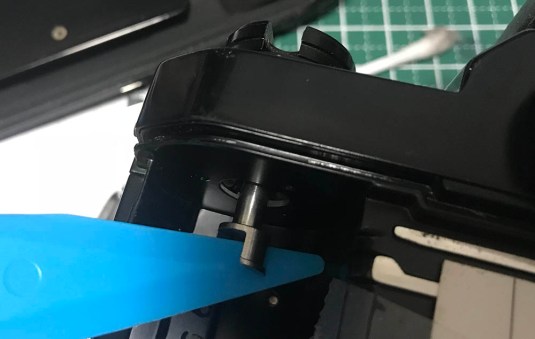 To remove the rewind crank, you simply jam the fork with something soft like plastic or wooden chopsticks. You then turn the crank counter-clockwise until it unscrews itself. It shouldn’t take you much effort to do this but if the one on your camera is stuck, just use a a bit of alcohol and apply a drop at the crank’s base. This should soften the lacquer that’s used to secure it at the factory.
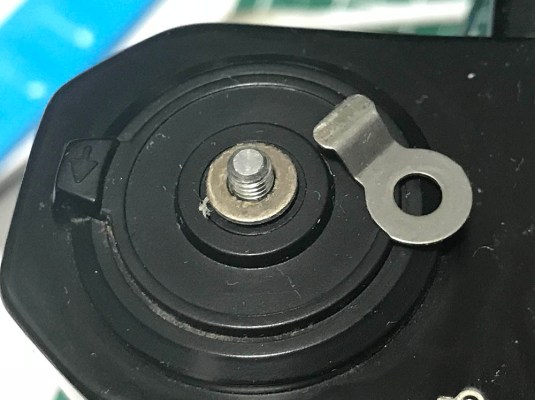 The washer and the spring is for the rewind lever so it clicks-into place. Do not put these back the wrong way or else your rewind lever won’t function properly. That plastic base can be removed by turning it towards the direction of the arrow and pushing it from the other side. Don’t use too much force so you won’t damages this plastic part.
 The slots for the advance lever is covered by faux leather. I applied alcohol to soften the contact cement and carefully lifted it off using special knife that watch repairers use.
 Use a spanner to remove the cover by turning it counter-clockwise. Never use too much force or the neck can snap. If it’s stuck, you can heat it with a soldering bolt or use a soft material like rubber to cover it and then whack it with a wooden mallet. These will break or soften the epoxy used on it at the factory if that was ever applied.
 Before removing the advance lever, note that there’s a spring that should latch to it. This has to be reinstalled properly and it can take a bit of time to do this. You can use a pair of tweezers and do it the direct way or use a length of thread to pull the spring into place.
 Un-hook the spring so you can remove the advance lever. The collar for multi-exposure can be removed but be careful that you don’t damage the thin film underneath it. That’s the bushing for this collar and if you damaged it your film counter won’t work properly or this collar won’t spring-back after an exposure. If I am not mistaken, the spring that’s connected to the advance lever has something to do with this part, too. The spring can be easily removed and the other end should be properly attached attached to a sliding slot.
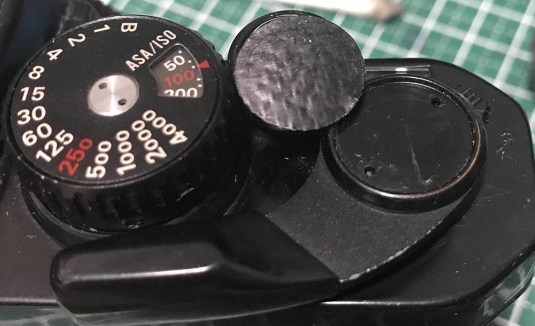
 The speed selector shouldn’t be removed if all you want is to remove the top cover but its ribbed grip should be removed because it’s in the way. The shutter guard can be turned to loosen it but it won’t come-off completely because the plunger is secured by a pin. This part can collect plenty of dead skin cells akin to toe-jam so I loosen the guard and clean it as well as I can with what I can access without completely removing it.
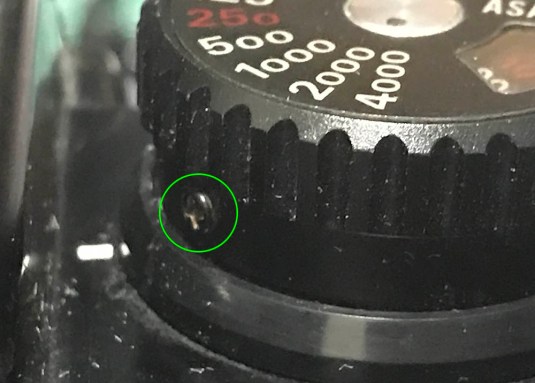 The grip for the speed selector can be easily removed by unscrewing these 3 screws. The speed selector’s housing itself is made of plastic so be careful as you remove or tighten its screws so you won’t ruin the plastic threads.
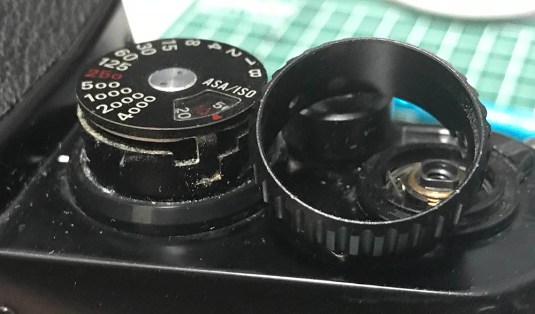 The grip can be easily lifted from the housing once the screws are gone. Just look at all of the things that got collected underneath it over the decades! I was tempted to clean all of this by disassembling everything but laziness kicked-in so I just wiped everything with a lot of alcohol and blew the dirt away with compressed air.
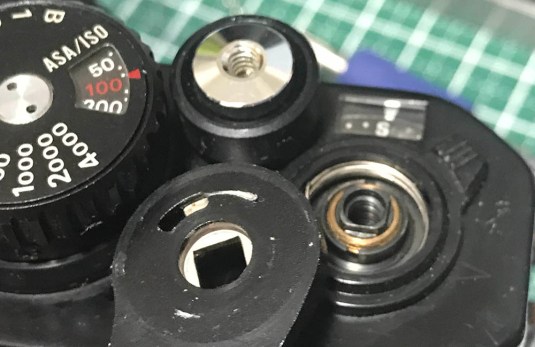
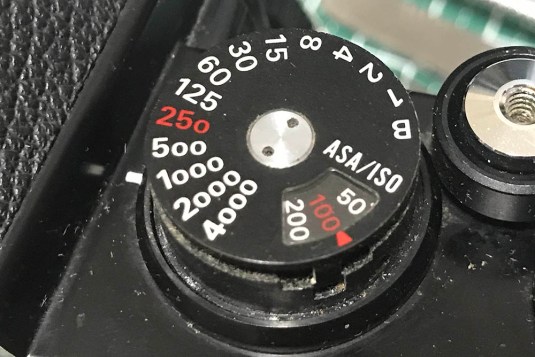 If ever you want to disassemble this even further for very important reasons then use a proper spanner to remove this fastener and everything should come-off completely. I do not encourage you to go any further than this unless you really have to.


(Click to enlarge)
The top panel has 5 screws situated around it that secures it to the body casting. Remove all of them and you can safely remove the top panel.
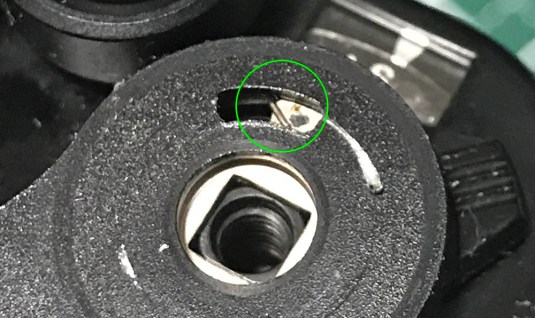
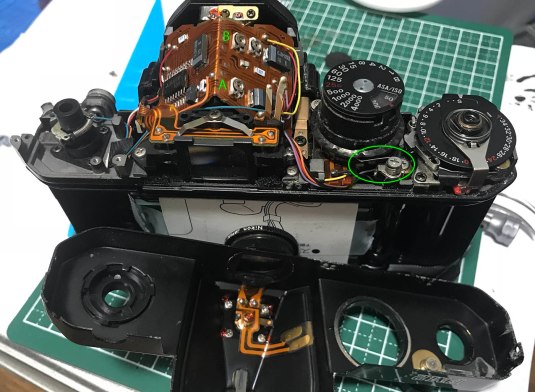 The top panel can now be safely pulled-away from the body. There’s nothing to de-solder here because the flash contacts are all smartly laid-out and the contacts themselves were not soldered to the hot shoe, this is Nikon engineering! Please take note of the position of this spring (circled). There are 2 variable resisters here (A & B) that are used to calibrate the light meter. You adjust them for high (high EV) and low (low EV) sensitivity and you balance the results to calibrate it back to factory-spec. This is a complicated step that I’ll skip because you can easily mess this up if you’re not careful or you don’t have the right equipment and setup for this such as a light-box with a dimmer and a spot meter. It also needs a specific lens (Nikkor 50mm f/1.4 Ai-S) in which you calibrate it to. This requires a separate article since it’s going to be too long.
That’s it for top panel. Clean whatever you can using a Q-tip saturated with alcohol. Don’t wipe anything on the PCB (printed circuit board) because the moisture may short it if the battery is still installed or you can remove some parts that were coated with lacquer or a thin film of silicone for protection or anti-static properties. There are many small things here that can be easily dislodged or damaged so be careful when handling the camera in this state. If you are handy with a multi-meter you can detect any bad connections here and replace any bad wires or re-solder any bad connections. Blowing air will also help in removing any bits of old foam that has fallen deep-inside the body but don’t overdo it or else you run the risk of blowing the dirt into some hard-to-reach places. When done right all of the dirt that you blew-off should collect and settle at the bottom cover and you can easily clean them by removing the bottom cover.
Disassembly (Bottom Cover):
The bottom cover is easy to remove. Trouble with winding, film advance, shutter firing, a corroded battery chamber and other things can be addressed by seeing what’s under this thing. It’s easy to see if something isn’t moving smoothly or is jammed due to dry or dirty lubricants. These are all easy to discover and address.


(Click to enlarge)
The bottom panel can be easily removed by unscrewing these 3 screws.
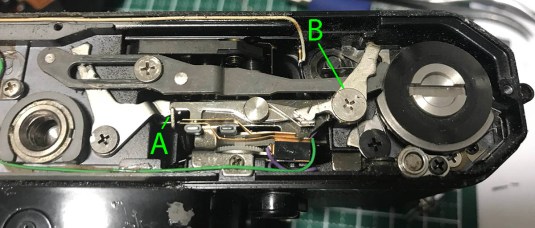 Clean A very well and apply a bit of high-quality lithium or molybdenum grease. You can also clean B and drop a very small amount of oil to its pivot. You only have to do these if your camera isn’t working properly and you isolated the problem to this part.
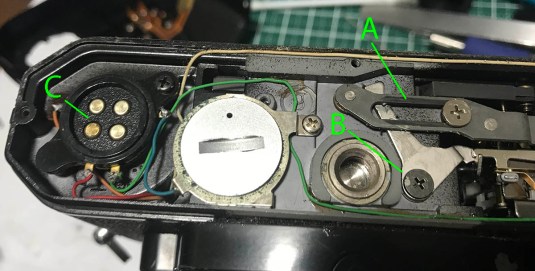 Clean A very well and apply some fresh grease. You don’t need to apply a lot, just a fresh film of grease is needed in this part. This is part of the mirror-charge mechanism and it’s important that this is clean. If the grease here has hardened then you can feel it when it’s cranked as you activate the advance lever. Clean and oil the pivot of B if it does not move smoothly. Use a Q-tip saturated with alcohol to scrub the contacts in C so the motor drive can communicate with the camera properly. Inspect all of the soldered wires in this part and see if any has to be re-soldered. A professional will also use a multi-meter and check the resistances of these and see if any of the wires has turned bad and is not conducting electricity properly.
That was easy wasn’t it? For most people, this is where they want to start before opening the top panel as many things can be fixed here without removing more things. Since lots of important things are housed underneath the bottom cover, it’s obvious that a knock or ding here can cause the camera to malfunction. Having said that, avoid any camera with a dented bottom and check it properly if you think that it is still OK. For those of us who are old enough to remember, there’s a good reason why we avoided canned food with a dented can at the grocers. That’s because the tin can get oxidized when the coating under or over it breaks and that can poison us. Modern canning technology has improved and we’re all thankful that this isn’t as big of a risk as it used to be.
Conclusion:
We’re almost done! We need to do some final cleaning and touch-ups before we can use this camera. I replaced all of the foam seals and dampers with fresh ones. It was easy, the channels for the foam seals at the film chamber are wide enough to fit the pre-cut 1.5mm strips of foam so I used replacement material that has adhesive backing. In cameras that have narrower channels like the Nikon Nikkormats, this can test your patience so I use the technique outlined in this foam replacement article to make my life easier. I swear, I hate replacing foam seals for these types of cameras!
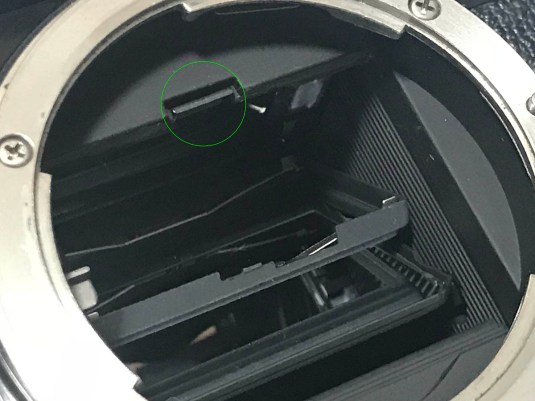 The frame for the focusing screen can be opened by pushing on this tab. Carefully get the screen out so you don’t scratch it. Clean it with a bit of soap and water or alcohol that has been thinned with distilled water in a ratio of 1:9. The screen is made of acrylic and it is going to be damaged if you use straight alcohol or naphtha when cleaning it. You only use the softest lens tissue for this and never wipe the fresnel side of the screen unless fungus has grown there. The fresnel side can be cleaned by using a strip of 3M Magic Tape. Use a small strip and stick it to the surface of the fresnel and any dirt should stick to the tape so they stay with the tape as you lift it off. I eventually replaced the screen with a fresh one that I bought for $19.00 and it’s super-bright compared to the original one. The K3 screen that I bought is originally intended for the Nikon FM3A but it works fine with this model.
This camera has molds growing at the broad surface of the prism and I cleaned it with a lot of Q-tips that were bent at an angle to help me reach every corner of the prism. I blew it with air first and then saturated my special Q-tips with alcohol or naphtha then went on to wipe it as best as I can while carefully cleaning the areas around the shutter speed display so I won’t damage it. It wasn’t easy because there’s not a lot of space but it had to be done. Had I known this earlier I would have removed the prism and cleaned it while I had the top panel off.
There is a shim and a spring here and make sure you don’t lose either of them. The shim is sometimes absent depending on the camera. If your camera seems fine as you check it via the viewfinder then you don’t have to worry about the shim.
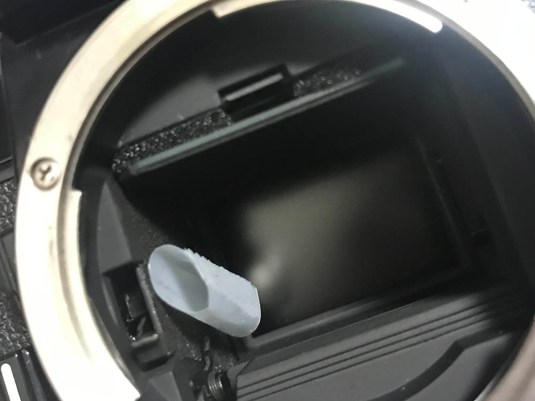 As you can see, I have applied a fresh set of foam so the mirror won’t get shocked every time it hits the top. The final thing to do is to use some tape and clean the felt lining of its mirror box. You can also oil the lock of the mirror if it doesn’t move smoothly, if a camera has symptoms like this then it only points to a bigger problem inside and the mirror box has to be removed and cleaned properly. This is a big job that involves removing a lot of parts including the front casting and it’s best that you avoid doing it. This is the reason I only buy cameras with no problems related to the mirror box.
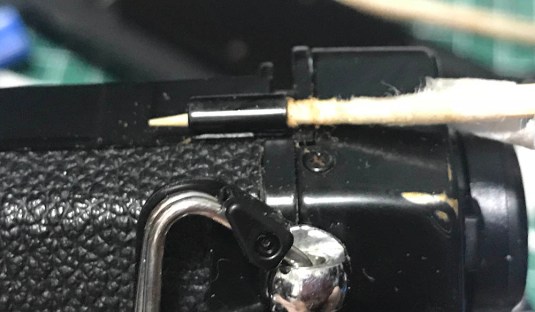 The hinges of the back were really rusty and I used a toothpick wrapped with tissue and saturated it with oil and scrubbed-away at the rusty hinges. I can’t remove all of it but it’s a lot cleaner now that it was when I first got the camera.
The camera is now ready for a fresh roll of film! While what I did with the camera can be considered strictly cosmetic it’s good that I worked on it because the moldy screen can be a serious problem if left as-is. I just hope that there aren’t any molds inside the camera or I will have to open the whole thing up and clean everything down to the last screw. This is one of the things that you should be careful with when using old equipment and that is why I learned to repair cameras because you cannot rely on other people to do this. Sure, most repairers will fix the camera for you but not all repairers will go the extra mile and clean the camera thoroughly for you. Those who do care for their clients’ health and they are the ones that we all should patronize. Having said that, if your camera is broken and you have the itch to fix it yourself, please consider sending it to a real repairer if you are unsure of your repair skills or you lack the tools to do a proper job. Paying somebody for repairing your camera is a small investment that goes a very long way down-the-road, it will ensure that the camera will work properly and prevent any trouble that’s just under the surface waiting to happen. This article is just for minor maintenance and a real job is going to be multiple times more complicated than this and that requires another article or two just to cover them all. Adjusting the shutter alone requires you to remove a lot of parts and extract the shutter cradle itself so you can get to the small crown gear to adjust it and that’s beyond the skill of most people reading my blog. Remember, this is strictly a material that was written for your entertainment. See you again in the next article and I thank all of you who continue to support and patronize this blog. Ric.
Help Support this Blog:
Maintaining this blog requires money to operate. If you think that this site has helped you or you want to show your support by helping with the upkeep of this site, you can simple make a small donation to my paypal.com account (richardHaw888@gmail.com). Money is not my prime motivation for this blog and I believe that I have enough to run this but you can help me make this site (and the companion facebook page) grow.
Leave me some tip?
Thank you very much for your continued support!
$2.00
Helping support this site will ensure that this will be kept going as long as I have the time and energy for this. I would appreciate it if you just leave out your name or details like your country and other information so that the donations will totally be anonymous it is at all possible. This is a labor of love and I intend to keep it that way for as long as I can. Ric.

Dec 20, 2018 @ 20:33:01
Hi Richard! How are you? I’m glad that I found this article! I’m looking for somekind of help, I’ve a FM2N and its in the repair shop, the problem is the exposure meter (photometer, don’t know how it is calle in English), the circuit board is fried, so I need to find the circuit board or the little chip of 16 legs (again, don’t know the name in English, in Spanish is “integrado”), and the repair man told me that that piece is a Mitsubishi m51868p, but I can’t find anywhere. Can you give me some direction where I can find that part?
Thanks a lot!
Dec 29, 2018 @ 02:46:30
Hello. Unfortunately you can only find one from old cameras or spare parts. these are usually sold as a whole assembly and not single parts. it’s called integrated circuit or IC, Ric.
Sep 22, 2019 @ 10:03:47
Hy there Richard, i have a problem and you probably could give me some help, i bought a nikon fm2 that has the latch that opens the viewfinder screen suport broken, can it be replace, if so, can you please show me how it.s atach to the body of the camera?? Best regard, Adrian.
Nov 28, 2019 @ 18:24:36
Hi Richard,
I recently got an FM2 as a gift but unfortunately, the shutter doesn’t seem to be working at all.
I feel like it’s part of the sprocket advance since the sprocket wheel inside the body is spinning freely and the button on the bottom doesn’t do anything. Any ideas?
Dec 21, 2019 @ 03:19:12
it sounds like its something underneath the camera, looks like its not catching the spring charge lever.
Jan 10, 2020 @ 22:16:29
Good day sir!
I was hoping I could get a couple more information on how to calibrate the exposure meter for Nikon FM2n. My FM2n is
Mar 12, 2020 @ 02:33:43
Could use a bit of help. I had to do a repair on my FM2n. Specifically the mirror would flop around because it’s spring was no longer holding it in place. I repaired this issue no problem with replacement parts. BUT the meter no longer works and I know why. The spring you mentioned after removing the camrea’s top panel (circled in green) is not in correctly. I can’t seem to figure out how to get it in properly. Camera works great but If I could have my meter back it would be even better. The meter will glow but it obviously is out of wack. Do you have any clue how the aforementioned spring should be set?
Apr 03, 2020 @ 03:54:39
It’s probably a ground problem
Jun 08, 2020 @ 19:09:50
Good day Richard;
My FM2 meter only shows the Minus sign. Moving the Shutter Speed Dial in and out of Bulb position will light up the Dot and the Plus sign. I read that exercising the Shutter Speed Dial will sometimes make the meter work again. I’m dubious about this though.
Everything else on the camera works. I reached out to Nikon, they don’t support it and offered no information.
Dec 23, 2021 @ 12:32:31
I have this same issue!
Sometimes, with careful adjustment of aperture I can get a + to appear, which then responds to changes in light but switching shutter speed or aperture reverts back to -.
Did you ever find out the cause and solution?
Sep 26, 2025 @ 05:53:18
did you find a fix?
Feb 01, 2021 @ 15:26:55
Hi Richard !
I’m glad to you made all those articles on repairing and disassembling old cameras and lens, it helped me several times, particularly when I needed to clean the aperture blades of my Nikkor 50mm H.C Auto and checking what was inside my Canon 7 rangefinder, so thanks a lot !
I’m experiencing some troubles with my Nikon FM2N regarding the light meter, it seems to be off by a fews stops, that I could compensate the ISO dial but not when shooting lower ISO-rated films.
I’ve checked the old repairing manual from Nikon and was able to get my hands on a 50mm f1/.4 Ai/s as they/you recommend and made a dimmable light-box with a grey chart to accommodate to the different exposure values needed to calibrate the light meter for low and high exposure values.
The problem is that neither of those variable resisters are identifiable as which one is for high EV and low EV, they are just named VR#105 an VR#106… I was wondering if you had more in-depth knowledge on how to identify them and/or a “less-obscure” way – than the one described in the manual – to accurately adjust the light meter ?
Thanks for your time and have a great day,
Best regards from France !
Apr 11, 2021 @ 11:58:09
Hello, Richard. I always enjoy reading your blog, it is interesting and informative. Thank you for your hard work. If it is not difficult, tell us how to clean the focusing screen (there is a lot of dust inside) on the NIKON FM device? Unlike FE, FM2, FM3A, the FM camera does not have a removable screen, and I do not understand how to get to it. You can send a response to seabeco75@mail.ru. Thanks). My name is Mikhail, I’m from Russia, Saint Petersburg.
Jan 27, 2022 @ 21:17:57
Hi Richard, I’m looking a bit of help with a FM2n which seems to be in mint condition not even any specs of dust in the viewfinder. But there’s a problem with the shutter speeds or rather lack of any speed below 1/250th second. At these shutter speeds the shutter will open but not close other than 1/125 which will fire in portrait or upside down (weird I know ). Is it simple fix if so how or is it major surgery. Any advice would be most welcome. PS all the shutter speeds of 1/250th and faster seem to be accurate.
Thanks Gary.
May 13, 2023 @ 12:49:01
What ho Richard,
Somewhat late to your repair party!!!! but am reading everything. So interesting. I have a Nikormat FTn that worked (?) fine and I regularly run the various shutter speeds. A few days ago, I cocked the self-timer and although it wound down, it did not trip the mirror / shutter. I just stopped a moment before activation. Now I cannot wind the s-t nor trip the shutter. Assuming the s-t mechanism needs a bit of TLC or a drop of cleaning fluid. Any suggestions would be much appreciated. Thanks, Rex
Sep 14, 2023 @ 10:55:59
Hi Richard, Thank you for this very interesting info on the fm2. I have replaced the FRE variable resistor disc that sits just below the shutter speed dial and I’m having trouble understanding where the ends of the small spring locate around the base of the dial. it is the spring that you have shown circled in green in the picture with the top removed. The Nikon repair manual calls it part 539 (earth spring) but I’m struggling to see how this part actually works.
I’d really appreciate a bit of help if you could spare a little of your time.
Best Regards, and many Thanks
Ian
Jul 20, 2024 @ 01:14:36
hello. My FM2 does not shutter at very low speeds. Can I put wd40 on those pieces? thank you
Apr 12, 2025 @ 08:49:52
Please don’t apply any liquid like oil or wd40. It would make the situation worst. Probably the shutter just needs some clean. I just replaced shutter curtains of my FM2. It is not difficult as I thought. There are some good video on Youtube. Good luck!
Apr 12, 2025 @ 09:00:11
Hi Richard, Thanks for the post. I am trying to fix my Fm2 light meter. The reads are always under evaluated. Looks like ISO400 readings are the ISO100. I am not sure if is due to the position of the spring near the shutter dial, the one having green cycle in the picture before
“The top panel can now be safely pulled-away from the body. There’s nothing to de-solder here because the flash contacts are all smartly laid-out and the contacts themselves were not soldered to the hot shoe, this is Nikon engineering! Please take note of the position of this spring (circled). There are 2 variable resisters here (A & B) that are used to calibrate the light meter. You adjust them for high (high EV) and low (low EV) sensitivity and you balance the results to calibrate it back to factory-spec. This is a complicated step that I’ll skip because you can easily mess this up if you’re not careful or you don’t have the right equipment and setup for this such as a light-box with a dimmer and a spot meter. It also needs a specific lens (Nikkor 50mm f/1.4 Ai-S) in which you calibrate it to. This requires a separate article since it’s going to be too long.”
What is the function of the spring? what is the correct position on the shutter speed dial axle? Thanks!