
Hello, everybody! I just got back from a trip from the ¥100 shop, it’s Japan’s version of a dollar shop and you can buy just about anything you need here for your daily needs. The products are cheap and flimsy but for people who have other priorities or those who are constrained by budget, these shops offer a means of survival in an expensive place such as Tokyo. We’re simple people with simple needs and so these shops are more than OK to help with easing the burden of upkeep. Some of the products offer great value and you’re not going to find anything better in a more expensive shop. I sometimes get my tools and equipment from these shops and many of them have served me very well. While we are on the topic of being cheap, I will show you a camera today that offers great value today, they are cheap not because they’re bad but mainly because they’re old and some people prefer cameras with different sets of features and specs. This is the perfect choice for art student who can’t afford much or a traveler who wants a capable camera to bring along with them on a trip but don’t want to bring their expensive cameras with them. Read my article to find out what this is.
Introduction:
The Nikon FE was released around 1978, roughly a year after the Nikon FM debuted. The Nikon FE shares many similarities with its mechanical sibling so accessories can be used with either models. Both cameras replace the popular mechanical Nikkormats as well as the all-electronic Nikkormat EL series in their respective categories. Both are smaller and lighter, built with newer technology, used newer materials and have better handling. The Nikon FE sold decently but the Nikon FM sold better because it’s all-mechanical and you’ll only need batteries to operate its meter. People didn’t trust electronic cameras those days but the Nikon FE proved to be a reliable machine and many can still be found today for a nice price and they still work as reliably as the day they were sold. Fewer moving parts means less things that can go wrong due to mechanical failure but the flip-side of this is you will need batteries to operate the Nikon FE or you’re going to be stuck with its 1/90s mechanical back-up speed that will let you fire the shutter even when you don’t have any batteries in the camera, this gives you a certain insurance in case things go wrong.
 The Nikon FE has a beautiful silhouette that it inherits from the Nikon FM. Its design is its biggest asset because everything just makes sense once you hold the camera yourself. It’s also worth noting that it has a retractable Ai-coupling tab so you can use pre-Ai lenses if you choose to and meter with it using stopped-down metering. This is the only reason to choose the Nikon FE over its successor, the Nikon FE2.The Nikon FE has a nice set of features, it has automatic exposure and speeds from B up to 1/1000s, the flash sync’s at 1/125s which is decent compared to the Nikon F3’s 1/80s. It’s all due to the reliable Copal shutter inside these cameras. Nikon designs the shutters and Copal manufactures them for Nikon. Does this setup sound familiar? Sony makes sensors for Nikon and they were designed by Nikon. Nikon uses Sony’s dies but it doesn’t make it a Sony sensor (totally). The shutters Copal makes are tough and reliable, the shutters also travel vertically instead of horizontally and the shorter travel allows them to achieve the current shutter speeds that we are used to in modern cameras which is only a dream for camera manufacturers before the 1970s.
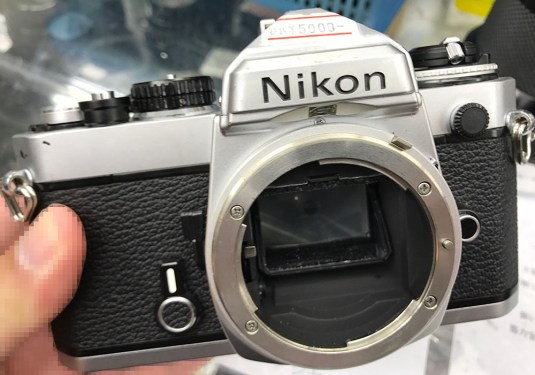 There’s also a silver version of the Nikon FE, I prefer the black one but I also like this one on certain occasions. This one works properly and only requires some cleaning, if you’ve got a camera with a mirror-box problem it can sometimes be fixed easily but sometimes it requires a total tear-down which can take plenty of time. This is the reason why I avoid cameras with mirror-box problems as much as possible unless it’s a Nikon F because I’m going to open the camera completely as a standard treatment anyway.
The Nikon FE’s successor is the Nikon FE2. It has speeds from B up to a staggering 1/4000s and an impressive 1/250s flash sync speed. The ISO dial also goes up to ASA 4000 from its original ASA 3200 and you also now have more options for focusing screens. The camera also loses the ability to use pre-Ai lenses because it now has the familiar rigid tab instead of the Nikon FE’s foldable one. If all of these matter to you then this is what you want.
 The Nikon FE is small and to appreciate just how small it is, here’s a picture of it beside a Nikon Df. The Nikon Df is considered to be the smallest DSLR in Nikon’s lineup but it’s big compared to the tiny Nikon FE.
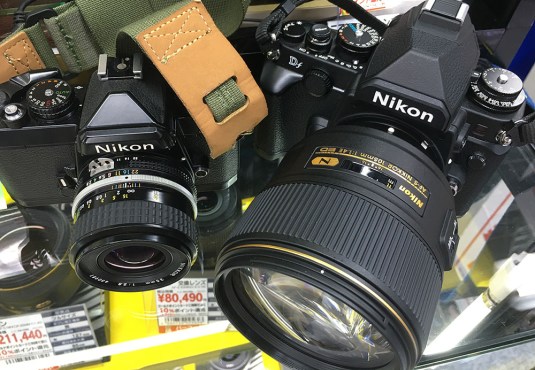 This picture should tell you why I prefer manual lenses over the latest ones with AF and other gimmicks. A small manual camera is what I will bring with me when I need to use it all-day. The footprint is tiny and my neck won’t hurt as much by the end of my day.
The Nikon FE uses the Nikon MD-11 or a Nikon MD-12 as its standard motor drive. All the models from this family of Nikons up to the Nikon FM3A can use these motor drives. The setup will give you a modest 3.5 frames-per-second continuous automatic advance. This is convenient and the added weight of the setup will add stability when you’re using the camera with a big lens and will handy for shooting using slower shutter speeds because the additional weight will make your setup more stable.
For people who want a cheap and reliable manual camera with automatic exposure, this camera is my best recommendation. Sure, the Nikon EM is cheaper but you cannot use it with manual speeds. The Nikon F3 is amazing but it’s not cheaper compared to these and they’re bigger. The Nikon FA is probably the most-advanced manual Nikon camera when it comes to features and automatic exposure modes but it’s neither cheap or reliable. The Nikon FE is hard to beat in this price range and I will highly recommend these to anyone.
Before We Begin:
If this is the first attempt at opening a lens then I suggest that you read my previous posts regarding screws & drivers, grease and other things. Please also read what I wrote about the tools that you will need in order to fix your Nikkors.
I highly suggest that you read these primers before you begin (for beginners):
- Essential tools
- Best practices 1
- Best practices 2
- Best practices 3
- Ai conversion
- Working with Helicoids
Reading these primers should lessen the chance of ruining your lens if you are a novice. Before opening up any lens, always look for other people who have done so in Youtube or the internet. Information is scarce, vague and scattered (that is why I started this) but you can still find some information if you search carefully.
I highly recommend that you also read my working with helicoids post because this is very important and getting it wrong can ruin your day. If I can force you to read this, I would. It is that important!
For more advanced topics, you can read my fungus removal post as a start. This post has a lot of useful information here and there and it will be beneficial for you to read this.
Disassembly:
I will show you how to open the camera so you can access what’s inside and diagnose the problem better. This is an electronic camera so problems aren’t always obvious since you don’t see the cogs and levers work in front of you like in a clock-work camera. You’ll need a multi-meter to check some of the functions and if you’re not comfortable with one then don’t try and fix these cameras because you’re only going to make things worse. You can probably fix simpler things that are mechanical in nature by cleaning them and that’s all you can do for now. This article is just for your entertainment and should never be used as a repair manual!
Before you dig into your camera it’s best to try to diagnose the problem first. If trying on a fresh pair of batteries still won’t do then your should try considering your options. The mirror sometimes stays up when the batteries are weak. The battery test lever isn’t really reliable at times and may even give false readings due to oxidized contacts or fungus and only a fresh set of batteries will work. If your camera works in all manual speeds except for the electronic ones in spite of having fresh batteries then the problem is definitely an electronic one. Corroded contacts are easy to clean and fix but a bad connection is hard to detect without the right equipment and knowledge on which connection does what. It is important that you only choose a camera that works properly because fixing one is an expensive endeavor and will defeat the purpose of buying a cheap camera to use. Simple defects can be dealt with easily while more serious ones will need a professional’s hand.
 Open the back and push the pin of the hinge to remove the cover. There should be a tiny peg at the pin to help you push it. The pin acts like a spring-bar so it retracts.
 The back was moldy so it had to be cleaned. Scrubbing it with dishwashing liquid using a stiff brush will take care of the mold. Make sure that you blow-away any droplets or else the moisture can make this thing rusty.
 Removing the pressure plate will help you access what’s underneath it so you can give it a thorough cleaning. Don’t forget which way the pressure plate should be mounted when you put it back again later. If the pressure plate has scratches that you can feel using the tips of your nails then you should polish the pressure plate using metal polish and a soft cotton cloth, an old T-shirt will be perfect for this. If you left the scratches as-is they can cause lines to appear in your negative. Never polish the pressure plate too much because it can lose the anodized plating so the shiny metal underneath peaks through. The shiny parts can cause light to reflect from them and cause light leaks to appear in your photos.
 Removing the top cover requires you to remove some of the parts on top of it. To remove the advance lever, simply peel the fake leather cover to reveal the slots for the fastener. I usually saturate this with alcohol to soften the glue and gently peel it with my fingers.
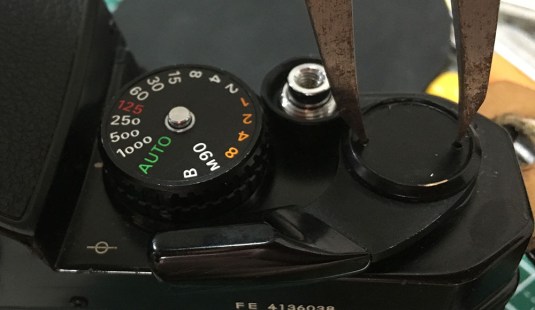 A lens spanner with the correct tip shape is used to remove the fastener. It’s usually stiff since the threads were secured. Applying heat or gently striking it with a wooden mallet will help break the seal. Don’t use too much force or you’ll snap its head.
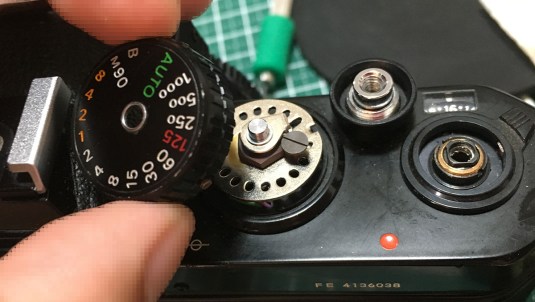
 There are scars on the advance lever, somebody has been here! There’s a spring under it and one of the ends is hooked to the advance lever. It’s at the 11:00 position in this photo, make sure that you put it back teh same way again later and with the correct tension. It’s there to help give the advance lever more tension so it springs-back easier.
 Remove the lever and you can see the spring and how both ends should be connected. It can get really dirty in this part so clean it carefully. The lever for multiple-exposure has a thin plastic washer underneath and it’s fragile. Make sure that you do not lose or damage this washer. Replace it when it’s worn because it can impede on the lever/counter’s way.
 The shutter speed selector dial can be removed after loosening its screws, there are three of them located around the dial.
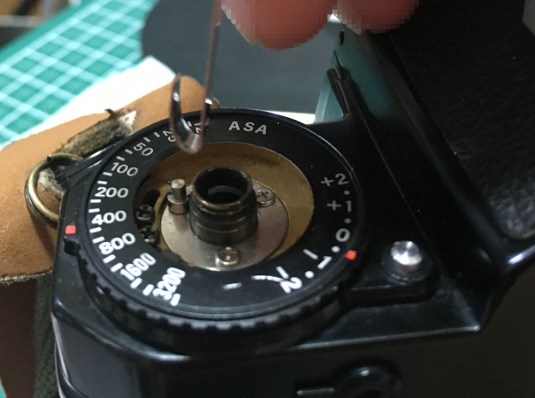 In case you accidentally closed the rear cover and you can’t open the back again because you removed the rewind dial, use a hook-shaped object to catch the lock within the tube. Pull it up as soon as you feel it catch on the lock and that should open the back for you.
 The ASA selector dial is secured with a collar and it’s in-turn secured by these screws. It’s made of plastic and can be flimsy at times so be careful when you handle it.
 This particular screw that I left here is used as an anchor point for a spring. Don’t forget to put it back at the same place later during re-assembly.
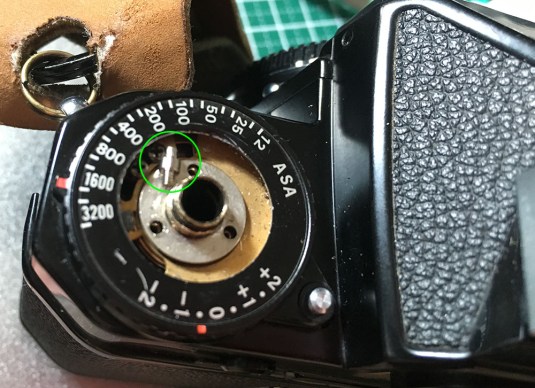 This screw sure loves to hide underneath anything it can find so don’t lose it!
 Remove the collar and the ASA dial can be safely removed. Never remove the 2 screws at the inner side of the ASA dial. These are used to adjust the ASA dial’s position in relation to the ASA FRE underneath it. You will never put it back correctly without special testers.
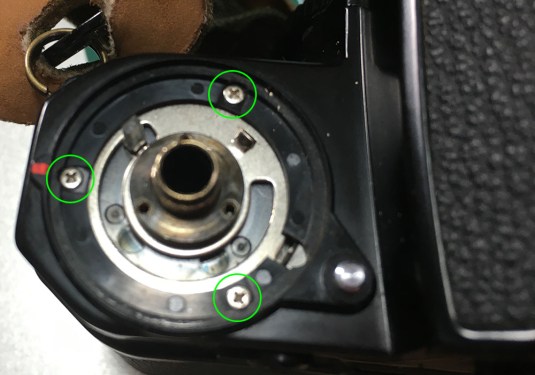 The decorative bezel for the ASA dial is secured by these 3 screws. It’s a plastic part and it can flex a bit under slight pressure so it’s flimsy, don’t damage this part.
 You can simply pick this part off once the screws are gone.
 The top cover can be safely removed once you got rid of all the screws around it. I think there are 5 of them, one near the eyepiece, 2 beside the prism and 2 at the sides. Lift the top cover carefully and don’t force it in order to prevent the top cover from warping. The top cover is made from brass and it’s thin at certain places and that’s where they bend.
Removing the top cover will reveal all of the sensitive parts that it protects such as all the variable resisters for the camera’s meter, etc. Be careful not to drop anything, small parts can easily get dislodged and drop to the floor without you noticing it so take many photos as soon as you remove the top cover so you will know what fell-off and from where. Just check the pictures and compare them to what you have.
The shutter speed selector’s base is connected to an FRE underneath it. This FRE can get dirty and result in your shutter speed selector’s malfunction or your meter to display the wrong shutter speeds in the form of the jumpy-needle syndrome, etc.
The whole shutter speed selector mechanism is then connected to a pulley underneath it and that pulley is coupled to another pulley at the shutter mechanism. They’re linked via a string, this string can worn or dislodged so nothing happens when you change speeds.
There’s another FRE underneath the ASA selector and that can also get dirty. The result is the same as a dirty shutter speed selector FRE but this time turning the ASA dial will not give you the correct ASA value or it may skip. These FRE wafers can be cleaned by using a Q-tip saturated with alcohol and naphtha. Gently wipe the dirt or fungus from its brush and the contacts on top of the wafers. The contacts are delicate and can easily be lifted so be careful when cleaning them. The brush can also be bent easily so handle it with care.
That’s it for this section, I hope you got a good idea of what and where you should look in order to fix what’s wrong with your camera. I didn’t show you how to open the front part because I didn’t have to open mine. Trouble with the Ai-coupling mechanism can only be fixed by opening it and cleaning the FRE if it’s dirty. If nothing happens when you change the aperture of your lens then this is where I will look first. Lazy or retarded action only requires that you flush that part with naphtha and blowing it with air. No disassembly is usually needed for this unless the problem is severe. I consider this as a hack but I’m not going to shy-away from using this trick because it saves me time and spares the camera a bit of trauma. Never use WD-40 with your Nikons! You can do it with your cameras from another brand but Nikons need the respect they deserve because they’re not disposable.
Conclusion:
If you think we’re done with this article, I’ll show you some of the things that you should keep an eye on when cleaning this camera. These are routine checks that I do in case the camera has hidden problems that require more work. I’ll also give you simple tips that’s useful for fixing minor problems with the Nikon FE.
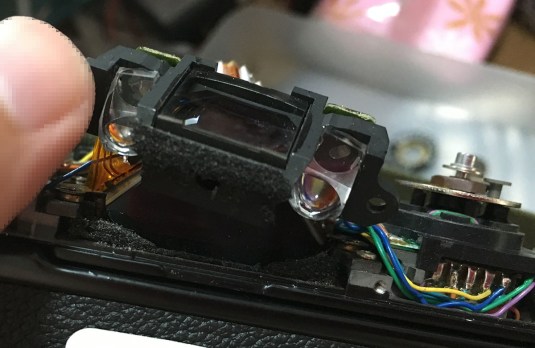 The plastic housing for the metering cells and the eyepiece can be lifted-up once the two screws holding are down is removed. You can then replace the old and desicated foam if yours are crumbling. I replace these with felt of various thicknesses as they won’t turn to tiny bits of debris. The dried pieces of foam can settle in the shutter mechanism and can cause it to malfunction. They can also get trapped between the prism and the glass so it’s important that you get rid of it. The lenses for the metering console are made of acrylic, I usually just wipe them with a small amount of lens cleaner when they get fungus but it’s rare that these things get dirty.
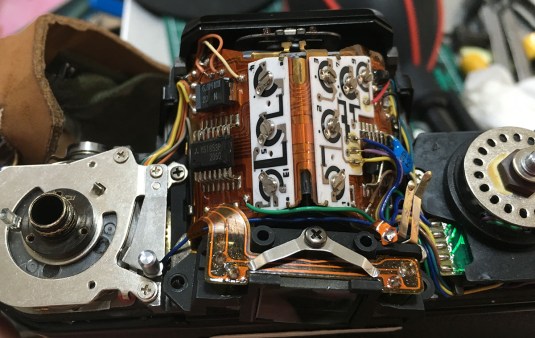 There are a total of 8 variable resisters/mini-potentiometers on top of the prism. They’re all glued to their substrate and are part of the PCB unit along with the harness. This is an electronic camera and these are delicate so discharge static electricity by touching a big metal object first or any gadgets specially made for that before touching these things. I’m sure it’s not as delicate as modern cameras but you just want to be safe.
The variable resisters all adjust the basic functions of the camera, don’t fuss with them if you don’t have to! Even the simplest adjustment requires some knowledge of electronics or camera repair, you will also need testers and other tools so don’t bother if you are not familiar with camera repair and just leave this to the professionals. Please treat this only as something for your entertainment.
There are small numbers printed beside each variable resister and I’ll use these numbers to name them. Variable resisters numbers 1,2,7, and 4 are used to adjust the shutter. You can set the timing of the shutter with these and each one correspond a value or a cluster of values in the shutter speed range. Numbers 3 and 9 are both used to calibrate how the needle in the meter swings, one for the high range and another for the low range. Do not touch number 13 because it’s used for voltage adjustment!
 The bottom cover can be easily removed by removing all of its screws. Problems with the camera’s advance and exposure cycle can mostly be fixed by cleaning and lubricating the problematic parts that you can access here. Wind the camera and see what’s not moving properly. If it looks sluggish and with a retarded action then it needs to be cleaned and a tiny drop of fine watch oil applied to its pivot. The Nikon FM/FE family of cameras are all very robust and they usually just require cleaning to work again properly.
 All of the foam seals were replaced with fresh material. The foam at the channels for the back cover can be replaced with yarn but foam is a better material for this since it’s a lot softer. Some cameras were designed to use yarn and other cameras aren’t so only use the correct material when replacing the seals. If you are new to this you can read my article for replacing foam seals. Cameras that were made from the late 1960s mostly use foam, if you use yarn then you may stress the camera back because it doesn’t compress very well.
 This Nikon FE was saved from the junk bin. It’s not as reliable as the mighty Nikon F but I will bet you that it will last longer than many cameras produced today. Unfortunately, it’s now resting in the parts bin today because I was experimenting on it and bricked it when I was fiddling with its electronics and trying to learn more about it. It was operating OK, I just had the itch to take things apart and the result is a dead camera. Rest in pieces.
I made this article because a lot of people enjoyed my Nikon FM2n article. While my blog posts aren’t meant to be proper camera repair manuals, I am glad that people find them educational and entertaining at the same time. I am contemplating on writing more and more camera repair articles in the future because I use less time writing them compared to our usual lens repair articles. I am promoted back to a junior management position so I won’t have the time to write long articles every week. See you again next week, if you’re enjoying what I am writing in my blog, please share this with your friends to help spread the word about my work. Supporting this blog helps ensure that this will go on for more people to enjoy. Thank you very much for following my work, Ric.
Help Support this Blog:
Maintaining this blog requires money to operate. If you think that this site has helped you or you want to show your support by helping with the upkeep of this site, you can simple make a small donation to my paypal.com account (richardHaw888@gmail.com). Money is not my prime motivation for this blog and I believe that I have enough to run this but you can help me make this site (and the companion facebook page) grow.
Leave me some tip?
Thank you very much for your continued support!
$2.00
Helping support this site will ensure that this will be kept going as long as I have the time and energy for this. I would appreciate it if you just leave out your name or details like your country and other information so that the donations will totally be anonymous it is at all possible. This is a labor of love and I intend to keep it that way for as long as I can. Ric.

Dec 10, 2018 @ 18:40:01
Hello, Richard,
I recently acquired an FE that had a jammed shutter. This was to be a learning experience and while it took some time to obtain a repair manual and Tomosy’s Nikon Repair Manual, it also took a while to gather the nerve to take this FE apart. There are online posts and video that supposedly tell you how to fix a jammed FE shutter, but I found that they are misleading. With the bottom removed from my FE I found that the shutter would fire after squirting a shot of Naptha up alongside the mirror box. However, this is but a temporary fix. I removed the top cover and found that I could remove the prism and all the electronics after desoldering only the sync terminal. They can be pulled away from the camera without any further de-soldering; some wires are glued in place, but they can be loosened. I now have the mirror box out and am inspecting its operation and cleaning it. I was surprised to find gooey foam inside the front, bottom, of the mirror box, and underneath the meter sensors. I’m hopeful that I’ll get this FE working properly again.
Dec 11, 2018 @ 00:39:21
Thanks for the great post! The FE was my first real camera and remains my true love. I tried the FE2 but it was a bit too advanced for me – I just love the feel and look of the FE and could shoot it blind if I needed to. That said, I have a growing collection of bodies because they are not necessarily inoperable, but perhaps better said unusable, due to different issues. I keep them for parts since they are so cheap to buy in the first place, but now with this post I think I might go back and see if I can fix a couple of them.
Feb 12, 2019 @ 04:41:25
Hello Richard. I have an original Nikon FE I purchased in 1978. New. Photometer not working. What would you recommend? Thank you!
May 17, 2019 @ 01:38:10
I recently picked up an FM in mint condition but with one stripped screw in the bottom plate. Upon further inspection (and foolishly) I drilled down too far into that hole and it became too wide for the original screw to hold it in place. I did manage to find another larger screw which seems to have sealed things up pretty well. My question is, will having rilled down into the screw hole too far have a negative impact on the camera body or other parts underneath that part? Thanks!
Sep 30, 2019 @ 06:22:57
Richard, The rewind lever came off while my son was using my FE. I was able to rewind and remove his film, but when I closed the door, the shaft fell into the camera and now I can’t get the door to open. Any suggestions?
Regards,
David
Sep 30, 2019 @ 06:25:28
Disregard the previous. I see you have already addressed in here.
Jan 04, 2020 @ 00:38:28
Excellent guide, Richard. Quick question about the ASA selector dial which is secured by 3 screws. 2 of them can be opened by a small Philips screwdriver. One of them is a shaft with 2 slots on the side. What tool do you recommend to open/unscrew it?
May 07, 2020 @ 13:29:07
Hey Richard, thanks for this post and all the photos with it! It was great to understand the steps.
Do you have any experience in exchanging the fins on that Nikon?
Nov 16, 2020 @ 13:51:33
Hello all,
I am fighting with the release of the ASA dials collar (visible on 12th picture). Any idea how to screw out this special screw?
Thank you in advance!
Aug 16, 2021 @ 23:46:33
Hi Richard, I just discovered your blog and it’s honestly super helpful.
Recently I found my dad’s Nikon FE, I cleaned it up, put fresh batteries in it and loaded a film into it. The problem is even though the battery check light up correctly, the Lightmeter isn’t working, the needle is in B, the frame counter doesn’t seem to advance either and the only working shutter speed are M90 and Bulb. Do you have any idea on what is causing this and how can I repair it?
Nov 24, 2021 @ 21:30:41
Hi Richard I’m about to buy a Nikon FE which according to the seller has a problem with the shot counter in practice does not reset automatically but stops at different positions despite this I’m thinking of taking it and then checking the problem. Do you think this is a solvable thing? I have already repaired some of my Nikon lenses in the past following your tutorials and I have to congratulate you for the passion you put into these mechanical works of art.
Jun 10, 2022 @ 09:06:52
Thanks for your work, articles and knowlegde! Great indeed.
I have a question RE the Nikon FE and a ring/ping/metalic sound when firing the shutter. It sort of resonated through the camer and is getting louder. My recently bought F3 also faintly makes a similar sound. Something to do with shutter dampers or the like?
I’m very interested to know your advice on a DIY option, or if it’s best sent to a pro!
Many thanks
Nick
Mar 01, 2023 @ 12:45:48
Hi Richard – thanks for the informative post. I recently picked up both a FE and FM with the identical fault: a badly cracked and damaged battery compartment. Both need to be replaced. Do you know any company worldwide that might manufacture replacement parts for this issue?
Apr 22, 2023 @ 05:41:49
G’day Richard,
you legend you !
Having got well into to doing the prism/ viewfinder crappy light seal of one of my FE bodies, i whimsically turned the body upside down to clean and lube the shutter release (the initial quest) and dropped a spring and flat ended brass tube out the top.
i put it back where I guessed it came from and then had the thought check your awesome library of info to make sure I was correct.
thanks heaps for your stunning resource, it is very much appreciated.
Andy, Perth, Western Australia
Apr 28, 2023 @ 14:19:40
My FM, FE, and FE-2, are still going strong. 👍