
Hello, everybody! I am actually amazed by how many youngsters are into film photography these days. It is a good thing because it keeps the industry alive and the appreciation for older equipment ensures that the little mom-and-pop shops selling used cameras stay open. The side-effect to this is prices of used gear is on the rise, even cameras that used to be less-desirable now cost more than they should. I am not against this, in fact, it’s a sign of a healthy market. Today, I’ll introduce to you something that represents this social phenomenon, it was something that people forgot but kids these days remind us of what used to be precious and how photography is supposed to be enjoyed.
Introduction:
The Nikon L35AF/AD was sold from 1983 to about a few years after that since newer, improved models were introduced frequently to keep the market interested. It’s a handsome camera, the body shell was designed by no other than Giorgetto Giugiaro himself so it incorporated some of his design philosophies that you could see in a Nikon F3. Going back to its conception, this was made in order to give Nikon something to sell in this part of the market. Other manufacturers made early-advances with their all-automatic cameras and Nikon had to join the race in order to show them who was the boss back then. This resulted in this camera which is a good, reliable design and it performs consistently as you would expect from a Nikon. The designers were so proud of it that Nikon nicknamed this the “pikaichi” or “number-one”. It’s an impressive camera considering that it’s Nikon’s first fully-automatic compact camera.

It’s sturdy, certainly well-made compared to other cheaper compacts of its time made by other companies. Its plastic chassis is tough and the back is made from metal. The flash pops-up when the shutter-speed is too-low but you could trick it by covering the meter’s window and depress the shutter-button. You can also shoot with it in lowlight without the flash by depressing it so it won’t pop-up but the results won’t be as good because you are overriding what the camera thinks will give an optimal exposure. The flash’s GN is unknown but the user manual said that the flash is only able to give accurate exposures up to 4m at most. It’s also coupled to the iris module, ensuring accurate exposure within the 4m-range.
What’s peculiar about this is its lens, it’s a Sonnar-type, something you don’t see much in compact cameras. It stood-out from the Tessar-type lenses that many manufacturers use. The 5-elements-in-4-groups design is tiny and bright, achieving a maximum aperture of f/2.8 when most compacts of its time only get to f/3.5 or smaller. It’s also wider than many of its peers which makes it even more versatile. The lens is indeed a masterpiece in its class. To know more about the optical design, read Nikon’s official article about this camera.
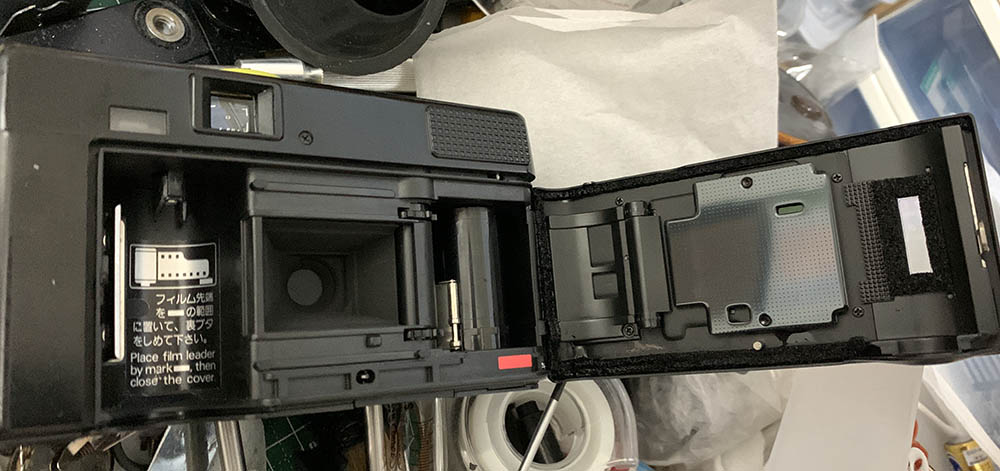
Film is advanced and rewound automatically. It’s slow, winding takes about a second or so and rewinding is a lot slower compared to a Nikon F4. Loading film is easy, you simply put the leader above the spool and close it and let the camera do its job winding to the 1st frame. There’s no information about the shutter’s range but it’s assumed that it won’t go very-fast and it doesn’t support long-exposures either. It appears to fire from around 1/250s to 1/30s judging from the sound that it makes but don’t quote me on that.
The rangefinder is activated when half-press, it also stores exposure information at this point. Pressing it all-the-way will adjust the focus and fire the shutter (and flash). Releasing it will cause the film to advance. This is a 3-step-sequence that many people who program user-interfaces are familiar with (like Qt and ScriptUI). The film-advance is the noisiest part of the whole cycle thanks to its loud motor. You can delay that by depressing the shutter and not releasing it until you think it’s safe for people to hear the camera buzz.

The only difference a Nikon L35AD has compared to the base-model is its inclusion of a date-back. It accepts a pair of LR44 cells to power the date-back. These are cheaper since collectors don’t find these desirable, they’re not cheap either but at least they cost less so they’re great as parts cameras. Visible here is the lever that you’ll have to use when shooting in backlit-situations, this will force a +2.0 exposure compensation, similar to what we have with the Nikon FM3A. There’s also a self-timer lever, a mandatory feature for all compact cameras. It has a power switch situated around the shutter-button, you flip it to power the camera or turn it off. It doesn’t have a sleep-function so turn it off when you’re not using it or the batteries will get exhausted easily. I am not sure but this looks like the first time Nikon implemented this feature, we’re now familiar with the switch in all of Nikon’s cameras and this is probably the first camera to have that. This makes Nikons a lot easier to switch-on because the position is so intuitive.

I assume that the earlier models only have provision for ISO400 but the later ones will go up to ISO1000. You’ll have to adjust the dial yourself and see how high it goes because there’s no visual indication apart from that. I love how the front looks. It has 2 “eyes” for its infrared rangefinder, this theoretically means that it will work better in the dark. Unfortunately it won’t be as accurate specially when you’re shooting through glass or other things that don’t have a distinct form or is tinier than the AF-point inside the viewfinder. The viewfinder has a scale with icons to display which distance the camera is focusing at. It’s nonsense since the icons inside do not mean much, a human, 2-humans, 3-humans and a mountain range. I’d appreciate it more if the display shows numbers instead because the icons could mean anything. The human-icon corresponds roughly to 1m and the one with 3-humans is probably around 3m and the mountains mean infinity according to my experience with it. The 3-humans-icon implies that this is the limit of the flash’s power.
It uses 2 AA batteries, a fresh pair will last you 100 rolls when not using the flash and merely 10 rolls when it’s fired every frame according to the user manual. This is respectable but you should assume that it will deplete the batteries faster since older cameras tend to suck power more than new ones thanks to corrosion.
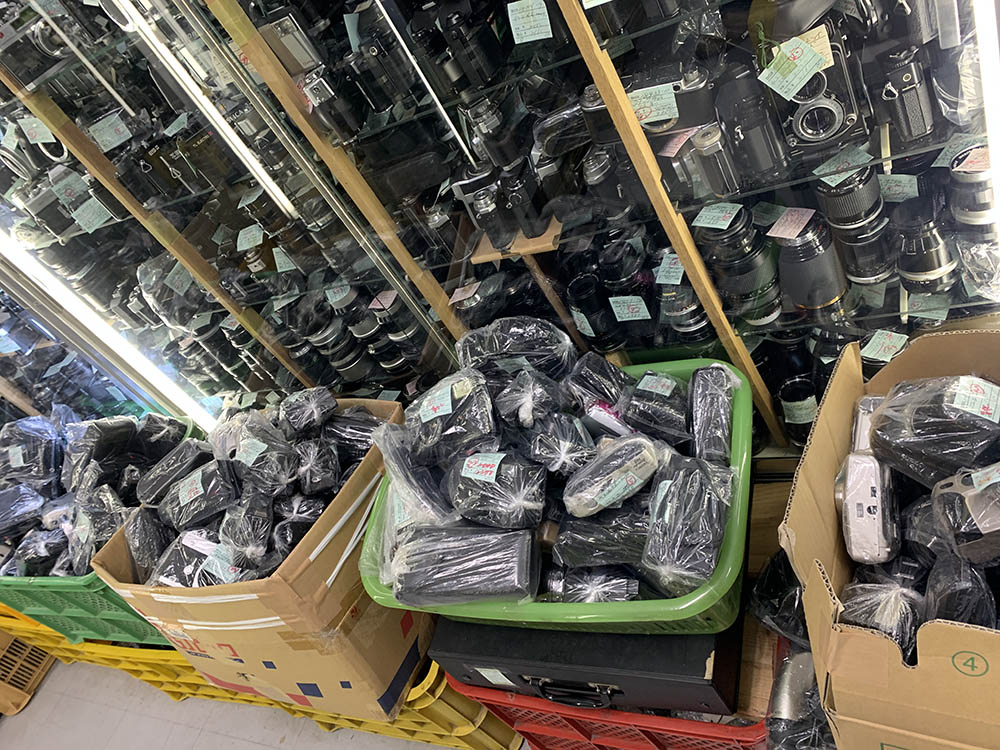
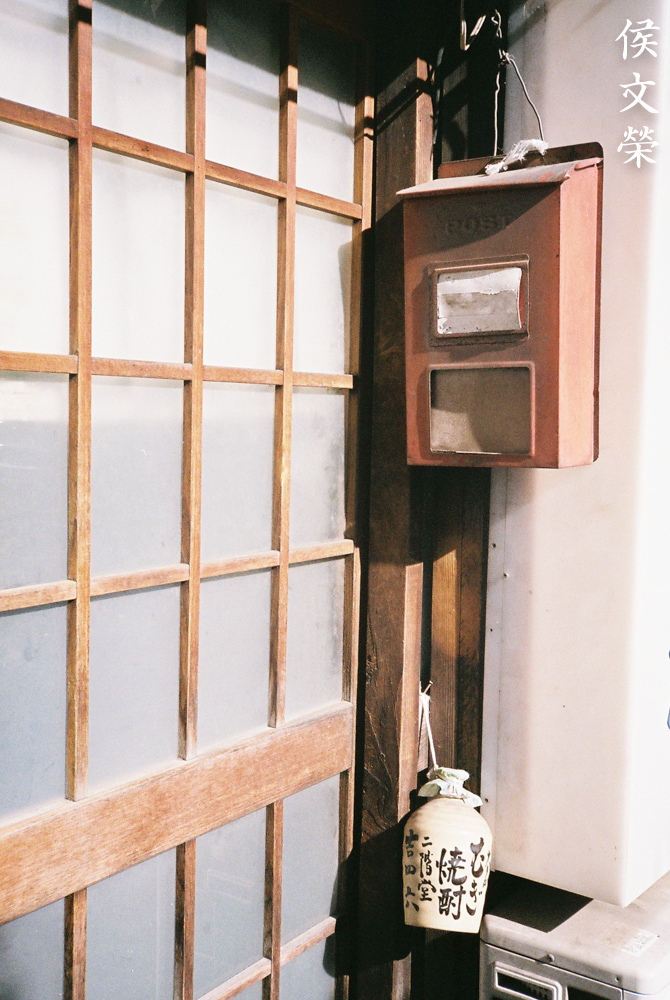
I found mine in the junk section of Shinjuku’s Chuko Camera Box. This place has the most compact cameras in every condition found in Tokyo. Their supply of Nikon L35AF has been depleted because youngsters all want them. It takes a couple of minutes to look for one in the unorganized heap of old, junk cameras, that is if they still have any in the shop.

The meter appears to be quite good for its time. It’s reliable in most cases so you could predict what you’ll get to see once the roll has been processed. I’m actually impressed by it, the results remind me of older Nikons or maybe a bit better in some cases.

It has a lever to the side of the front barrel, you depress it in backlit situations in order to force a +2.0 reading which is helpful. I’m not familiar with how it meters but I knew I had to use that lever in this scene and this is what I got. Apart from the metering I’d like you to see the chromatic aberration around my daughter’s hair. It is terrible, some of the worst I’ve seen. This is a compact so I’d let it slide.

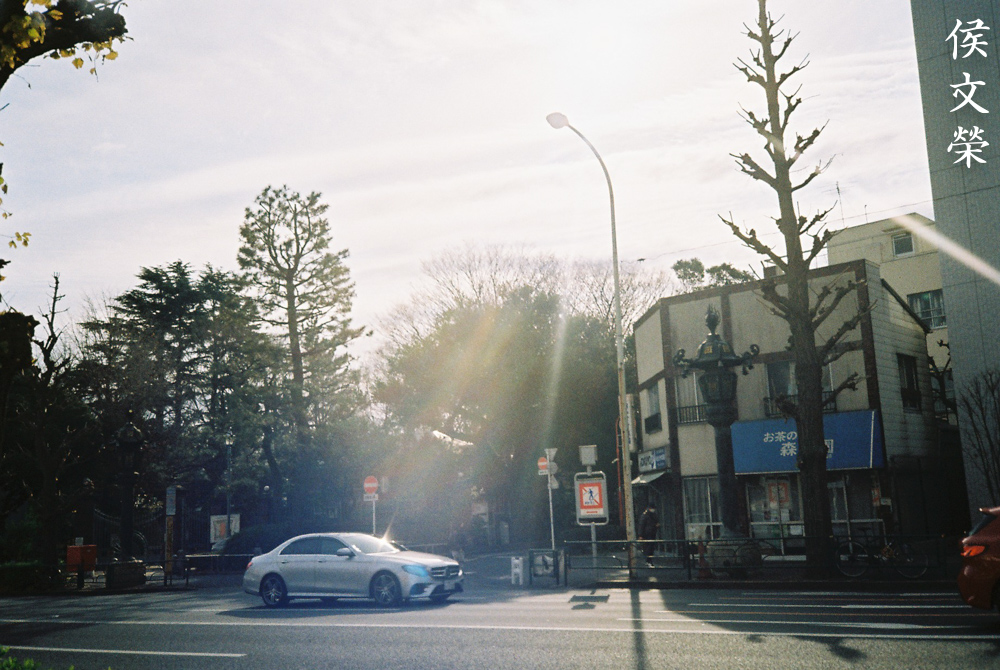
I shot this scene because I knew that it would look exactly like this and I was right. If you want to see more of the shadows exposed properly you simply depress the lever beside the lens’ protective barrel.

I got this one wrong. I was expecting that this will be underexposed due to the lamp but it handled it well. The meter appears to be center-weighted and heavily-biased towards the center, too. It seems to behave a bit like the Nikon F3 in this respect.

Here’s another example of a tricky situation. It exposed this quite well, I am impressed by how it was only off by a bit, maybe around 0.7 stops.


(Click to enlarge)
It flares terribly but that’s expected, I don’t think it has any of the advanced coatings applied to it. On the good side, I don’t see any blobs, not even under the worst situations but this doesn’t mean that it’s immune to it.

This is how it looks like at its worst. The metering seems to be spot-on but the huge blob ruined this shot. You may like it depending on how much you pay for your coffee and how many letters its name contains.

I am not sure of what we see here is chromatic aberration or flare, just be aware that this happens when you have shiny highlights in your scene.
This one appears to have been shot with a smaller aperture judging from how the sun-stars look. Chromatic and spherical aberration can be easily-seen in this photo. It seems to linger even at smaller apertures. Notice that it creates 4-sided-stars with an elongated profile. This is how the iris looks like, an elongated-diamond.


(Click to enlarge)
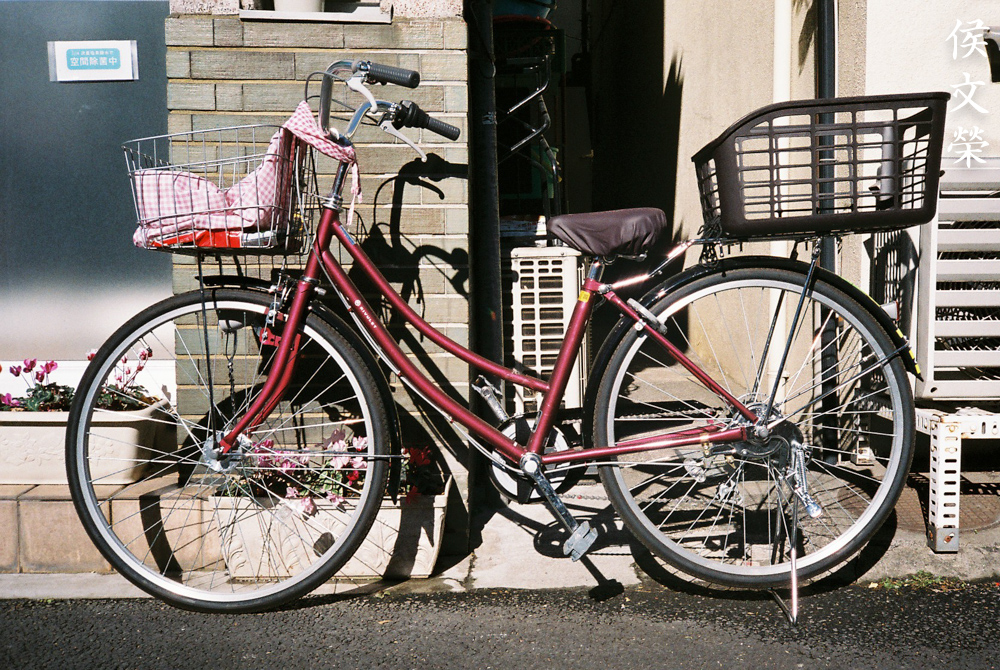
It does seem to have a shallow distortion-profile, a lot less than I was expecting. What I don’t understand is it shows a barrel-type profile in some of my photos but some exhibit a slight pincushion-type one. Maybe I am just seeing optical illusions but if I were to choose, I’d say that it’s more of a shallow barrel-type one.

Avoid placing your straight lines near the edges of your frame so they won’t appear bowed. Even if you did, it doesn’t look bad at all and is actually quite tolerable. Let’s change topic while we’re looking at this. Spherical aberration can be observed in this photo around the overblown areas of the scene despite this being shot at a smaller aperture.

I’d say that it handles distortion quite well judging from what we see in this photo. You’ll see a slight curving of the beams and that’s it.

This is not the camera to use with lowlight situations. If you’re anticipating something like this, buy the ones that will allow you to change your ISO up to ISO1000. This was shot with ISO400, I was surprised that the flash didn’t pop-up and the camera allowed me to shoot this with available-light.


(Click to enlarge)
This is how it looks like with the flash on-and-off. It appears that the camera will choose a higher-speed if the flash pops-up. Flash exposure appears to be spot-on which suggests that the camera is intelligent-enough and it couples the autofocus module to the flash.

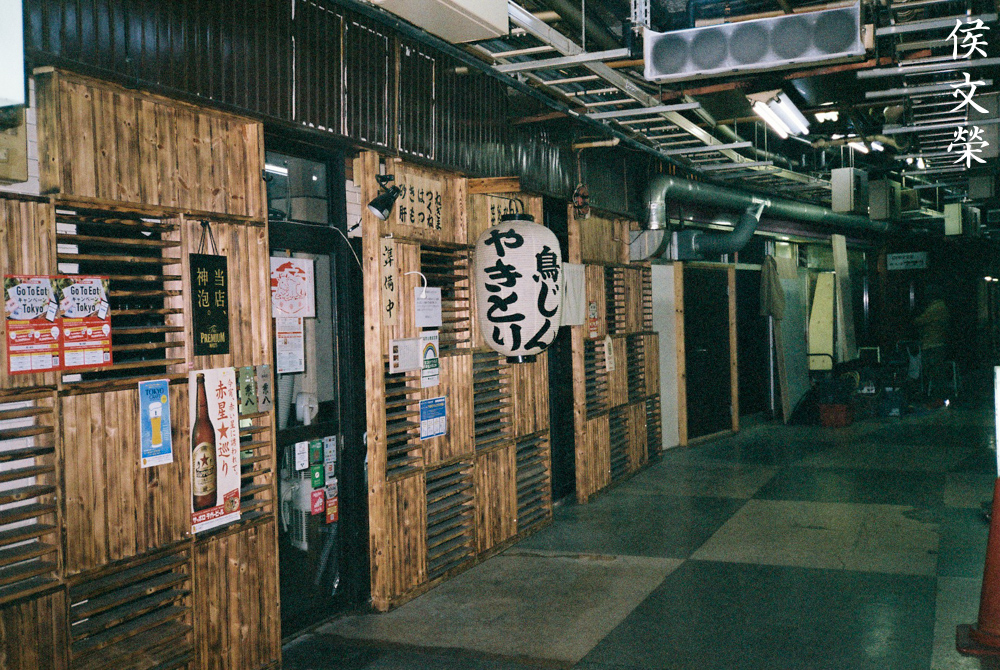
Here’s another example that implies that the autofocus, focusing and metering modules communicate. I shot this by focusing on the lantern and then recomposing my frame. It appears that the camera will retain what it saw at the time you half-press the button, locking focus and exposure settings. If it didn’t then the flash would have fired with more power and the lantern would look overblown. Remember this so you could expose your subjects better, have them move instead in order to get a better reading. Another thing that’s interesting here is how the stars look, it’s ugly due to the shape of the iris.

I don’t know what GN the little pop-up flash has but it doesn’t seem to be powerful. It does its job well but not to the extent that it could illuminate an alley for you.

Sharpness appears to be excellent specially when stopped-down. Resolving power is obviously less than what we’re used to seeing with true-blue Nikkors but it’s adequate when you give it the right variables.

This photo demonstrates how inadequate the resolution can be at times. I assume that it was shot with a tiny aperture judging by how much depth-of-field we have and how bright the scene is, I was also shooting with a box-rated ISO400 film, too. With these variables I expected to see more details at the bangs of the ladies but it isn’t showing enough resolution to render those fine details well.

Here’s another example. It’s not bad but it looks rather “cheap” if you ask me.

This appears to be a nice, sharp photo but I can easily tell that the resolving power just isn’t there.

This is the last photo where we’ll talk about resolving power and sharpness. It appears that it performs much better when focused closer compared to infinity.

Autofocus seems to be adequate for amateur use but it could miss occasionally if you’re not careful. Just focus on something and see the tiny display in the viewfinder to confirm if you got it right. With that said, I think it is good-enough for quick snap-shots of moving subjects so long as you’re careful.

It’s a handy camera for travel photography, I’d imagine that this is the actual purpose of this camera.


(Click to enlarge)
I had a lot of fun with it. I was nervous because I didn’t know if I could trust the camera since it has no display to show you which settings it’s going to be using but it did the trick, most of the time. There are cases when it did not give me what I expected of it but that has more to do with difficult situations where I was using this at its near-limits. The lens appears to be lovely, with a lot of character but I won’t rate it close to the Nikkors. It’s capable but its lack of resolving power made it appear less than what it should’ve been. Maybe I am spoiled, I am used to taking photos with Nikkors. This is not to say that it is bad, it’s just not at the same level as what we are used to seeing in this website. Despite that, I still think that it’s one of the best compacts in its time.
These are nice cameras. The recent demand for them have raised their prices but it’s not impossible to find a good deal specially if you know how to repair cameras. Working ones usually sell for $100.00 and up, I found mine for a lot cheaper because I only look for junks. You’ll have to test these thoroughly before you buy them to make sure that nothing is wrong. Operate it ang see if it works, the film should advance without problems and the viewfinder display should also indicate the correct distance. Trigger the flash by covering the meter’s window with your finger and see if it fires once the ready-light is lit. Run a test-roll with it if you’re allowed to test it before you buy it. Check if the focus is accurate or at the very least, acceptable. The battery door should be tight when closed, too. If you want a cheaper deal find a Nikon L35AD instead. They’re cheaper not because many people desire the Nikon L35AF more due to name-value. Even the later, improved models will do. They are even cheaper because nobody cares to look for them. All models are nice cameras on a sunny day. Be sure to find those that will work with higher-ISO so you can push your film or shoot with a higher-ISO stock. They will all attract people’s attention the next time you go order your fancy cake-coffee. Happy hunting.
Before We Begin:
If this is your first attempt at repairing a lens then I suggest that you see my previous posts regarding screws & drivers, grease and other things. Also read what I wrote about the tools that you’ll need to fix your Nikkors.
I suggest that you read these primers before you begin (for beginners):
Reading these should lessen the chance of ruining your lens if you are a novice. Before opening up anything, always look for other people who have done so in YouTube or the internet. Information is scarce, vague and scattered (that is why I started this) but you can still find some information if you search carefully.
I highly recommend that you read my working with helicoids post because this is very important and getting it wrong can ruin your day. If I can force you to read this, I would. It is that important!
For more advanced topics, you can read my fungus removal post as a start. It has a lot of useful information, it will be beneficial for you to read this.
Disassembly:
The camera you’ll see here is the Nikon L35AD but it’s also applicable for the Nikon L35AF, too. This is a simple camera but it’s not easy to diagnose it. This is typical for electronic cameras so I hate working on these, I like to work with manual cameras because of this.
Typically, a simple cleaning will help revive the camera but there will be times when you will have to replace, repair or adjust something. For this very reason you should never work on this because you will need special tools and knowledge in order to diagnose what’s wrong with it. Your safety is also at risk, you may get shocked and cause something fatal if you have a condition may not be aware of.

(Click to enlarge)
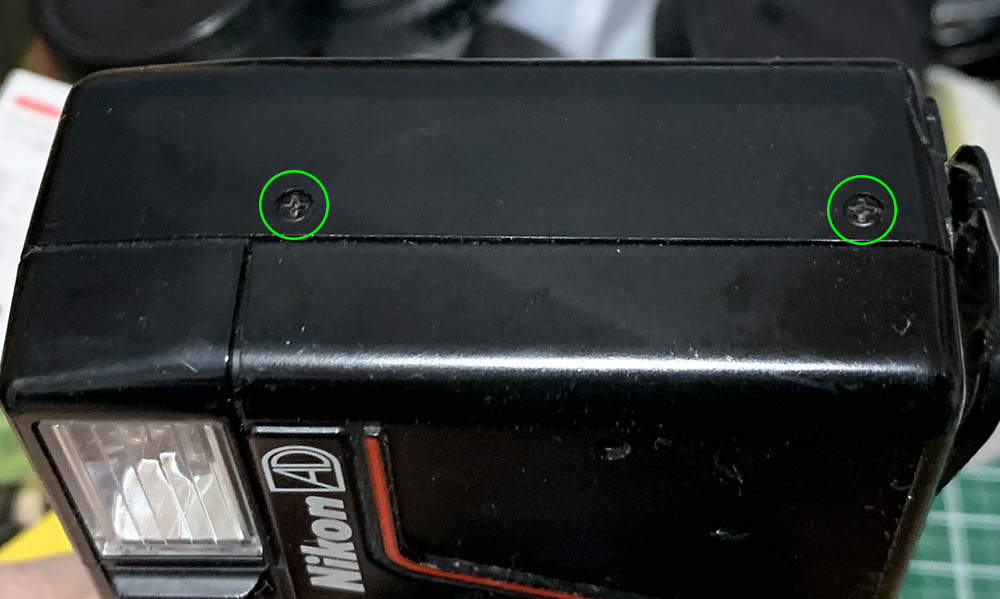
Extract these outer screws. Don’t forget which one came from where since not all of them are identical.
(Click to enlarge)
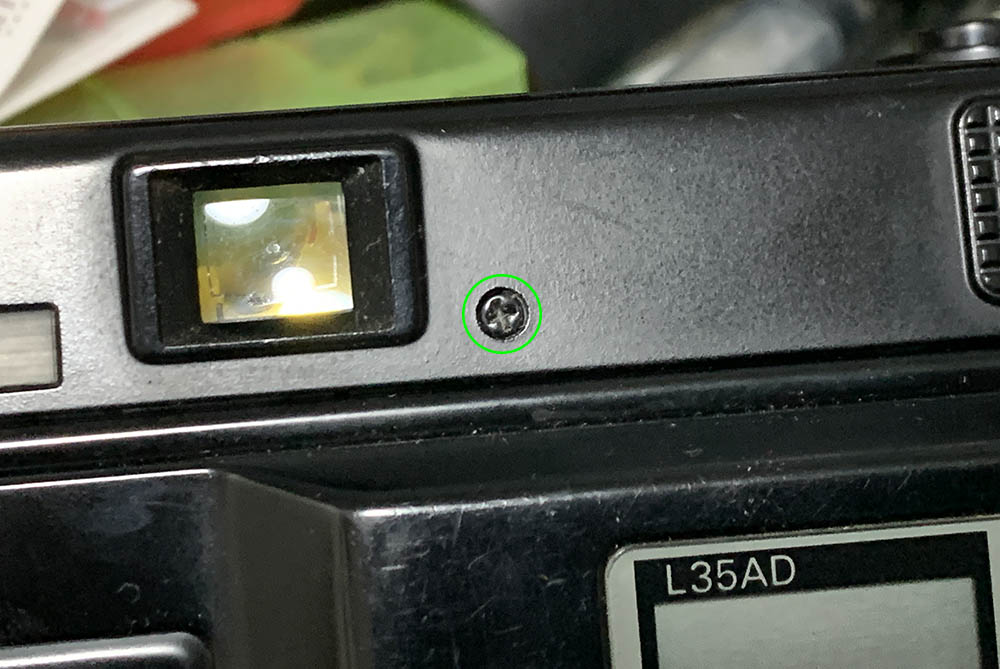
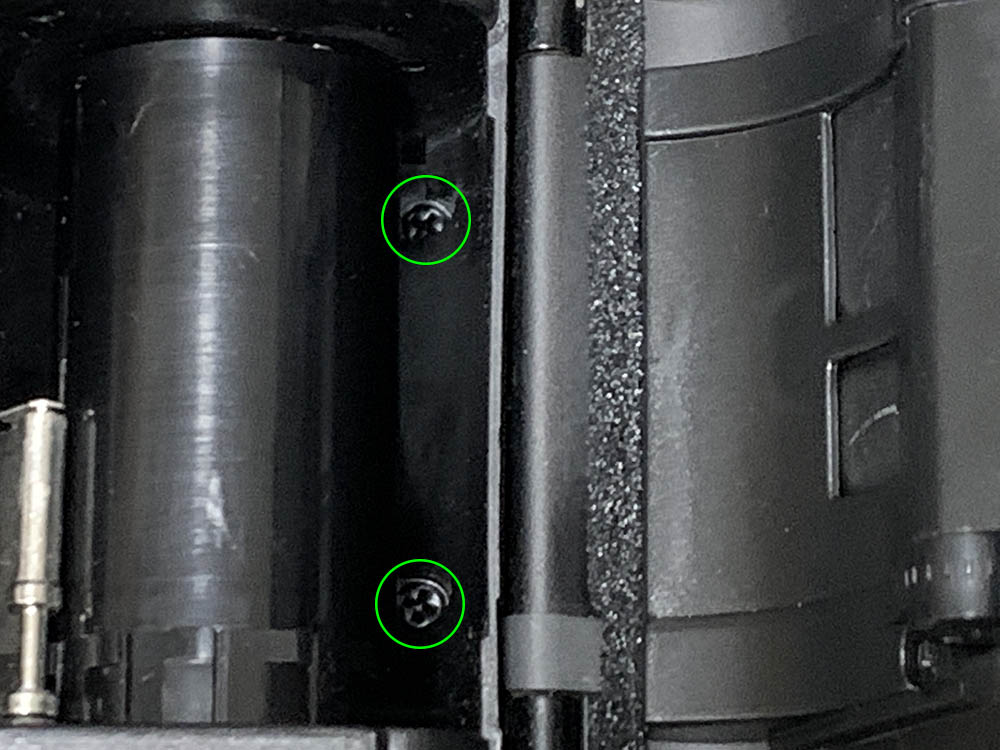
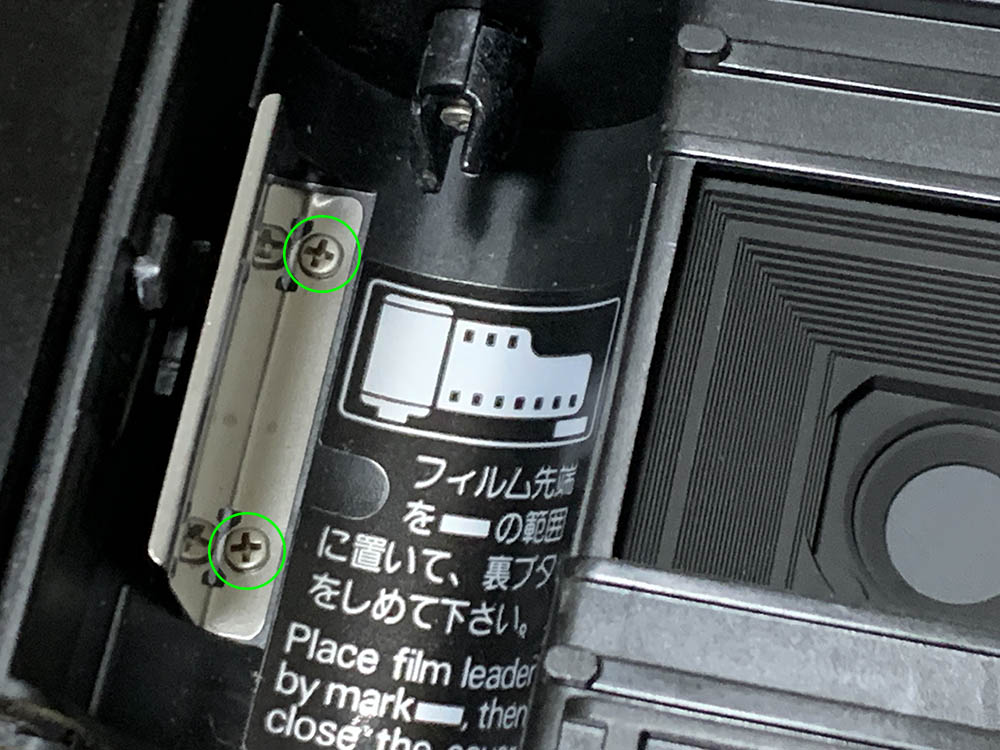
Open the rear and extract these.
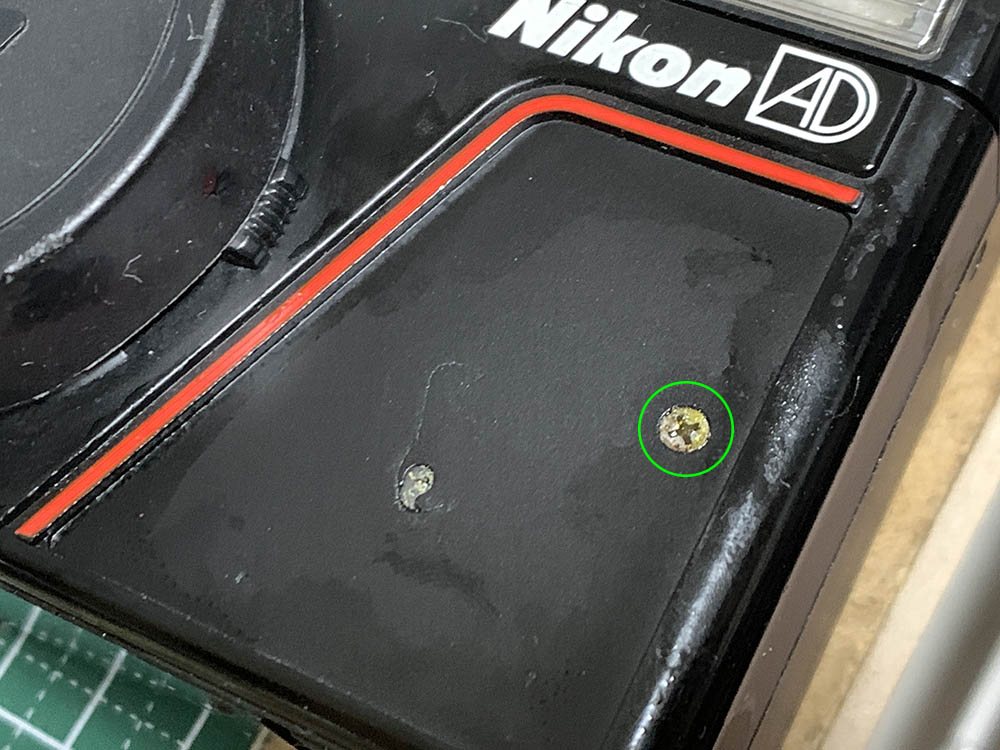
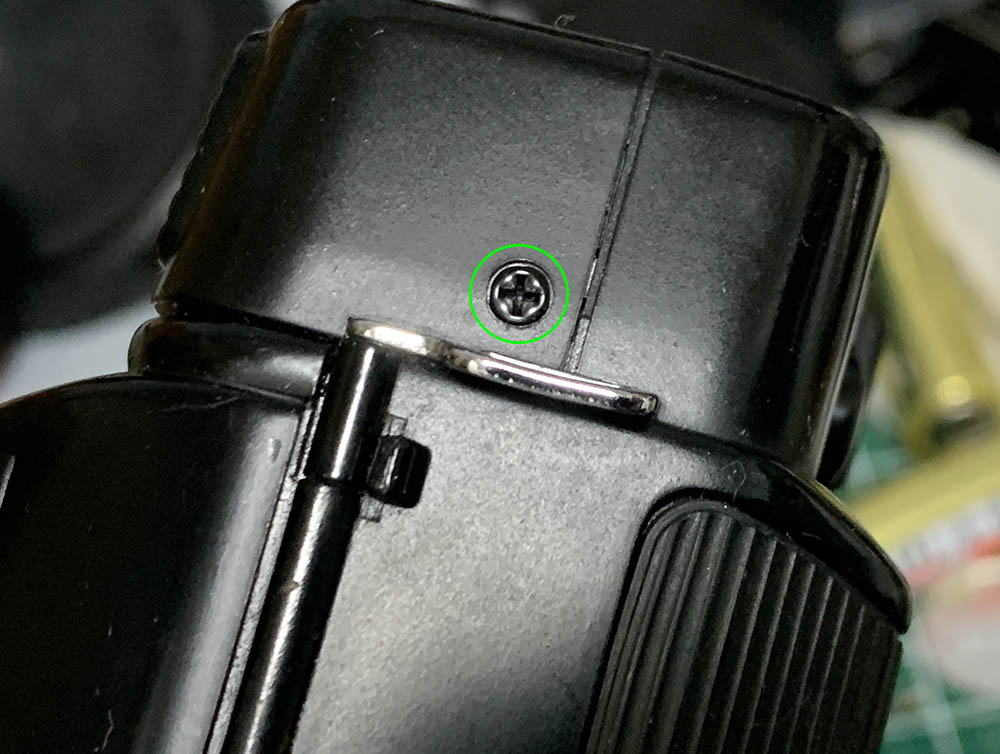
There’s another one underneath the front cover.

Carefully remove the top cover. You should discharge the capacitor with a multimeter and make sure that the voltage is less than 8v before you work on the camera. I have been shocked numerous times and I never learn my lesson. It’s not easy to discharge this without peeling the capacitor off from the chassis.
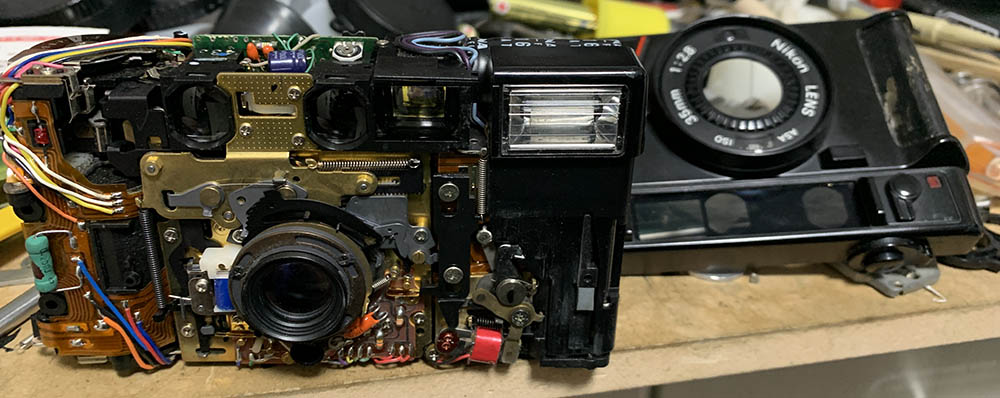
The front cover is a bit more tricky to remove since thee left-side is has 2 clips that has to be disengaged first.
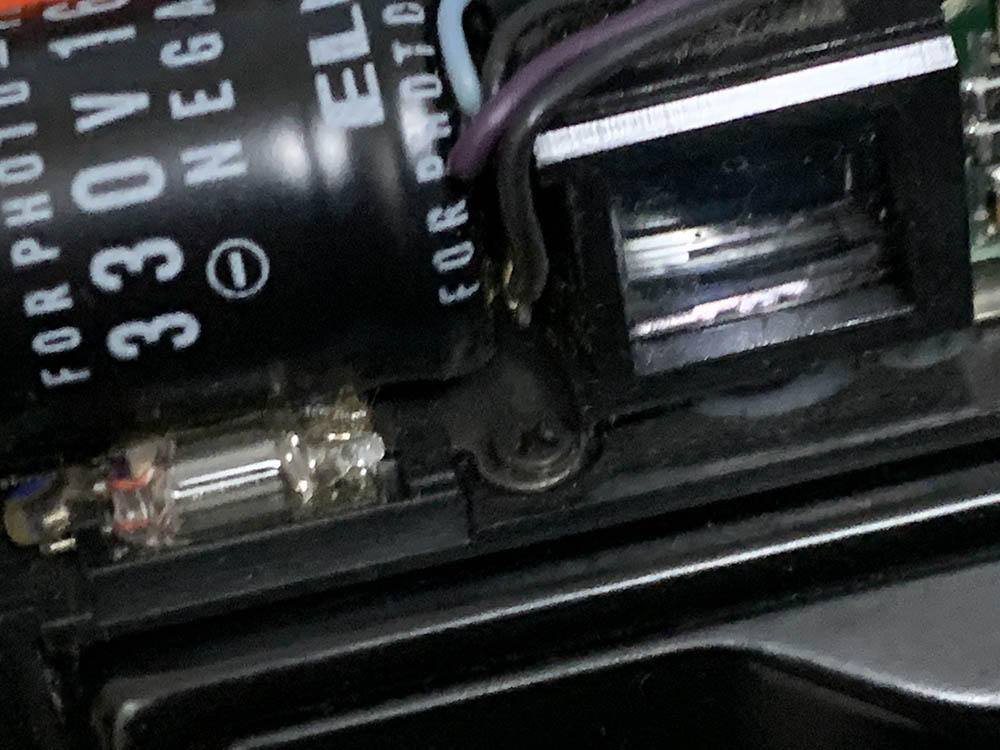
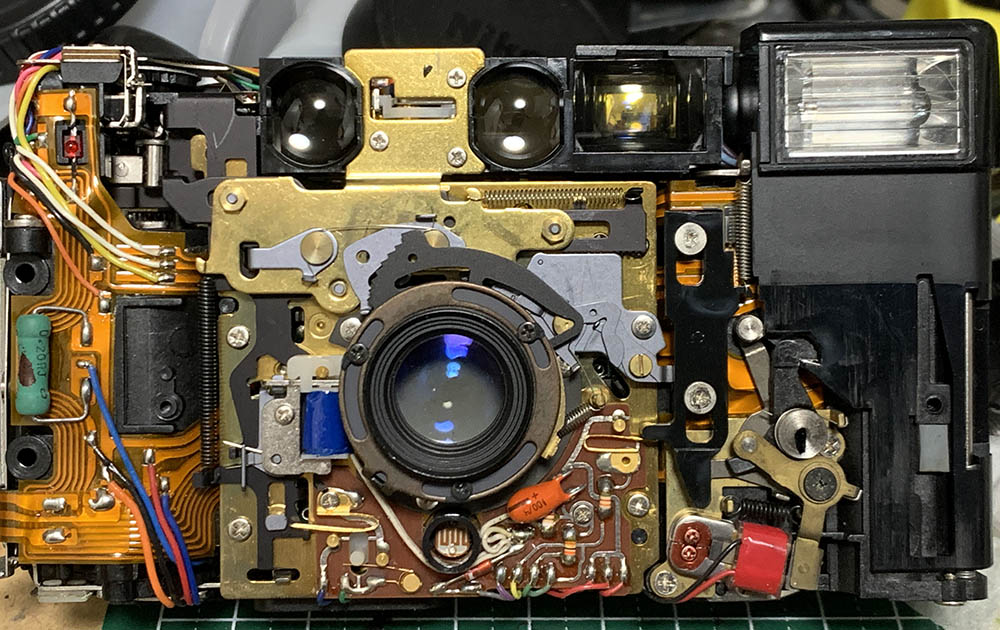
This is the capacitor, careful when touching anything close to this thing as it will definitely give you a shock.
Remove the circlip to free the button. There’s a spring underneath the button so be careful not to misplace it.
Removing this clip with allow you to free the power witch.
There are 2 springs here. be careful not to misplace any of them.
You can refresh the grease of the ISO-dial if you want to.

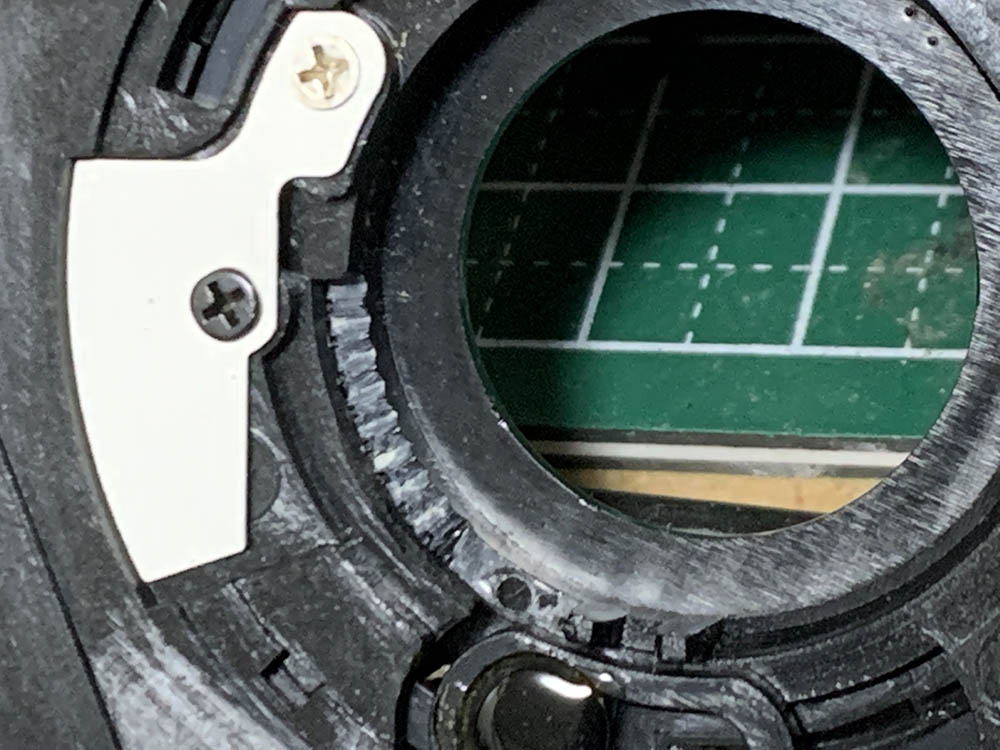
This is the slit for the meter, turning the dial will regulate the size of the slit. Press the lever for the ND filter to move the tiny, smoky film over the slit to alter the meter’s reading.
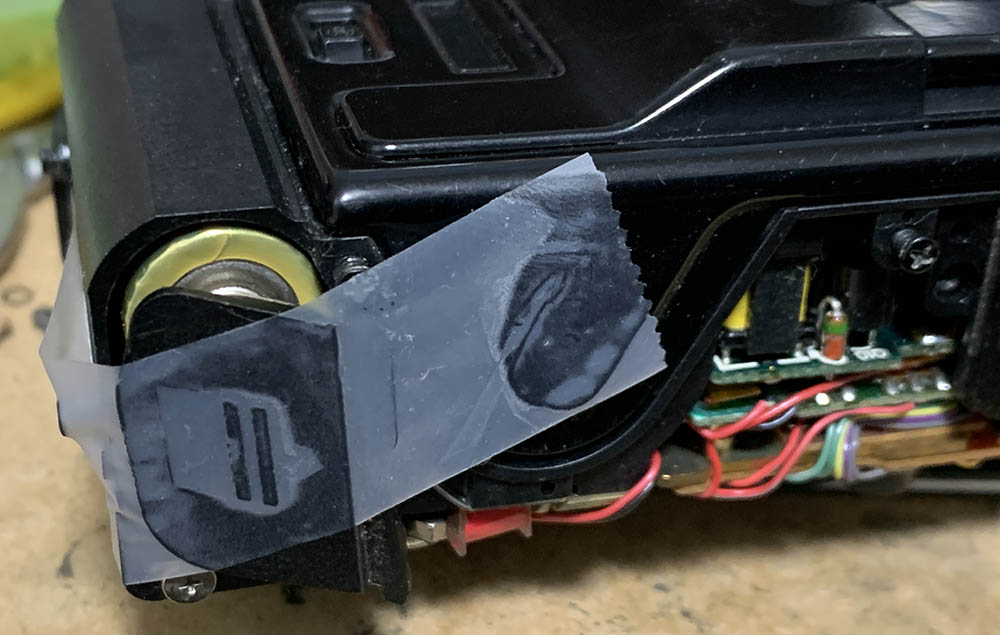
In order to test the camera install some good batteries and secure the cover with tape.
Inspect everything and be sure not to lose anything. There’s a small spring at the bottom-right corner that is connected to the lever for rewind. It’s easy to misplace, I’d advice applying a bit of contact cement to it so you won’t lose it. Apply the contact cement to the end that doesn’t move.
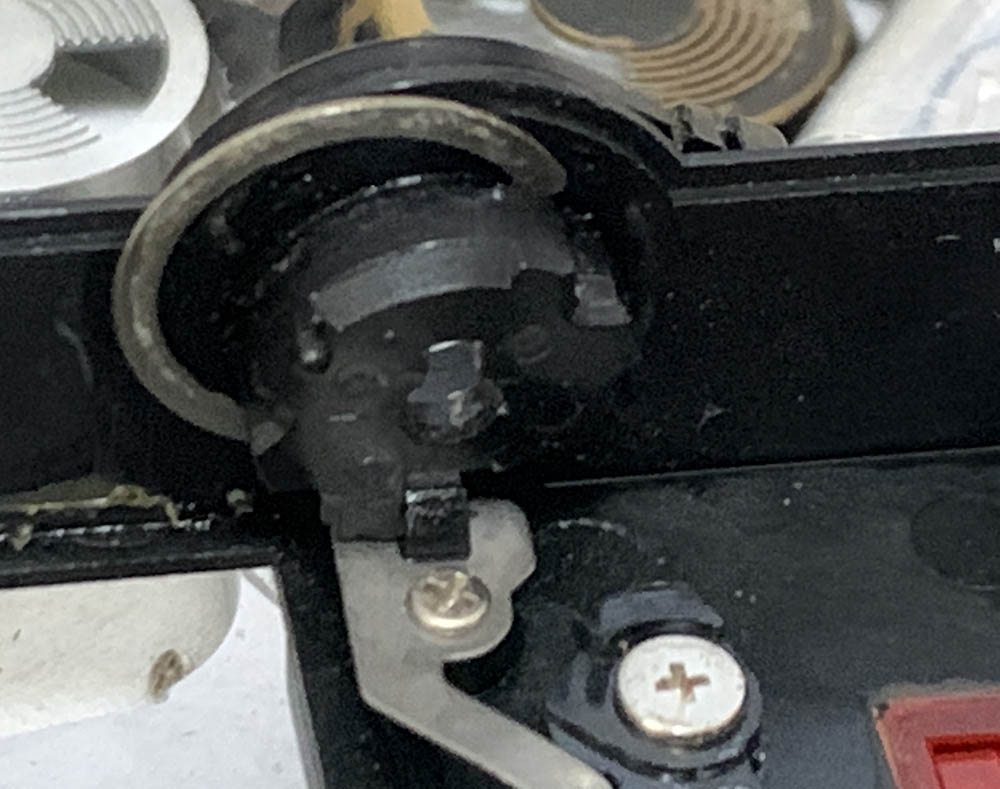
When the shutter is stuck in the down-position one thing you should look at is the part behind the depressor. I found mine stuck and it moved quite slow. Flushing it and applying a little bit of oil helped.
Another reason for that is the capacitor. If it doesn’t charge quickly, sounds weak or doesn’t charge at all then that’s another that needs to be looked-into. It will prevent you from firing it when the flash is deployed. You’re out-of-luck if that’s the problem since looking for replacements can be difficult. The only reliable way to get a working capacitor is to salvage one from another camera.
Another sign of a bad capacitor is when the ready-light won’t light-up or takes a long time to do so. Cover the meter’s window to deploy the flash and see if the ready-light works. It should not blink slightly, look weak or have any unusual properties.
Disengage the flash by its lock, it should charge the capacitor if it’s exhausted.
If it won’t rewind, look at the bottom-right part of the camera and see if anything is jammed. That’s where the contacts and levers for rewinding is located, at least parts of it. The rest can be found under the frame-counter mechanism.
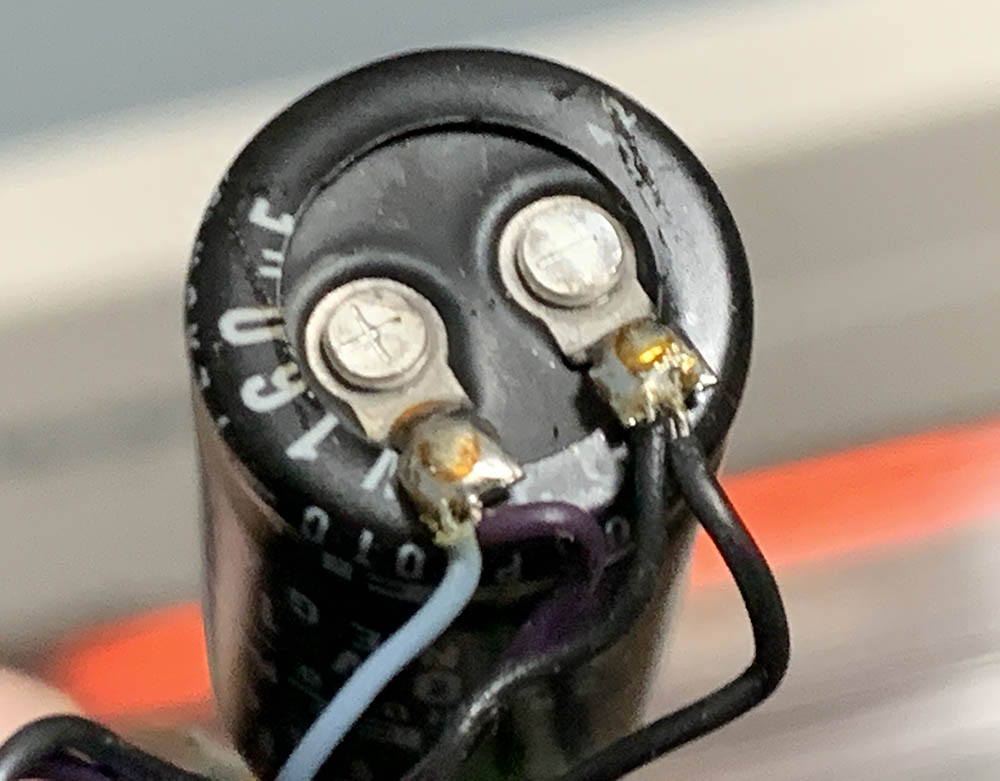
This is how the wiring looks like when you decide to replace the capacitor. Be sure to discharge it first before you work on it in order to prevent any accidents.
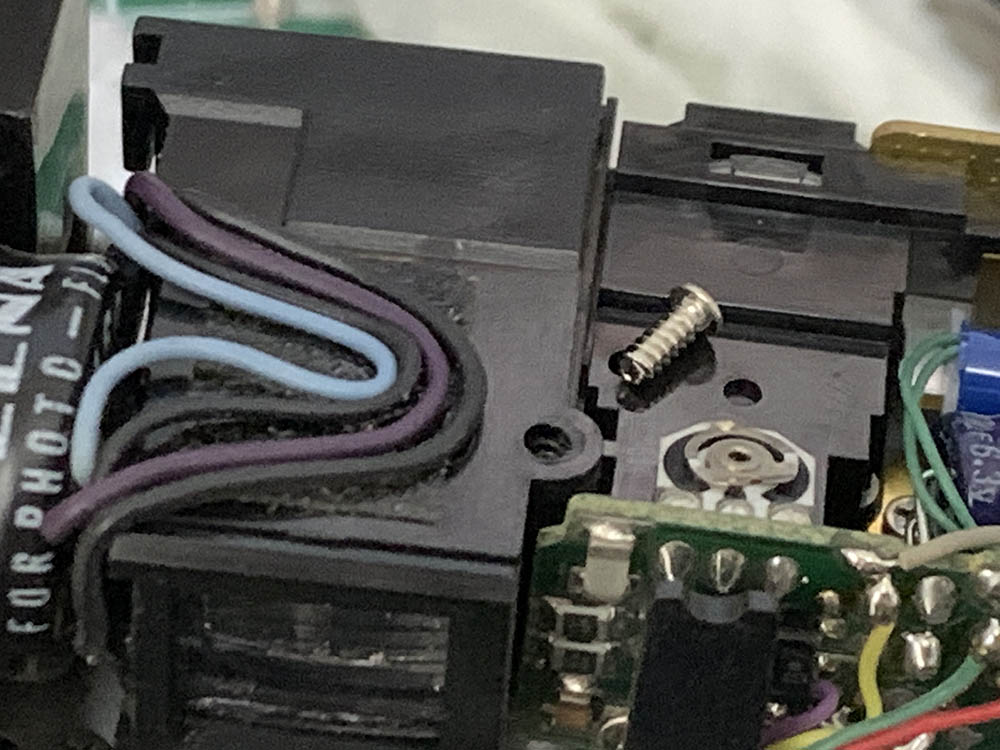
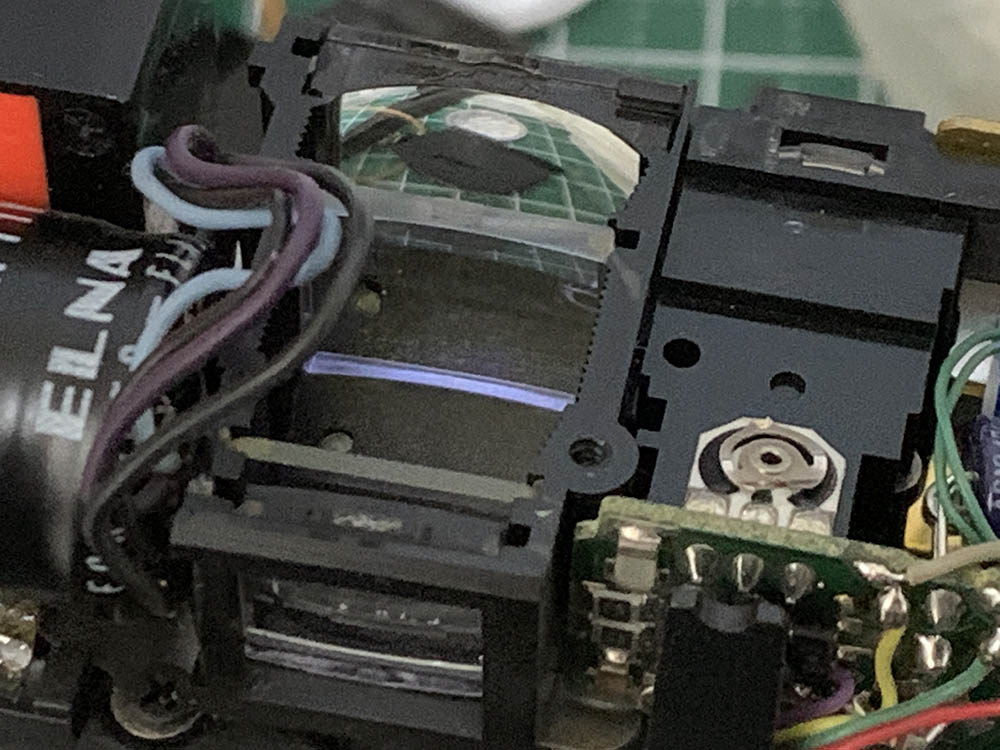
To clean the viewfinder extract this screw and remove the cover.
The potentiometer you see here adjusts the rangefinder, never alter it unless you know what you are doing. If the distance you’re focusing at doesn’t correspond to the distance you see in viewfinder this is where it can be adjusted. Unfortunately, nobody knows what the icons in the viewfinder means or what they represent.
Before removing anything apply a drop of alcohol to the edges of the lenses to dissolve the seals. The front and rear lenses shouldn’t be removed, they were forced-fit and they couldn’t be removed easily.
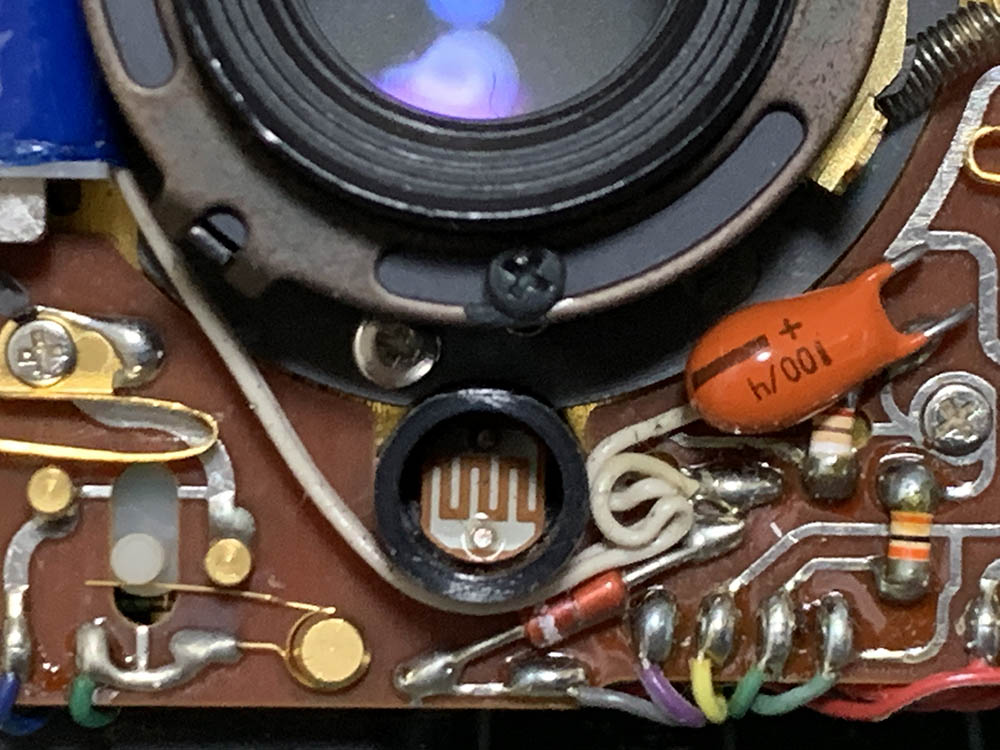
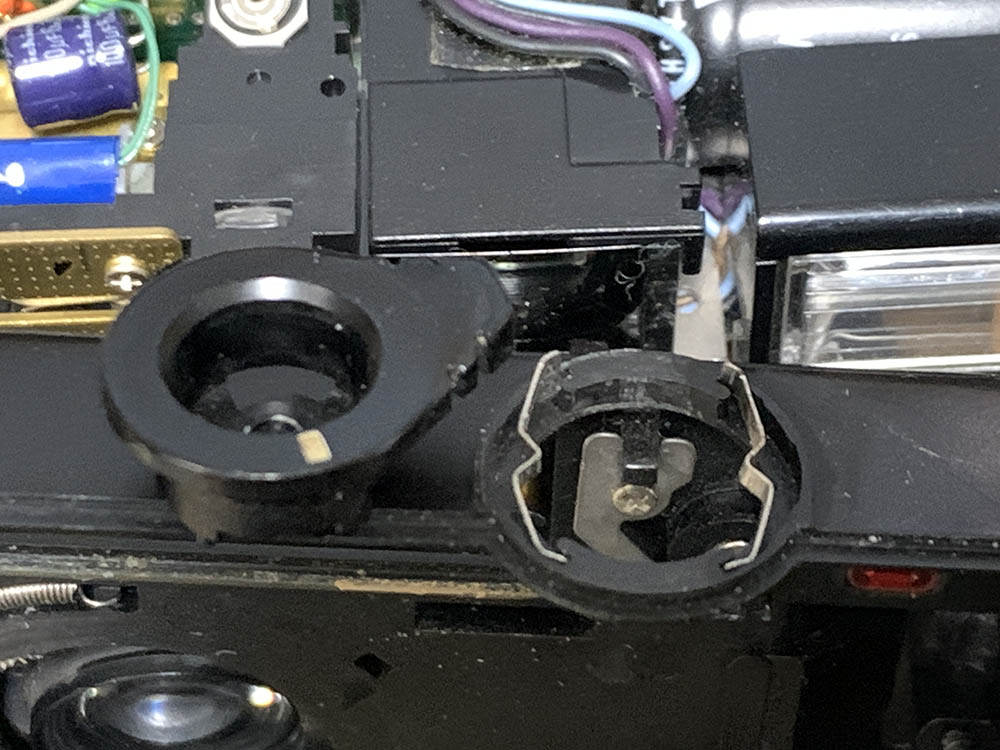
This is the meter’s cell, you should wipe it clean when you see fungus inside of it.
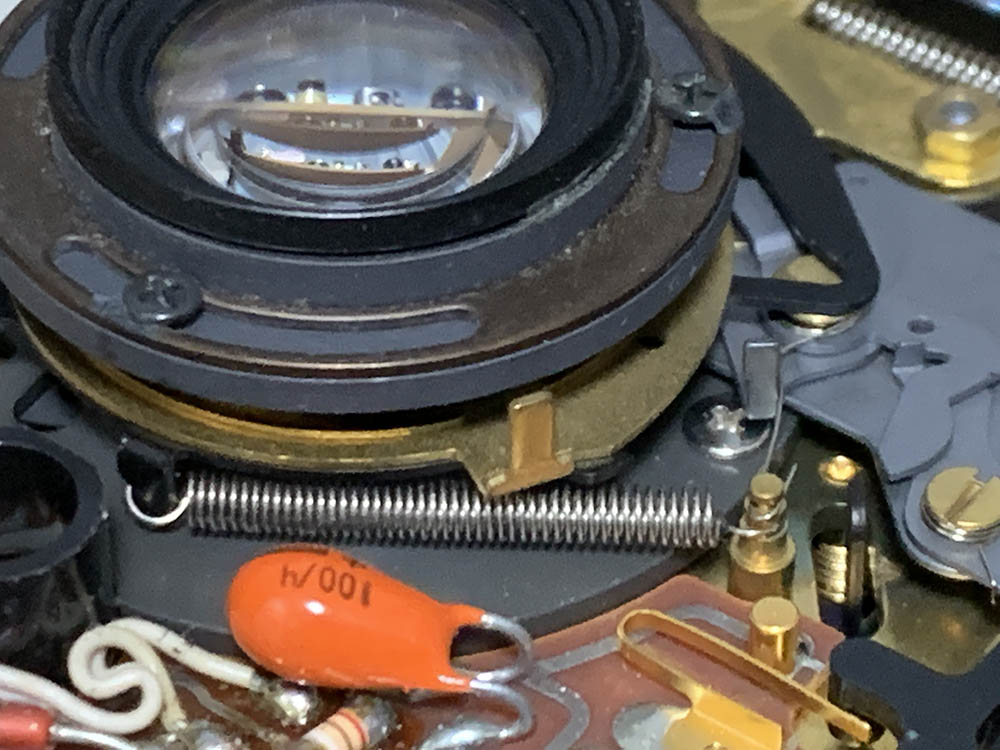
Loosening the screws of the lens will enable you to adjust its focus. It’s difficult to adjust it but I will show you how it’s done later.
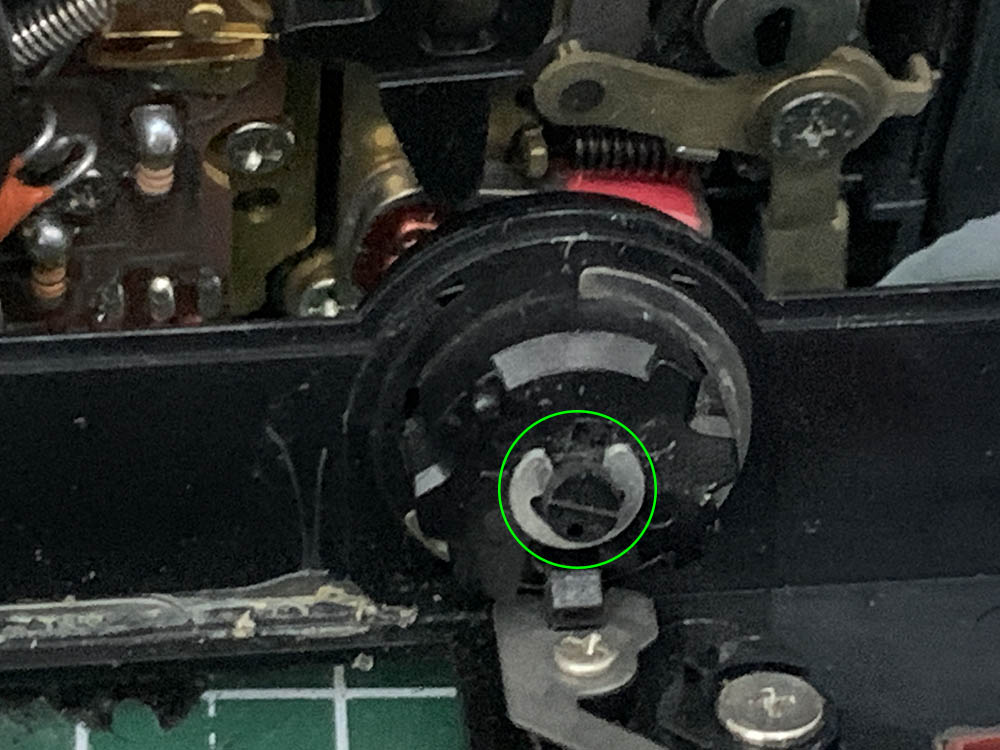
That post you see here should couple to the ISO-dial, it can be difficult to align it with the dial but I’ll tell you how that’s done at the end of the article.

Some functions of the camera will only be available when the frame has reached 1. To do with while the cover is open you depress a lever here by jamming it with a toothpick.
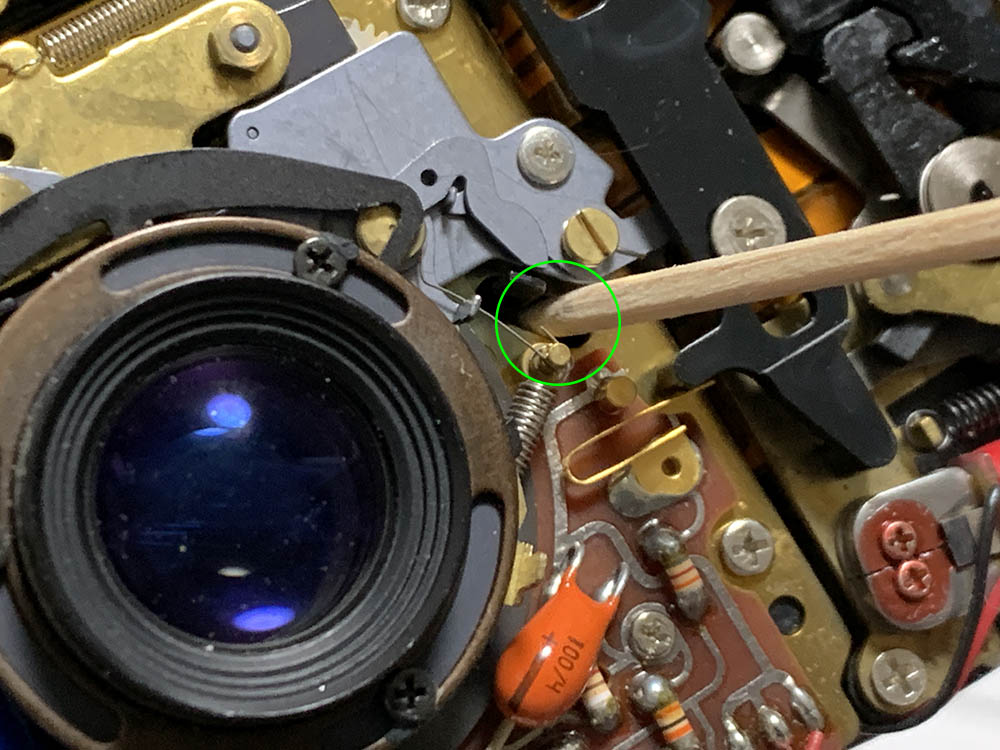
To keep the shutter open, depress the shutter button to activate it but don’t let go so it won’t advance and close the shutter. Stick a toothpick here to keep the shutter from closing. Be careful with this, you may damage any of the delicate parts underneath it and jam the camera, making things worse.
Here’s what you should do to check or fix the focus. Before you continue you should read my article on how to adjust a lens’ focus and how to make a tool for it.
- Focus on something and depress the shutter button.
- Stick a toothpick to the hole described earlier.
- If it is a “known” distance such as infinity, look at viewfinder.
- What you see in the viewfinder should match the assumed distance.
- Determine if the rangefinder is off or inaccurate, adjust if needed.
- Check what the lens actually sees by using this tool.
- Loosen the screws of the lens and adjust its focus.
- Tighten the screws when you’re done.
Never attempt to do any of the steps here if you don’t have any experience fixing cameras. You may destroy it and waste your camera.
Be sure to confirm if everything works as they should before you reinstall the shell. I have a film roll that I use for testing, I ran it and made sure that everything works. Once I’m satisfied with everything it’s time to put all of the parts back.
When replacing the front cover be sure to align the slot of the ISO-dial to its corresponding post. You can view it through the hole for the lens and nudge anything so things will align properly.
Conclusion:
After seeing this I hope that I convinced you that this is not a job for a beginner. Send it to a real repairer and be sure that he’s legit because there are many bogus operators out there. It shouldn’t take long to repair it so long as there’s nothing important that’s broken or needing replacement.
Change the seals with new ones if they’re dry or corroded. Read my article on how to change light seals so you will know how it’s done.

It’s always hit-or-miss when it comes to repairing compacts because you’ll never know if it will work unless it has been tested in real-world use. Thankfully, there’s nothing wrong or at least it doesn’t seem to exhibit any major problems.
Thanks for following my work, if you liked this article please share this with your friends so it will get more views. This site earns around $1.10 a day, it’s totally reliant on views. You can also support this site, it helps me offset the cost of maintenance and hosting. You are also helping me purchase, process and scan film. This site promotes the use of film so we’re all in this together. See you again in the next article, Ric.
Help Support this Blog:
Maintaining this requires resources and a lot of time. If you think that it has helped you or you want to show your support by helping with the site’s upkeep, you can make a small donation to my paypal.com at richardHaw888@gmail.com. Money isn’t my prime motivation for this blog and I believe that I have enough to run this but you can help me make this site (and the companion facebook page) grow.
Buy me a roll of film or a burger?
Thank you very much for your continued support!
$2.00
Helping support this site will ensure that this will be kept going as long as I have the time and energy for this. I would appreciate it if you just leave out your name or details like your country’s name or other information so that the donations will totally be anonymous. This is a labor of love and I intend to keep it that way for as long as I can. Ric.

Jan 10, 2021 @ 08:04:42
Thank you so much for this article. I’ve got my AF3 in mint condition recently for a few euros, shoot 3 rolls without any problem but when start loading next roll it never goes from S to 1 frame and then start auto rewinding back after a few attempts. Then rewinding process never stops until the battery isn’t off.
I dissembled the camera (thank you again for your work) but didn’t find any loose parts or something on a glance.
Do you have an experience with loading/winding malfunction of these cameras.
Thanks in advance!
Jan 21, 2021 @ 04:45:34
I have the same problem, if you find a way to solve it I would really appreciate it if you shared it
Mar 10, 2023 @ 19:43:22
I have this same problem
Apr 16, 2021 @ 19:02:39
Any idea what may cause the camera to automatically advance through the film roll? The only way I can get it to stop is by taking the batteries out. I was able to shoot a few rolls successfully before it ruined my last one due to this malfunction.
Thank you for the article!
Aug 02, 2021 @ 14:43:04
Hi, I opened my camera and I am not sure what you mean by this: ‘Inspect everything and be sure not to lose anything. There’s a small spring at the bottom-right corner that is connected to the lever for rewind. It’s easy to misplace, I’d advice applying a bit of contact cement to it so you won’t lose it. Apply the contact cement to the end that doesn’t move.’ I don’t know which spring this refers to. If anyone knows please let me know, thank you!
Thanks for the article, it’s very helpful
Oct 11, 2021 @ 14:40:53
Theres a small silver spring that has two long arms and only a couple of coils so it doesn’t look like the stereotypical spring, but one arm is against the body, the two middle coils are on a post, and the other arm pushes the chrome arm that runs along the strap side of the camera to trigger the rewind. The spring allows the chrome arm to return when the rewind function is disengaged. I hope that helps!
Dec 01, 2024 @ 05:48:11
I’m wondering about that small spring you referred to on bottom right. I have a loose spring and can’t fig out where it goes
Dec 01, 2024 @ 05:46:56
I’m in same boat. I have a loose spring. And not sure if it’s the one he is talking about
Sep 08, 2021 @ 09:27:49
Hi Sir Rick. Is it possible to disassemble the lens of the Nikon L35af and clean it? Thanks!
Jan 15, 2022 @ 18:57:58
Hi Richard, thanks for the in depth review. I thrifted one of these bad boys and I can’t seem to get the iso dial to move. What grease exactly should I use and where do I apply it so it works again? Thanks!
Jul 03, 2022 @ 03:02:52
use either dielectric grease sold in auto parts stores or high grade silicone grease sold in scuba shops and use VERY sparingly.
Jan 27, 2022 @ 23:36:32
Hi Richard, thank you for providing this guide. I have a L35AF, and the shutter doesn’t release unless I remove the batteries. When I press the shutter down, the self-timer light turns on and the camera freezes. is it something that i can fix by opening the camera up?
Thanks!
Dec 10, 2022 @ 12:58:59
Hi
I’ve got a Nikon L35AD but the date display doesn’t work. I’ve tried cleaning the contacts and using new batteries. I’ve not film tested it, but it seems to be working ok. Would an AD without the button cells fitted work just the same as an AF?
Thanks, Tim
Apr 04, 2023 @ 12:45:43
Hello, I have a Nikon L35 AWAF from the mid 1980s. The flash doesn’t work and I wonder if you have any suggestions from repairing it? This and film transport issues are apparently not unusual with this camera but I cannot find any info on self fixing for a DIYer
Jul 02, 2023 @ 16:35:28
I got a capacitor out of an old olympus af twin compact and it fitted perfectly! And the best thing is you can pick one up for about £10!!
Jul 02, 2023 @ 16:39:39
I’ve repaired a few L35AF’s now. The latest one was stuck on advancing. I had to take the counter dial section off and there were a few dislodged parts as well as the little bit that moves the focusing needle. Placed them all back in line and it’s fixed!
Oct 16, 2023 @ 13:58:15
Hi Sean. My L35AF’s shutter won’t work and I have absolute zero camera fixing skills. I got it from my dad so it has a lot of sentimental value. Do you do other people’s cameras, or if not, do you know of someone I could send it to for a check and fix? Thanks in advance.
Jul 12, 2023 @ 21:21:07
This is a great article… do you have any info that could help me diagnose my L35AF 2? The shutter release stays stuck down after firing the shutter (flash charges and fires fine…but that’s where it stops… it won’t advance after firing to reset the shutter release… it doesn’t load film or advance.. I can’t hear it trying to do either…any help would be greatly appreciated.
Aug 21, 2023 @ 06:31:26
Hey Jason, did you get this sorted? My AD3 (next model) is doing exactly the same thing and won’t advance after the first frame.
Nov 25, 2023 @ 09:50:44
so the Nikon L35AD Has the same lens as the L 35 original?
Mar 24, 2024 @ 05:10:27
Greeting from Taiwan.
Your article saved me and inspired me for getting further.
I got an abandoned L35AD from my friend, and it does not react in the beginning. After reading your article, I tear it down and study the mechanism behind.
With series of cleaning and reassembling, it runs, but the flash won’t pop up and it will keep winding when the camera back is close(I mean the hatch).
I try to force the flash pop up, it does charge and fire, which means all the major components are fine, it must be some signal issue.
About the winding problem, I noticed that it works well when the hatch is open, which means it’s also a signal issue.
Giving the counter a series of cleaning, rewiring and adjustment, the L35AD is fully functional now.
Once again, thank you for your article, and hope you’re doing well, take care.
Jun 22, 2024 @ 16:45:22
Hello!
I have this camera and have used it for years. Recently, it has begun to drain a fresh set of batteries within a day. Even when not in use and even with the power switch to “off”. Any ideas? Does anyone know who can/will work on this camera? Thanks!
Dec 29, 2024 @ 09:23:56
Hello! Thanks for the fantastic and informational post. I recently acquired one of these Nikon’s at a Hard Off here in Japan. Unfortunately it is not powering on. This has been so helpful and educational. I’m eager to read more of your posts!
Sep 15, 2025 @ 19:28:57
Hello there, I’m currently trying to fix my camera’s sticky shutter button (turning on/off is fine, auto flash is fine, it’s just taking longer and longer to actually take a picture — the button stays depressed for several seconds — compared to when I bought it professionally refurbished years ago). I would like to apply oil to the spring but as I am new to camera repair, I was wondering what specific oil/flushing substance you used on that part in this tutorial? Thank you! I checked out your other thread on lubricants but it didn’t really enlighten me on what to use for this specific task…