
Hello, everybody! It’s now really hot here! I am now craving for a serving of ice-cold noodles served with wasabi and light dipping sauce! While this may sound a bit weird to some, this is a very popular way of cooling-off in Japan on the hot summer months. It is as weird as vanilla ice cream on your chips but I will tell you that many people do this and that includes me! Next time you go to a fastfood restaurant go order some and try it for yourself. While we are on the topic of unusual things I will show you an obscure lens from Nikon today. It’s so obscure that not a lot of people know about it.
Introduction:
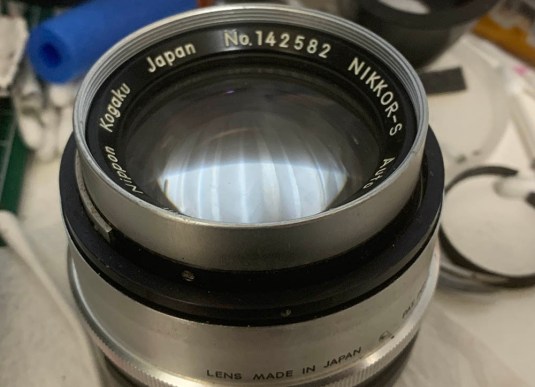
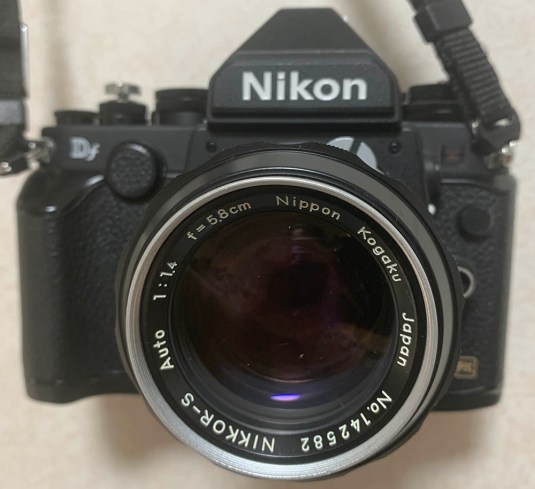
Today, I’m going to show you one of the more obscure Nikkors that was ever made, the Nikkor-S 5.8cm f/1.4 Auto! This little lens is relatively unknown to the average Nikon photographer and is only being talked about by collectors and older lens aficionados like me. There are several small details that were unconventional at the time with this lens if you compare it to other Nikkors of its time that some people even dared to speculate that this lens was made by another company. I will show you what is different with this lens during the teardown section but do not get your expectations too high because the differences aren’t really that much and is insignificant except for one thing which I’ll show to you later. This is the only place on the internet that talks about things like this.
 This is the first lens with a maximum aperture of f/1.4 for the F-mount. Just think about the light that it’s able to gather. It’s a beautiful lens and you can start a conversation with many people just because of how it looks. Despite it looking almost identical to the Nikkor-S 50mm f/1.4 Auto that replaced this a few years after this debuted it is a completely different lens on the inside. Many people confuse the two lenses at first glance and many collectors are even confused when they saw one from a distance at the camera shops.
The Nikkor-S 5.8cm f/1.4 Auto came about as there was the need to design a true 50mm lens with a maximum aperture of f/1.4 for the Nikon F-mount. It was difficult to design a 50/1.4 lens for the Nikon F-mount since the flange distance of all SLR systems are further away to the front than that of all the rangefinder systems. Nikon and the other companies were new to this and this was a major challenge back then, it was made even more complicated because there were no advanced computers to help with ray-tracing and the technique of using back-focus hasn’t matured yet but that will happen soon after the debut of this lens.
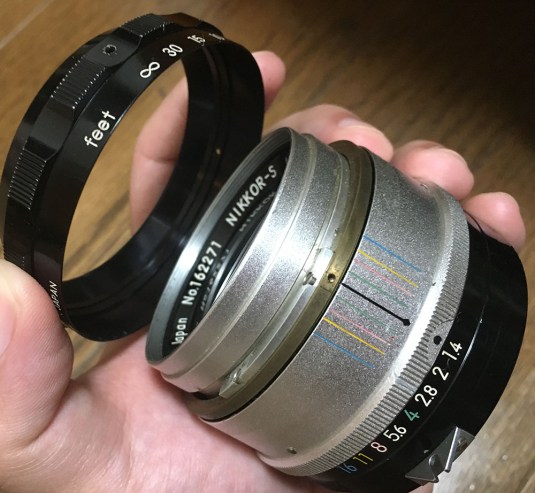
 Here it is beside the Nikkor-S 5cm f/1.4 Auto lens which succeeded this lens. Can you see the similarities? The front ring of the latter variants is the same as the one found on the Nikkor-S 5cm f/1.4 Auto lens. Some of the parts may even be interchangeable (?).
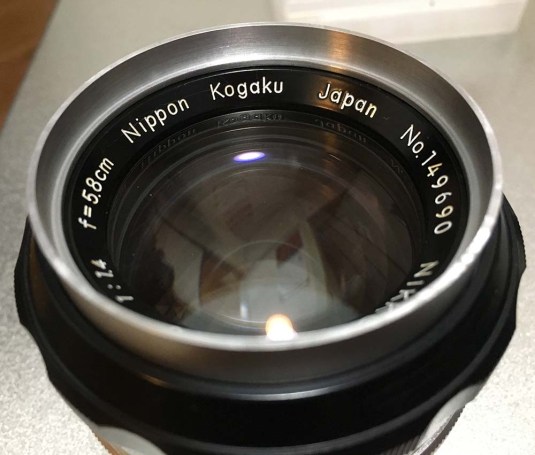
To address the challenge of designing a true 50mm f/1.4 lens for the Nikon F-mount, Nikon made the option of making a stop-gap solution by making the focal length a bit longer to compensate for the flange distance required and therefore settled with the odd 58mm focal length for this. We’re not going to discuss here the merits of using the Sonnar design versus a Gauss design bit I’m going to tell you that this lens used the Gauss design because it gave the lens a decent performance and the back-focus required for the mirror. The Gauss designs tend to be longer and the faster the lens, the thicker the lens elements need to be so that contributed to the decision to use 58mm as the nominal focal length which is a good compromise.
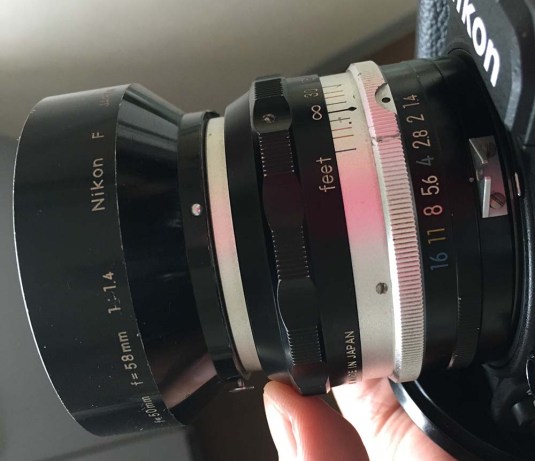 You will want to use this lens with its dedicated hood. This will prevent any stray light from the corners of the frame hitting the front at an angle which is one of the causes of flare and other optical artifacts.
This is also the first f/1.4 lens for the Nikon F-mount and it was popular back then until it was replaced by the new Nikkor-S 5cm f/1.4 Auto which Nikon originally had in mind but wasn’t capable of manufacturing yet at the time. The Nikkor-S 5.8cm f/1.4 Auto had short production run but it achieved what it was designed for, a stop-gap measure for marketing while the “real deal” was being developed. I think the production lasted around 3 years only.
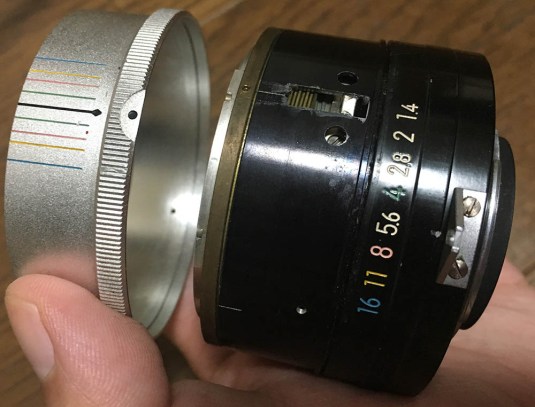
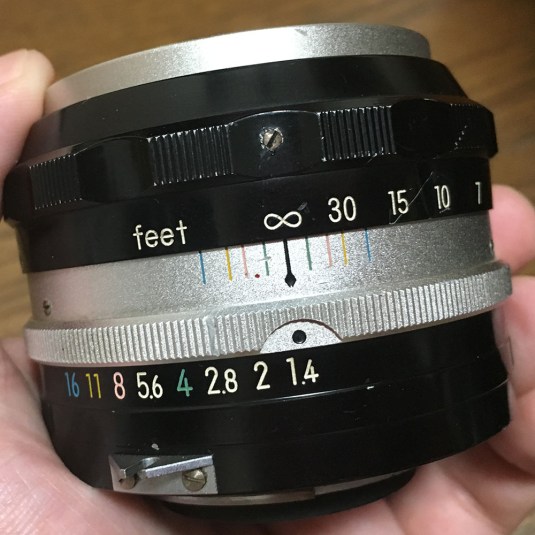
 The ealiest versions have a different type of barrel. It’s straight compared to the later ones and the aperture rings are longer. The earliest versions are a bit harder to find and is considered to be quite desirable by collectors.
Despite its short production, this lens did have 2 major variations where the front and the aperture rinsg are different and there were also some smaller differences in between. The earliest one has a taller lip on the aperture ring so you won’t be able to mount it with all Nikkormat FT versions. There are a few early variants with the shorter lip on the aperture ring and all you need to do is to look at the rear of the lens to see if you got the right type or not.


(click to enlarge)
Here are the two major variants. The one on the left is missing its front ring so I found a scrap somewhere and modified it into a makeshift front ring. I fabricated something that looks a lot better and you will be able to see it in this article.
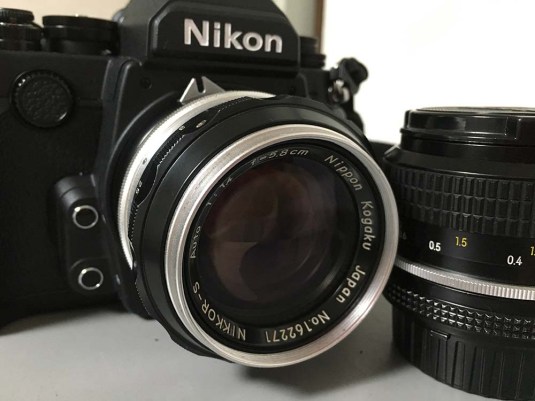 Here it is mounted on the Nikon Df camera. Never mount this to any camera with the Ai-coupling interface! You need to modify this to make it safe to use on those cameras unless they have a special tab like the Nikon F3, Nikon F4 or the Nikon Df. To see how to convert a non-Ai lens, click on this link. I will just leave this alone If I were you because this is too precious to be modified since there aren’t many of them left. Yes, these are somewhat rare and most certainly more expensive than the Nikkor-S 5cm f/1.4 Auto.
Let’s now see some pictures that were taken with this lens. These pictures were taken from f/1.4, f/2 and f/2.8 where most of the changes take place in terms of its rendering characteristics. Knowing how a lens works is key to using it effectively because you will know what its strengths are and avoid its flaws. These aren’t scientific and are just based on my impressions.


(Click to enlarge)
Vignetting can be terrible wide-open and improves a bit by f/2 but only goes away by f/5.6. As you can see in my photos, it’s still visible at the far corners at f/4 if you look carefully but it won’t be obvious in real-world use.


(Click to enlarge)
The bokeh balls look nice and clean wide-open. You won’t get any edging or concentric rings in them and it looks uniform, pretty good for an old lens. If you stop the lens down you will notice that the hexagonal-shaped iris starts to show itself in the shape of the balls. This won’t be as obvious when you’re using the lens in normal scenarios when you’re focusing a bit further. I took these at the minimum focusing distance which makes the balls larger.


(Click to enlarge)
Flare and ghosts can be a problem with this lens due to its ancient coatings. You will want to use it with a hood to help prevent it but there’s not much it can do when the source is within the frame. The Nikkor-S 5cm f/1.4 Auto is worse when it comes to ghosts so don’t worry too much about this. Bokeh is smooth so far, I took these pictures because foliage and twigs are great for showing how good or bad a lens’ bokeh quality is. I don’t get any harshness or edging in the twigs and the leaves don’t smudge at all or look clumpy. It’s one of the smoothest as far as I know when it comes to golden-age Nikkors.


(Click to enlarge)
I took these pictures to show the effects of chromatic aberration. The lens is pretty good at controlling this but there will be times when you can get the lens to show this. I have seen worse examples of this and this should not be a problem at all in most cases. Spherical aberration is a bit high wide-open and we’ll see that in the next set of pictures.


(Click to enlarge)
The lens is decent wide-open and spherical aberration is prominent which will give your image a pleasant-looking glow which is great for portraits. It renders with exquisite character wide-open and I liked it a lot. Stop the iris down to f/2 and the glow goes away, sharpness also improves a lot and your going to love the character of this lens at this aperture. It’s the best-looking aperture if you ask me. At f/2.8 you get really good performance near and at the center of the frame. It’s clear and sharp where it matters, the character of the bokeh remains smooth which is exceptional. You only lose this when you stop it pass f/5.6 where the blurriness begins to look generic. Sharpness is better at moderate distances compared to the minimum distance. I do not have any samples at infinity but I recall that it’s not that exceptional. Please click on the picture of the statue and the leaves, they show how sharp this is even wide-open and how great it is by f/2. This is as good as it gets and I like it more than some 50/1.4 lenses that came much later like the Nikkor 50mm f/1.4 Ai-S which is terrible wide-open (but sexy from f/2).


(click to enlarge)
Here are some pictures and please pardon my poor focusing skills. Focusing this lens with moving subjects is tricky. Most of the images were shot at f/1.4 and some of the ones that were shot at night were taken at f/2. It’s very easy to tell which one is which by looking at what’s in focus. This lens loves to be shot at f/2 where the picture still retains the smooth, blurry background but your subject looks sharp. Check the photo of the lady riding a bicycle, notice that there’s significant vignetting when you shoot this lens wide-open and it can be exaggerated when you pair it with a plain background like the sky or asphalt. Look at the picture of the couple, this is how good this is at isolating your subject. A 50mm lens won’t be as good as this one and it seems that the extra 8mm difference is what it needs to give you that. Sorry for the missed focus, I am apologizing for the second time.
 This was shot wide-open at its minimum focusing distance. See how smooth the background is and how smooth the transitions is from what’s in focus to what’s not. This is great when you want to make detail photos of something and blur the background.
The Nikkor-S 5.8cm f/1.4 Auto is great wide-open and it can render a dreamy photo when shot under the right circumstances. It’s also capable of making what the people are raving about today – the “soap bubble-look”. Its bokeh quality won’t hold up to the 85/1.4 class lenses but this was great for its era. There are aberrations here and there but they all just work together to give you a unique image. Spherical aberration will be the most prominent that you will notice and it mostly occurs wide-open and goes awat from f/2 on.


(click to enlarge)
The pictures above were shot at f/1.4 and I set the pictures up so we’ll have foliage in the background because photographing leaves (on a sunny day) will easily give you an idea of how a lens performs in terms of “character”. This is a passé term that’s being used by many people these days to describe the intangible aspects of a lens’ rendering. Notice the “soap bubble” effect on the image, remember I said that this lens is capable of that? Well, here it is. This is considered a flaw and is corrected by many modern lenses but it is also highly desirable when you know how to use it in a non-distracting way.


(click to enlarge)
These pictures were shot at f/1.4, f/2, f/2.8 and f/5.6 (from left to right) to give you an idea on how this lens performs when shot with different apertures. Notice that the lens loves to be shot at f/2 where you still get the subtlety of f/1.4 but you get a sharp center. The photo is already pretty good at f/2.8 and by f/5.6 the center is at its peak. See the changes in the bokeh’s character? It did not really change a lot from f/1.4 to f/2.8 but it changed a lot at f/5.6. That change probably occurred at f/4 and is expected in lenses in this class (faster lenses) and this is a desirable trait in a lens because it gives you the greater flexibility of having a lens that renders differently as you stop down the iris. This is a handy trick that saves you the hassle of bringing other lenses with you. What I don’t really like is the angular shape of the iris and I will avoid using this lens if I want to take pictures with bokeh balls in the frame, some people like that look but I don’t.
 Here is a higher resolution sample from this lens and it was shot at f/1.4. As you can see from the picture the lens has a very pleasant character for use with portraiture. The spherical aberration and imperfections make the skin look smooth and natural. This is great for portraiture so pores and wrinkles won’t show. Her eyes are also sharp but lacks in contrast since the coatings and lens design were both dated but if you have to ask me, I will say that it’s perfectly OK since it adds a “pleasing” quality to the photo.


(click to enlarge)
Here are 2 more pictures. These photos were shot at f/2 and as you can see, it is starting to pick up. The eyes look sharp now but the picture still retains the delicateness of the picture shot at f/1.4 when you look at the wall behind her. These pictures are outtakes and were shot just to determine is this lens will work on her or not or if the makeup works so don’t be too critical of her or my photography. From here, you can see that this isn’t really ideal for her when used to shoot tight headshots because of the focal length.
The 58/1.4 lens class was revived lately with the release of the expensive but great AF-S NIKKOR 58mm f/1.4G. The 2 have nothing in common except that it was designed to be the spiritual successor of the venerable Nikkor-S 5.8cm f/1.4 Auto and It is a different lens made for a different era, related only by lineage and history.
Let’s now see some pictures that were shot with film. Film renders uniquely compared to digital so it is important that we see how they both render to help us assess a lens better. This lens was designed to work using film and seeing the results with film enables us to see this lens through its intended medium. I took these using Fujifilm Industrial 100, a Nikon F2 with a Nikon MD3 attached and had the lab scan the roll using Fujifilm Frontier SP-3000, the best film scanner that I know. Almost all of these pictures were taken at f/2.8 to f/5.6 because of the sunny weather and f/1.4 is too fast so the depth-of-field may be too shallow. This is also how you would want to use any fast lens in real-world settings.
 Not sure if I took this at f/2 but it sure looks like it. Notice how good this lens renders and presents human skin. The colors and saturation are muted and the picture looks very natural. It is sharp and the subject isolation is great and almost 3-dimensional.
 This lens has decent resolution for its time when you stop it down to a more reasonable and practical aperture such as f/2.8 or f/5.6. Shooting wide-open may not be a good idea for a portrait framed like this as it will result in one of the eyes being out-of-focus specially if the eyes aren’t on the same plane as your camera’s film plane.
 The bokeh quality is good and smooth but stopping this down will reveal the hexagonal iris’ hexagonal shape. Some like this while many people don’t. It all depends on how it is used but you can get away with it most of the time.
 The lens performs at its peak by f/5.6 and it should give you sharp pictures down to the far-corners of the frame. This is good news if you like shooting with strobes.


(Click to enlarge)
Here’s the rest of the set from that afternoon. I’m pleased by the results and this is still great despite its age, it’s Nikon’s first attempt at a fast normal lens for use on the F-mount at a time when designing such a lens was difficult. It sure delivers the goods and it will still be relevant for practical photography for many years to come. Click on the pictures to see the larger versions and appreciate the details.
Did you like what you see? If you did and you are in the market for a rare lens to shoot or collect then this lens is for you. If you do not care much for history or collecting then I will recommend that you consider the Nikkor-S 50mm f/1.4 Auto instead. They’re cheap and they also come with factory Ai-rings and a better coating for the later versions. This is for use with earlier cameras that uses the old post-and-prong mechanism and the earliest of all versions can only be mounted to Nikon cameras with the old-sized bayonet mount. It’s not going to be compatible even with a Nikkormat FTn or any of its mechanical versions because their bayonet mount is shallow. The earlier versions have skirts and it’s going to prevent you from mounting them to a Nikon camera that doesn’t accept it. Mounting it to a Nikon F, the Nikkorex F, Nikkormat EL, Nikon FE, Nikon F2, Nikon F3 or a Nikon Df will be fine. A slightly-later version will be OK since they don’t come with the said skirt, do your research first before buying the earliest version so you won’t purchase something that you can’t use. That’s all for the review and I hope it satisfied your interest on how this lens performs in real-world settings, it’s now time for the main article – how to service this lens so you can enjoy a real classic Nikkor.
Before We Begin:
If this is your first attempt at repairing a lens then I suggest that you check my previous posts regarding screws & drivers, grease and other things. Also read what I wrote about the tools that you’ll need to fix your Nikkors.
I suggest that you read these primers before you begin (for beginners):
- Essential tools
- Best practices 1
- Best practices 2
- Best practices 3
- Ai conversion
- Working with Helicoids
Reading these primers should lessen the chance of ruining your lens if you are a novice. Before opening up any lens, always look for other people who have done so in Youtube or the internet. Information is scarce, vague and scattered (that is why I started this) but you can still find some information if you search carefully.
I highly recommend that you read my working with helicoids post because this is very important and getting it wrong can ruin your day. If I can force you to read this, I would. It is that important!
For more advanced topics, you can read my fungus removal post as a start. This post has a lot of useful information and it will be beneficial for you to read this.
Disassembly (Lens Barrel):
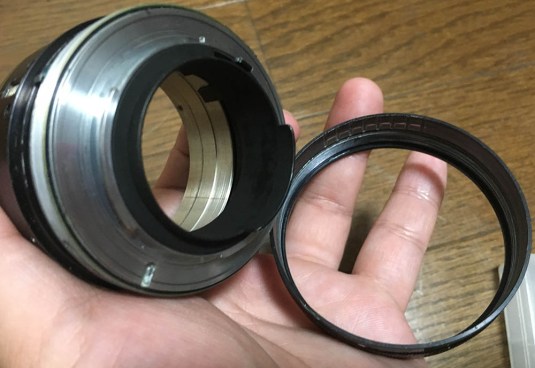
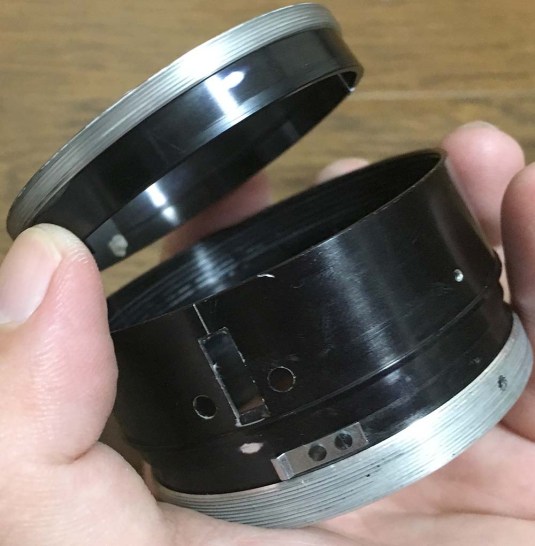
The main barrel or what I call the focusing unit is relatively easy to open up if you are an experienced repairman with all the right tools for the job. As with most lenses, we’ll want to separate the objective from the main barrel to prevent it from getting damaged as we work with the barrel. Nobody will want to accidentally damage anything so this is a must! This lens has really big glass elements that can be easily damaged.
If all you want to do is clean away any junk or fungus on the glass then all you need to do is remove the objective and then skip the rest of this section because there’s really no need for you to bother with the main barrel unless you want to overhaul it, too.
 First, remove the focusing ring by unscrewing the 3 screws that secure it. Be careful not to scar the screws as they shown prominently! Nobody likes an ugly and scarred lens!
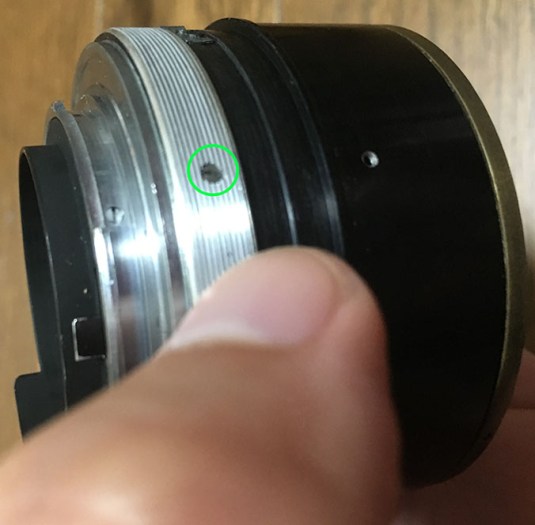
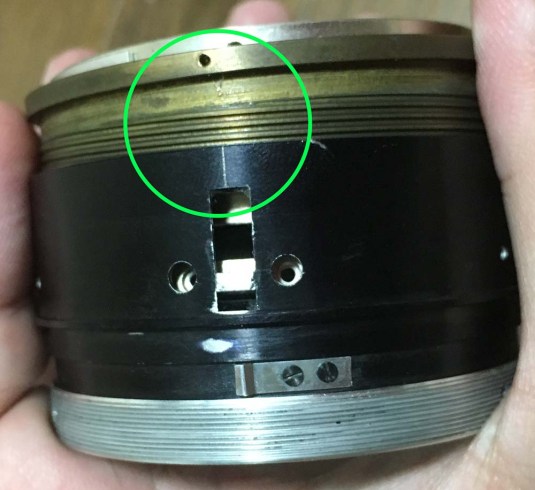
 The front ring can be removed by unscrewing this set screw. The early ones with the smooth front barrel doesn’t have this.
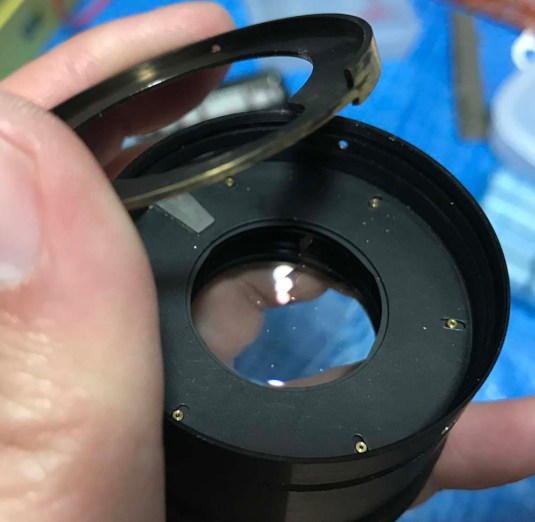
 The objective is being secured by these 3 screws. I’m just showing you one of them in this photo so it is up to you to look for the other 2 on the other side.
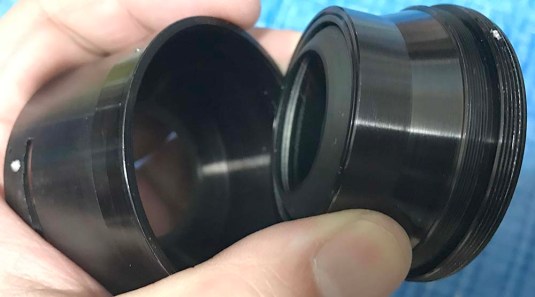
 The objective and its casing can now be pulled from the barrel. It is a heavy object so be careful not to drop this unless you want an expensive doorstop.
 To remove the sleeve, simply remove these 3 screws. Just like the screws on the focusing ring, be careful not to scar these, too. A slip can make this look ugly.
 Pull away the chrome sleeve afterwards. There’s usually an oily mess under this and I would advise you to clean that up with naphtha and tissue.
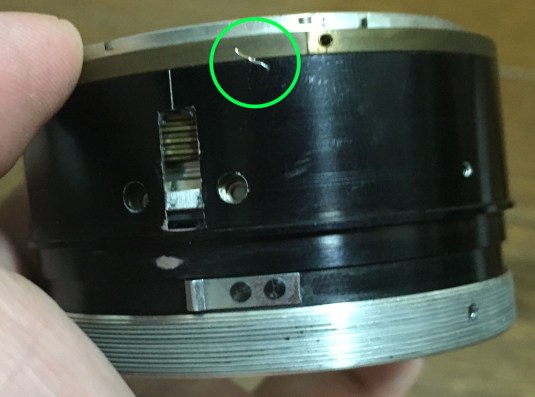
 Before you remove the aperture ring, unscrew this first. This screw serves as a pin to connect the aperture ring and the iris mechanism inside through a slot attached to a ring. Be careful when reattaching and probe it first with an object that is thin enough to fit in the hole like a pin and make sure that this is sitting squarely on the slot underneath this. Put this pin back and if something feels weird, just do the previous step again or see if the aperture ring is positioned properly, it may be sitting too far to the front so unscrew it back to the the other end of the lens to make the hole site properly on top of the slot under it. Get it?
 The aperture ring unscrews just like this now that the pin is gone. Note the tolerances of this thing before you unscrew it. You don’t want to screw it too far into the lens or it will impede pin’s function so it will not couple with the slot under it properly.
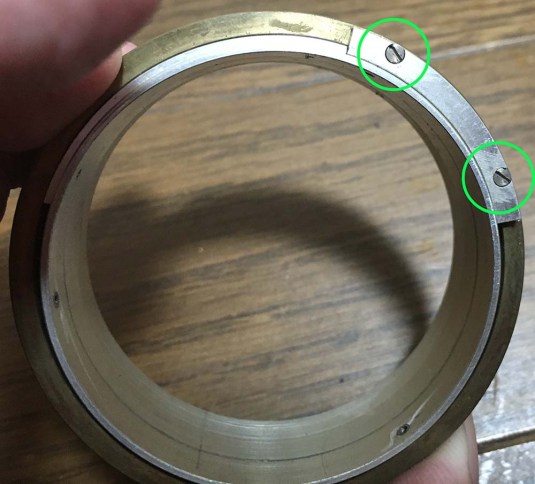
 To separate the bayonet mount, unscrew these screws and be careful not to damage the threads surrounding it so use a driver that will fit perfectly.
 The bayonet plate can be pulled away just like this. I do not think that Nikon glued this in place but if yours is stuck then be just careful when removing this and NEVER pull it using the baffles! The baffles are made of thin metal and will easily warp.
 See the ball bearings? This is the stop-down lever mechanism and I’ll advise you to just leave it alone unless it’s faulty or not snappy. This thing can be taken apart by disconnecting the spring and unscrewing the retention ring with a lens spanner.
 Here are the helicoids if set to infinity. Take a picture of yours and observe how they were configured as you will need to get the lens back to this state later. The 2 round holes in the middle of the photo are access holes for you to reach and unscrew the helicoid key. The helicoid key keeps all 3 helicoids in sync as you focus this lens in or out. Remember the orientation of the helicoid key before you remove it. Sorry for the blurry pic,too!
I recall somebody wanted me to take HDR pictures so that it would look nice and unfairly insulted my photography skills when I told him that was crazy since I’m only taking repair notes. You get unreasonable jerks like that guy everywhere. You can;t please everybody. He will be remembered as the jerk that he is by my readers. He takes terrible pictures himself, too. The nerve.
 Now that the helicoid key is off, you are free to collapse the helioids outside of the range that the helicoid key was constraining them to. Collapse these all the way and then make a small diagonal mark. This mark will help you determine if you re-assembled your helicoids properly. This mark I made is too big and rough so do not follow my example, this lens is mine so I didn’t care as much.
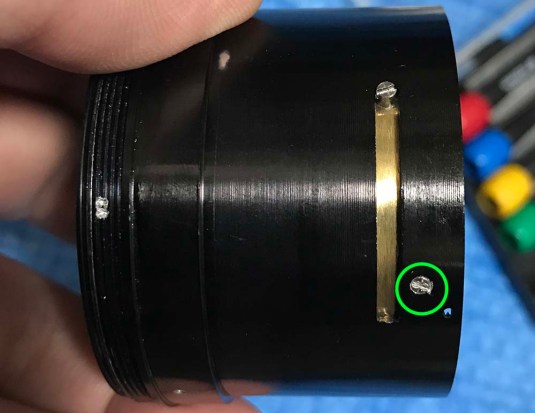
 You can go on with separating the helicoids. The central helicoid separated with ease and I marked where they separated to help me mate them back later. Note that the central helicoid was milled from a single billet of brass! This is really unusual as far as Nikkors are concerned and this is probably a factor why the lens focuses really smooth since brass is known to have that as a property, I think engineers call that “self-lubrication” in their jargon. If you are new to lens repair read my article on working with helicoids. Many people get stuck because they can’t put the helicoids back properly so read my article to help prevent this from happening to you.
 The inner and central helicoids won’t separate unless you remove this stop. It’s there to prevent you from focusing out of the lens’ intended range as a safety. I’ll also advise you to note this thing’s orientation because this thing is not symmetrical.
 Mark where they separated. If you forgot this and end up having a terrible time then please do not message me for help! Read my helicoids article for your peace of mind and education if you are new to this.
 Unscrew the aperture coupling collar from the outer helicoid. It is this part that is connecting the aperture ring to the iris mechanism inside. Be really careful not to damage the delicate threads by cross-threading or scarring it. I am just making up the names of the various parts of this lens in case you haven’t noticed it yet. Now you know.
You can see the aperture detent spring in the picture. I usually remove them and clean everything very well. Make sure that you put this back carefully, I will also caution you about putting this back facing the right way. Omitting this will allow you to turn the aperture ring without the clicking-action and this is what many videographers do to their lenses.
Clean the helicoids really well and make sure not to leave any residue since that can contaminate the fresh grease that you’ll apply later. You can pickle these in an aclohol bath or use a strong detergent and scrub the old grease away with a stiff brush. It will depend on what kind of grease was used and you will have to try different types of solvents and see which one will strip the old grease.
Disassembly (Objective):
The objective is rather simple and pretty straight-forward as far as Nikkors go. There isn’t anything radically different from the usual Nikkor lens and any technique and advise on fixing your usual Nikkor prime from the same vintage applies. If ever I’m going to warn you about anything, that will have to be being careful with which way a lens element should be facing when it is time to put the elements back together. The lens curvature is not obvious on some elements specially the ones on the rear.
 The front lens assembly can easily be unscrewed from the casing with your hands. If it’s stuck, place a small drop of solvent on the seams and leave that there for a while to let that soften whatever was used to seal it before giving it another try.
The rear lens assembly can be removed the same way. I’d like to apologize for all the missing photos on this section, I think I have lost them when my iPhone 4s died! Do not worry, the construction is very similar to the one on the Nikkor-S 5cm f/1.4 Auto lens. I wonder where those pictures went, I will update you as soon as I find out!
That is all for the objective (unfortunately). I doubt that you will ever need to go deeper but if you do then read the next section!
Disassembly (Iris Mechanism):
The iris assembly is best left alone unless you need to clean it. This part can get oily and the contaminants can come from anything ranging from grease to fine dirt. I usually will leave it alone unless it needs to be cleaned.
 Before you start working on the iris mechanism, make sure to take plenty of pictures for your notes. This can be complicated for some people so taking a lot of notes should be part of your standard routine. There is absolutely no excuses for not doing so.
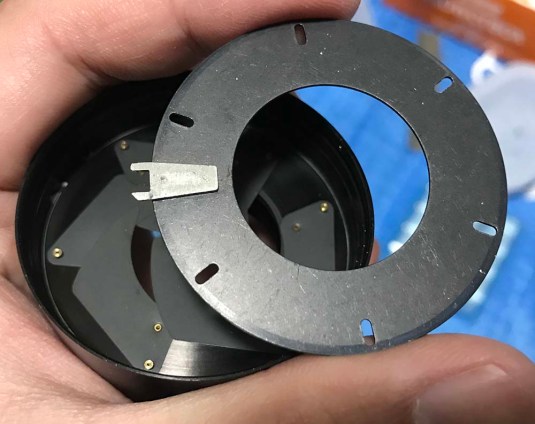
 The ring inside that holds the iris mechanism is being held by these. There are 3 of them and just look for the other 2 on the other side of the casing.
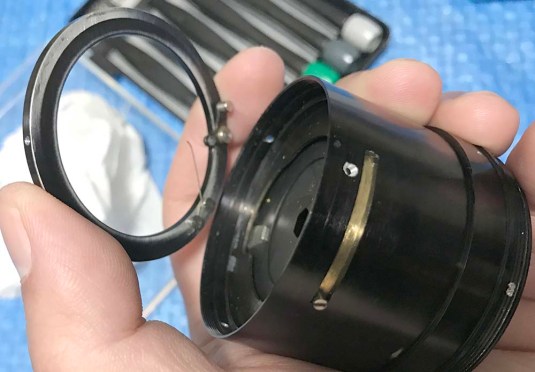 This ring should come after you got rid of the screws. It can be a tight fit so just use your fingertips to pull it away from the casing. You will also need to unscrew that screw near the center of the picture attached the brass ring before you proceed.
 The ring can now be removed now that the screw is gone. Note its position since this thing isn’t symmetrical. Having this face the wrong way will only lead to trouble later. Do disregard the fact that the front elements are still in the picture.
 The rotator plate can now be removed. The safest way to do this is to push the tab/ears from the outside to lift it slightly and then pick it up with your finger nails. Please be very careful with this. If you dropped this thing and it warped, I’m going to bet that the iris won’t be able to open and close down as smoothly or snappy as it once did.
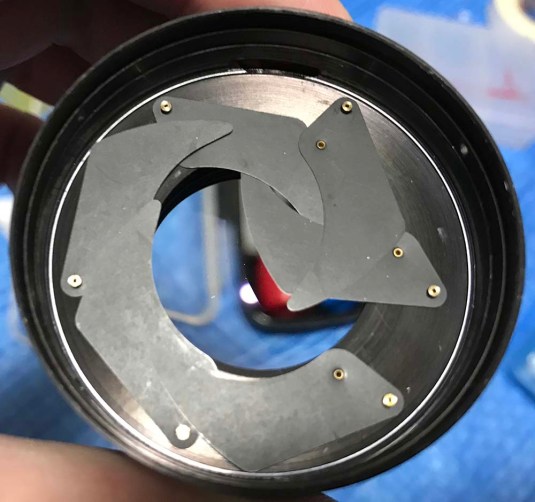 I simply drop the iris blades on my palm and wiped them properly with a lint-free tissue and naphtha. These are really delicate so handle them with care!
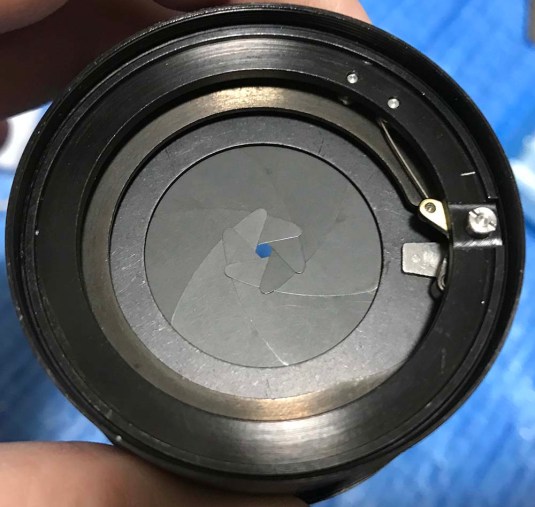
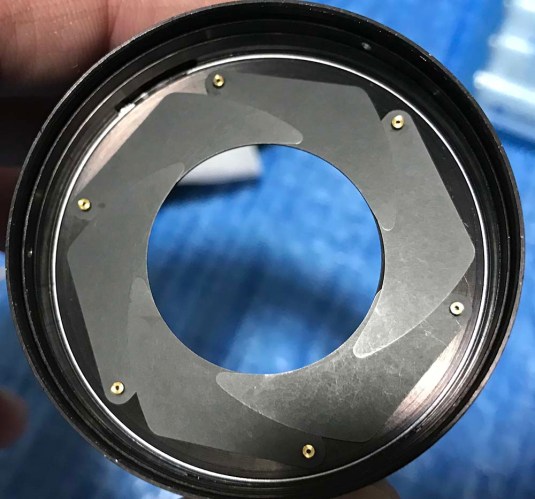 The iris blades were then put back together carefully using a pair of sharp tweezers. Handle the blades with care and only pick them using their pins to prevent warping them. It may take you some time to put all of them back together if you are a beginner this but this was easy for me since there were only 6 blades in total. Before this, most F-mount Nikkors have 9 iris blades so this is another unusual thing (back-then) until the later lenses were being made with just 6-7 blades became the norm. It’s a big cost-cutting decision but it also assures reliability since the 9-bladed ones were kind of delicate. Take my word for this, I know how delicate the 9-bladed ones can be, read my Nikkor-P 10.5cm f/2.5 Auto article to see why.
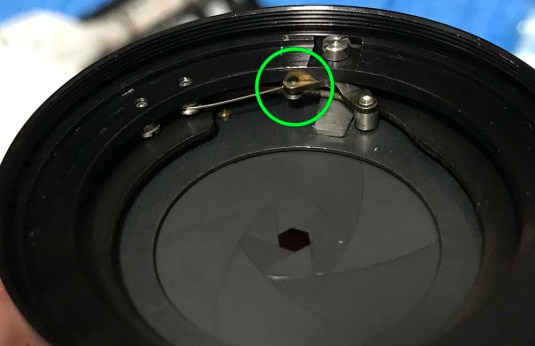 When reassemble your iris mechanism, be careful about the position of this little spring. It can be hard to get this into position, the straight end should be situated on the peg of a lever and the curved end of the spring should be facing the inner wall of the objective’s casing. The peg is circled in the photo in case you haven’t seen it yet. This tiny spring ensures that the iris opens or closes down properly.
If your blades are oily, simply wipe them clean using tissue and solvents. It’s not unusual to find these with oily blades because some of these stayed for a long time in storage and the conditions aren’t always ideal. They may also have been repaired improperly and another cause for this problem. Never lubricate these as they’re supposed to work dry.
With the iris reassembled, check for anything weird by rapidly flicking the stop-down lever and see if it actuates freely and the action should be really snappy. If the blades retard or stick then you will have to clean it further. If the iris is irregular then you will have to set the iris blades again. The cause can come from a damaged blade or if the blades aren’t sitting flat because of the plate.
Conclusion:
It was a boring task working with this lens since the construction is generic but I was really happy with the lens’ performance so it is more than enough to make all this effort worthwhile. The feeling that you have saved another lens is indescribable.
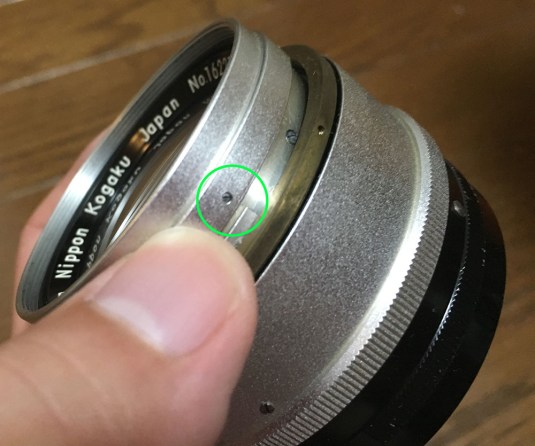
 I am going to show you some differences between the really early ones here in the following pictures. Note that the earliest versions don’t have a brass central helicoid compared to the ones that came later. I find this odd and it’s a mystery why Nikon decided to use a brass one later in production.
 Another interesting difference in the earliest versions is this. The cover for the rear part of the objective wasn’t anodized at the plant, it’s bare-metal as you can see in the picture. This is odd and I don’t have an explanation for it.
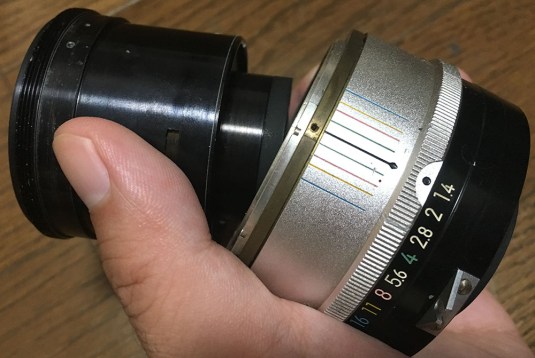
 Here it is with an improvised front barrel. I milled this one from my spares but I was not able to mill the threads for the filter or hood because I do not have the equipment at that moment.
 This is how the real thing looks like. My improvised one looks ghetto but it’s hard to distinguish from a distance so I guess it’s better than nothing at all.
 Here is another picture of the early version with the makeshift front barrel. See how it is shinier compared to the later Nikkors? They don’t make them like they used to.
The doesn’t come cheap due its rarity but it is not as rare as the “tickmark” lenses or the more exotic ones like the Noct-Nikkor 58mm f/1.2 Ai-S so it is more affordable for the average person to own one of these. If you want an important piece of Nikkor history then you should buy one of these but if you are thinking of buying it to shoot with it and if you don’t give a rat’s ass for all that history then the Nikkor-S 5cm f/1.4 Auto lens may be all that you need. It’s better than this lens in many ways. Personally, I just use this lens for the fun of it. Weird Nikkors are fun to shoot with, the feeling is akin to driving an old European car around town on a Sunday afternoon.
We’re now at the end of another article. Thank you for reading my blog and if you wish to help me then please click on my links or just browse through my blog. I have began to monetize the blog so any traffic helps. Sharing my blog is also going to help a lot. Of course, you are free to buy me a coffee or burger by donating to my paypal. That will help me with maintenance and offset the cost of buying film. Thanks again and see you again next time, Ric.
Help Support this Blog:
Maintaining this blog requires money to operate. If you think that this site has helped you or you want to show your support by helping with the site’s upkeep, you can make a small donation to my paypal.com (richardHaw888@gmail.com). Money is not my prime motivation for this blog and I believe that I have enough to run this but you can help me make this site (and the companion facebook page) grow.
Leave me some tip?
Thank you very much for your continued support!
$2.00
Helping support this site will ensure that this will be kept going as long as I have the time and energy for this. I would appreciate it if you just leave out your name or details like your countrym name or other information so that the donations will totally be anonymous. This is a labor of love and I intend to keep it that way for as long as I can. Ric.

Mar 20, 2019 @ 19:48:37
I am curious if acetone or lighter fluid could stain the casing. I was taking this lens apart and was having a hard time getting the front element area off so hit it quite a few times with acetone and lighter fluid.
When I did get it off the inside of the casing had some blueish circle stains on the inner casing.
Have you ever seen this in the lenses? Can this be from the acetone I used? I don’t think it will hurt anything since it is just inner casing area but I want to avoid in the future if possible. Thanks and thanks for the articles.
Jun 10, 2019 @ 14:03:50
Thanks for the update, interesting to read about the earlier version.
Jul 07, 2021 @ 22:41:02
Thank you. The instructions really worked well for the barrel disassembly of my Nikkor-S 50mm f1.4. For the optical part, the 50mm instructions are better fitting.
Jan 25, 2023 @ 19:10:50
Some time ago one of these came into my hands, and I managed to recement the doublet (which came semi detached). Obviously, I did all the research I could on the lens – tanks for this post by the way. And one of the things that I like a lot is how the lens renders the out-of-focus areas. Looking at the optical design (a very asymmetric gauss, with the inner group much smaller than the front one) it reminds me a lot of the Biotar. It’s true, the big front doublet are 2 pieces, but it’s almost as if they weren’t (in later lenses it’s more obvious, with the front doublet properly separated, like the Xenon design).
The bokeh of this one is soft wide open, but with those smooth lines that, in certain circumstances, look like brushstrokes; sometimes swirl too; isn´t neutral like the gauss/xenon design that dominated the landscape in the 70s-80s.
Will it be the most “biotar” of the classic nikkor?
Aug 12, 2024 @ 11:46:32
Hi Richard,
your site really is an inexhaustible source of knowledge and inspiration for Nikon friends! Thank you for your valuable work and your passion!
I bought this beautiful lens in almost pristine condition. I find its rendering very special, a great, distinctive image look. Unfortunately, I noticed that the focusing doesn’t seem to focus 100% at infinity. I tried it through all f-stops and tried to focus on a tower on the horizon about 3 – 4 kilometres away, both on an F1 and digitally adapted on a Lumix S5 (with two different adapters). Compared to my other Nikorras, which reach infinity exactly in analogue (and a little beyond on the adapter), the 5.8/1.4 always remains slightly below this. At the infinity setting, the greatest sharpness is around 30 metres, with the aperture wide open, the range of acceptable sharpness naturally extends further. However, even at f8-16 there is a decisive lack of sharpness on the horizon.
My question is this: How likely is it that there is a misalignment of the focussing here? An acquaintance told me that not all Nikon lenses are designed to reach infinity. But I can’t quite believe that…
What do you recommend? Can a workshop fix this problem – or do you have to live with “the infinity soft focus” with this lens?
Many thanks, all the best for you and best wishes from Germany, Daniel
Dec 24, 2024 @ 14:51:05
Hi Daniel! Did you repair it? It’s an old lens, so it’s very likely that during its history it has already been disassembled (and this is not always done by technicians) , sometimes the re-assembly part isn’t perfect. From what you say, it’s very likely that the front group is not screwed to its original position, only a few tenths of mm are enough to mess the focus at infinity. According to the original drawings, from glass to glass it should measure 51.5 mm (front glass-rear glass, center to center). I know this because I have taken mine apart and reassembled it down to the last detail, including re-cementing the rear doublet (several headaches, but it worked after 2 attempts 🙂 !!) Obviously you have to measure carefully, with a vernier caliper/micrometer, and try not to scratch or mark the glass