
Hello, everybody! It’s Father’s Day today so I will greet all of the fathers who are reading my blog today a very happy Father’s Day! I was admitted to the hospital today because of my blood pressure but I am fine now and the most important thing is I spent time with my family. I spend lots of time at work and maintaining this blog that I often times find I am neglecting my family. Speaking of fathers, I am going to introduce you to a really special father in this article because this one started a long line of excellent lenses!
Introduction:
The Nikkor-P•C 10.5cm f/2.5 debuted late in 1953 to fill the gap between 85mm and 135mm. Some people find its focal length a bit odd but this made a lot of sense if you’re carrying a 50mm in your bag because 85mm just isn’t too different from 50mm and 135mm may be too long for many people. The f/2.5 maximum aperture may also be unusual for people who aren’t familiar with Nikon’s history, the f/2.5 maximum aperture was common and was also used on the W-Nikkor 3•5cm f/2.5. Back in the day, Nikon was in a contest with everyone so even a small lead counts (f/2.5 vs f/2.8) so this became the fastest lens in the 100mm class for some time.

This lens looks gorgeous with all those shiny chromed details. You will sure to get plenty of stares when you shoot with this lens! I know some people who treat cameras as jewelry. I know it sounds strange but who am I to tell them otherwise? Focusing this lens can be really clumsy because of the long focus throw. You can also accidentally knock your focus off when you change the aperture and I find it annoying. Thankfully, I usually set my aperture before I focus my lens so this saves me a lot of trouble.
The optics was designed by the legendary Wakimoto Zenji, a giant in the Japanese optical industry. The lens is the predecessor of the famous Nikkor-P 105mm f/2.5 series of lenses. The formula was very long-lived and it pretty much stayed that way until the early 1970s when this was given an update by the disciple of Wakimoto Zenji.

Here’s a comparison between the legacy 5-elements-in-3-groups design and the later 5-elements–in-4-groups one. While the design shown to the left is for the Nikkor-P 105mm f/2.5 Auto, the difference is negligible since the rear element was modified by shaving-off some 1mm to make a bit of clearance for the Nikon F’s flapping mirror so you can think of it as the same design used on this lens. This is just for the sake of illustration.
Its optical formula can be thought of as an enlarged Nikkor-P.C 8.5cm f/2, another lens designed by Wakimoto Zenji. The original design served like a template for this, it worked pretty well. I shoot with both lenses, I can say that the characteristics of them both are similar in many ways because both share the Sonnar pedigree.

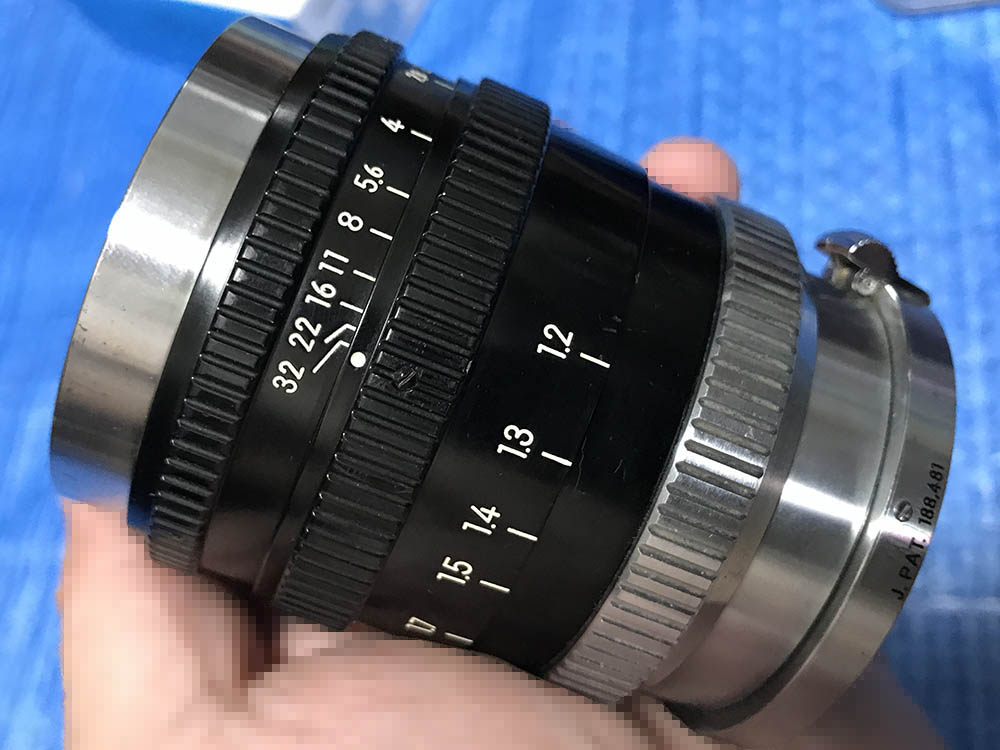
This lens was sold as junk due to some coating damage by a previous fungus attack. I also noticed that it won’t focus all-the-way to infinity and the shop was not aware of this. I love the beautiful engraved details which is really helpful. Minimum focus is around 1.2m which is adequate for a lens of this class.
This lens comes in 2 versions. The lens shown we have is the later model. It was just updated with a different way of attaching the lens shade where the original one has two small lugs to secure it and this one has none, resulting in a smoother front barrel that catch on anything. The differences are minor, you can treat them as identical. There’s a Leica L39 version as well and the only difference is the lens mount.

Here it is compared to the F-mount version. They’re different in many ways but you can consider them to be similar because it is just a minor variation. Some people claim that the rangefinder version is better because the rear is closer to the film plane so optical artifacts like sphero-chromatic aberration, etc. are near-absent compared to the later F-mount version. I could confirm this myself, you can check my samples for reference.

Here it is with the rest of the gang. From the original one at the left from 1953 all-the-way to the last one to the right which ended production around the new millennium. If you are a new Nikon photographer and you do not know what this lens family is about then I will advise you to read my articles and get to know these better. They are all excellent lenses.
From left-to-right:
- Nikkor-P•C 10.5cm f/2.5
- Nikkor-P 105mm f/2.5 Auto
- Nikkor-P•C. 105mm f/2.5 Auto
- New-Nikkor 105mm f/2.5
- Nikkor 105mm f/2.5 Ai-S
All of them are regarded by many to be the best in their class. You could not go wrong with any of them.

It looks great with my Nikon S3. The 35mm, 50mm and 105mm is the trinity for the Nikon S3 since it has frame lines for these focal lengths, it’s really convenient. It’s heavy, it’s going to make your setup front-heavy so the best way to handle your setup is to hold it by the neck of the lens. You don’t want to let the lens dangle in front of your camera without support, this will wear the mount of the camera or damage the camera’s front casting.
Compared to other Nikkor telephoto lenses for rangefinder cameras, this is relatively new that it only came in the “new” scheme of chrome and black. Older telephoto lenses like the Nikkor-P.C 8.5cm f/2 and the Nikkor-Q.C 13.5cm f/3.5 first came in all-chrome and then the two-tone “panda” version like we see here.
Knowing how your lens performs will help you maximize it. You’ll get to know its strengths and weaknesses, this knowledge will help you decide if a lens is the right tool for the job. I shot these from f/2.5, f/4 and f/5.6, we’ll see the most changes happen within these apertures. I’d imagine that many people would shoot with it using these apertures.


(Click to enlarge)
Vignetting can be terrible wide-open and it can reach to more than 2-stops-worth of light at the far corners. It gets a lot better by f/4 but only begins to really disappear by f/5.6. It is really dark and is probably the biggest weakness of this lens. Now, this was designed as a general-purpose lens but it has great utility for portraiture so you can use this “feature” to help give your portraits a unique look and help direct the eyes of your viewers closer to the center of the frame where you will most likely position your subject. The 2nd set helps illustrate how smooth the bokeh quality is, it’s one of the defining traits of this lens. Wide-open, the background melts into a smooth wash of colors, the bokeh discs look nice and clean without any ugly outlines. The background remains smooth despite stopping the lens down but it gets less blurry due to the deeper depth-of-field. The bokeh balls still look circular because the iris isn’t angular, it plays a big role in the character of the bokeh. I consider this lens to have one of the best bokeh characteristics amongst all of the lenses that Nikon has made for the S-mount and “exquisite” is the only word that can describe that.


(Click to enlarge)
Here are some photos I took with the subjects at closer ranges. Sharpness and contrast at the center looks nice wide-open and tonality look natural, too. Bokeh seems pretty smooth but you’ll see that it has the tendency to render some linear and long details at the background in a smudgy manner. It may just be just an unfortunate combo in the background of the 4th set because the bokeh looks gorgeous otherwise. Vignetting will make the corners look dark. You won’t notice it much as long as you don’t have the sky or any even-colored things in the background. Resolution looks fine wide-open, stopping this down will make it better but not by much because it’s already good from f/2.5. There’s a slight hint of chromatic aberration but you won’t see it unless you go out of your way to look for it. The field seems flatter-than-usual for a long lens but I’m not sure about it, that’s just my impression. The technical quality of the photos look great at f/5.6, it is really sharp, clear and the contrast looks great. This is the aperture that you will want to use when sharpness and all those things matter most.


(Click to enlarge)
This renders great for subjects that are further into the scene. Longer lenses should perform better when shot at farther distances for obvious reasons. You’ll only see slight spherical aberration at really bright parts of the scene and that’s it. Again, vignetting will be your biggest concern here.
Let us see some real-life pictures, shooting mundane objects for tests won’t give you a good idea on how a lens performs. My reviews aren’t technical at all, I will always base everything on my impressions of the lens from real photos and experiences. The following pictures were taken wide-open using my old Sony a7. I took them wide-open because that’s the best aperture to examine this lens’ character.


(Click to enlarge)
Please pardon me because these shots are a bit blurry since they’re all taken at slower speeds like 1/60s since f/2.5 isn’t really fast enough for lowlight photography, my subjects are all moving. See how natural the photos look? They definitely have a vintage feel to them. Despite being a bit blurry due to a shaky hand you will see that they’re sharp and if my subjects only stayed still then these would be better photos in the technical sense.

I love the mood of the pictures that I get with this, the rendering is very natural and the low elements count of just 5 helps achieve that. This lens is not overly-corrected, all of its flaws work together beautifully to give you a unique-looking picture.

I love the colors that I get from it. The tones are subtle despite the contrast being a bit on the high-side for an old lens, this is a good derivative of the Sonnar.
I also took some pictures using my Nikon Z6, it has IBIS, that helps a lot when shooting with slower speeds.

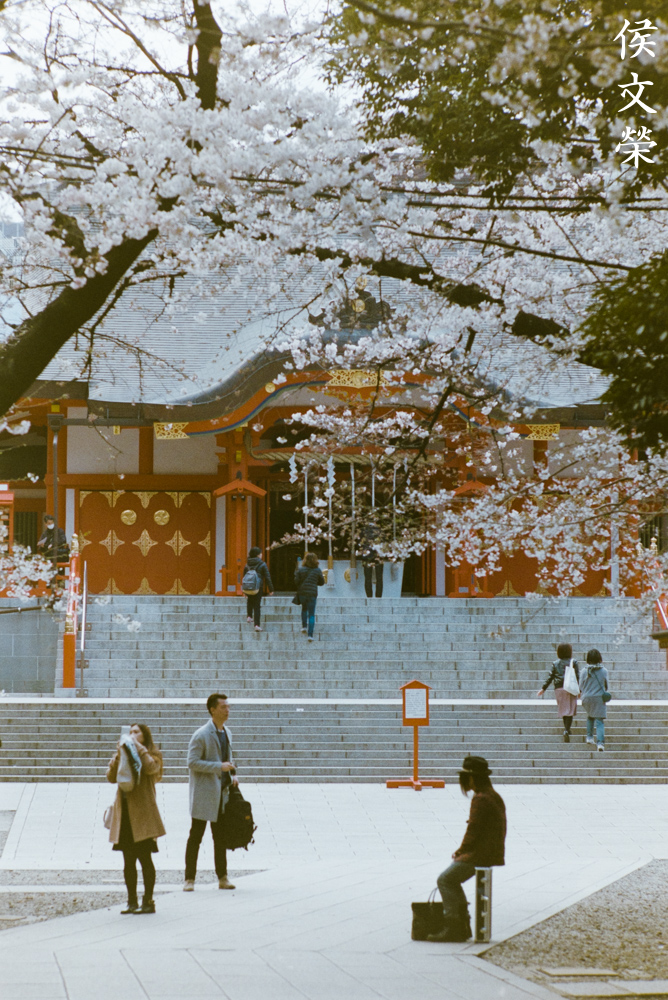
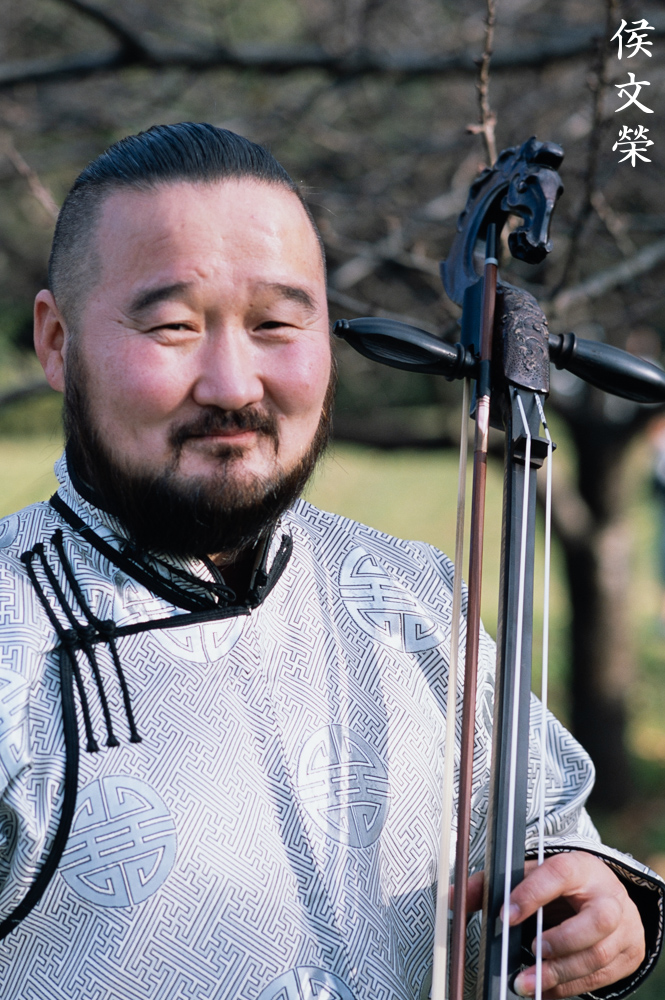
Amazing details even near the edges at f/2.5! The bokeh character is smooth, it is perfect for taking pictures of people who are about 6m away from you. It’s a great lens for full-body portraits as the longer focal length will help make your model look a bit taller due to frame compression.

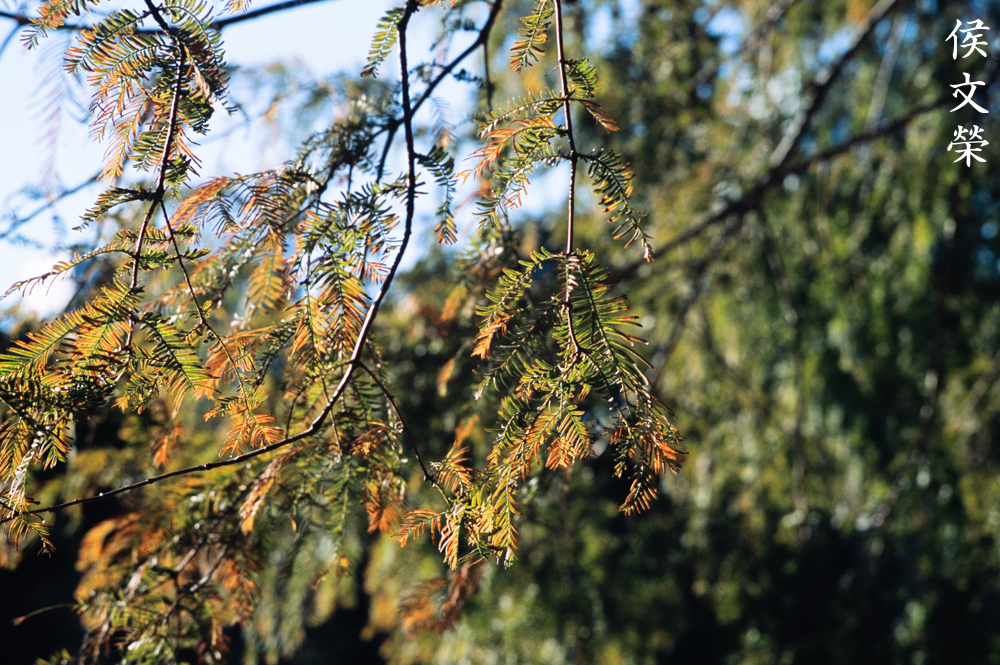
The colors that I get with it is wonderful even with fungus damage. It is never a boring lens, it is a shame that Nikon never made one with AF and VR. I am sure that it will sell very well.

The bokeh quality is smooth in most cases but there are times when weird smearing could appear.

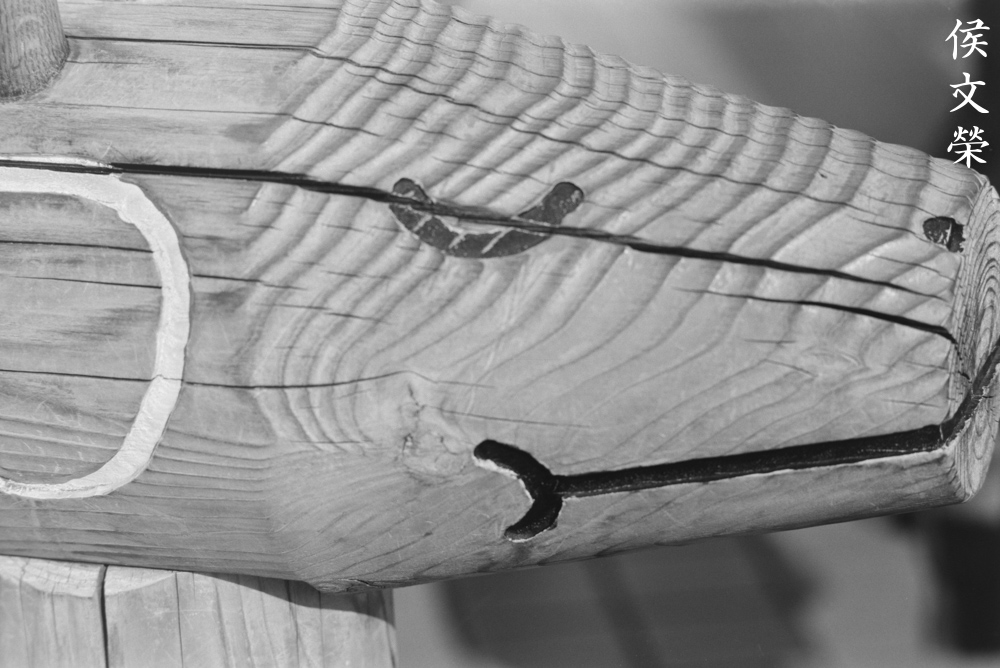
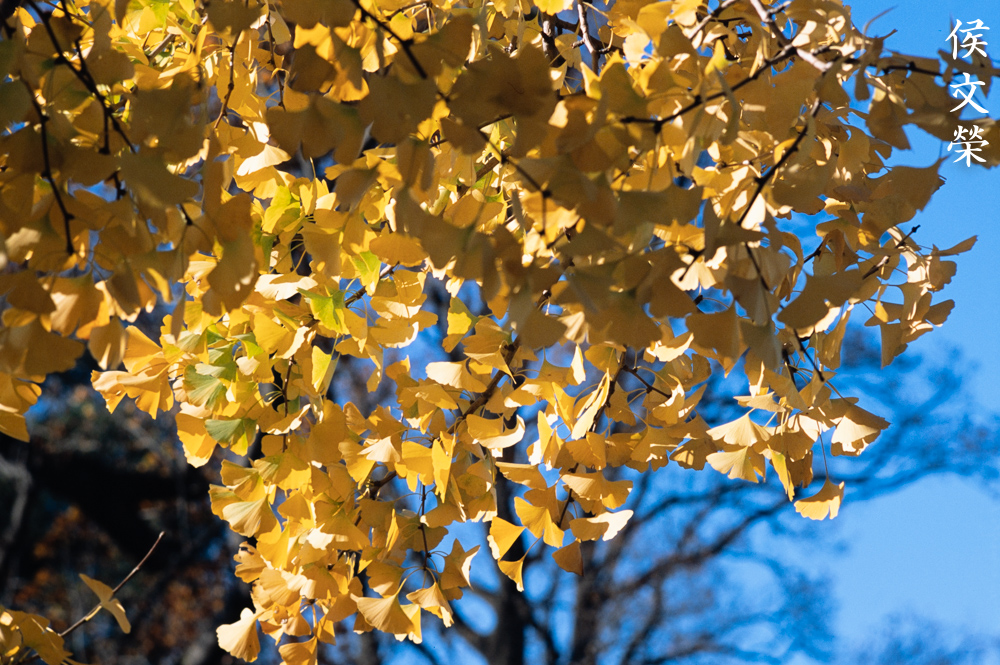
Sphero-chromatic aberration is well-controlled but there are times when it can show traces of it as evident in the worn parts of the track. This is simple to fix by stopping the iris down by a stop.


(Click to enlarge)
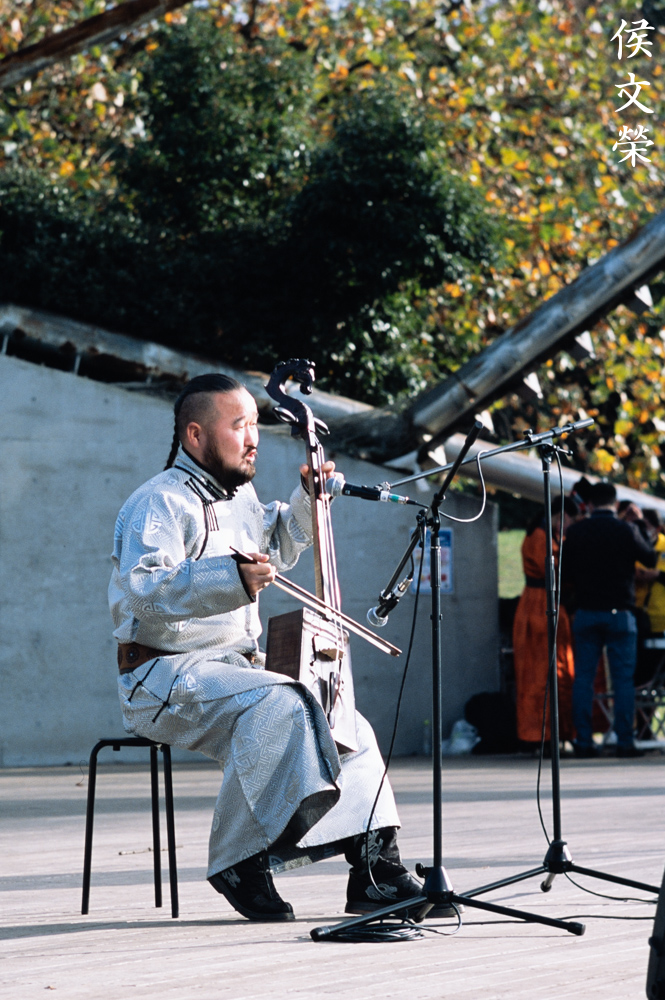
These are great photos for showing how good this is for real-world use. It is a great lens for candid photos and stage photography but tracking subjects by-hand can be frustrating at times even with focus peaking but you will be rewarded with amazing photos if you nailed your focus.
Let’s now see some pictures that I took with film. It is important to see the performance of this lens when shot with film since this was calculated exclusively for use with it. It’s the only way we can see what the designers were thinking when they made this some 65 years ago.


(click to enlarge)
Here are some sample shots that I did as soon as I finished overhauling this lens. These have no creative value since I usually shoot a roll to test the lens and see if I got the focus coupled properly to the rangefinder and to see how this lens performs. See how smooth the bokeh is? You can also see that this is indeed sharp wide-open and it will improve a lot when you stop it down to f/4. You can see that large polygonal blob when shot against the sun, it has more to do with its outdated coating than the design of the optics. A flaw set by the limitations of its time.


(click to enlarge)
Time for some color photos. The results are full of character as you can see in the transition from what’s in-focus to what’s not.

I shot this at around f/8 at 1/8s, dragging the shutter to give me nice motion blur. The corners look sharp as you can see from the cartoon girl’s eyes and the details on it. The tiny fishes also looks sharp. The contrast is just right, it is not too-high but it’s enough to not give you a flat picture.


(Click to enlarge)
Here are shots that I took wide-open. I think I shot these at around 1/60s or so. The lens is on the heavy-side due to the brass barrel, that added more stability to my setup so I could use slower speeds than what I am comfortable with. A rangefinder camera is more stable because it doesn’t have a flapping mirror that shake your setup a bit.
Now for something more “premium”. I shot these with Fujifilm Provia 100 to see how it performs with fine-grained slide film which isn’t so forgiving. It’s mostly used stopped-down from f/5.6 or f/8 because I wanted to examine the character of the bokeh.

The colors look nice but you’ll see some smearing in the bokeh. It’s the only complaint I have with it.
The character of the bokeh looks rough here which is a shame, it looks great when viewed through a loupe.
This was shot at f/8, it’s great for portraiture. You’re going to notice some smudging at the branches, this has a tendency render smeared bokeh artifacts when you’re not careful.
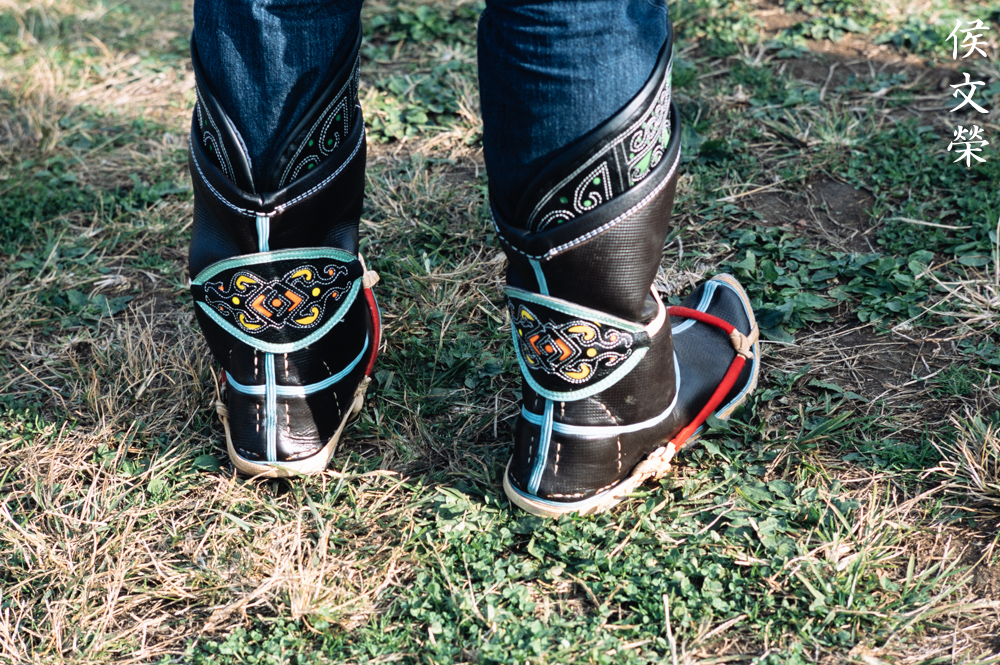
It’s quite sharp at smaller apertures, it resolved the stitches of the boots and you could even feel the texture of the leatherette.

The details of the fabric can be seen in this photo. It also has nice tonality as you can see in the blue part of the flag.

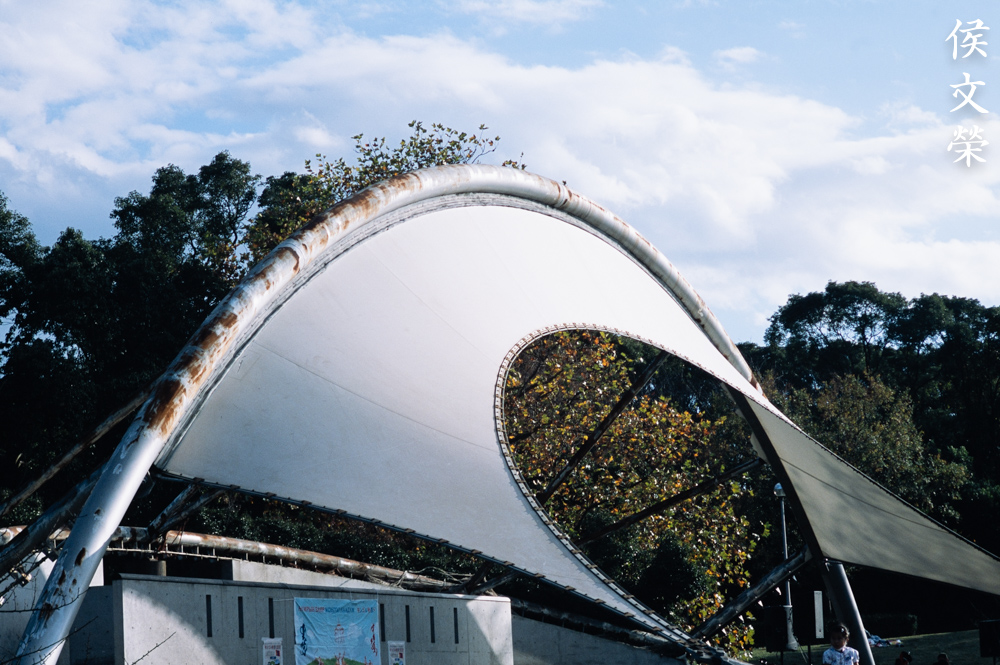
This was shot at f/8, distant objects are rendered sharp but you could notice a bit of chromatic aberration in the overblown areas which is surprising. It shouldn’t be visible at this aperture but this is an extreme case.


(Click to enlarge)
Here’s more. It could take photos with a nice 3D-feel, when I was looking at the photos with a loupe on top of a light-table I was amazed by what I saw. I could feel the depth in the photos.
I highly recommend this, just be careful not to trigger its tendency to render smudgy-looking bokeh artifacts. If you’re using Nikon rangefinders You will want to get one of these. Zeiss Ikon Contax shooters will need to look for the ones engraved with “C” at the barrel or the focus won’t be accurate. This is a great lens for Leica shooters but it can be an odd focal length. Using a separate finder with it will be mandatory. Their prices have gone down, you could get one for $150.00 these days and $200.00 will get you a clean sample. I spent around $130.00 for it when it was still selling at $250.00 back then. It was sold as junk so I got it for very little money. When you’re looking for one of these be sure that the barrels turn smoothly and the iris is dry. The glass has to be clean and clear. Scratches at the front element is common for older glass but you could still get one in great condition. Happy hunting.
Before We Begin:
If this is your first attempt at repairing a lens then I suggest that you check my previous posts regarding screws & drivers, grease and other things. Also read what I wrote about the tools that you’ll need to fix your Nikkors.
I suggest that you read these primers before you begin (for beginners):
Reading these primers should lessen the chance of ruining your lens if you are a novice. Before opening up any lens, always look for other people who have done so in Youtube or the internet. Information is scarce, vague and scattered (that is why I started this) but you can still find some information if you search carefully.
I highly recommend that you read my working with helicoids post because this is very important and getting it wrong can ruin your day. If I can force you to read this, I would. It is that important!
For more advanced topics, you can read my fungus removal post as a start. This post has a lot of useful information and it will be beneficial for you to read this.
Disassembly (Focusing Unit):
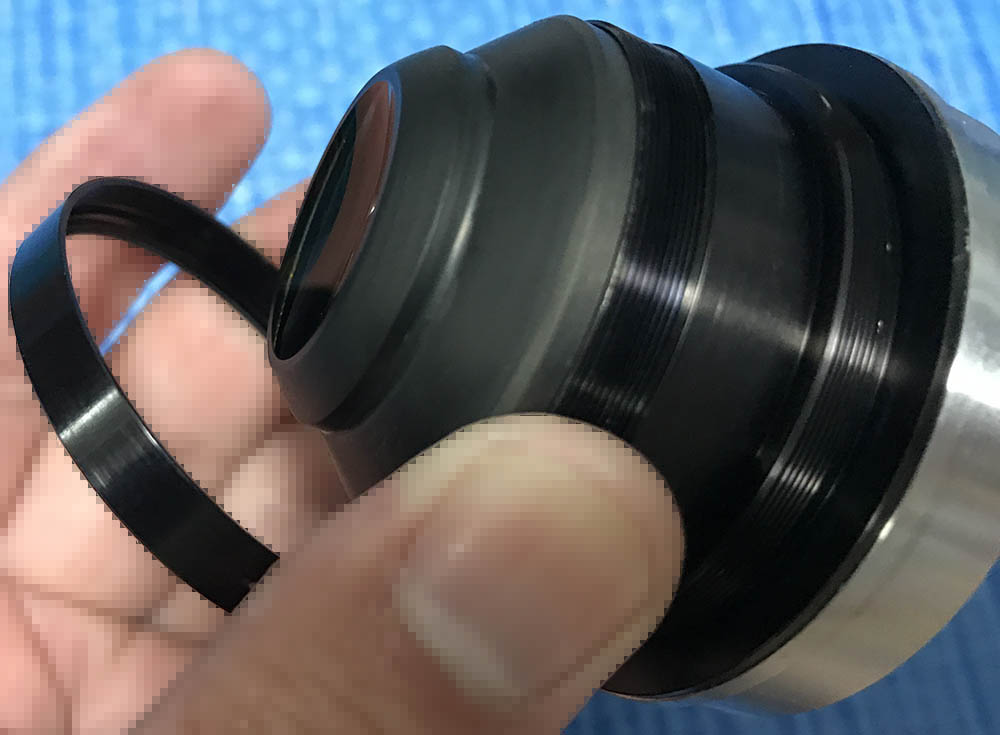
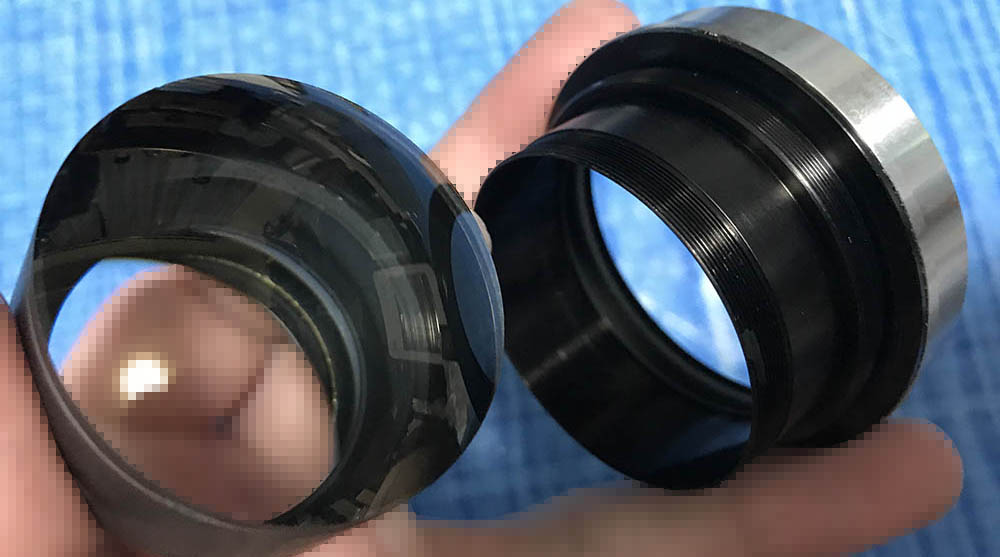
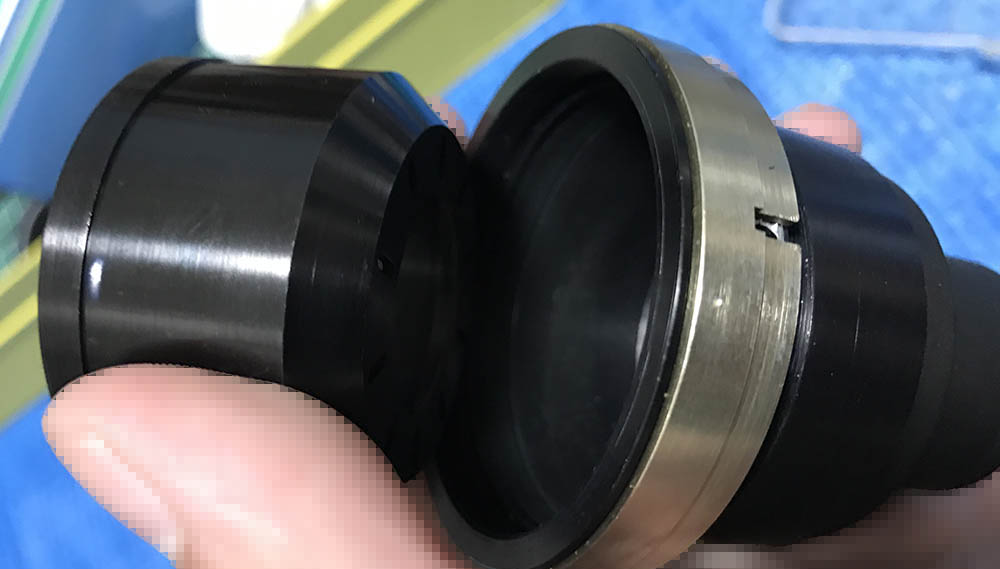
First of all, we would like to separate the objective from the main barrel to protect it from any accidents. Some rangefinder lenses are simple so you could just unscrew the front assembly. It was designed this way so you could change the main barrel to mount a Contax, Leica or even the very rare F-mount version. Nikon sold the F-mount barrels as a separate unit, this can be confirmed by old catalogs but the Contax and Leica ones were definitely sold from the factory as-is. Interesting, huh?

The objective can be easily removed by unscrewing it from the focusing unit. It may take some effort because it may be glued or old lubricant may have bonded it together.

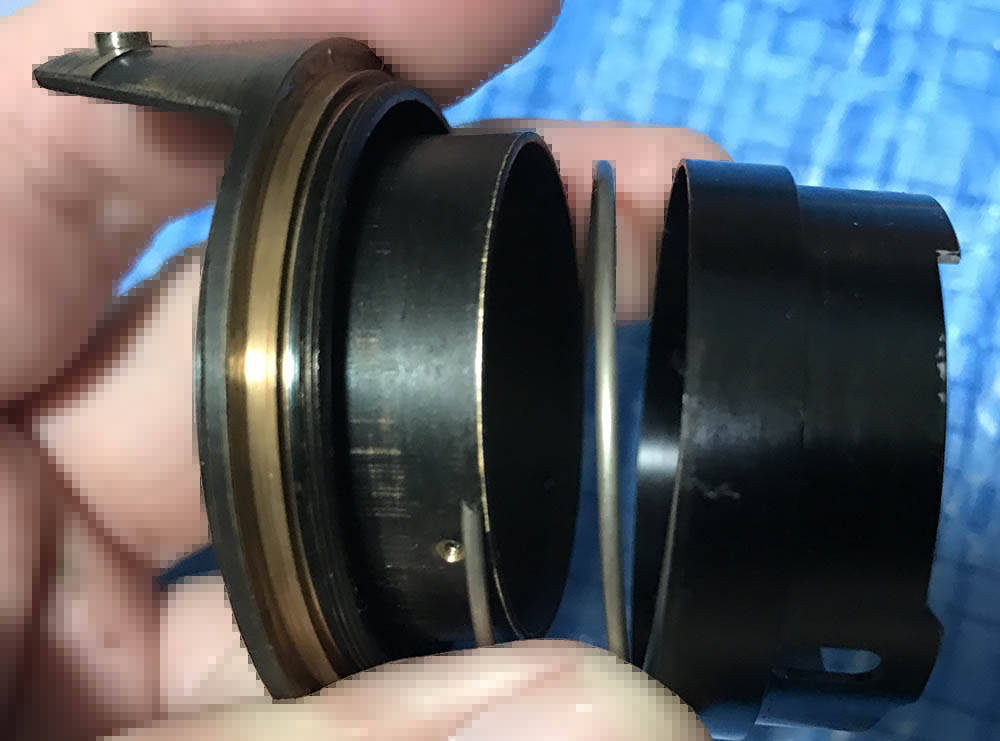
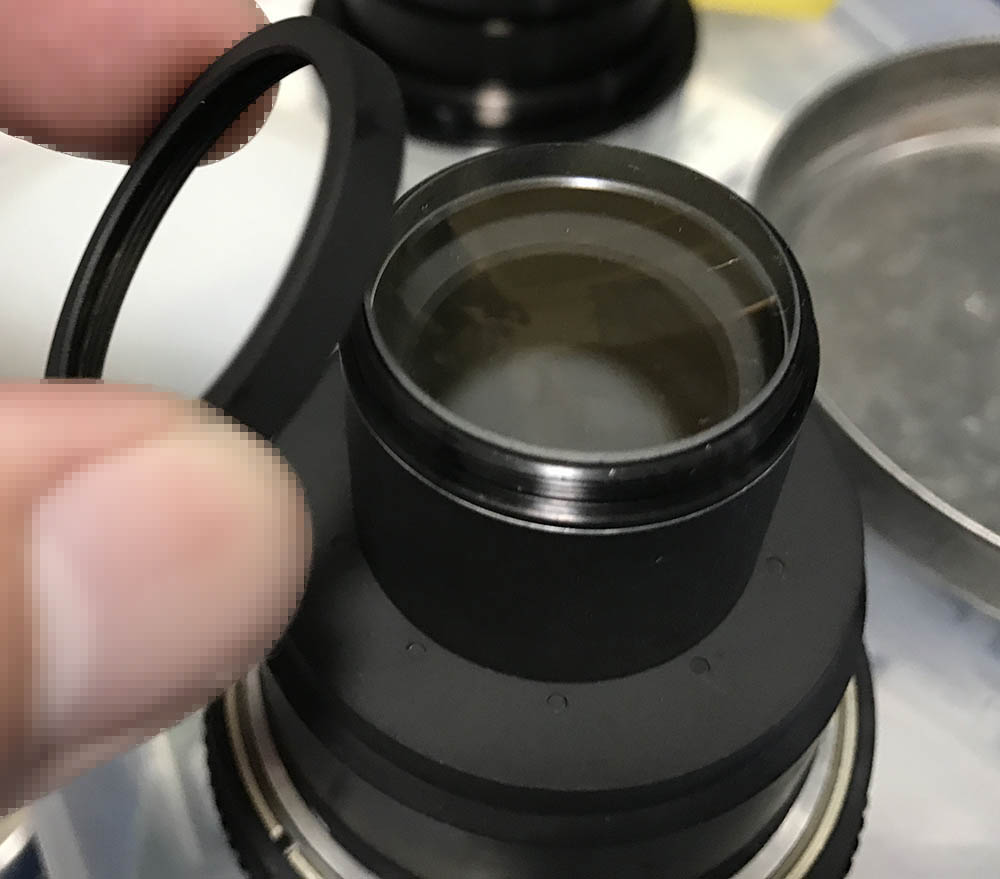
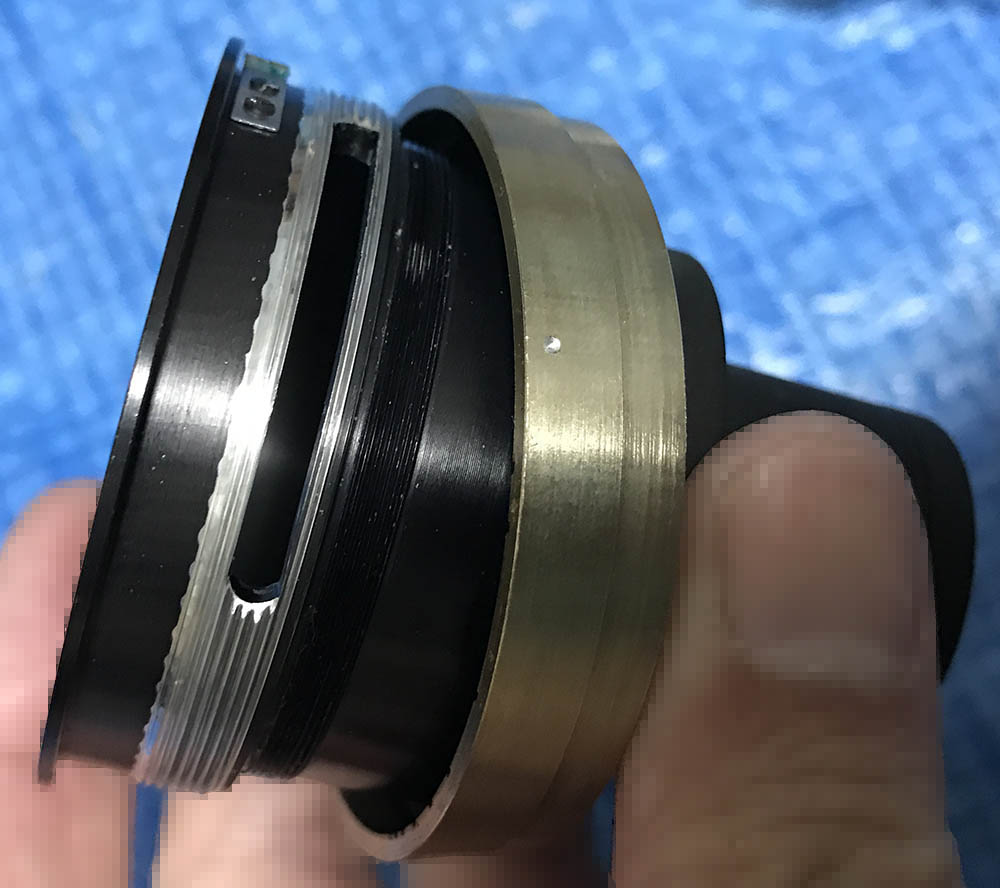
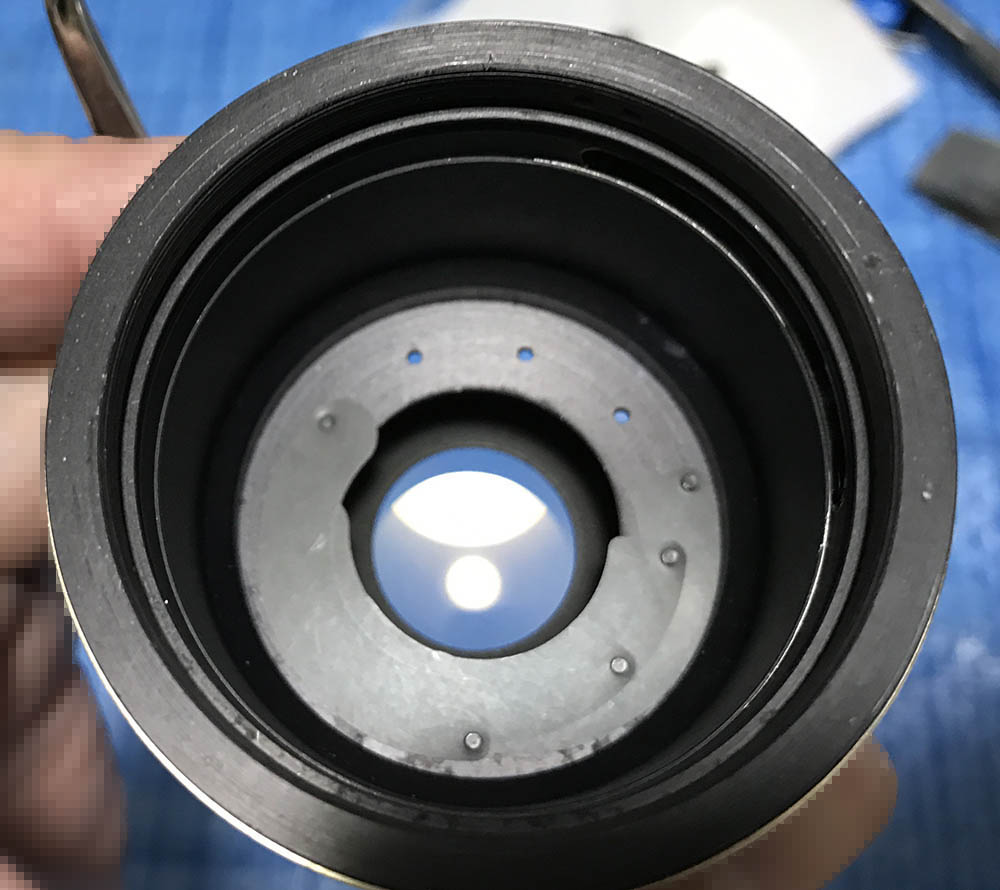
Be careful not to damage or lose the brass shim. It’s used to help adjust its focus. These are unique to each lens and were selected from a box of spares by the person who’s in-charge of calibrating its focus.

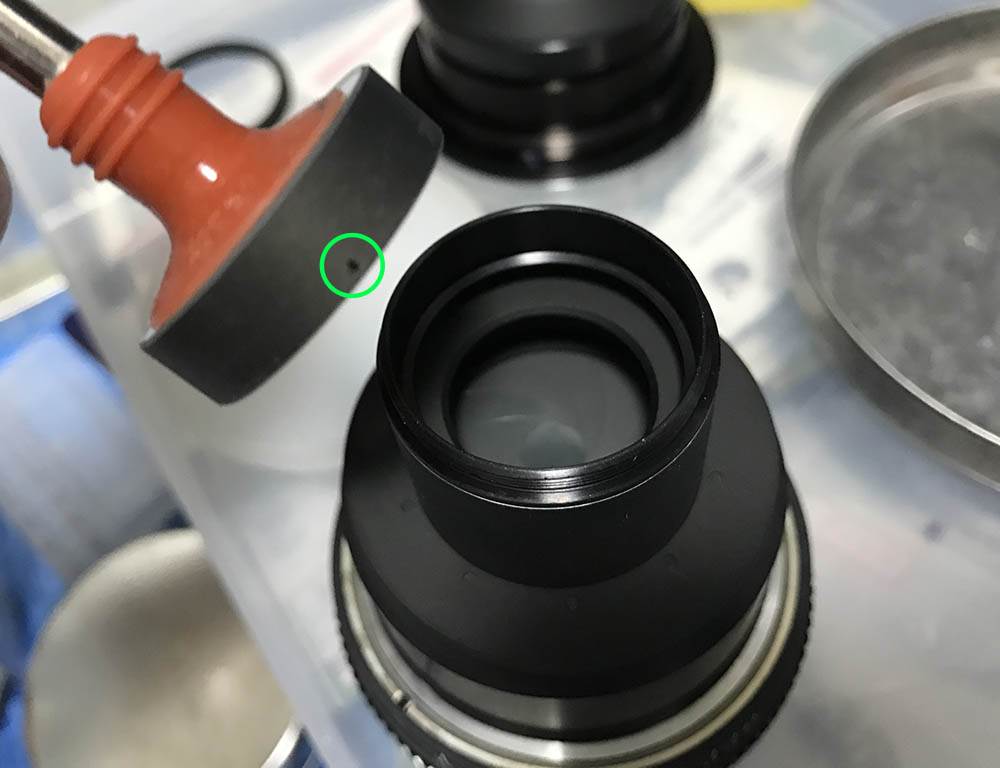
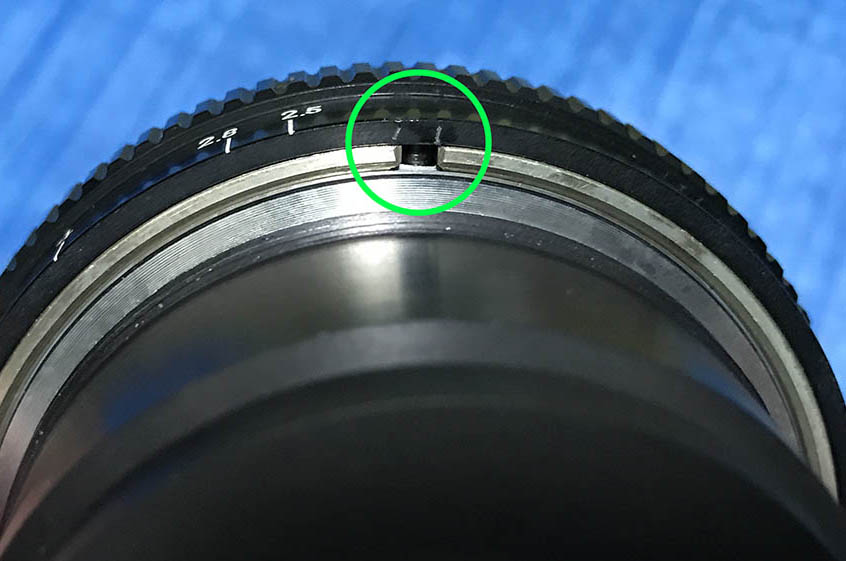
Remember I told you that this was sold as junk because it won’t focus all the way to infinity? This is the cause, I don’t know how this thing got inside but it was preventing the barrel from collapsing.

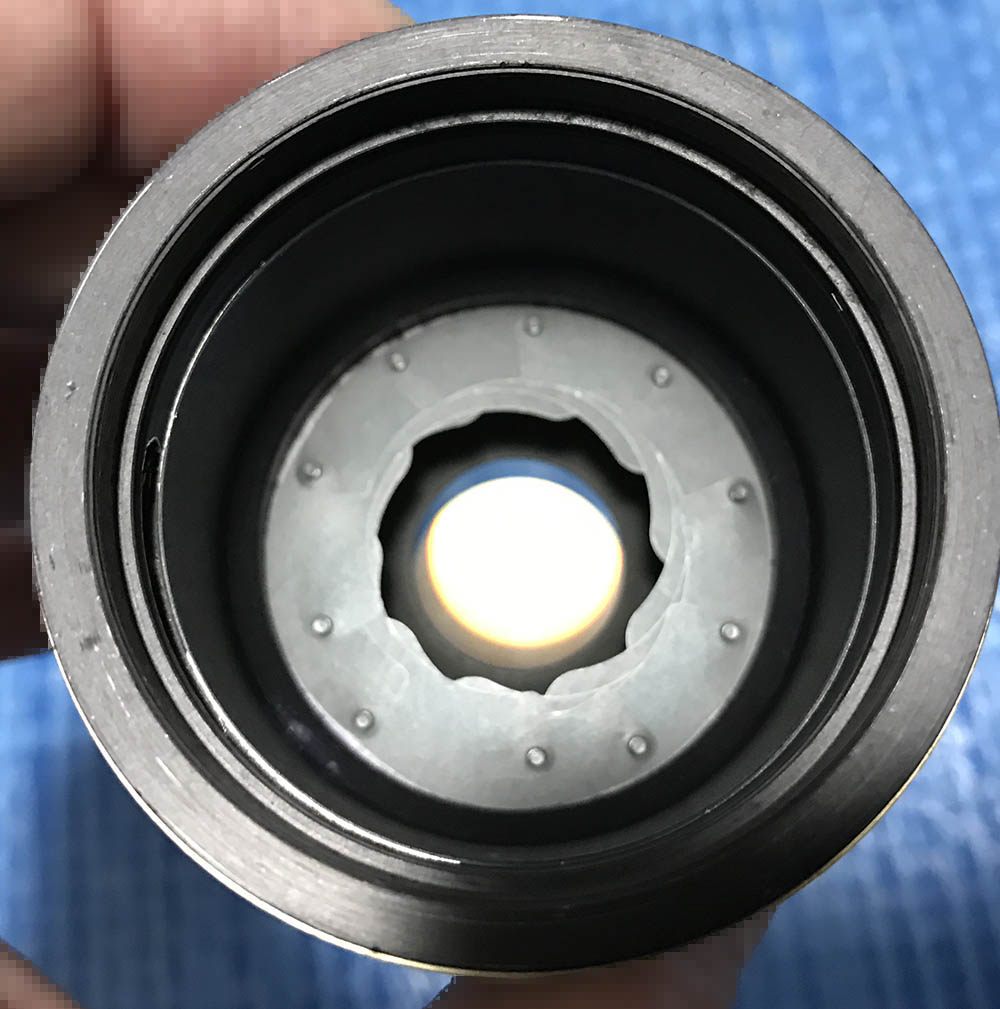
See, now it collapses all-the-way. I can really make a good living repairing lenses. Maybe I should do it in my retirement?

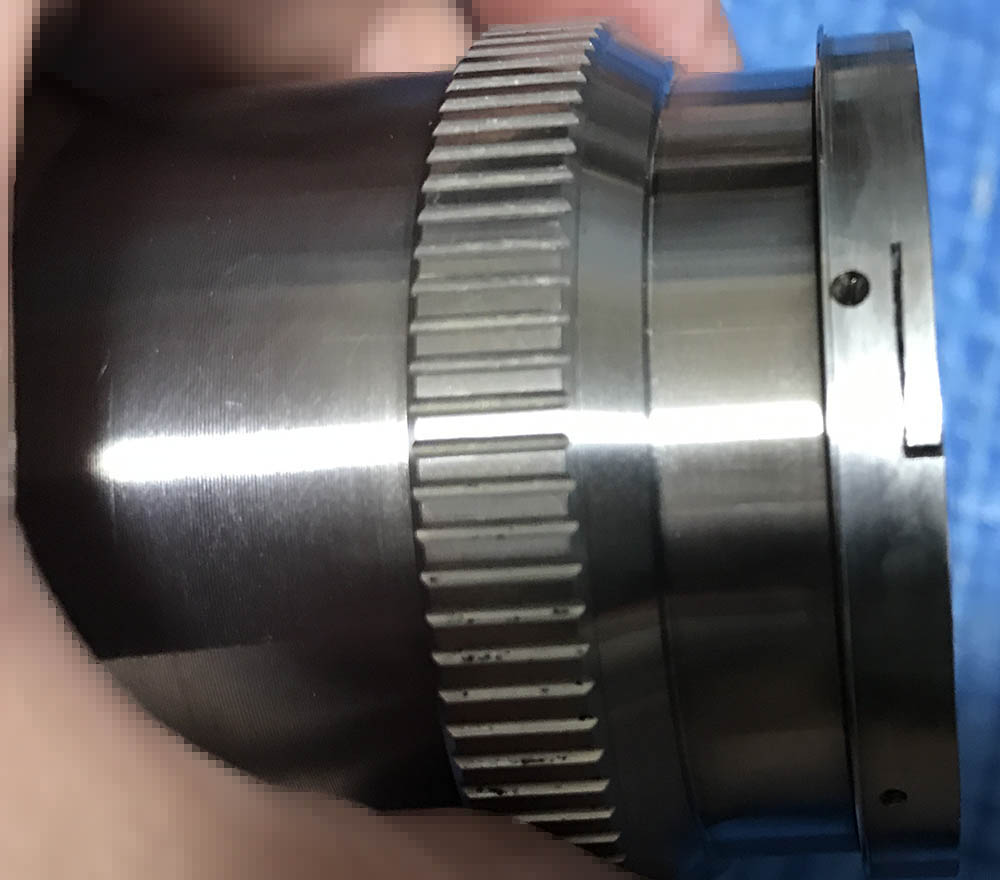
Remove the focusing ring by unscrewing these 3 screws that secure it to the inner helicoid.

Take note of the screws’ positions before you dismantle this further. Taking notes is essential but people just do not listen and message me when things go wrong.

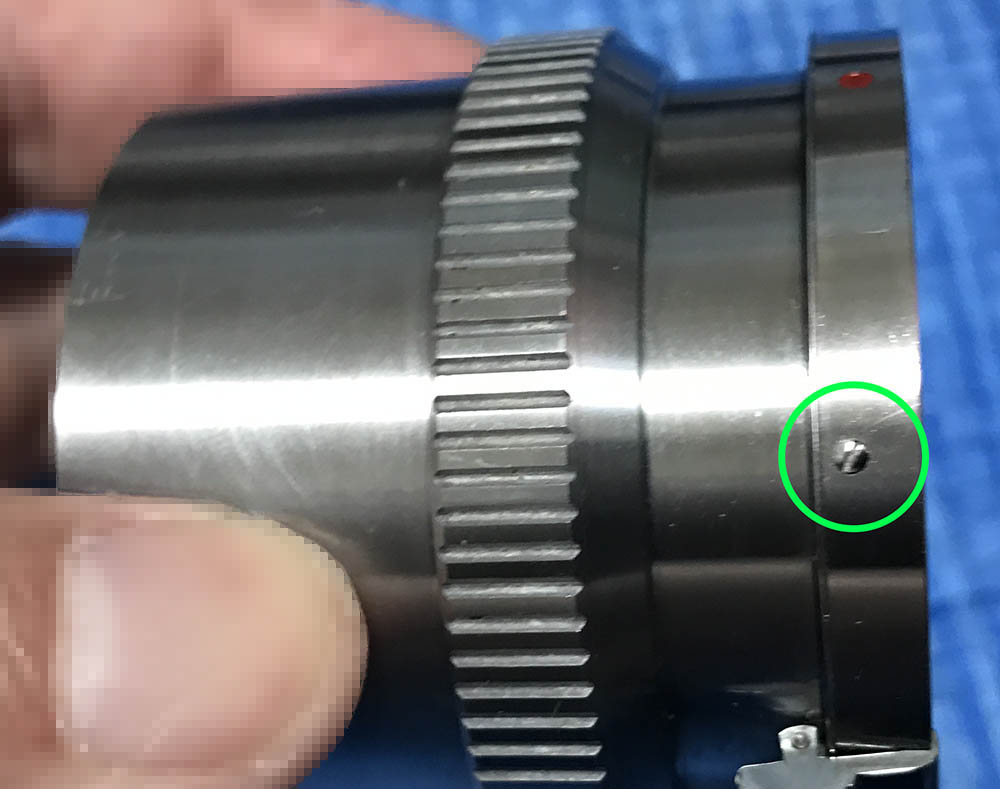
This screw prevents the helicoids from turning outside of their focus range. Carefully remove it as this can be delicate because the neck of the screw is thin.

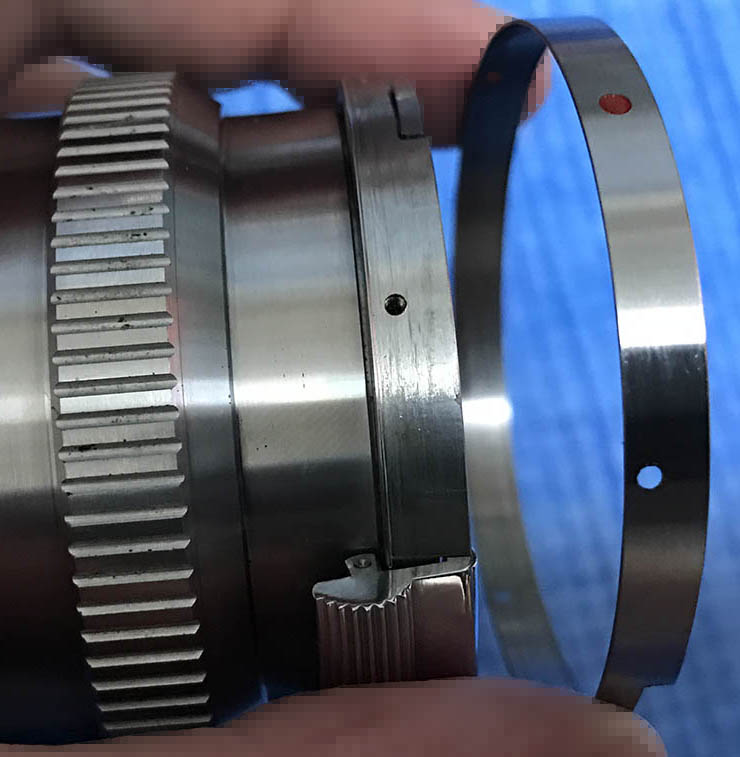
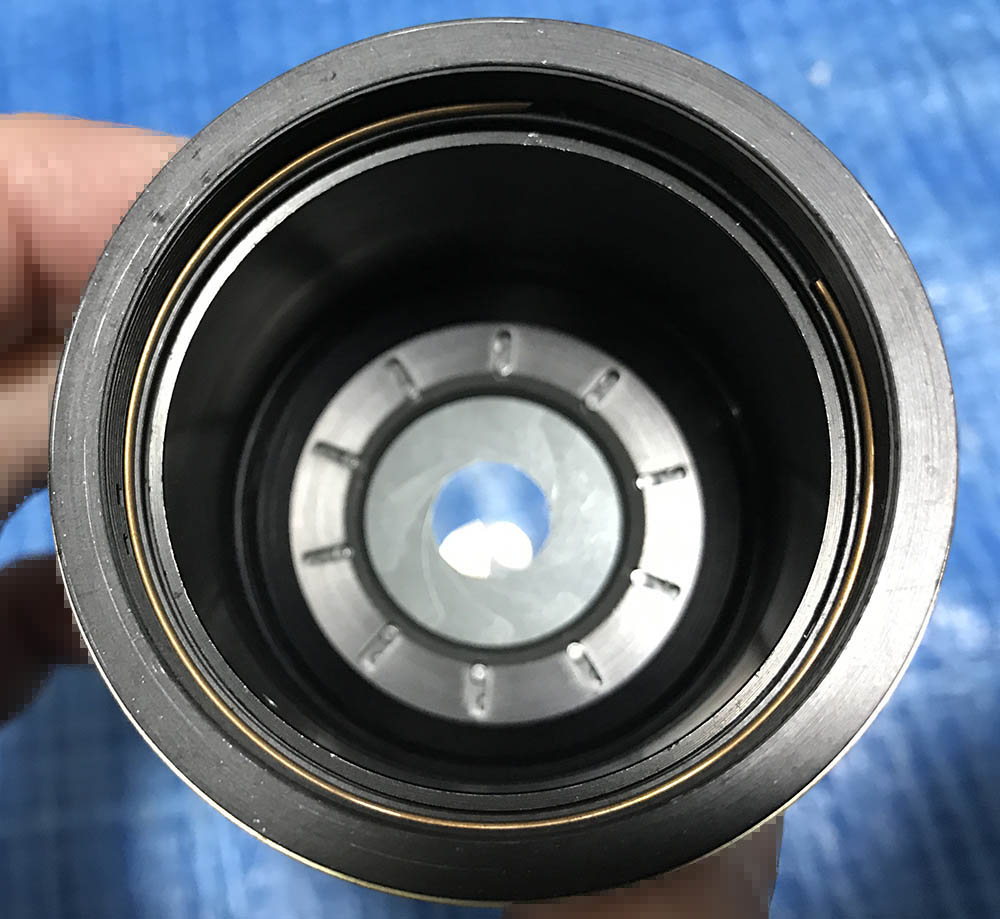
Take notes before you dismantle this. This shows the focusing cam’s inner mechanism, the screw slides within the slot as you turn the focusing ring. The cam on the other side pushes a lever in the camera that operates the rangefinder.

This is how much the barrel should extend before the screw is extracted. I took this so I will know later if I reassembled this correctly.

Separate the helicoids and never forget to mark where these parted. If you forgot to do this you will spend plenty of time guessing where these should mate later since you will have to mate them in the same position as where they separated. If you are new to this, read my guide on how to work with helicoids to prevent any mistakes.

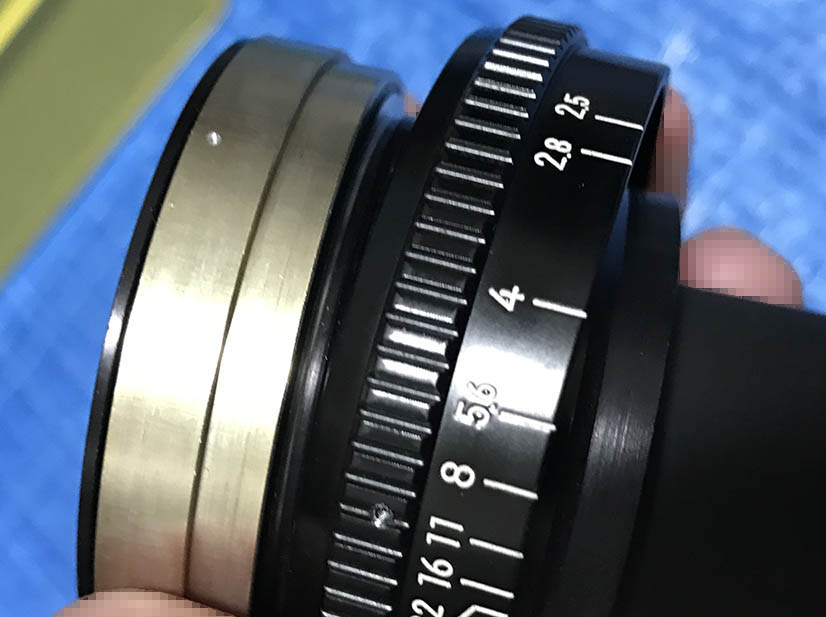
The sleeve can be removed after extracting its screws. I believe it this is overkill, the scale could be engraved into the main barrel. I always find oil underneath this so maybe this was implemented to somehow help with keeping oil from seeping out of the barrel and it is not merely a cosmetic part.

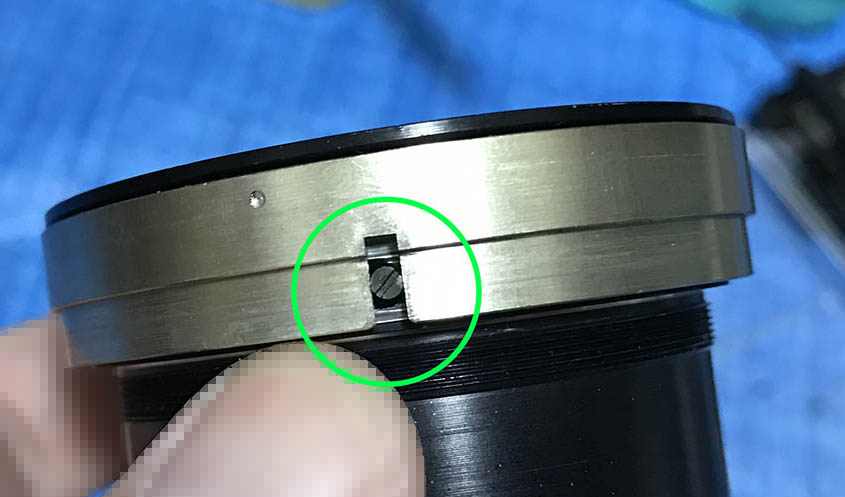
Extract this screw so you could remove the retainer ring. It is there to secure the ring.

This retention ring can be unscrewed with a lens spanner. Remember to rotate it exactly to how it was before so you can put the set screw back properly.

Once the ring is gone you can take out the focusing cam mechanism.

To remove the cam’s collar, extract this and be sure not to lose it. This screw is used to keep the cam in-place, it keeps everything together.
Once the screw is gone, everything comes apart. That spring is responsible for pushing it out so it comes into contact with the rangefinder lever all the time.
You can remove the mount’s collar if you wish but it’s not necessary.
This is how it comes off. There’s is no real benefit from removing this.
If your lens won’t seat correctly with the mount on the camera then you can use your hands or a pair of pliers wrapped in rubber to bend these a bit. This is a delicate operation and I’ll advise you not to do this unless you know what you’re doing, the problem may not be on the lens but on the flanges on the camera’s mount itself.
I doubt that many people will have problems with the main barrel but there will be people who’ll want to take it apart due to grease migration or a dry helicoid. I make it a habit to do this for all of my lenses because I just do not trust what’s there and I do intend to keep these things working forever.
The helicoids have been thoroughly cleaned. I polished them with a stiff wheel-brush on a Dremel then wiped them until the tissue wipes clear of anything. I’m very meticulous when it comes to this step because I do not want the old grease to contaminate the fresh one. Use a lighter-type of grease for this, the internal helicoid on the camera will add resistance and they will all add-up. Do not apply too much grease or you’ll end up with an oily barrel.
The rear cam and its spring were lightly lubricated with the same grease used with the helicoids. It will help prevent it from squeaking and corroding. If you found rust on the spring, clean it off using a fine steel wool or WD-40 and be sure to clean it thoroughly and leave no residue before lubricating it lightly and putting it back to its assembly.
Warning:
Be careful with the Dremel. Only use a soft, organic brush to polish anything related to the helicoid threads. A steady hand is required.
Disassembly (Front Barrel):
The objective is easy for me since I work with this lens family regularly. It’s so simple and the elements are of a comfortable size to handle, handling them is easier. There is nothing I’ll need to warn you about, just follow the fundamentals, take lots of notes and be careful not to put any elements back facing the wrong direction.

The front optics assembly can be removed by unscrewing it. It neatly comes off as an assembly as you could see here. Be careful not to scratch the back as it is exposed and can come in contact with anything inside the casing.

The front element can be removed by unscrewing the front ring. This may fall all-the-way to the ground if you are not careful so do this while this is facing up.

The front element can now be extracted using a lens sucker.
The 2nd group consisting of the 2nd, 3rd and 4th elements (a triplet) it comes off when you unscrew its collar. Both ends are accessible without removing it from its housing so you can clean it just like this unless there is fungus or serious “schneideritis” which rarely happens with this lens.
I’m removing this just in case somebody is curious. These are usually tight so don’t not force it or you will risk damaging the glass.
The rear element can be accessed and cleaned thoroughly by removing its collar. You may have to place a tiny drop of alcohol to soften the seal of the threads.
You could extract it by using a lens sucker. At this point I will place a dot using a Sharpie to identify which side should be facing the front. Its curvature is shallow, it can be tricky to distinguish which side is convex. I have worked on this lens family long enough to know that this is concave on the surface that’s facing the rear.
Clean the glass carefully. If your lens has fungus, read my article on how to clean lens fungus. Don’t use the solution at full-strength, thin it with distilled water. Don’t soak the elements in the solution for too long or it will dissolve the coatings. The cemented group is fragile so handle it with a lot of care.
Disassembly (Iris Mechanism):
The iris assembly on rangefinder lenses aren’t as delicate as the ones found on automatic-iris ones so having a bit of oil in them is tolerable but never acceptable. The oil will evaporate eventually and that will settle on the surface of the elements and ruin the coating. This is a delicate operation and many people get stuck here, it’s a job for an experienced repairer.
Extract this but mark the position of the aperture ring first.
The aperture ring is being held by 3 small set screws. See the dimple on the collar in the picture? That’s where the screws sink into. You have to put this ring back together again the same way as how it was so the mark we made in the previous step will help a lot.
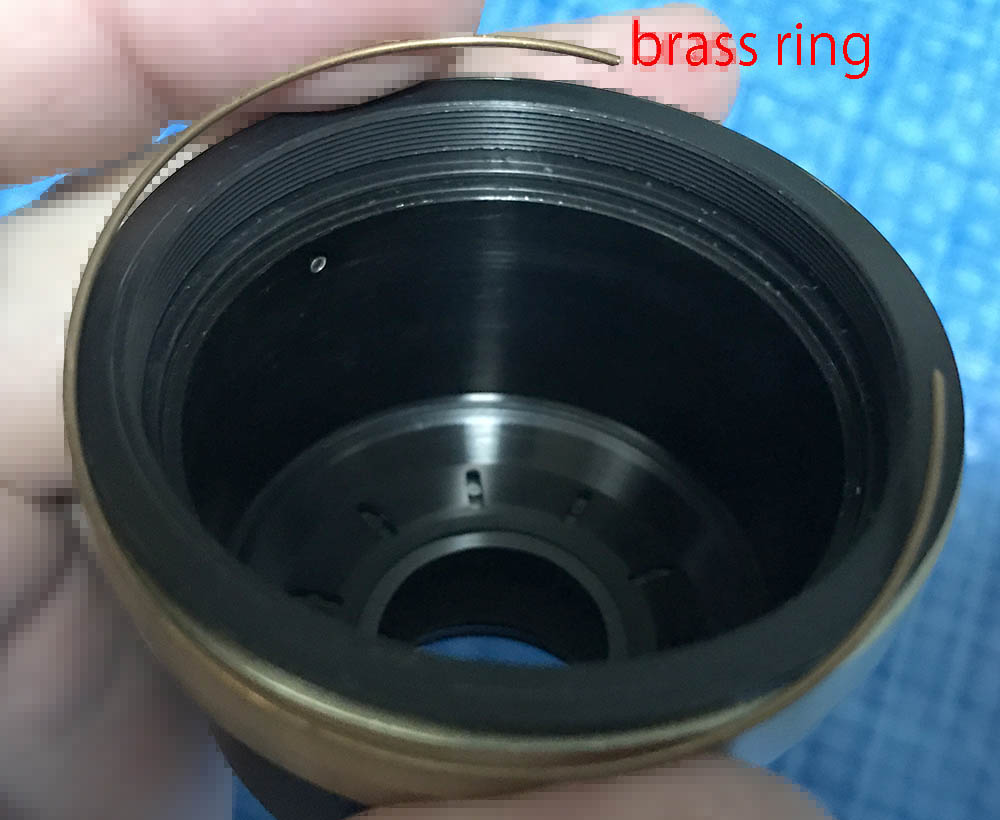
Extract the brass ring to remove the rotator cup that’s securing the iris. You may need a sharp pick and it may take you some time to get it out.
This screw couples the rotator cup to the aperture ring, remove it to extract the cup inside of the housing.
Carefully remove the cup with your fingers.
The collar can be removed by unscrewing it. Note its original height before you remove this.
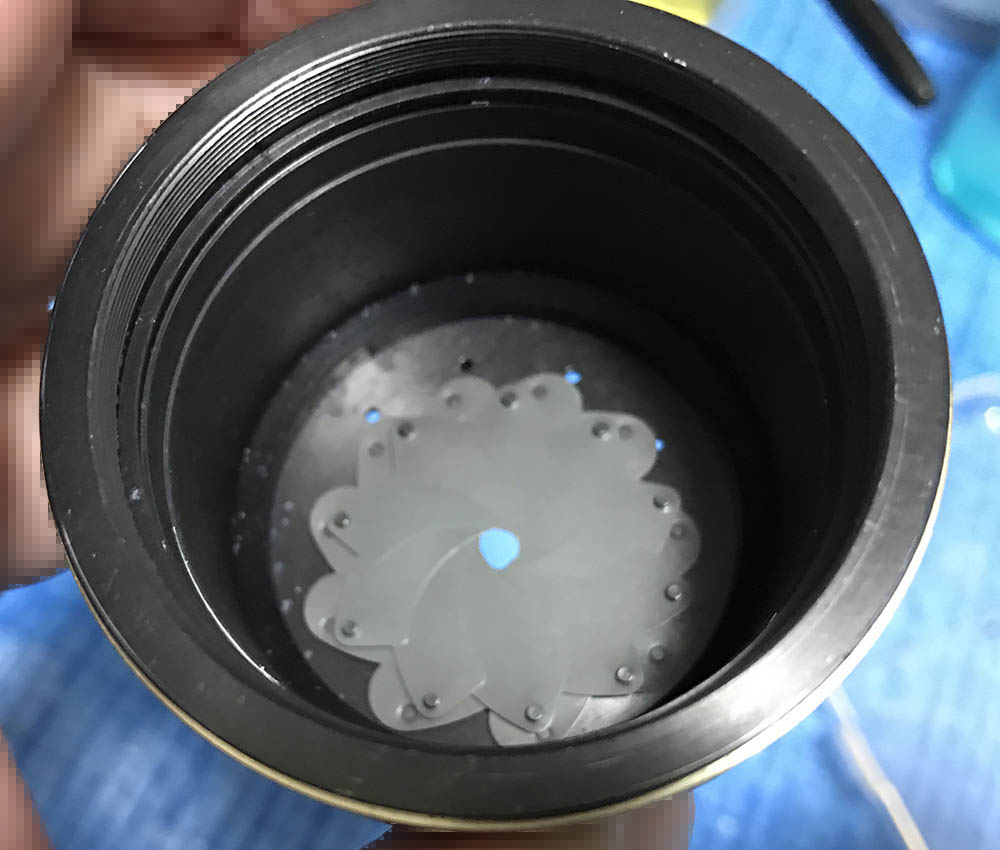
This is how the iris mechanism looks like. It’s hard to put it back, read my article on how to repair preset-type irises so you’ll have an idea on how it’s done.
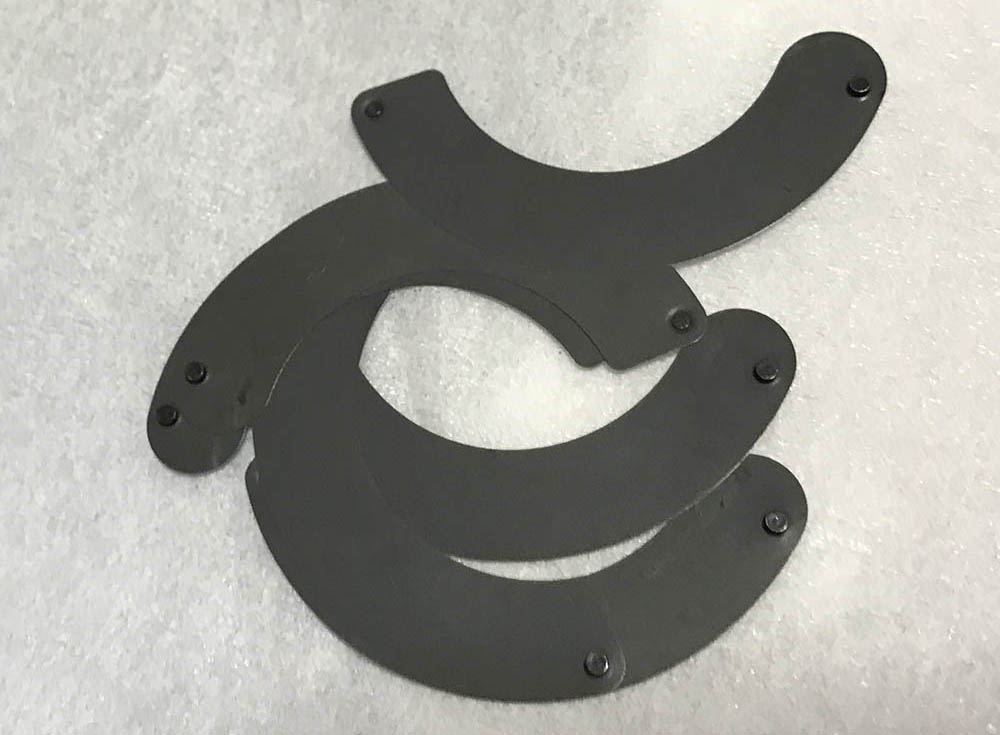
Carefully extract the blades, wipe them clean with lens tissue and naphtha.
This one was easy, the blades aren’t symmetrical. The trick here is to have the pin at the rounder-end insert to the holes on the housing. The rounder-end creates a clearance for it to pivot. Putting them back in the wrong way will result in an iris that won’t work properly. You will know it when you see it.
There are many techniques to do this, mine is to slide a blade under the one on top and then push it into place by using a pair of tweezers. Only handle the pins and never the flat of the blades.
This is how it looks like now.
The only troublesome part is the iris, I doubt many people will even try to attempt taking this apart but if ever you have the need to then this is how to properly do it. Some people will simply saturate it with naphtha and solvents then wipe-off the gunk but that isn’t the proper way to do it, the problem will soon come back.
Conclusion:
As far as lenses for the Nikon rangefinder system goes, this is bog-standard, it has a lot in common with other telephoto lenses in terms of engineering so I wasn’t even worried about this thing when I worked on mine. In fact, this took me less time to overhaul than expected, there aren’t many parts to take care of. I am saying this from the perspective of an experienced repairer. This is not a lens for a beginner to work with, if yours needs attention, bring it to a reputable repairer.
This one comes in metric. I sold it but I wish I didn’t because its rarer. I seldom sell anything, if I did, I usually sell them to people I know. I may buy them back one day.
Thanks for following my work, if you liked this article please share this with your friends so it will get more views. This site earns around $0.30 a day, it’s totally reliant on views. You can also support this site, it helps me offset the cost of maintenance and hosting. You are also helping me purchase, process and scan film. This site promotes the use of film so we’re all in this together. See you again in the next article, Ric.
Help Support this Blog:
Maintaining this blog requires money to operate. If you think that this site has helped you or you want to show your support by helping with the site’s upkeep, you can make a small donation to my paypal.com (richardHaw888@gmail.com). Money is not my prime motivation for this blog and I believe that I have enough to run this but you can help me make this site (and the companion facebook page) grow.
Buy me a roll of film or a burger?
Thank you very much for your continued support!
$2.00
Helping support this site will ensure that this will be kept going as long as I have the time and energy for this. I would appreciate it if you just leave out your name or details like your country’s name or other information so that the donations will totally be anonymous. This is a labor of love and I intend to keep it that way for as long as I can. Ric.

Apr 06, 2021 @ 07:39:17
Dear Sir, I have a copy of early Nikkor-P 105mm 2.5 (version with studs for bayonet hood). The lens requires cleaning to the rear side of the front element. I’ve followed your guide in removing the front group. However, I’m having trouble removing the front ring (chrome) which seems to be stuck to the front group. Using the hood as an anchor grip doesn’t help to remove it either. Would appreciate if you have any tips or information on removing the ring. thank you in advance.
Apr 06, 2021 @ 09:11:50
Replying to myself: To access the front element, unscrew the two studs/screw on the chrome front ring, which releases the name/beauty ring. Thereafter the name ring is easily unscrewed via a rubber stopper.
Jul 13, 2022 @ 21:26:28
Richard,
Thank you for the thorough article on this lens. I have an example I purchased which, when mounted on my S3 2000, has resistance to focusing closer than 6 feet, despite having no issues focusing past 6 feet when off the camera. A few times it started focusing closer than 6 feet while on the camera, but then when I went to remove it, I had to turn the lens far past where one would expect based on the red dots on the lens and camera. What do you think might cause this issue? At first I thought it was related to the S3 2000’s squeaky helicoid but now I’m wondering if the cam for the rangefinder is slipping. Any advice you could provide would be appreciated! I can send pictures of the lens if that helps.
Feb 06, 2023 @ 02:10:34
Joe l,
I have this EXACT same issue with this lens on my S3 2000 as well…
Did you ever get a response regarding this?? I suspect that the focusing cam is not fully seating onto the rangefinder lever on the camera or in the flanges on the inside of the camera body mount. Maybe the cam spring on the lens is worn and not pushing out far enough into the flange? Any ideas?
Dec 29, 2023 @ 21:30:26
Thanks for the information. I have a 105 f2.5 Nikkor-P with a jammed focus ring. I can’t move it from infinity. I ‘m having trouble separating the lens unit from the focusing unit. Any suggestions about how to do this? I’m reluctant to twist too hard on the aperture ring. Great how to articles.