
Hello, everybody! I’m going to show you how to work on a preset iris. It’s a type of iris or diaphragm that was commonly used many older lenses made before the ’70s and I’m not sure wether this went on until the ’80s. A preset iris (my term) is a type of iris design that was commonly used on lenses with no automatic diaphragm feature, you will have to do the opening and closing manually as it’s not automatically actuated. An automatic iris is convenient because it did away with manual intervention and SLRs benefitted the most from this because SLRs allow you to look through the lens or “TTL”. This is beneficial in many ways because the image you see on your viewfinder is bright and not darkened as you close the iris down. A preset-type iris won’t give you that brightness because it won’t open or close automatically so you see through the lens with the iris opened or closed so whatever light is gathered is what you see on the viewfinder of an SLR.
Mechanically, the preset-type irises are more complicated to make. Instead of the simpler cantilever-type blades used on automatic iris lenses, the preset-type iris uses leaves with pegs on either end. They almost always have more blades and so it tales plenty of time to put them together. All this means that things start to become expensive really quick and I can tell you that accountants don’t like this so to make a profit, this had to be simplified.
 Preset-type irises are notorious for being time-consuming and frustrating to assemble! I am not fond of working with these but what can I do? Some of the best older lenses have them. They can be intimidating at first but it’s not as bad as it looks; just have patience.
I know that I made it sound very inconvenient so I’m sure some of you are asking why it was even implemented. Well, there are many advantages in using one when you’re using a system that doesn’t need TTL viewing like rangefinders or the twin-lens reflex cameras (TLR). Not having to view through the lens negates the need for automated irises so this is where the many (mainly artistic) advantages of the preset-type iris come into play.
- A preset-type iris does not actuate as you take a photo. This is beneficial if you want to be discreet when taking candid pictures. An actuating iris along with the flapping mirror’s glimmer will surely be more obvious. The sound of the mirror flipping isn’t also helpful. This is why rangefinders are more discreet for candid photographs.
- Since there are usually more iris leaves in a preset-type iris, the aperture maintains its roundness even if you stop it all the way down. This makes for ugly sunstars but it will give you very nice bokeh balls. There are some preset-type irises that weren’t designed this way and they will either have angular apertures or sometimes, weird star-shaped apertures just like what the Micro-Nikkor 5.5cm f/3.5 lens will give you.
- They are usually tougher since both ends of each leaf have pegs in them but there are instances where this make them more delicate as with the notorious case of the Nikkor-N 5cm f/1.1 lens. On the brighter side, since you manually actuate the iris, a bit of oil on the blades will not alter its performance. Oil on an automatic iris will foul it up and it will retard or seize depending on how bad it is.
- You also do not need to think wether to store your lens for a long time with the iris stopped-down or wide-open because there are no springs used in preset-type irises. The spring’s tension will be affected by metal fatigue when you store a lens with its iris spring’s tensioned. This happened to me with the Auto-Nikkor-P 10.5cm f/2.5. It has 9 iris blades and it needs more tension for it to actuate so I had to replace the old worn spring with a new one from my parts box.


Tp illustrate my point better, here are pictures of what an automatic iris looks like when you fully stop it down compared to a preset iris. Notice that the preset iris’ roundness is still maintained while the automatic iris (left) is hexagonal. Round and polygonal bokeh is a matter of taste so which one is better is up to you. A philosopher once said: “There is not arguing taste.” so I am going to leave it to you. There are creative uses for both.
I need to mention something important before I forget about it! Since this type of iris is mechanically linked to the aperture ring directly it is important not to turn the aperture ring abruptly because some lenses like the notoriously-fragile Nikkor-N 5cm f/1.1 lens is prone to the mangled iris blades syndrome. If you have a lens with a preset-type iris and if it has a reputation for delicate iris blades then treat them with care. Long and thin iris leaves can be very delicate and the case with the Nikkor-N 5cm f/1.1 is extreme because it is pushing the design too much just to get an aperture that is big enough to accommodate such a huge f-number! Having mentioned this, most are tough enough so don’t worry.
 John B. shared this picture of his specialized tool for this application. It is basically just a regular pair of flat-point tweezers that he bent into shape to help him with this annoying task. I will make one for myself, too. Thank you, John for sharing!
If you are familiar with older lenses, you’ll notice that unserviced lenses with preset iris are usually oily (in the iris). This is caused by many things like incorrect storage for years and even decades, the oil getting too old or the use of antiquated lubricants like the once commonly used whale oil. Modern lubricants are less likely to lose their constitution and they stay good for a longer time. Remember to treat your lenses with love and respect so do not bask them in the sun for long periods of time for trivial reasons. Storing them in a car under the hot Summer sun is also not good. On the other side, storing your lens on a very dry environment is also not good since it will dry the oil on the grease.
Here are some videos that I made on the subject. I figured that making a video is going to be better to illustrate the steps. Please bear with me because it can be difficult to record a video in an awkward position. I would also like to say sorry because I had to make three separate recordings because I had to attempt doing this for more some time. I suspect the iris was damaged somehow because the leaves just don’t stay flat. I overhauled another one from the same lens model and I don’t recall having such a hard time.
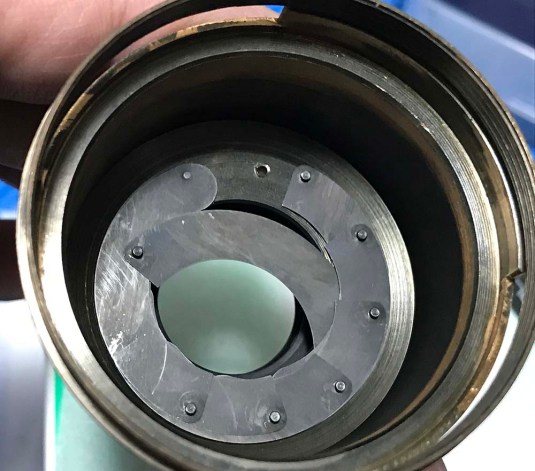
Here is the first part, you will have to put the leaves in their respective position until you are left with the ones where their corresponding holes are covered by the leaves.
This is where things get tricky. You will need to use both of your hands in this step. I had 2 pairs of tweezers to help me manipulate the leaves so I can get things into position. It’s impossible for me to use both hands while recording in this position so I had to pause it.
Here is how it finally looks. The oil is gone and this should last for many more decades to come! Old doesn’t always mean bad and with a proper overhaul this 70-year old lens will function properly for many more decades to come!
As of writing, I have written repair articles for these lenses with preset-type irises:
- PC-Nikkor 35mm f/3.5
- W-Nikkor 3.5cm f/3.5
- Nikkor-H.C 5cm f/2 RF
- Micro-Nikkor 5.5cm f/3.5
- RF-Nikkor-P.C 8.5cm f/2
- RF-Nikkor-P.C 10.5cm f/2.5
Check them out to see the differences in their design and how they were implemented.
I hope that you learned something from this article. If you enjoyed this article, please do share it with your friends. Thank you and see you again in the next article. Ric.
Help Support this Blog:
Maintaining this blog requires money to operate. If you think that this site has helped you or you want to show your support by helping with the upkeep of this site, you can simple make a small donation to my paypal.com account (richardHaw888@gmail.com). Money is not my prime motivation for this blog and I believe that I have enough to run this but you can help me make this site (and the companion facebook page) grow.
Helping support this site will ensure that this will be kept going as long as I have the time and energy for this. I would appreciate it if you just leave out your name or details like your country and other information so that the donations will totally be anonymous it is at all possible. This is a labor of love and I intend to keep it that way for as long as I can. Ric.

Sep 06, 2017 @ 16:41:46
I will never take one of these lenses apart, or even see one in person. But I enjoy reading your articles for the engineering and historical value, to see how these things were done. Keep up the great work!
Sep 12, 2019 @ 18:02:27
Would you be interested in reassembling a Motic BA300 microscope field iris which fell apart on me with at least one bent leaf and a missing leaf brass pin? I would be willing to pay you for this service. I can send you photos of what the job would entail, if you send me an email address. Thanks, Mike
Oct 23, 2022 @ 17:29:06
Hi Richard I just wanted to thank you A LOT because you make me save my Nikkor F3.5 RF. the aperture baldes got an issue and my dia was no more round. I passed 3 f.. hous to put it right again and thx to your tip explained in the second video I finished by succeeding but what a nightmare !!! I must in fact thank you to avoid me tearing my last hairs off ;). Thx again and I will give you a “paypal coffee” to make you keeping do this fantastic work !!! thx again and have a nice Sunday.
Dec 31, 2022 @ 07:50:33
I wonder how they did it in the factory… For sure it must have been a streamlined process. I just spent a couple of hours with my first attempt of iris blades reassembly (10 blades) and one blade always slips out of position when trying to put back the guide cover. One particular issue is that the blades need to be “stepped down” for the pins to line up with the slits. It’s a very poorly machined lens but I’m after the experience and exercise so I’ll keep trying. And I’m quite good with handling small parts (dentist by trade).