
Hello, everybody! I just watched Rocky (1976) and that movie never gets old. Young ones these days probably have never heard of it, it’s all about an up-start boxer who proved to be more-than-a-match to the champ. He went the extra-mile and won with hardwork and dedication so he eventually succeeded and turned his life around. I’m going to show you this lens that helped made an “underdog” into one of history’s biggest optics company. It also has a very humble start just like the hero in Rocky and ended up being a legendary lens that’s still relevant after it debuted around 69 years ago.
Introduction:
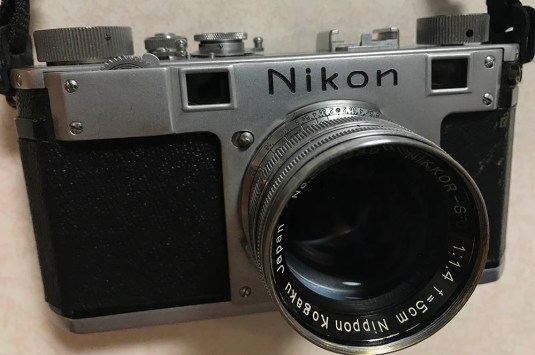
The Nikkor-S.C 5cm f/1.4 is Nikon’s most popular rangefinder-era lens. This used to be the fastest lens for 35mm photography at one point and Nikon’s marketing capitalized on the hype while it lasted. The lens was made for about 12 years which is considered long since the Nikon rangefinder camera era only lasted for about 15 years. It was based on another famous (but rare) lens – the Nikkor-S 5cm f/1.5. It was replaced by another legendary (and rare) lens in 1964 with the same name but it’s a totally different lens – the Nikkor-S 50mm f/1.4 “Olympic version”. That lens is very sharp and is still a great performer even when it is judged by modern standards but it’s a totally-different lens from the ground-up since it was based on a different optical formula of either a “Double-Gauss” or “Planar-type”.
 The Nikkor-S.C 5cm f/1.4 is a compact lens but it feels dense in your hands. Lenses are not made like this anymore these days and you will wonder why you’re paying so much for a plastic electronic lens when you can have something like this for much less. It’s a manual lens that cannot be focused by itself so you’ll need to mount in on a camera that supports it like the Nikon I/M/S, Nikon S2, Nikon S3 or the Nikon SP. The Contax rangefinders can be used with these as well but you will have to compensate a bit because the turning rate is a little different from Nikon’s S-mount despite the fact that it was copied from Zeiss Ikon’s Contax mount.
The Nikkor-S.C 5cm f/1.4 and the Nikkor-S.C 5cm f/1.5 that came before it were both based on Zeiss’ popular Sonnar design which is known to give smooth bokeh and decent center performance wide-open. It retains much of the original Sonnar’s characteristics in terms of rendering but it also inherited the Sonnar’s curse which is focus-shifting. This happens when you stop the lens down and the focus shifts slightly. This can cause you to think it’s your focusing skills that needs improving when it’s really the lens that’s playing tricks on you. Stopping the lens down negates this effect to some degree and you will hardly notice it in real-world use so don’t worry about it.
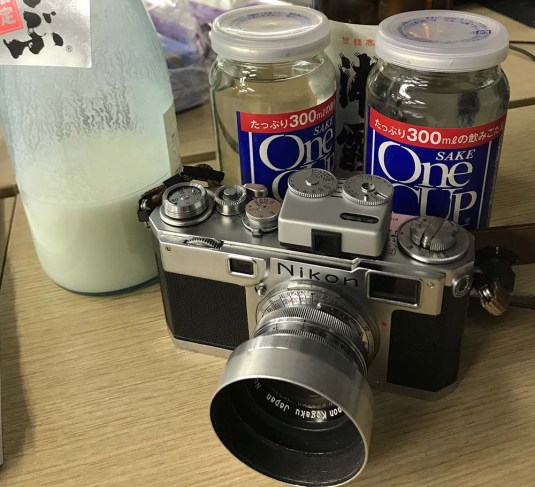 It’s a pudgy-looking lens when mounted on a Nikon rangefinder camera. It’s a little heavy due to the big chunks of glass used with the Sonnar designs. It can be a bit front-heavy in your hands but it’s no where near as heavy as the Nikkor-P.C 8.5cm f/2. Using a shade will help you keep stray light from hitting the front element at an angle and produce flare or ghosts and any optical arefacts that you don’t want. This is the original hood but you can use ones with holes at the hood so you can still see-through the hood from the finder. The lens is a good partner to the Nikon S2 because it has a bright 50mm viewfinder which is a big help when trying to focus with a lens that has very shallow DOF like this one.
 The Nikon I/M/S series of cameras are the heaviest that Nikon ever made so this lens is a great partner for them, too. The mass of these cameras and the weight of this lens makes this a very stable setup so you can shoot using a slower shutter speed than what you are comfortable with. I can easily shoot with 1/8s when using this setup and not get shaky or blurry pictures (at least not a lot). The later versions were made with lighter materials in an attempt to make the lens barrel lighter but the glass is still huge so the difference may not be that significant.
Nikon also made LTM versions of this lens and they’re probably 3-4x more expensive. Its price is proportionate to its demand amongst collectors and users because it’s such a nice lens for general use so some Leica photographers use these instead and they spend what they saved for something else, maybe on another LTM Nikkor.
The following set was shot from f/1.4, f/2 and f/2.8 respectively. This should give you some idea on how this lens performs. Just like all lenses, you should know how this performs in order to maximize its use. This will help you avoid its weaknesses and you’ll know its strengths so you can use it to your creative advantage. Having said that, this is known to be a lens that was calculated to give better performance at closer distances compared to the German original that it was based on that was made by Zeiss. Observe my samples to see what I mean with that statement.


(Click to enlarge)
Wide-open, the lens is pretty good when taking pictures of subjects that are closer to you. It has some spherical aberration and softness even at the center of the frame but that’s a small issue specially if you consider the age of the lens. You can see some vignetting at its corners but it’s not too distracting at all. Stop the lens down to f/2 and everything is going to improve drastically. The center is now sharp, the softness and optical aberrations are also now mostly gone by f/2. Vignetting is also mostly gone by now but it will never really go away unless you stop the lens down to about f/5.6 or so. The contrast also starts to pick up along with a huge improvement in resolution. Stopping it down to f/2.8 really brings it all to a different level. Image quality is now excellent for a lens that was designed during the war. The resolution also looks pretty good here (for an old lens) and you can now see fine details getting resolved beautifully. The quality of the bokeh is both smooth and also look “out-dated” at the same time. The transition is smooth but the quality of the orbs are not even up to 1960s vintage Nikkors standards. It’s certainly not the best but it’s not bad that you won’t want to use it either. This is a Sonnar-derivative afterall and Sonnars were famous for their smooth bokeh even before that word got a bad connotation.


(Click to enlarge)
Here’s a closer look at the bokeh. Wide-open, you will see that it forms an outline and it’s kind of ugly but it’s smooth otherwise. This is common to many older lenses that are fast so don’t worry too much. It goes away by f/2 and the bokeh balls now look more uniform, I will say that this is the best aperture to use when you want this kind of effect. You’ll see that the quality of the bokeh is still smooth even by f/2.8 because of the circular aperture, this helps a lot because an angular iris will produce ugly and “clumpy” details when you have something at the background that will allow the lens to do just that like foliage. The circular iris of many older lenses remain circular because it has more leaves so this isn’t much of a problem even if you stop your lens to about f/8 or so.


(Click to enlarge)
The first set with the scooter shows a subject that’s about 3m or so away from me. These pictures show that performance degrades as your subject gets further away from you. It’s really obvious wide-open but improves a lot as you stop the lens down. I was focusing at about 10m away from me in the 2nd set and you can clearly see how terrible it is now. It does improve as you stop the lens down to f/2 but it’s barely useable wide-open. Shooting from f/2.8 is what you should consider when shooting this lens past the 5-6m mark. These pictures show the typical Sonnar trait where a lens exhibits different characteristics if it’s stopped-down 2-3 stops from it’s widest aperture, unfortunately for us the Sonnar lenses also has a tendency to shift its focus as you stop the lens down at these apertures. This is one of the biggest issues of the early Sonnars but I doubt that it’s the cause for this since I shot these with a digital mirrorless camera. You can actually see the effects of the shift as you stop the lens down in real-time because you are viewing through-the-lens. Go and do it yourself using any early Sonnar-type lenses and you will see what I am talking about. It is most obvious with subjects that are closer to you because the DOF is shallower.


(Click to enlarge)
Shooting subjects at very close distances isn’t a problem at all, it’s actually excellent and I cannot see any of the ugly spherical aberration in these pictures. Just click on the picture (1st one) of the cucumber if you don’t believe me and see it for yourself. Surpisingly, this lens’ bokeh has a tendency to look harsh when using it at its minimum focusing distance or anywhere near it. Is this a hint that the lens was over-corrected for close-up photos? It certainly feels that way but we’ll never really know. Having this in-mind you will want to be careful with what you put near your subjects when taking close-ups of them. If you’re going to take photos of subjects that are more than 4m away then you may want to think about using the excellent Nikkor-H.C 5cm f/2 instead.


(Click to enlarge)
Now for subjects that are about 70m away from you. The effects of spherical aberration’s going to be really obvious here, it’s only going to improve once you stop the lens down by quite a bit but the gain is not going to be exponential. Stopping it down to f/8 will help the picture look more “contrasty” but you do not want to be stopping it down any further as diffraction will start to kick-in at about f/11.
 Using this lens like this is the way to go. Its performance is good for its day when you use it to take pictures of subjects that are closer to you. This was shot wide-open and at about its minimum focusing distance. Notice how nice the details look despite the softness of its center due to spherical aberration. This actually helps give the picture a pleasant look or what many people call the “vintage lens” look. I love how beautiful the rendering is and how soft and smooth the bokeh looks. The bokeh can show a bit of “nervousness” at times but it’s generally good as expected from a Sonnar-type lens. You can see a bit of spherical aberration and a tiny hint of chromatic aberration in the form of magenta hues where it is really bright (at the highlights) but it’s nothing to be worried about.
 Here’s another picture that was shot with the same parameters as the one before. I shoot pictures of twigs and foliage to show how a lens’ bokeh performs because these are great for revealing any flaws in the bokeh quality. You can see some “double-line bokeh” in the twigs so we get a smeared look but it’s not too severe for my taste. I would like you to pay attention at the flower that’s in-focus and appreciate how nice that part of the frame is.
 Here’s another picture showing how nice the lens is when shot at closer distances. Notice that the picture doesn’t exhibit a lot of spherical aberration (if any) and the bokeh quality is exquisite. There’s also no chromatic aberration around the bright highlights of the pipe and the overall character of this picture is quite pleasant.
 This picture was taken with the lens stopped-down to about f/8 or so and you get a clean-looking picture at this aperture but its devoid of any of special characteristics. People are going to shoot at this aperture most of the time so it’s good to see that this lens performs great at smaller apertures.
 This picture should help illustrate how nice the bokeh balls look. The orbs can sometimes show an outline but many lenses from this era do. This is now considered to be generally unpleasant but I don’t really mind to be honest. I judge a lens by the standards of the era they were made.


(Click to enlarge)
This lens is not very forgiving when it comes to focusing errors because if you are off by just a bit you will end up with a blurry photo when shooting wide-open for subjects that are a bit further into the frame. Even if you got it correctly you will still notice that lots of spherical aberration is present even at the focus plane. I will do an experiment and see if I can fix this by adjusting the elements’ spacing. I suspect that many of these lenses have been repaired and were not put back properly by whoever repaired them (including me) so we get this as a result. I will update this article if I am successful.


(Click to enlarge)
Spherical aberration will be the defining characteristic of this lens when shooting with it wide-open. It’s either you’re fine with it or you hate it. Some people call this “Leica glow” because many of Leica’s earlier lenses have this look because they were purposely-made to exhibit this. You can say that this lens was also made with that in mind so you can get that “Leica glow” without having to pay the ridiculous “Leica tax“. People will say that it’s different to justify “the mythology” but no, it’s just the same thing (for less money).


(Click to enlarge)
The lens can be pretty pleasant to use even wide-open if you just find the right conditions so you won’t get the ugly blurriness that you saw in some of the samples before. I suspect that this lens really isn’t a true f/1.4 and it’s “real” aperture is really closer to f/1.6 because everything looks really good as you stop the lens down between f/1.4 and f/1.8. Nikon was trying to make the fastest 50mm at that time and they succeeded with this but this really is stretching the lens’ design by a bit. Sure, it’s OK when using it wide-open and I can say that it’s even excellent if your subjects are really close but it’s really not a true f/1.4 as far I am concerned.


(Click to enlarge)
Shooting wide-open on subjects that are a bit further into the frame isn’t the best way to use this lens as you can see in the pictures above. Spherical aberration will present itself and your subjects won’t be sharp. Stopping it down by a little bit helps a lot even if it’s by 1/3 of a stop. If you need to shoot something like this, stop your lens down to about f/2 so you will see less spherical aberration in your pictures.


(Click to enlarge)
Here’s the good news, you can use the effects of spherical aberration to your advantage. I like to use it to make the skin “glow” a bit when taking people pictures, see how nice and soft the skin of these “sohei” (warrior-monks) cosplayers are? Click on the pictures and it is obvious that the lens did capture the details of the face but the glow also removes a bit of contrast from it, it works like a double-edged sword this way. This glow can be useful if you want to re-create old photographs or give your pictures a “unique” feel.
Now that we have seen how it performs on digital, it’s time to see how it performs using film. Film is more forgiving in many ways so some optical flaws are less apparent when you use a lens to take pictures with film so let’s see what what’s different. These pictures were taken using Cinestill 800T film so bright light sources on my pictures will exhibit an “unnatural” glow called halation. It’s a fine-grained film and it’s reasonably fast.
 I think that this was shot at f/2.8, the DOF is too deep for this to be shot at anything that is faster than that. It’s sharp and the details of the rope can clearly be seen in my monitor.


(Click to enlarge)
It’s interesting to note that the effects of spherical aberration isn’t as obvious with my pictures that were shot with Cinestill 800T even if these were shot at about f/1.4 or so. I’ll say that these are some decent pictures from an old lens that was calculated during 1949 or so. It looks like this is still a viable option today for film shooters depending on which film is chosen and which f-stops one wishes to shoot it with (under what conditions, too).


(Click to enlarge)
Please pardon my missed-focus, it can be difficult to nail your focus wide-open with this lens. The 50mm focal length is great for taking candid pictures like this and I love it more than the 35mm focal length at times because I can get to frame my photo the way my eye sees it (my shooting eye, that is).
I hope that my pictures helped in giving you an idea of how this lens performs. If you are looking for a nice 50/1.4 for your Nikon rangefinder camera then this is the only one that is easily (and affordably) available to you. Leica thread mount shooters will appreciate it as a good alternative to expensive Leica glass in this category. Though the LTM version of this lens costs about 3-4 times of the native Nikon S-mount version it’s still cheaper than a Summilux. The higher price of the LTM version is caused by its rarity and demand among the Leica community because many newcomers tend to buy these because they’re cheap compared to Leica’s and all you need is a LTM-to-M adapter and you’re good. So, what do you think? Do you think you should own one of these? If you shoot with a Nikon then it’s not even a question! Every Nikon rangefinder user should own and use one of these. For Leica shooters, your budget will decide what you buy. An older Summarit is probably the cheapest option for you but that still costs 2-3 times more than this lens in LTM version. I am not sure which one is better but judging from the pictures that I see online I think the 2 lenses perform just about the same in most cases. There are also other options from the other Japanese brands and they’re even cheaper than this Nikkor in LTM version.
Before We Begin:
If this is the first attempt at opening a lens then I suggest that you read my previous posts regarding screws & drivers, grease and other things. Please also read what I wrote about the tools that you will need in order to fix your Nikkors.
I highly suggest that you read these primers before you begin (for beginners):
- Essential tools
- Best practices 1
- Best practices 2
- Best practices 3
- Ai conversion
- Working with Helicoids
Reading these primers should lessen the chance of ruining your lens if you are a novice. Before opening up any lens, always look for other people who have done so in Youtube or the internet. Information is scarce, vague and scattered (that is why I started this) but you can still find some information if you search carefully.
I highly recommend that you also read my working with helicoids post because this is very important and getting it wrong can ruin your day. If I can force you to read this, I would. It is that important!
For more advanced topics, you can read my fungus removal post as a start. This post has a lot of useful information here and there and it will be beneficial for you to read this.
Disassembly (Housing):
The construction is simple and is similar to the Nikkor-H.C 5cm f/2 in almost every way. It usually takes me less than 2 hours to completely overhaul one because it doesn’t have its own set of helicoids. The most time-consuming part of the repair is always the part when you need to re-assembly the iris. This is an easy lens to fix if you have the correct tools. It can be tricky because the lens is really compact and so you don’t have much space to use for positioning your tools so a slip can be dangerous. Read the whole article to see what I am talking about.
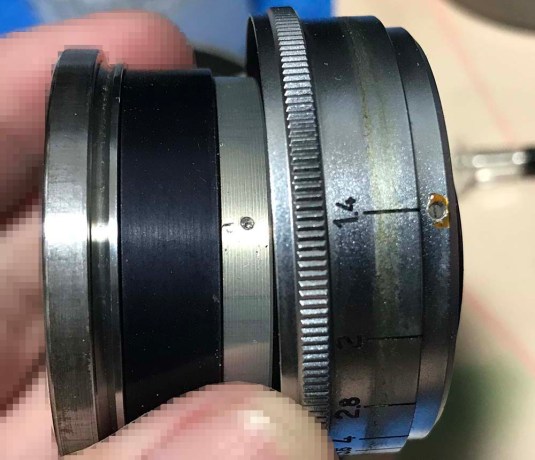
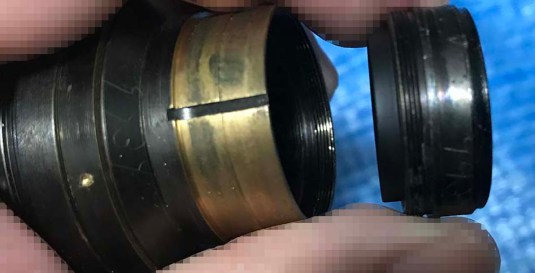
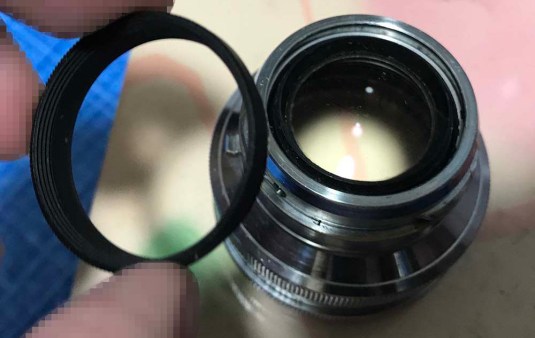 Unscrew this collar from the rear of the lens. Make sure that the lens is resting on a table like I have here in this picture. The insides of the lens is being secured by this thing alone and removing it will separate the lens into 2 pieces.
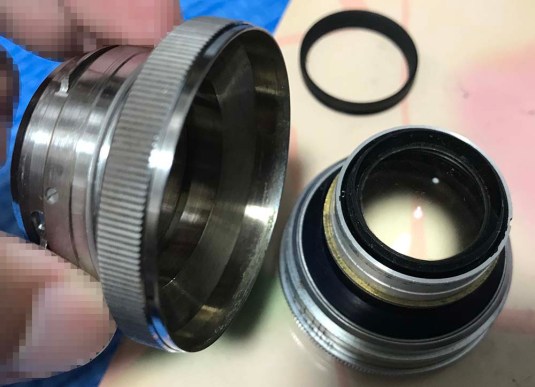 The housing of the lens can be removed now that the collar is gone.
 Remove this shim and keep it safe. It’s used to calibrate the lens’ focus. These were made at the factory and filed-to-fit if needed.
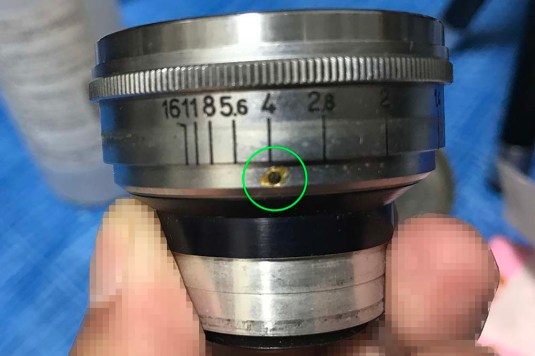 To remove the aperture ring, locate these set screws and remove them. These are usually sealed with lacquer at the factory so place a drop of alcohol to soften it first before trying to remove it. If you managed to strip its head then it’s going to be tough to remove it.
 Do note which side should be facing where. This screw sinks into this dimple so I made a very small scratch to indicate that it should be positioned here.
That’s it for the housing. The lens elements are big and chunky so they make up most of this lens’ mass. They’re so heavy that they can be easily dropped if you’re not careful. It’s a good idea to work on top of a clean towel so at least something can cushion its fall if the lens element managed to slip from your hands. Clean all of the surfaces very well, never oil anything here.
Disassembly (Objective):
The optical unit of this lens is simple to dismantle if you have the right tools and skill. It’s easy for experienced repairers like me but it can be unusual for somebody who isn’t used to repairing rangefinder camera gear. Be careful when using solvents on lenses that have the Sonnar design like this one because the solvents can potentially damage the bond on the lens groups. The cement can be damaged by vapors as the solvent evaporates and it’s bad news if solvent seeps-in between the seams. Never oil anything here apart from the spring for the aperture clicks and a very small amount around the collar of the aperture ring’s inner surface. I only applied a very thin film and that’s enough. Only clean what’s needed and don’t open anything that’s clean. Not only is that a waste of time but it can be a source of accidents if you’re not careful. The rule is never to fix anything that’s working OK. An oily iris is never OK eventhough it’s working properly, it has to be overhauled so you can properly clean it. The oil can evaporate and leave a nasty haze that eats-into the glass or coating. Remember, optical glass is usually softer than the ones for windows and kitchenware. Some can even be scratched easily if you rub a dirty T-shirt against it!
 The rear elements assembly can be removed using a special tool called a pipe key. This is a specialized tool and can be hard to make without a lathe but you can fashion a tool that does the same thing and is just as safe to use if you’re careful. Read my article on how to make a pipe key alternative to know more about it.
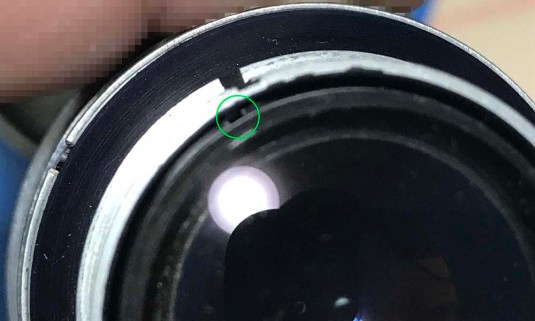
 Carefully position the prongs on the slots of the rear elements assembly’s housing. Use it to loosen the housing and then unscrew it off using a lens sucker. This tool is only used to loosen or tighten things and should never be used to turn things.
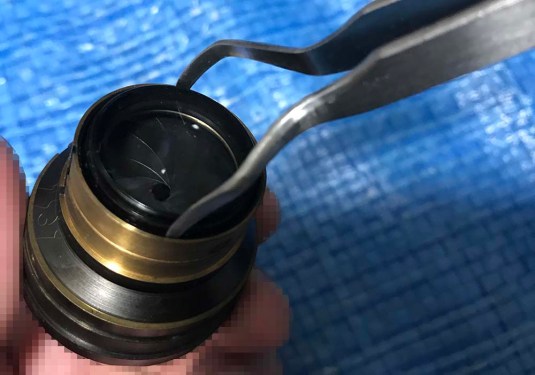
 The rear elements assembly can be removed as a unit.
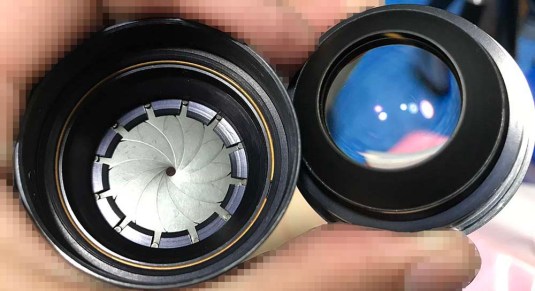 The front elements assembly can be unscrewed just like this. Use a rubber glove to help you grip it if you think it’s too hard for you to accomplish it with your bare-hands. If you need to clean the 1st and 2nd elements’ surfaces you can unscrew the housing of the 2nd and 3rd elements. Put a drop of alcohol into the threads and wait for it to soften the glue before you remove it.
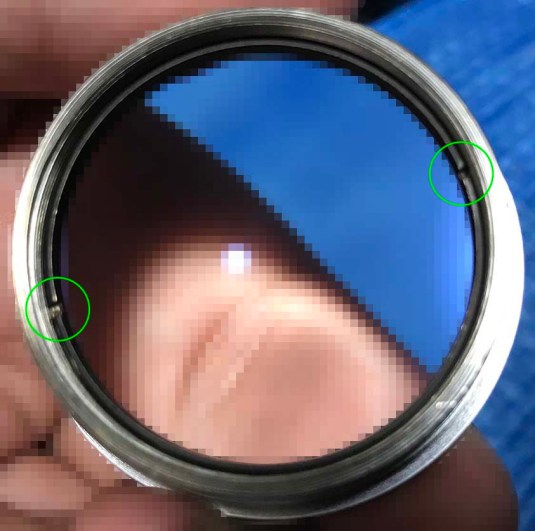 The front element can be removed by unscrewing this retainer ring. Be careful with your tools so you won’t slip and scratch the lens.
The objective is a dense, compact unit and it’s heavy. I wasn’t able to take pictures for the iris mechanism’s dismantling but if you need to see how then read my old article for the Nikkor-H.C 5cm f/2, the iris assembly is nearly-identical to this one’s so you can also use it as a guide for this. If you need to know more about re-assembling the iris mechanisms of preset-type then please read my article for that.
Conclusion:
Overhauling this lens is a great way to unwind after a long day at work not only because it has a simple construction but it has more to do with how beautifully it was made. You can’t find anything made like this anymore these days! Each time I rebuild a rangefinder camera equipment, I feel as if I was taken back in time like in the movie “Somewhere in Time“. The simplicity of days-past reminds us of how much we have these days and yet we still yearn for more. Maybe we should slow-down a bit and ask ourselves if we need the latest gear in order to be happy.
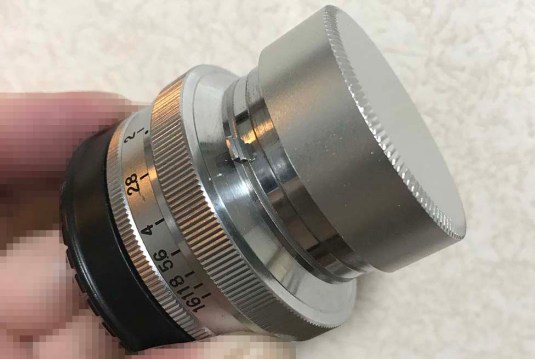 I bought these beautifully-milled rear caps for all of my internal-mount S-mount lenses. I also use them for my Contax rangefinder lenses, too. They’re not cheap but you can’t find anything cheaper than this at the moment so $13.00 is probably a small price to pay.
 Time to enjoy some sushi! I love this lens a lot and I enjoy using it with my Nikon S2. This lens is now very clean and it will continue to be used for more decades to come.
That’s it for this short article. I hope that you enjoyed this one, I will write a longer one in the days to come but we will have to make-do with shorter ones like this article for now. I don’t see lot’s of articles online tackling this lens in-detail despite being a popular lens for decades for many Nikon photographers so I hope that this one will add to what the other writers made so the general public will have more information about this lens. As usual, if you love this article then please share this with your friends at social media and please tell everybody about the best review and repair blog online (this blog!). I am a man on a mission and I intend to write as much as I can – while I still can! Thanks for the support, I really appreciate that people are beginning to discover this blog and know more about it. See you again in the next article, Ric.
Help Support this Blog:
Maintaining this blog requires money to operate. If you think that this site has helped you or you want to show your support by helping with the upkeep of this site, you can simple make a small donation to my paypal.com account (richardHaw888@gmail.com). Money is not my prime motivation for this blog and I believe that I have enough to run this but you can help me make this site (and the companion facebook page) grow.
Leave me some tip?
Thank you very much for your continued support!
$2.00
Helping support this site will ensure that this will be kept going as long as I have the time and energy for this. I would appreciate it if you just leave out your name or details like your country and other information so that the donations will totally be anonymous it is at all possible. This is a labor of love and I intend to keep it that way for as long as I can. Ric.

Nov 04, 2018 @ 01:42:28
My 5cm 1.4 H-C Nikkor has focusing issues. It is acting like a close up lens, and won’t focus to infinity. It is the lens itself, and not the mount. Possibly that focusing shim? But disassembly looks different from your example, it doesn’t have that removable black ring on the back. Not sure how to resolve issue.
Nov 04, 2018 @ 03:38:35
Frank,
I don’t recall any Nikkor-H that’s 1.4, it’s probably an f/2. yours is exhibiting the problem associated with a poorly-set helicoid. it has to be taken apart again and the helicoid set back to its correct mating point. Ric.
Mar 11, 2019 @ 10:05:35
Hi Richard, I just picked up a very nice Nikkor S.C. 5cm f/1.4 LTM that appears to have a fungus issue on the front optic group. Would the disassembly of the LTM version be similar to your instructions shown here? I’m only interested in removing the front optics to deal with the fungus issue? Thanks for your advice. Steve
Sep 27, 2020 @ 21:52:10
Hi, if i got it correct the front with the filter rings unscrews with a rubber glove?
The front on mine got loose after i used a heilopan filter for some bw shooting, of course the filter had wrong threading so it got stuck. So if I tightening the front by hand it should be fine? Have some plans to get my S2 with 50mm clad but have not found anyone in Europe that cla old Nikon, in Norway I’m quite certain we don’t have any. Thanks for a great website! Regards Vidar H
Dec 19, 2022 @ 20:35:41
Thank you so much for compiling all of this information. I’ve just bought a Nippon Kogaku 5cm F2 in “fair” condition but with some internal fungus on the presumption that I’ll be able to clean it without destroying the lens. I’m guessing the disassembly for the F2 lens is not that different from the F1.4 lens, so it’s very reassuring to read your guide.
Dec 29, 2024 @ 05:45:51
Hello, thank you for a nice article.
I took this lens apart to clean fungus from the posterior element, now I can not put the aperture ring back on over the spring that is held there by 2 screws. Any suggestions? Thank you for your help. Bob
Jan 08, 2026 @ 20:39:50
Hello Richard!
I saw your blog post however this part is. Ot clear to me… I am trying to repair theb blades on this 5cm 1.4 nikkor-sc
How can I remove the retaining ring of the blades? The one with the grooves for the pins? Is there a recommendation to put the blades back? One of them is slightly bent 😩