
Hello, everybody! It is Nikon’s 100th anniversary today! The company was founded with the merger of several smaller companies and it was called Nippon Kogaku which means Japan Optical literally. There are milestones throughout Nikon’s 100 years of continuous operation and I will tackle some of them here in my blog. You may have already seen my Nikon Museum series which I began a few months ago along with the related articles and this is just a part of that. I hope that you will enjoy this series, Nikon lover or not.
Introduction:
Today, I am going to show you a historically significant lens as far as the Japanese optics industry is concerned and that’s no other than the old but venerable Nikkor-P.C 8.5cm f/2! The Nikkor-P.C 8.5cm f/2 was perfected and sold during the post-war reconstruction years following WW2. It was heavily inspired by the Zeiss designs since Nikon was new to this game and needed somewhere to start from. I would consider this lens to belong to the 1st generation wherein the lenses have very strong resemblances to the Zeiss “inspirations”. By the 2nd generation, Nikon had learned enough and their lenses begin to look different in terms of design and engineering. Everybody has to start somewhere, right?
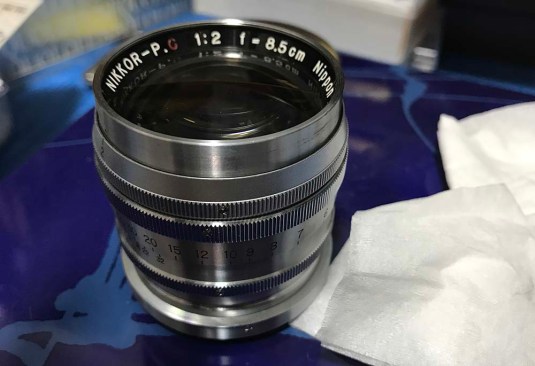 This is a compact but dense lens. The Nikkor-P.C 8.5cm f/2 is a joy to hold in your hands. It was made of chrome-over-brass with big pieces of glass, hence the weight. This amazing lens is legendary and you can even say that it was partly responsible for introducing the Japanese camera and optics industry to the world. Nikon is known here (in Japan) as one of the companies that helped revive the Japanese post-war export industry and this lens helped it achieve that. If you want to know the remarkable story of this lens then please read this web comics made by Nikon. This lens is so significant to Nikon’s history that the lens has its own comics!
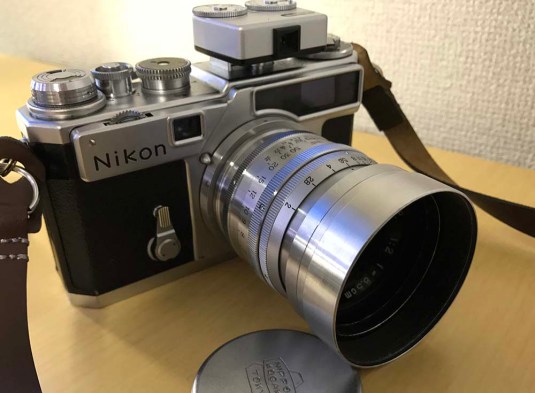 This is the lens with the hood on. The cap is rare and is sold with the early models of this lens. It came as a set and that cap alone can cost $60 just by itself. The early models don’t have a filter thread for you to attach a hood so it had to be secured by friction alone. The light meter is a Voigtländer VC2 meter. It’s the best meter for classic rangefinders and it’s still being sold new. It is very accurate and compact. It’s money well-spent if you ask me.
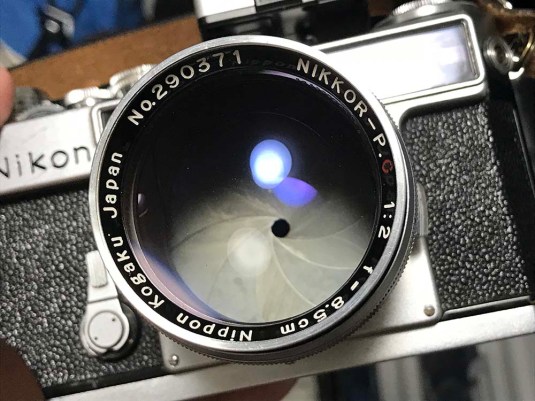
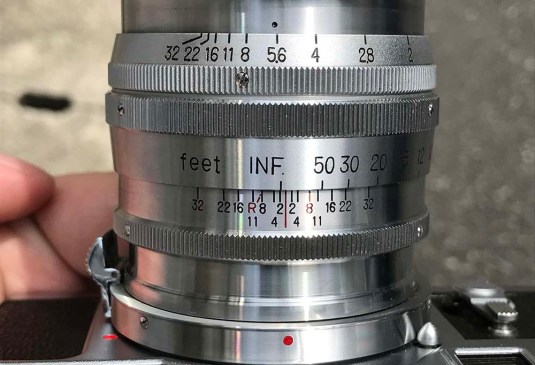 One very annoying thing about this lens is that the focusing ring turns when you rotate the aperture ring. You should hold the focusing ring firm before you rotate the aperture ring so that your focus won’t change. This is not exclusive to this lens as a matter of fact, many lenses from this era and earlier were made like this. If you are wondering why the engraved characters and numbers look so good despite the lens’ age, I will tell you that I repainted them with enamel paint. Read my article on how I repaint these things on my old blog post on this link. This is important because the chrome finish can make the feint lettering harder to read. The fact that they were thin and tiny doesn’t help at all.
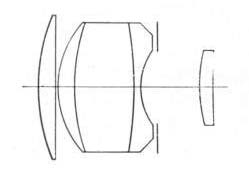
The optical design is simple and it is just another variant of the Zeiss Sonnar. There are 5 elements in 3 groups as you can see from the illustration above. If you think that this is a familiar design then you may be correct because this design is also the basis for the very popular Nikkor-P.C 10.5cm f/2.5 lens. Both render similarly and this is the reason why.
 Here it is beside my lunch of raw fish and rice. It balances very well on the Nikon SP and the 8.5cm frame lines of the Nikon SP is very useful for framing. There are 2 variants for this lens. One is the chrome-over-brass finish that you see here and another is the rarer black anodized aluminium alloy version. There are several minor variations in between these 2 major variants such as the early ones having a click-less aperture ring and some versions having a different minimum aperture and so on.
I generally do not shoot tests but I wanted to show you how organic-looking the images from this lens look. Do note that all images were shot hand-held and framing or focus is not exact so please take these into account and please cut me some slack. Knowing how a lens performs is key to using a lens effectively. You need to know its strengths and how to work around its weaknesses. If you don’t study how your lens renders then it’s you won’t make the most out of your gear. Please see my samples and read my commentaries for a good and fair (?) assessment of this lens’ performance.


(click to enlarge)
The series of sample pictures above show how the lens performs as it was stopped-down from f/2, f/2.8, f/4 and f/5.6 (from left to right). The lens is already pretty sharp wide-open and it improves significantly when stopped down to f/2.8. By f/4, what’s not in focus still looks smooth but the subjects’ contrast improved a bit. Finally, the lens looks like it is at it’s peak when shot at f/5.6 but you loose the smoothness of the background. What’s good is that the background still retains its organic look and doesn’t look hard at all. The good thing about the 10-bladed curved iris of this lens is that your aperture will still be round even if you stop it down. Most rangefinder lenses are like this and this is one advantage of the rangefinder system over the mostly-polygonal irises found on almost all automatic iris lenses found on SLR’s and modern mirrorless systems.


(Click to enlarge)
The bokeh balls remain round even by f/4 because of the rounded iris. You will see a little bit of angular corners but that’s about it, you won’t really notice it unless you look for it. The character of the balls is typical of Sonnar-type lenses from this era. You’ll also notice that the balls near the corners tend to look elongated, giving you that weird soap-bubble look to your pictures which some people really hate or love. Whatever it is, this lens will give your pictures a very unique look.


(Click to enlarge)
These were shot at the minimum focusing distance of about 3ft. It’s hard to maintain my focus at this distance while changing the aperture size of this lens so please ignore a little bit of shift in framing and focus. The pictures look great when shot at closer distances so you can use this lens for detail shots. I’m impressed because I cannot find any chromatic aberration (at least not a lot) even wide-open. You do get some spherical aberration but it is acceptable and well-controlled, this is as good as it gets for a lens this old. Do note that everything looks sharp by f/4 while you still retain the smoothness of the bokeh.
 This is how sharp it is wide-open when shooting a flat object. The area between the white and green parts look clean and devoid of any weird aberrations.


(Click to enlarge)
I really love the character of this lens, the mild spherical aberration helps in adding a bit of mood to your pictures and helps in making this lens a great portait lens. You can see a bit of that in the picture of the couple in red because I missed my focus a bit and you can see the effects of spherical aberration on some of the brighter parts of the scene near the focus plane. It’s a really sharp lens if you can nail your focus which is very hard because my subjects are all moving.


(Click to enlarge)
Here are some pictures of still subjects. Notice how sharp the lettering is at the lanterns. I love the contrast because it’s adequate and is not over-corrected to the point that it looks un-natural like what most Tessar-type lenses tend to do.
 This should give you a good idea of just how good this lens handles chromatic aberration, just look at the highlights at the chrome parts of the scene and you won’t notice any pink, purple or greenish tint at the highlights. You’ll notice some spherical aberration evident in the highlights, giving you this glow around those parts. This picture looks very natural, almost painterly-like in some ways (Vermeer?).
 I’m not a cat person (I don’t like them) but I do appreciate a good cat picture if I saw one. The picture shows just how delicate the lens is when shot wide-open. It’s sharp where it’s in focus and the transition to what’s not in focus is very smooth. The image also has good separation, giving you that classic “Zeiss-pop” as what some people call it these days. It is just a fancy way of saying that the image looks three-dimensional instead of flat. Also see how rich the colours are when there aren’t any strong light sources within the frame. Old coatings just don’t compare to the new ones that were introduced just a decade after.


(click to enlarge)
Check out the pictures above. All of them were shot wide-open at f/2 I think. This should give you a good impression of how this lens performs wide-open where it counts. Look at the lovely “bokeh” and see how sharp the subjects are despite the ancient coatings used. I had a hood when I shot these and that helped a lot! However, when the sun is situated at the periphery of the frame just outside of what’s in view you might get a big blob on your frame. I counter this by shading the lens with my palm. I also shot a variety of backdrops ranging from geometric shapes like architecture to organic ones like foliage. Foliage is a very tool for showing how good a lens’ bokeh is because they are sort of reflective and is multi-faceted as individual leaves act like little waxy mirrors. As you can see from all the images above, it doesn’t seem to exhibit the dreaded “二線ボケー” or “double-bokeh”. This is highly desirable for a lens like this. On the down-side, it did seem that this lens is prone to produce some smudging of the bokeh. It is not terrible at all and you may not even see that on everyday scenarios so don’t worry, just enjoy the many strengths of this lens!
Let’s now see some pictures taken using film. I took these with Fujifilm Industrial 100 and I had the lab scan them using Fuji Frontier. It’s important to see how this lens works with film because this lens was calculated for it. This will help us have a better idea on what’s in the mind of its designers when they calculated this lens. Film has a different look that is near-impossible to replicate using digital sensors and that’s why we’re interested in the pictures that this lens takes using film. This is as close as it gets.
 I think this was shot wide-open or around f/2.8 at most. Notice how sharp the lens is and how nice it renders the details. The bokeh quality is smooth and you get this “3D-look” in the picture becayse the subject isolation qualities of this lens is good. Also notice how the monk’s skin is rendered in a vaery natural way, not too harsh but it’s not soft at all.
 These re-enactors are portraying “soheis” or warrior-monks (僧兵). I took this at f/2.8 so it has a deeper DOF. Notice how nice the skin of the man is and how soft it looks despite his eyes and other features looking sharp and in-focus. This is one of this lens’ special traits that makes it such a great portrait lens. The bokeh looks a bit “lumpy” on the parts where the foliage is but that’s to be expected. Despite that, the bokeh still looks smooth despite it being shot at f/2.8 and the transition from what’s in-focus to what’s not looks smooth.


(Click to enlarge)
These were shot wide-open, I love how the lens rendered the skin of the “nun” and how it makes her stand-out from the rest of the picture. If I have a little bit of rim-light shooting at the short side of her face then this would have made the picture much better but we’re not so lucky this afternoon since it was a bit cloudy. I missed my focus by a bit on the one on the right but it still looks OK. The ugly background was blurred a bit more because the subjects were closer to me when I took these. Subject-to-background positioning will help make the background look blurry and you should know how to position and frame your shots to achieve this. Unfortunately, this is a parade and I don’t have any choice at all but to just accept what was thrown in front of me.


(Click to enlarge)
These are good examples to show how this lens works for environmental portraits, while these aren’t strictly environmental portraits they’ll probably do just so I can illustrate my point. Environmental portraits are people pictures showing depicting your subject in his or her day-to-day setting like taking a picture of a boxer in his gym. Using a long lens on your subjects will help make them look taller in the resulting picture due to the effects of compression. The 85mm focal length is great at this without making your subjects look a bit weird that’s why any people consider this to be the perfect focal length for portraits. It is also great for making people’s faces look a bit longer and a lot less like puppy pictures. Using a lens that’s shorter than 50mm on somebody’s face and filling half of the frame or more with their faces will make their noses bulge due to the effects of foreshortening. It’s one of the reasons why 85mm is great for this because it sits between these focal lengths.
 The subject-isolation qualities of this lens make it ideal for story-telling in the sense that I can separate my subjects from their background and help highlight them. Notice that the bald head of the monk (he’s a real monk) and the drum that he’s beating has objects that have similar tones to them at the background but you can easily separate them because of the thin DOF, I bet that this would make a great picture when printed. It looks so good and the over-all feel of this picture is very natural for the lack of a better adjective.


(Click to enlarge)
I love shooting with this lens wide-open, there’s something about it that makes compels me to shoot it at f/2. The pictures have that “Sonnar-look” to them and its rendering and other abstract qualities gives the photos this unique but natural look to them. This is why I love using older optics these days because they aren’t overly-corrected for the charts, a problem that many lenses face today because of reviews and pixel-peepers. How a lens renders a scene is much more important that its technical qualities in my opinion.


(Click to enlarge)
These pictures were shot from f/5.6 to f/8, sharpness is pretty good at these apertures and you won’t see any vignetting at all. If having bright and clean corners matter to you then stop your lens down to at least f/4 to achieve it. Sharpness at the corners look decent, this lens isn’t so bad at the corners but it won’t best modern prime lenses in this category.


(Click to enlarge)
Here are some more pictures that I took today with this lens. Most were shot wide-open while some were taken at f/2.8. The only picture that I took using f/5.6 is the one with the old man sporting a blue head scarf. The lack of chromatic aberration impressed me and I can also notice that the spherical aberration was kept at a reasonable amount. Enough to make the skin glow and the bokeh smooth but not too much as to make bright highlights bloom. This is a very good lens if you ask me specially considering how old it is.
The pictures above shows how this lens perform in real-world scenarios. I know that the contrast looks great but I promise you that I didn’t adjust its saturation or anything else. I rarely do that when I edit photos and I make it a point not to do it when posting pictures for reviews. The lens is considered by many to be the best in its class during its time and I hope that my pictures help illustrate this point.
That’s it for the introduction! I hope I succeeded in showing you what this lens is capable of. This is a very special lens in both historical and artistic senses so collectors will want one or else their collection means nothing. For people who love using older lenses this is a great lens for shooting just about anything. You can adapt these lenses to your cameras and take nice pictures with it like what I did for this article. The handling is awkward but that’s a small price to pay for the privilege of using a legendary lens. If you’re still using a Nikon rangefinder camera just like me then you don’t have much choice since this is the only practical option for you. The later variants of this lens costs much more but they all have the same optics and the fast f/1.5 version of this lens is rare and very expensive. The Leica thread-mount is also nice and will be a great lens for Leica shooters, it’s a very nice alternative to the expensive Leica-brand lenses. Having said all that, you’ll never regret a bit once you have shot with this lens unless you’re the type to compare it with a modern lens which isn’t really fair. This is a very old lens that is still relevant today and should be treated as such when you review or use it. Treat it with respect because not many lenses have such a rich history and the bragging right to claim as one of the factors that saved a country’s economy after a devastating war.
Before We Begin:
If this is the first attempt at opening a lens then I suggest that you read my previous posts regarding screws & drivers, grease and other things. Please also read what I wrote about the tools that you will need in order to fix your Nikkors.
I highly suggest that you read these primers before you begin (for beginners):
- Essential tools
- Best practices 1
- Best practices 2
- Best practices 3
- Ai conversion
- Working with Helicoids
Reading these primers should lessen the chance of ruining your lens if you are a novice. Before opening up any lens, always look for other people who have done so in Youtube or the internet. Information is scarce, vague and scattered (that is why I started this) but you can still find some information if you search carefully.
I highly recommend that you also read my working with helicoids post because this is very important and getting it wrong can ruin your day. If I can force you to read this, I would. It is that important!
For more advanced topics, you can read my fungus removal post as a start. This post has a lot of useful information here and there and it will be beneficial for you to read this.
Disassembly (Focusing Unit):
If you’ve been following my blog for some time then you’ll know that I prefer to remove the objective from the focusing unit first if possible. This will prevent any accidents from happening to the objective and its glass. The “safety first” advice applies to everything.
You will need to have several slotted screwdrivers available because the screws come in many different sizes and you should use the correct driver that will fit the slot precisely. If the driver is too big, you will want to file it to fit. The screws here are very prominent. I always try to be very careful with them because ruining the heads of the screws is going to affect your lens cosmetically in a very big way. Yes, aesthetics are important for lenses like this where the screws are part of the design. Think of it like the chrome trims in cars.
You will also need a proper lens spanner for this. If you do not have one then do not even think about doing this! Buy the best one you can afford because quality matters here.
 The objective can be screwed off from the focusing unit. This is very typical of the earlier Nikkor telephoto designs for rangefinders. If yours is stuck then don’t force it and drop a small amount of naphtha or pure isopropyl alcohol into the seams to help dissolve what’s in there. Make sure that you do not put too much or it will get into the iris assembly.
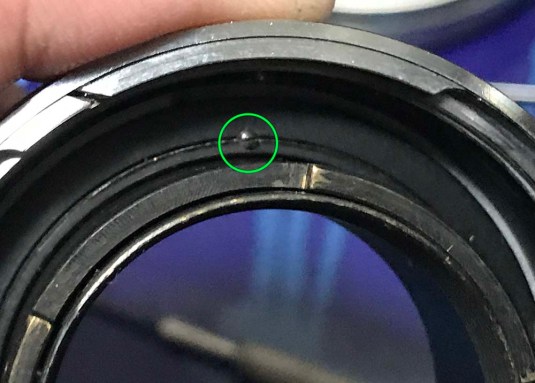
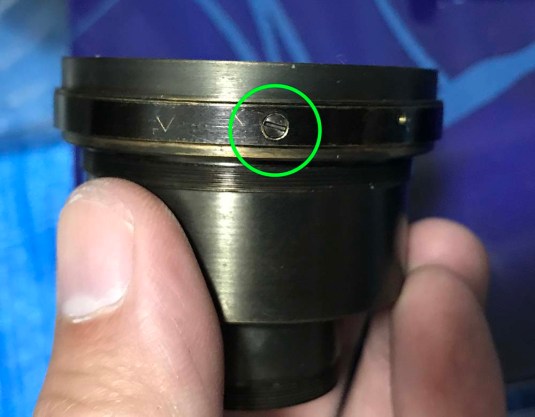
 The screw near the top edge of this picture is responsible for keeping the focusing ring or the helicoids of this lens from going beyond its focusing range. You can remove it now or you may opt to do that later before you separate the helicoids. It’s your call.
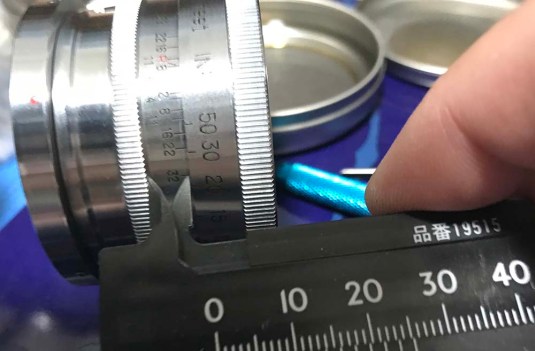 While the focusing unit is set to infinity, I got a caliper and measure the clearance just so I will know if I got things right later on. Pardon the cheap plastic caliper, the digital one is safely stored somewhere. It is expensive so I take good care of it.
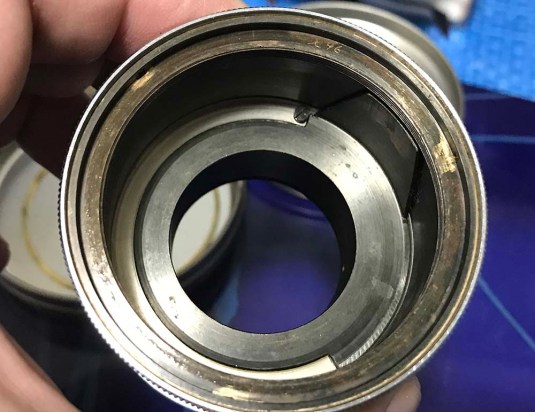
 Take as many pictures and notes before you begin removing anything. Here is the rear of the focusing unit with the rangefinder coupling cam/collar. This is how it should look like when you put it back together. Better take notes now than regret not having them later!
 Let’s begin taking apart this things. Begin by removing the retainer ring that secures the rangefinder coupling mechanism. The retainer ring is being secured by 2 set screws and here is one of them. Use the proper screwdriver that will fit the slot or you’ll ruin it!
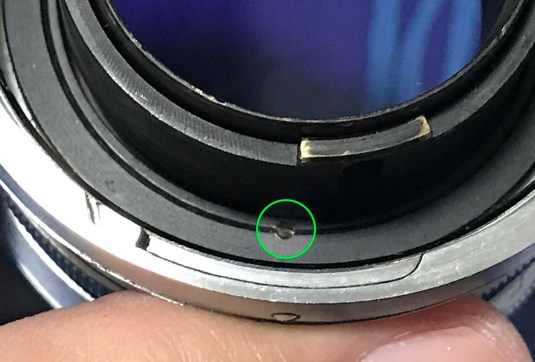 Here is the other one. Notice that the screws look different. I am not sure if it came out of the factory like that or it has been modified by a repairman but whatever the case is, you should take note of small details like this to prevent you from making any mistakes later.
 The retainer ring can now be safely removed with the help of a lens spanner. I am going to caution you about this part. It was precisely secured into place so that the rangefinder coupling mechanism won’t wobble if it’s too loose or squeak when it was too tight. Count how many times you have to turn it to get it off, that is one good way to remember how it was put together before you remove it. Take note of the 2 small screw holes and how the 2 of them aren’t identical at all so remember to put the right screw back to the right hole!
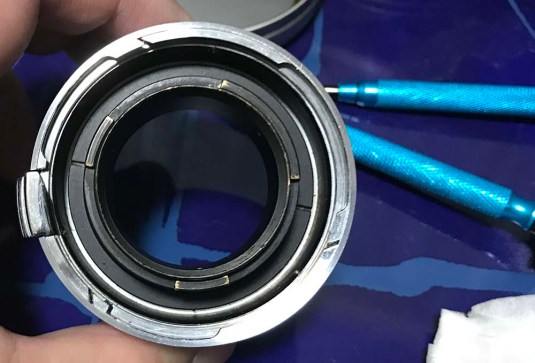
 The whole mechanism can now be removed. Do not worry about its orientation, this part is free-turning and the most important thing is to put the screw you see here into its slot found on the inner surface of the focusing unit and that this thing sits flat on it’s ring.
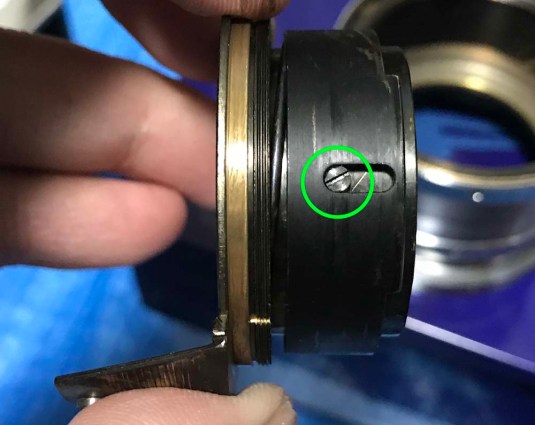 The cam/collar can be removed by unscrewing this off.
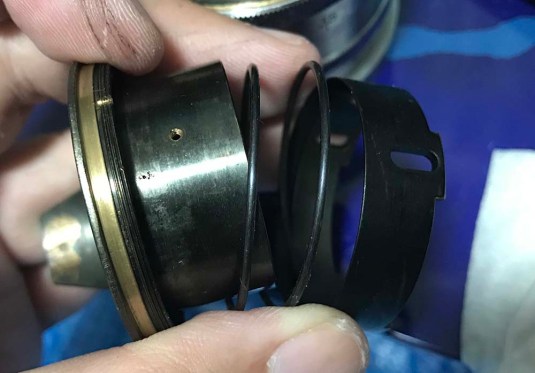 Here it is stripped down to its basic components. The spring ensures that collar is always in contact with the rangefinder in the camera. Take special care to note how this spring was seated on the screw that we removed a step ago. If you got it wrong then you will get frustrated and open this thing again just to guess how it was originally.
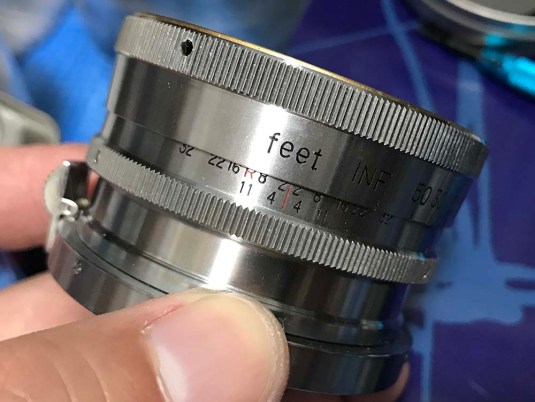 Time to separate the helicoids! I turned the focusing ring until I got to this point wherein I am not able to collapse it further and then I took note where the red infinity mark is. In this picture, the mark ended up on the 2nd “e” of the word “feet”. If I couple the helicoids again later, I should be able to get to this mark again when I turn the focusing ring all the way in. Taking small notes like this will save you from hours of frustration later.
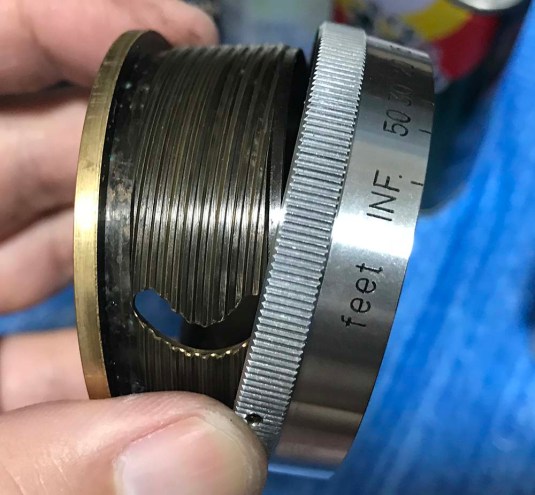
 The most important note to take is where the helicoids separated because this is also the same spot where you should put them back together. Mine separated here with the mark for infinity landing in between the 15ft and 20ft mark. If you’re new to lens repair, please read my article on working with helicoids so you won’t get stuck.
 Removing the 3 screws securing the focusing ring will allow you to remove it from the its helicoid. You can opt to remove this earlier but I decided to leave this thing intact until I was done taking all of my notes because the characters on the focusing ring are great for taking notes. Never forget to mark the orientation of the focusing ring before you take it off because it has to be on the right orientation when you secure it back later. If you did not do this then all of the numbers will all be on the wrong places and your notes will all be for nothing. This is how many people get stuck and send their lenses to the repairman in the hopes that he’ll fix it but without any notes then he’ll also be clueless!
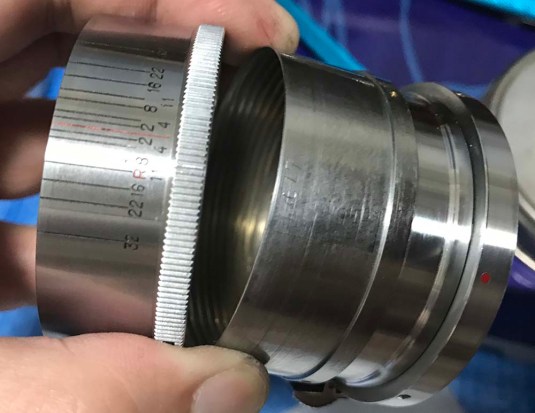 This decorative sleeve with the scale can be removed after unscrewing the 3 screws that are securing it. You’ll usually find plenty of oil underneath this so clean that mess up!
That’s it for the focusing unit. I cleaned off all of the old grease with plenty of naphtha or naphtha. Make sure that there are no traces of the old lubricant there and scrub it with an old toothbrush. I even soaked my parts in denatured alcohol just in case and gave it a good rubbing with Scotch-Brite. This will ensure that the old lubricant won’t contaminate the fresh grease. I use a lite grease for the helicoids because the helicoid on the camera is coupled to this and turning both helicoids on the camera and the lens at the same time is going to give you just the right damping sensation. I hope you get what I meant!
The rangefinder coupling mechanism was also lubricated using the same grease that was used on the helicoids. Every part that has metal-to-metal contact was lightly lubricated. I would like to emphasis that the part where this mechanism connects to the main barrel has to be lubricated properly because if you left it dry, then the focusing will not feel just as good as it used to be. This is issue amplified when you mount the lens to the camera.
Disassembly (Objective):
The objective is pretty basic when you compare it to the W-Nikkors which have elaborate designs just to keep the lens small. Many of the parts can be unscrewed with your hands alone none of the parts were glued as far as I can recall. The only thing that I will have to warn you about is to be careful with the glass. They are heavy and they can roll off from the edge of your table or you can drop one directly to the floor! Again, safety first!
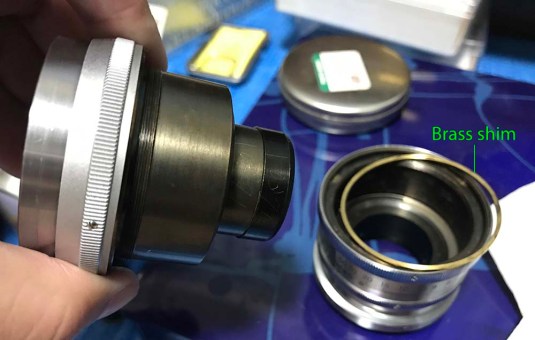
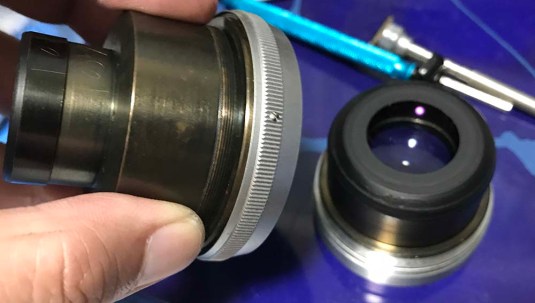 The front elements assembly can easily be screwed off from the objective with your bare hands. There may be a thin brass shim around the collar so be careful not to damage it.
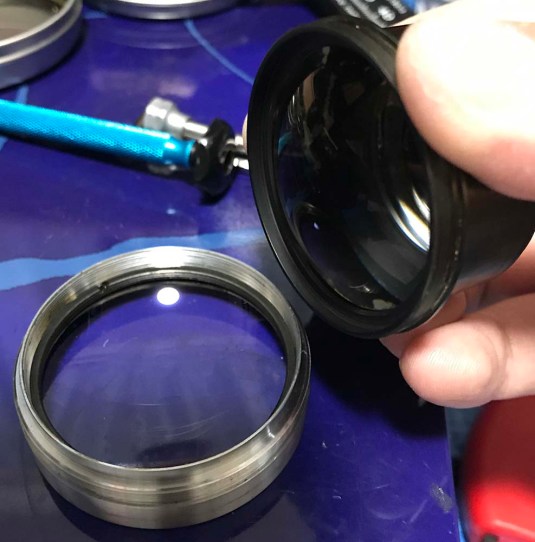 The front ring can be unscrewed from the front elements assembly’s housing. Be careful not to scratch anything at this point as everything is exposed. You can remove the front element by unscrewing the retainer ring that secures it. You can actually see that ring in the picture above. Use a proper lens spanner and be careful not to scratch your glass! It’s going to be a tight fit so apply constant pressure or soften it up with some alcohol.
The 2nd group consists of the 2nd, 3rd and 4th elements and are cemented together into a single group called a triplet. This is very typical of the Sonnar design.
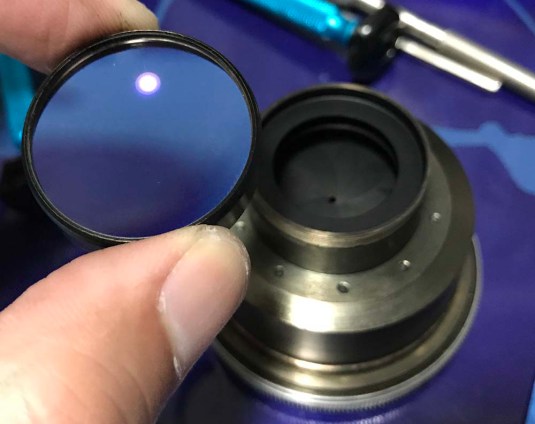 The casing for the rear element can be unscrewed just like this.
Store the glass somewhere safe while you work with the rest of the lens. Place them on a soft surface like a clean towel to prevent them from being scratched. Sure, the coating on Nikon’s lenses are tougher than what the Germans used but that doesn’t mean that it’s OK for you to just leave them on any surface! Do not wipe the triplet with solvents or expose it to high head or the cement will deteriorate and this will become an expensive repair.
Disassembly (Iris Assembly):
The iris assembly is probably the most intricate thing on this lens but it is still simple. I’m used to this kind of work so it was peanuts for me.
 The aperture ring can be removed after you got rid of the 3 screws holding it. I made it a point to mark where the original position of the screw hole is in relation to the casing. If you for got to do this then you will end up guessing this thing’s orientation.
 Next, unscrew this big screw off so you can remove the collar. Notice that there are some marks on the collar. These are preexisting ones made by somebody else. This means that this lens has been serviced at least once in its almost 70 years of existence.
 The collar can now be removed once the screw is gone. Again, make a small mark so that you will know how to put this back together later. Some people use a marker for this but I would rather be safe so I scratch it gently. I will sand this later to make it less obvious.
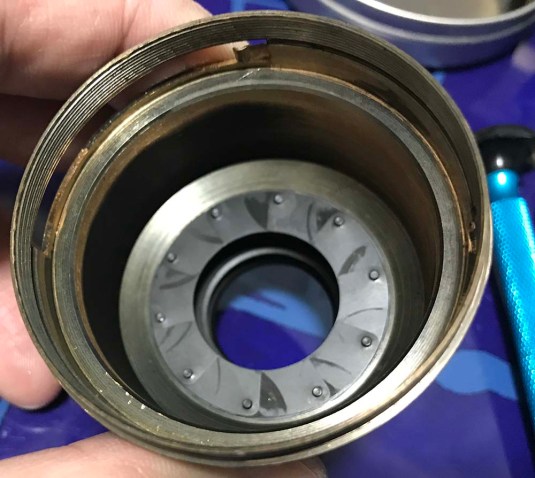
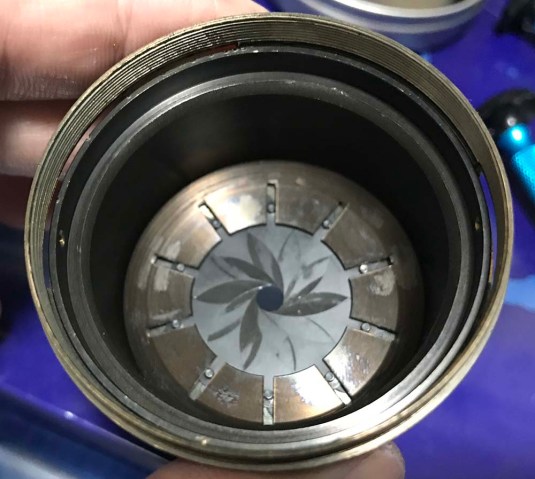 Here is the iris! It is acceptable for rangefinder lenses to have a little bit of oil in their iris but having this much is not good. The ideal scenario would be a bone-dry iris but that is not always avoidable given the age of these things. Oil on the iris will evaporate and end up sticking to the inner surface of the lens elements and this’ll result in a hazy element.
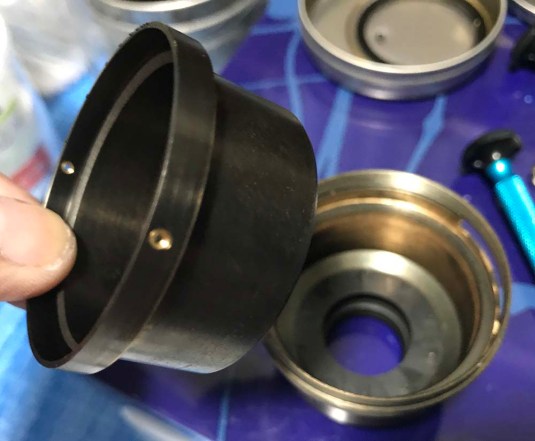 This cup can now be safely removed with your fingers. I should have warned you earlier that by removing the screw and its collar, this cup is now loose so be careful not to drop it! Work with the objective with it facing the ceiling to prevent any accidents.
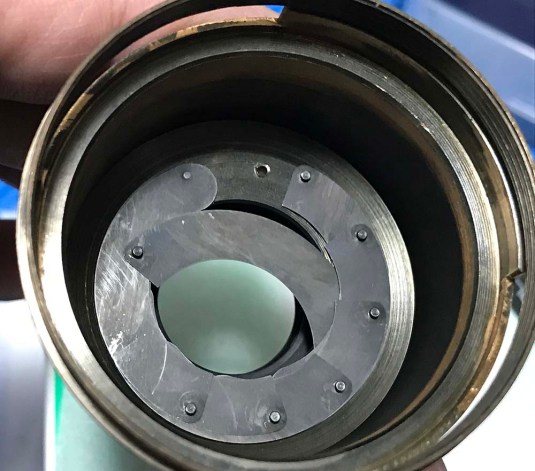
 Just look at that thing. I will drop the iris leaves on a soft surface to prevent it from being damaged. These are tougher than the cantilever designs but you just have to be sure.
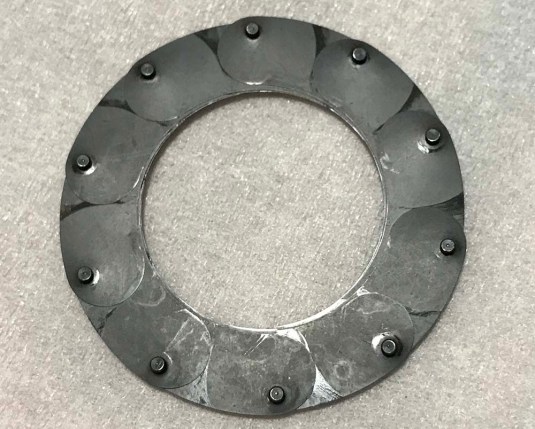 Just take a look at that. It was so oily that it came of as one single unit! Here is an article on how to work with preset-type irises and there are videos there. Check the link out for more information; the lens shown there is different to this one but it is still relevant.
Clean each individual part (of the housing) carefully with naphtha to dissolve any old or hardened gunk in there. Wipe it clean with a lint-free tissue so you will not end up with fibers on your lenses. I always take extra time and care in cleaning the housing’s parts so I am assured that nothing will settle on the glass as I use the lens or else I will have to do another round of cleaning! Better to spend some time doing this than do the while thing again! Putting everything back together can be a challenge for beginners but don’t worry.
Conclusion:
This is routine for me and since I have worked on a few Nikkor-P.C 10.5cm f/2.5 a couple of months ago, there was nothing that caught me by surprise since the construction and design of both lenses are similar in many ways. Would I let a novice fix one as their first lens? Never. Nikon rangefinder lenses are not as common or cheap. A Russian lens will be a better choice for this purpose. The Russian lenses are cheap and those sold as junk are even cheaper so you won’t be guilty if you have ruined one for the sake of learning.
The lens is pretty straight-forward and the only thing that took me some time was the iris but that didn’t take me a lot of effort to do and I will show you how in the next steps.
 Here are the individual iris leaves after cleaning them thoroughly with naphtha. Wiping them with a soft lint-free ensures that all that gunk is removed. Be careful with these and make sure that you don’t warp or bend any of these. These are irreplaceable!
 Putting them back can be very challenging to beginners but I am used to this. My style is to put them back individually and then leave out the last 2 or 3 for later because they are supposed to be interleaved with each other and the best way for me to install them is to slide one end under the other blades and push them into place using a pair of tweezers. I always handle them with their pins to prevent damaging the leaves themselves. This will require plenty of patience and you may even end up doing several attempts. That is OK.
 Here is the gorgeous iris after it has been overhauled! The iris is always round whatever you do and the corners aren’t really obvious so you will never end up with polygonal and irregularly-shaped bokeh balls. This is the original bokeh machine of Nikon!
Here we are again at the end of another article. Did you enjoy this? This is only a part of my Nikon Centenary series and I intend to show you more important Nikon gears in the coming weeks so come back and see what I have published! Thank you and please share this blog to your friends if you find my work interesting or useful to you. This blog relies on “ad impressions” so each time somebody sees an ad on my page, my blog gets a small fraction of a cent in revenue. Thanks again and see you next week, Ric.
Help Support this Blog:
Maintaining this blog requires money to operate. If you think that this site has helped you or you want to show your support by helping with the upkeep of this site, you can simple make a small donation to my paypal.com account (richardHaw888@gmail.com). Money is not my prime motivation for this blog and I believe that I have enough to run this but you can help me make this site (and the companion facebook page) grow.
Helping support this site will ensure that this will be kept going as long as I have the time and energy for this. I would appreciate it if you just leave out your name or details like your country and other information so that the donations will totally be anonymous it is at all possible. This is a labor of love and I intend to keep it that way for as long as I can. Ric.

Oct 14, 2021 @ 20:47:12
44 years ago a man gave me a Nikkor 8.5 cm f2. As this lens did not fit My Nikkormat, I put it away. Recently, I adapted it to my Nikon Z6. It is like new, the mechanics are perfect, the optics are free of scratches or dust and the diaphragm is completely dry. About the photos… Wow!!! I have no words to define the colors and structure of the image!