
Hello, everybody! I was at the hospital last week to have a heart monitor installed. I was a bit tired and stressed the last few weeks so my health was a bit down. Now, the doctor advised me to have the heart monitor attached for a day to see what’s going on and while I think that this is a little too much since my problem is only some weird palpitations and not some dangerous heart condition, I just went along just for the sake of it. I can repair broken equipment but I cannot fix sick people. If only we can just have our organs fixed or replaced just as easily as opening up a machine and changing what’s wrong then the world would be a very different place to live in. I do not wish to be a bionic but I’m very thankful of the advances in medical technology. Today, I am going to show you a how to replace a problematic part found in a very popular Nikon gadget so please read on!
Introduction:
The Nikon MD-3 is a very popular motor drive amongst Nikon F2 users. It was affordable and is the “basic trim” as far as Nikon F2 motor drives are concerned. It is convenient to have this with your Nikon F2 when you have a heavy lens and it is very useful for sports photography in particular because you have automatic advance as a feature. In this blog post, I am going to show you how to repair a very common problem with the Nikon MD-3 and show you why this thing happens. There aren’t many resource available on this topic so I hope that you will enjoy this article and if you like it, please share this on your page!
 Here is the Nikon MD-3 inside the shop’s display case. It sure has seen better years. These are usually found in this condition because they were usually used pretty hard by pros.
The Nikon MD-3 is a simplified and cheaper option for the Nikon F2. The deluxe editions are the Nikon MD-1 and Nikon MD-2 which has even more dials, switches and functions. I will not mention what is different between the models because that will make this article too long but all I can say is that the more expensive options were the best you can buy. In their time, they were considered to be engineering masterpieces and works of art.
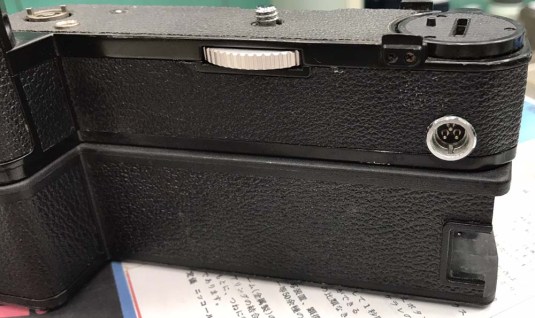 The Nikon MD-3 will not work alone and should always be coupled with a power pack. In this picture, it is coupled with a Nikon MB-2 power pack. There are several types and you can customize your setup by changing which power pack you attach to your Nikon MD-3. This is a clever design and makes things modular but you can end up with a very big and heavy setup! The Nikon MD-4 for the Nikon F3 is a lot smaller and I like it that way.
The video above shows how the problem sounds like. Majority of the Nikon MD-3’s found on the market these days have this problem. The good thing is not every single one has a bad gear because the earlier batches were made with metal gears. I am not aware of the serial numbers but I will update this blog as soon as I get the required information and I will post a follow-up when I do so follow the companion facebook page for more updates!
This job is not for the beginner and it requires special made-to-order parts. Do not bother taking the damaged cog to a parts shop and begin looking for a replacement cog with the sample you brought, you will just waste your time. The best thing you can do is send this to a qualified repairman who has the correct replacement parts or source the parts then send it to your repairman to install and test it properly. Leave this to the professionals.
WARNING!
This involves electricity and electronics so be careful when handling this! Make sure that you discharge any static electricity from yourself and guard yourself from electrocution. Common sense and safety are very important and I will NOT be responsible for anything that will happen to you while you follow the steps here. As I always stress, this article is for your education and entertainment. Send this to a qualified professional!
Ok, let us begin with the repair guide!
Before We Begin:
If this is the first attempt at opening a lens then I suggest that you read my previous posts regarding screws & drivers, grease and other things. Also read regarding the tools that you will need in order to fix your Nikkors.
I highly suggest that you read these primers before you begin (for beginners):
- Essential tools
- Best practices 1
- Best practices 2
- Best practices 3
- Ai conversion
- Working with Helicoids
Reading these primers should lessen the chance of ruining your lens if you are a beginner. Also before opening up any lens, always look for other people who have done so in Youtube and the internet. Information is scarce, vague and scattered (that is why I started this) but you can still find some information if you search carefully.
I highly recommend that you also read my working with helicoids post because this is very important and getting it wrong can ruin your day. If I can force you to read this, I would. It is that important!
For more advanced topics, you can read my fungus removal post as a start. This post has a lot of useful information here and there and it will be beneficial for you to read this.
Disassembly:
Taking this thing apart is not really difficult but it will definitely take plenty of time since you will have to remove large areas covered with leatherette. Make sure that you have a JIS screwdriver before you begin. An organizer of some sort is also going to be helpful. In fact, I use a pills organizer just for this purpose. This will prevent you from misplacing a screw or two and also help you to remember which screw should go where. The screws used on this thing aren’t all identical and while some may look similar, there will be very small differences in them and this will prevent you from making any mistakes later on.
 Remove these 4 screws from the base. I’m not sure but these screws may not be identical to each other so take note of where you extracted which one just in case.
 The cover should come off easily since it wasn’t sealed with anything. Debris usually gets accumulated under these things so I cleaned mine with a soft and clean toothbrush.
 Next is the dirty task of removing faux leather. Saturate the edges with alcohol and allow it to sit there for some time to soften the old contact cement. Never use rubbing alcohol! I avoid using that because they usually come with moisturizers or oils for scent. I only use denatured alcohol or isopropyl/ethyl alcohol for this kind of job. They are also cheaper!
 You may need to saturate it more than a couple of times in order for the contact cement to soften up and if you think it’s softened enough and peel off one of the edges carefully. Go about it slowly and always apply a firm but even force when pulling the leatherette. If you are not careful then you will end up tearing this thing up.
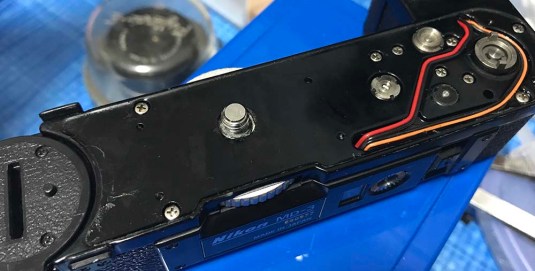 Now that the leatherette is out of the way, you can now access the screws underneath it. See all the wires underneath it? This is why you don’t oversaturate this part with alcohol.
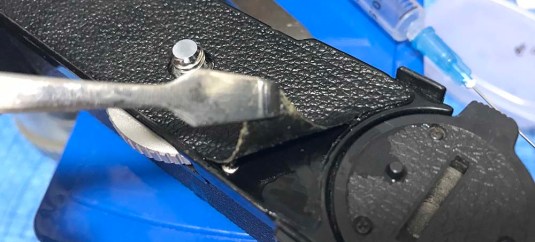
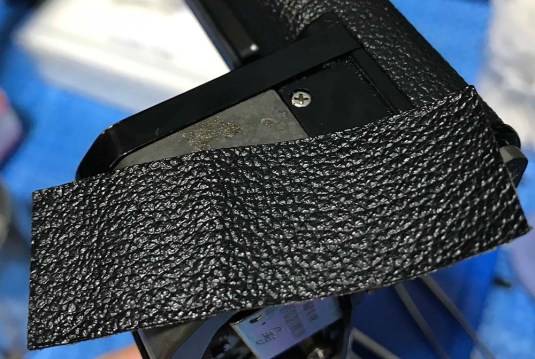 Using the same technique from the previous step, remove this leatherette from the side of the grip as you need to access a screw underneath it. Don’t worry, this is easy!
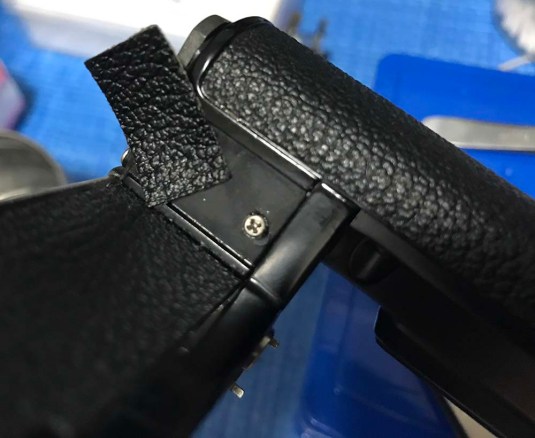 Do the same for this small piece of leatherette found on the inner side of the grip.
 Next, we need to remove these 4 screws so that we remove this panel from the base.
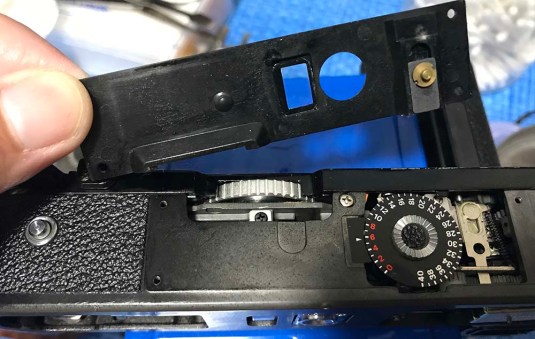 The panel should come off easily. Be careful not to poke on the plastic window because it was glued with contact cement at the factory. If you dislodged it then you will have to use a non-fogging adhesive to put this thing back.
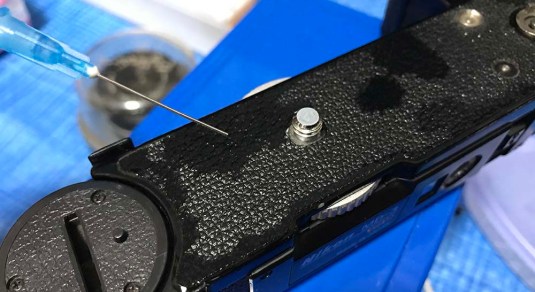
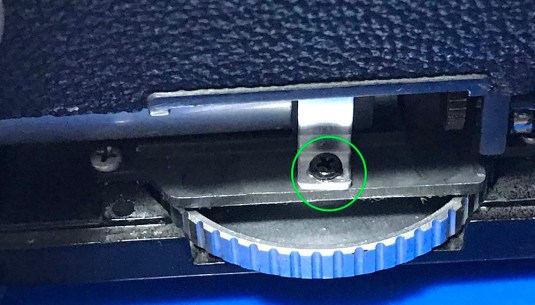
 Now that the leatherette is gone, you can now access this screw. It has to go.
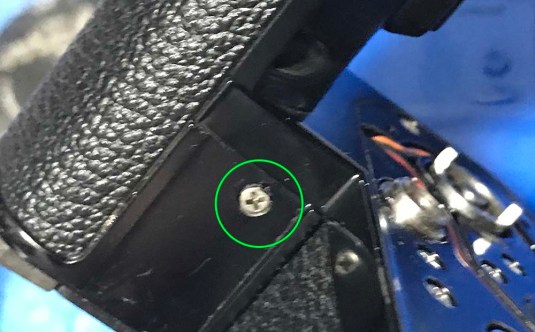 This one has to be removed as well. From here on, your main task will be removing these screws to open the grip up so you can access the dynamo.
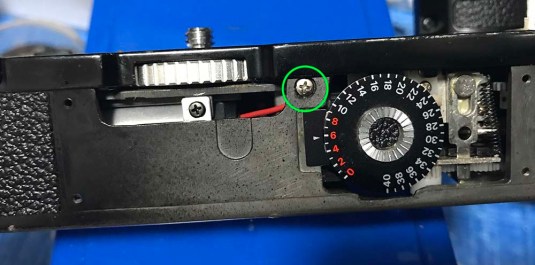 Remove this screw and store it in a safe place. These screws aren’t identical so remember which one came from which hole! They can look very similar at times but the difference is there and it is enough to stop you from putting things back together!
 These screws on the terminal has to go,too. This will allow it to move as you remove the metal casing where it is screwed and this will prevent it from getting damaged.
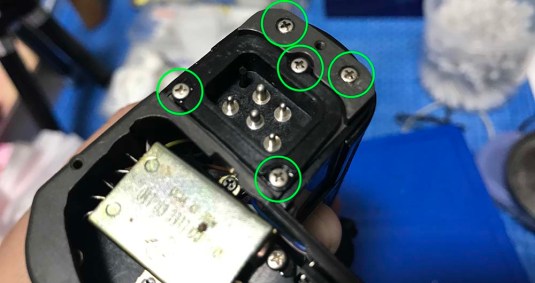
 Finally, remove these 4 screws from the top panel. These 4 hols everything together. The other ones help put everything in place but these ones seem to be the main ones.
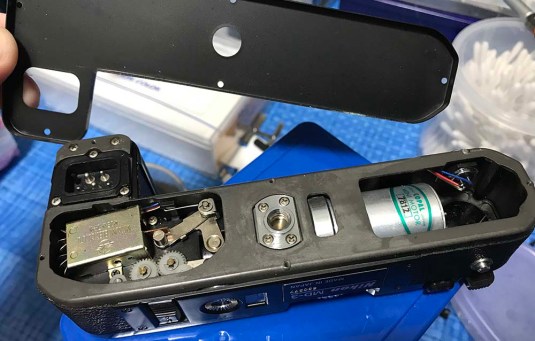
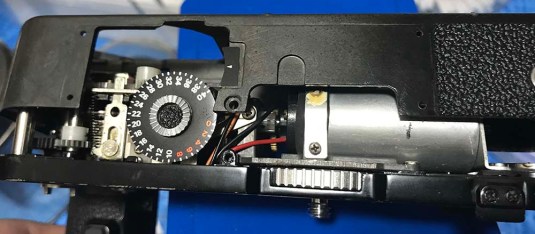 Carefully lift the housing to reveal what s inside. Be careful not to press on the counter or the arrow for it. These parts are all made from thin sheetmetal and they are easily bent. I have to apologize because I changed the orientation of the image.
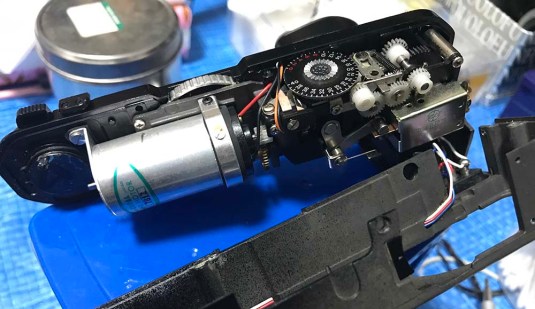 At last, we can now access the core! Be careful not to pull on the wires too much or they will break away from where they were soldered to!
 Remove this screw to free the brace. There is another one on the other side by the way.
 And here is the other one. The housing is getting in the way so I had to contort things just to access some hard to reach parts. Again, mind the wires!
 These are the last screws that you need to remove in order to free up the dynamo. These are resting on top of a rubber insulator/damper. This rubber part can come off so be sure to take a picture of it so that you will know how this rubber part is fixed. You can in fact see this rubber part on the picture above. Please do not lose this little thing!
 That was a lot of trouble just to get to this thing! Don’t worry, we are halfway there!
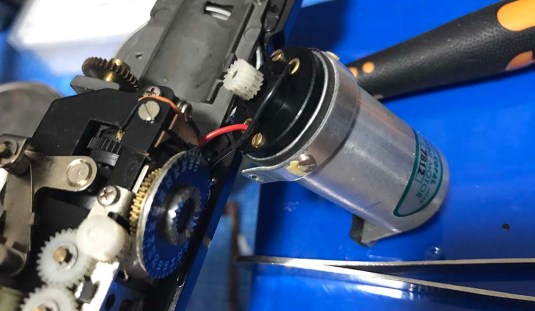
 Th is the problematic gear. Can you see the crack? It is very thin but you can see it in this picture! Unscrew the tiny set screw so that you can pull this gear off from the dynamo.
 The left one is the replacement part. It is made of brass and it will not wear easily unless you abuse your motor drive. Notice how small it is compared to the original one? I don’t know why Nikon made the decision to use plastic ones but my guess is that plastic gears are a lot more silent than metal ones. Of course, cost-cutting is also another factor.
 Install the new gear and reinstall the dynamo. Do not tighten the screw too much so you can move the the gear up and down the shaft. Adjust the gear in a way so the screw hole doesn’t get in the way of anything. Once you are happy with it, tighten the screw and test it by connecting the power source to the motor drive and listen for anything funny. If it sounds strange then you may have to re-adjust the gear so that it sits perfectly in relation to the other gear. Once you are happy with everything, apply a small dab of grease to the gears and make sure that you applied it evenly. Applying too much here grease will cause another problem. Using the correct grease is important. I use molybdenum grease that is sold in hobby shops for use with radio-controlled cars. Molybdenum grease is what’s good for metal-to-metal contact surfaces according to one repairman that I look up to in Japan. I do not understand why because my Japanese is not that good but that was what he said. Molybdenum grease can dry up and leave a dry film of molybdenum disulfide (?) so if you know something better that will last through the years, do tell us. The dried-up grease is what you see when you clean it off and it looks like a fine black powder. Be sure to clean both gears before applying your grease. If you need to lubricate anything else and if the other gear is made of plastic then you will have to use a silicone-based grease on that so it will not affect the plastic over time and make it discolour or change its properties.
Disassembly (Grip):
I wanted to clean this motor drive further so I will open the other half of it. This is not a mandatory step and I just wanted to make sure that things are working properly so I had to open this up to see what’s going on underneath. You think I am a bit OCD? I hope not!
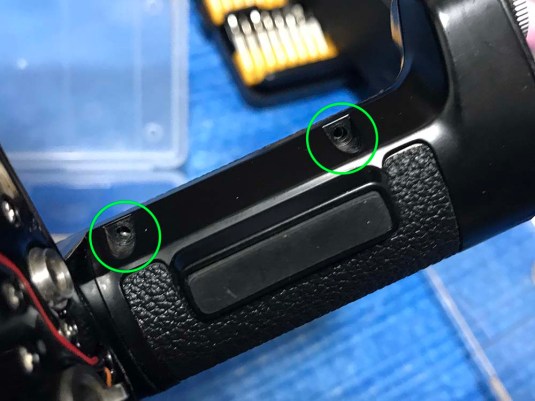 Remove these 2 screws. The case is made of plastic so be careful not to crack it.
 Now, don’t open it up just like because this will place a lot of strain on the leatherette and the plastic ears on the other side. In fact, I cracked this one! There are 2 more screws on the other side of this cover that needs to be removed for you to get this cover off.
 Once the leatherette is gone, you can easily open it further to access what’s inside. I made a big mistake so I cracked the plastic ears on the cover. This is why you should go about it slowly and experienced amateurs like me also make mistakes like this. Don’t say I did not warn you! Good thing this doesn’t affect anything because the leatherette is also there to hold things together. Make sure you learn from my mistake!
Conclusion:
Here we are again at the end of another blog post! Did you guys enjoy it? I hope that this article gave you enough appreciation of what goes on when a repairman fixes your gear. It is not as simple as what some people may think and the parts needed involves cash as well especially if the part we are talking about is custom-made like this one. This roughly took me around 1.5 hours to do because I had to wait for the alcohol to soften up the old and hardened contact cement. Whatever you do, always go about slowly.
The video above shows you how the Nikon MD-3 sounded like after we replaced the gear with a new one made from brass. It sounds a lot quieter now compared to the annoying buzzer-like sound that we had before. This worth the trouble if you’re a dedicated user of the Nikon F2 and you can’t live without a motor drive for advancing the film. Like what I said earlier in this article, this is not an easy job for somebody who has no experience in repairing things and you will need a special cog that matches the one found in this one. I would just recommend you to send this to a reputable repairman who has experience or knowledge of this problem and most importantly, have the correct replacement part for this job. Do not send this to a hack or he will just way your time and money. If you really want to be sure that your repairman does the right job then you can probably send him the link to this article just in case. I am sure anybody would appreciate extra references before starting a job. It is always better to err on the safe side, do you agree with this?
Here is another video. Pardon my voice, I just woke up and I video’d this even before my daily morning ritual in the toilet. This sounds much better than before. I should take this out for a test one of these days! Never mind the bulk and weight – “photography is life”!
Thank you very much for your continuing support for this blog! I did mention that I had begun monetizing this blog and today, I earned a staggering $3.51 USD from last month’s views! Of course, I am being a bit cheeky but that’s how monetizing works and a big blog that has millions of views a month only takes in around $120 USD monthly. I guess this is all dependent on which products gets shown and a very niche site like ours will even get less because the content is so specialized. I hope we get better results in the coming days but I was told that my stats are pretty good for a blog like this. Good luck to us, and let’s see each other again in the coming weeks as I cover Nikon’s 100th anniversary! Have a great weekend and enjoy the summer sun! Love, Ric.
Help Support this Blog:
Maintaining this blog requires money to operate. If you think that this site has helped you or you want to show your support by helping with the upkeep of this site, you can simple make a small donation to my paypal.com account (richardHaw888@gmail.com). Money is not my prime motivation for this blog and I believe that I have enough to run this but you can help me make this site (and the companion facebook page) grow.
Helping support this site will ensure that this will be kept going as long as I have the time and energy for this. I would appreciate it if you just leave out your name or details like your country and other information so that the donations will totally be anonymous it is at all possible. This is a labor of love and I intend to keep it that way for as long as I can. Ric.

Dec 13, 2017 @ 18:46:14
hello RICHARD
I’m from FRANCE (MONTPELLIER) and I was looking for your blog (via GOOGLE and your videos on YOUTUBE) because I have a NIKON F2 with md2 + mb1 who had exactly the same problems of bad gearing !!! I look for all your explications and you are absolutly perfect in your texts and photos…but it will be too much difficult to repair it by myself , because Im not a professionnal !
FELICITATIONS !!!
Thanks and…friendly !
Paul (from FRANCE) >>> p.grib @orange .fr
Dec 13, 2017 @ 22:01:10
Thanks! For the F2, send to Sover Wong or to Kiitos here in Tokyo.
Jul 15, 2018 @ 13:29:55
Enjoyed your video!! I have a question. This Youtuber has the same problem as I am having with my MD-3. Is a bad gear the problem, or is it something else?
Thanks….
Jul 16, 2018 @ 15:44:14
Hello, Ken.
I am not sure what is going on with his grip. These are old by now and many can be found in terrible state. Ric.
Jul 16, 2018 @ 15:48:53
Thanks for your reply. Probably not worth trying to repair.
Jul 17, 2018 @ 00:51:04
Hello, Ken. It depends, really. If you got it for cheap then it’s worth it. Ric.
May 08, 2020 @ 17:41:31
Hi Rick, can you tell me who sells the brass gear? Thank you
Elio
Jun 11, 2021 @ 22:07:58
Hello from Argentina!! The brass pinion gear have 15 teeth and the Nylon pinion gear have 16 teeth? The brass pinion gear, where you got it? Thanks