
Hello, everybody! We just had a great dinner tonight and we had some banh mi from one of those Vietnamese shops in Shinjuku. I liked how the taste and texture of the ham gelled so well with the liver paste. The combination is so good that it will work universally with any sandwich from any cuisine. There are combinations that work so well that you will want to use it all the time. Today, I will show you a great combination from Nikon and I’ll also persuade you to buy one if you don’t own one yet. Read on.
Introduction:
The Nikon MD-4 was designed for the Nikon F3 series of professional cameras. The design is so well-integrated to the Nikon F3 that you just have to use it with one of these and see it for yourself. It really feels like a single unit and the Nikon F3 balances better with one installed specially if you are shooting with a heavy lens attached to it.
 Here it is with the Nikon MD-3 set that I just worked on the night before I worked on this Nikon MD-4. Notice how much smaller it is? This compact form factor is very good since it helps a lot with the weight distribution. The Nikon F3 is physically smaller compared to the Nikon F2 for which the Nikon MD-3 was made for. I love mine a lot!Unlike the grips today for most digital cameras, the older ones actually gives you more in terms of enhancing the camera’s performance. In this case, the Nikon MD-4 gives you:
- Automated advance
- Automated rewind
- Faster burst rates
The above mentioned benefits are just 3 examples out of the many things that this thing will help you with and with it’s dedicated accessories, you get even more from this such as the special camera back which has contacts to communicate with the grip to prevent it from rewinding the film all the way so you will not have to pick the leader out again with a film leader extractor when it’s time to develop the roll. There is also a small plug that is handy for shooting in the portrait orientation because you can use your finger to actuate the shutter button on the grip. I am not aware of the rest of the lineup but there are more shown in the catalogue. Search for it online and see it for yourself.
Now, there are quirks in using the Nikon MD-4 and one of those things is it will ALWAYS advance the frame and cock the shutter after you press the shutter button on the grip. It is not good to leave the shutter cocked for long periods of time as far as the type used on the Nikon F3 is concerned, Horizontal-travel shutters store energy on drum springs with Swedish piano wire springs inside and they will lose tension once you have left this for a long time in the cocked position. To prevent this, always press the shutter on the camera to release the tension before you store the Nikon F3. It can be annoying and you’ll lose a frame by doing this but at least you will keep your camera’s shutter in great condition.
Before you start tinkering with your Nikon MD-4, please understand that I am not trained in this and I am not a professional. Whatever you do or whatever happens to you won’t be my responsibility. Send this to a technician if you are new to this! Let’s start!
Before We Begin:
If this is the first attempt at opening a lens then I suggest that you read my previous posts regarding screws & drivers, grease and other things. Also read regarding the tools that you will need in order to fix your Nikkors.
I highly suggest that you read these primers before you begin (for beginners):
- Essential tools
- Best practices 1
- Best practices 2
- Best practices 3
- Ai conversion
- Working with Helicoids
Reading these primers should lessen the chance of ruining your lens if you are a beginner. Also before opening up any lens, always look for other people who have done so in Youtube and the internet. Information is scarce, vague and scattered (that is why I started this) but you can still find some information if you search carefully.
I highly recommend that you also read my working with helicoids post because this is very important and getting it wrong can ruin your day. If I can force you to read this, I would. It is that important!
For more advanced topics, you can read my fungus removal post as a start. This post has a lot of useful information here and there and it will be beneficial for you to read this.
Diagnosing:
Before anything else, you will have to determine wether you Nikon MD-4 is working OK or not. You can do this without the need to attach it to a Nikon F3 camera body with this simple trick that I will show you. Again, do this at your own risk!
This is going to be handy when you are in a shop and you just want to test out the junk in the bin that you are prospecting so you do not have to risk getting one and taking it home only to find out that it’s dead. Just be sure to ask the clerk if it is OK for you to do this.
Disassembly:
Most of what I am going to do here is to open up the Nikon MD-4 and clean up the insides so it was just a quick operation for me. For people who have electronic problems for the Nikon MD-4 then I cannot help you more than what is shown here because the problem of my motor drive is related to junk fouling up the motor.
As with many things related to this, I always check to see if the motor is OK or not. It was easy to access the motor for this thing since it is cleverly situated inside the grip instead of having it inside the body. These dynamos usually don’t die “just like that”. They were made to last a long time so I suspect that a cleaning might bring it back to life.
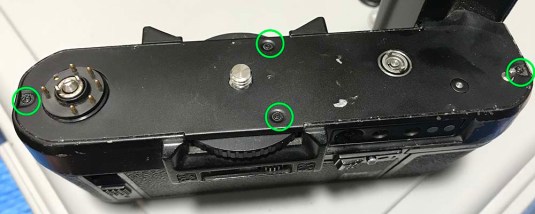
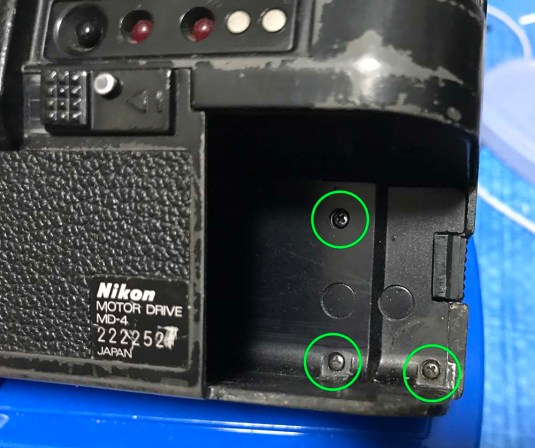 Remove these 3 screws. These are the main things that hold the grip and the bottom part together. I make it sound flimsy but these are more than enough, trust me.
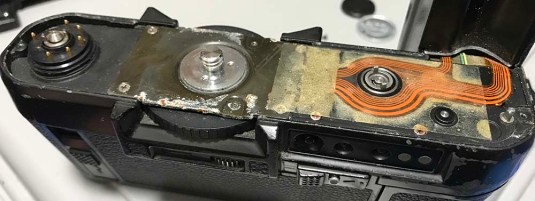
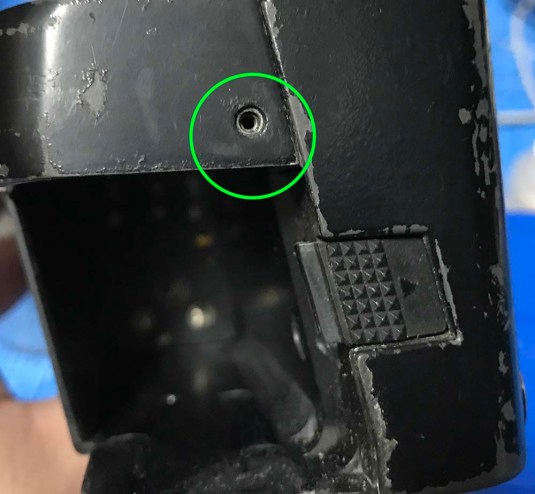 Next, remove this screw found on the outer part of the grip. Mine didn’t came with one. I got this from the junk shops for little money so I am fine with this.
 To remove the back cover of the grip, simply remove these 2 screws.
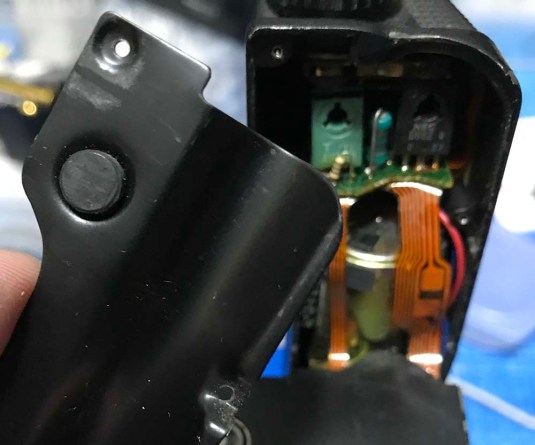 The cover should come off cleanly like this. At this point, I will check and see what is not working properly by looking for bad connections or any damage to the ribbon cables.
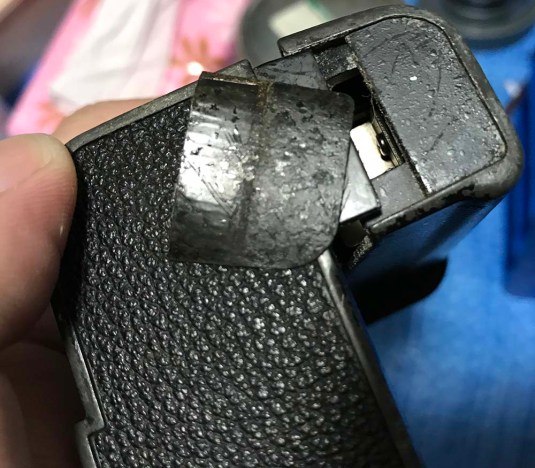 Next, carefully remove this leatherette from under the body. It helps keep the body and the grip together. Saturate it with alcohol and peel it away from one of the corners with a pair of tweezers and go slowly at it while saturating it more with alcohol as you go along.
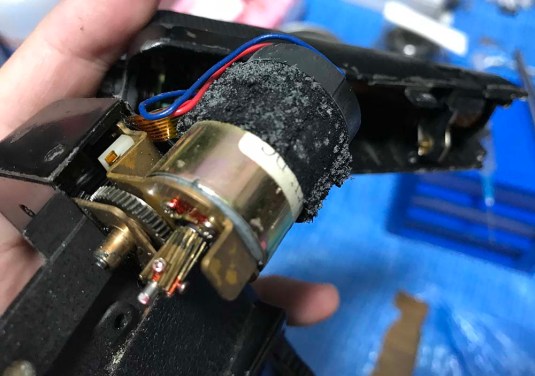 This is the old and corroded foam. I cleaned this as good as I can and while I am at it, the cogs/gears were also cleaned with naphtha and then greased with molybdenum grease.
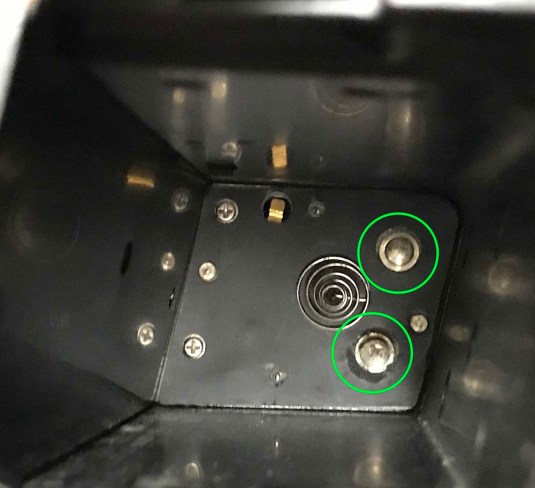 While we are at it, make sure to clean these contacts with alcohol and a Q-tip. If these are corroded then try rubbing a hard rubber eraser and see if it helps. If the corroded parts are too bad to to be saved by cleaning then you will have to open this up and replace the contacts with something salvaged from another electronic device such as an old torch.
 Well, since I got myself into the mood then I will go ahead and also clean the gunk under this panel. These things usually hide nasty deposits underneath them.
 Just look at all the junk deposits under this, yuck! That looked like salt crystals from the sweat of the previous owner! This has to be cleaned, no questions asked! Just be careful with the ribbon while peeling away at the old tape.
Once the dynamo was cleaned, the Nikon MD-4 is still dead so I did what every expert do in cases like these, bang the thing on palm really hard for around a dozen times! Thanks to that, I dislodged even more junk from the deeper parts of this thing and everything is now working properly. If you’re old enough to remember, older cathode tube TV sets also were banged really hard this way to fix a noisy image. The reason is you are dislodging a lot of dirt from the tip of the tube when you do this. I am not advocating this practice but many electronics repairmen do this. I should know, I used to hang around the shop of my cousin Delfin and saw how the repairmen worked. I also observed the same thing from a service center. When the family TV or Betamax is dead, I am the guy who repairs those.
There really isn’t much to the Nikon MD-4’s construction and you shouldn’t get to a point where you need to open up the bottom half of it to access what’s inside. If you need to do that then maybe it is better to consider buying another one. I am not an electrician and I am very bad with electronics so don’t take my word for it.
Conclusion:
This isn’t a real repair article in the sense that it isn’t a complete guide to fix everything wrong in the Nikon MD-4. I just showed you what was wrong with mine and how I fixed it to my own satisfaction. If yours need attention and you do not have the skills to work with one then never hesitate to send it to a qualified repairman. This is a simple enough device so repairs shouldn’t be costly as long as you do not have anything that needs to be replaced. These are very reliable and despite their age, you still see many of them being used by hobbyists since most pros has since moved away from shooting film years ago.
I hope that you enjoyed this short article and do look forward to the Nikon MD-3 article that I am going to write in the future! That one has more pictures and a few videos so it’s going to be a longer article for you enjoy. Thanks a lot and see you next again time, Ric.
Help Support this Blog:
Maintaining this blog requires money to operate. If you think that this site has helped you or you want to show your support by helping with the upkeep of this site, you can simple make a small donation to my paypal.com account (richardHaw888@gmail.com). Money is not my prime motivation for this blog and I believe that I have enough to run this but you can help me make this site (and the companion facebook page) grow.
Helping support this site will ensure that this will be kept going as long as I have the time and energy for this. I would appreciate it if you just leave out your name or details like your country and other information so that the donations will totally be anonymous it is at all possible. This is a labor of love and I intend to keep it that way for as long as I can. Ric.

Feb 18, 2019 @ 01:27:34
Hi Richard, would you consider doing a repair article on the Nikon F36 motordrive?