
Hello, dear readers! How are you this weekend? The weather here in Tokyo is beginning to be unbearably hot as mid summer approaches, there are times where the heat would even reach 38! Please stay hydrated by drinking plenty of water because I care for your well-being. I don’t wish to read about a photographer who collapsed because of the heat, that would definitely spoil my mood. Do take care. Speaking of heat, I’ll talk about a “hot” lens today and when I say hot I mean it’s popular these days for people who like to adapt old lenses to their cameras. Stay and read what this hot item is all about.
Introduction:
Today, we are going to talk about the Nikkor 135mm f/2.8K! For those who are following my blog for some time you may have remembered that I made a tear-down guide of the Nikkor-Q 135mm f/2.8 Auto lens earlier this year – this lens is its successor! The older lens has set the bar high for Nikon but this new lens was able to surpass that in almost every way. It has a new optical formula and a new lens barrel design. This lens is totally new, it has nothing in common with the older lens apart that it’s from the same lens class.
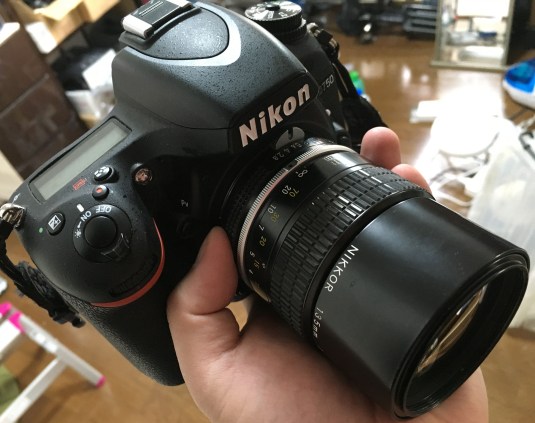 This lens looks great on modern DSLRs like this Nikon D750. Its image quality still keeps up with the best of Nikon’s (or Sony’s in the case of the Sony a7) sensor technology! There is a lot talk these days online about this lens and I will show you why this lens is special.
The Nikkor-Q 135mm f/2.8 is a lovely lens and its rendering has lots of character because it can make the background melt into a wash of colours while leaving the focused area pin sharp when shot wide-open. It seems to be a very difficult lens to succeed but good news! This lens is just as sharp and performs even better! Nikon has revised the optical formula by adding another element to it and added improved coatings. Nikon has also changed the chassis of the lens to make it more compact and lighter as compared to the previous lens. This new lens formula persisted until the last version of this lens. The last version of this lens is the Nikkor 135mm f/2.8 Ai-S and it was made until 2005. The lens is so good that Nikon retained the formula for about 3 decades! Just think about that, there aren’t many lenses that can match its production life and those that do are usually made by Nikon. This is the beauty of the F-mount!
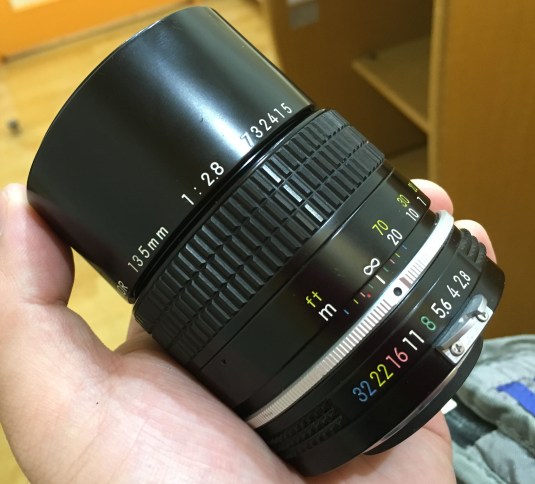
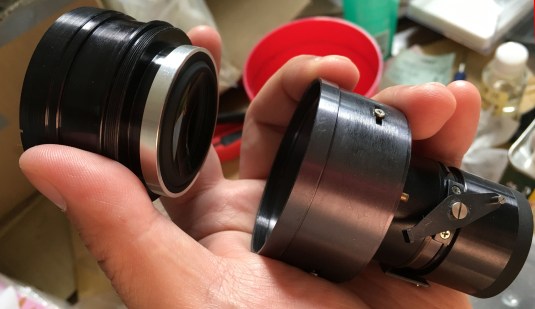
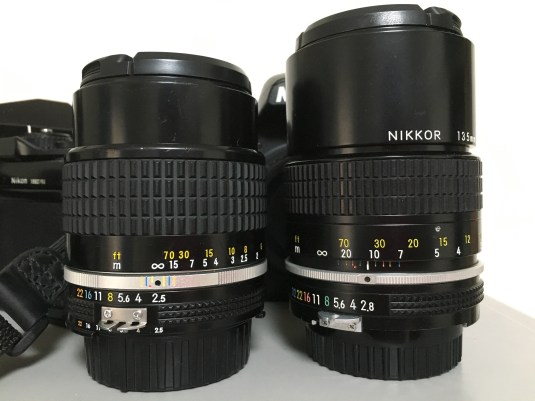 Here is the lens when compared to the Nikkor 105mm f/2.5 Ai-S. You can see that it is not a lot bigger than the smaller lens. It’s impressive because even with the reduction in size and weight, Nikon actually managed to retain the retractable hood feature which is very useful when you need to shade the front element from stray light or protect it from dust or other things.
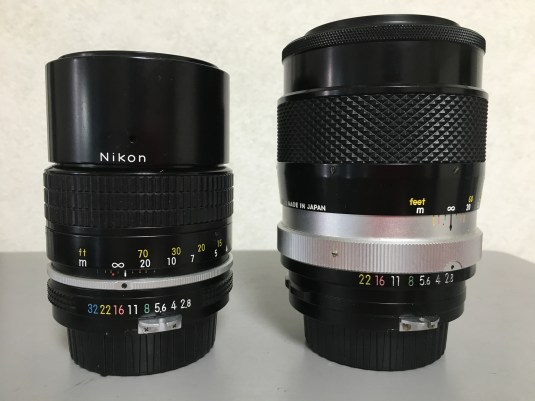 Compared to the older lens you get around a 20% reduction in size, if that’s impressive in numbers wait till you actually have both lenses in your hands! The Nikkor-Q 135mm f/2.8 is built like it could withstand a nuclear war but the subject of our post today’s built just as tough and will give you many decades more of service provided that you keep it clean and well-maintained. This is something that the electronic lenses of today will never get to achieve! Once the electronics are dead, the lens is just as good as a manual focus lens!
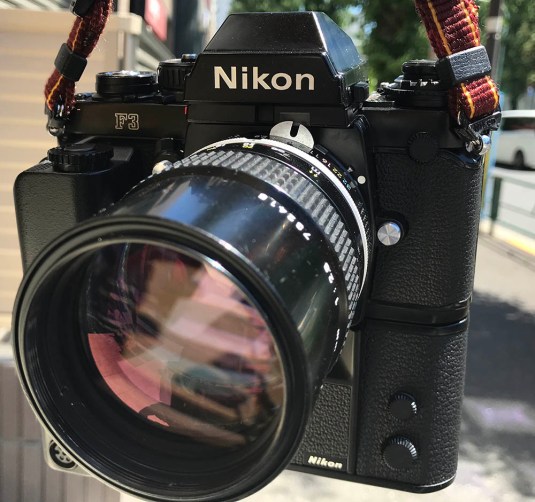 The lens can be quite heavy if you mate it to a small camera body but a Nikon F3 is great because you can attach a Nikon MD-4 to it which makes you setup more balanced. This is a great combination and I imagine that professionals did this in its day. The Nikon F3 has a retractable Ai-coupling tab so you can use pre-Ai lenses with it if you just lift the tab up. You can only meter via stop-down metering but it’s better than nothing. I modified this lens’aperture ring so I can use it on modern Nikon cameras. Read how I did it in this blog post but I wouldn’t recommend that you do this because the resale value will drop.
This lens has a very good reputation. It’s going to be impossible to illustrate that without the use of pictures so I am going to shoot a couple of samples so you can see how good it really is for both film and digital. I shot a few pictures using the Nikon D750 and the rest were shot with my Nikon Df. The film samples were shot using a Nikon F3 and the film it had was the Fujifilm Industrial 100. It’s important to know how to use a lens so you can maximize your equipment. I’ll help show you how to use this lens so you can use it to its full potential and you will know when to use this lens and when not to use this lens.


(Click to enlarge)
The sample pictures were all shot from f/2.8, f/4 and f/5.6 respectively. These are the most important apertures to know about because the lens changes its character the most here in these apertures. Wide open, you can see that there’s vignetting at the corners. Most of it goes away by f/4 and you hardly notice it by f/5.6. You can use the vignetting creatively for portraiture but I won’t use it if there’s an even-colored background in the frame such as the sky or a light-grey curtain. Vignetting is a bit on the heavy side and that’s probably the only thing I can nit-pick about with this lens. It doesn’t really look obvious when you shoot this lens in real-life situations and pictures. I shot the sky to emphasize this for you.


(Click to enlarge)
I’m not sure but it seems that this lens was calculated for better performance when you use it for subjects that are closer than 20m or so. The picture of the pagoda shows plenty of chromatic aberration at the roof’s tiles wide-open but it’s otherwise sharp. Flaring and ghosts can be seen when the sun’s in the frame but the ghosts look diffused wide-open so it’s not an issue but flaring can be a bit more serious than expected. This can be due to its old coating technology but it’s not something that will prevent you from making useable pictures. In fact, you can even use this to your creative advantage just like what I did in the picture with the sun behind the building (last picture). I shot the picture of Mt. Fuji at the horizon, it was shot with a CPL filter and I was behind an inch-thick wall of glass. The sharpness isn’t very good but we’re asking for too much here. Apart from the CPL and a thick layer of glass, I am also shooting through many kilometers of atmosphere/pollution.


(Click to enlarge)
Here are some more examples. At f/2.8, the lens is capable of producing very smooth and delicate bokeh. The picture is sharp in the focused areas and the contrast is adequate but a bit lacking. I’m not saying that the contrast is bad, it’s actually good but it will improve as you stop the lens down. You’ll also see a slight hint of chromatic aberration but what’s good is that you don’t see any terrible spherical aberration wide-open or at least it’s not a big deal. Stopping down the lens to f/4 will make the contrast improve by quite a lot. You will also notice that sharpness also improves along with the contrast and the added DOF will also help things out. The bokeh won’t look as smooth as it was wide-open but it’s still pretty good. The 7-sided iris helps make the polygonal points of light look less rigid and it helps make the background look smoother as you can see in the first set. By f/5.6, you can see that the lens is already nearing its peak performance. Sharpness and contrast look so good but the background has lost much of the washed-out look but still looks smooth. It’s also worth mentioning that the bokeh balls look really polygonal now. This will turn-off a few people but some people like this look a lot and use their lenses specifically for this. It is all just a matter of taste and creative license. Saturation looks good through-out and it’s colors tend to give your pictures that “vintage-look”. The colors look “punchy” but it’s not overwhelming to the eyes, giving it a flat but rich palette in terms of tones. Resolution is great from f/4 and up, it peaks from f/5.6 to f/8 so if you’re shooting this lens in a studio it will give you very good images when shooting with strobes. It’s a perfect portrait lens!
Here are some pictures that I took in real-life use and these should give you some idea on how this lens really performs. Shooting tests are good but shooting real pictures is better. You cannot judge a lens purely on metrics alone because a lens is just an artist’s tool and how you use it is all that matters.
 I don’t like cats very much but I like this picture a lot. This was shot near its closest focus distance and this makes the background melt into a wash of colors! It’s sharp wide-open and you can perfectly use it at that aperture. The thin DOF will make some of the details appear soft but they’re not! If I can only show you how it looks like in my monitor then it will be obvious to you just how good this lens is.
 The picture of this Buddhist monk is exquisite to say the least. At f/2.8, there is a tiny hint of chromatic aberration but the overall picture is clean. The bokeh is lovely and natural, this is the trademark of the 135/2.8 family of Nikkors! The details look nice and while it’s not super-sharp yet I will not call it soft. The contrast will improve when you stop it to f/4 and that is where everything will look really good.


(Click to enlarge)
These pictures were shot wide-open at distances that are commonly used for portraiture. The delicateness of the bokeh is something that’s common to these pictures. Sharpness is good but not too much as to render every single pore in your subject’s skin. This is great if you want to make your subject look a few years younger. Resolution is adequate since you can see the hair’s details properly and they don’t look “smudged”. If you want higher resolution while maintaining the smooth bokeh then shoot your portraits at f/4.
 This was shot at f/5.6 and the resolution looks great! You can see every detail rendered in an exquisite way from the weave of the hat, the strands of her hair and the details of her eyebrow. The skin still looks nice and smooth, perfect for a portrait lens. The background looks a bit “lumpy” on the areas with foliage, this is due to the polygonal-shape of the iris at f/5.6 but it doesn’t bad if you ask me.
 I think this was shot at f/5.6, this should show you how this lens renders details further in the frame. You won’t usually use this lens for something like this but it’s nice to see how it performs with these variables.


(Click to enlarge)
The 135mm focal length is great for isolating your subjects and taking candid photos. The compression is also very good and you can use that for telling stories using framing and composition techniques. This focal length is off for some people and these people usually shoot with the 28,50,105 lens combo. This lens is best-paired with a 35mm if you ask me. It will depend on your shooting style and your vision.
The following samples were shot with film. It’s important that we study how the pictures from this lens look like when shot using film so we can make a better assessment of it. It was tested with Fujifilm Industrial 100 and scanned at the lab using their cheap scanner.
 This was shot at f/2.8 with film, the details of her hair looks great. The background melts into a nice wash of colors. The bokeh is silky-smooth and the subject isolation is perfect.
 I think this was shot at f/4 or so. The details on the megaphone and its cord looks great, it is also worth mentioning that the skin is rendered beautifully. The bokeh is still smooth at f/4 but not as smooth as it was wide-open.
 I am not sure if this was taken at f/4 or f/5.6 but it’s obviously not taken at f/2.8. It’s sharp and you can see all the details of here costume apart from the feathers. If I shot this one with just a little bit of underexposure then I’m sure that we can see even more details.
 Another picture that was at mid-apertures. This is such a beautiful picture because of the details and colors, it shows that this lens renders colors naturally. They are saturated but not too much. The previous picture was a bit over-exposed but this one was spot-on. You can see the details on her jewelry clearly and the weave of her cloths “feels” real.


(Click to enlarge)
These pictures were shot from f/2.8 up to f/4 at most (I think). This lens is still kicking and it can be hard to tell that these pictures were shot with a lens that was made more than 4 decades ago. Given the right conditions and skill, this lens is still relevant today. If you’re fine with manual focusing then this lens shouldn’t be a problem for you. People who are new to manual focusing may find this difficult to use because of the long focal length. It’s hard to track your subjects because the focus throw of this lens is on the long side. I hate it to be honest but I am so used to manual focusing that it doesn’t matter at all. Stationary subjects shouldn’t be a problem at all. If you can’t manually-focus on a still object then it is hopeless for you! In case you’re wondering, these were shot with the Nikon Df.


(Click to enlarge)
The samples above were shot with film. I will admit that some of them were exposed too much but most of them looked great. It was a really sunny day so even the 1/2000s fastest shutter speed of the Nikon F3 wasn’t enough. I should have stopped it down even further but I wanted to shoot below f/5.6 at most. I hope that these samples will give you an idea as to how this lens performs with film. Shooting samples with a digital camera is easy, it’s so convenient and you can see your results in an instant so not many people shoot using film for lens reviews. It’s also not cost-effective but somebody has to do it. I want to make this blog unique and as complete as possible.
I hope that this introduction will help give you a better understanding of how to use this lens and why you would want to own one. This is a serious lens that was made for pros, I will dare say that this lens will out-live most of the people reading this article. Old lenses are made to last forever and this lens will make a very good family heirloom! Should you go out of your way to hunt for this lens? Well, only you can answer that but if you need it then make sure that you buy one that has an Ai-ring installed. This will allow you to use it with newer Nikon cameras. They cost a bit more but its worth every cent. If you do not want to spend the extra money then you can buy the non-Ai ones and convert it yourself. Read my article on how I convert non-Ai lenses to see how it’s done but I will advise you to just buy the ones with Ai-rings because the conversion isn’t reversible. Once you do it, it’s going to be like that for good. The resale value and aesthetics will also take a hit and if those matter to you then just get one that has an Ai-ring. Going back to the focus throw, if you want shorter focus throw then the Nikkor 135mm f/2.8 Ai-S will be the one for you. It has a shorter focus throw that will be useful for action shots since you can quickly focus with it because the turn rate is shorter. You can never go wrong with any of the lenses in the 135/2.8 lens family. All of them are solid performers from the first one to the last. Let us now begin with the repair article!
Before We Begin:
If this is the first attempt at opening a lens then I suggest that you read my previous posts regarding screws & drivers, grease and other things. Read regarding the tools that you’ll need in order to fix your Nikkors in the links above.
I highly suggest that you read these primers before you begin (for beginners):
- Essential tools
- Best practices 1
- Best practices 2
- Best practices 3
- Ai conversion
- Working with Helicoids
Reading these primers should lessen the chance of ruining your lens if you’re a beginner. Before opening up any lens always look for other people who have done it in Youtube or other sites on the internet. Information is scarce, vague and scattered (that’s why I made this) but you can still find some information if you search carefully.
I highly recommend that you also read my working with helicoids post because this is very important and getting it wrong can ruin your day. If I can force you to read this, I would. It is that important!
For more advanced topics, you can read my fungus removal post as a start. This post has a lot of useful information here and there and it will be beneficial for you to read this.
Disassembly: (Lens Barrel)
This lens is actually the K (New-Nikkor) version but the lens is so similar to the Ai and Ai-S versions so you can somewhat use this guide for those versions of this lens as long as you take into account the small changes Nikon has made to improve the engineering of this lens line and cost cutting. Nikkors made in this era tend to be glued in most parts so it can be difficult to remove some parts. The rule is if something is stuck, use alcohol and place it at the threads or seams and wait for it to soften the lacquer or whatever is there. If it’s still stuck then use a soldering iron to heat it. Never heat anything that’s close to the optics! Optical glass is not as tough as the ones in your windows!
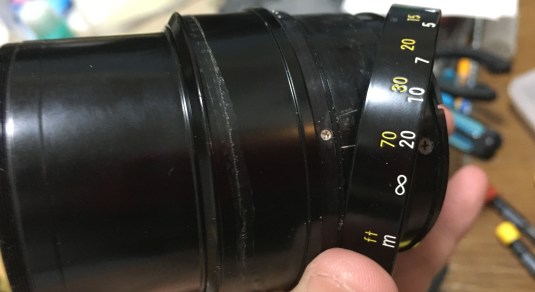
 Make sure that the lens is focused all the way out to infinity as you’re work with a lens. It will give you a reference position as you remove parts and reassemble your lens. Always take plenty of notes while the lens is at this position. This is very important and it is just one of those things that you will learn as you go about dismantling lenses.
This lens in’t hard to work with if you have already worked on a few lenses but I would like to stress that you should be careful as lenses of this vintage can be delicate because of corrosion. I will tell you which part you should be careful with so don’t worry.
We will begin by removing the objective from the lens barrel. As usual with Nikkors from this era and class, we start by working on the lens from the front.
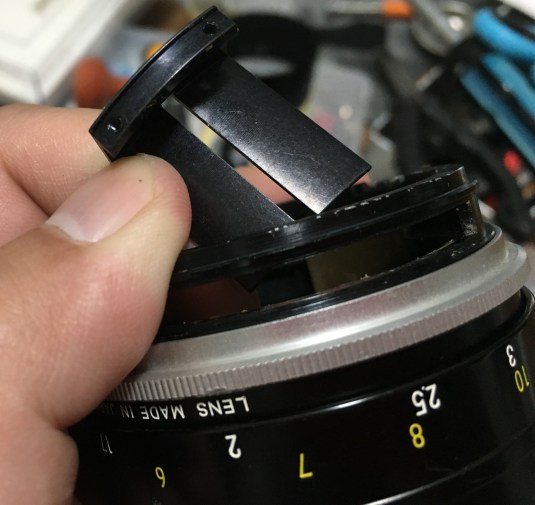
 Begin by extending the retractable hood.
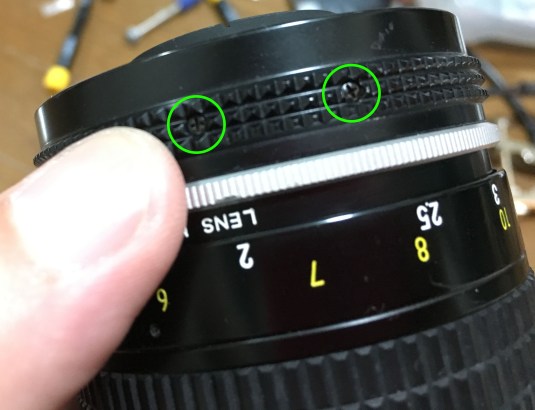
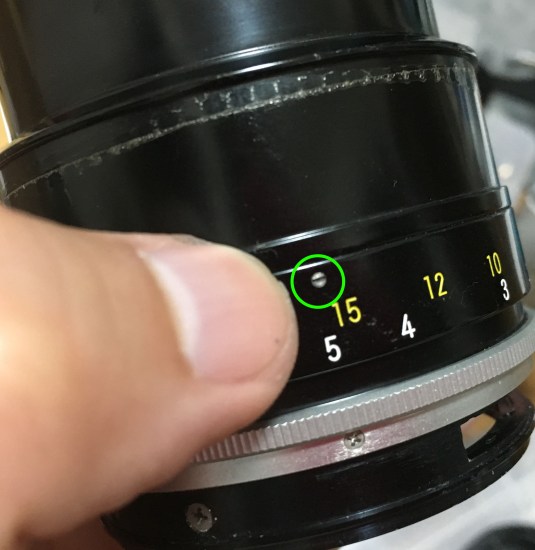
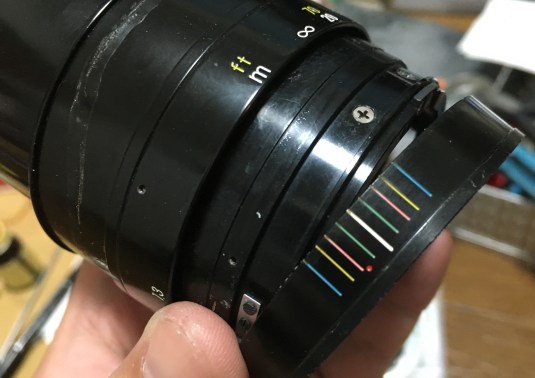
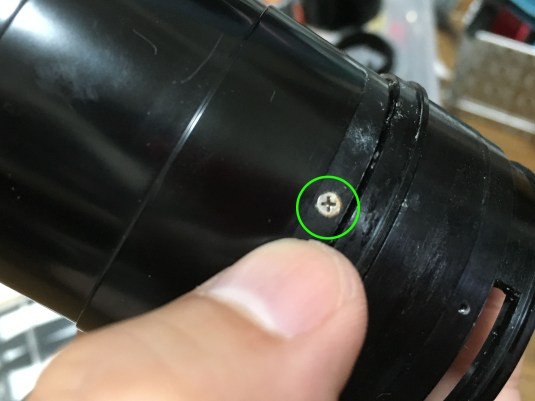
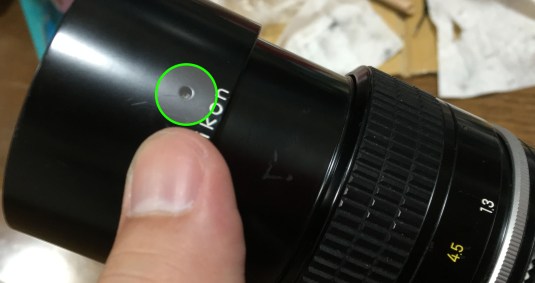 Rotate the hood until the hole on the hood lines up with the set screw. Unscrew it so you can remove the front ring.
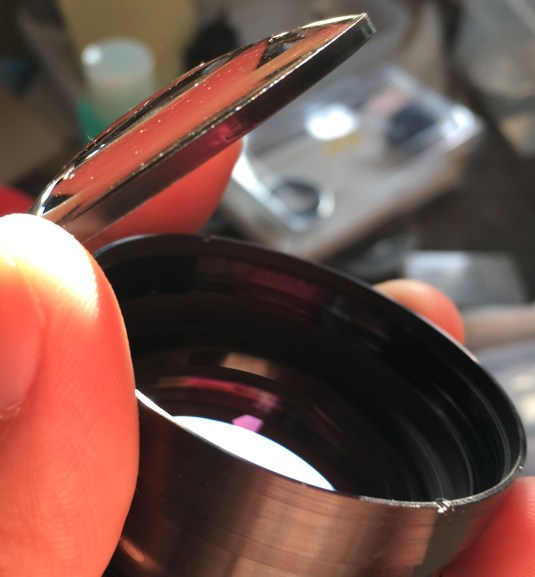
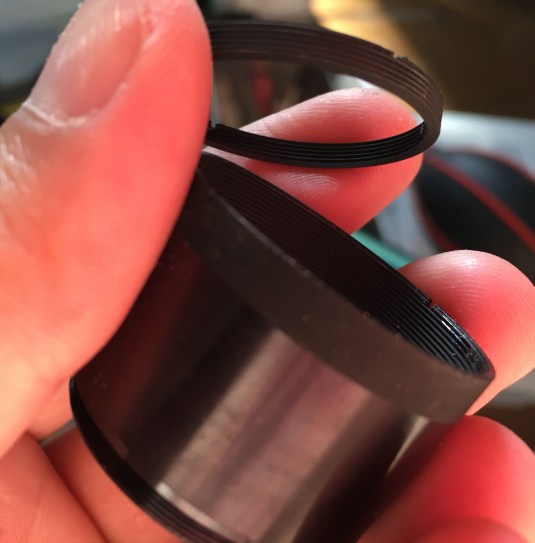
 Now, retract the hood again and remove the front ring. The front ring might be secured by adhesives so try placing a drop of solvent like acetone into the hole for the set screw and let that sit for a couple of minutes. Look at the picture above, the front ring has a hole in it and that is where the set screw was secured.
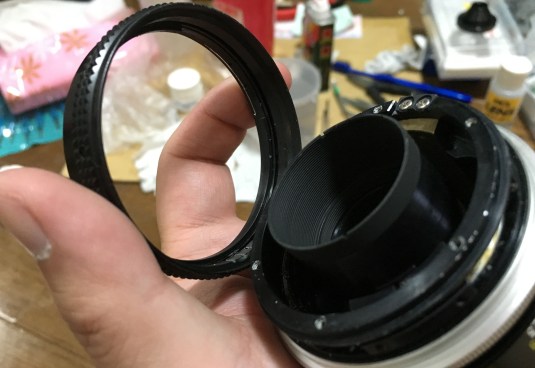
Get a rubber pad that is big enough to cover the front ring and use it to remove the front ring by using friction. You may want to put your elbow into it because these things can be tough to remove at times.
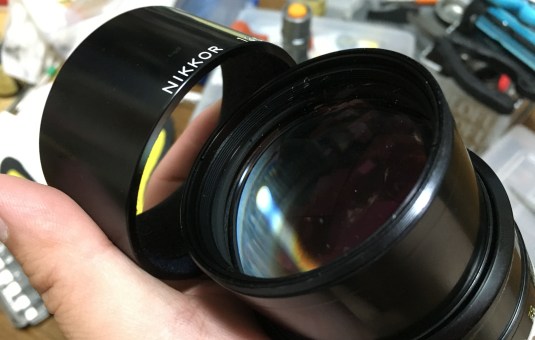 You can now remove the hood from the front barrel. Be careful not to damage the felt on the inner surface of the hood! You can remove the objective after this step but I chose to leave it there as I wanted to see how things were connected inside before I remove it.
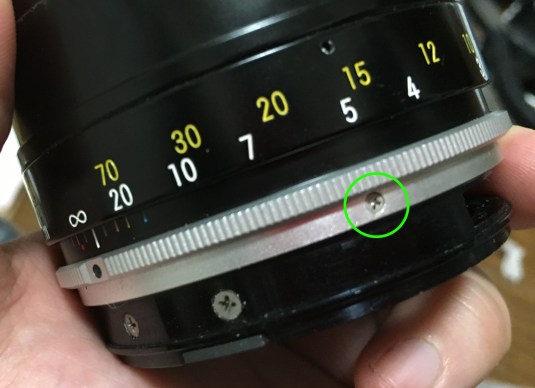
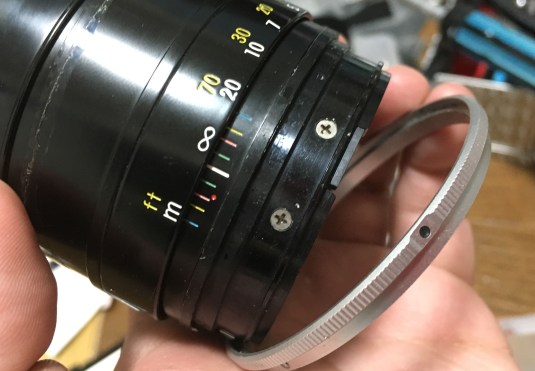
 Now, on to the back of the lens. Remove the screws on the bayonet mount. These screws are secured with generous amounts of Loctite so be sure that you put a drop of acetone into each screw and let it soften it for half an hour before you attempt removing any of these. You can also use a soldering iron to head these up to soften whatever was used on these. Also be sure to use the proper screwdrivers for the task – it should be JIS. If you are new to lens repair then I will suggest that you read my article on screws as a primer.
 Carefully remove the bayonet mount from the rest of the body. You may be tempted and remove the aperture ring at this point but just leave it there for awhile…
 The aperture ring is being held by these screws so you have to removes these to get that aperture ring out. This is a non-Ai aperture ring so I had to convert it to Ai. If you want to know how I convert my aperture ring to Ai, head over to my Ai conversion post. I’ll warn you that this process is irreversible so refrain from doing it unless you know what you’re doing! This will affect your lens’ resale and aesthetics.
 With those screws gone, you can now safely remove the aperture ring.
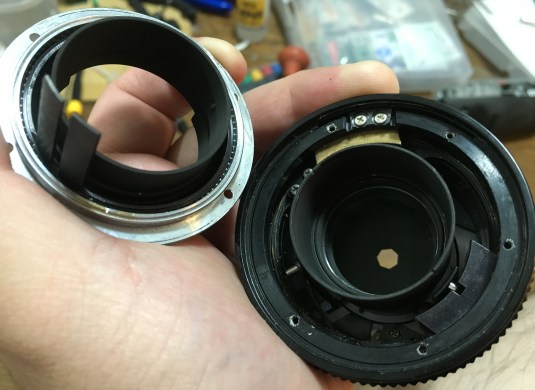
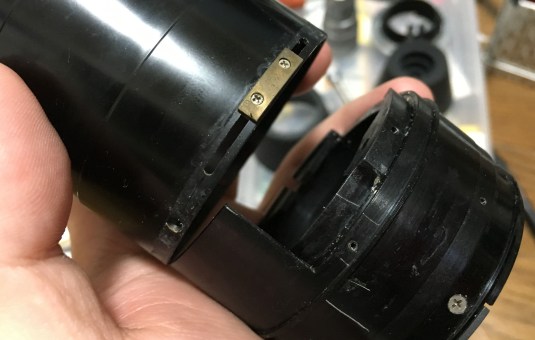
 OK, this is how it looks like inside. We would never have seen this picture if we removed the objective earlier.
 I should have removed the rubber grip earlier but whatever. Simply run a toothpick or any round tipped tool along the inner circumference of the rubber grip to loosen the glue used to hold it to the focusing ring. Look at the picture and you can see the residue left by the decades-old glue. Remove the grip carefully because you do not want to damage this.
 The objective is being held by 3 screws near the edge of the barrel. Remove these and you can safely pull the objective out from the barrel.
 As you can see from the picture a few steps earlier the rear part of this lens is cramped. Now that the objective is out of the way, you can now easily remove the smaller parts and not worry about damaging anything in the process.
 To completely dismantle the focusing ring to its bare parts have to remove the scale first by removing the 3 set screws that hold it in place. Be sure not to lose any of these!
 This grip should be removed as well so unscrew these 3 screws.
 The grip might be glued in your lens but mine wasn’t so it was easy to get this undone. If your’s was glued then you should apply some solvents or alcohol first and let that work before you remove this.
 This sleeve has to go as well. Again, you have to do the alcohol or solvent routine on this.
 Now that nothing is in the way, you can now remove the scale from the lens. Be sure not to damage this as this part is thin and easily bent.
 The focusing ring itself is being secured by these screws…
 Remove the screws and the focusing ring can be easily pulled away from the lens barrel.
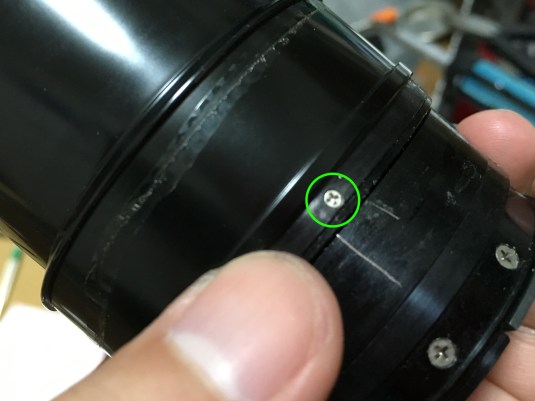
 To remove the front barrel from rest of the body, simply remove these screws that secure it to the helicoids.
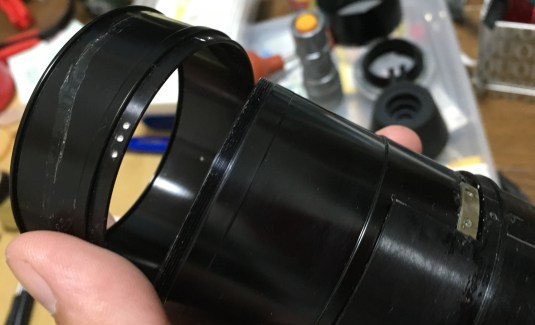
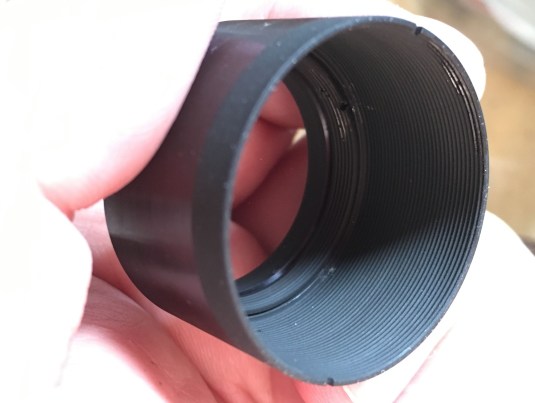
 The front barrel should come off easily…
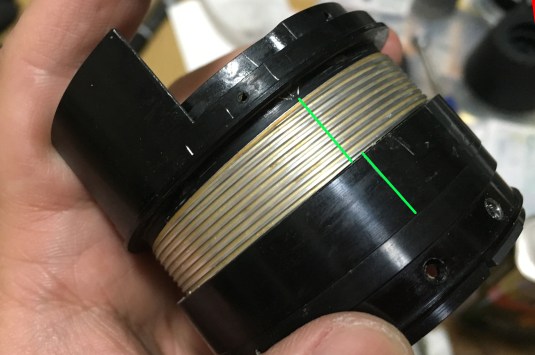
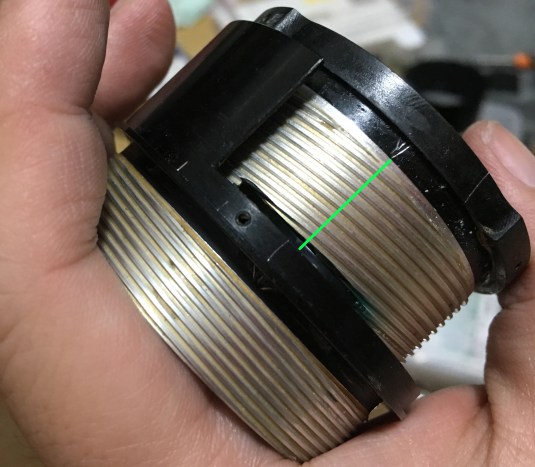
 Before we start separating the helicoids we should scour some marks so we’ll know how and where the helicoids should mate later on when we reassemble the lens. If you didn’t mark or note the helicoids’ positions and tolerances then I assure you that you’re going to have a very stressful time guessing their position in relation to the infinity mark. You can read more about working with helicoids in this article.
I made a few marks on the helicoids – one for the infinity position, another to mark the maximum compression of the helicoids. This is my personal lens so I have the liberty to mark it however I want but if this lens belongs to somebody else then I would mark this lightly. They say that a skilled repairman leaves no marks, that’s true! I am not as skilled.
 Once you are satisfied with your notes and markings, simply unscrew those 2 screws in the previous picture so that you can remove the helicoid key. Be careful with the screws since these are usually epoxied into place. If you’re lucky, these will be secured by Loctite but if you are working on a K-era lens then it will most likely be epoxied. You can tell if it is done with epoxy if you see an epoxy bead or smell the parts for that familiar peanut butter-like smell of epoxy.
Some people will touch this with the tip a soldering iron and let the heat soften up what is there, I simply use solvents to dissolve whatever was used. There will be times when the screws used on the helicoid key will snap due to age or left over glue so be careful! If that happens then you have no choice but to bring out the screw extractor or drill out the screw (or what’s left of it) and re-tap the screw hole to clean up whatever material is left.
 Separate the outer helicoid from the central one and be sure that you mark where they separated. I marked where they separated with a small arrow pointing to the infinity mark.
 Now, separate the inner helicoid from the central helicoid and mark where they separated. Look at the picture above to see how I went about marking these positions.
That’s it for the lens barrel. This took longer than it should because it has so many parts. I usually finish this part in less than half of what we have here but it can’t be helped. This is the reason why some New-Nikkor lenses are heavier, it has more parts than the usual Nikkor made from another era. This is a good thing if quality matters to you.
Disassembly (Objective):
Working with the objective of this lens isn’t difficult since it’s pretty straight-forward but I will caution you because the glass can be big and heavy. You will also need some special tools to open some of the parts here. If you’re not comfortable with working with optics, I will suggest that you leave this to the experts. It’s not worth ruining this lens just for the sake of learning a new skill.
 Simply remove the front front elements group by unscrewing it from the objective.
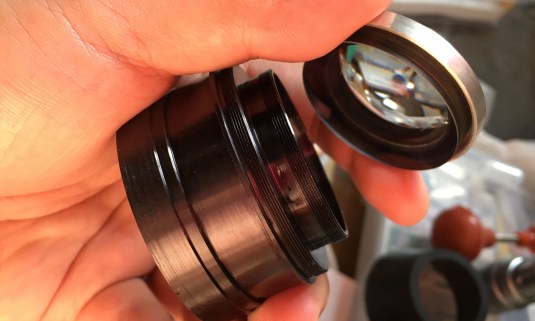 Begin by removing the last element on the front elements assembly by unscrewing it.
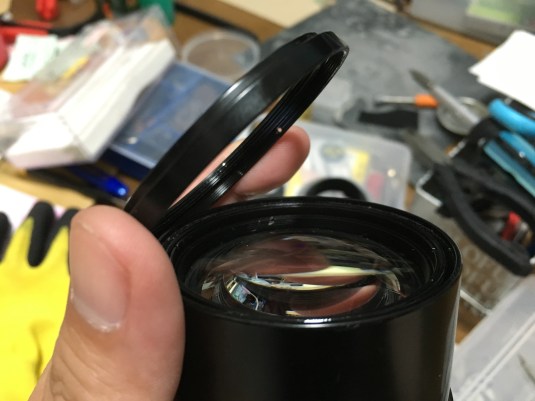
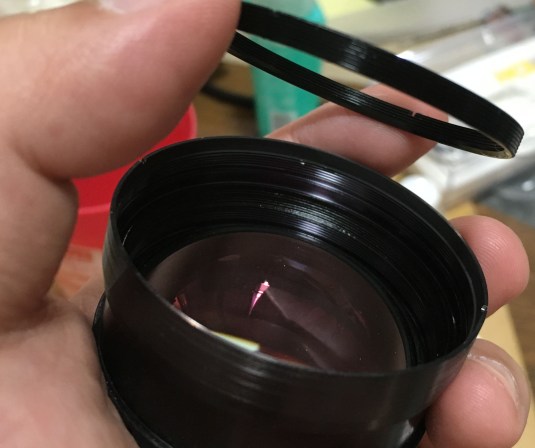
 Now, on to the front! Remove the retention ring with a lens spanner and be careful not to scratch the front element!
 Once the front element is gone, you can now access the second element.
 The next lens element is being secured by a retention ring. Use a lens spanner to carefully remove the ring without damaging the glass.
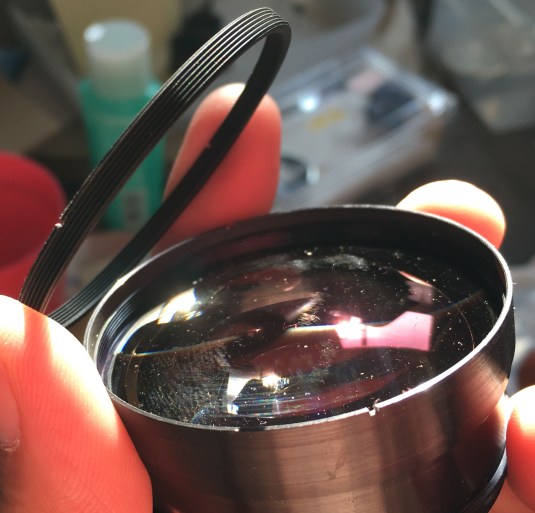
 Once the retention ring is gone, you can carefully extract this big chunk of glass from the barrel. The tolerances of these parts are usually very fine so it may be a tight fit for this so just take your time.
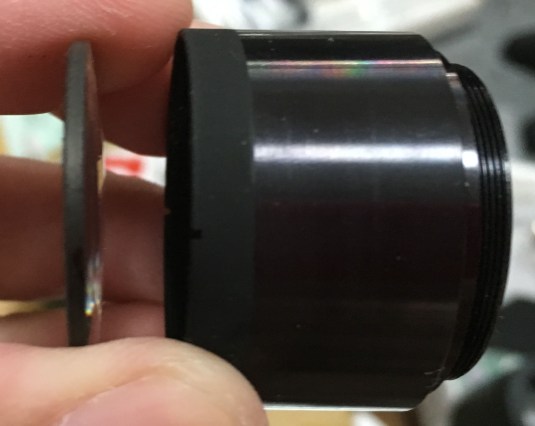
 The rear elements group also comes off easily by simply unscrewing it.
 The rear elements can be difficult to access without the proper tools. To find out how I got mine to separate, read this blog post about making your own DIY lens spanner.
 This ring is usually glued so place a drop of alcohol to soften up whatever is there. Mine softened after a couple of minutes after saturating it with alcohol.
 Now that the retention ring is gone, you can remove the rear element from its barrel. Be careful and note which side of the element should be facing forward or else you will end up with an “art lens”.
That’s all for the objective. The iris on this lens is clean so I didn’t have to take it apart. If you need to repair your iris then this article can’t help you with that. You can check what I have done in my other lens repair articles and see if you can find a lens with a similar iris mechanism design. Whatever you do, always take plenty of notes before you remove something and you should be OK.
Conclusion:
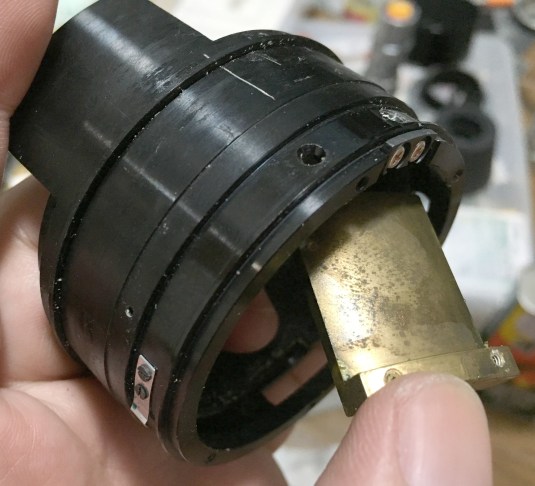
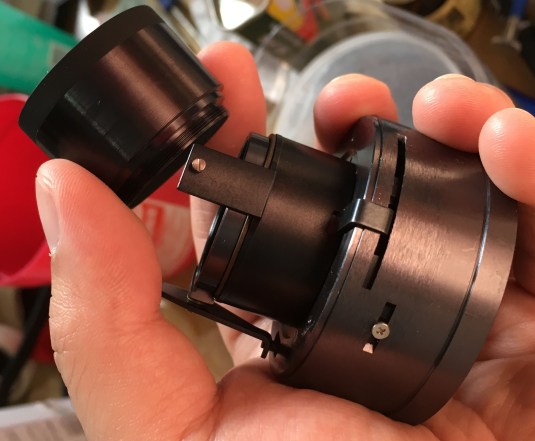
Before you put everything back together, assemble your lens until you end up with what I have in the picture below. You want to assemble the lens so that it can be mounted on any Nikon camera but still having all the necessary adjustment points accessible for you to fix the infinity focusing of this lens.
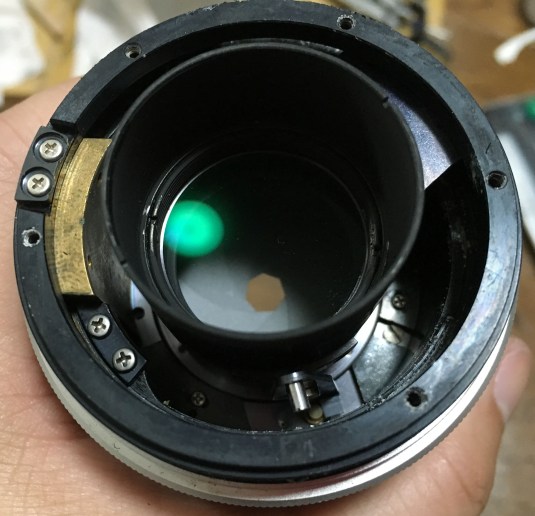
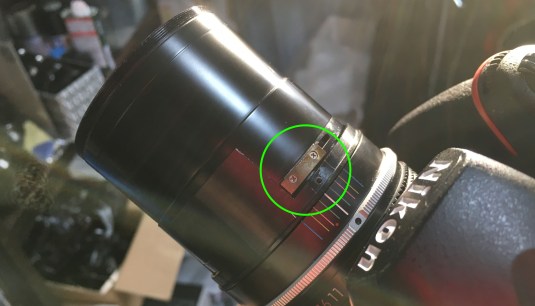 You can adjust your infinity focus by loosening these two screws a bit. Be careful not to loosen these too much because you may accidentally drop whatever is holding this brass stop. Just loosen them enough so that you can slide this brass stop left and right.
I like using Nikon’s modern DSLR’s because of the digital rangefinders. Simply focus your lens on something distant around 2 or more kilometres away and when the dot lights up in the viewfinder then that is where your infinity focus should be. Make sure that you do not move your lens accidentally and push this alignment off. Move this brass stop to the left until it cannot go any further, tighten the 2 screws and check again if your focus hits spot-on when you focus on a far away object. If it is still OK then you got your focusing right – congratulations! Finish it off by adjusting the scales of the focusing ring until the infinity mark is centered to the focusing dot and the white line.
 I got this lens from the junk corner of my favorite camera shop here in Tokyo. It was sold to me for a reasonable price so I bought it. I was looking for one anyway. While the lens itself is OK, the helicoids were rough and the exterior has some scratches here and there so that is probably the reason why this was sold as junk. Well, one man’s junk is another man’s treasure! I really enjoy using this lens and it’s going to be a keeper if you ask me.
This should be an easy lens for somebody with experience opening up lenses. I hope that you learned something from this so you can start fixing your lens, if not, I hope that you enjoyed seeing how this lens was put together and appreciate its engineering. If you have not “liked” our companion Facebook page yet, please click on this link and press the “like” button to get updates on new posts, interact with others who have similar problems and interests as well as showing off whatever gear you found in the junk shop. I would like to thank you for the continuos support and until next time, Ric.
Help Support this Blog:
Maintaining this blog requires money to operate. If you think that this site has helped you or you want to show your support by helping with the upkeep of this site, you can simple make a small donation to my paypal.com account (richardHaw888@gmail.com). Money is not my prime motivation for this blog and I believe that I have enough to run this but you can help me make this site (and the companion facebook page) grow.
Helping support this site will ensure that this will be kept going as long as I have the time and energy for this. I would appreciate it if you just leave out your name or details like your country and other information so that the donations will totally be anonymous it is at all possible. This is a labor of love and I intend to keep it that way for as long as I can. Ric.

Jul 10, 2016 @ 06:17:01
Perfect timing with this post Ric.
I have to replace the front element in one of these lenses next week, first time I’ll be stripping down a K version.
Thanks for sharing the procedure 🙂
Jul 10, 2016 @ 07:03:13
Be sure that you have the proper drivers 😀
Nov 28, 2016 @ 18:40:50
Wow! Well structured guide with lots of good advice. A truly helpful article… With this tutorial I fee confident to bid on an U.G.L.Y 2.8-135 Nikkor that came up on eBay… wish me luck.
Nov 30, 2016 @ 09:03:11
Hello, Simon! Be sure that you have the right tools first! The most important thing to master and learn is how to work with the bayonet screws. Make sure you saturate it with MEK for a couple of hours if it’s stuck. Ric.
Dec 21, 2016 @ 09:33:27
Be careful,Simon, as all those screws have JIS, not phillips heads. They look nearly the same, yet wrong screwdiver can easily strip the screw. Instead of acetone, you can heat the screw with fine tip soldering iron.
Moody tools makes reasonably good JIS drivers
Dec 21, 2016 @ 23:44:16
Hi, Charlie! I have a small butane torch for this but I rarely use this nor the acetone trick anymore since I got myself a long shafted VESSEL driver. Ric.
Jan 29, 2017 @ 18:30:51
No body could depart a Nikkor 2.8/135 and show them online better than you.
I just have one question, where is the small screw bellow the shade that I have to remove to accomplish the very first stage?
Thanks.
Jan 30, 2017 @ 02:20:35
Thanks for your appreciation! As for the screw, unfortunately, you will have to look for it. All you need to do is rotate the hood until see the screw hole. It is going to take some time but my technique is to line up the hole just 2-3mm below and above where the seam of the front ring is and just rotate the hood until I see something. Ric.
Mar 11, 2017 @ 17:28:59
but how to open the aperture to clean the leaf!!!!!!!!!!!!!!
Mar 12, 2017 @ 02:43:47
Hello, Luigi!
Mine was OK so I didn’t have the need to open it. I forgot how it looked like exactly but you should begin my removing the 3 screws on the iris casing and also the screw on the brass rotation ring. Be careful and read all of my articles so you are familiar with how Nikkor irises look like. Ric
Mar 21, 2018 @ 16:40:04
i have a nikon 50-300mm f/4.5 non ai with the zoom ring blocked, can you help me?
Mar 22, 2018 @ 00:12:38
Going to make an article for that soon
Dec 05, 2018 @ 20:26:26
An extraordinary guide! This lens belonged to my father, and I really love it both for quality of optics and focal length. Unfortunately, it had many fungus inside that made it unusable, although perfectly preserved for what concerns mechanics and aesthetics.
This guide allowed me -without any previous knowledge- to completely disassemble the optics and clean them (by mistake I also disassembled the diaphragm … but I have been lucky enough to be able to reassemble it :-).
Now it works nicely, and with great satisfaction, on my D750.
Grazie mille!
Dec 29, 2018 @ 02:50:01
Glad that it helped! Ric.
Oct 27, 2019 @ 04:08:43
How do I appreciate this type of blogs, just perfect!Firstly hang out through the album and than throw to repair business(who is interested) :)) Big thanks!
P.s I have a dilemma between this one and jupiter 134 f4, which is slower but cool lens(lot of blades). Tair seems very atractibe but different price.. Cheers!
Aug 29, 2023 @ 07:30:22
Hey and thanks for an excellent guide. Just a small thing: you don’t need to remove the rubber grip on this one.