
Hello, everybody! I am craving for some smooth and creamy French blue cheese, the one that smells of feet and with the blue molds. It is one of my comfort foods so I love to spread it on top of bread and saltine crackers for breakfast. I know that this is not good for people who suffer from gout but you have to eat the things that make you happy some times. We only live once and we should live our life to the fullest! Of course, we should never abuse our health so we should take care not to over-do anything. Since we are on the topic of smooth, creamy things, I’ll show you something smooth and creamy that isn’t as expensive as the stinky French cheese that I crave. Read the whole article to find out more.
Introduction:
There are few Nikkors that can match The Nikkor-Q 135mm f/2.8 Auto when it comes to creating smooth bokeh for very little money. These lenses can be bought for as little as $10 to an average of $80 these days depending on the condition. Near-mint samples with those valuable factory Ai-rings can fetch above $120 but seldom more than $150. This isn’t as popular these days due to it being a manual focus lens, the modest f/2.8 speed is turning-off people who crave for faster glass, too. For people who know their thing, this lens is going to be a keeper. Professionals even use these today and I know a few of them (2 actually) who use these as their portrait lens for work.

The Nikkor-Q 135mm f/2.8 Auto debuted in 1964 and was made until 1975. It was then replaced by a similar lens with the same optics design but with an updated barrel. The 135/2.8 line has about six major variants throughout its long production run. The lens family existed up until the DSLR era with the Nikkor 135mm f/2.8 Ai-S being the last version. This shows how this lens line sold very well through the years and across generations. It’s a classic in the sense that it’s never going to be useless even in the decades to come.
This only has 4 elements, hence the Q in Nikkor-Q. This means that there is less glass to filter-out the light coming from outside and this translates into rich saturated colours as well as the 3-dimentional look that many of today’s overly-corrected lenses lack. Many people think that more glass is better, it isn’t always the case. It’s a balancing act by the lens engineers to make glass with as less elements as possible while correcting flaws in the design. Years went by, people wanted lenses that beat the charts and graphs at the cost of a lens’ rendering qualities. Advances in engineering or electronics gave the lens designer access to computers that can calculate for these flaws, making it easier to compensate them with more glass. This led to the state that we are currently in, this is starting to get boring when a new lens is announced since they now look nearly-identical when it comes to rendering. Gone are the days when lenses were measured by how they render a picture and so Nikon began introducing this again with their new premium line of lenses like the AF-S NIKKOR 58mm f/1.4G and the AF-S NIKKOR 105mm f/1.4E ED. I would love to own any of them but my finances wouldn’t allow me to do so and that’s the reason why I’m shooting classic lenses and I’m showing you which ones to get.

The lens is built like a hammer, there is just not enough words to describe the feel of this thing in your hands and it makes you wonder why you are paying so much money for the plastic lenses that come out these days. The lens also has a built-in lens hood, a really nice touch. Everything about this lens hints that this is what a pro lens should be back in the days. It was the favorite of many photographers for all the right reasons as you’ll see later.

If your lens has an Ai-ring you’ll be able to mount it with newer Nikons like the Nikon F6 and benefit from its advanced features. It balances better with bigger cameras, smaller ones feel awkward with it.

It’s a great partner to the Nikon Df. With this, you’re able to use older lenses that are pre-Ai since the Ai-coupling tab could be lifted-up.
Knowing how an optic performs is the best way to exploit it. If you knew its weakness then it’s easy to workaround it and exploit its strengths in order to give you the most out of it. It’s a nice lens but I feel that the focus throw is a little bit long. This hints that it was probably designed mainly as a studio-only lens where precise focusing is allowed/demanded since it’s a controlled environment. For sports or other stuff where the subject isn’t cooperative, it can be challenging to focus with this. It takes a lot of practice if you are not used to using manual focus lenses but you should be able to get the hang of it within a day.


(Click to enlarge)
The samples above were shot from f/2.8, f/4 and f/5.6 in that order from left-to-right. You can see that the lens is sharp wide-open but you can see some chromatic aberration near hot highlights or areas with high contrast. This makes the lens look less-sharp than it realy is at f/2.8. Contrast is also quite decent at this aperture, it’s decent over-all. Stopping it down to f/4 will clean the aberration away and the pictures look “crisp” or cleaner than f/2.8 but not by much because it’s already quite nice wide-open. The background and the bokeh still looks smooth and blurred but not as smooth as it was at f/2.8. By f/5.6, the lens is beginning to peak in resolution. The background has lost its blurriness due to the deeper depth-of-field but it is still nicely-rendered. In case you guys are curious, the vignetting isn’t bad at all as you can see in the first set of photos. I also shot some pictures with this focused to infinity so you’ll see how this lens performs when focused further. It all looks good so you don’t have to worry about this lens being a “portrait-only” lens.
Time for some real-world photos. Pardon the focusing errors, it is a manual lens and it’s hard to avoid this specially if your subjects aren’t staying still. I took these wide-open since I wanted you to see the maximum effect of the blurred background and judge it for yourself. I would also like to showcase how decent the sharpness is wide-open despite chromatic aberration being present. I will show you how it can be beneficial for shooting portraits.


(Click to enlarge)
I love the 135mm focal length for candid shots. It allows me to shoot people from about a couple of paces before they even notice me. A longer lens will also give you more compression, you can use this to “flatten” /shorten your perspective and use it for telling a story. Telephoto lenses are not only used for getting closer to your subject, you also use these to fill the frame or alter how your subject looks. Shooting a subject with a longer lens when taking full-body shots will make them look taller or skinnier. This also applies to faces and other things that’s why you don’t want to use longer lenses when shooting things like food or jewelry because it will make them look smaller. Learning how to choose focal lengths is very important in story telling and a good director knows his focal lengths very well.

I just can’t resist taking photos of these Mainland Chinese tourists squatting in the middle of the fashionable Ginza district. Their squat-poses caught my attention, their poses make them look like they belong in an old painting. It is said that you can take the villagers out of the village but you can’t take the village out of the villagers.


(Click to enlarge)
Here are 2 good examples of compressing a scene. Pardon the missed-focus on the first picture, I ended up focusing on the handles! It would have been a great photo otherwise. Compressing the frame can flatten the perspective and make the size relation between the elements in your scene less obvious.


(Click to enlarge)
The bokeh character looks gorgeous, please click on each photo to see them. It’s amazing how much you can isolate the subjects from their backgrounds with this. I love the smooth, painterly-like rendering, the background feels like some pastel or water color painting. It can look rather comical if used too-much but this is just what you can get when you position your subject and background properly. Sharpness is also very good but not so good that you can see every pore in your subjects’ skin, which is a very good trait of portrait lenses. Are you convinced that this lens is good? Wait, I have more samples for you to look at.

Wow, just look at this photo! See how her skin glows? This is how the optical flaws of this lens work together, forming a nice picture. Instead of taking-away from the picture, they actually add more to it to make the rendering look soft. I said soft but I wan’t talking about the lens not being sharp, I was using it in the context that the rendering looks delicate. It has this refined look to it that makes it exquisite. You want an ART lens? This is an ART lens.


(Click to enlarge)
More samples for the bokeh lovers. This lens can turn your background into mush, just look at how blurry it is. There are absolutely no defined edges in the background and details, bright points-of-lights just blend together into a wash of colors. Click on the pictures to see the whole frame and just look at how everything melts like cheese.


(Click to enlarge)
Here are some more examples. The lens is very versatile and you can use to shoot things like environmental portraits. It has a lovely character and you can use this lens to show potential clients that you have something that the competition doesn’t but don’t tell them that it only costs just a fraction of the expensive new lens that the other guy bought. You know how some clients will always want expensive gear, tell them that this lens has some magical properties that only artists knew about.
Let’s see how this performs with film. Film has a unique look that’s difficult or impossible to replicate exactly using a digital sensor because it has film grain. People are shooting film because of this unique look. It is important for us to study how a lens works when shot with film in order for us to give a fair assessment of its qualities. For lenses that were made during the film era, this is the only way for us to see how and why a lens was calculated this way. These lenses were never intended to work with a digital sensor when they were calculated so shooting film takes us closer to a lens’ essence. I am not a purist but I appreciate using a lens in its historical context. I took the following pictures with Fujifilm Industrial 100 then I had the lab scan them with Fujifilm Frontier SP-300, the best film scanning system available to me.

Amazing rendering! The bokeh quality is superb, the frame compression is just perfect for these kinds of photos. This photo was taken at the minimum focusing distance, this is how much you can magnify your subjects despite this lens having a longer minimum focusing distance. Attach an extension tube and you can focus even closer.

I don’t call this a “magic lens” for nothing. see how beautiful the rendering is and how sharp it is wide-open. The lens balance between sharpness and softness and the rendering of the background is exquisite, I do not have to buy a more expensive lens just to get this kind of rendering. It’s a real “ART” lens for very little money.

The subject isolation is amazing, your subjects will “pop” right out from the frame if you know how to position them against the background.

Skin is rendered beautifully due to the residual spherical aberration which helps give the skin a soft “glow”. It’s perfect for portraits because of this and the 135mm focal length is great for tight framing such as this. I love how the details in the foreground is blurred.

Sharpness is great even with film, digital doesn’t have the qualities of grain so sharpness is better with a digital camera so I find this really impressive. Some films like the Fujifilm Acros 100 have grain that’s so fine that it rivals the output of a digital camera but we are seeing the scan from a cheap film here.


(Click to enlarge)
You can use its amazing subject isolation properties to your advantage. This can dissolve an otherwise boring background into a nice wash of colors and your subject will be left sharp and rendered in nice detail so long as you got your focus right.


(Click to enlarge)
The 135mm focal length is something that you need to be comfortable with, some people either love it or hate it, some people find it odd to work with. I personally love it and I think it’s great for candid shots like these. I also like how it compresses the frame, a longer lens will have too much of it while an 85mm lens won’t have enough of it at times. A 135mm lens hits the spot for me when it comes to portrait lenses.


(Click to enlarge)
Here are some more photos that I took that afternoon, these should give you a nice idea as to how this works for portraiture. I took these photos with the subjects framed at various distances so you can see how compression works in scenes like these. If you use a longer lens to take a subject that’s a bit far from you then it will help make them look a bit taller like what the picture with the standing lady shows. That one with the sitting girl shows the same effect but not as much since she’s closer. A longer lens will make her appear tiny if you framed her similarly. If you use a wider lens, she will look larger compared to the background if you framed her like this. The photo with the red-haired-auntie can show you how frame compression works for tighter framing. If I used a much longer lens then she would look “flat”, almost like a cardboard cut-out with very little contour due to the diminished effect of foreshortening. If I used a wider lens like a 50mm I’ll make her look chubby due to the effects of foreshortening. That is great for puppy photos and baby albums but not for pictures like this. An 85mm lens is great for portraits but it’s better for subjects that are framed similarly to the one with the standing lady. I based my observation on my experience so you may have a different opinion from me.
So, did I make a believer out of you now? Did I make you want to buy this? Well, if you don’t have one, please get yourself a copy. These don’t cost much so I don’t see why you wouldn’t want to get one for yourself, just make sure that it has an Ai-ring or it’s going to be used only with older Nikon cameras or mirrorless cameras wirh adapters. It’s worth paying the premium for a sample with an Ai-ring if you want to use this thing on modern Nikons with the Ai interface. If you have this but you’re not using it then I hope that this article can inspire you to shoot with it. I want to get the word out about this lens and the amazing rendering it does so I hope that I can convince you to help spread the word. This is one of those lenses that can endure the test of time, something that will still be useful many decades to come.
Before We Begin:
If this is your first attempt at repairing a lens then I suggest that you check my previous posts regarding screws & drivers, grease and other things. Also read what I wrote about the tools that you’ll need to fix your Nikkors.
I suggest that you read these primers before you begin (for beginners):
Reading these primers should lessen the chance of ruining your lens if you are a novice. Before opening up any lens, always look for other people who have done so in YouTube or the internet. Information is scarce, vague and scattered (that is why I started this) but you can still find some information if you search carefully.
I highly recommend that you read my working with helicoids post because this is very important and getting it wrong can ruin your day. If I can force you to read this, I would. It is that important!
For more advanced topics, you can read my fungus removal post as a start. This post has a lot of useful information and it will be beneficial for you to read this.
Disassembly (Lens Barrel):
This is probably one of the easiest Nikkor to service since the construction is straight-forward. I’ll even suggest this lens to people who just want to have something relaxing to do on a lazy Sunday afternoon. Overhauling this lens shouldn’t even take you 2 hours. Like most lenses, we would like to separate the objective from the main barrel so we can safely work on the main barrel without having to worry about scratching the optics. This takes a few more steps with this lens when compared to the usual Nikkor prime since it has a big front barrel with a lens shade attached but it shouldn’t be difficult to it.

Remove the screws on the bayonet (later versions) and you can remove the aperture ring from the rest of the lens. The aperture ring for my lens is not Ai’d so I had to convert this myself. To see how I do this, please read my Ai Conversion article. If yours is Ai’d then good for you.

The bayonet mount should come off as well. Do not force it if something felt stuck, just go about doing this step slowly.

Extract the screws on the focusing ring and you should be able to remove it easily. Just take a look at that old grease, yuck!
Remove the screws from the shiny chrome grip and slide it up to reveal the helicoid key. In order to remove the helicoid key you should focus the lens to a certain point so that these screws can be accessed. Remove the 2 screws and set them aside. You’ll definitely want to clean the helicoid key.

With the key gone you can now separate the helicoids. The helicoids on my lens separated at this point. Be sure to mark where they separate, if you are new to lens repair, please read my article on how to work with helicoids so you won’t get stuck. Many people get stuck because they don’t know how to put the helicoid back so please read my article in order to prevent this from happening to you.
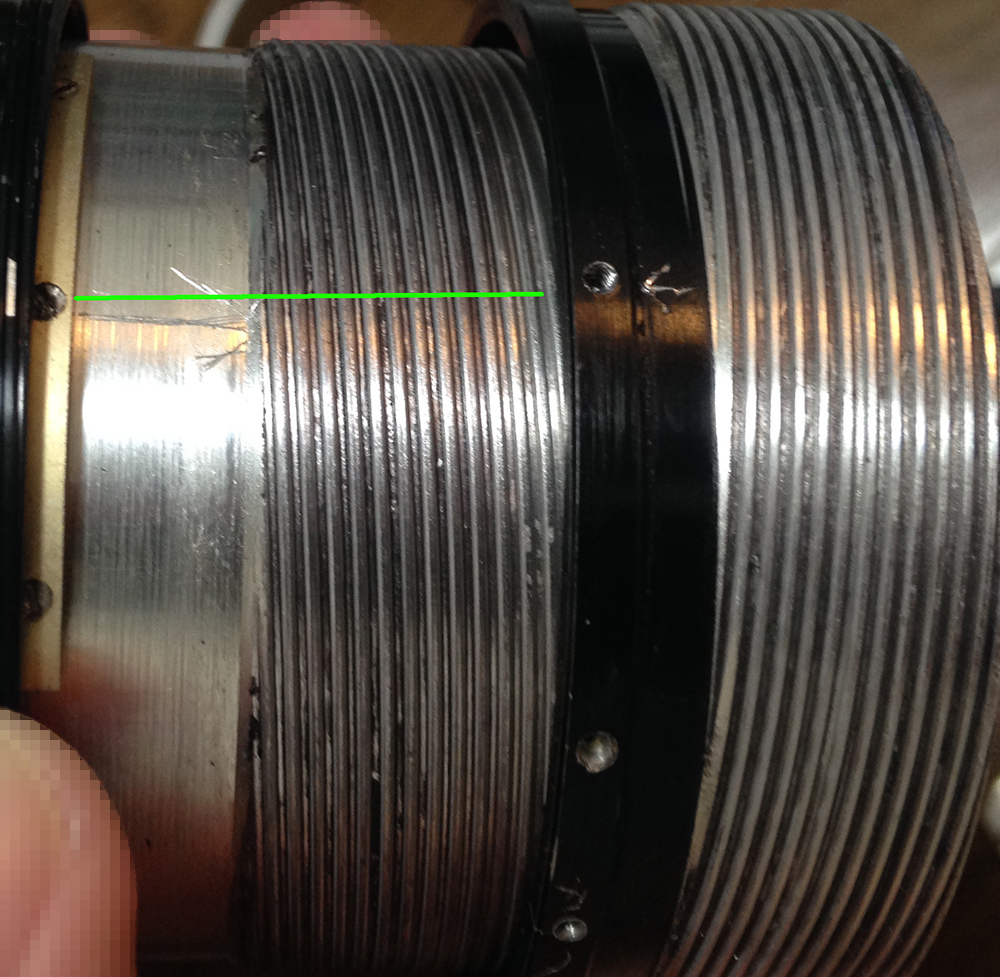
Do the same thing for the inner helicoid. Smart readers will notice a pattern with this lens by this point. The helicoids and several points in the lens have hints in them to indicate where they should separate or mate. This is really convenient, I hope that more lenses were made this way. Some things line-up to give you hints as to where things should align, mate or separate. Don’t follow what I did here. The marks I made were bigger than what’s needed, a small scratch is all you need.
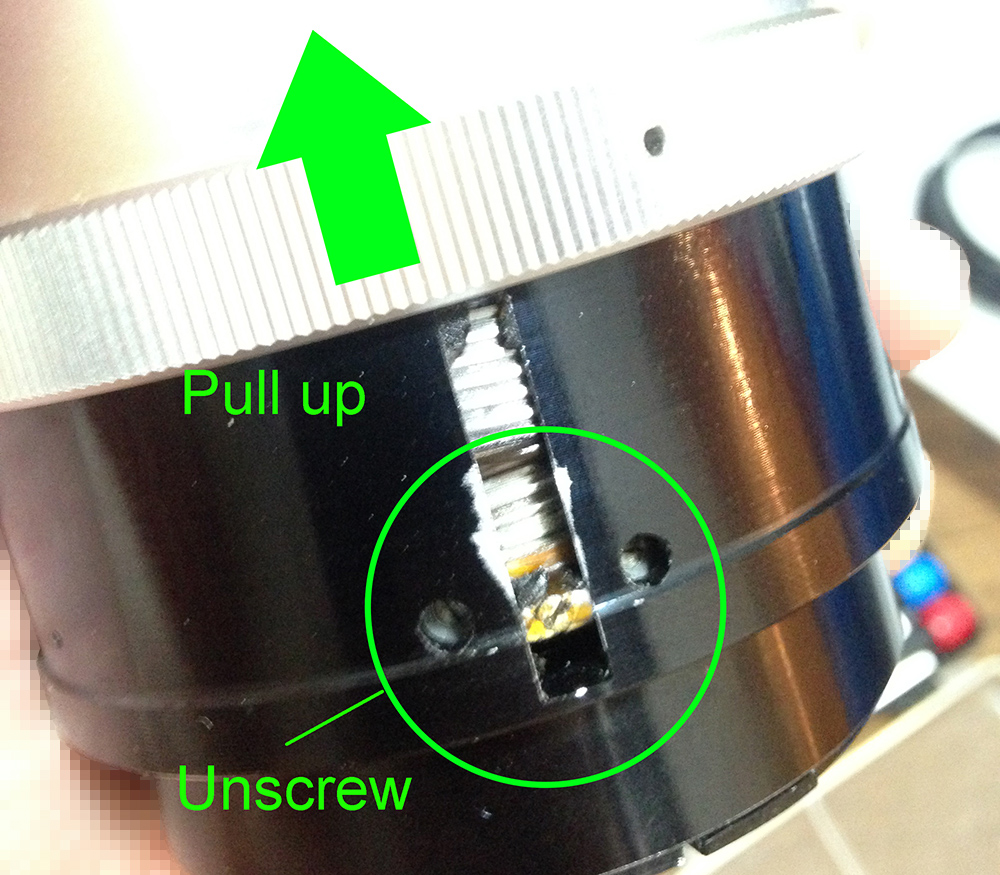
Pull the built-in hood and carefully extract this screw, this secures the front barrel. Please disregard the fact that the focusing ring is in the picture.

You should be able to unscrew the front barrel. If it will not budge, simply apply some acetone or solvent into the screw hole to dissolve the seal.

This lens has the number 107 marked on it. I find this interesting, could this be the employee number of the person who machined this part?
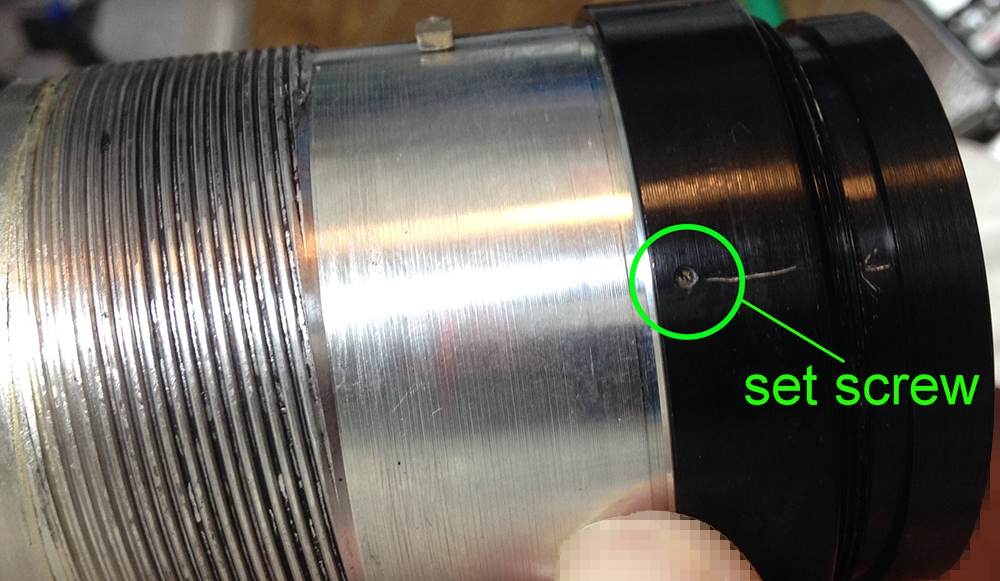
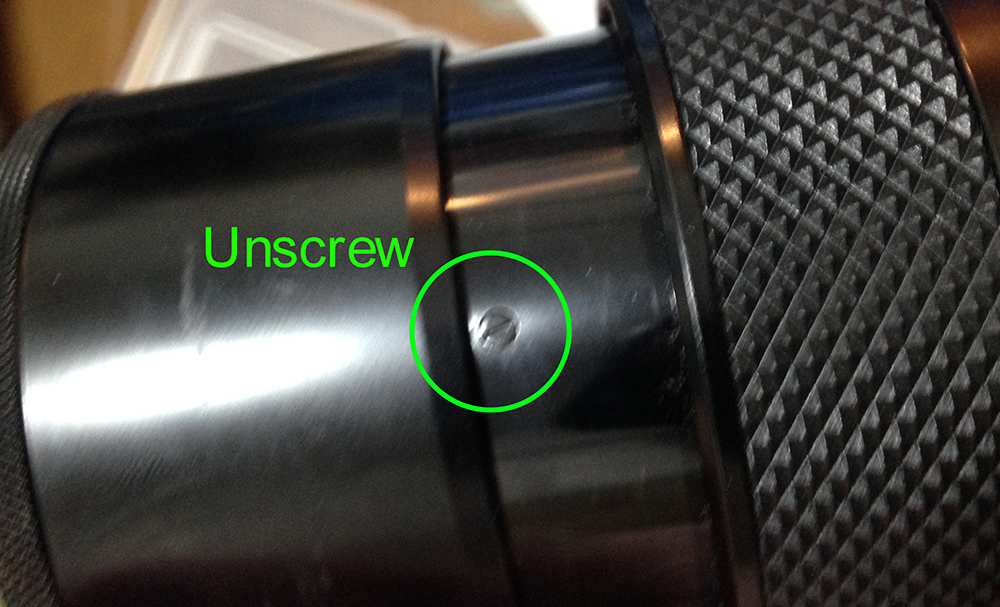
Carefully get rid of this tiny set screw. Set is aside so that you won’t lose or damage it. It can be delicate to extract, if it’s stuck, drop oil and naphtha to that hole and wait a bit (even overnight) and try it again. If this got stripped then it’s going to be difficult.
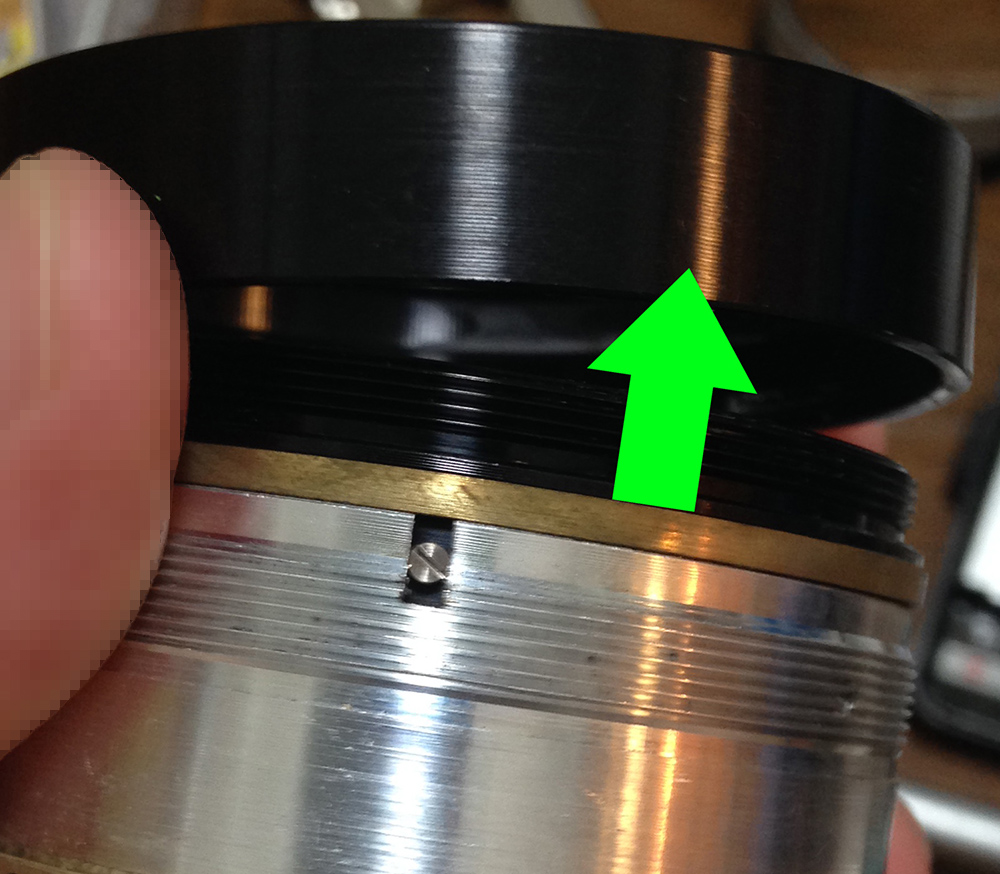
With the set screw gone, you can unscrew this collar to access the objective. The brass shim in the picture is what Nikon uses to help calibrate the focus of this lens. Later models will allow you to adjust it with the focusing ring’s screws.

Make sure that you don’t drop the objective. It’s heavy, gravity alone will be enough to cause this to separate from the helicoid. You may have noticed by now that you can get the objective off earlier. Once you get the front barrel off, you can unscrew the collar securing this and remove it. Mine was stuck so I had to make a short detour just to remove it safely.

For a thorough cleaning, remove the aperture fork and its ring. To remove it you’ll have to unscrew its retention retention ring. I’ll lubricate these parts later when I put the lens together again for a smoother operation. You only need to apply a thin film on the ring and that’s it. Don’t apply too much here or it will migrate to the iris. The grease I used is the same one that I used for the helicoids so there’s no chance that the helicoids’ grease will contaminate this and vice-versa.

You should have something close to this by this point. You can dismantle the bayonet mount assembly if yours is filthy but I will just let it go for now. The bearing is a bit of a pain to work with and I don’t have the patience to work on it. I will only work on it if I had no other choice.
That’s it for the lens barrel. Make sure that you clean the helicoids very well using a stiff brush. Clean them well so the old grease won’t contaminate the fresh one. It is very important that you keep it really clean before applying a fresh coat. I used a thinner type of grease for this because I don’t want too much resistance on this lens. If I used a thicker type then the focusing ring will be too difficult to turn. Don’t apply too much grease or it will puddle-up and form a disgusting gloop.
Disassembly (Objective):
Dismantling the objective won’t take a long time, you only have 4 elements to think about. It is pretty straight-forward so long as you have the proper tools. I’m not going to clean the iris blades on this since they are clean so for those people who need to clean theirs, this guide will not be very helpful on that matter. Read my other articles for reference, there are plenty of lenses where iris mechanisms that are similar to this.

Put a small drop of acetone or alcohol into this hole to dissolve the lacquer sealing this collar. Notice that the plate below it was moist with solvent, that thing comes off as well and I also applied some solvent to help dissolve any lacquer there. The rear element can be easily accessed once these are off.

You have to remove the bezel with the beautiful engraved characters before we move on. Use a lens spanner for this, be careful not to scratch the glass. You will also want to apply some alcohol on the seams of this ring because these are usually glued and it can be difficult to remove. It will take several applications so be patient. If you have a rubber tool then try it before using the lens spanner. Using rubber on parts that are close to any glass part will always be the preferred method. The serial numbers ends in “888” and this is one of the reasons why I got this lens. Nice!

Remove this ring to access the front elements. As with the rear, drop alcohol in this hole to dissolve the lacquer, wait for a few minutes and unscrew this with your hands.

The front elements should come off easily. Four-elements-in-four-groups, I like simplicity and it can’t get any simpler than this (except for the Nikkor-T 10.5cm f/4), the rear element isn’t in the picture in case you are wondering. Be careful not to drop any of these as they’re heavy
The objective can now be properly cleaned. Thankfully, my lens wasn’t too dirty so I did not have to dismantle everything further. It is also important that you make a small mark on the walls of some of the lens elements using a permanent marker. Some of the elements’ curvature look ambiguous and symmetrical but they’re not so that small mark will help you identify which side should be facing where. All you need is a small dot, you do not want to make a mark that’s bigger than what you need. The walls of the lens is also marked with India ink so if yours got cleaned-off for some reason then you can apply it again with a fine-bristled brush.
Conclusion:
Once the barrel has been cleaned and lubricated you can reassemble it by back-tracking each step but leave out the front barrel, hood and the collar of the objective. Reassemble the objective, make sure that the iris is snappy when you actuate it just to be sure that it’s clean.

As you can see, this lens sure is pretty simple. The only annoying step that I could think of when I was working with it is the part where you reassemble your lens and you need to put the objective back. While the inner diameter of the barrel is pretty wide, the objective itself is pretty big as well so there’s not a lot of room for you to move around. The easy way is to go slowly while aligning the aperture lever and the aperture fork to their respective tabs to the objective. It may take awhile for you to get it right so don’t worry. Lower the objective into the lens barrel and make sure that the claw and tabs align. You can also depress the stop-down lever at the bayonet to make it easier.

As you can see from the photo, the fungus is gone, the lens functions like it’s new. The helicoid is now silky-smooth and the glass is clean. It should have been like this in the first place considering the price that I paid. Sellers like this push me to repair cameras and lenses. This was not the first time I was scammed, it’s certainly not the last. On the other hand, there are lots of nice and honest sellers around but rats like this ruin the entire lot. The problem is they can just delete their crap account and do another one.
The reason why I wanted to clean the objective was to remove fungus at this spot. The rat who sold me this at Yahoo! Auctions Japan is a liar and can’t be trusted. He posted this as a lens in great condition with “dirt” in the middle element, some dirt it was. Yahoo! Auctions Japan is like eBay, it’s filled with a lot of shady sellers and dishonest people.
I had a lot of fun working with this, I hope that you have fun working with yours, too. I hope that you enjoyed reading this article. Sharing this around with your friends helps make this site more popular. I only earn a few cents a day from clicks so if you want to see this blog continue, please consider to support this as it helps me pay for hosting and buying and developing film. This will ensure that this blog continues to live and help more people in the future. Thanks again and see you again next time, Ric.
Help Support this Blog:
Maintaining this blog requires money to operate. If you think that this site has helped you or you want to show your support by helping with the site’s upkeep, you can make a small donation to my paypal.com (richardHaw888@gmail.com). Money is not my prime motivation for this blog and I believe that I have enough to run this but you can help me make this site (and the companion facebook page) grow.
Buy me a roll of film or a burger?
Thank you very much for your continued support!
$2.00
Helping support this site will ensure that this will be kept going as long as I have the time and energy for this. I would appreciate it if you just leave out your name or details like your country’s name or other information so that the donations will totally be anonymous. This is a labor of love and I intend to keep it that way for as long as I can. Ric.

Apr 25, 2016 @ 13:31:01
Nice article. I’ve seen these for sale in Tokyo for pennies. They made them so well that a ton of good copies are still floating around the used market over 40 years later! I never bought one since I have a 135mm/2.8 Ai lens, which is very similar optically but more compact.
Also, wchinazz2007 sounded familiar, and I checked my e-mail history. I bought a 39mm Nikon orange drop-in filter for my 300/4 lens from that guy, actually he stated that it had scratches on the surface but it was so cheap I figured I’d give it a try anyways. There was some crud on the surface when I got it, but after some careful cleaning with alcohol the filter is basically in perfect condition. In any case, I only use it when I mount the big lens on my film bodies with B&W film (I also keep a red filter in this size).
Apr 25, 2016 @ 13:37:56
Thanks hernlund!!! yes, these are built like VW beetles. i can smash this into a mugger’s face for self defence! the Ai one I believe has a different optical design, or was it the Ai-S?
that wchinazz2007 guy is such an annoying son of a bitch. i lodged a complaint against this guy and he even would not bother to respond to my messages properly. that rat owns a shop.
Apr 26, 2016 @ 11:49:04
Not sure but I think all the pre-Ai 135 lenses had 4 elements, while the Ai and Ai-s had the same 5 element formula. They are all great lenses, just different packages. On the Ai version the bokeh is nice but I’ve found that I have to really nail focus wide open to get sharp results and good subject separation. The green dot doesn’t always do me right with this lens.
I’ll watch out for that wchinazz2007 jerk in the future…thanks for letting me know!
Apr 30, 2016 @ 14:37:38
I see. the later Ai and Ai-s ones are superb. the green dot works for me, i have poor eyesight and even a focusing screen is not helpful.
Jun 27, 2016 @ 11:50:14
G’day Richard,
This article looks awesome ;]
I have a 135mm f/2.8 non-Ai copy of this lens that has had an AI conversion done to the rear end by a previous owner.
I’ve recently noticed that it doesn’t focus to infinity correctly ;[
Some research and discussion with others has come to the conclusion/suggestion that it appears to have been reassembled wrongly at some point in the past.
So, I’m guessing I need to disassemble the lens and then adjust one or both of the helicoils and retest.
Just wondering if you could suggest which helicoil to tweak (or both?) and in which direction to tweak it?
Thanks, Jeremy.
Jun 28, 2016 @ 16:47:14
Hello, Jeremy and thank you. I can write a guide for you next weekend if you can wait. It can be easily adjusted so long as the helicoids are not involved
Jun 28, 2016 @ 20:30:38
Thanks mate, that’d be really awesome ;]
Jun 28, 2016 @ 23:13:41
Hello, Jeremy. You are missing the infinity mark by how many mm in the focusing scale? Ric
Jun 30, 2016 @ 10:24:12
G’day mate, sorry for the delay in getting back to you, work has been demanding a lot of my time this week.
I’ve just got the lens out again and had a look.
With the focus ring turned all the way to close focus, the 1.5M lines up dead centre on the black focus mark on the silver section of the lens.
With the focus ring turned all the way towards infinity, the infinity mark is centered over the black focus mark in the silver section.
So, it seems to have a full range of motion.
I’ll try and set up the lens on tripod and measure how far from the sensor plane is in focus at a few points on the focus range.
Jun 30, 2016 @ 11:48:49
Ok, testing reveals the following:
With lens focused at “1.5M”
Distance to in focus subject = 1330mm
With lens focused at “4M”
Distance to subject in focus = 2870mm
With lens focused at “10M
Distance to subject in focus = 4650mm
With lens focused to 20M
Distance to subject in focus = 6310mm
With lens focused to “Infinity”
Distance to subject in focus = 7835mm
Jul 01, 2016 @ 00:10:35
Hello, Jeremy. looks like the helicoids were improperly set. If it was properly set then you will be off by less 10cm or so and it can be adjusted through the focusing ring adjustments. Wait for my article and pay attention to where my helicoids separated. Ric.
Jul 01, 2016 @ 10:18:07
Awesome ;]
I did wonder if that might have been the case.
We’re heading off on holidays after the weekend for a week. I’ll keep an eye out for your article and attack the lens when we get home.
Thanks heaps for the help. I really appreciate it ;]
Aug 21, 2016 @ 12:15:03
Hey Richard, I’m trying to strip and rebuild the 135 f2 AI, I have removed the rear plate and the 3 screws on the focus ring so it is now loose but now I’m stuck ! Can you help? Thanks.
Aug 21, 2016 @ 14:01:36
Hi, Andy! That sucks. If you can post the problem with accompanying pictures on the facebook page maybe me and some other people can help you. Rick
Aug 30, 2017 @ 02:51:12
What’s the easiest way for me to just remove the lens hood?
Aug 30, 2017 @ 15:15:53
Hello, Martin.
The lens hood isn’t easy to remove in this lens. If I recall, you will need to remove the name ring first. Ric.
Oct 03, 2017 @ 08:23:04
Hello Richard, thank you for posting all these useful notes! Can you advise me on this very same 135mm f2.8: I have disassembled the lens, and have trouble aligning the aperture fork with the protruding tab on the objective, while trying to mate the helicoids at the same time.Is it possible to assemble everything else first, then attempt to insert the objective from the front? On your repair notes on the Nikkor S 50mm 1.4, you mentioned that only the front covers need to be opened if one only wants to access the objective and clean the glass elements.
Thank you in advance!
Oct 04, 2017 @ 10:01:48
Hello, Ah-Siong.
Yes, that is what I do. I would assemble everything and then slide in the objective. Do not forget to push the stop down lever down by the way. I may do a video on this one day.
Some lenses will be easier to do it the other way around. If in doubt, send it to David Hilos. Ric.
Oct 12, 2017 @ 03:51:10
That is how my friends address me here. (How did you know?!) Thank you for these articles. Can’t find them elsewhere.
Oct 12, 2017 @ 04:23:39
Hello. Well, your singaporean what?
Oct 04, 2017 @ 10:20:20
G’day, I’m having the same issue and also looking for a hint please ;]
Oct 19, 2017 @ 04:41:44
I am Singaporean. Appreciate you taking the time to post all these articles. Have since assembled the 135mm with some questionable white lithium grease and a prayer. Currently working on a Zuiko 50mm 1.4, and stuck at the rear bayonet re-assembly. The Oly 50 1.4 wasn’t a fantastic lens to begin with. A glutton for pain.
Thanks Richard.
Oct 25, 2017 @ 05:17:20
Thanks Richard, this guide helped me rebuild my 135mm 2.8. I found my copy (serial #168118) to be a little different though. The aperture ring and aperture fork both screw on…there isn’t a retention ring for the fork. Thanks again!
Oct 28, 2017 @ 04:44:41
Thank you, Bryan!
Sorry I was really busy to reply so I just got to see this. Yes, there are MANY sample variations for this lens. Ric.
Mar 30, 2018 @ 06:48:48
Hi Richard! Hope you are well.
Thank you for the articles, they’ve been tremendously helpful.
I’ve been taking apart an AI converted version to clean the rear elements, but have been stuck with the aperture claw, as well as the aperture lever connected to the bayonet, not quite sure how to fit them together correctly. I did not strip the lens down completely, only about half way.
Hoping you could point me towards the right direction! Thank you in advance
Apr 01, 2018 @ 00:04:17
Hello. You put the lens barrel back together as usual and then just slide the objective inside while pressing on the stop down lever. it wont be easy with this lens because its deep. Ric.
May 01, 2018 @ 19:21:22
Thank you Richard! I had hoped I wouldn’t have to disassemble the front lens group, as I only took it apart to clean off a patch of fungus on the rear 2 elements! Oh well, work to do… Thank you for your awesome contents! L
Oct 05, 2018 @ 03:32:56
Hello there! Thanks for the informative and thorough guide. I’m having troubles with sitting the objective back. It seems to go in right but after that the aperture doesn’t open fully if set on anything but 2.8. There seems to be no other way to put it together but here still I’m doing the same thing over and over and it just doesn’t go back to opening fully Could you point me in the right direction? Many thanks!
Oct 09, 2018 @ 00:58:21
Hello, Russ. Sorry for the late reply, I was busy.
One way to do it is to inset the whole optics housing inside the lens barrel while the bayonet isnt installed and then install the bayonet later. Some people find this easier but not for me. This may work for you. Ric.
Oct 28, 2019 @ 01:26:41
Hola! quiero agradecerte porque no solo me incentivaste para comprar el objetivo si no que tambien me he animado a realizar la modificacion para poder usarlo con mi d700. Muchas gracias por el gran aporte!
Jan 07, 2020 @ 21:09:33
I bought this lens a while ago after reading this article. It’s pre-ai, its bulky, it’s heavy and I paid too much for it. And I love it! Thanks for the tip! And thanks for your excellent street photos – they are one reason why I like returning to your site
May 09, 2020 @ 12:59:16
Finally an article worthy of reading appears!
Thank you.
Feb 20, 2021 @ 00:24:41
Richard,
I have a copy that was supposedly Factory AI’d but when I purchased it years ago I didn’t know how to tell the difference.
That said, after having it for a year I upgraded to a D750 and found that it was not properly AI’d as it fit very stiffly (my D5000 didn’t have the auto index). Apparently they didn’t etch enough of the material away and it rubs ever so slightly on the outer ring of the bayonets.
If I purchased a cheap Factory AI’d version of this lens can I just swap the requisite parts? Namely the bayonet. I feel the answer to this is yes but before dropping $$ I thought I’d ask.
2nd question. My lens is near mint condition. No fungus, some dust/lint. Utterly amazing for a 249xxx series I feel. Is there a chance that if I buy a cheap version that was factory AI’d but has fungus that I’d run into problems by cross contamination?
3rd One such copy I’ve found has Phillips head screws, not flat head. Was that a legit change that was made or did someone put the wrong screws back in?
Many thanks in advance.
Mar 12, 2022 @ 14:13:13
I don’t know if this has been touched on elsewhere but for anyone considering cannibalising a lens for parts it is worth noting that the inner focusing sleeve and the location of the aperture activating pins and locating pin on the optical block can vary wildly (by as much as 90 deg.) and I suspect were matched individually in each lens. Just be aware….
Jan 26, 2023 @ 09:40:45
Sehr geehrter Richard,
vielen Dank für Ihre ausführlichen und interessant beleuchteten Artikel. Durch Sie habe ich verstanden, welchen besonderen Wert diese alten Nikon Objektive besitzen. Ich werde dieses Wissen mit persönlichen Erfahrungen und Bildern weitergeben.
Beste Grüße aus Deutschland, Seba