
Hello, everybody! How are you today? I just had a little midnight snack with my wife and we had some sushi. Sushi is as Japanese as cherry blossoms despite having its origins in Southeast Asia in the distant past. It’s a throwback to old Imperial Japan but its taste has not changed much since the late 1800s. It’s a testament to how something good can stand the test of time. Today, I am going to show you something that was designed long before most of the people who are reading this blog was born and like sushi, its design is still as relevant today as the day it debuted. Read the rest of this article to find out more.
Introduction:
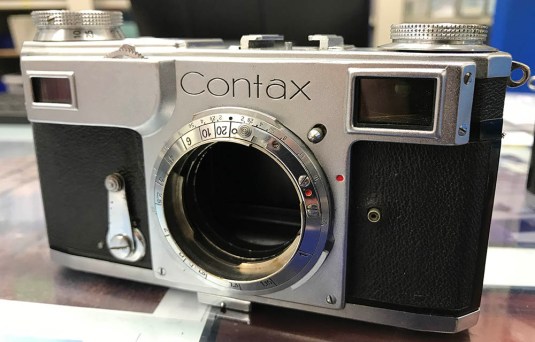
Today, we are going to tackle Zeiss Ikon’s masterpiece – the Contax 2 camera! It was made from the second half of the 1930’s all the way to the post-war years and it’s the product of Hubert Newrin’s genius. He presided over the development of this camera and he vowed to make a camera that would fix all of the bugs of the previous model (the Contax I). The previous model was troubled with numerous flaws that it was updated so often that new updates would come out just a few months after the previous updated was sold. Reliable isn’t the word that you’ll see used in the same sentence with the Contax I except if it was used in the negative. While the last model was fairly trouble-free, it’s considered to be a lemon. The Contax 2 changed all that and it restored Zeiss Ikon’s tarnished name because it is so much more reliable and the ergonomics made plenty of sense. It feels like it was a design that came out of Bauhaus and its ergonomics and design was copied by many. It’s such a breakthrough that you can still see its influence in the camera designs that were made in recent years. This Contax 2 is to cameras as the Model T is to cars.
 The Contax 2 is a beautiful camera, it’s amazing to think that this camera was designed in the years leading to the rise of the Third Reich before the mid 1930’s. The design endures the test of time and it’s still a joy to use this camera despite being almost 90 years old.
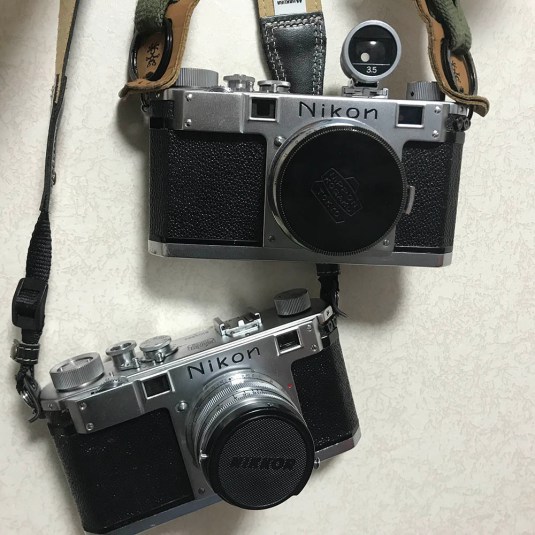 Now, you may be wondering why the Contax 2 is being featured in a Nikon blog. I need to feature this camera because its design is the inspiration for Nikon’s first 35mm camera! It was only possible because German patents were made void outside Germany after WW2. This led to many copy-cats from just about everywhere. The Nikon I/M/S models were all inspired by the Contax 2’s timelss design but they were never copies. I will show you why in the Nikon S article that I am preparing. It’s an evolution and a step in the right way.
 The Contax 2/Contax 3 were both succeeded by the Contax 2a/Contax 3a in the early 50’s. You can see a Contax 3a in the background, it’s a bit smaller and the engineering is great for a camera that was designed in the 2nd half of the war. It’s a much more complicated machine and its engineering is nothing less than what I would expect from the Germans.
The Contax 2 was released with a sister design in the form of the Contax 3 with the only difference being the top panel has a built-in uncoupled light meter installed. These two designs were revolutionary and were way-ahead of their time. The shutter-speed selector dial doesn’t revolve when you press the shutter, the rangefinder has a very long base so it’s very accurate, all of the important dials are at the top deck. These are just a few of the many important things that the Contax 2 introduced to camera design.
There are numerous articles written about this camera online so if you want to see more information about it then just do a search. It’s pointless repeating what’s written there in this article because this is just a short introduction and we’re more of a repair site than a review site. I am going to separate this article into multiple parts just because this is long enough to eat up all of my time so I need to separate it into smaller parts. Here is the link to part 2 of this article.
Important, please read the following:
As beautiful this camera is, its claim-to-fame in the camera repair circles is its complexity so repairing it isn’t really easy. It’s difficult not because you need special skills to service one, it’s difficult because the parts and assemblies are interconnected and this makes the usual maintenance job difficult. Another thing is there isn’t much you can do to adjust its shutter mechanism so fine-tuning the shutter mechanism is not something you will want to consider. I know this sounds bad but to be honest, I actually find servicing the Nikon F to be a more delicate task. Do not believe what some people claim. This is not a camera that’s impossible to fix by an experienced camera repair hobbyist! I would certainly not recommend this to the beginner. Having said this, please treat this article as a journal of some kind of my experience repairing this camera. This is by no means a real repair and servicing manual for this camera and any damage done to your camera by following this is not my fault. Again, this article is only for your entertainment and education.
I rarely endorse stuff here in my blog but I highly recommend Peter Tooke’s book on the repair of the pre-war Contax cameras. While it was useful, it’s not complete because it is lacking information on some important parts regarding the shutter mechanism. It is also poorly-illustrated so there are many things that are left for your imagination. There are some vague explanations there as well. Despite all these, I still recommend that you get it because it’s the only thing available out there of its kind.
To help you navigate, here’s the link to the whole series:
Now that you have read the caveats above, we can now begin with the repair section.
Before We Begin:
If this is the first attempt at opening a lens then I suggest that you read my previous posts regarding screws & drivers, grease and other things. Also read regarding the tools that you will need in order to fix your Nikkors.
I highly suggest that you read these primers before you begin (for beginners):
- Essential tools
- Best practices 1
- Best practices 2
- Best practices 3
- Ai conversion
- Working with Helicoids
Reading these primers should lessen the chance of ruining your lens if you are a beginner. Also before opening up any lens, always look for other people who have done so in Youtube and the internet. Information is scarce, vague and scattered (that is why I started this) but you can still find some information if you search carefully.
I highly recommend that you also read my working with helicoids post because this is very important and getting it wrong can ruin your day. If I can force you to read this, I would. It is that important!
For more advanced topics, you can read my fungus removal post as a start. This post has a lot of useful information here and there and it will be beneficial for you to read this.
Disassembly (Casing):
Disassembling the Contax 2’s outer casing is more complicated than it sounds. This step is very time-consuming and it’s one of the reasons why I hate working on the Contax 2. The individual assemblies and parts are inter-locked with each other and you can’t work on some parts without removing another part that’s interlocked with it. The good news is it’s not necessary to fabricate specialized tools to work on this step. Before you begin to open your camera, make sure that you have the correct-sized screwdrivers for this because if you use a driver that’s smaller or bigger than the slot then you will only risk stripping it or scarring it at the least. The width of the driver’s tip is also important so you would like to use one that’s a very close fit to the screw that you want to remove. It’s also important that you don’t force anything. Remember, this is a camera that was made before the war so you should treat this camera like an octogenarian. Other than the warnings given, you shouldn’t have a hard time with this step so long as you follow all of the steps here.
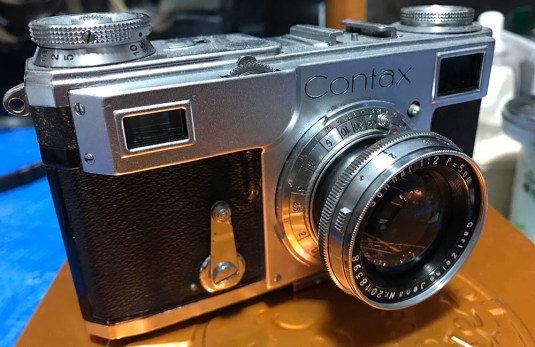 The Contax 2 is a very beautiful camera. There are a few ways to open this but the usual way is to open it by first removing the top panel if you wish to open it completely. It can be complicated because of over-engineering but it all makes sense once you figure it out.
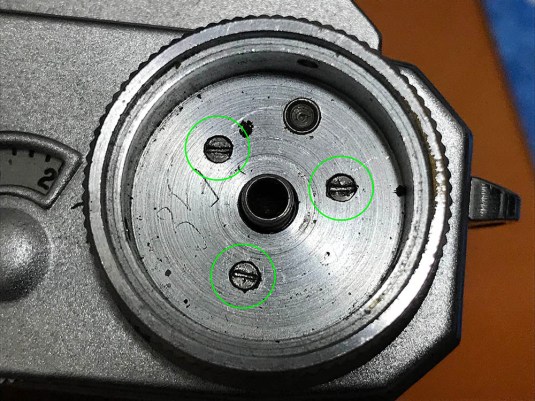
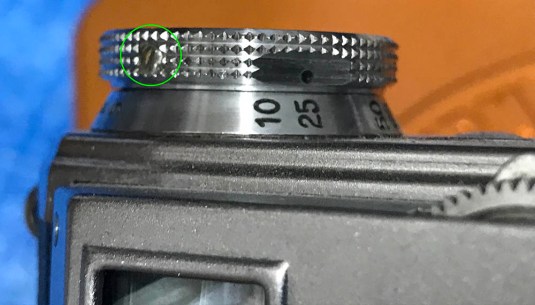 I usually begin by removing the advance dial. You can remove it by unscrewing these 3. I will recommend that you use the best screwdrivers you have for these and make sure it’s a perfect fit to the slot so you won’t damage or strip it.
 The top dial can be removed just like this. See how dirty it is underneath? That’s toe jam from the previous owner! Make sure that you don’t damage the detent spring.
 Clean this very well by soaking it in alcohol or whatever. This is how it should look like in case the detent spring got dislodged and you need to put it back. This spring is needed so that the plunger clicks and stays in-place when you rotate it in T mode.
 Now that the top dial is gone, you can access these 3 screws. These hold the advance dial down. I usually apply lacquer on the threads so these won’t come loose after reassembly.
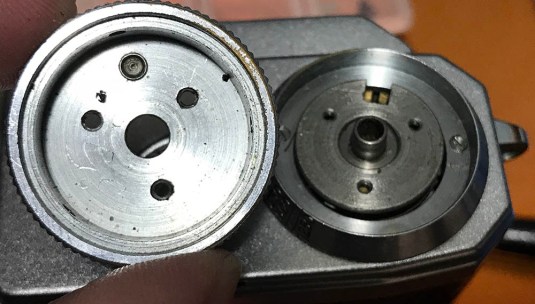 The advance dial can now be removed. Notice that riveted pin? There is a tooth under it and that tooth or pin sits in the brass slots under the dial’s collar. You can see one of the slots in the picture above. Inserting that pin inside the numerous slots in that brass part will allow you to set the shutter’s speed or to be more precise, to set the size of the gap in between the curtains. This pin holds a lot of stress as you turn the advance dial and it is sometimes bent from being forced. This is one reason why you never force the dial.
 The collar of the advance dial can be removed by unscrewing these. The collar has all the shutter speeds engraved on it. I will usually repaint these before reassembly. Read what I wrote about repainting letterings to see how I do it the easy way.
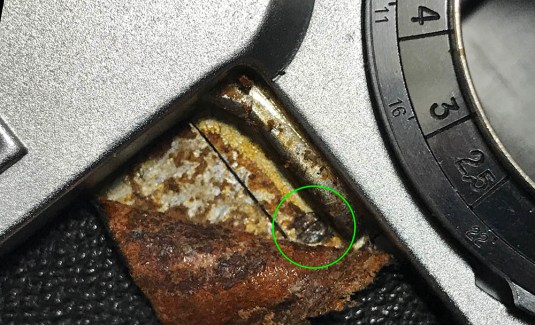
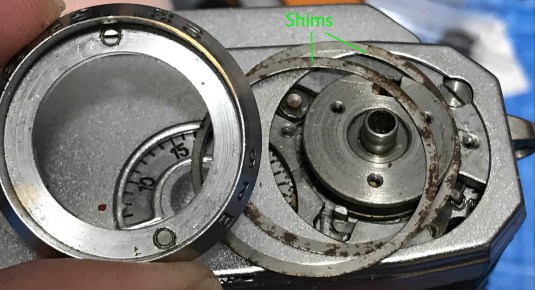 There are shims underneath the collar and make sure that you don’t lose any of these. It can be very good place for germs and humidity and the result is what you see here. Soak these in naphtha and drop a small amount of oil on it. This will help soften the rust so it can be easily be wiped-away. There are other alternatives to naphtha like cyclohexane.
 Let’s now go to the other side. The rewind dial can be removed by unscrewing this thing. As you can see, somebody damaged the slot. Always use a driver that fits perfectly!
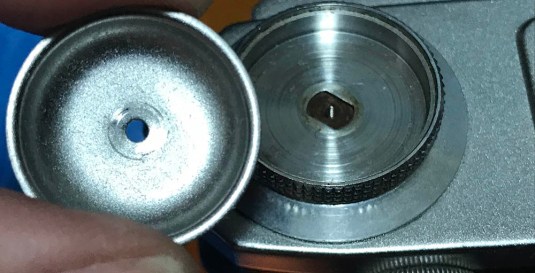 The bowl can now be removed. As usual, clean it carefully because sweat can get in here.
 The rewind dial can now be removed. Notice that spring underneath? Don’t lose it.
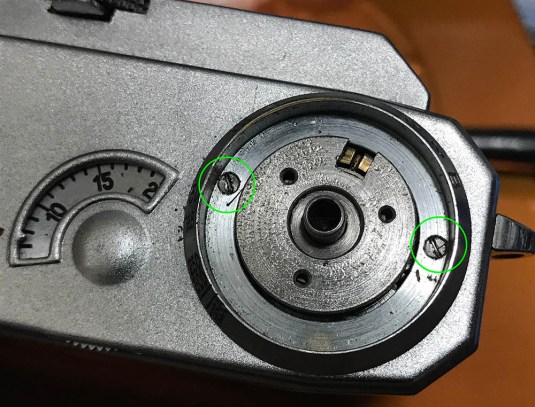
 There are 2 screws here that you should remove.
 The top panel can now be removed. While removing it, be careful not to snag on the dial for the film counter. To avoid it, lift it from the front and then pull it back.
 The film counter dial can now be removed. It doesn’t matter which way you reinstall it, it can be rotated. I will clean this very well, mine was stuck with hardened oil.
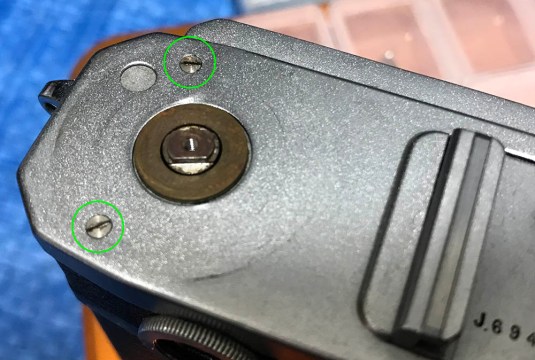
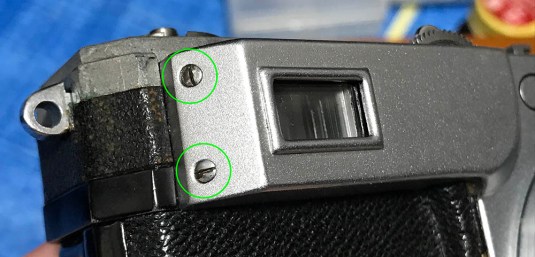
 Now it’s time to remove the front bezel. You begin by removing these 2 screws. Again, it’s very important to use drivers that fit the head and slot closely.
 Next are these 2 screws. If I recall it properly, these 2 screws are shorted and also a little bit thinner than the other screws so make sure you know which screws belong to which hole. I immediately screw them back to their own holes as soon as I removed the bezel to prevent me from losing them and to remind me where they originally were.
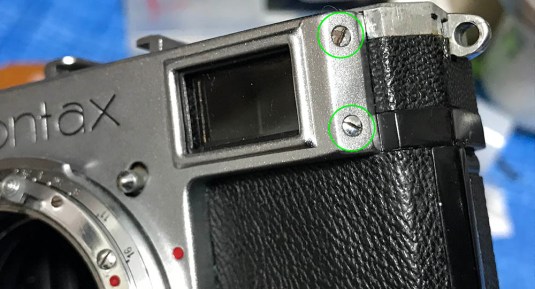 Next, go to the other side and remove these 2. Be careful not to scar the bezel.
 This is the last screw that you need to remove in order to lift the bezel. Drop a little bit of alcohol on the old leather and lift it carefully with a toothpick. Only lift a small portion of the leather that’s enough for you to reach this screw. This screw can be tough to remove if it got rusty or the glue has sealed it so be careful.
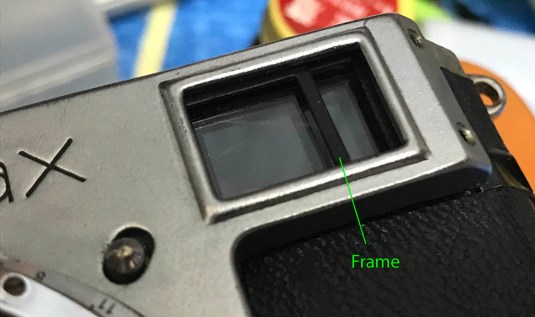 While lifting the bezel, the frame for the viewfinder can get lose. Be careful not to lose it.
 This overhang on the rangefinder housing makes this a snug fit so go at it slowly.
 With some patience, the bezel should come off. Be careful not to damage the bezel when you lift it by snagging on the focusing wheel. It can get caught there and ruin the metal.
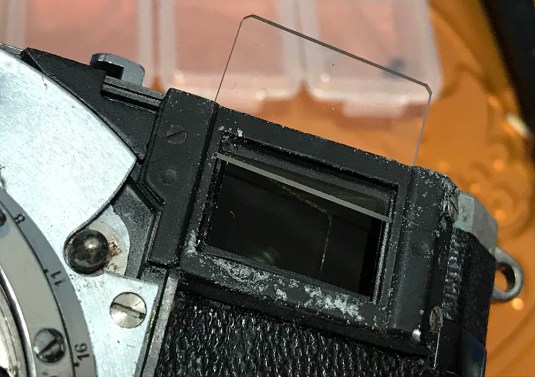 The protective glass from the viewfinder window can now be removed. Make sure not to scratch or chip this. If you damaged yours then you can replace it with microscope slides.
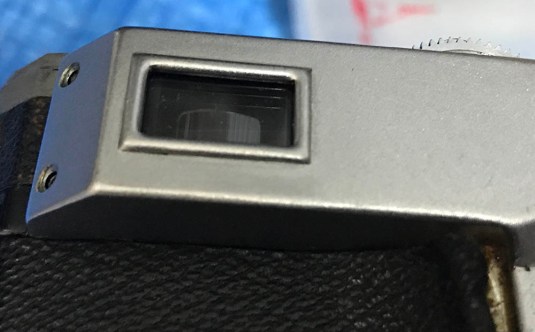
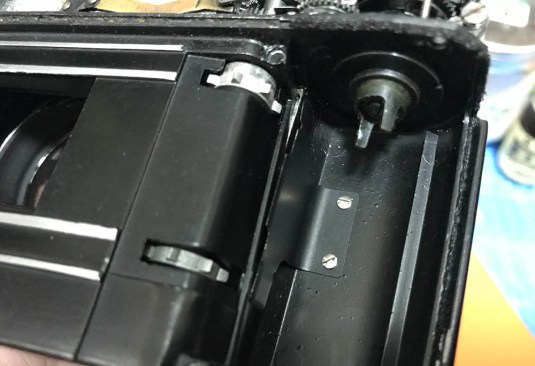
 You can also remove the protective glass from the rangefinder window.
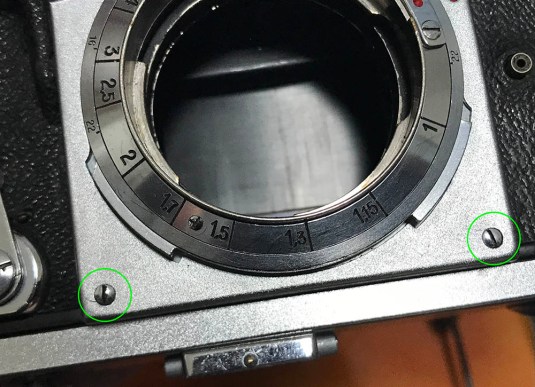
 We can now begin removing the screws securing the big top casting. Begin by removing 2 screws at this location at the film compartment.
 Here’s another 2 in the take-up spool side.
 Lastly, remove this screw.
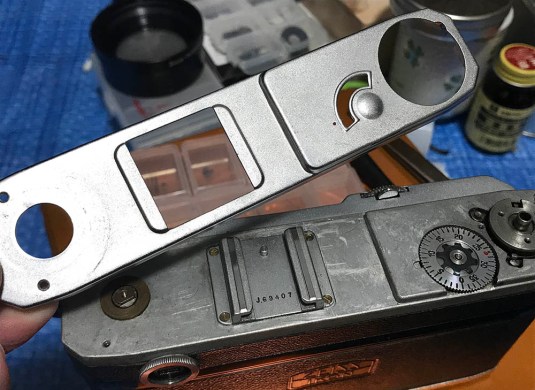
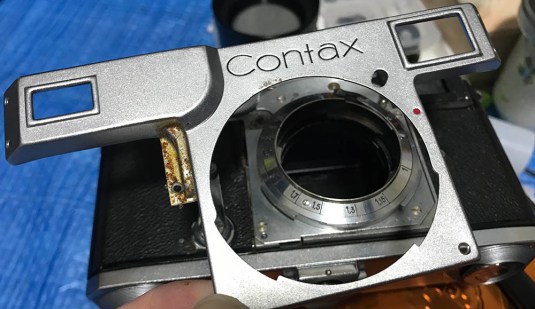
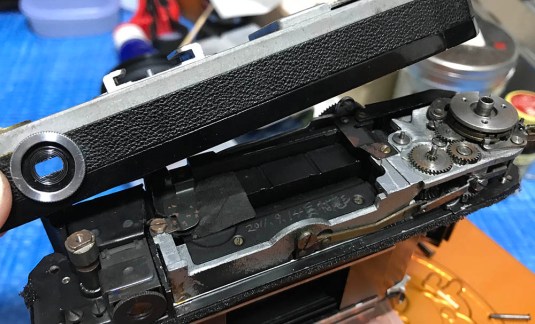 The whole top casting can now be removed.
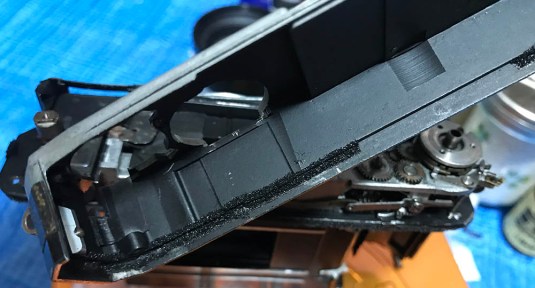 I don’t know if this is necessary but the previous guy who worked on this used the usual camera foam for this part. If I am not mistaken, the original material is yarn and it is not secured like this. I am not an expert on the Contax 2 so don’t quote me on that.
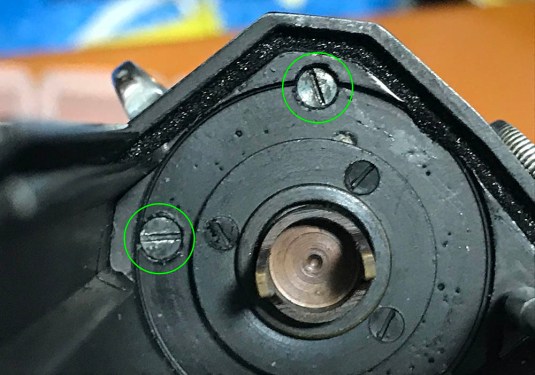
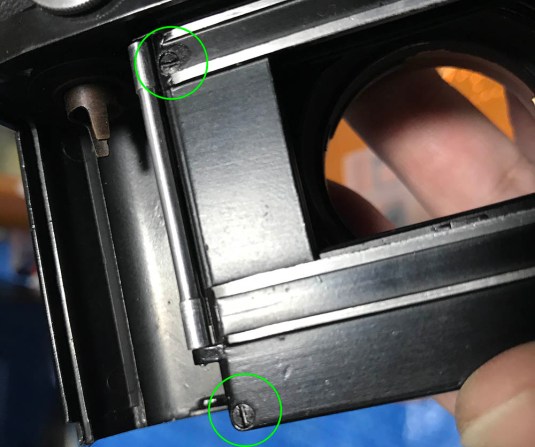 This step can be done much earlier. In fact, you can do this step from the very start but I saved this for last because it’s easier to do this after everything else is gone and I wanted something to protect the shutter mechanism. The Rear casting can be taken-off only after these 4 screws are removed, here are 2 of them.
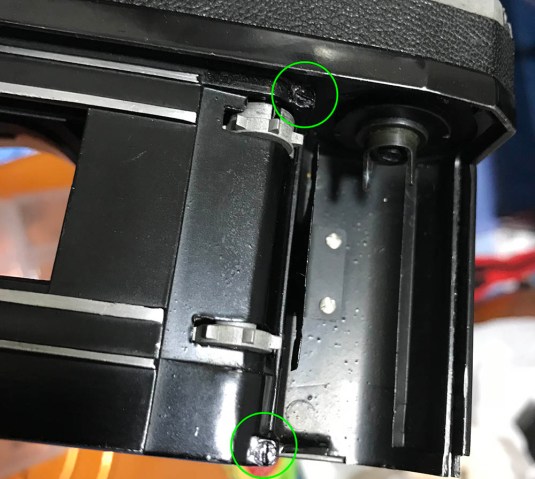 And here’s the rest. Keep in mind that the screws aren’t all the same and if I recall, there are 2 that are longer than the rest. Note which screw came from which hole so you won’t put them back in the wrong hole.
 Once the 4 screws are gone, you can begin lifting the rear casting off but be careful with this part because it catches the sprockets.
 This can take some time and all you need to do is be careful and never pull it with force.
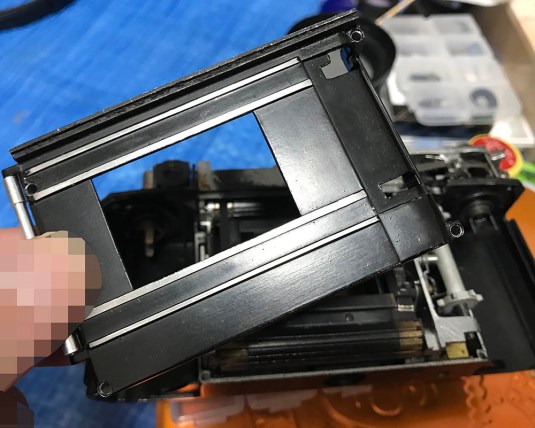 And off it goes! Be careful not to warp this casting because this is a delicate part despite it being a heavy casted piece of alloy and I will show why in part 2 or part 3 of this series.
That’s all for the removal of the casing. You don’t need to open the whole camera just to fix something most of the time. In fact, all you need to remove is the rear casting when you need to diagnose the shutter assembly, lubricate something or even do something major such as replacing a ribbon on the shutter. It’s doable but it’s going to be tight so I prefer to open the whole camera when I need to replace a ribbon. When you want to get rid of the rear casting without removing the top panel and casting, just remove all of the 4 screws and then check for the hole below the sprocket. There should be a screw there, unscrew it so you can give the sprocket more room to move up and down. This will help you with removing the rear casting because you have a few mm more to move that thing as the sprocket moves up and down. Just be careful so you won’t damage anything. It is a very important thing that you don’t warp the rear casting because it will affect the travel of the curtains, etc. Never force your way with this or you’ll regret it.
Conclusion:
This is just the beginning, it will get more complicated in the coming parts. The Contax 2 is a complicated machine as you just saw in the article. I mentioned that the assemblies are inter-connected to each other and this can be annoying specially if all you need to do is a simple cleaning of some part inside the camera such as the rangefinder. Compared to the Nikon S2, it can take you significantly more time if all you need to do is overhaul the helicoid and clean/adjust the rangefinder.Be specially aware of the order things come-off because you will put them back in the same order in reverse. This is specially true in the helicoid part. You should be OK so long as you take plenty of notes.
If you are thinking of fixing your Contax 2 yourself and if you don’t have the experience or tools, do yourself a favor and just send this to a qualified repairman. Repairing these take lots of time and lots of repairmen just won’t bother fixing these because of that so looking for a person who is willing to work on yours can be difficult but not impossible. Just make sure that he is not a hack and he knows his way with these cameras. Ask for a recommendation in camera repair groups and I am sure that you will get answers there. If somebody is trying to pull your leg by saying that it’s going to take a crazy amount of money somewhere in the neighborhood of $800 just to fix these, look for someone else. I will tell you that people can spin stories make absurd claims about working with these, I will tell you now that most of it is rubbish and marketing BS. Like I said, the best source of information is the many camera groups across the internet. You can also check if they are legit or just crooks by asking people about their experiences. Don’t be gullible and do your own research and be patient to prevent yourself from falling into their trap.
That’s all for part 1. This is not complete so don’t go digging into the camera yet until you see the next parts. See you in part 2 and please don’t forget to share this to your friends if you liked it. Ric.
Help Support this Blog:
Maintaining this blog requires money to operate. If you think that this site has helped you or you want to show your support by helping with the upkeep of this site, you can simple make a small donation to my paypal.com account (richardHaw888@gmail.com). Money is not my prime motivation for this blog and I believe that I have enough to run this but you can help me make this site (and the companion facebook page) grow.
Leave me some tip?
Thank you very much for your continued support!
$2.00
Helping support this site will ensure that this will be kept going as long as I have the time and energy for this. I would appreciate it if you just leave out your name or details like your country and other information so that the donations will totally be anonymous it is at all possible. This is a labor of love and I intend to keep it that way for as long as I can. Ric.

May 03, 2022 @ 18:02:36
many very sensible warnings thanks :0)