
Hello, everybody! I was watching some Culture Club MTV’s a few moments ago. I recalled how I was confused by Boy George’s persona back in the 1980s when I first saw them. It’s a time when the division between genders was clearer and homosexuality was looked at with either contempt or exoticness. Ziggy Stardust sure was different but Boy George was unique and he took it to the next level. I will admit that I admired him because of how he carried himself, he was elegant, classy and smart on his appearances on TV. I loved how he sang in Live Aid and all that ’80s thing. My confused young mind turned him into a big inspiration as to how I carry myself, I wasn’t afraid to wear what I want in school despite looking like a weirdo. That edginess actually attracted the opposite sex because girls saw me as a bad boy. If only I knew who had a crush on me then I would have chosen who to marry earlier on. Before I share too much about my private life on the net for my wife to read I will talk about a lens that confused me at first, is it a Zeiss or a Leitz? It’s neither, it is a unique lens as much as how Boy George is a unique individual and we will never see another quite like him again. Read my article to find out what lens this is.
Introduction:
The Nikkor-H•C 5cm f/2 is definitely Nikon’s most popular rangefinder lens. This lens was made in several version including the Nikkor-H.C 5cm f/2 for the Nikon S-mount, and the rigid Nikkor-H.C 5cm f/2 (Leica Thread Mount) which has the ability to focus-down to 1.5ft (un-coupled). The topic of our article is the collapsible version (Leica Thread Mount). The Nikon S-mount (collapsible) version is similar to this except for the mount so you can see this lens as almost-identical to it from a historical or engineering context. Both were saw a brief (parallel) production run and both are now expensive and rare. The S-mount lens can sell for an exhorbitant price and is highly-desirable. This one is a bit cheaper but the price can still easily go above the $400 mark at the very least. I just got lucky and found a cheap one for much less than that.
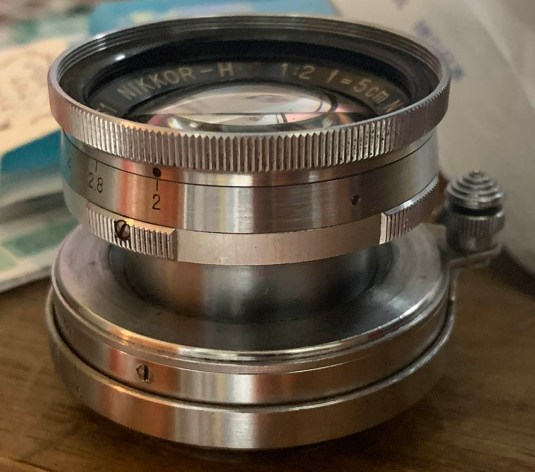 The Nikkor-H•C 5cm f/2 (collapsible) is a handsome lens. Many people will mistake it for a Leitz optic for obvious reasons. The quality of the machining is top-notch and it reminds me of the time when things were hand-made in small quantities and each part was made to fit the opposing part. The fit is exceptional, almost to the quality of Zeiss but not quite. Zeiss is the king when it comes to quality and precision, Leica is not far behind in quality but they will never match their quality until much later after they made the Leica M3. It’s a nice machine but I would say that the Zeiss Ikon Contax IIa is a better machine when it comes to engineering quality.
Now, why would Nikon make lenses for this mount? Well, Japan was desperate after the war for foreign currency and making a lens for this mount makes it possible for cameras that were made elsewhere to mount their lenses. Nikon was considering making cameras using the Leica Thread Mount and they need lenses to go with those. Lastly, there were a lot of Japanese camera makers who copied the Leica cameras (inlcuding Canon) and sold them as “Leica-copies”, clones that would flood the market and many of the makers don’t have the capacity to make their own lenses so they sold their cameras together with the Nikkors that had gain popularity because of TIME magazine. One such maker is Nicca, it is common to find Nicca cameras (like the Nicca 3S) bundled with Nikkors or lenses from other manufacturers. This makes hunting for Niccas much more interesting because you also have the potential of finding another precious item.
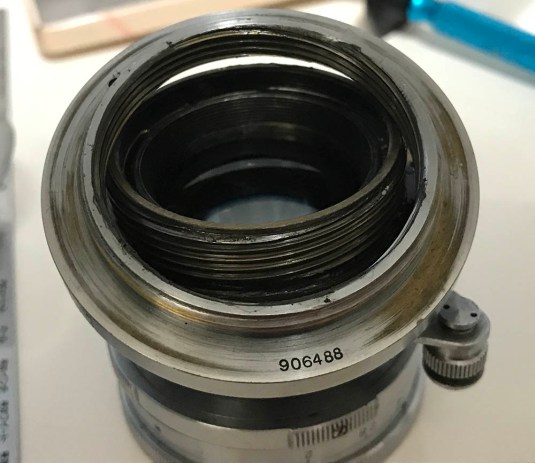
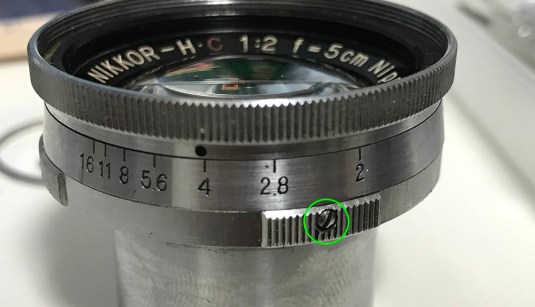
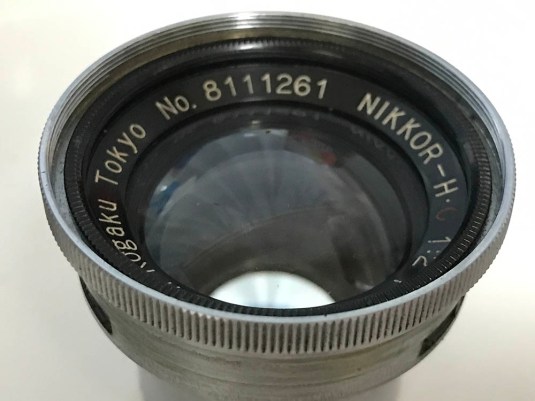
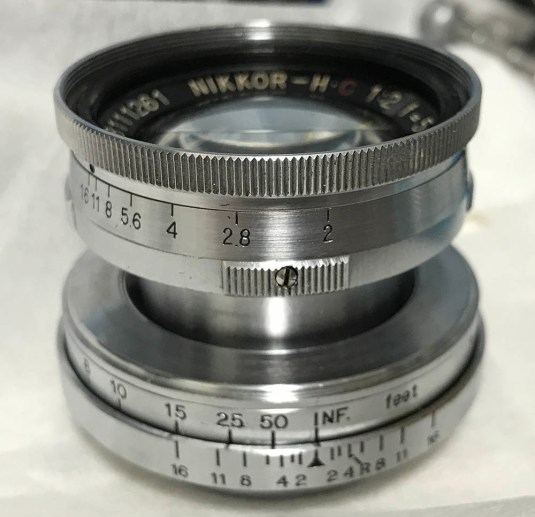
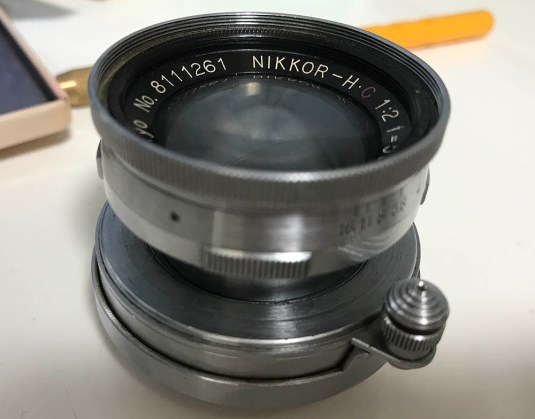 The serial numbers suggest that this is an early lens made around 1948 during the early years of Nikon’s consumer camera business. Notice that the type-face is different, it’s has small and thin characters compared to the bolder ones from later lenses. As usual with a lot of early Leica thread-mount lenses, this lens has a focusing button that also serves as a lock when the lens is focused to infinity. You press the button to free it from the lock, this was necessary so it’s easier to unscrew the lens from the camera and it also makes it a lot easier to focus the lens with one finger. Going back to the serial number, this puts this as a lens that was made in the 4th batch. What does that mean? It means that this lens was made in 1948 and is one of the later ones made in the collapsible format. Later ones were sold with a collar to prevent it from collapsing so collectors call it the “hybrid” version. It also means that this lens is mostly made from locally-sourced glass. The earliest Nikkors were made almost exclusively from German glass, as the supply got scarce, Nikon had to make them using Japanese equivalents. This means that the lens had to go through small re-calculations to accomodate the different refractive qualities of the newer glass. All this happened within the span of a few years and this particular lens had to go through a few small revisions because of that. You may not see what’s different in your pictures but it’s neat to know that the design of this lens had gone through several minor changes.
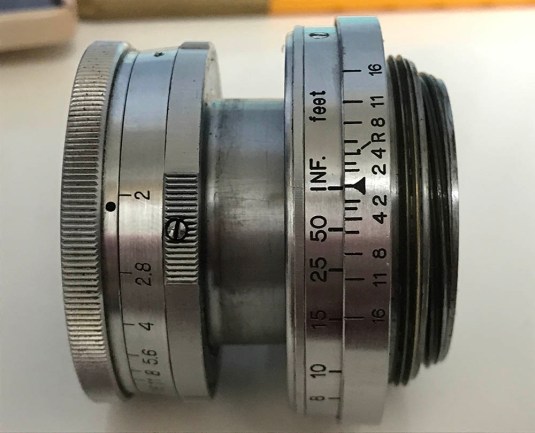 The lens can contract by around 1cm when collapsed. It’s not as compact as a collapsible Nikkor-Q•C 5cm f3/5 or similar lenses but it’s small-enough to notice the difference. Many will say that it’s pointless since 1cm isn’t much but it’s still better than nothing. The focus throw of this lens is quite long, lenses from this era tend to have really long focus throws for a few reasons and one of those is for accurate focusing when using a rangefinder. It’s also worth noting that Leica’s cameras have shorter rangefinder bases which makes it a bit less-accurate compared to the Zeiss Ikon Contax series of cameras so a longer throw is appreciated when you want to focus accurately. This lens has somewhat of a confused or contradicting identity. While it was based from the Zeiss Sonnar design its lower-half was based on Leica lenses. The front reminds me of a Zeiss Jena 50mm f/2 Sonnar collapsible. I overhauled one before and I swear that they feel very similar in construction.
As far as handling goes, it feels nice after I overhauled it. The focusing tab is nice and the ability to collapse it makes this lens unique amongst Nikkors. The aperture ring does not have click-stops as this lens pre-dates that trend. The barrel clicks into-place with a faint but positive tightness. I could have made it even more tight but I don’t want to scratch its patina. It won’t be visible because the surfaces are hidden mostly but I still don’t want to risk it. It has an assuring heft to it when you hold it and it’s bigger than what you would imagine from the pictures (the lens).
Let’s see how this lens performs. I will not make a detailed analysis of this lens because I don’t do those kind articles and I focus more on how a lens feels to me when I use it from a real-world perspective. I also did a couple of reviews of the Nikkor-H.C 5cm f/2 and the Nikkor-H.C 5cm f/2 (Leica Thread Mount). Since those lenses are technically similar to this one, what holds true for them is also true for this lens. There’s no point in repeating what was mentioned previously so just treat the following section as a supplement to the ones that I linked above. With that said, please enjoy my pictures and commentaries.
 This particular lens has a what seems to be an early balsam separation problem but it is not a problem at this point and I test it by shooting a scene like this. As you can see, flare resistance is terrible but that’s to be expected from a lens this old. The good thing is that I don’t see any refraction-related problems from the balsam separation problem. I had an old lens with this problem several years ago and the effect is easily seen on the highlights and high-contrast scenes like this. It looks funky and is hard to describe.
 The bokeh is nice as should be expected from a Sonnar-copy lens. It certainly has the look that many people associate with a Sonnar design, it’s smooth, somewhat-swirly and what many people (including me) characterize as a polite rendering. The transitions between what’s in-focus to what’s not is smooth and not abrupt as some Gauss-types tend to do.
 The character of the bokeh can look “busy” when given the right variables but I can still consider it smooth especially considering that the lens is old. It’s sharp where it needs to be (at the center) even wide-open. Note how smooth the transition is, this is what I meant when I said that the character of this lens’ bokeh is “polite”.
 The “soap-bubble effect” as some people call is present in this lens but it’s not as obvious as some older German or Russian lenses. The bokeh balls won’t be uniform until you stop the lens down to f/2.8 or smaller and you will see some outlining wide-open. This is quite normal for many lenses from this era. The picture above demonstrates how nice the lens is when shot at portrait range, it’s sharp even wide-open and the subject separation looks great. It certainly has that 3D look that many lenses these days are lacking.
 Chromatic aberration is absent even wide-open but you’ll notice spherical aberration in small amounts if you look for it. This white porcelain frog is the ideal subject if you want to see the effects of sphero-chromatic aberration so I took this boring picture for you.


(Click to enlarge)
Here are some pictures taken with people in the frame. Notice how spherical aberration made the skin “glow” a bit, making it look smoother. This is a coveted feature of Sonnar-type lenses and it gives pictures taken with them a unique look. Sure, other lens designs have similar traits but the Sonnar-type lenses does this best in my opinion/observations. I love shooting with rangefinder cameras because I can use this lens design. SLR cameras won’t be able to mount true Sonnar-type lenses because they require the rear element to be much closer to the film plane compared to the Planar or Gauss designs which became the de facto standard for normal lenses as far as SLR cameras are concerned. This is why most lenses for SLR systems seem to render similarly if you think about it, that’s because most of these lenses are based on the Gauss/Planar designs.


(Click to enlarge)
Here are some more pictures that I took with a digital camera. I quite enjoy using this, it’s compact when collapsed which makes it a nice lens to carry around when you don’t want to carry-around a bigger setup and your neck will thank you for that.
Here’s how this lens performs using film. It’s important to see how a lens renders when it is used with film. Film renders differently compared to digital so seeing the results from both mediums will give you a better understanding of how a lens performs. These photos were taken using Fujifilm Venus 800 and the camera that I used is a Nicca Type-5.
 This lens really shines when using it with film. It certainly will give your pictures an old-style look. This vintage feel is why I love shooting with older lenses because my pictures feel “organic” for the lack of a better word. Film is also more forgiving so some flaws are not as obvious when shooting with film because the grain will “mask” some of it.
 Shooting this lens slightly stopped-down results in a sharp picture. See the beautiful and varied textures we have in this scene, this lens renders details exquisitely. It’s an artist’s tool akin to a paint brush and not like a surgical instrument made for doctors like what’s the norm these days as far as lenses go.


(Click to enlarge)
The subtle qualities of this lens is nice. It’s hard to explain what makes it work, there are some people who dislike this vintage look while some people try to emulate it in post. It’s polarizing but it all boils down to what you want to achieve. For me, I just shoot with film because simulating this with your camera or in post won’t get you close to what film can offer. Neither is superior, they’re different tools for different purposes.


(Click to enlarge)
Here are some more pictures that I took with film. Looking at these pictures feels like I’m back in time several decades ago. Film cameras are like little time machines this way, it’s hard to explain how it feels but taking pictures without all that distraction is therapeutic in a way and I consider it to be a kind of meditation in some ways. Simple is beautiful.
I will say that I like the results that I got using film more. It’s a mix of nostalgia and a zen-like experience that’s hard to explain. I will update this with photos taken with black and white film when I have the time so come back again to see them.
Will I recommend this lens to those looking for a nice 50mm lens for this mount? No. It is and expensive lens and you won’t gain anything by buying it. It’s a lens that collectors or people who are into Nikon historica like me will find interesting. Its value is inflated due to its rarity (less than 2000 made for this batch) and you can find better lenses for less. If you want a similar lens then the Nikkor-H.C 5cm f/2 (Leica Thread Mount) is the lens that you want. It’s not cheap but it’s certainly much cheaper than this. It also has the ability to focus really close so you have that option when you need it. If you already have this lens then please take care of them because you own a very special part of Nikon’s history.
Before We Begin:
If this is the first attempt at opening a lens then I suggest that you read my previous posts regarding screws & drivers, grease and other things. Please also read what I wrote about the tools that you will need in order to fix your Nikkors.
I highly suggest that you read these primers before you begin (for beginners):
- Essential tools
- Best practices 1
- Best practices 2
- Best practices 3
- Ai conversion
- Working with Helicoids
Reading these primers should lessen the chance of ruining your lens if you are a novice. Before opening up any lens, always look for other people who have done so in Youtube or the internet. Information is scarce, vague and scattered (that is why I started this) but you can still find some information if you search carefully.
I highly recommend that you also read my working with helicoids post because this is very important and getting it wrong can ruin your day. If I can force you to read this, I would. It is that important!
For more advanced topics, you can read my fungus removal post as a start. This post has a lot of useful information here and there and it will be beneficial for you to read this.
Disassembly (Focusing Unit):
The design of this lens is rare amongst Nikkors. Its construction is closer to that of a Leica Summar 50mm f/2 with a little bit of influence from the Zeiss Sonnar 50mm f/2 (pre-war) when it comes to the front part. The construction is simple but it’s not as easy as the rest of the lens is the Nikkor H•C 5cm f/2 family. There are many things that needs attention, a good example is the use of very fine screws so you will need a drivers that fit perfectly. It is also a rare lens so you should be extra careful or else you’ll end up losing money trying to repair it. I will suggest that you just leave this to a professional repairer for overhaul. I will recommend anybody who is an expert in repairing Leica lenses such as Alan Starkie in the UK. This should be simple enough for them to repair and they will have the proper tools and experience.
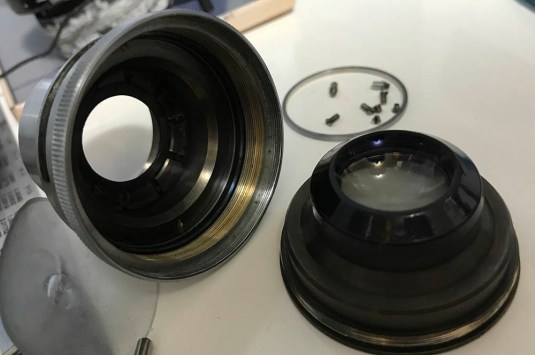
Just like most lenses, it’s important that we remove the optics first before we worn on the rest of the lens. This will prevent the precious glass from being scratched or worse. There are many approaches in repairing this lens but this is the best that I know so far.
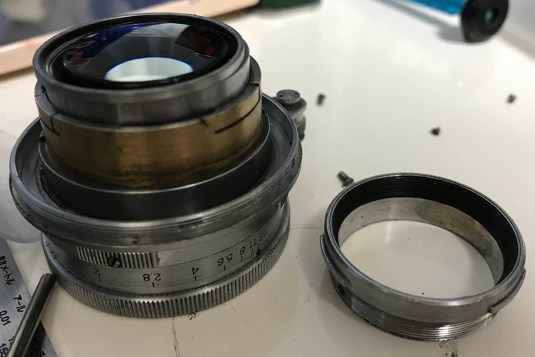
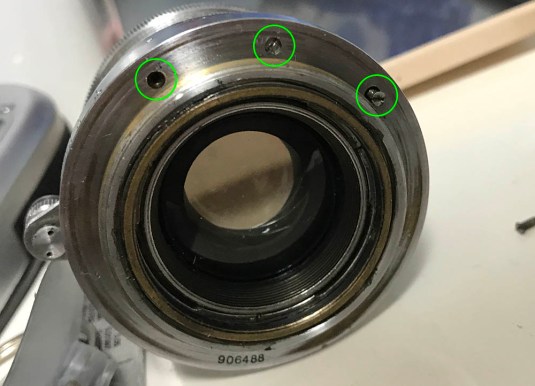 I started by removing these 3 screws, these 3 secure a brass ring inside. This is not what I would call the ideal way to open the lens bit this was what I had to do because the screws at the barrel are all stuck so I will work like this for now. I’ll show you how to open it the right way later after a few steps.
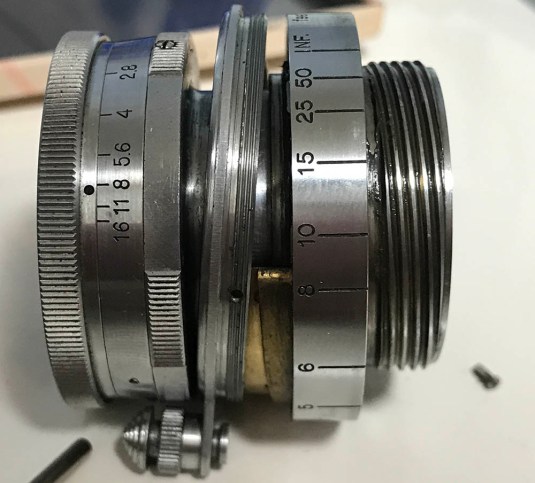
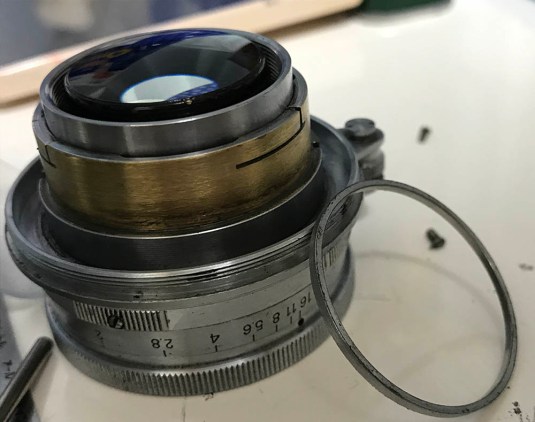
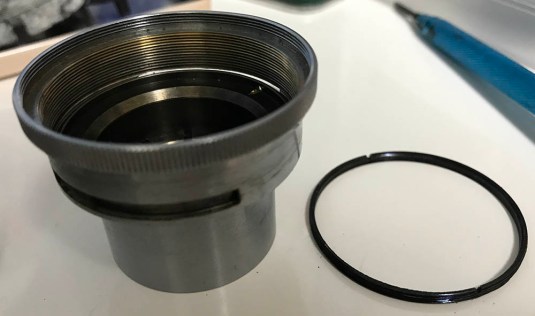
 Once the 3 screws are gone I carefully separated the outer barrel from the rest of the lens by turning it until it separates. It also houses the outer helicoid so I took several notes so I won’t get stuck later figuring out how the helicoids should mate. If you are new to this, it is important that you read my article on how to work with helicoids, this article will show you how to properly dismantle and re-install helicoids. Many beginners get stuck in this process because they don’t know what they’re doing so please read my article so you will not end up with a box-full of spare parts.
 I made a very shallow mark so I will know where the outer helicoid separated from the inner one. The mark is shallow, you don’t want to make deep marks here because this is the same surface that gets into contact with the rangefinder lever/roller and any bumps here will result in an unpleasant, rough sensation when turning the focusing ring as the roller touches the marks that you made. I buffed these a bit to make them less obvious. It looks deep but it really isn’t.


(Click to enlarge)
These screws secure the front bezel of the focusing ring. This is the proper way to open it so start from here if you’re working with your lens. I had to make a detour because mine was stuck so I had to wait for the solvent to soften what’s holding these screws. Carefully unscrew them using drivers that fit perfectly or else you will scar the slots.
 Once the screws are gone you can now unscrew the bezel of the focusing ring. See those holes in the threads? Those hole belong to the 2 screws that you just removed, remember to line these properly later so the screws will sink into them.
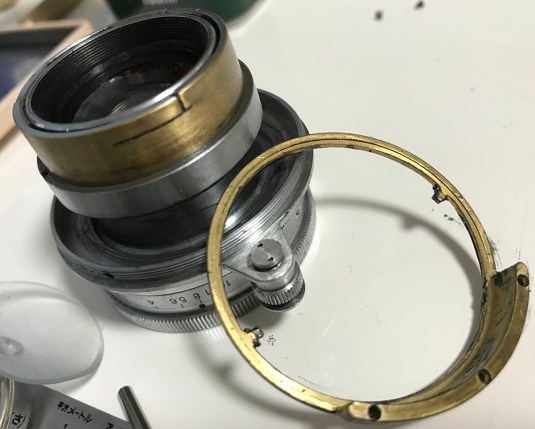
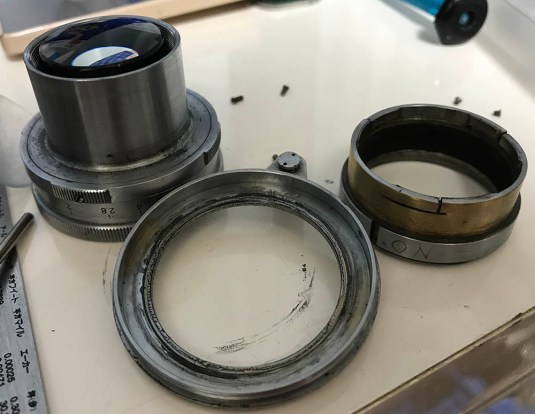
 You can now separate the front assembly from the main barrel. Make sure that you don’t warp that brass ring, it serves as a guide rail and helicoid key and is an important part of the lens. It was milled precisely at the factory so replacing these isn’t an option.
 Clean this intricate part very well.
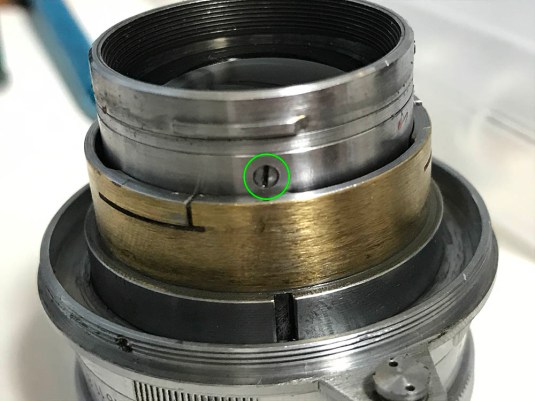 This small screw secures the collar that prevents the front barrel from slipping-out. Get a proper driver and unscrew so you can turn the collar.
 Turn the collar until it separates but be sure that the front barrel is resting with its front facing a flat surface so that the bottom part faces up. The front barrel can slip once this is gone so you want to be safe to prevent it from dropping straight to the floor.
 Make sure that you don’t lose or warp this shim, it’s there as a kind of spacer so the lens can focus properly to infinity. These are hand-picked at the factory from a box of various thicknesses.
 You can now remove the bezel/cover and the sliding collar. Part of the inner surface of the collar is lined with felt so there is some resistance when the barrel slides in-and-out and when you turn the front barrel to lock it. I replaced mine with fresh material so that I won’t have to worry about the germs! These are perfect places fro germs to breed and it is usually soaking with old oil.
Clean everything very well. Remove all traces of oil from everything and replace the felt liner with fresh material if you have to. Make sure that the new material is thin enough, I spent plenty of time looking for the right type. The barrel should slide freely but it should be snug enough to offer a bit of resistance and there should be no play between the parts involved. I used a light grease for this lens because the focus throw of this lens is longer than most lenses. Do not apply too much grease or it will migrate and coat the lens again. The sliding barrel was lubricated by applying some graphite powder on the felt lining. It will disperse and coat the barrel as you use the lens. Never oil the felt lining or the barrel like what some people foolishly do!
Disassembly (Front Barrel):
The front barrel houses the objective and the iris mechanism. This part is the hardest one to work with in the whole lens because it houses so many delicate parts. You will need a few specialized tools if you want to work on this.
 The delicate rear elements group is cemented to its ring. It can only be removed by using a special tool called a pipe-key or an alternative tool that you can make using tweezers. It is a very delicate part and you should be very careful when working on this. Store this in a safe place so you won’t damage it.
 We can now safely work with the rest of the lens now that the delicate rear assembly is stored safely somewhere. The aprture ring can be removed after you unscrew these. The screws are very delicate and the heads can be damaged rather easily so be careful. They are also not the same as far as I know, one is longer than the other so you should note the differences so you will know which screw should go to which side.
 The focusing ring should slip down easily. Clean the inner surface really well and never oil this part, the most that you will want to do is apply a really thin film of fine grease. So thin that you won’t even notice it, putting too much will just result in an oily iris later on. The aperture ring itself is composed of 2 parts, the ring itself and the bezel where all the numbers are engraved. I don’t recommend removing the bezel because it can be hard to put it back. I had to clean mine so I did it anyway.
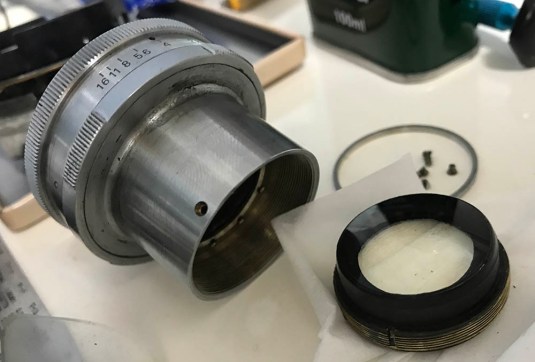
 The front elements assembly can be removed using a rubber cup of the appropriate size. If yours is stuck, just us a small drop of alcohol to soften the gunk or lacquer and try later again. Repeat the alcohol trick if it’s still stuck but don’t apply too much solvent since the 2nd group is cemented and alcohol will damage that if you’re not careful.
 Make sure that you don’t damage the raised lip. You can unscrew the rear part so you can clean the inner surface of the front element. Do not attempt to remove the front element or the 2nd group from their respective housings. They’re sealed at the factory and doing so will damage the lens beyond-repair.
That’s it for the front barrel. It’s basically just a housing for the objective. Clean it well so germs won’t thrive in it. The glass can then be cleaned using lens tissue and solvents. Do not separate the rear elements group and the front elements group. The Sonnar design is known for its big cemented groups which can be easily damaged if you’re not careful. It’s important to avoid using harsh solvents and not soak the cemented elements in anything to clean them. Do not lubricate the inner surface of the aperture ring with grease or oil, I used graphite powder instead because that’s not going to gum-up the iris since it’s really a powder instead of a liquid or any suspension. The tolerances are very tight so don’t add too much or it won’t turn properly.
Disassembly (Iris Mechanism):
The iris mechanism of this lens is the trickiest part if you are new to lens repair. It’s tiny and it has plenty of blades so it will take a lot of patience to re-install them all. You’ll need high-quality tweezers to work with this or watchmaker’s putty if you have access to that.
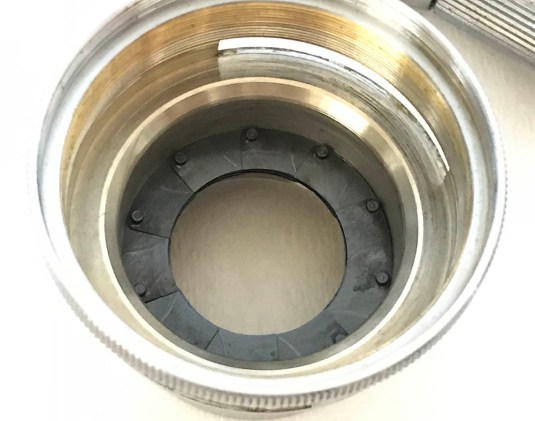
 There is a brass ring that secures the iris mechanism. Use a lens spanner to remove it, be careful not to damage this or its opposing thread. Use a spanner with its tips bent out and it should help make things easier.
 This little screw constrains the movement of the iris so it won’t turn beyond the aperture range. Remove this or turn it so its head is sunk within its hole. This will let you remove a big brass rotator cup where it’s attached to. This cup holds the iris blades together.
 The cup can be easily removed by using your fingertips.
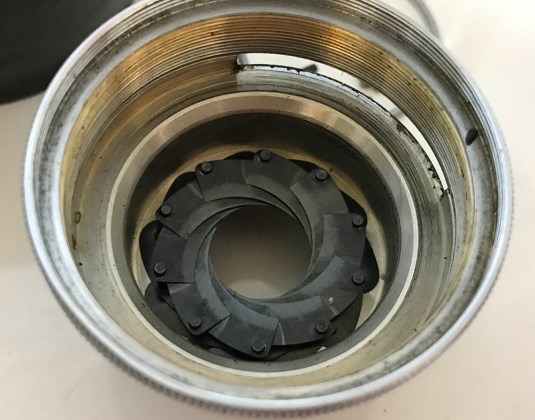 Here’s the oily iris. Notice how everything sticks together because of the oil.
 Carefully remove the blades and clean them carefully by wiping them using a saturated tissue (with solvent). Make sure that the blades are clean before you re-install them.
 The barrel was filthy so it was cleaned thoroughly.
 After everything is clean it’s time to put every back again. Preset-type irises aren’t easy to re-assemble, they take plenty of time and will certainly test your patience! If you are new to this, read my article on working with preset-type irises to help guide you, a better idea is to not touch it and let a professional work on it instead than risk ruining the lens.
This part will probably take you the most time in repairing this lens. Some people just do a quick-and-dirty shortcut by dousing the whole thing with solvents in the hopes that it’s going to clean everything properly. What they don’t know is that oil and grime seep-into the iris via their holes and if these holes weren’t cleaned the right way there’s no point in doing what they did because they’re just treating the symptom and not the cause. There’s always the right way to do things and it’s usually not the easiest.
Conclusion:
It was a joy working with this lens, probably the oldest Nikkor in my collection. It took an hour or so to put everything back since the iris takes about 15 minutes or so on average. I could have made things faster but I would rather take it slow just in case. The screws are all old so don’t over-tighten them or else they can snap. I also avoid using any lacquer on the threads apart from those that felt loose so any future maintenance will be easy. This lens will last a few more decades before needing to be serviced again and I was glad that I overhauled it, if it was some collector who got it instead of me then this lens may spend the rest of eternity inside a cabinet. I use my lenses regularly so I require them to at least work smoothly so I can use them without any hassle.
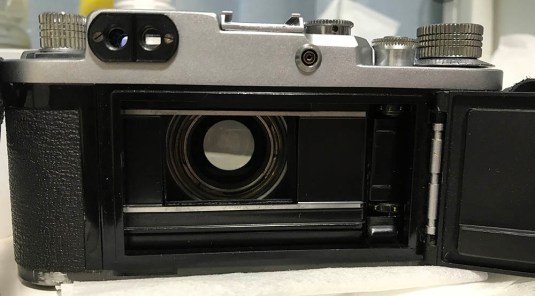 A camera with an opening back makes things a lot easier when it comes to calibrating a lens’ focus. This Nicca Type-5 is very handy for this task, I love this camera a lot. While it is not possible to adjust the lens’s focus apart from the shim that we removed early on it’s possible that the lens’ focus may be compromised by incorrectly mating the helicoids. It’s important to make sure that the helicoids are mated properly and the only way to test it is by doing this. You can also read my article on infinity focus calibration, I used the same method described there to check if the focus of this lens is correct. If you re-assembled it correctly then your focus should be spot-on at infinity.
 This lens has never been this clean in decades, see how shiny it is now compared to how it looked like before I worked on it? This is the gleam of cleanliness while what we had a moment ago was shiny lens because it was coated with a very thin layer of oil, yuck.
That’s all for this article. There aren’t any articles on the net about the repair of this lens so I hope that this will help somebody who’s thinking of repairing their lens. If you own one and you want the lens to be serviced, send it to a qualified Leica repairman, I know how it’s tempting to repair this yourself but if you ruined your lens then you have ruined an important article in the history of the Japanese camera industry. These lenses are not cheap so give them the respect they deserve. See you guys again in the next article, if you like this article you can help support this blog so we can continue making new ones. The support you give allows us to cover the cost of film development and scanning and that’s a big thing because it ensures that we can continue creating original articles. This blog is aimed at creating original content and we don’t re-post content from the blogs of others. With that said, please do not re-post this article without my permission. Nobody can stop you but just think about what our supporters will think about you if you did. Thank you always and see you again in the next repair article, Ric.
Help Support this Blog:
Maintaining this blog requires money to operate. If you think that this site has helped you or you want to show your support by helping with the upkeep of this site, you can simple make a small donation to my paypal.com account (richardHaw888@gmail.com). Money is not my prime motivation for this blog and I believe that I have enough to run this but you can help me make this site (and the companion facebook page) grow.
Leave me some tip?
Thank you very much for your continued support!
$2.00
Helping support this site will ensure that this will be kept going as long as I have the time and energy for this. I would appreciate it if you just leave out your name or details like your country and other information so that the donations will totally be anonymous it is at all possible. This is a labor of love and I intend to keep it that way for as long as I can. Ric.

5 Comments (+add yours?)