
Hello, everybody! Being the sentimental and romantic person that I am, I was surfing the net checking-out my old classmates that I haven’t seen for decades on facebook then I just remembered that I was pursuing a girl in my teens who everybody had a crush on. She’s popular and all but I discovered something that nobody else noticed, she has a sister and she’s just as amazing. She’s polite, simple and cute in her own way with her little flaws. It didn’t take long for me to realize that it’s her sister that I actually wanted all along. I was young so I was foolish to let her go. Did you ever have the same experience as me? There are many times when you’d realize that what you wanted isn’t what everyone wanted at all at first. I think that this is a profound feeling and this just goes to show that you have matured in a way because you now follow your heart instead of what other people say is hot. Today, I am going to share to you a lens that caught me by surprise. It’s been thrown-off to the limelight because of its “hot” sibling but it’s every-bit as good or even better for those who know what they wanted. Please read the article to find out what this lens is.
Introduction:
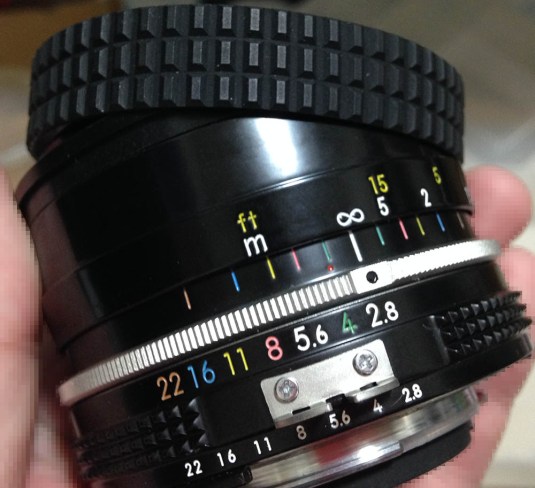
The Nikkor 28mm f/2.8 Ai is the successor to the New-Nikkor 28mm f/2.8 which shares lots of similarities to this one that you can consider both to the same lens in every sense. The later Nikkor 28mm f/2.8 Ai only differs in the sense that it comes with an Ai-ring, you can add a factory Ai-ring to the older New-Nikkor 28mm f/2.8 and you basically end up with a near-identical lens so what applies to this lens also applies to that one, too. There are few differences in the models that came between the first one and the last model but they’re all minor and shouldn’t matter at all except for collectors. The New-Nikkor 28mm f/2.8 is a trail-blazer, it started a new lens line because the closest model that came before this is the Nikkor-H•C 28mm f/3.5 Auto, a lens that has an old optical design and was at one time the widest SLR lens available that you can use without having to flip the mirror up. That was a popular lens and it sold a lot but people wanted a faster lens so this design debuted in 1975 as the New-Nikkor 28mm f/2.8. It took Nikon that long because designing fast and wide lenses was difficult given the technology of the time but Nikon managed to make it, it has a 7 elements in 7 groups design which is reasonable for a lens in this class. It soon became popular and it sold very well because the performance is fantastic, it’s resistance to flare and ghosting is something that’s hard-to-beat to this day and it’s sharp as well. An even bigger bonus is that it only has a mild distortion profile considering its focal length. I will consider this design to be one of Nikon’s high points in optics engineering.
 The lens feels great in your hands, it certainly feels like a classic Nikkor. It’s compact but it’s just a bit bigger than the usual small prime from the same era. You can throw this to an assailant and this will likely crack his nose, they don’t make lenses like these today.
Despite being a great performer, its reputation has been dwarfed by its successor, a nice little lens called the Nikkor 28mm f/2.8 Ai-S. It has CRC floating elements implemented so it’s sharp across the whole focus range, it’s a great lens but I find that it’s not as resistant to flare and ghosts as this lens. The difference sharpness is only obvious in close-ups and you won’t really find a night-and-day difference between them at all for most purposes. I do notice that the Nikkor 28mm f/2.8 Ai-S has more pleasing bokeh characteristics but this is not something that you will think about when using a lens from this class. This is still a great lens today for videography and I heard about some people who love using this lens for video. I don’t know if this lens has terrible focus breathing tendencies but I assume it has a bit of that going on.
 The front element of this lens is a bit on the large side for a small Nikkor. It has to since it has to gather as much light as it can. It doesn’t bulge much but it’s exposed so attaching a shade will be helpful to protect it. I never found the need to attach a shade because it has great performance against stray light. I tried my best to make this flare but it just won’t.


(Click to enlarge)
Vignetting is present at the far-corners at f/2.8 but it’s gone by f/4. You won’t notice this if you don’t have the sky or any even-colored background. You don’t need to stop it down to f/5.6 to alleviate the vignetting issue since the frame is even-lit by f/4.


(Click to enlarge)
Sharpness, resolution and contrast is good from the center to the corners wide-open. Set it to f/4 and everything improves a bit more, specially resolution at the corners. By f/5.6, it has excellent from corner-to-corner. Vignetting is obvious so you will want to stop this to f/4 if this bothers you. I’ll say that shooting with this lens from f/5.6 to f/8 is going to yield the best results as the performance of this lens seems to peak at those apertures when it comes to resolution.


(Click to enlarge)
Saturation is rich and there’s no blue tint to the pictures. Chromatic aberration isn’t seen even in pictures like the 2nd set where there are many shiny objects in the frame. I don’t know about coma and astigmatism since I haven’t used this lens to shoot night shots yet but I suppose that it has some of it at the corners like most lenses that are not corrected for it. I will update you in the future when I get the chance.
 I tried to make this lens flare or ghost by shooting a scene like this but I got nothing. This is why I love this lens so much and landscape photographers will find this appealing. The sun is something that I like to put in the frame as an element when I was still taking a lot of landscape photos and I will tell you that this is as good as it gets because it even bests the newer lenses that I was using back then with all that fancy coatings, etc. However, it’s not immune to it and in certain conditions you can get small flares and ghosts if the sun’s in the frame but it fares better than most lenses that were made from this era.
 If there’s something that I dislike about this lens then it’s the tendency to produce a busy background such as this when shot wide-open so you must be mindful of what you have in the background when you shoot with this using wider apertures. The good part is this lens is capable of producing pictures with that desirable 3D-like effect. It’s probably due to the lens’ simpler optical formula.
 Distortion is obvious in scenes like this but the good thing is the curve is shallow and the profile is simple and not wavy. This can be corrected in post easily or you can just ignore it if you don’t have straight lines in the scene, who shoots pictures like this anyway?
 Distortion can be observed if you deliberately take pictures like this but it’s not too bad at all considering how wide this lens is. It’s still not bad for architectural photography but I will want to use a different lens for that and I will show you what that is next time.
 This is how close you can get with this lens. I missed my focus a bit but it’s decent so far. I will say that the Nikkor 28mm f/2.8 Ai-S is better for things like this but this isn’t bad at all considering how old this lens is. The picture has a natural look to it unlike what many of us are used to these days. Going back to this feature, this lens began a trend for this class class of lenses wherein the ability to focus really-close is essential for a lens of this type. I find this very handy for detail shots and wedding and event photographers will be happy to use this to take pictures of the wedding ring or the cake.
 I really love the saturated photos that I get from this lens. I almost never tweak my shots in post these days because it makes me feel like I’m at work in the studio so this is a very welcome attribute. It has that “vintage-look” that many people are after these days.
 Food photography isn’t my thing but this lens is great for this. It’s wide-enough so it won’t make the food look tiny or flat due to compression and it can focus close for the detailed shots that food photography demands. I shot this wide-open but you’ll want to use f/5.6 at very least in a studio setting. I don’t want to be kicked-out of the restaurant for setting-up a tripod and studio lighting just to take pictures of my lunch!


(Click to enlarge)
Who doesn’t love dogs? This is a great lens for taking pictures of Fi-Fi. The foreshortening effect makes pets look adorable. The fur on the dog’s face is sharp and is resolved in good detail. This is a perfect lens for taking snap-shots of just about anything, it’s a great travel lens and this lens will grow on you the more you use it.
Now that we have seen how this lens performs with digital it’s now time to see how this lens performs with film. Film has a distinct look that you can’t replicate with digital. This is because film grain looks organic. You can try and simulate the colors that you get with film but you can’t simulate grain. Seeing how lens works with both film and digital gives you a better understanding of how a lens performs since you can see how it works with both medium. This lens was designed during the film era so seeing its results with film is going to make us see this lens work with its intended medium.


(Click to enlarge)
These are the worst photos that I can get from this lens when it comes to ghosts or flares. All of these were shot using smaller apertures of f/5.6 or f/8. Wider apertures diffuse the ghosts so you won’t see them much. The good thing is the sunstars look great, this can be used to creative effect as a part of your scene.


(Click to enlarge)
Here are some pictures that I took with the subjects positioned within 12m from me. This lens performs great at every distance except maybe at the minimum focusing distance, it is a just a bit soft at that distance but it’s still pretty good but just not as good as distances that are further than that. Like what I mentioned before, this lens is a great travel lens to bring with you. The above pictures are typical of what many tourists take on vacation.
 Here’s how it looks like when shot at the minimum focusing distance using film. It’s good but just not as good as further distances when shot wide-open. The bokeh quality doesn’t as bad with film because grain hides it a bit but you can still see that this in’t the best lens for this. To be fair, who uses a lens from this class for “bokeh“? Now, I will let you in on a big secret about this lens since we are talking about close-up photography. The reason it’s part of my collection is because I was into taking high-magnification pictures before and this lens has a stunning reputation when used in-reverse with bellows, reverse-adapters, extension tubes or with another relay-lens. On its own with a reverse-adapter it will give you a magnification amount of about 9x, that’s simply saying that an object will look 9x bigger in the frame. Some people who are into coin photography may already know this, it has a small following amongst people who take photos of really small things.
 Chromatic aberration goes-away when you stop any lens down by a stop or more, this is not a problem for this lens because doesn’t exhibit any even wide-open. Maybe you can get a few at the far-corners of the frame but it’s still minimal and you won’t see it unless you look for it really hard. This scene was taken at f/4 so we get some blurring happening here. The resolving power of this lens is great for pictures like this where the subject has high-frequency details.
I like this lens a lot, I will recommend this to everyone who’s looking for a nice 28mm for general-use. It’s great as a travel lens and you can take all the pictures you need with this lens when you’re out-of-town. The decent f/2.8 maximum aperture is helpful taking shots of temple or cathedral interiors. It doesn’t distort much and is sharp even wide-open. The biggest argument against this lens is whether you whould buy the Nikkor 28mm f/2.8 Ai-S instead of this. I personally don’t see the reason for spending almost 2x for that lens since this lens fulfills my need for a 28/2.8 lens for a lot less money. It’s tougher because it does not have any delicate CRC elements so a little bit of sand or moisture won’t mess-up with its focusing, the Nikkor 28mm f/2.8 Ai-S is delicate so sand particle finding their way into the small gaps at the front of the lens can potentially jam the CRC unit. This lens is for the people who want a no-frills lens that won’t let them down in all situations. The resistance to flare and ghosting is also its strongest selling-point so landscape photographers or the people who like to shoot with the sun in the frame will appreciate this. Whatever you do, make sure you buy one that has the factory Ai-ring or just get the Ai version of this lens. I use older cameras that can mount non-Ai lenses so this doesn’t matter much to me but it will be mandatory when you need to use this lens with Nikon that uses the Ai-interface. If you don’t then you risk damaging your camera. Those who use this lens with an adapter won’t have this problem as most adapters are just “dumb” tubes anyway. This lens is nice and it’s not going to waste your money if you buy one. Try one out and see it for yourself!
Before We Begin:
If this is the first attempt at opening a lens then I suggest that you read my previous posts regarding screws & drivers, grease and other things. Please also read what I wrote about the tools that you will need in order to fix your Nikkors.
I highly suggest that you read these primers before you begin (for beginners):
- Essential tools
- Best practices 1
- Best practices 2
- Best practices 3
- Ai conversion
- Working with Helicoids
Reading these primers should lessen the chance of ruining your lens if you are a novice. Before opening up any lens, always look for other people who have done so in Youtube or the internet. Information is scarce, vague and scattered (that is why I started this) but you can still find some information if you search carefully.
I highly recommend that you also read my working with helicoids post because this is very important and getting it wrong can ruin your day. If I can force you to read this, I would. It is that important!
For more advanced topics, you can read my fungus removal post as a start. This post has a lot of useful information here and there and it will be beneficial for you to read this.
Disassembly (Lens Barrel):
The lens barrel is simple to work with because it’s similar to many smaller Nikkors made during the same era. The only thing that made things harder for me is the use of epoxy in the screws and lacquer on the threads of nearly everything. There was a time when most Nikkors were made this way and it’s annoying to work with early New-Nikkors (K) or the Ai-Nikkors from the same period. I am not saying that adhesives are bad it’s just that you don’t need to put too much and epoxy of all things should not be used because there are many substitutes that will work just OK like lacquer or contact cement. This lens is not a difficult one to service but it’s not going to be ideal for a beginner because the said use of glues can prevent one from successfully repairing this lens. If you really have to then just go slowly and apply heat or alcohol to soften anything that’s stuck and don’t force it. Use the right tools and you should be OK.
 Carefully remove the rubber grip by running a thin, blunt rod underneth it then pick the edges up with your nails. Be careful not to tear it as these can be brittle at times because they’re old or dry.
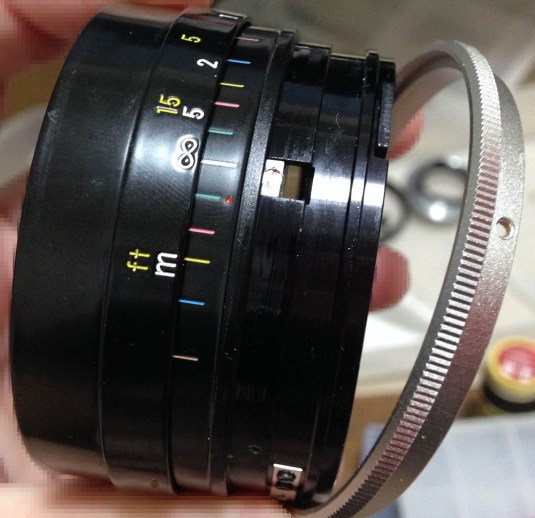
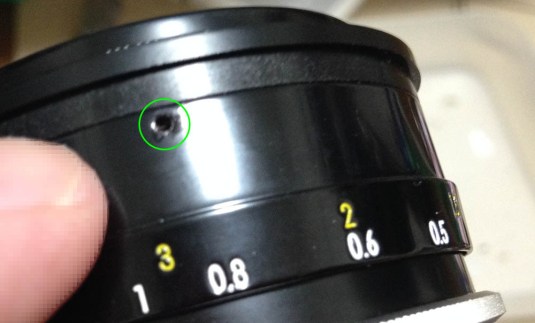 Remove the bezel of the focusing ring by first placing a drop of alcohol into this hole. Let the solvent soften the seal first before you attempt to unscrew it. This may take multiple applications or at times, none at all.
 The bezel is made of plastic if I am not mistaken so take care not to damage the threads. I will caution you not to use strong solvents like acetone or MEK because those will soften and melt the threads into a goop.
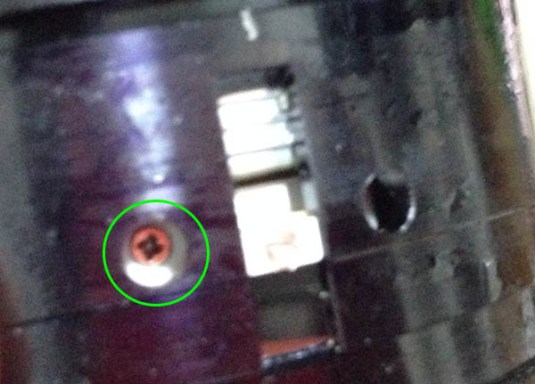
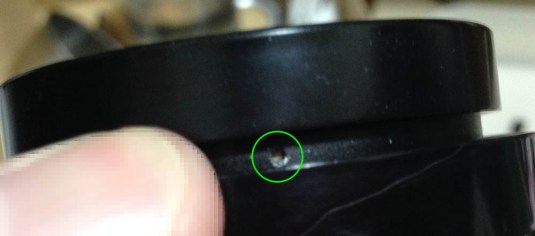 Once the bezel is gone you can now access this set screw. Remove it and carefully store it in a safe place. If the screw is sealed you will want to soften the seal with solvents first.
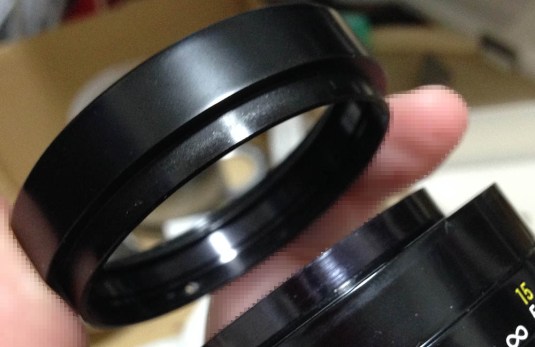 The screw secures the front barrel so you can now unscrew once it’s gone.
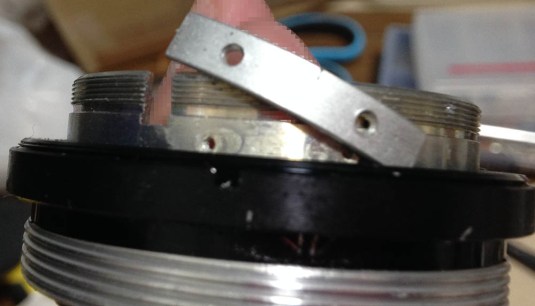
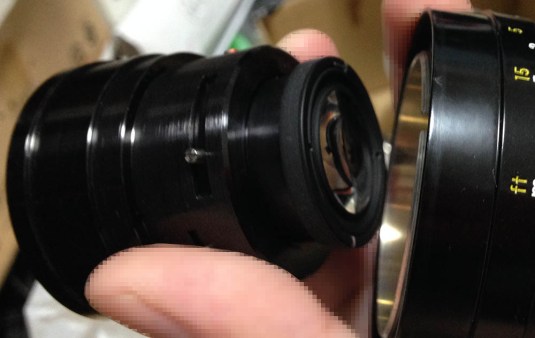 The front barrel secures the objective’s housing. You can safely pull it off once the barrel is gone and be careful not to scratch the front or rear elements. Store this in a safe place while you work on the lens barrel to prevent damaging it accidentally.
 Remove the screws of the bayonet plate. These screws are JIS screws so you should only use a JIS driver for these. Many beginners get stuck because they used the wrong driver or just don’t have the right technique. To prevent this from happening to you, read what I wrote about how to remove bayonet screws so you won’t get stuck like most people do.
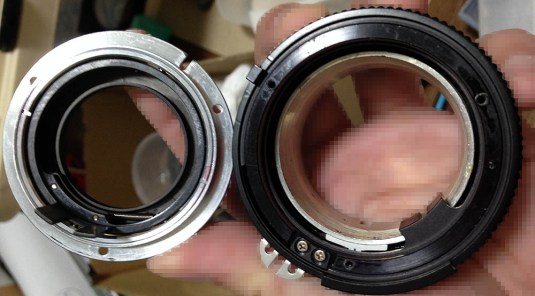 The bayonet mount can now be safely removed. Don’t damage the stop-down lever or the iris won’t actuate properly.
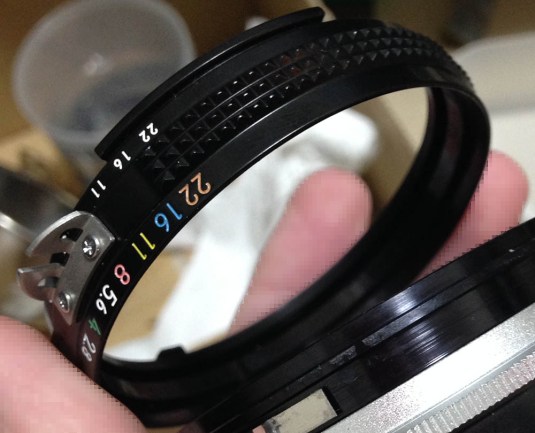 The aperture ring can be easily removed since nothing is securing it.
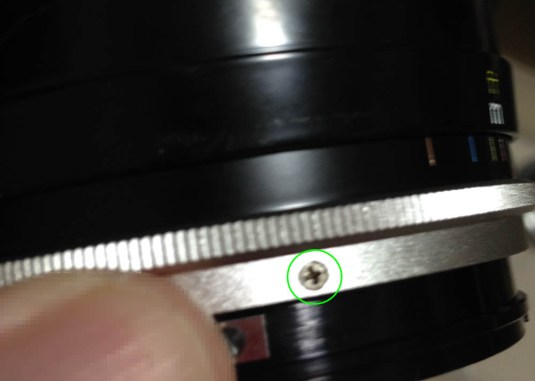
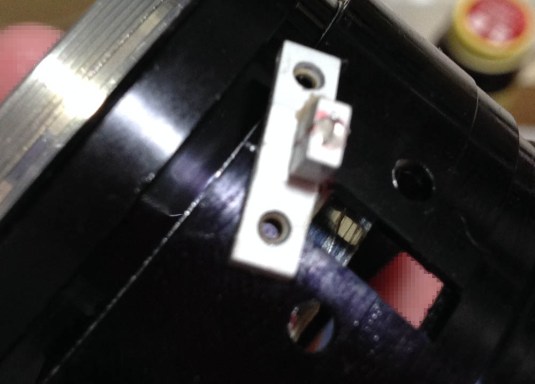
 This screw couples to the aperture ring so it can control the iris. It’s in the way so remove it and place it in an organizer to prevent losing this.
 These screws secure the chrome grip. Carefully remove these so you can remove the grip from the barrel. Make sure that you use a driver that fits perfectly.
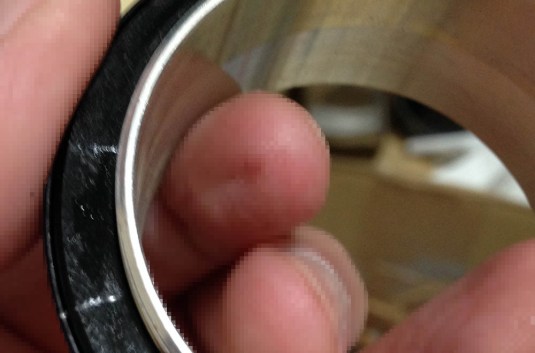
 Carefully remove the grip. It can be stuck at times due to dried oil and dirt so use alcohol to soften it first then try to remove it again later after having a cigarette or two.
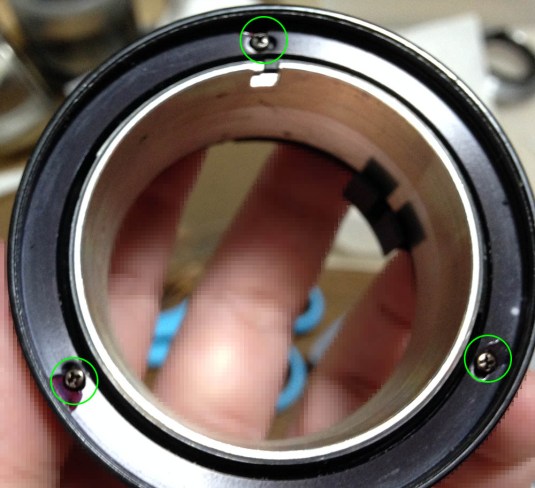 You can do this earlier but I chose to do it just now for no particular reason at all. These 3 screws secure the focusing ring and they are adjusted at the factory so the infinity mark is square with the centerline of the lens. Remove these but remember their positions.
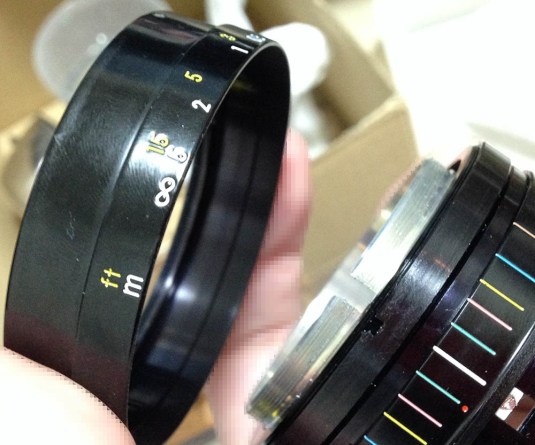 The focusing ring should easily come-off from the rest of the barrel.
 The sleeve with the focusing scale can now be removed. You can do this earlier after the chrome grip has been extracted in case you are wondering.
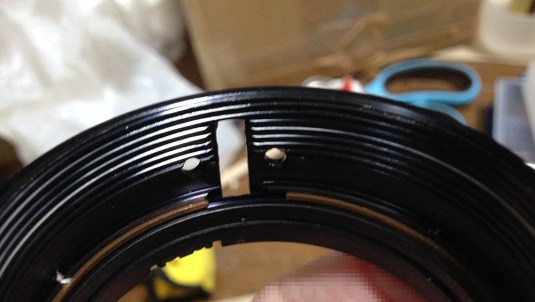
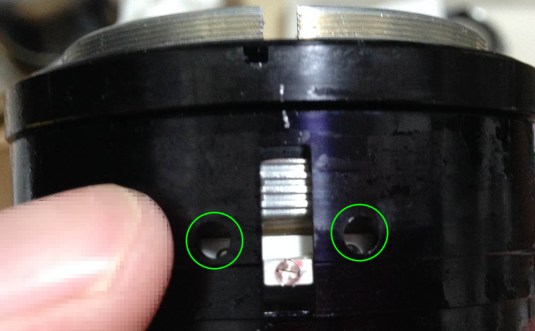 Once the sleeve is gone you can now get to work removing the helicoid key but mark the position of the helicoids first while the barrel is set to infinity. This will help you later, it’s your point-of-reference so you will know if you re-assembled your lens properly or not. I made 2 small marks above the slot for the helicoid key. The screws won’t be accessible to you until you turn the barrel to reveal them.
 Once you have clear access to these, carefully remove them using a JIS driver.
 The helicoid key can now be removed.
 Now that the helicoid key is gone you can now separate the helicoids to clean them. The internet is filled with failed lens repair stories because many people failed to re-assemble the helicoids back again properly. To prevent this, make shallow mark on walls where it’s not going to touch anything moving. The marks that you made should tell you where the helicoids parted because this is also the same spot that they should mate. To know more about this, read my article on how to work with helicoids. This should help beginners and those who want to know more about repairing lenses.
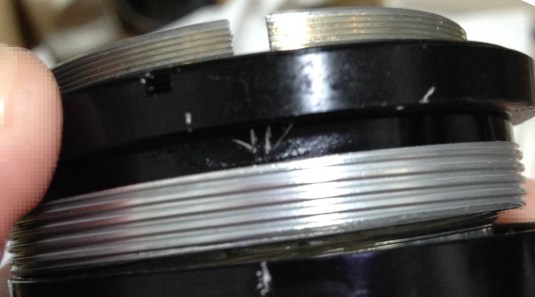
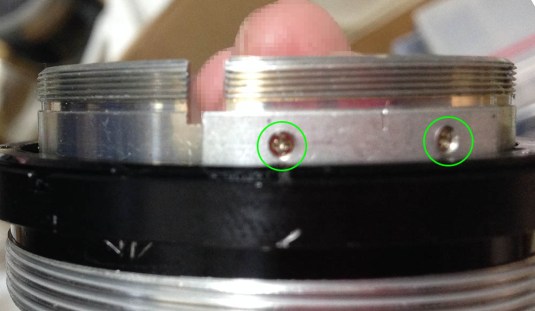 The inner helicoid cannot be removed because this helicoid stop prevents it from turning beyond its range. Make a small mark on the helicoid stop so you will know which side is facing the top and then carefully remove the screws to free it.
 The helicoid key is sometimes glued to the wall of the helicoid like what you see here. It’s easy to remove by heating it.
 The inner helicoid can now be removed. Again, be sure to mark where they separate and don’t make the mark too deep like what you see here. I don’t know what was in my mind when I did this, I was probably just tired.
 The central helicoid has a ring within it. This ring is used to adjust the helicoids’ range or to calibrate the lens’ focus. Before you remove it, make a small mark so you will know its position later. I don’t have to remove it but I just wanted to make sure that my lens won’t have any residual grease when I apply a fresh coat. This ring is being held by set screws, they are almost-always sealed with lacquer and the ring itself is hard to remove. Dunk it into an alcohol bath, helicoid-and-all for a few hours and that should soften it nicely for you to unscrew the ring easily. The set screws themselves don’t have to be removed, just loosen them half-way and turn the ring. The threads are very fine so be careful, damage to the threads will result in cross-threading and make the whole repair job a disaster.
 The ring for the aperture control fork is being secured by a brass ring. Carefully remove the ring by pushing it until one of the ends is near the slot, pick on the end with the tip of a precision driver and the brass ring should undo itself.
 You can now extract the ring. Clean it very well before you put it back.
Clean the helicoids very well by scrubbing them in strong detergents using a stiff brush. I usually polish them with a pig-bristle brush or lap them if I need to but that’s for people who are really into lens repair. I pickle the helicoids in alcohol to kill the germs and give them a final polish before applying a fresh coat of grease. I use a thicker type of grease so this lens turns smoothly, this lens has a short focus-throw and it’s a wide lens so a thicker type of grease will be beneficial. It will depend on what you prefer, just use the right type of grease that’s made for lenses because they won’t gas-out and cause haze on the glass. It is also worth mentioning that optical grease shouldn’t break-down so its oil won’t cause a big mess and migrate to the iris mechanism. You only need to apply a thin,even coat. Do not apply more than you need because the excess oil will have to go somewhere and that place is usually the iris and the optics!
Conclusion:
This lens took me around 2 hours to overhaul with most of that time going to cleaning its helicoids and other parts. The glass is clean but there are specs of dusts so I had to clean it. The objective was simple to dismantle if you have the right tools and skills and a quick cleaning took care of all the junk in the glass.
 I wasn’t thinking of writing this blog when I repaired this lens some years ago so I wasn’t taking pictures of everything. If you need to clean the objective of this lens, read articles that I made of similar lenses because they’re all made similarly. Read the repair article of the Nikkor 35mm f/2.8 Ai because the objective of both lenses are constructed similarly to a certain extent. You can use that as a guide for this lens’ objective.
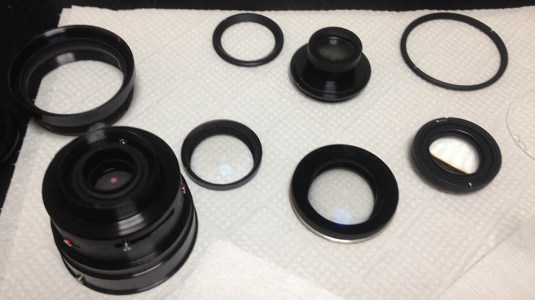 It was easy to dismantle everything to clean the glass properly. Just follow common sense and take plenty of reference pictures so you won’t get stuck.
After putting the lens back together, you’re left with the task of calibrating its focus. That can easily be done by adjusting the delicate inner ring of the central helicoid and lining-up the focusing ring after so that it’s square with the focusing scale of the lens. I you are new to this, read my article on infinity focusing calibration. This is a wide lens so you are not going to notice any big errors in focusing if it’s not off by a lot but making your lens focus accurately is important so you must not skip this step.
That’s all for this lens. Did you like this repair and review article? It takes more time for me to prepare articles lately because I want to give you the best information about a lens so I take my time to take plenty of pictures to show you how a lens works. This takes a bit of time and a small amount of money for developing, scanning and the initial cost of film purchases. You can help me with this by supporting this blog, your small donation goes a long way and it will help me offset the cost of maintaining this blog so we can continue to give you great original content. Share this page to your friends and photography groups in social media and help this blog grow. Thank you all and see you again next time, Ric.
Help Support this Blog:
Maintaining this blog requires money to operate. If you think that this site has helped you or you want to show your support by helping with the upkeep of this site, you can simple make a small donation to my paypal.com account (richardHaw888@gmail.com). Money is not my prime motivation for this blog and I believe that I have enough to run this but you can help me make this site (and the companion facebook page) grow.
Leave me some tip?
Thank you very much for your continued support!
$2.00
Helping support this site will ensure that this will be kept going as long as I have the time and energy for this. I would appreciate it if you just leave out your name or details like your country and other information so that the donations will totally be anonymous it is at all possible. This is a labor of love and I intend to keep it that way for as long as I can. Ric.

Apr 07, 2019 @ 07:24:20
Hi. Great to read you technical writings. I have followed you a time now. Im very pleased that there are people like both work and write about old Nikon equipment. I have used Nikon since I got my first Nikon FM in 1978.
BTW, have you wrote anything about Nikon FM. I wish you good luck and carry on Sir. Greetings from Norway 🇳🇴
Apr 11, 2019 @ 16:43:04
Another great review and rebuild. Thanks for this!
Apr 27, 2019 @ 22:13:32
Ric–Thanks, as always. Most of the time I read your repairs with admiration the way I watch Alex Honnold free solo the granite faces of Yosemite: I can’t do it myself but it’s great watching someone in action with those special skills! I did benefit from your Nikon FE repairs and fungus removal techniques, which seem to be within my realm of ability. Thanks for everything and please keep on with your exploits!
Feb 14, 2020 @ 20:00:05
SUPER site Thank your