
Hello, everybody! I had SPAM for lunch today. SPAM is delicious, I love it so I consider it my comfort food. Many people don’t like it for personal reasons but it’s one of those things that just won’t go-away as portrayed in a famous comedy show from a long time ago. It’s a classic and its taste hasn’t changed for a long time despite some tweaks to the recipe. SPAM is SPAM and it will be with us for a very long time. While we’re on the topic of classics, I’ll show you a lens today that’s been here for some time and is still being made new to this day by Nikon. Like SPAM, some people don’t like it and some love it a lot for certain reasons which I will explain soon. Enjoy your SPAM!
Introduction:
The Nikkor 50mm f/1.4 Ai-S is the SPAM of Nikkors. It’s production started in 1981 and is still being produced and sold today. It was based on the popular Nikkor 50mm f/1.4 Ai which was based on the New-Nikkor 50mm f/1.4 before it. The optical formula hasn’t changed since the mid-70s and it’s still used on the Ai AF-Nikkor 50mm F1.4D that replaced it, which is also being produced and sold today by Nikon. It would have been retired long-ago if this lens is a failure but I consider it a “secret masterpiece” despite having burned by the performance of a bad sample of the Ai AF-Nikkor 50mm F1.4D. Some people will argue that this lens sucks and they’re correct to a certain extent. This is one of those lenses that has lots of sphero-chromatic aberration and coma if shot wide-open but it’s a feature of this lens because it renders beautifully. I love how the designers balanced and used these “flaws” to make this lens do what it does with its rendering and I’ll show you how to use this effectively in this article.
 The Nikkor 50mm f/1.4 Ai-S handles better than the Nikkor 50mm f/1.4 Ai. Its focus throw is shorter which allows you to focus faster with this lens. It was launched in 1981 to complement the Nikon F3 and it has sold close to about 800,000 copies (as of writing) according to Roland’s amazing site. The update allows it to meter in all automatic modes with cameras that will allow it like the Nikon FA. It’s feels great holding one as expected from a classic Nikkor.
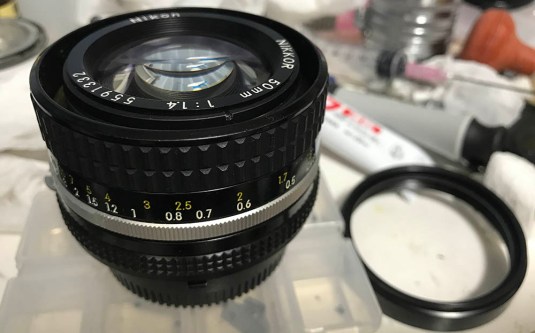
 The glass is big and clear, that’s the first impression that you will get when you see this lens for the first time. It will allow you to use this lens on dark places and focusing with it is nice because of the brighter view but it’s a bit difficult at times due to its very shallow depth-of-field.
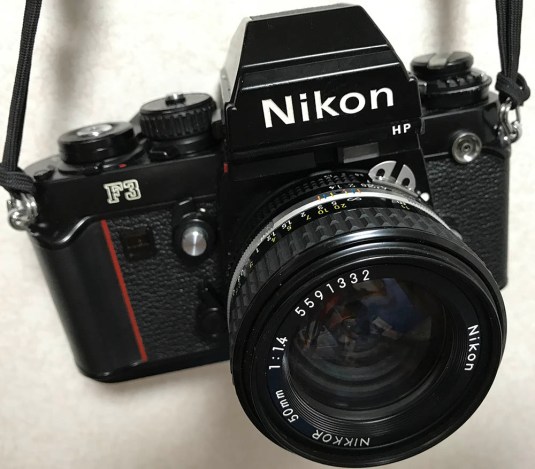 Here it is with my “hall-of-famed” (signed by Mr. Goto) Nikon F3HP. Perfect is the best term to describe this combination, like SPAM and fried eggs. This will balance perfectly regardless of what camera it’s mounted to. I used this with my Nikon F4 and it’s great with that camera, too.
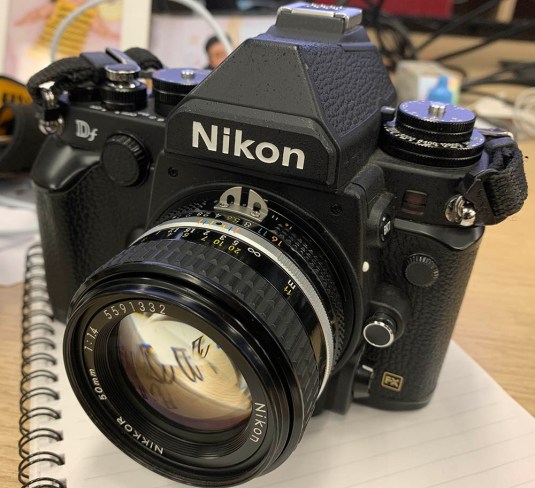 It’s great with a Nikon Df, it’s still a relevant lens today despite being made a long time ago when all you saw on the TV are rioting coal miners and news about how bad Soviet Russia is. Some things never change, the Russians are still unjustly portrayed as the bad guys and this lens is still amazing.
Are there other F-mount alternatives to this lens? The Voigtlander NOKTON 58mm F1.4 SLII N is a good candidate but from what I can see this Nikkor is better at closer distances. It’s also capable of great pictures and its pictures also have a nice feel to them, they’re also sold new today and costs around the same as the Nikkor. The ZEISS Planar T* 1,4/50 will cost you almost 2x more, it’s also a great lens and I like it more than the Nikkor when it comes to rendering but it comes at a higher price even in the used market. Exotic Zeiss lenses are great but they’re out-of-reach for most people, including me so I cannot justify buying them at all.
Knowing how a lens performs is important so you can maximize its use. It’s helpful so you’ll know when to use it and what to do to avoid its flaws. You can also use its weaknesses to your creative advantage, too. The pictures in the next portion were taken from f/1.4, f/2, f/2.8, f/4 and f/5.6 (left-to-right). I chose these apertures because the character of the lens changes the most in these values. These are also the most common apertures for real-world use, I don’t think anybody would shoot this lens beyond f/8 on a regular basis. If you wanted to shoot at smaller apertures then you’re better served by using a slower lens. There’s nothing scientific about my observations, what you’re going to read are all just based on my impressions.


(Click to enlarge)
Vignetting is terrible wide-open, the falloff isn’t smooth at all and the weird thing is it’s not even on my particlular specimen with a clear bias towards the right-side of the frame. It’s really ugly and doesn’t really go-away even by f/2 and you’ll see traces of it even by f/4. This lens is known for a terrible trait and that’s boat-loads of sphero-chromatic aberration and coma when shot wide-open. I hated The AF-Nikkor 50mm 1.4D because of it, it uses the same optical formula with this lens so I equate this lens to that. If you click on the bicycle set (cropped), you will see how bad it is wide-open but it gets much better by f/2. You won’t see it by f/2.8 and it’s gone beyond that.


(Click to enlarge)
Here are more samples. The first set was cropped to near 1:1 magnification. Just like the bicycle set before, you can see that chromatic aberration can be terrible wide-open but gets much better by f/2. This won’t really go away, it’s still going to be present even by f/4 in really small amounts if you look for it. The good news is it’s not really obvious and should be gone by f/5.6. The 2nd set shows how nice the lens is when you don’t have anything in your scene that will exhibit chromatic aberration. Keep this in mind and you can avoid this lens’ weakness. Sphero-chromatic aberration makes for a bad combo if there’s a lot of both wide-open. Spherical aberration is tolerable usually but I can’t say the same for chromatic aberration. I hate it a lot but it has its role to play in the grand scheme of things because it can “depth” to your pictures even when stopped-down a bit. Think of it like MSG, it’s ok in tiny amounts but deadly when used too much.


(Click to enlarge)
This doesn’t flare as much thanks to the newer coating but you’ll get a huge blob in your frame if you’re not careful. Using the hood might help but for pictures like this where the sun is in the frame, it’s useless. It’s ugly but you can make it smaller by stopping the lens down.


(Click to enlarge)
Here are some pictures that were within the middle of the focusing range. It is a pretty good lens at this distance when there’s nothing in your scene that can trigger sphero-chromatic aberration. Sharpness and contrast looks good even wide-open and gets much better as you stop the lens down. It reaches its peak performance by f/4 or f/5.6 and there’s no point in stopping it down any further unless you need more depth-of-field.


(Click to enlarge)
This is quire poor when shot at infinity. I don’t think this was calculated for that judging on what I have here and things look much better when focused at closer distances. Things only start to look good pass f/2.8 and I won’t use it below that for distant objects.


(Click to enlarge)
Peformance at the minimum focusing distance is much better so long as it’s not super bright as you can see in the 2nd set (cropped). It was really bright in the 1st set and you can see how spherical aberration affects its sharpness wide-open. Contrast on the other hand is great even wide-open and it’s rich so the colors look very nice even at this aperture. The resolution is also nice but it will get much better when stopped down to f/2 where the lens really begins to shows its potential. It’s just amazing from f/2.8 and beyond. Going back to the 2nd set, click on the pictures and you can see that it can resolve the nice weave of the brwon kitty cat even wide-open. The sharpness is nice even at that aperture and that picture really made a good impression. Note that the pictures have this very clear quality with good micro-contrast even wide open. It’s not going to beat the likes of the Sigma 50mm f/1.4 ART but it can show the Sigma that charts and scores don’t mean much if it fails in the rendering department. The pictures you get with this lens has an intangible quality to them when taken wide-open despite the horrible aberrations.


(Click to enlarge)
Here are some more pictures that were taken at really close distances. This lens is capable of rendering really nice at this distance. Wide-open, this lens has a tendency to render slightly busy-looking bokeh but is generally quite good. Again, sphero-chromatic aberration along with coma will make your photos look soft but I guess that you already know it by now.
 This is how sharp it can be at f/8. The funny thing is you can still see a bit of spherical aberration at the edges of the buildings but it’s just traces of it so don’t worry much about it.
 The bokeh balls can exhibit some edging wide-open but goes-away by f/2. It can render exquisite-looking backgrounds when you give it a chance to. It’s amazing how beautiful this lens renders, I will choose this over a pin-sharp photo that has no unique character at all.
 The skin is rendered beautifully thanks to spherical aberration. It’s not bad to have some amounts of spherical aberration wide-open so long as it helps render a beautiful picture and gives the skin a nice, soft glow. If you look at the picture carefully you can see that her hair was resolved nicely and you can see the individual strands clearly (at least in my monitor at 1:1). This is a nice photo if you ask me, it has a good balance of sharpness and blurred elements in the scene, a good expression of wabi-sabi.
 I love this photo a lot because it has a lot of character. This lens can render a photo with painterly-like qualities and the focus transition is smooth, you won’t get a harsh “wall-of-focus” as I like to call it. It is sharp where it needs to be and soft where you’d like it. Sphero-chromatic aberration works really well to my favor in this picture as you can see in the highlights in the frame of the glasses. It adds a little something to the picture. This is what directors call “glossiness” or “sexiness” when it’s time for checks, what they wanted to say is to just give the frame something “special” akin to sprinkling fairy dust to make the picture look better. I hate it when I get comments like that but it is part of the job and people who have worked in this industry will know it.


(Click to enlarge)
Here are some more pictures showing just how dreamy the rendering is. It’s a great lens with a lot of potential despite the terrible flaws that I pointed. If you look at the picture with the people wearing white shirts then you’ll see what I mean. Some people will call it junk after seeing that picture but there is more to this lens that its weaknesses.
Let’s now see some pictures that were taken using film. It has a unique look that’s hard to simulate in digital because of grain and other factors. Because this lens was made for film it’s going to be good for us to see how it renders under its intended medium. Seeing both results from film and digital will be helpful in studying how this lens renders. I took these pictures with Cinestill 800T loaded on a Nikon F100. The Nikon F100’s spotmeter is helpful because night photography with film requires that you meter your scene perfectly. I love using Cinestill 800T for its fine grain, tones and to a lesser extent – that unique halation/glow that you get with this film.
 Film is much more forgiving of this lens’ flaws when shot wide-open. You’ll find out that you can get away with it most of the time. This lens was made for film and this just shows how important it is to see photos that were shot using a lens’ intended medium. If we don’t see them then we could have just judged the lens unfairly. It’s like judging a donkey based on its performance on the race track.


(Click to enlarge)
These were taken at f/2, I think. This is just perfect for film photography and it’s going to be your favorite 50mm lens on a Nikon F3. If you liked what you saw in the digital section of this introduction then you’ll probably enjoy the pictures in this portion more. The colors look great and you can see all of its subtle qualities very well in the form of a nice, deep tones.


(Click to enlarge)
I think I shot these at f/2.8 to about f/4. Resolution looks great and the details are nice. I love how the lens handled the textures in this scene, you can see them really well with the resolution of Cinestill 800T. The smoothness of the bokeh is also nice even when stopped-down by about 2 stops.


(Click to enlarge)
Here are some more pictures that were taken with Cinestill 800T. The glow that you get with this film compliments the rendering of this lens very well. Cinestill 800T is also a fine-grained film so the resolving power of this lens won’t go to waste. There’s something about this combination that makes the pictures look great and I will be shooting with this combo again for sure.
Time to see some normal film photos without the distracting glow that you get with Cinestill 800T. I took these with Fujifilm Industrial 100 and I used a Nikon F4 because of its amazing meter. You don’t use Cinestill 800T for shots like these because these were taken on a sunny day.
 Very beautiful three-dimensional rendering! I am not sure which aperture I used here but it looks like f/2.8 or f/4. It’s so sharp that the flowers look like they are paper cut-outs. You can really feel the depth of this scene.
 I just can’t stop talking about the rich colors that I get with this lens because it’s so good. The saturation is quite high but not so much to make the photo look like a cartoon.
 This looks like it was shot at f/4 judging from the blur. It’s hard to focus the lens even when using a camera with a split-prism and you can usually miss your focus by a bit if your subject is moving like what we have here. Lucky me, this fellow got a bit tired and sat for a while which gave me a short time to snap his picture.
 You can anticipate your subjects’ movements at times and you can focus on an area before they get there and take the picture at the right moment. This is the most reliable way to focus with this lens.


(Click to enlarge)
Here’s the rest of the pictures from that roll. The pictures have a classic feel to them which makes them look vintage. Why use a digital camera only to use filters on the photos to make them look like they were taken using film? Just shoot with film instead! It’s much more fun on!
I will recommend this lens to everybody who wants a fast 50mm lens. It’s a very good lens and the results show why this lens is still being made today. It’s not the best lens in its class due to its dated optics that was designed in the 1970s but it’s still capable of making beautiful pictures. You can buy one online or get them new from your camera shops for about 2-3x their price in the used market. These don’t cost much more than what the competition has (Cosina) but it’s much better wide-open at closer distances. The Chinese lenses are cheaper but you’re better-off buying something that is Japanese. The build quality is much better and you’re buying from companies that are reputable with good heritage. When buying these, make sure that there are no scratches in the rear element because they’re bulbous and vulnerable. If you can, inspect the iris and how it moves. It should be snappy and not oily, this lens can easily develop the oily iris syndrome, you’ll see why in a bit. If the focusing isn’t smooth then it’s a sign that it has to be overhauled. That’s all I can think of apart from the usual checks for dust and scratches. Let us now proceed to the repair section.
Before We Begin:
If this is your first attempt at repairing a lens then I suggest that you check my previous posts regarding screws & drivers, grease and other things. Also read what I wrote about the tools that you’ll need to fix your Nikkors.
I suggest that you read these primers before you begin (for beginners):
- Essential tools
- Best practices 1
- Best practices 2
- Best practices 3
- Ai conversion
- Working with Helicoids
Reading these primers should lessen the chance of ruining your lens if you are a novice. Before opening up any lens, always look for other people who have done so in Youtube or the internet. Information is scarce, vague and scattered (that is why I started this) but you can still find some information if you search carefully.
I highly recommend that you read my working with helicoids post because this is very important and getting it wrong can ruin your day. If I can force you to read this, I would. It is that important!
For more advanced topics, you can read my fungus removal post as a start. This post has a lot of useful information and it will be beneficial for you to read this.
Disassembly (Lens Barrel):
Working on the lens barrel of Ai-S prime lenses isn’t as simple compared to earlier Nikkors because of some clever manufacturing decisions so you will have to take careful notes as you go. You’ll need the right type of JIS drivers for this task along with some rubber tools to open the barrels and rings. As usual, we would want to remove the optics as soon as we can but it will take us several steps to get to them unlike the New-Nikkor 50mm f/1.4 which only requires you to remove its front barrel. Make sure that you don’t scratch the glass while working with the barrel and cover them with caps whenever it’s possible. This lens is not for the first-timer and it’s good to practice on other lenses from other brands first to acquire the required skills. You don’t want to damage a lens that can be saved and turn it into an expensive junk.
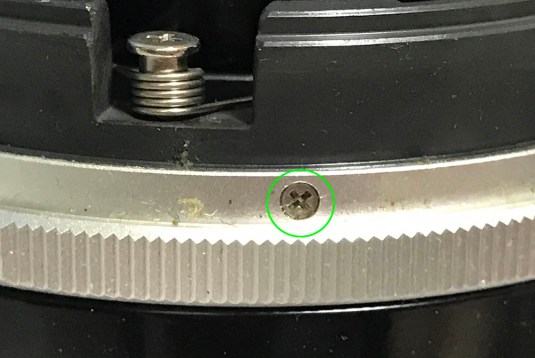
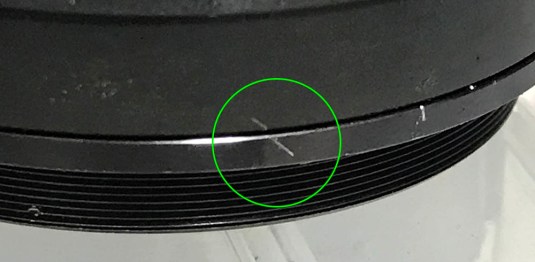
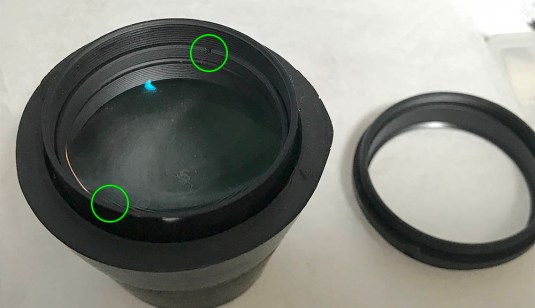
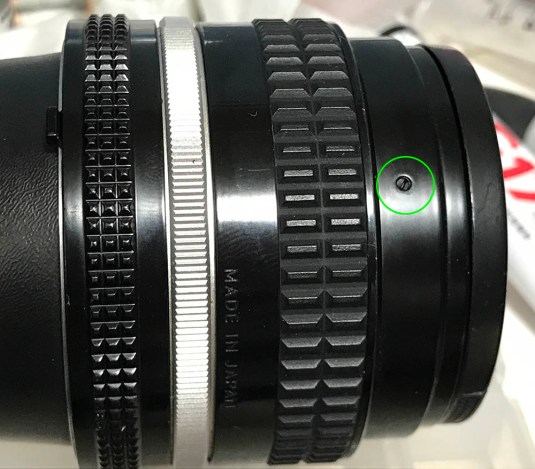 Carefully remove this set screw to remove the front barrel. These are sealed with paint and it’s best to first soften the paint with a bit of solvent. You will have to focus the lens closer in order to access this screw, by the way.
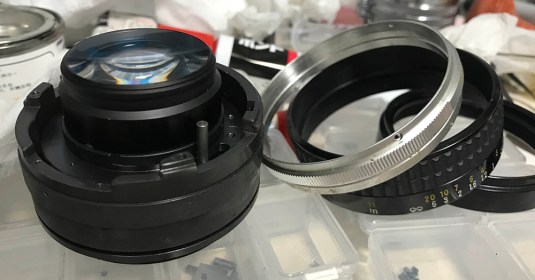
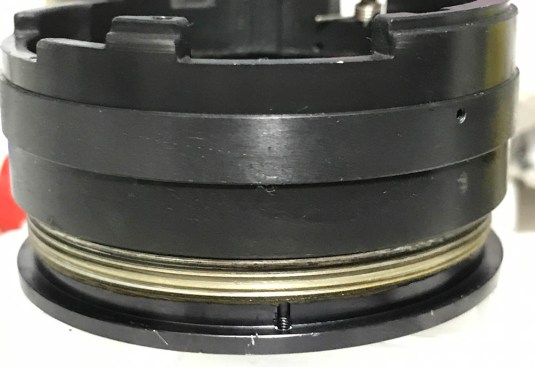
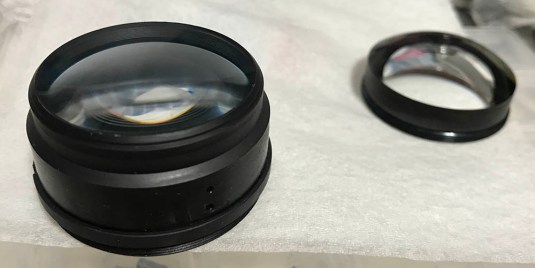
 Once the front barrel is gone, you can now access the front lens assembly.
 Unscrew the front lens assembly using a rubber tool. Keep it safely stored in a padded case so you won’t damage anything.
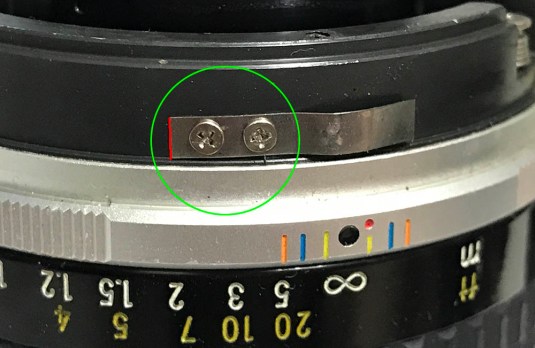
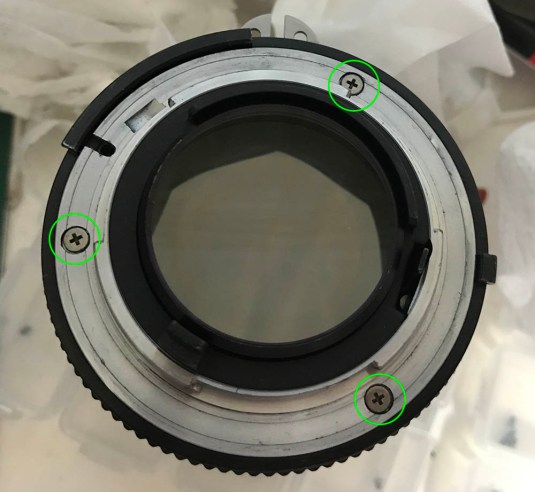 The bayonet can be removed after unscrewing these. Many people get stuck in this step because they stripped the screws’ heads by using the wrong type of driver. These are JIS screws and you should only use JIS drivers for these. To prevent this, read my article on working with bayonet screws and follow what I wrote and you should be fine.
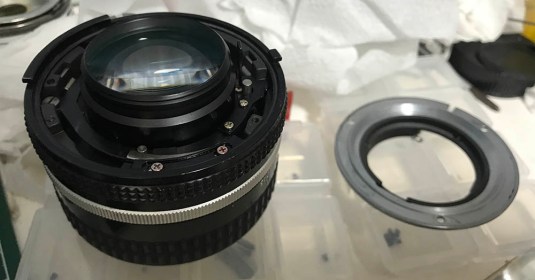 The bayonet can now be safely removed.
 The aperture ring can be removed as soon as the bayonet is gone. Notice the dirt and grease underneath it? Clean this part as good as you can later.
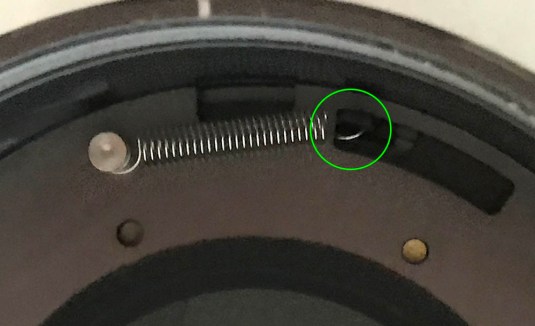
 Examine the stop-down mechanism first before removing it and study how it works. The lever/arm has a short stud that touches the regulator found in the aperture ring and turning the aperture ring pushes this thing in or out. It’s a delicate part that can easily be warped if you’re not careful. There is a guard to prevent it from going out too far as well as protect it from damage.
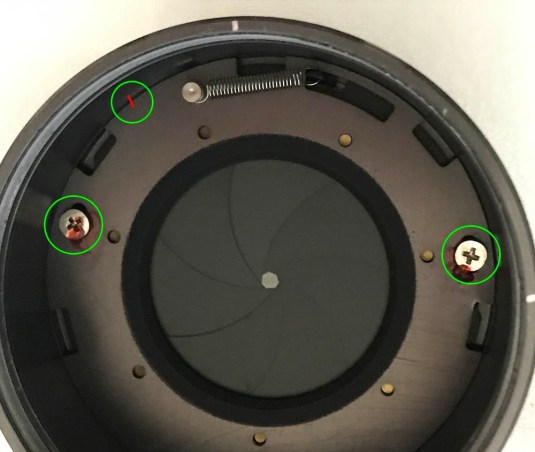
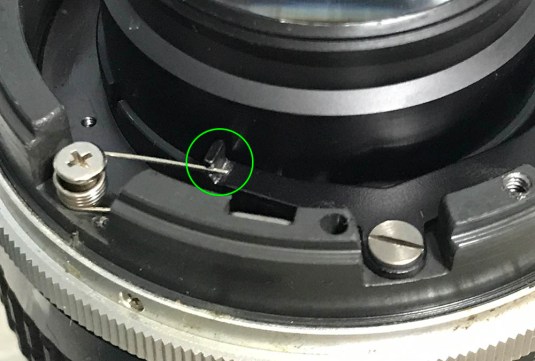 Make sure that you put this spring back correctly later. The screws you see here have to be removed, too. One screw for the spring and another for the lever. Be careful when removing these screws so you won’t strip them.
 Remove the guard and be careful not to bend its tongue. Notice that there is dried some dried grease underneath the arm. Don’t apply any lubricants in this area, if you have to do it just use some powdered graphite.
 Carefully remove the lever/arm and make sure not to bend this part.
 This has never been re-lubricated as evident in the intact red seals applied to the screws of the helicoid keys. Dissolve the seals with alcohol before you remove them but before you do that, focus the lens to infinity and take lots of notes on how things should be positioned so you’ll know how to put this back together properly again later. Try your best to work on this lens while it’s focused to infinity so you’ll have a point-of-reference when taking notes. Having said that, I think it’s better to remove some other things first before we remove the keys.
 The focusing ring is being secured by this brass pressure ring. Dissolve the seals with alcohol first before removing the screws. This part is where your lens’ focus is adjusted so take plenty of notes before removing these so you will know how things should align later when it’s time to put this back.
 Clean these very well and make sure not to warp the brass ring.
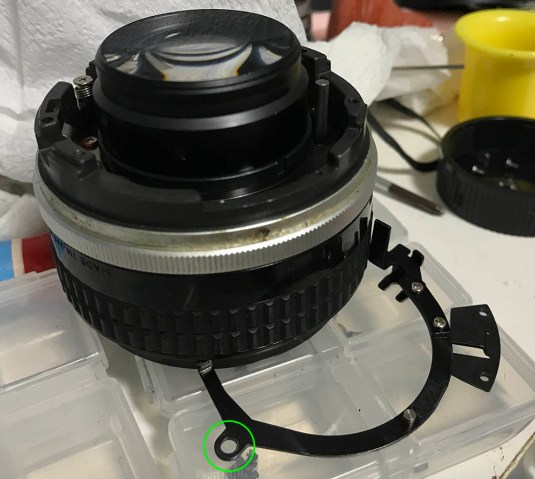
 This is the detent spring for the aperture ring and you can remove it after these are unscrewed but mark one of its edges first so you can put it back in the same position later. Videographers remove this spring so they can turn the aperture ring smoothly without any clicking-action. This spring is in the way of the grip so you’ll have to remove this first. The grip also functions as a limiter so the focusing ring won’t turn beyond its range so we’ll remove it later after we remove the focusing ring but not before taking lots of notes.
 The grip can be removed after you unscrew 3 of these. Make sure that your driver fits the head perfectly in order not to scar te surrounding metal. It is easy to scar the knurling if your driver is bigger than the screw’s head. You can safely remove this once the detent spring is gone.
 You can now remove the focusing ring and the grip. Make sure to take a lot of notes and make a few small marks to note how things should be aligned before removing anything. This is the perfect time to document the position of the helicoids and their alignment. You can also try removing the rear lens assembly now. Mine was sealed so I had to remove other things in order to get to it using some tools.
 This is how the helicoid keys should be positioned when the lens is focused to infinity. Remove the keys but mark one of them so you’ll know which key should be attached to which slot. The mark doesn’t have to be big and don’t put it anywhere near any moving parts. The helicoid keys keep the helicoids in-sync so they turn at the same rate so turning the central one will allow it to turn the rest of the helicoids, this is how the barrel extend and collapse.
 Now that the helicoid keys are gone you are now free to turn the helicoids beyond their range. Collapse the central one all-the-way and then make tiny marks like this so you’ll know how it should align. This will help you later in determining if you have re-installed them correctly or not.
 You can now separate the helicoids, begin with the inner one and mark its position right where they separated. This is important because this is where it’s also going to mate when you put it back again. Many people get stuck in this step because they forgot to mark this. If you’re new to lens repair, read my article on working with helicoids so you won’t get stuck. Don’t message me asking for help on helicoids because I can’t help you with that because different lenses will separate at different points.
 Do the same for the central helicoid and do not forget to mark where they part just like what you did for the previous one.
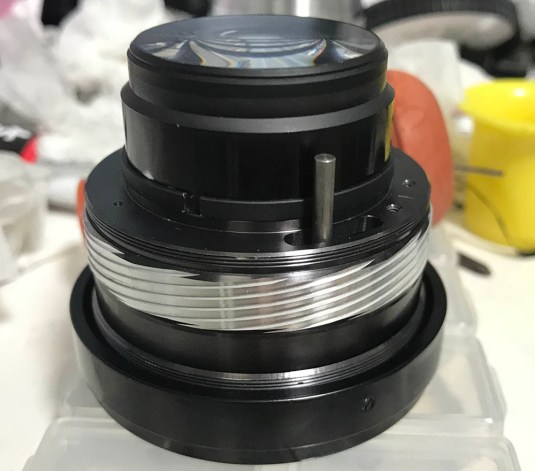
 I had to use a lens spanner to remove the rear lens assembly so I only get to remove it now. Ideally, you’ll want to remove this as soon and as safe as you can but if yours is sealed just like mine then you’ll have to wait until all the other parts are gone in order to access this easier using tools. The rear glass is vulnerable and it’s scary while working on this because you don’t want to scratch the glass.
Clean the helicoids very well except for the inner one because it also serves as the housing for the objective. You’ll have to remove what’s inside first in order to clean it thoroughly and I’ll show you how to do that in the next step when we get to the objective.
Disassembly (Objective):
Working on the objective is quite easy so long as you have the right tools. It has many things in common with other Ai-S lenses so read my other articles to look for hints. I didn’t have the need to dismantle the iris mechanism so if yours is oily then just refer to my other articles for this. A nice place to start is my Nikkor 85mm f/2 Ai-S repair article.
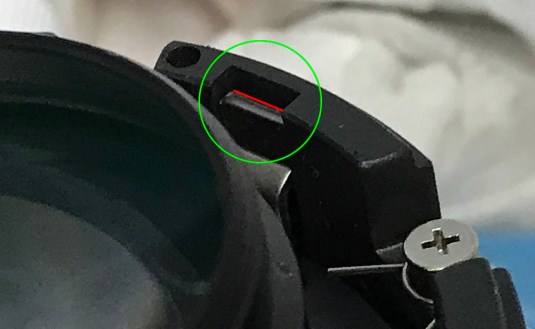
 The glass has been extracted in previous steps and we are now left with the iris. The iris mechanism is secured by these screws, it can be adjusted that’s why you see the familiar red lacquer seals on the screws. I made a mark on the part where the mechanism meets the wall of the housing to remind me how this should be aligned later. The mark doesn’t have to be big, it should be as small and shallow as possible but enough for you to see where it is. It’s adjusted at the factory and you can’t put it back properly unless you have a tester or made this tiny mark. Dissolve the seal with alcohol and proceed to the next step.
 Carefully remove this spring using a pair of sharp tweezers. This end has to be removed because it’s anchored to something. If you don’t remove it this will actuate the iris when you don’t want it to and cause a big problem.
 Press a rubber cup on top of the iris mechanism and then gently raise it up, leaving the iris mechanism on top of the rubber cup.
 The iris mechanism is delicate and is only being held by a small amount of lacquer on some parts so handle it carefully. A better idea is to just leave the whole thing on top of the rubber cup and then handle it by the cup, store it in a safe, vibration-free place.
 The rear cemented group is stuck to its collar with glue. Carefully remove it with a lens spanner and make sure not to scratch the glass.
 Store the rear cemented group in a safe place and only handle it by its ring.
 Here’s another retainer that you should remove to get to the 6th element. It can be removed by using a lens spanner as evident by the slots in the photo.
 Here’s a bigger photo showing the slots.
 You can now extract the 6th element, the safest way is to use a lens sucker. I protected the rear element by protecting its housing inside a rubber cup.
I didn’t have to clean the front lens assembly since mine’s clean but this one had condensed oil between the 7th and 6th element which baffles me up to this day because the oil has to go through several layers to reach that spot. I bought this lens because it was mint condition and it made me sad to work on it but it has to be cleaned before it does any permanent damage.
Conclusion:
This didn’t take me a long time to repair but the contaminated element took me some time to clean. The glass is perfect apart from it so I wanted to do it as carefully as I can. Despite being a relatively clean lens, it took me about a night to clean it because I wanted to remove as much of the old grease from the lens and you will see the results in the next picture.
 Make sure that you do not leave any residue so your fresh grease won’t be contaminated with bad lubricants. I used a type of grease that’s not too light so it won’t migrate to the iris in the future.
Before putting everything back together, leave-out the front barrel in order to adjust your lens’ focus. You’ll have to do this each time you repair a lens if that lens’ focus can be adjusted just like what we have here. If you do not know how this is done, read my article on simple focusing calibration. Don’t rely on the position of the parts for accuracy, the best way is to test it after it has been re-assembled properly. If it’s off by a lot then the helicoids have to be re-seated again because you have put them back the wrong way. Tough, I know and that’s why I insist that you read my article on helicoids.
 I am pleased with my work and thankfully I don’t have to do anything else. I don’t want to work on the lens barrel but the grease is showing signs that it is starting to go bad because the damping didn’t feel even. I stored this for a long time sitting in a dry cabinet doing nothing and I was surpised to find a thin layer of oil on the optics.
That’s all for this article. There are a couple of resources online for this lens’ repair but I wanted to make this so you guys can see my take on it. This is a simple lens for an experienced repairman but don’t repair this if you’re not into lens repair because you’ll require the correct tools and skills for this. It is better to spend on repairs than throwing money away due to a bad job by a novice. Having said that, not all repairmen are competent and it’s best to ask your friends for recommendations. If you liked this article, please show it to your friends and if you loved my work, you can help me by supporting my blog. This will help me continue writing original content and keep this blog alive. I am busy these days but I will try to find time for this blog. Your help is very much appreciated. Thank you and see you again, Ric.
Help Support this Blog:
Maintaining this blog requires money to operate. If you think that this site has helped you or you want to show your support by helping with the site’s upkeep, you can make a small donation to my paypal.com (richardHaw888@gmail.com). Money is not my prime motivation for this blog and I believe that I have enough to run this but you can help me make this site (and the companion facebook page) grow.
Leave me some tip?
Thank you very much for your continued support!
$2.00
Helping support this site will ensure that this will be kept going as long as I have the time and energy for this. I would appreciate it if you just leave out your name or details like your countrym name or other information so that the donations will totally be anonymous. This is a labor of love and I intend to keep it that way for as long as I can. Ric.

Jul 17, 2019 @ 21:38:00
Good writeup! I particularly enjoyed the detailed analysis of certain features of rendering, complete with pictures. I used to have an AF-D version before I got into high res digital and it performed pretty well when stopped down to f5.6. The rendering at large apertures can be quite moody for things like portraits, provided that the focus is accurate, which is not always easy with all the aberrations.
Aug 10, 2019 @ 18:15:33
Richard, how do you adjust the lens so there’s no forward/backward play between the focus ring, attached to the lens group and the part with the silver ring on? Mine has about 0.5mm play which isn’t much but it “knocks” when I pick the lens up or put it down. Incidentally, my 28mm f/2.8 Ai-s does the same. Thanks!
Jul 31, 2022 @ 19:13:44
My inner helicoid is stuck, bad. I bought this lens from a junk box, so I don’t know how it came to be this way. I have disassembled and reassembled it a few times trying to diagnose the problem, so I got that part down. What I need to know is how can I separate the stuck pieces (inner and outer helicoids)? I’ve been soaking in various types of solvents and it will not budge. I think I will try cycling between heat and cold next, from the freezer to hot water, but I am worried about cracking. Finally, I assume the inner heli is a standard thread and will unscrew with a counterclockwise turn? I would appreciate any advice. Thanks.
May 09, 2024 @ 10:24:23
My question is similar to Glenn Wright but for the aperture ring. Is there any way of adjusting the forward/back play of an aperture ring? Any way of adjusting the ring setting to remove the play? I’ve just started purchasing lenses and my first purchase has this play. Regards.