
Hello, everybody! It’s still hot here in Tokyo and the humidity is too high for me to work on cameras and lenses so I have a couple of weeks’ worth of backlog that I have to work on once the weather gets cooler. The heat makes me want to cut my hair short, that will also make me look more presentable so I can attract the attention of the opposite sex. I’m married but that isn’t an excuse for me to neglect my grooming. I need a new look so that I will have a fresh feeling each time I go out of the house and head to work. We all need a make-over some time. Speaking of make-overs, I will show you something that had a big revision and it turned out to be a big success for Nikon!
Introduction:
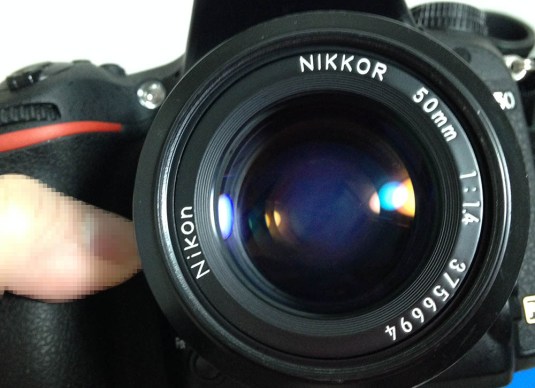
The New-Nikkor 50mm f/1.4 v2 is Nikon’s 2nd 50/1.4 lens design for the Nikon F-mount. Its predecessor is the New-Nikkor 50mm f/1.4 v1 which is simply a Nikkor-S 50mm f/1.4 with a new barrel design and some small improvements. The new optical design is compact, it is roughly 20% smaller but the bigger news is it out-performed the older design. The new design was so good that Nikon ended up using it up until the AF-Nikkor 50mm f/1.4D with new coatings and undoubtedly very minor adjustments to its lens formula. This is quite a big feat because the AF-Nikkor 50mm f/1.4D is still being made and sold as new today! It debuted in 1976 so the design is still being used 42 years after it was introduced! I don’t know when will Nikon stop producing it but there’s still demand for it because there will always be people who will want to use a lens with a proper aperture ring. This lens looks a lot like its successor, the Nikkor 50mm f/1.4 Ai and as a consequence many people think that they’re the same lens. You can think of it that way but there are small variations that make them different and these differences will only matter to collectors.
Before I forget and if it didn’t seem obvious to you, I am calling this lens the v2 because it shares the same name with the older one which I am calling the v1, people get confused when talking about this lens because they’re both called New-Nikkor 50mm f/1.4 or some people call them Nikkor 50mm f/1.4K. This confuses people and even a few collectors, too! It can get so confusing that some people aren’t even aware that either version existed. It’s common to get into a discussion where people will call the New-Nikkor 50mm f/1.4 v2 as the Nikkor 50mm f/1.4 Ai. Some people will even get into arguements about which lens is the topic of their conversation and realizing that they’re talking about the same lens.
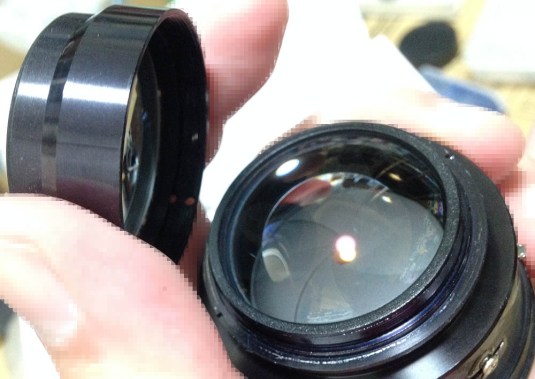
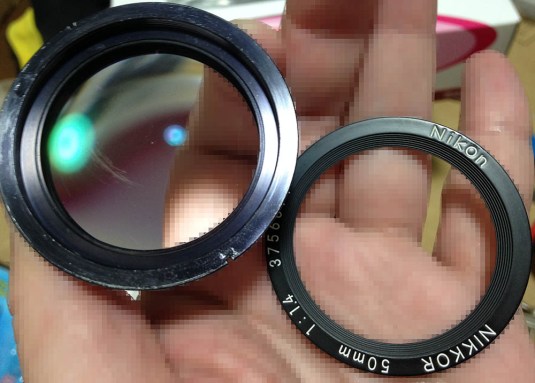
 The New-Nikkor 50mm f/1.4 v2 is a fine lens. I got this one as a junk with seized helicoids, the optics were also dirty as you can see from the picture above. The good news was the coating is intact and you can see its beautiful blue tint clearly. Nikon’s coatings are tough, the technology was developed during the war to coat periscopes for submarines.
While the element/group ratio didn’t change at all (7/6), the optical design shared nothing much in common in both designs. It’s a totally-new design and it had to surpass the older one in every aspect because 50mm lenses back then were the “face” of the company. The 50mm lenses are the ones that are usually sold along with the body as a kit and any bad impressions made on any of these 50mm lenses will reflect badly on the company. Nikon knew this so they have invested plenty of time and money on making a new generation 50/1.4 because the older design was being used from 1962 up to 1976. The good news is it proved to be an excellent design that corrected many of the flaws of the older design. It’s still prone to flaring and both spherical and chromatic aberrations but I can see how the pictures from the new design looks better in most aspects when shooting with it at f/1.4. I also noticed that the newer one has better resolution at f/2 and this means a lot for a lens in this class. If it’s still useless at f/2 then there’s no point in using this lens.
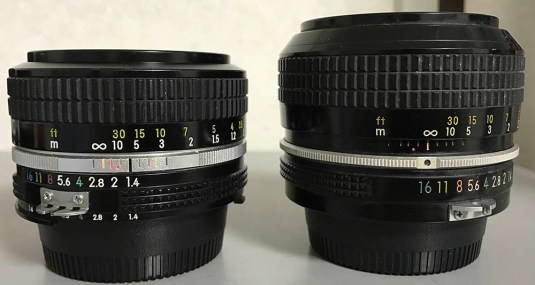 The New-Nikkor 50mm f/1.4 v2 is a lot smaller than the New-Nikkor 50mm f/1.4 v1. What the engineers did wasn’t easy because not only did they had to make the optics smaller, it had to be housed in an even smaller barrel. Advances in lens design at that time enabled Nikon to make a smaller 50/1.4 lens. The New-Nikkor 50mm f/1.4 v1 was also based on the Nikkor-S 50mm f/1.4 Auto and it was the first 50/1.4 for 35mm SLR cameras to be made. It had to be big because it was difficult to design lenses with the required back-focusing at that time to clear enough space for the mirrorbox. This became an even bigger problem once the design got wider that’s why Nikon made some lenses that can only be used if the mirror was in the “up” position so the optics are closer to the film plane. Once people got used to designing lenses with adequate back-focus, lenses got smaller and smaller and it made it possible to make wider lenses with faster maximum aperture like the practical Nikkor-O 35mm f/2 Auto and the fast Nikkor-S.C 55mm f/1.2 Auto.
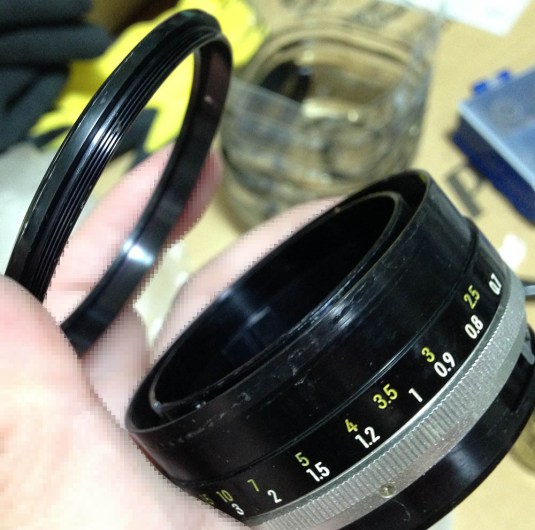
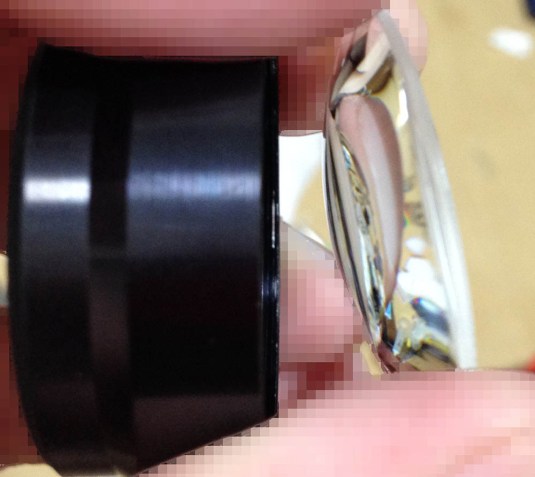
 This picture should make you appreciate the efforts of the engineers in giving us a small 50/1.4 lens. The handling improved considerably and you carry less weight so your neck will feel less tired after a long day of shooting. The filter size didn’t change so all of your 52mm accessories will still work. Nikon invested plenty of effort to make their lenses use the then-standard 52mm filer threads as much as possible. This was important because a lot of professionals invested in accessories with 52mm diameter threads. It remained this way until recently where we see Nikon use sizes that aren’t common to their system. You can see that my New-Nikkor 50mm f/1.4 v2 came with the factory Ai-ring so I can use this with Nikon cameras that have the Ai-interface. You will damage your camera if your lens hasn’t been updated with an Ai-ring so you’ll need to convert it to Ai if you want to use it with any modern Nikon cameras that have the Ai interface.
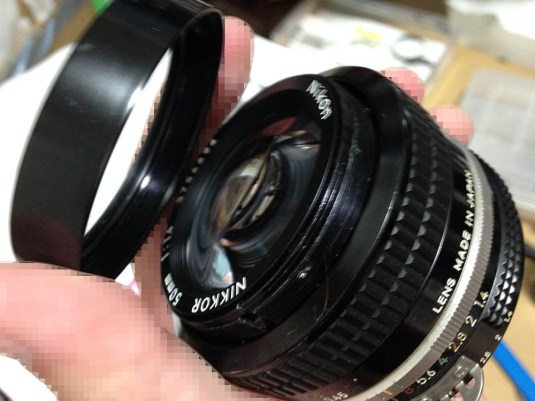
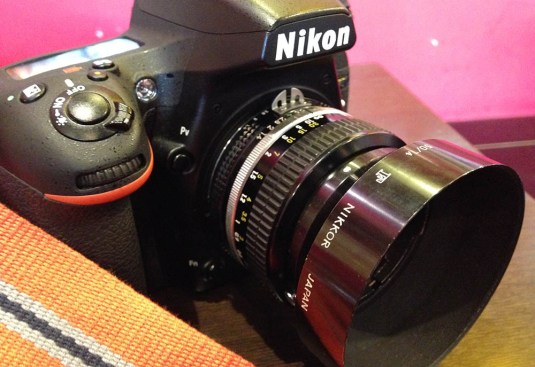 The optional shade is useful for proteting the front element from damage as well as help shielding it from stray light hitting the front element from an angle and causing flare or ghosts to appear in your picture.
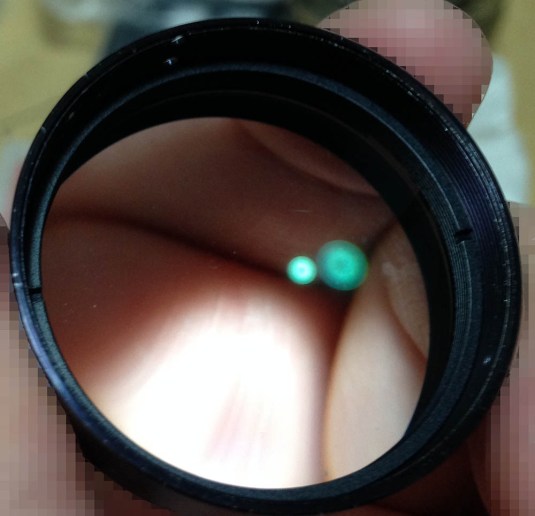
 Flare resistance look OK so far. No ugly diffused flare as far as I can see. If you have the sun in your fram you may get some ghosts but not by much.
The following pictures were shot from f/1.4, f/2 to f/2.8 to show you how this lens behaves when you stop it down. I only did the first few F-stops because that is where you can see the biggest changes or improvements happen. Knowing how this lens behaves will make it easier to determine when or how to use this lens effectively, for performance or for its creative potential. There are varying opinions of this lens online and we will see if some of those are true or just speculations made by people who have “different needs”.


(Click to enlarge)
Vignetting can be heavy at the far-corners but that’s kind of expected from a lens in this class. You can see it at its darkest at f/1.4 and it can be as much as 2-stops’ worth of light. The good news is it improves by f/2 and it’s almost gone by f/2.8 but I suspect that it will it will only be truly gone by f/4. It’s not too bad at f/2.8 and you can’t notice it much but this will have to be stopped-down to f/4 if you want really clean corners. I know that I made it sound terrible but this doesn’t really matter much in real-world use and I would even say that it adds to the lens’ character when shooting this wide-open as you will soon see. This lens was not calculated for shooting fine art or architecture anyway so this wasn’t taken into consideration.


(Click to enlarge)
These pictures were shot at closer distances that are less than 1.5m away from me. This lens has a bad reputation for this and we will inspect it closer to see it that holds. At f/1.4, you can see that the lens is indeed sharp. This is contrary to what many people say about this lens and I was of that opinion long ago until I understood how to use my lenses in an effective manner. Going back our the assessment of this lens, it’s decently-sharp at f/1.4. I can see the sharpness peeking-through a veil of chromatic aberration and that robs takes away the sharpness from the images. The very thin DOF compounds this issue and this is going to make it appear even worse. The bokeh is smooth as expected but it’s far from the perfection we see in lenses like the Nikkor 85mm f/1.4 Ai-S but it’s unfair to compare this lens with that for bokeh quality. By f/2, all that veiling flare and chromatic aberration are all but gone and you end up with a clean and crisp picture. The bokeh still looks smooth but it’s not as smooth as f/1.4, obviously. The contrast didn’t improve by much because it’s already excellent wide-open, the same goes for saturation as well. Resolution looks great at f/2 and this is the reason why this lens exists, you shoot it for resolution at these faster apertures. Stopping the lens down to f/2.8 will show near-peak performance. Resolution is excellent so sharpness and all the good stuff improves along with it. The bokeh is still rendered smooth but the background isn’t as blurred as it was. I have to say this but the rendering looks so natural and and the colors look neutral, it’s an exquisite lens.


(Click to enlarge)
Here are some crops that are close to 1:1. These should help make my point easier to see. The last set was shot with the subject at the right edge of the frame so we can see how its corners perform. As you can see, the sharpness looks decent wide-open but the veliling flare and other aberrations are making the image look bad. The images that were shot at f/2 and f/2.8 just mirrors my assessment of the pictures in my previous set of samples. It’s worth clicking the last set of pictures and inspect the details on the wig. Hair is good for testing a lens’ resolving power because it has a pattern with high frequency. You can see how high the resolving power of this lens is even wide-open. It rendered hair strands of the wig nicely depsite being shot wide-open and positioned near the edge of the frame. It is what shooting this lens is all about. I am not saying that other lenses can’t do this but I am just showing you how to use this lens properly.


(Click to enlarge)
You don’t usually shoot things like this with faster apertures but here it is anyway. It was nice to see that the lens can resolve the details of the temple at faster apertures. I am not sure about the coma performance but I do recall that it looks terrible. This lens certainly isn’t a Noct-Nikkor 58mm f/1.2 Ai-S in this regard and it costs a fraction of the real thing.
The following pictures were shot in real-world situations. Please forgive me because they are not all focused perfectly because this is a manual focus lens and my subjects are not stationary or cooperating with me for a picture but these should give you an idea on how this lens performs when used in real-world settings.
 This was shot wide-open and you can see just how nice and delicate the rendering is. The subject is reasonly in-focus and you can see that it’s decently-sharp for taking pictures of people. This makes for a nice portrait lens because sharpness is not too much as to show all of the pores in the subject’s skin. The chromatic aberration works to make the skin so smooth and delicate which gives it a flattering look specially for imperfect skin. This was how people do that softening filter back-in-the-day for their portraits.
(Click to enlarge)
The thin DOF at f/1.4 will give nice subject isolation for portraiture and makes the subject pop-up from the picture. The best example of this is the last picture where the subject is drinking a can of beer. He looks sharp while the rest of the frame looks blurred. The blur is smooth and not harsh at all so it gives the images a very pleasing and organic quality.


(Click to enlarge)
Some more pictures that were shot at f/1.4 with the subjects further in frame. Very good rendering from this lens. The slightly unsaturated colors makes the pictures look natural. I don’t like pictures that look too-saturated but that’s just my taste. It’s also worth noting that I shot these during a slightly cloudy day that’s why the colors look a bit toned-down. I love how beautiful the subject isolation is on these pictures. Can you say that this lens is terrible wide-open? Maybe not as clean as modern-day optics which can be too much but it is certainly far from looking terrible. Don’t trust everything you read online unless the opinion makers have real-world pictures to back them up or there’s no agenda behind it.


(Click to enlarge)
These were all shot wide-open and you can see just how delicate the pictures look. They look more like pictures than the ones we see from modern lenses that look like CG since they were overly-corrected. I must point-out that the lens was probably calculated to give better quality for subjects taken at these distances and beyond. You can see how sharp it looks without looking too-sharp like how modern lenses tend to do.
 Another picture that was shot wide-open. The interviewer asked: “What do you think of richardhaw.com?” and the lady said: “Oh, it’s such a brilliant site! Not only do I get to see honest reviews but I also learn how to fix lenses! I bet he looks cute for his age, too!” See just how sharp and contrasty the subject looks. Chromatic aberration doesn’t look bad in this picture despite being shot wide-open. You can say that the aberrations mostly affect pictures that were shot at closer distances because I can’t see much of it even at the shiny highlight at the bald guy’s scalp and the pink yukata or the white long-sleeve shirt.
 This was shot at f/2. Notice that there’s almost no hint of aberration in this picture and its bokeh is still smooth. The wider DOF will make your subjects stand-out more like they’re some cardboard cut-out. Sharpness looks great at f/2 and this is where you want to shoot it at if you don’t want any chromatic aberration or veiling flare to muddle the frame. The details look great and the yukatas’ patterns are all well-defined.


(Click to enlarge)
See how nice it looks at f/2? To be honest, this looks too “generic” to me and I prefer all of the aberrations working together to make a nice picture like what we have at f/1.4. If this was for a magazine then this will probably work nicely. This is an exquisite lens and the lens shows its high quality in these shots.


(Click to enlarge)
Here are some more pictures that were shot from f/2.8 and below. Can you guess which ones were shot at which apertures? A lens that changes character as you stop it down is considered to be superior when it comes to utility and creative potential because it can render differently across its aperture range. This will give you the flexibility and comfort of using only 1 lens to take pictures in several different ways, saving you the hassle that’s associated with bringing several lenses to do the same purpose. Indeed, knowing how a lens performs is the key to maximizing your equipment.


(Click to enlarge)
Here are some pictures that I shot on Cinestill 800T film. This film is sharp and you’ll see that the lens resolved pretty well with film showing nice details even wide-open. I think it even looks better with film as I don’t see any of the chromatic aberrations in any of the pictures that I took. Well, at least not terrible at all if you ask me. The guy walking down the alley was a bit mis-focused and so you can see some blooming happening, halation is also another culprit here but that’s caused by this film having its rem-jet layer removed. I believe that picture with Michael Jackson’s poster was shot at f/2, I had no reason to shoot this wide-open since it’s a stationary scene.
 See how nice it looks? I believe this was shot at f/2. The resolving power of this lens at f/2 is good and that is something that most, if not all 50/1.8 lens will never give you. Inspect the details of the couple and you will see how nice it is.


(Click to enlarge)
Here are some more pictures. If you click on the pictures, you can see that most of them are sharp unless the focus is a bit off. The picture with the old ladies in kimono and the one where I was shooting-through a grille were probably shot at f/2. The lady wearing a red fox mask on top of her head was either shot at f/2 or f/2.8. The salaryman walking at the alley was shot at f/1.4. I hope that these samples gave you a good idea of how this lens performs with film. I have other samples that show better results but they’re pictures of my daughter and I don’t want to upload them here for obvious reasons.
Having seen my samples, do you think that this lens is worth shooting with? If you were to ask me, the simple answer is “yes”! It does give you a “vintage” look and the lens won’t beat the standards set by newer glasses but it still has many things to offer if all you want is a lens that renders beautifully. If you don’t mind focusing manually then using this will save you money if you’re a hobbyist, if you’re a professional then this lens will help give your pictures a certain “look” that you can use as to help make your pictures unique and stand-out from the rest of the competition. People will see your pictures and recognize it easily because of the rendering and this will attract clients who are looking for a unique look so their images will look different. This lens is still relevant today as the day it was unveiled more than 4 decades ago and you can have lots of fun with this lens when you know when and how to use it to your creative advantage. They are being sold for about $70-120 on the used market depending on the condition or if they have the Ai-ring with it or not. Mirrorless shooters won’t have much use for the Ai-ring so the money they save is better used to buy it a good hood or another accessory. Let’s go on to the repair article.
Before We Begin:
If this is the first attempt at opening a lens then I suggest that you read my previous posts regarding screws & drivers, grease and other things. Also read regarding the tools that you will need in order to fix your Nikkors.
I highly suggest that you read these primers before you begin (for beginners):
- Essential tools
- Best practices 1
- Best practices 2
- Best practices 3
- Ai conversion
- Working with Helicoids
Reading these primers should lessen the chance of ruining your lens if you are a novice. Before opening up any lens, always look for other people who have done so in Youtube or the internet. Information is scarce, vague and scattered (that is why I started this) but you can still find some information if you search carefully.
I highly recommend that you also read my working with helicoids post because this is very important and getting it wrong can ruin your day. If I can force you to read this, I would. It is that important!
For more advanced topics, you can read my fungus removal post as a start. This post has a lot of useful information here and there and it will be beneficial for you to read this.
Disassembly (Lens Barrel):
There’s nothing difficult with disassembling the lens barrel if you’re an repairman but it can be annoying for this lens because Nikkors made in this era tend to be glued at every point possible with lacquer and even epoxy. This makes them time-consuming to repair and you will need plenty of patience to repair it safely. Having said that, the barrel is of a conventional design and is pretty straight-forward. Like all lenses, we would want to pull the objective off as soon as possible so we can work on the rest without having to worry about damaging the glass. This is not possible with some lenses like zooms but for older prime lenses this is easily done after removing what’s securing the objective’s housing.
This article may also be applicable to the Nikkor 50mm f/1.4 Ai but you should be aware that there are minor changes in the design so it will look different from what we have in this article. Just go at it slowly and think before you remove anything and you should be OK. Differences such as number of screws and the position of some parts are trivial and you should get your way around it using this article.
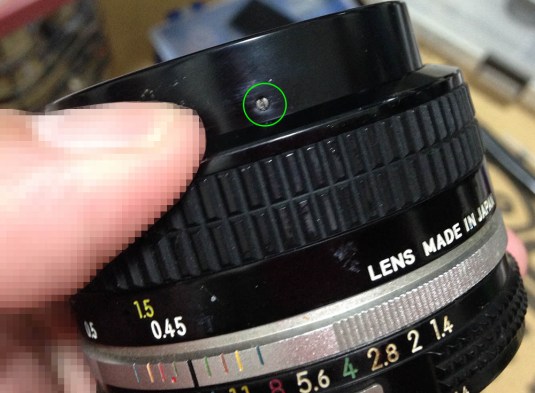 To remove the front barrel, you will have to remove this set screw. Be careful with this as it can be easily damaged if you use the wrong type of driver. If it won’t come-off you will have to use solvents to soften the glue on its threads or just head it with a soldering iron and unscrew it while it’s hot. Don’t lose this screw, taping it to your screws organizer is a good way of securing it.
 The front barrel can now be easily unscrewed. If it won’t come-off, drop some alcohol to its threads via the screw hole of the set screw. Wait for it to soften what’s binding it then you can try unscrewing it again. See that dimple on the thread? That’s where the tiny set screw should sink into when you reassemble it later.
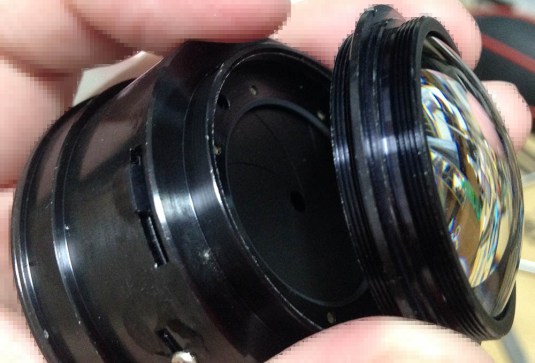
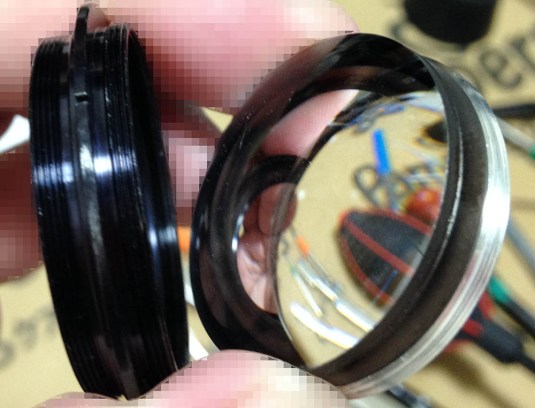
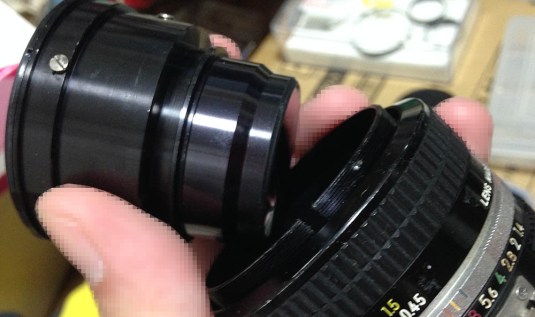 Once the front barrel is gone, you can pull the objective out from the lens just like this. It is heavy so make sure you don’t drop it to the floor. Gravity alone is enough to make this slide off from the lens barrel and you don’t want that to happen so never tip the front of the lens towards the floor when the front barrel is gone. Keep the objective safely-stored in a clean and safe place, also make sure that it won’t roll-off the edge of your table.
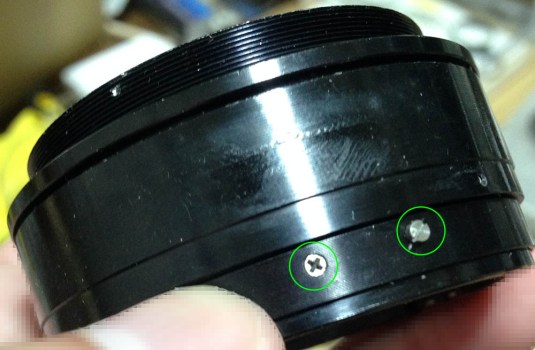
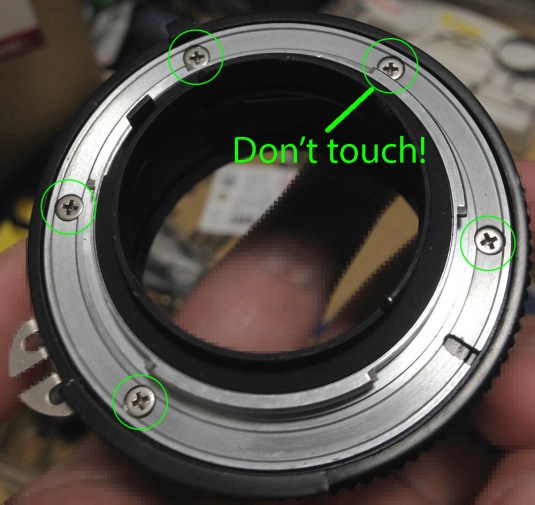 Now that the objective is out of the way, we can now work on the lens barrel without any fear of scratching the glass. To remove the bayonet mount, you will have to remove these screws. Do note that I have encircled one of the screws here and you don’t have to touch as you will soon see why. This is the screw at the 6:00 position when the lens is mounted to a camera. Many people get stuck because they can’t remove these screws and damage them to the point that the slots are stripped. To prevent that from happening, read what I wrote about removing screws from bayonet mounts. If you damaged these screws then it’s going to be expensive for you because you will need special tools to extract them.
 The screws are now gone apart from the one that I told you not to touch.
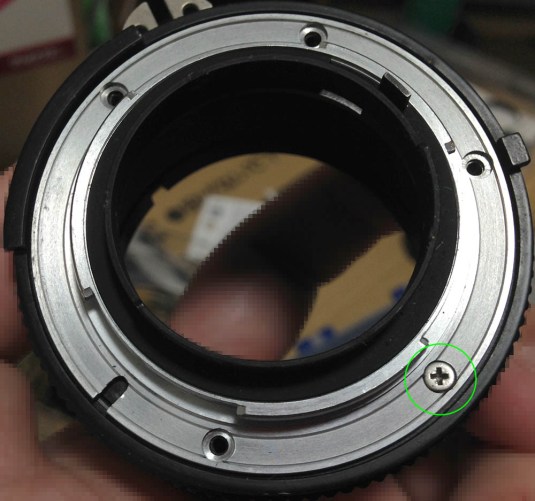
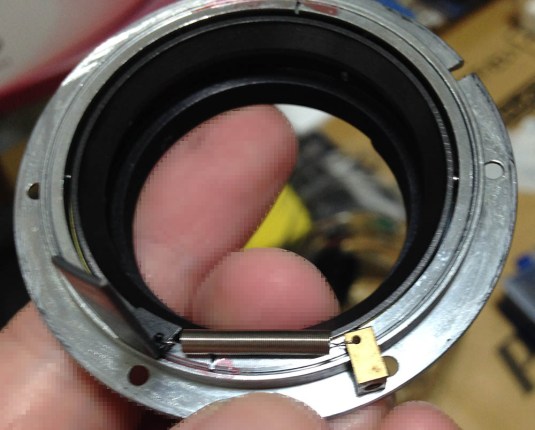 That screw is used to secure an abutment for the spring of the stop-down lever. I took the screw off in this picture because I wanted to clean the lens thoroughly and so the whole assembly had to be taken apart down to the last screw.
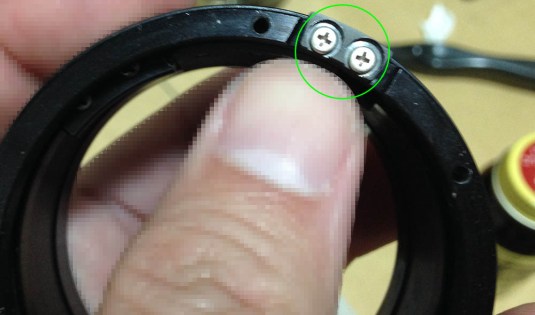
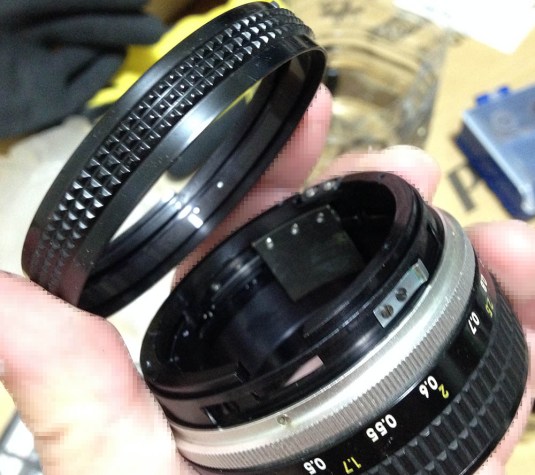 After removing the bayonet mount, it’s easy to remove the aperture ring just like this. It’s not being secured at all by anything but in later Ai versions of the lens, you will have to remove 2 screws from the outside in order for you to safely remove this.
 To remove the focusing ring you will have to remove the rubber grip first. A toothpick or a small screwdriver will be needed to pick under the rubber grip and run it around the whole circumference of the rubber. This will lift the rubber from its cement and you can pick it of later. Remember not to damage the rubber in any way because there will be no replacement parts available to you when that happened.
 The rubber grip can now be easily picked-off with your fingernails.
 You can now remove the front ring of the focusing ring. This is usually secured with glue so use generous amounts of alcohol to soften it up. If it still won’t come-off then leave the part alone for now because you may damage it if you force it.
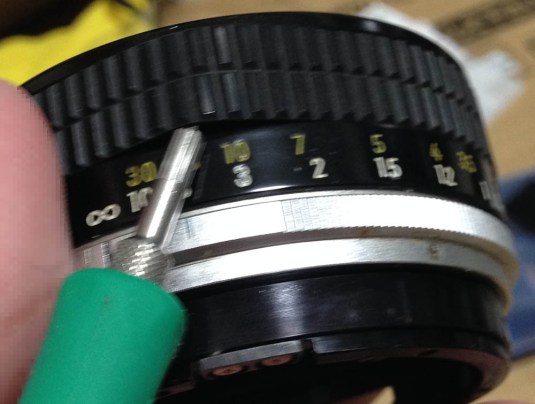
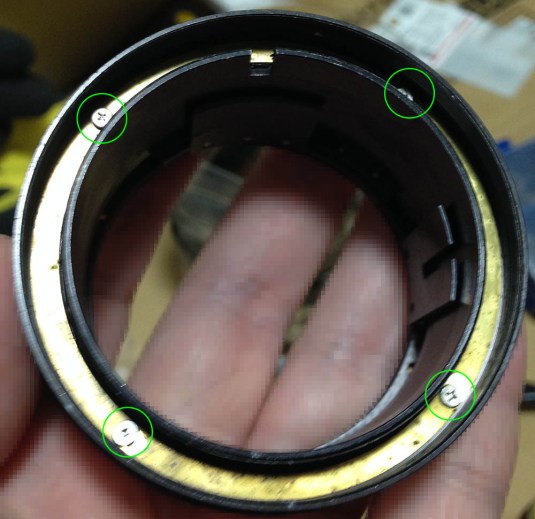 The focusing ring is being secures by this brass ring. Removing these 4 screws will allow you to remove the focusing ring. This is also where you adjust the focusing ring so your lens can be calibrated to focus properly to infinity.
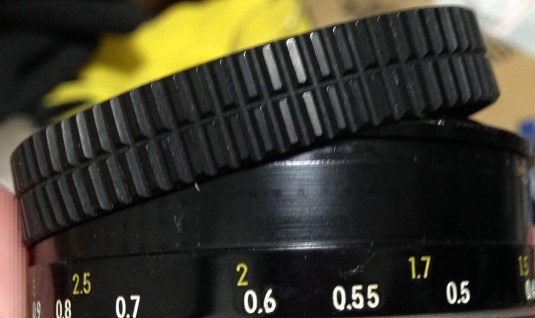
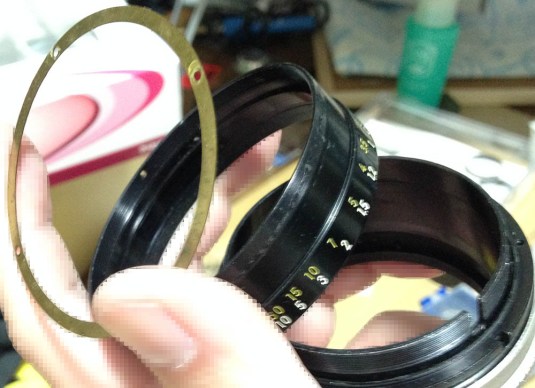 This is how everything comes-apart. The focusing ring is just being sandwiched between the brass ring and the central helicoid.
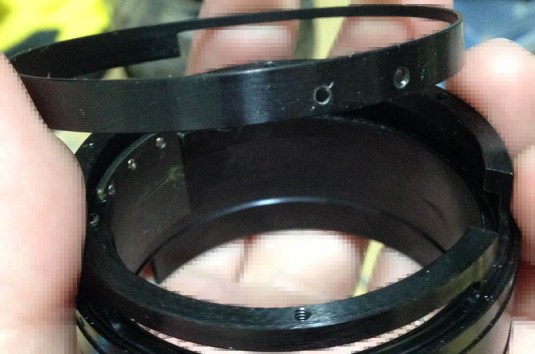
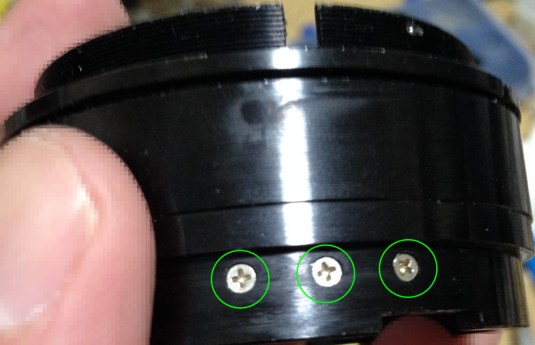
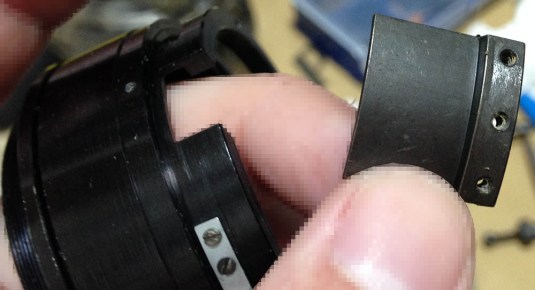
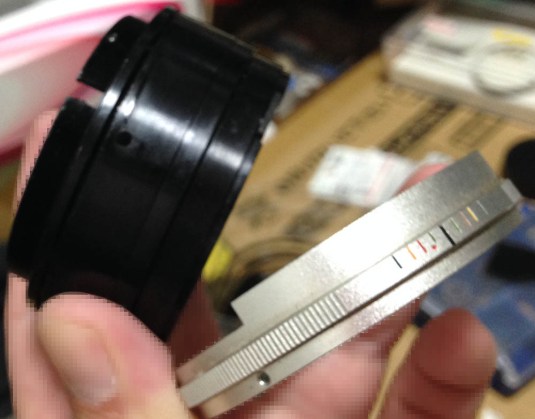 Removing the sleeve is easy and it involves removing 3 screws near the base. Make sure that you use drivers that fit the slots properly because a smaller tip will strip the heads of the screws and a bigger tip will scar the nice fluted pattern on the grip. These are glued to the barrel at times so use some alcohol if that’s the case for your lens.
 To remove the aperture fork from its rail you will habe to remove these 2 screws. Notice that one of the screws is of the slotted-type and I am not sure if it is original or not. These screws can be difficult to remove at times due to being sealed by epoxy at the other end. If that’s the case then only heat can soften it.
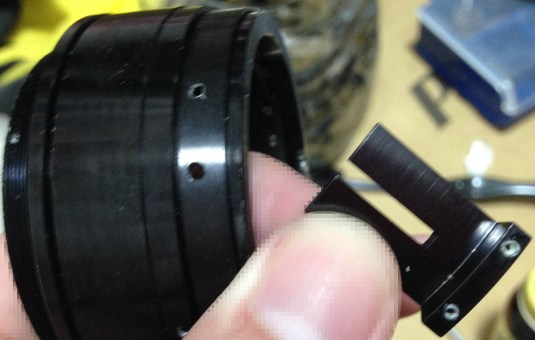 This is the fork and it couples to the iris mechanism inside of the objective’s housing. See the white deposits at the screw holes? That’s the residue from the epoxy. The screws can sometimes snap due to this so apply heat when needed.
 To remove the rail/ring, remove these screws so you can remove the stop.
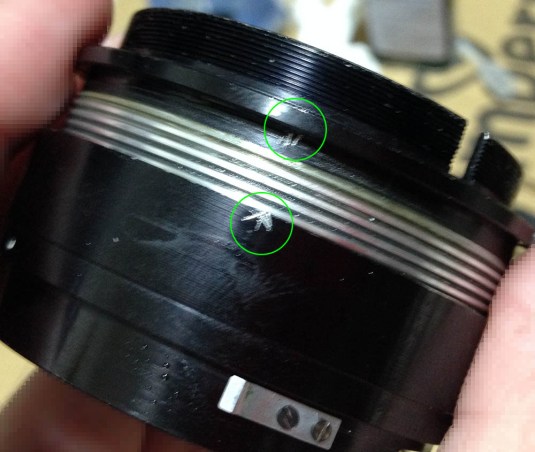
 The ring can now be removed easily just like this. Before you go proceed, take pictures or note how the helicoids move and their range. Take note of their alignment when they are compressed or extended. This will help you determine if you got everything right or not when you re-assemble the lens barrel back after cleaning it.
 Once you are satisfied with your notes, remove these 3 screws so you can separate your helicoids and do a thorough cleaning. These screws are usually glued with epoxy or some other type of strong adhesive so heating these will help you prevent any damage.
 This is the helicoid key that’s being secured by the 3 screws. The helicoid key contstrains the 3 helicoids so they turn in-sync. This will allow them to extend or retract as you turn the central helicoid, making it possible to focus your lens. Do not damage this part or the surface that this thing comes into contact with because this will affect how smooth your helicoids are when you turn them.
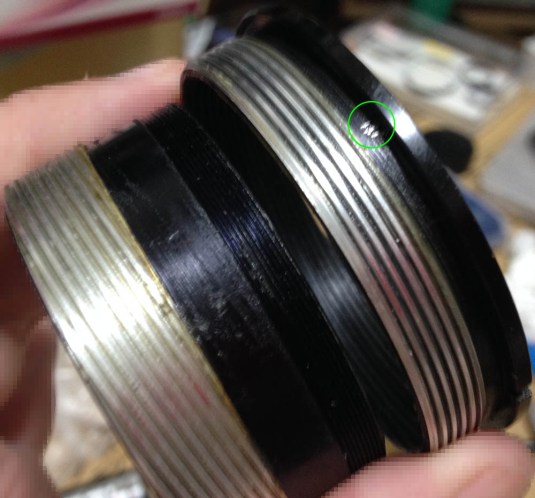
 Once the helicoid key is gone, you can now separate the helicoids. Separate the outer one from the central helicoid and never forget to mark where they separated. This is where many people get stuck and to prevent that from happening to you it’s best that you mark where they separate because this is also where they should mesh together later. If you’re new to repairing lenses, please read my article on how to work with helicoids to prevent any problems from happening during re-assembly. This is where mine separated.
 Do the same for the inner helicoid. Notice that the inner helicoid was extracted through the bottom of the central one. This works for some helicoids so use your judgement when removing your helicoids.
That’s all for the lens barrel. Clean it very well using a toothbrush and scrub it very well with a plastic wool to remove any hardened grease. A toothpick is also helpful if that did not work. Clean them very well before you lubricate them because you don’t want any of the old gunk to contaminate your fresh grease. Don’t apply too much or the excess grease will migrate to your optics and that will be an even bigger problem later. I used a thinner type of grease for this lens because I don’t want too much resistance when I turn it. Use a thicker grease for lenses with a shorter focus throw and that will make it feel smooth. It’s important which type of grease you choose as it will affect how you use the lens. There is also one more thing that I have to mention so please pay attention. When putting the key back, make sure that you don’t tighten the 3 screws first and turn the helicoids and see if they are smooth. Once you exercised the helicoids, the helicoid key will set itself and that is the only time when you should tighten the 3 screws. If the helicoid key wasn’t set right the helicoids will not turn smoothly because it’s not square within its slots.
Disassembly (Objective):
The objective isn’t difficult to disassemble but you will need the proper tools to work on it like a few pairs of lens spanners, some rubber tools and a lens sucker. If you have been a loyal follower of my blog then everything should look familiar to you by this time. If you have a lens with an oily iris problem then this will not show you how to fix it because it’s clean on this one. The good news is that you can search my blog for lenses that share the same iris mechanism design as this one and you can use that as a guide.
 The rear elements assembly can be unscrewed just like this. These are sometimes glued using lacquer at the threads so place a small drop of alcohol at the seams of the thread so it can soften it up before you try another attempt. Never use too much alcohol here since there are cemented elements used in this lens and alcohol can weaken the cement used to bind them together. This is something that you never want to happen to any lens.
 You should only do this step if you have to because it can be delicate. The rear element is secured by a retainer ring and you can remove the ring using a lens spanner. I’m certain that this was glued at the factory so use the solvent trick again on this.
 The 6th element can now be safely extracted with a lens sucker. Please note the direction of your elements as you remove them so you will know where they should be facing. The lens elements are never symmetrical and putting it back the wrong way can stress them and that will result in a cracked element. The last element is glued to the casing so don’t bother removing it, it’s permanently-sealed to it and there’s no point in removing it.
 The housing of the inner elements can now be removed with the help of a lens spanner. I forgot if this was secured with lacquer or not so try it out with your bare hands first. Use caution when working on this part so you won’t scratch that exposed glass.
 The 5th and 4th elements are cemented together as a doublet, they are then cemented to their collar. You can remove them as a single unit. Handle this with care because they’re delicate. You can also adjust or collimate your lens by tuning how far this thing sits in its housing. This is beyond the scope of this article and it can only be done using specialized equipment and techniques. Having said this, you will want to measure how far this thing is set within its housing before you remove it.
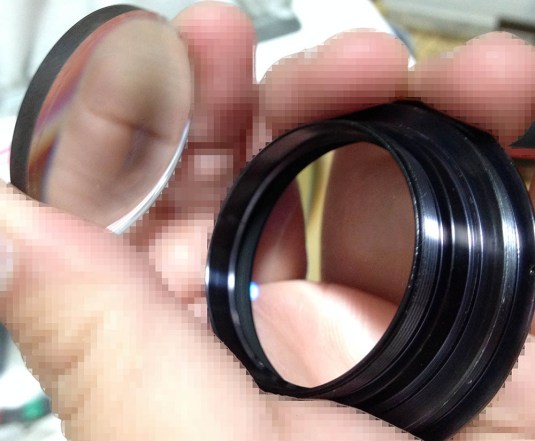
 The front elements assembly can be unscrewed like this. Use a rubber tool to help grip it and place a small drop of alcohol at the threads when it’s stuck. Be careful not to damage the exposed lip of the element here because it’s thin and can chip easily.
 You can further disassemble it by unscrewing the collar at the rear.
 You can now safely extract the 2nd element with a lens sucker. Don’t forget to note which way this should be facing, I do this by drawing a small dot at the wall of the element with a permanent marker.
 The front element is being secured by the front bezel or name ring. You can remove it by using a rubber friction tool and be careful not to drop the front element.
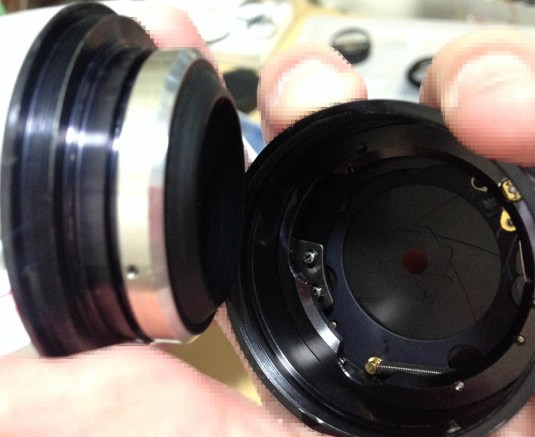
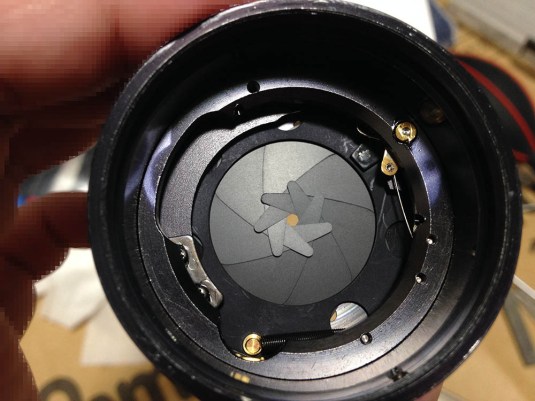 Here is a good view of the iris. I didn’t have to work on it with this lens but it’s easy to do because the design is conventional and share a lot in common with many Nikkors. If you want to work on your iris mechanism, read my other guides to find tips on how to work on the iris mechanism. Just make sure to find one that looks similar to this.
 The iris mechanism is being secured by these 3 screws. Notice that lacquer was applied to them and that indicates that this is an adjustable assembly. Do not fudge around with this because this was set at the factory so your lens will expose properly. If your iris had to be disassembled, take notes or mark the position of these things so you will know how to put it back again properly later. This is how the iris is regulated and if it’s off by even a bit then your lens will not give you the right F-number when you use it and that will fool your camera’s meter.
That’s it for the objective. It’s not difficult to work on but you must exercise care when it’s being handled because the glass can be heavy. Dropping any of them is never an option, I have been repairing lenses for some time now and I am always nervous every time I get to this part.
Conclusion:
It took me 2 nights to work on this lens because I spent plenty of time cleaning it. If it was cleaner then this would have taken me only 3-4 hours of work. The lens was filthy when I got it so it had to be thoroughly cleaned. Before you put everything back together, leave the front part of the focusing ring so you can access the screws that tighten the focusing ring because you will need to adjust the lens’ focusing so it can focus to infinity properly. Read my article on how to calibrate your lens’ focus to see how this is done. Once you are satisfied, reinstall the front part of the focusing ring and you can now enjoy your lens. It is also important that you use contact cement to glue the rubber grip of the focusing ring so it won’t slide as you turn it. Don’t apply too much to prevent a mess.
 The lens is now ready for use! Such a lovely lens once everything has been restored back to working order. Who could have guessed that this was sold as junk when I got it.
That’s it for this article. I will be writing short articles for the coming weeks because I’m busy at work and I only have about 2-3 hours of free time every night and weekends are spent with my family or sleeping because I am currently sleeping about 5-6 hours every night and that takes a toll on my health and well-being. Don’t worry, I have a few articles that I have been preparing for you and all I need is the time to edit them so I can present them in a logical manner. See you guys next time and I hope that you enjoyed this one. I will be publishing something again within the week so please come back again. Ric.
Help Support this Blog:
Maintaining this blog requires money to operate. If you think that this site has helped you or you want to show your support by helping with the upkeep of this site, you can simple make a small donation to my paypal.com account (richardHaw888@gmail.com). Money is not my prime motivation for this blog and I believe that I have enough to run this but you can help me make this site (and the companion facebook page) grow.
Leave me some tip?
Thank you very much for your continued support!
$2.00
Helping support this site will ensure that this will be kept going as long as I have the time and energy for this. I would appreciate it if you just leave out your name or details like your country and other information so that the donations will totally be anonymous it is at all possible. This is a labor of love and I intend to keep it that way for as long as I can. Ric.

Aug 13, 2018 @ 20:48:29
Just great work, I have about 20 various Nikkormat cameras. Nikkormat EL is my favorite, Nikon F very close 2nd nikkormat FT3 ranks up there also but the FT 2 is as dependable as any 35 mm film camera Minolta X700 when I had better eyesight would be my everyday camera FILM FOREVER. Just to let you know people are great full for what you do. Lunch money on the way. I have about 10 of each of the above. Thanks from a 72 year old camera fanatic.
Sep 03, 2018 @ 19:23:28
Hello and thanks for another nice tutorial :D! Is this version of the lens “almost” identical to the 50 mm f/1.4 AI-S? Or are the 2 version really different? Thanks :).
Sep 16, 2018 @ 22:40:36
Hello. I suspect that there are small differences in the optics as Nikon tweaks the optics a bit during production but it’s very close to the Ai-S version. The iris assembly of the Ai-S version may be different as well as some parts inside but they’re very close. I will know when I work on one. Ric.
Sep 17, 2018 @ 04:25:05
Thanks Richard!
Nov 05, 2018 @ 19:35:09
Thanks for this write up Richard. Any chance you have a spare focusing ring for one of these lenses? Would you be interested in doing the repairs and a cleaning on one of my copies of this lens?
Nov 09, 2018 @ 00:37:50
Hello, Leo!
I dont have much time lately and lack of sleep is a chronic problem of mine. I don’t think I have any spares for that lens. Is the dent so severe that it cannot be bent back to shape or is it something else? Thanks.
Nov 11, 2018 @ 21:51:54
Hey! I bought the lens you had listed on eBay… so I will take apart my damaged lens without fear of complete loss.
Thanks!
Feb 07, 2019 @ 17:02:29
Hi Richard,Just found this repair manual on your blog, I have the AI-S 50mm F1.4 lens(the version that only have 3 screws at the lens mount, and the f16 text was orange coloured),I bought this lens as 2nd handed, when I got it I found it can not align in the infinity,How do I adjust this?
Feb 08, 2019 @ 03:53:17
It is the Ai-S version. It is different from this one. Ric.
Feb 10, 2019 @ 23:18:10
Hi Richard, I really appreciate your blog – thank you so much for putting all that great information out there. I have a question that I thought you might have the answer to, since you are intimately familiar with the 50mm 1.4 v2. On my copy of this lens, the stop down lever has a couple of characteristics that are different from all my other Nikkor lenses and I’m not sure if it’s not functioning correctly, or if that’s just how this model of lens is. The reason I’m concerned is that I had to get my Nikon Df aperture stop-down lever mechanism replaced last year, and it seems like the trouble started with this particular lens mounted.
The first thing is that the stop-down lever on my copy of this lens doesn’t move in its slot when you rotate the aperture ring with the lens off the camera. You can move it by hand, of course. The lens still stops down to the correct aperture when you take a picture. On all my other lenses, the stop-down lever moves in its slot on the lens mount when you rotate the aperture ring. It looks like yours is probably the same as mine, judging from the position of the stop-down lever in the image you posted of the rear of the lens. So maybe that’s just normal for this lens.
The second possible oddity on my lens is that when the stop-down lever is pushed by hand all the way to the left (to hold the aperture wide-open), it stops about a millimeter short of the end of the slot. This is where I’m worried it might damage my camera. On all my other Nikkor lenses, I think the lever is able to travel all the way to the end of the slot. When I unscrew the lens mount and look inside the lens body, it looks like the stop-down lever is probably being stopped by a screw before it reaches the end of the slot. I’m concerned that it’s putting undue pressure on my camera’s aperture control arm when the lens is mounted, since the stop-down lever on the lens isn’t able to reach the end of the slot when the aperture control arm on the camera is pushing it in that direction to hold the lens wide open.
So my question is, would you be able to tell me if these two behaviors are the same on your copy of this lens?
Sorry for the long, complicated comment! If you prefer, I can email you a photo of what I’m talking about – it might be a lot easier to describe that way.
Thanks, Richard!
David
May 19, 2020 @ 14:35:51
Thanks a lot for the great guide, it’s the first clear one I’ve read since I started opening it years ago. After all the fixing ups the lens finally focuses properly and the glass is clean. I still couldn’t find a way to fix the little bit of play between the helicoids themselves. Do you know any way to fix that? Is it because I only put a little bit of grease coz I was worried it would have wet the lenses? I’ll try to follow your guide when I’ll take it apart yet another time. Thank you!
Oct 12, 2020 @ 19:19:46
inner helicoil seized any solutions Tia
Feb 14, 2021 @ 17:38:03
“The New-Nikkor 50mm f/1.4 v1 was also based on the Nikkor-S 50mm f/1.4 Auto and it was the first 50/1.4 for 35mm SLR cameras to be made.”
This is not correct at all. The first was the Super Takumar 50/1.4.