
Hello, everybody! I’m lazy today and I do not have the motivation to make myself a fresh cup of coffee so I went out and bought some instant coffee to give me that caffeine boost. I am aware that some people simply add cream and sugar to yesterday’s coffee to make it a bit more palatable but I would rather drink canned coffee than that. Re-heating food or beverages from last night isn’t good at all but there are some foods that tastes better this way like curries and stews. Some sauces also benefit from being “fermented” over-night, making its taste more intense (sambal is a good example). This “recycling” also happens with lenses and I will show you a lens that was given the same treatment by Nikon and it became the ultimate version of that lens formula. This is what lens manufacturers do if they ran out of things to show so they just “heat yesterday’s curry” so to speak. It’s better than nothing, I suppose.
Introduction:
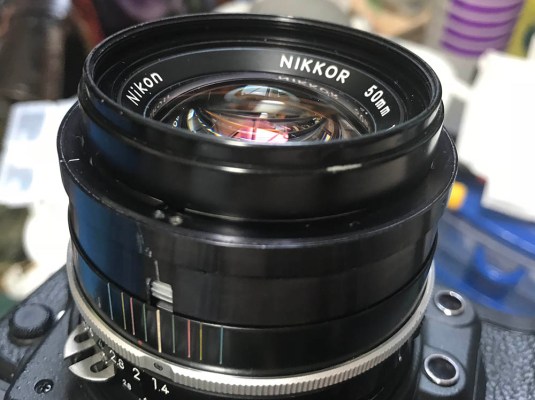
The New-Nikkor 50mm f/1.4 v1 is an update of the venerable Nikkor-S 50mm f/1.4 Auto. It has the Nikkor-S 50mm f/1.4 Auto’s optical formula but the lens barrel was updated so the look is more in-line with the New-Nikkor series of lenses that appeared in the ’70s. Nikon gave most of its lenses a cosmetic update in this era to make them look more modern and some were even given new lens formulas to go along with it. I’m guessing that Nikon did not make it on time to introduce the New-Nikkor 50mm f/1.4 v2 so they had to sell this in its place as a stop-gap product. Yes, it’s like the Honda Civic in recent times. This lens was only made for less than 2 years and was replaced by the New-Nikkor 50mm f/1.4 v2 after. This confuses some people because there are 2 versions in the New-Nikkor line and they are both in the 50/1.4 class. In fact, some people do not even know that this lens exists!
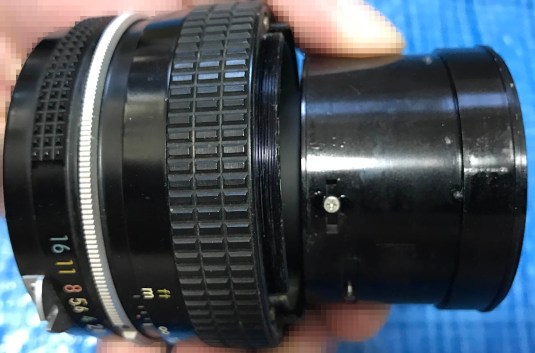
 The New-Nikkor 50mm f/1.4 v1 is just as big as the Nikkor-S.C 50mm f/1.4 Auto and that’s a big lens by older Nikkor standards. This lens feels confident in your hands and the added weight will add stability to your setup. Despite being huge, this lens is balanced so it does not feel heavy at all when mounted to a camera. Its girth is a bit too big for my taste but I am sure that some people will enjoy the fat focusing ring. Videographers might want this lens for their setup just because of the big focusing ring.
 This lens retained the 7 elements in 5 groups design of the Nikkor-S 50mm f/1.4 Auto that it replaced. By the time this lens was introduced into the market, this lens formula is old already and Nikon made the investment return several times over. This is the last lens in the 50/1.4 family to ever use this formula. Even with newer coating technology, it’s clear that it needs a replacement because Nikon’s competitors are making better equivalents like the Asahi-Pentax Takumar 50mm f/1.4 SMC. This formula is the first true 50/1.4 lens design for the SLR and it’s already 12 years old by the time this lens debuted. In those 12 years, optical engineering improved a lot which enabled engineers to design better and smaller 50/1.4 lenses.
 The New-Nikkor 50mm f/1.4 v2 is a big improvement over this lens in that it’s smaller and it has an updated optical formula that’s almost better in every way. This lens formula will be used for decades and remains in production up to this day!
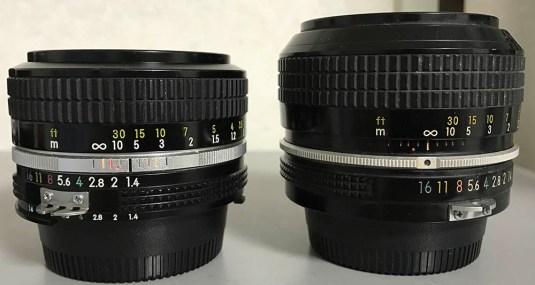
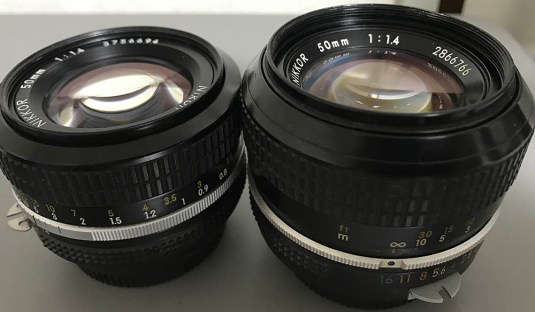 The New-Nikkor 50mm f/1.4 v1 looks old compared to the newer lens when you place the 2 lenses side-by-side. It has more in common with older lenses that it does with modern lenses. I consider this lens a transitional design bridging the old Nikkors to Nikkors from a later date. Was this lens necessary? I don’t think so and I still hold on to my pet theory that Nikon didn’t make it on time to release the New-Nikkor 50mm f/1.4 v2 and gave this lens to us instead. From a production point, this is a good decision because if you rushed something out in the market with many problems then you will only tarnish the name of your company by releasing something like that. It’s better to show something for the time being and release something game-changing at a later date.
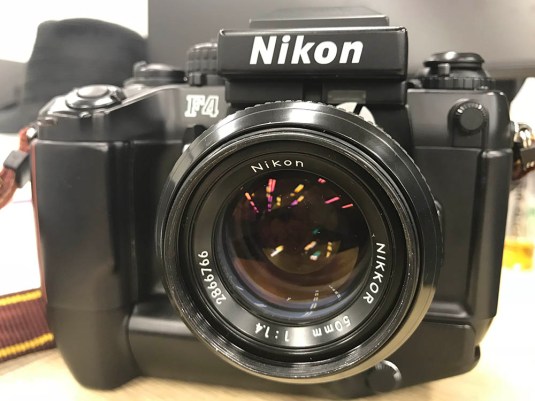 The New-Nikkor 50mm f/1.4 v1 balances really well with bigger bodies. Its size and heft is perfect for the Nikon F4s and it gives the setup more stability so you can use speeds that’s slower than what you’re comfortable with when using a smaller setup.
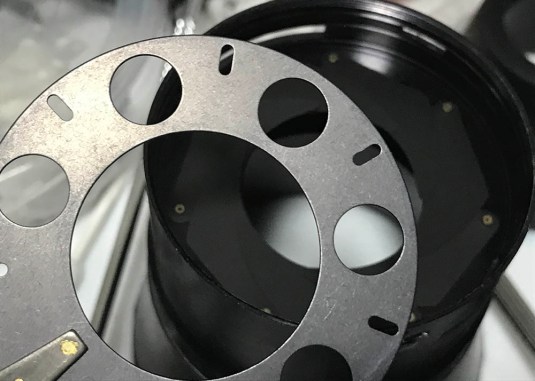
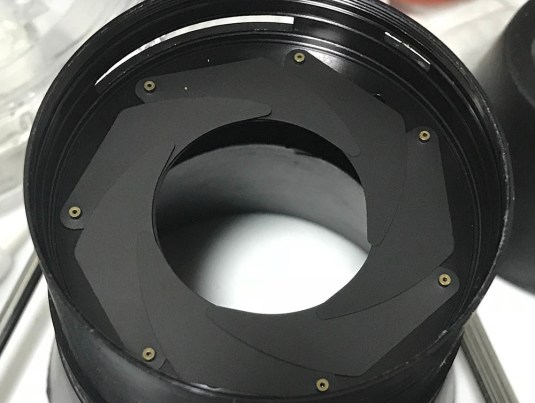
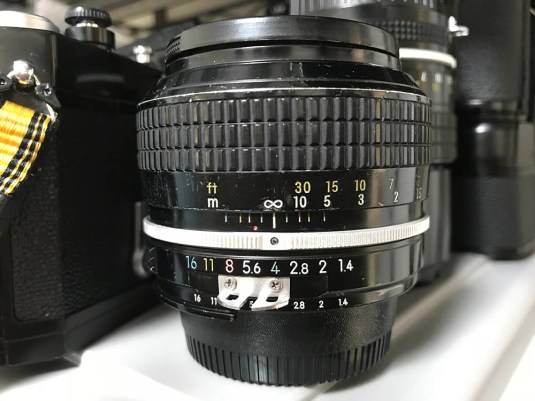 This is how the factory Ai ring looks like for this lens. It’s best if you can find one with it. I took the time and effort to do it and It’s worth every Yen that I paid for this lens. If you’re using a camera with the Ai interface then this is what you want or else you can harm the camera when you mount this.
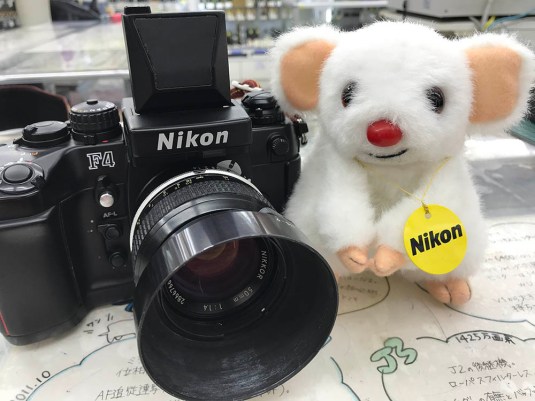 Here’s my setup beside the notorious “Nikon Mouse“. If you got a lens that’s pre-Ai, please don’t use it with a camera that can’t mount a pre-Ai lens. Some cameras will allow these pre-Ai lenses to be mounted without damaging them such as the Nikon F4 and all that is required is to lift the Ai-coupling tab up after pressing on a button. You can only meter in stop-down metering mode if you use this combo but it’s still better than nothing.
 This lens is heavy and smaller cameras like this Nikon FM may have the tendency to lean forward with this lens mounted. I attached a Nikon MD-12 motordrive to help balance it all out. This used to be a pro lens in its time so the build quality is quite high.


(Click to enlarge)
The coatings on this lens works great for negating flare as evident in these pictures but it is not going to prevent ghosting. Stopping the iris down will make the ghosts look smaller but it’s not going to disappear. The good news is the ghosts aren’t too big but you can see them at both ends of the picture. This is typical of this lens design and the lens that it was based (Nikkor-S 50mm f/1.4 Auto) on also exhibits this but I can confirm that this lens has better ghost and flare resistance than the older lens despite sharing the same formula. It can be largely attributed to the better coating plus the small tweaks that Nikon made to it over its moderately-long production life.


(Click to enlarge)
The pictures above were shot from f/1.4, f/2 to f/2.8. It would have been nice to add more samples reaching to f/8 because the lens changes character up until f/5.6 or so. This fact is what makes this lens interesting to use. At f/1.4, the pictures look nice but there is plenty of spherical aberration when shooting with subjects that are shiny or bright. The picture at the 2nd set exhibits this the most along with chromatic aberration. Shooting this lens in the shade or with subjects that aren’t strongly-lit will help you avoid this “feature”. The contrast is kind of low wide-open and vignetting is evident at the corners. At f/2, the lens is able to give you a nice picture with improved contrast, sharpness and resolution. You’ll notice a big jump in quality by stopping this lens down a little bit and you will also notice that the sphero-chromatic aberration is almost gone by f/2 and the vignetting isn’t as bad. The bokeh still looks nice and smooth. Stopping it down to f/2.8 will give you even better results but the background isn’t as blurred as it was. Vignetting isn’t obvious at this point and most of the aberrations are now gone. The lens peaks in resolution at about f/5.6 and this is where you will want to set your aperture when shooting subjects where you want to show fine details such as stitching.


(Click to enlarge)
These pictures were all shot wide-open. The first photo is of our humble toilet. I took this scene when I was testing my spot meter for zone metering. I’m showing this to you since it’s such a nice photo for demonstrating the effects of sphero-chromatic aberration. Look at the door knob and you can see a strong magenta cast along with a bloom. I take shots of shiny metal to exhibit this when I am testing a lens. Notice that the faucet looks great and you don’t see any aberrations on it because it’s in focus. This will give you a hint as to how this lens will behave when a surface is stongly-illuminated or if it is in-focus or not. Do note that the details on what’s in focus look nice as there’s no direct lighting that is affecting it (just bounced light). If that part of the scene was directly- lit by the sun then we will see some aberrations on that part, too.
I am showing the 2nd picture to you so you will see how subjects that are closer to your camera will look. This was shot in the shade so there’s no strong direct lighting here and you can see that the aberrations aren’t as strong in this picture. Having seen these, it will help you plan your shot when you want to keep sphero-chromatic aberration on the low-side while shooting wide-open. Lighting is the key here, just avoid direct lighting and you will get around this “feature” when you don’t want any of it.
The 3rd picture was shot with harsh direct sunlight and you can clearly see that the shirt is blooming with spherical aberration. This is typical for fast Nikkors that were made in that era and this lens is no exception. The good news is, all you have to do is to stop this down slightly at f/1.8 and most of this will be gone.
 This was shot at f/1.4, you can see that the rendering is quite delicate and the bokeh looks smooth. The transition from what’s focused to what’s not also looks nice, indicating that this lens a higher field curvature. It can be exploited creatively for dreamy portraits and surreal effects to give your pictures a different look. Sharpness isn’t the best but this will not be the lens that you will want to use if sharpness wide-open is what you want.
 Another shot that was taken wide-open. Notice that the spherical aberration works here in this picture because it gave the skin a nice glow. This makes it look delicate and will be flattering for portraits of women. You can use this to hide imperfections on your subject’s skin and make them look a few years younger. Straight lines can show if the bokeh is bad or not (foliage and twigs, too) and I am not liking how it looks on the brown pillar. Aside from that, I kind of like how the picture looks. Also notice the details on the bag, it is not sharp or contrasty but it certainly looks adequate at the least for this picture.
 This is how it looks at f/2, see how the details, contrast and resolution improved? See the hair of the girl with the brown bag, the sharpness and resolution is good-enough that it’s resolving the strands on her bangs pretty well. The bokeh still looks smooth but it’s not as blurred as it was wide-open. This is where you want to shoot this lens when you want a nice balance between detail and a blurred background. Of course, a blurred background is also reliant on your composition and subject placement but that’s another topic.
 Here it is af f/4, everything looks good here as expected or else the lens will be no-good. It shows very nice resolution and detail but the contrast is a bit muted for my taste but it’s more to do with the old coating technology used and overall lighting of the scene. Bokeh is still smooth but it’s not about that anymore in apertures smaller than this. Notice how the hair looks great on both girls and the pole of the umbrella looks sharp, I am talking about the details in case it’s not obvious. There is still a certain “delicateness” left in how this picture “feels” and it gives it a vintage look.
 This was shot at f/5.6, both spherical and chromatic aberrations are nowhere to be seen. I like how the scene was rendered with the slight bluish tint to it. The details look great so you can appreciate the textures of the wood and concrete but that vintage-look is still the big factor that makes this look special. I know that it’s a subjective statement and it’s just a matter of opinion to be honest so please don’t take my words as the definitive truth.
 This is how it looks like when you stop it down by a bit when shooting it with film. I took this with Cinestill 800T and I love how the details look. I think this was shot at f/2.
 I missed my focus a bit here because the lady moved so the mugs are sharp but the lady isn’t. It’s a very sharp lens for film if you judge it by this picture alone.


(Click to enlarge)
Here are some more pictures that were shot using film. I love the overall balance of this lens when shot with film. It’s sharp if you got your focus right and if your subject is still. I was shooting with slower shutter speeds so this was a bit of a problem for me. I enjoyed using this lens a lot. It’s apparent from these pictures that you will get some blooming or spherical aberration when you shoot with this lens wide-open and if your subject’s color is white or a light color that’s in-contrast with a much darker tone. Stop your lens down by a very small amount that’s not even half-way to f/2 and you will see it improve by a lot because the spherical aberration should be mostly gone at this point.


(Click to enlarge)
Here are a couple of more samples taken with this lens, can you tell me which image was shot with what aperture? You can see that this lens varies widely in character as you stop the aperture down even by a bit. Use this to your creative advantage and it’s like owning an extra lens. The spherical aberration can also be helpful in rendering your subject so a nice glow forms on the highlights of their skin. Some people call this the “Mandler Glow” or “Leica Glow”, these are just fancy names that people give to spherical aberration that was inherently built-into a lens’ design and some people will pay money for it. It’s part of the “mythology” of the other brand and they use it as a marketing tool even though their current lenses don’t exhibit this trait. You can now achieve something similar with just a fraction of what other people will for the “real thing”. I took these pictures while me and my subjects are walking so some focusing errors will be present but you can see that the lens is able to produce nice images when used correctly. The vintage look is a bonus and I value my older lenses because of this, it gives the pictures a nice unique look compared to the over-corrected results that modern lenses tend to give. The picture in my examples that exhibit this trait the most is the picture of the guy with the shades. The saturation is a bit low and the picture tends to look a bit cool, the contrast looks decent but not lacking and the image has a nice “flatness” to it. This is nice if you like doing color-correction in post because you have more colors in your palette to work with. I’m not a colorist but the ones that I worked with all appreciate this. The picture with the Hitchcock statue also has the cool-look to it, I know that this has more to do with white balance but the lens is also a factor to achieving this look.
Having seen my sample pictures, do you think that this lens is worth purchasing? If you ask me, I’ll tell you to skip this lens and buy the Nikkor-S.C 50mm f/1.4 Auto instead. Just be sure that you get the one with the C because it has the better coating, the ones without it will flare and ghost more. If you are willing to add a bit more then the you can just buy the New-Nikkor 50mm f/1.4 v2, that lens is a totally-new design and the optics are better in almost every way. The performance is closer to what modern lenses can do but it has that vintage-look to its pictures. Whichever lens you buy, make sure that you get the ones with the Ai ring installed or else you won’t be able to use them with newer Nikon camera bodies. The only reason to buy this lens for me is when you value the look of the pictures coming from the older Nikkor-S 50mm f/1.4 Auto lens formula but prefer to have rubber on the focusing ring for various reasons such as using the lens in cold weather. If you are a collector and you don’t have this then you are missing a big part of your 50/1.4 section. This lens is the last representation of the old 50/1.4 lens formula and that makes it special from a historical point-of-view. Despite the updated looks, it’s evident that Nikon needed a new lens formula so this lens was only made for about 1.5 years. This isn’t a rare lens at all but it was only made for such a short time and that makes it more interesting. That’s it for the introduction of this lens, let’s now begin with the repair article.
Before We Begin:
If this is the first attempt at opening a lens then I suggest that you read my previous posts regarding screws & drivers, grease and other things. Please also read what I wrote about the tools that you will need in order to fix your Nikkors.
I highly suggest that you read these primers before you begin (for beginners):
- Essential tools
- Best practices 1
- Best practices 2
- Best practices 3
- Ai conversion
- Working with Helicoids
Reading these primers should lessen the chance of ruining your lens if you are a novice. Before opening up any lens, always look for other people who have done so in Youtube or the internet. Information is scarce, vague and scattered (that is why I started this) but you can still find some information if you search carefully.
I highly recommend that you also read my working with helicoids post because this is very important and getting it wrong can ruin your day. If I can force you to read this, I would. It is that important!
For more advanced topics, you can read my fungus removal post as a start. This post has a lot of useful information here and there and it will be beneficial for you to read this.
Disassembly (Lens Barrel):
This lens should be easy enough for somebody with moderate experience in lens repair. I don’t think this will be a challenge to experienced repairers because it’s a simple lens to repair and it will probably take you a few hours to completely overhaul it. There are lots of things in common between this lens and the later Nikkor-S 50mm f/1.4 Auto models so if you have worked on that then this lens should feel very familiar to you. Just remember to use the correct tools so you won’t ruin this lens and use alcohol to soften the lacquer in the threads that the factory applied. Take plenty of notes before you remove anything so you will know how to put it back again when it’s time to re-install it.
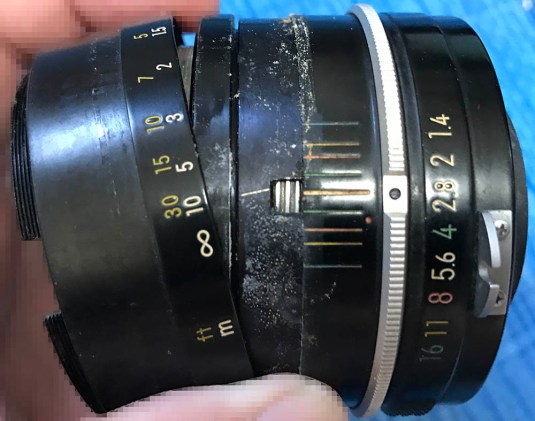
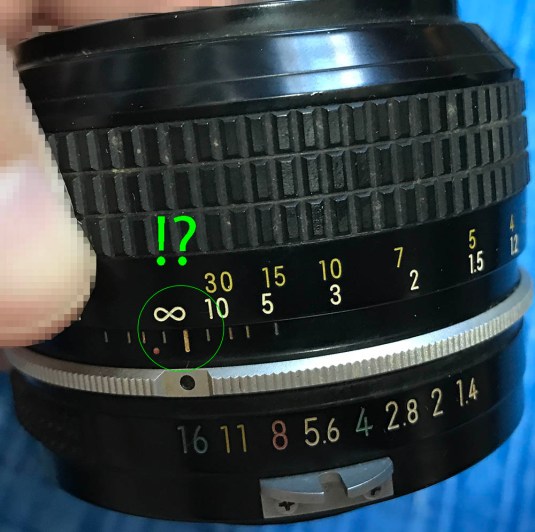 There is something odd about my lens, it doesn’t have a hard stop at infinity! I do not see how this came out of the factory like this so this must be the work of a “repairman”. This was not corrected because the adjustment inside was stuck and it’s going to damage the internal part that regulates this if I force it.
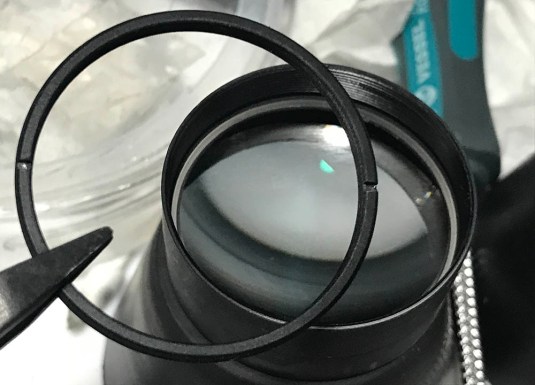
 Remove the front part of the focusing ring by unscrewing it. If it won’t come-off just use a bit of solvent like alcohol and saturate the seam and let capillary action take the alcohol around the threads. If this doesn’t work, just give this a light tap and see if that will work.
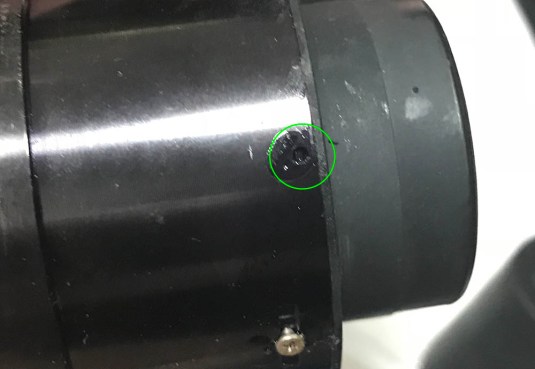
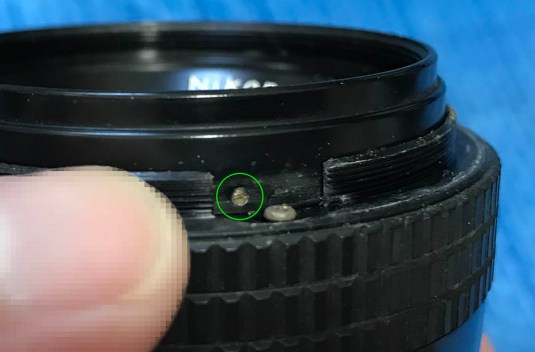 Once that collar is gone you can access more parts underneath it. Remove this set screw so you can unscrew the front ring.
 The front ring can now be removed. You can do that alcohol trick again if this is stuck. It is also important that you go at it slowly because you can easily cross-thread this part.
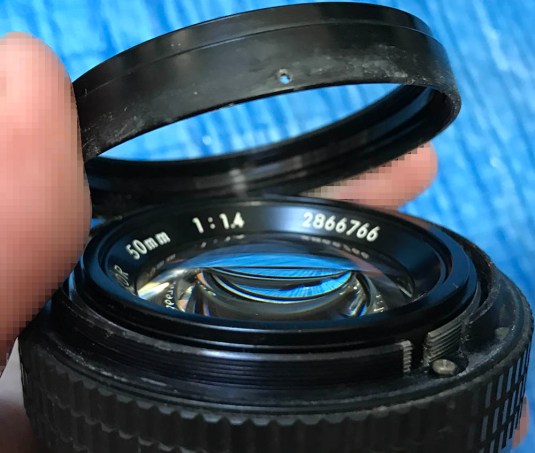
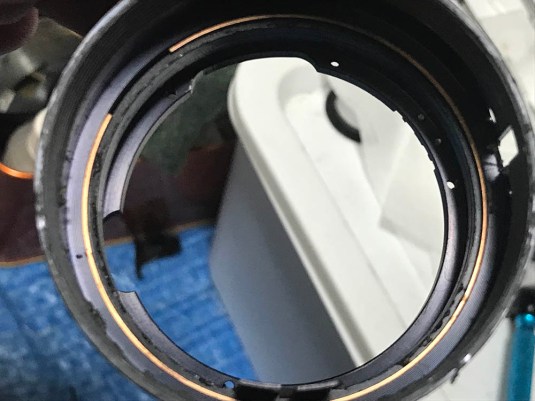
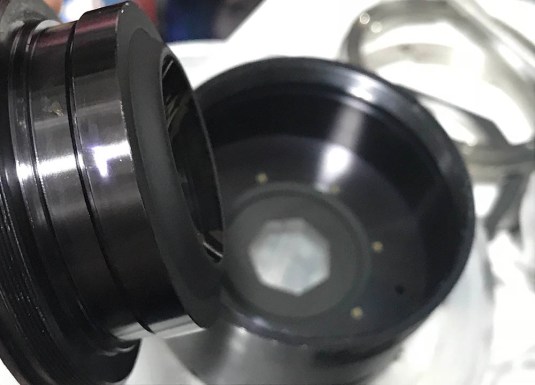
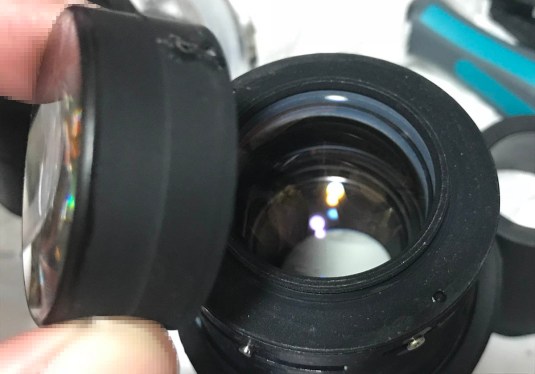
 The objective can now be easily extracted. It’s just being secured by the front ring and it can slide-off from its barrel if you’re not careful. Pull it away and store it in a safe place.
 The rubber grip can easily be removed by picking on it with your nails or a toothpick. Be careful not to damage this thing because you won’t get a replacement part for this.
 These screws secure the focusing ring and removing these will allow you to remove the focusing ring. You can also use these to adjust the scale of the focusing ring when needed.
 The focusing ring can now be removed. See all that dirt underneath it?
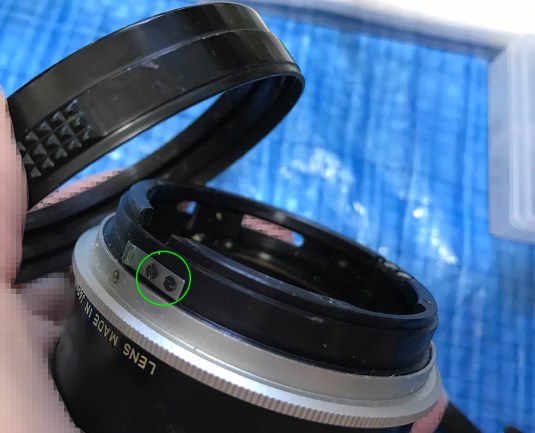
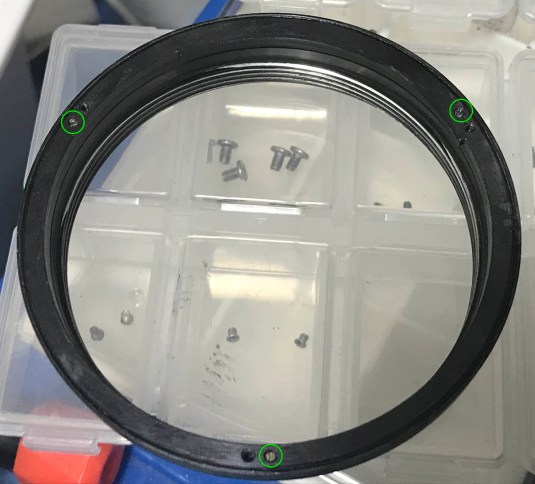
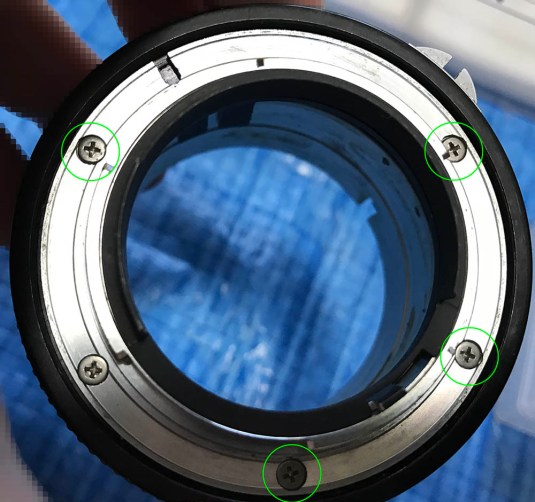 Next, go to the other end of the lens and remove these screws from the bayonet mount. If you’re new to this, read my article on how to work with bayonet screws. Many people get stuck in this part because they strip the heads of the screws. Be sure that you are using a JIS screwdriver and you are using the proper technique. Lenses made in this era usually have these screws epoxied, if that’s the case then only heat will soften the epoxy. Heat the screws with a soldering bolt or a mini precision torch and unscrew them while they are hot. Applying acetone on the heads of the screws will help but it will not do much if they were epoxied. Don’t touch the screw that I didn’t mark.
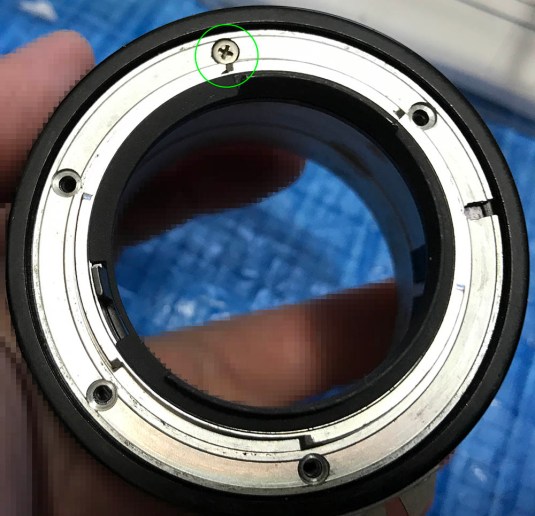 This screw can never be removed properly because it’s connected to a nut underneath it. This is the screw at the 6:00 position when the bayonet is positioned upright.
 This is how it looks like underneath. It’s secured to the abutment of the spring of the stop down mechanism. Trying to unscrew it will only lead to a repair disaster.
 The aperture ring can be easily removed just like this. You can now access the aperture’s detent spring once the ring is gone. Videographers usually remove these so their lenses won’t have the distinctive “click” when they turn the aperture ring. Before you remove it, mark its position so you will know how to put it back again later.
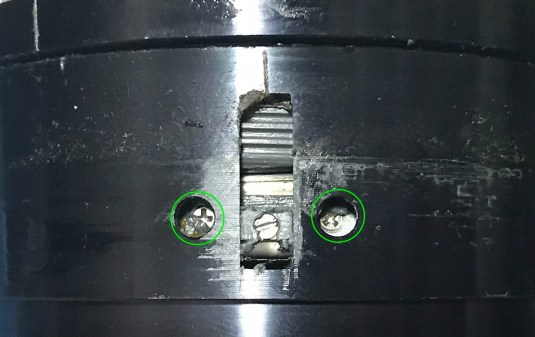
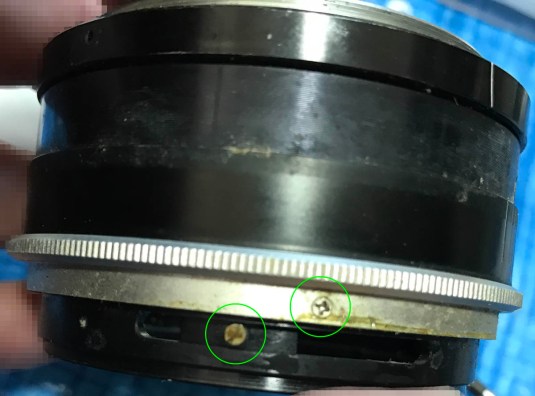 The screw at the lower part of the barrel is for the aperture fork. Remove this so you can remove the aperture fork and its ring later. The shiny grip is being secured by 3 screws. Remove these screws in order to remove the grip and the sleeve.
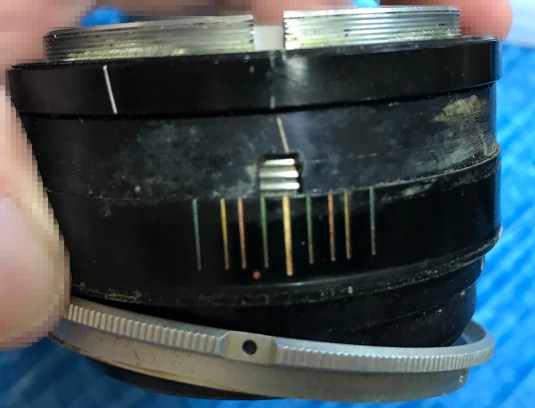 Once all of the screws have been removed, you can now pull the grip and the sleeve from the lens barrel just like this. These are sometimes glued and if yours won’t move just use a strong solvent like MEK to soften whatever was used to secure it.
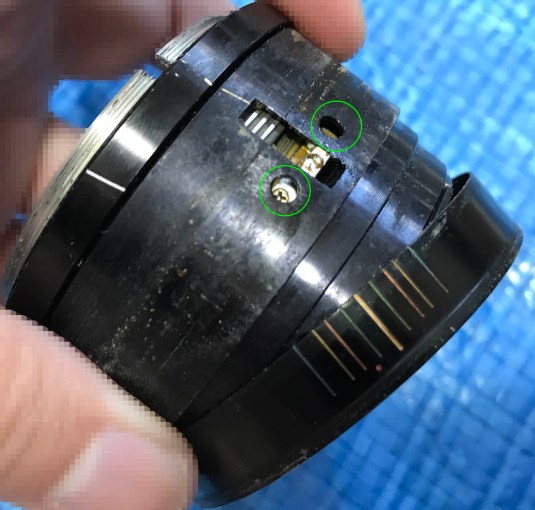 Once the sleeve is gone, you can now access the screws of the helicoid key. Removing the screws will allow you to rotate the helicoids past their range so you can dismantle them. The helicoid key keeps them turning within the lens’ focusing range in a synced manner, this will allow the helicoids to extend or collapse.
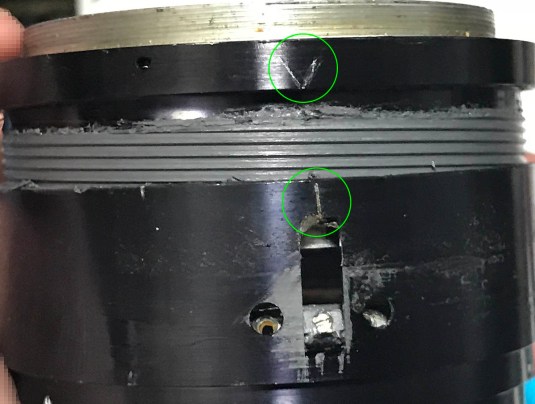
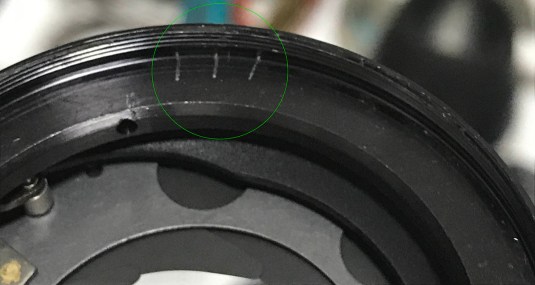
 These screws secure the helicoid key. The helicoid key constrains the turning range of the helicoids and it keeps them turning at the same rate, making it extend or collapse as you turn the central helicoid via its focusing ring. Removing it will allow the helicoids to turn past the focusing range so you can separate them. You may need to turn them a bit so its screws can be accessed via their holes. Before you remove this, collapse the helicoids so they’re in the infinity configuration. Make shallow marks on the 3 helicoids’ walls so you know how they should align. Make sure that the marks are shallow and a bit far from the threads. Take plenty of pictures and notes so you will know how they should be aligned.
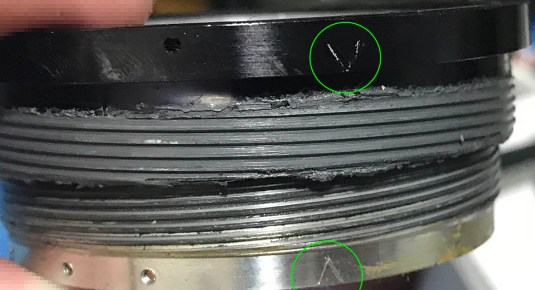
 Once the screws of the helicoid key are gone, you can separate the central helicoid from the outer one. Mark where they separate because this is also where they should mate. It’s important that you do this because many beginners get stuck here. If you are new to this, read my article on how to work with helicoids so you won’t get stuck.
 The inner helicoid can’t be separated from the central helicoid because there’s this stop in the way. The helicoid stop is another way to constrain the rotation of the helicoids by being in the way. Remove these 2 screws to remove the helicoid stop and remember how it was attached so you’ll know how to put it back as it’s not symmetrical.
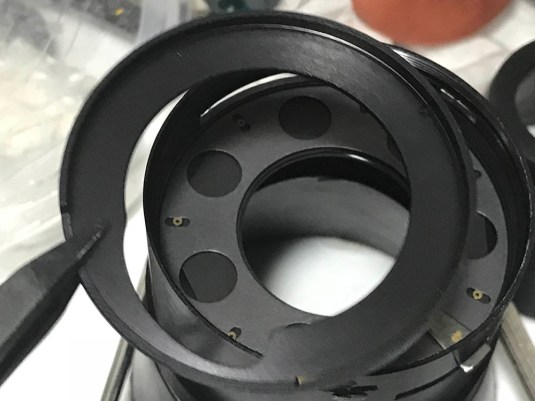
 Separate the inner helicoid and the central one and don’t forget to mark the spot where they separated just like what you did in the previous steps. Notice that I separated it via the bottom. I don’t think you can separate it through the top as it won’t fit.
 The aperture fork and its rail can be removed after you pick the brass retainer off. Use a sharp tool to pick at it and be careful not to damage anything. It can be tricky and you’ll need a lot of patience and dexterity to remove it.
 These 3 grub screws secure the ring in the central helicoid. This ring constrains the stop so it the inner helicoid won’t turn-past its range. It’s also used to adjust focus of this lens so it will stop turning once it reaches infinity. This ring is always glued at the factory and so it’s hard to remove. I soak this in an alcohol bath for a long time in order to soften the glue, it should be easy to unscrew once the glue is gone.
That’s it for the lens barrel. The lens barrel is typical of Nikkors made in this era and you should not have much trouble with it because it’s not complicated at all but you should watch for liberal use of glue. Nikkors from this era tend to be glued in multiple parts and epoxy was even used on some parts. If that happened, saturate the threads of what you want to remove with alcohol or heat it with a precision butane torch. That should make the epoxy soft enough for you to undo its bond. Lacquer is much easier since it responds to alcohol. Remember to be careful when using heat, never heat anything nead the glass elements or burn the paint job, I only use it as a last resort.
Disassembly (Objective):
The objective is pretty straight-forward and you should be able to work on it without any problems but just be careful when handling the glass elements as they can be heavy and big so they’re prone to getting scratched by your tools when you are not careful. Alcohol is useful to soften the lacquer on the threads of the casing so use this trick if something is stuck and don’t use force.
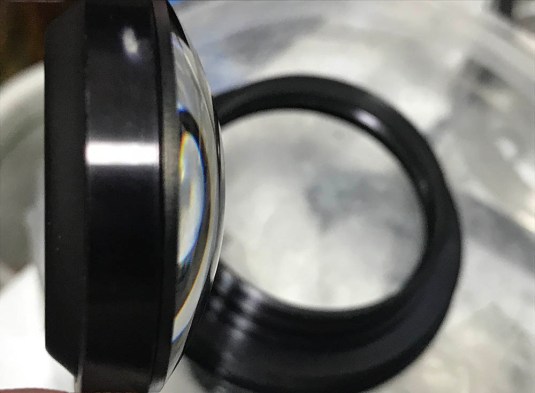
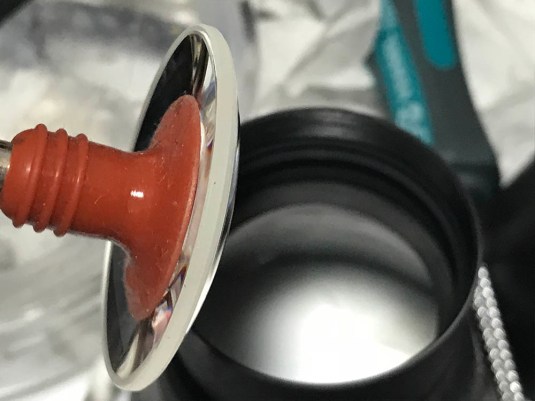
 The front element is secured by the front bezel or name ring. Use a rubber cup that fits it perfectly to unscrew it. Apply some alcohol if it’s stuck.
 This is how the name ring comes off. Be careful not to drop the front element.
 The front element can be extracted using a lens sucker.
 The front elements assembly can be removed as a single unit. You can remove this early on so I don’t know why I only removed it now.
 The 2nd and 3rd elements are cemented into 1 unit called a doublet. Be careful when you use alcohol near this part because alcohol can damage the cement used to bind this. This cemented group is glued to its housing, this bind can be weak at times this can separate from its housing. Unscrew the housing and you can remove this to clean it properly, don’t be careless with this part so you won’t damage the glass on both end.
 If you see these holes and you see some lacquer around it, use a drop of alcohol to soften the bond and re-apply it if it’s still stuck. Use a rubber glove to help you grip the surface and this should easily come off after the lacquer is softened.
 Do the same for the rear elements group. See how much lacquer was used?
 The rear elements group can be unscrewed just like this when the lacquer has softened.
 You can remove the housing of the 4th and 5th elements by using a lens spanner but be careful not to scratch the glass. Just like in the 2nd and 3rd elements, these are cemented into a single group so be careful when using any alcohol near this part.
 The rear elements group can be opened further once you removed this retainer ring. The ring was sealed using enamel so I used a sharp knife to scour the seam so I can use some alcohol to penetrate the threads. This may take several applications so be patient. Use a lens spanner to remove this retainer ring via the slots you see here and be careful not to damage the glass.
 This is how the retainer comes off.
 Use a lens sucker to extract the 6th element. The rear element was permanently-glued to its housing so leave that alone. You don’t have to remove it to clean it properly.
I have been doing this for a couple of years now but I am always nervous everytime that I do this. Remember which way the elements should be facing by using a marker to write on the walls of the elements. All you need is a single dot near the leading edge so you will know which side should face where. I put multiple spots to denote element number if it’s not obvious to me because some elements look-alike and re-installing these back in the wrong order can damage the elements and crack them due to pressure because these are made with exact tolerances.
Disassembly (Iris Mechanism):
The iris assembly must be left alone if they’re not oily or faulty. Mine wasn’t oily at all but I need to clean it properly since the inner surface of the housing was filthy and moldy. It is important that I clean this thoroughly so this had to be done.
 The cross-point screws (3 of them) secure the iris mechanism. Remove them and you can disassemble the iris mechanism. Note that it was sealed with lacquer at the factory and it is an indication that this is a precision adjustment point. Take notes because you need to put it back in the same configuration. If you didn’t put it back properly then the metering of the camera can be fooled because the aperture doesn’t correspond to the f-number on the aperture ring. There’s another screw in this picture and that’s for the iris regulator, it is used to couple the iris mechanism to the aperture fork and turning the aperture ring is going to move this. You can remove it now or just before you remove the iris regulator.
 I made 3 shallow scratches here so I will know it was originally aligned. All I need to do is to align these during reassembly and we’re done.
 This part can be removed after the 3 screws are gone. Be careful when removing it, it can be a tight fit and you can easily damage the iris mechanism when you’re not careful.
 The regulator plate can now be removed. Do note that you should remove the screw for you to remove it. Track-back a few steps back to see what I am talking about.
 The rotator plate can be removed by pushing down at the tab from the outside in order to lift it up a bit. Be careful when handling this because if you warp this the iris will not work properly and you will damage the iris blades.
 The iris blades are secured by the plate in the previous step so you can now remove the blades. I usually drop the to a pot of alcohol in order to prevent them from warping. The surface tension of the alcohol acts like a cushion. Handle these with care and wipe them using a clean lens tissue saturated with solvent. Air-drying them will case drying marks to form so I always wipe these dry. Only handle them using their pegs and never handle them using magnetized tools. I use a pair of plastic tweezers for this.
Working on the iris requires plenty of concentration when putting the blades back. These are very delicate and you don’t want to damage them. Never lubricate anything here, the oil will migrate to the iris and cause it to gum-up. Use dry molybdenum powder if this is essential, it won’t turn sticky because it’s dry.
Conclusion:
This was a fun lens to work with because it’s an easy lens to service (for me). It is a good lens for a Sunday afternoon’s project. Before you assume that you are done, do not forget you need to calibrate your lens’ focusing. Read the article that I made on how to calibrate a lens’ focus to read how I do it.
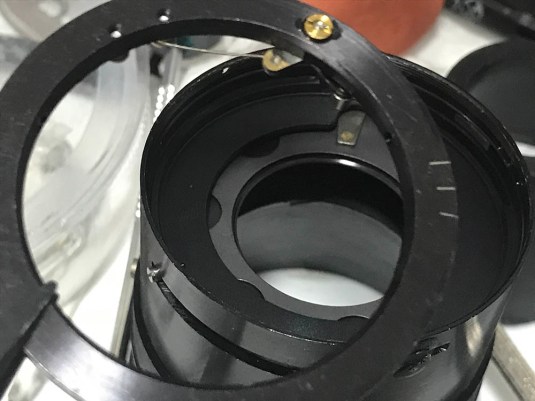
 Re-assemble the lens up to this point where the adjuster ring for the focus is exposed. It’s important that you get the focus properly on this lens or else it’s meaningless. Tighten all of its grub screws after you have adjusted the focus to your satisfaction and put the rest of the focusing back and you’re done.
 This is how everything turned out, it’s time for me celebrate with a plate of sushi! This is such a nice lens to use and the practical focal length and speed is convenient for general photography.
That’s it for this article, did you enjoy it? There’s nothing new when it comes to this lens as a repair article because it’s similar to many other lenses in my blog but I’m including lots of sample pictures on my blog these days and I just found a nice reason to write this article for you. This approach makes my blog more “holistic” and it also shows pictures shot with film to complete the package. Some reviews show pictures that were shot with a digital camera but film is unique and since the lenses on my blog were made when film was the only practical medium for photography I see it fit that we also show pictures that were shot using film so you will know how the output looks like in both film and digital. I will continue writing in this format and I’ll upgrade my old articles to make this blog the most complete blog on classic Nikkors anywhere. Thanks again for following my blog, it’s been a few years now and we have grown from several hundred views a month to some 30,000 to 40,000 views a month in the present. Please help this blog grow by sharing this with your friends at social media or at your camera club. Even if you don’t do repairs, it’s a nice blog to see how things work inside and also see lots of pictures. I spend lots of time and effort on this as well as money for developing and scanning to make this possible. It has become a way-of-life for my now thanks to all of you. See you again next time, Ric.
Help Support this Blog:
Maintaining this blog requires money to operate. If you think that this site has helped you or you want to show your support by helping with the upkeep of this site, you can simple make a small donation to my paypal.com account (richardHaw888@gmail.com). Money is not my prime motivation for this blog and I believe that I have enough to run this but you can help me make this site (and the companion facebook page) grow.
Leave me some tip?
Thank you very much for your continued support!
$2.00
Helping support this site will ensure that this will be kept going as long as I have the time and energy for this. I would appreciate it if you just leave out your name or details like your country and other information so that the donations will totally be anonymous it is at all possible. This is a labor of love and I intend to keep it that way for as long as I can. Ric.

3 Comments (+add yours?)