
Hello, everybody! I am currently not feeling well today because of hay fever or the cold. I hate Winter but it’s something that I need to put-up with every year. Good thing we’re using a fancy heater that I bought last week. It’s very good despite being cheap and compact. I can now warm the room and work on repairing my junk gear comfortably. Nikon made plenty of classic lenses that can be had for cheap lately and most of them are small but capable. I’ll show you one such lens today, it is really popular and is considered to be a real classic.
Introduction:
The Nikkor 28mm f/2.8 Ai-S debuted in 1981 to replace the old Nikkor 28mm f/2.8 Ai. The older lens is a great performer so Nikon had to surpass its performance when it’s time to update it. Nikon did that by adding CRC to it which also enabled this to focus even closer. It resulted in an excellent lens, it now has achieved a near-legendary status. It remained in-production for a really long time, Nikon only discontinued it recently in 2020. There aren’t plenty of lenses who could boast about having a 4-decade-long production run. Engineers and scientists find it an invaluable tool so there was always a need for it. Its ability to take great photos when mounted in-reverse along with having an aperture ring made it a favorite for extreme-macrophotography. Without it, you wouldn’t have the ability to use it properly with bellows.

The Nikkor 28mm f/2.8 Ai-S is a compact lens. It looks deceptively simple but it’s one of Nikon’s most advanced lenses when it came out in 1981. This lens uses CRC so this can focus very close while maintain its sharpness at closer distances. This is one of the reasons it’s popular for videographers because 28mm is a handy focal length and the ability to focus really close at 0.2m is very useful. You could even shoot bugs at this distance.
The optical design is if an 8-elements-in-8-groups type. It’s an elegant design in terms of simplicity but there’s nothing simple about its performance. The incorporation of CRC enabled it to take sharper photos at closer distances. It also has less than 1% distortion which made it the choice for engineers and scientists for precise documentation. Its shallow field curvature is essential for precise work and reproduction. Coin and stamp collectors know about it and use it for their hobby. This is a technical masterpiece, it soon achieved a near-legendary status amongst people who are into technical photography.

This came to me as part of a package. It had severe fungal infestation that’s so bad I cannot see through it clearly. I don’t mind I’m going to overhaul this anyway and I am not very picky with lenses so long as I get them cheap.

It was so filthy that even the rubber had fungus. I scrubbed it clean using a toothbrush and some dishwashing liquid. It is now clean and I hope that it remains this way. The CRC unit is what makes this lens amazing. CRC stands for “Close-Range Correction” and is Nikon’s fancy trade name for “floating” elements. What this does is it changes the spacing of one of the lens’ optical block as you focus in or out, making sure that it gives optimal performance in the whole focus range. The technology was first employed in the Nikkor-N 24mm f/2.8 Auto.

Here is the Nikkor 28mm f/2.8 Ai-S’ predecessor. The Nikkor 28mm f/2.8 Ai/K is excellent, I like mine and I still use it occasionally. It’s excellent and it was difficult for Nikon to surpass it so they really put everything into the Nikkor 28mm f/2.8 Ai-S to make sure that it will be better than the older one that it replaced. They also managed to make it just a bit smaller and lighter, this in itself is a huge achievement.
Let’s see what this lens can do. I used to shoot with this lens a lot but I don’t remember if a photo I took was using this lens or not. You will have to trust me on this, this is a good lens for general photography. The ability to focus really close is also welcome.


(Click to enlarge)
The pictures above were shot from f/2.8 to f/11. Wide-open at f/2.8, the lens exhibits plenty of vignetting. It improves a lot by f/4 and is gone as you stop it down further. This is not a problem if you shoot landscapes because you will want to shoot from f/8 on. This is just to show you how vignetting looks like and I underexposed the shot just to show you that. You won’t normally see it this bad in normal conditions.


(Click to enlarge)
I am not sure if shooting a heap of empty oyster shells is a good example to show this lens’ performance but here it is. These were taken from f/2.8, f/4 and f/5.6 (left-to-right). The details look good wide-open but contrast is kind of weak, everything improves when you stop it down to f/4 and you can see the details much better due to better contrast. The resolution also improves quite a bit when stopping it down as expected. Resolving power isn’t bad at all wide-open but you’ll want to use this from f/4 at least for most situations. It is also important to note that flaring at f/2.8 is a big factor in making the photos look a bit softer than what you would want or expect from this lens. Shooting this lens at f/5.6 is what I do most of the time if I can get away with it as it shows very good performance at this f-stop.


If there’s one thing that I dislike about this, it’s the poor flare resistance. You will have to remember that this lens was a terrible fungus case so that may have also contributed to it but it’s generally accepted that this lens has great flare and ghosting resistance. I’m also shooting in abnormal conditions just to make these things appear so you should not my word for fact. Landscape photographers on the other hand can find this useful as the Sun is usually in the frame for most landscape photos as part of the composition.

This is what I’m talking about. You’ll normally not see the flare when you’re shooting under normal conditions. A hood will be useful for preventing this from happening but it’s pointless in most cases for a lens this wide. The lens isn’t really bad as you can see from this photo so long as your light source is closer to the middle of the frame. Note that it’s sharp even at f/2.8 but some flare is taking the contrast away. Bokeh is also decent despite being a 28mm lens. You don’t shoot this lens for bokeh, by the way.


(Click to enlarge)
Now it’s time for some real-world examples! The 28mm focal length is wide but it’s not as wide as a 24mm but it’s still great for street photography. You will have to get close because 28mm will force you to get really close to your subjects. I love my 28mm lens for this kind of thing because it enables me to have a little bit more of the background in the scene and I can make what’s closer to me appear bigger than what’s further away.
Let us now see how this performs using film. Film is not as reflective as the glass AA filter of a sensor so it should theoretically show less artifacts. Film also has a different look so it’s good to know how a lens performs with both film and digital. This will help us in assessing if a lens is good or not so we’ll know when to use it and when or how to work around its weaknesses. The photos in the following sets were taken using my favorite Fujifilm Industrial 400 and were scanned in the lab.


(Click to enlarge)
Flare is a problem when shooting with this particular lens and it will make your picture look blurry and its contrast will be muted. I really have to find myself a good sample and re-do these tests.
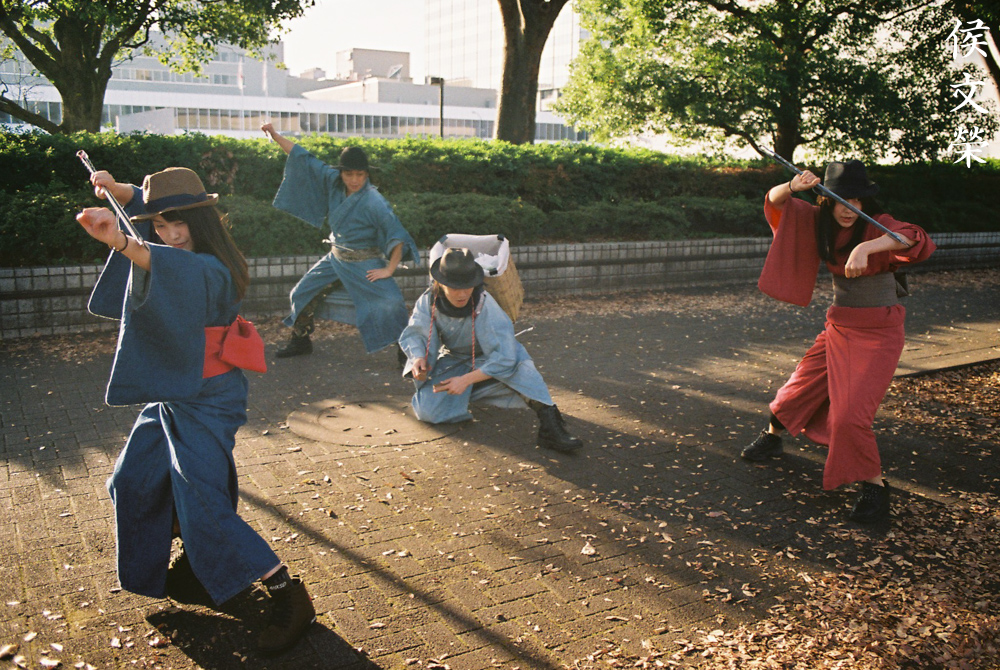
Since the flaring is somewhat visible from the viewfinder, you can position yourself and try to avoid it by changing your angle to compensate. This is a trick that I learned from my days shooting landscape photography and this works well for most cases. These kids you see here are members of a trash collecting club in Shibuya. They wear costumes and act as if they are in a samurai movie as they pick rubbish from the streets and they strike-a-pose each time they found something.

This photo is a bit over-exposed but it’s a good example of how it performs when you don’t have any bright lights in the scene. The colors and contrast look good, resolution is also good as you can see the details of the toy Combi well. Rendering looks natural and it gives you that “vintage look” that many people are into these days.


(Click to enlarge)
Here are other photos that were taken with film. The photo with the bottles was taken at f/4, the focus is at the same plane as the plastic pumpkin. The one with the bear has some difficult lighting and this picture would benefit from a fill-flash but I don’t have a flash with me when I took this picture. It was taken at about f/8 and you can see that it’s sharp when you zoom-into the upholstery of the front seat (passenger-side).
How about something that’s more “premium”? These photos were shot with Fujifilm Provia 100 on a Nikon FM. I consider it to be the best film to exhibit anything good about a lens because of its fine grain and unforgiving traits.

This was shot at its minimum focusing distance. It’s overexposed so you are going to see some blooming of the highlights. Despite being shot at a smaller aperture the resulting photo exhibited some spherical aberration specially at overblown areas. While it’s helpful in giving the photo a “dreamy” look it is something that I don’t really like.

When you expose it properly you’ll be treated with a nice, sharp photo. This is exquisite and the details look great. The bokeh quality looks smooth, blurs transition without any roughness or abrupt shifts. The colors look great and contrast is quite high.

Tonality is nice, too. Despite having higher-than-average contrast it retained nice tonality in the mid-tones. This may be due to the film used but the lens has a lot to do with it, too.
Amazing colors and sharpness. This is an exquisite photo, you’d think that it was shot with a digital camera.

Here’s how you could use its tendency to flare for your creative advantage. This is a nice effect if you’re a videographer or director-of-photography. It’s something that you could consider next time on your shoot.


(Click to enlarge)
Here are more photos for your enjoyment. If you could avoid flares or other aberrations you’ll be rewarded with beautiful photos. Shooting at a smaller aperture helps prevent flaring and also results in sharper photos.
I like this a lot but I prefer the older Nikkor 28mm f/2.8 Ai for some reasons. The older lens renders differently, something that’s more to my taste. Aside from that, I could recommend this lens to anybody looking for a 28mm lens. It’s inexpensive these days if the condition is terrible, I got mine for $20.00. I bought it as a junk and the condition was very bad. Those that are in better condition will set you back $90.00 or more with mint condition ones costing $150.00 and more. When looking for one of these, check the iris and be sure that it’s dry and snappy when actuated. The barrels should turn smoothly as well. It’s not unusual to find these with seized-helicoids if stored improperly and that will require a complete overhaul. These aren’t difficult to source, it is important that you exercise patience when looking for one and you could buy it for a reasonable price when you get lucky. Happy hunting.
Before We Begin:
If this is your first attempt at repairing a lens then I suggest that you check my previous posts regarding screws & drivers, grease and other things. Also read what I wrote about the tools that you’ll need to fix your Nikkors.
I suggest that you read these primers before you begin (for beginners):
Reading these primers should lessen the chance of ruining your lens if you are a novice. Before opening up any lens, always look for other people who have done so in YouTube or the internet. Information is scarce, vague and scattered (that is why I started this) but you can still find some information if you search carefully.
I highly recommend that you read my working with helicoids post because this is very important and getting it wrong can ruin your day. If I can force you to read this, I would. It is that important!
For more advanced topics, you can read my fungus removal post as a start. This post has a lot of useful information and it will be beneficial for you to read this.
Disassembly (Lens Barrel):
The lens barrel itself is not difficult to take-apart but it is more complicated than the usual Nikkor small prime lens because of CRC. The one thing that you need to pay attention with is taking measurements and notes. This lens has very tight tolerances due to it having CRC and you can’t adjust it to work properly if you got just one thing wrong. Always take lots of notes and mark the important landmarks before you remove anything. Be sure that the lens is focused to infinity while you are working on it so you will have a point of reference. This lens is not for the beginner and experienced repairers will also find this lens challenging to say the least. Just leave this to the experts, if yours needs repair then send it to a reliable repairer. This isn’t easy to service so it will cost you a bit more.

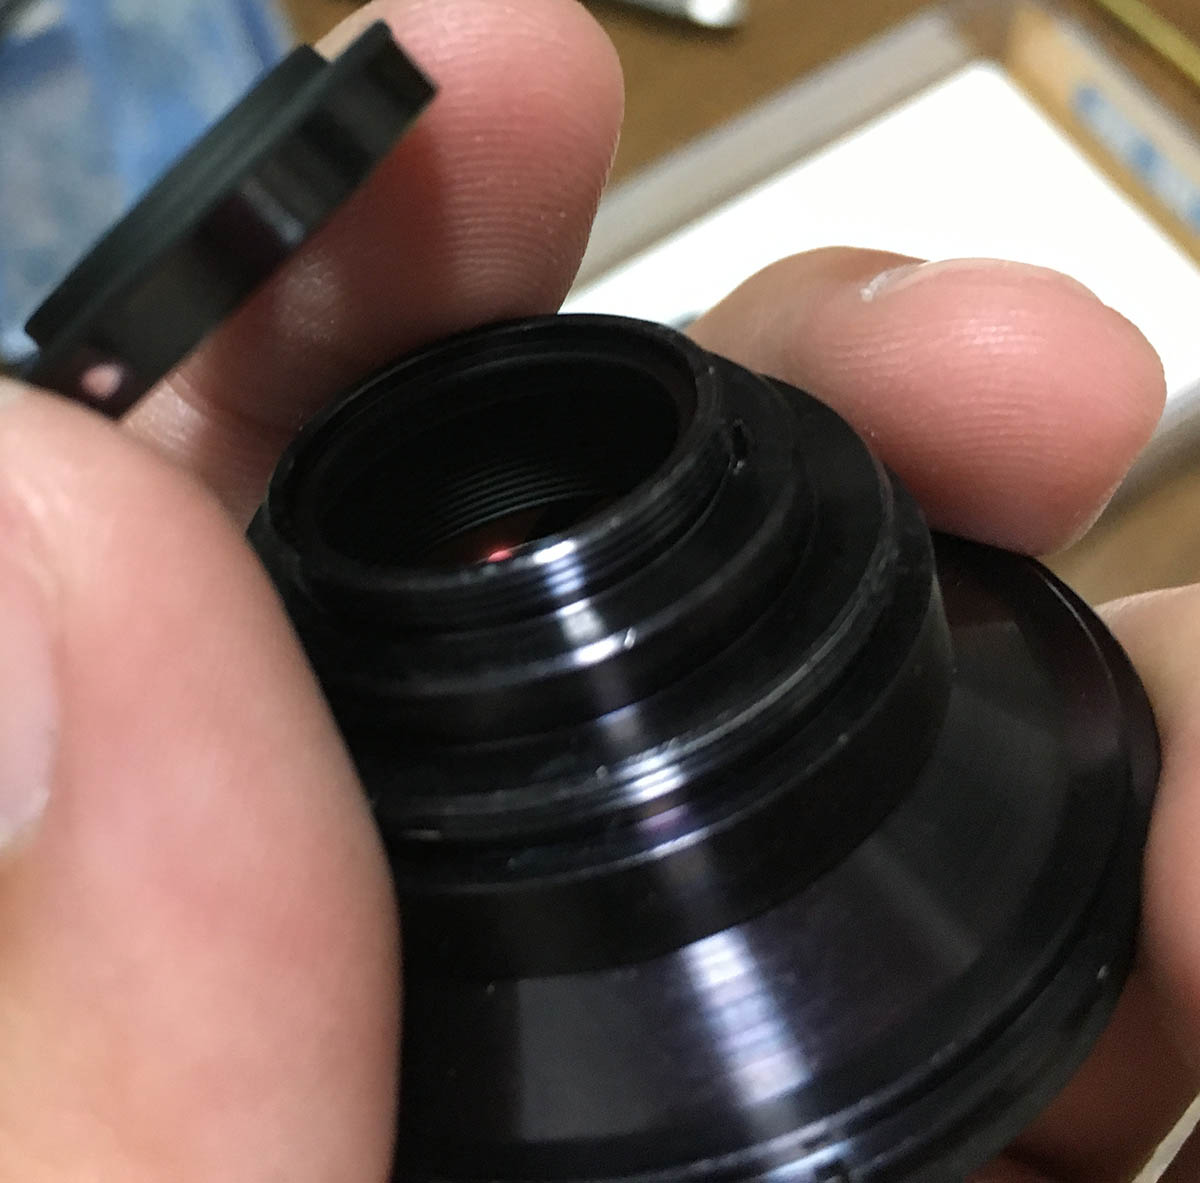
Nikkors from this era (smaller primes) tend to have something in common, they’re usually best opened from the rear. Begin by removing these bayonet screws. If you are new, read my article on how to work with bayonet screws. Many newcomers get stuck here and I’m going to show you how not to get into that situation.

The bayonet mount can be easily removed but be careful not to damage the rear element as it’s now exposed.

Take note of how things look like before you proceed. I make sure that the lens is always focused to infinity while I work on it. This gives me a point of reference later when I am going to reassemble the lens. This thing has CRC and that makes things more complicated, make sure to take notes and make marks where needed.

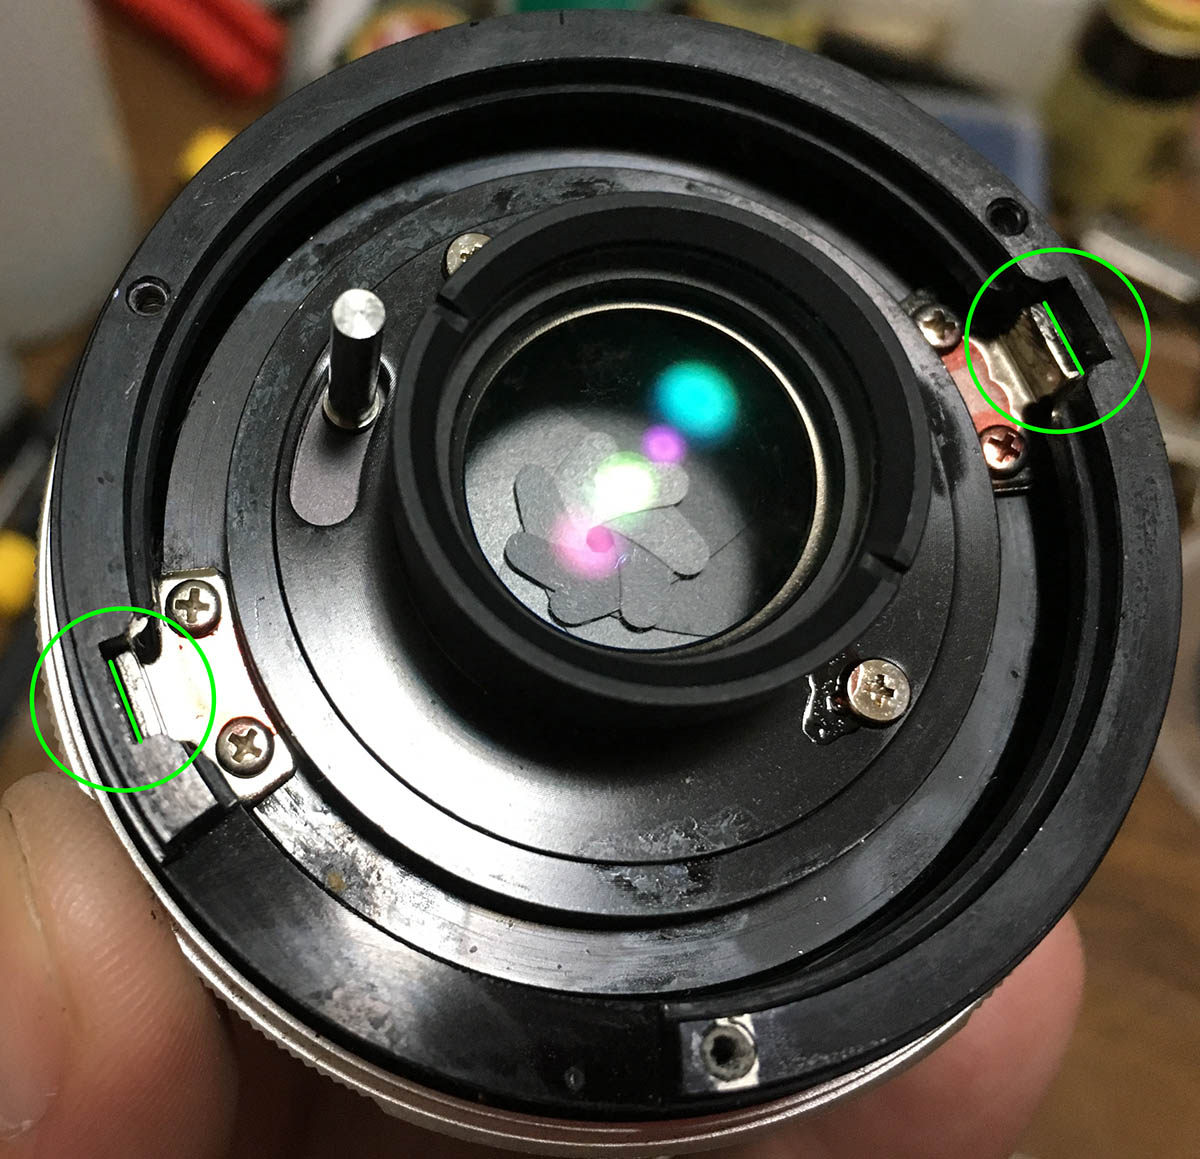
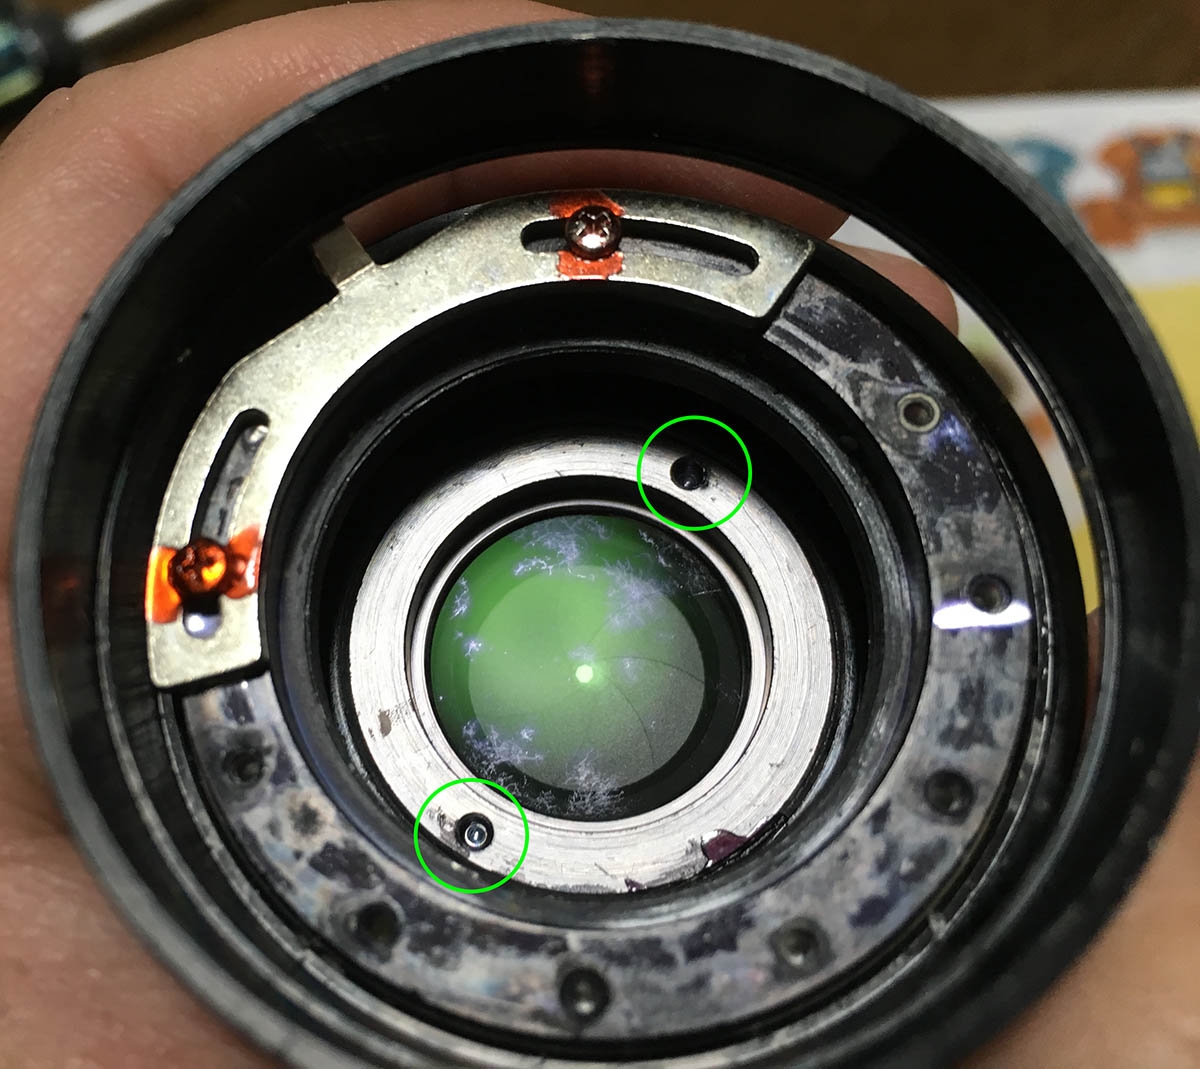
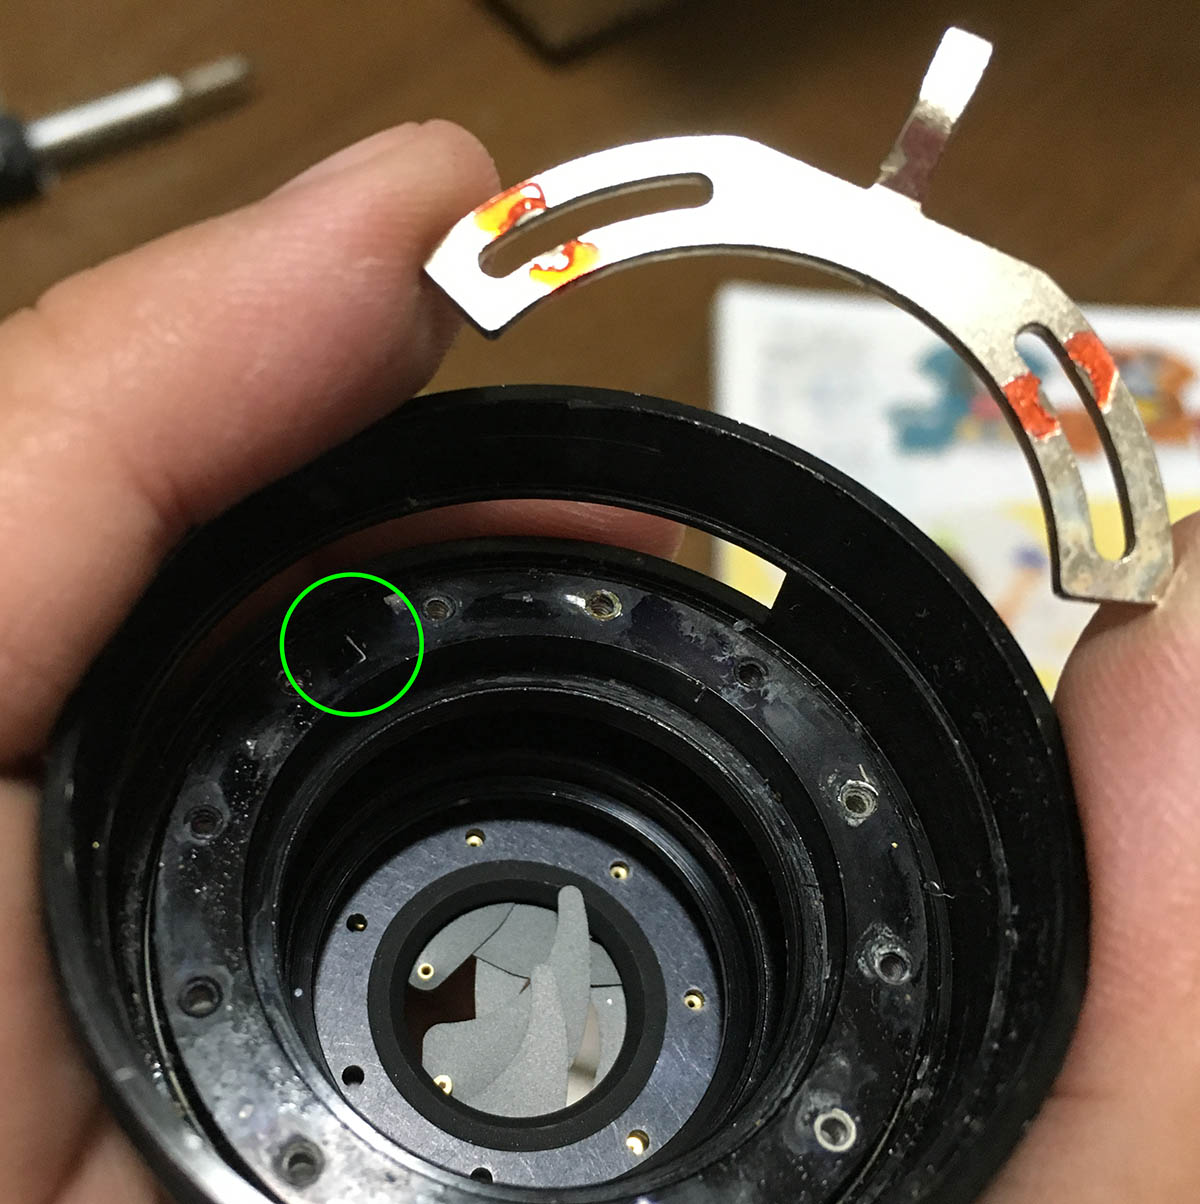
This ring regulates the size of the iris, this can easily be removed. Note that the tab should fit into a slot in the aperture ring. That tab should never be removed as it was set at the factory. If you mess around with this then the lens’ aperture will not be as accurate.

The aperture ring can now be safely removed. Look at how dirty everything is, this lens is definitely one of the dirtiest lenses that I have worked on.
Make sure that the lens is focused to infinity and mark the position of the 2 helicoid keys’ edges. After reassembling your lens, you should get the same result or else you will have to reassemble it again because this just means that you got everything all wrong.
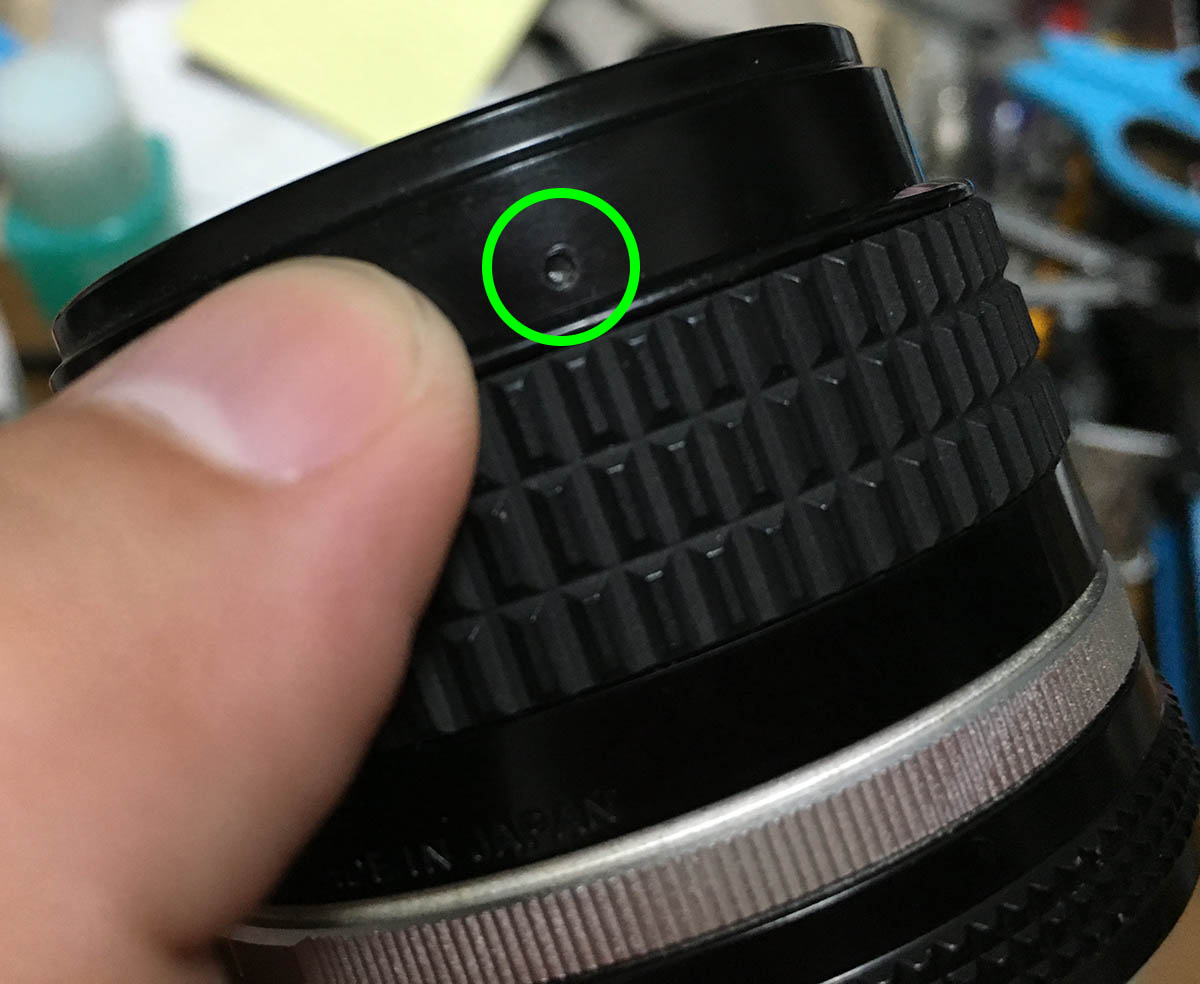
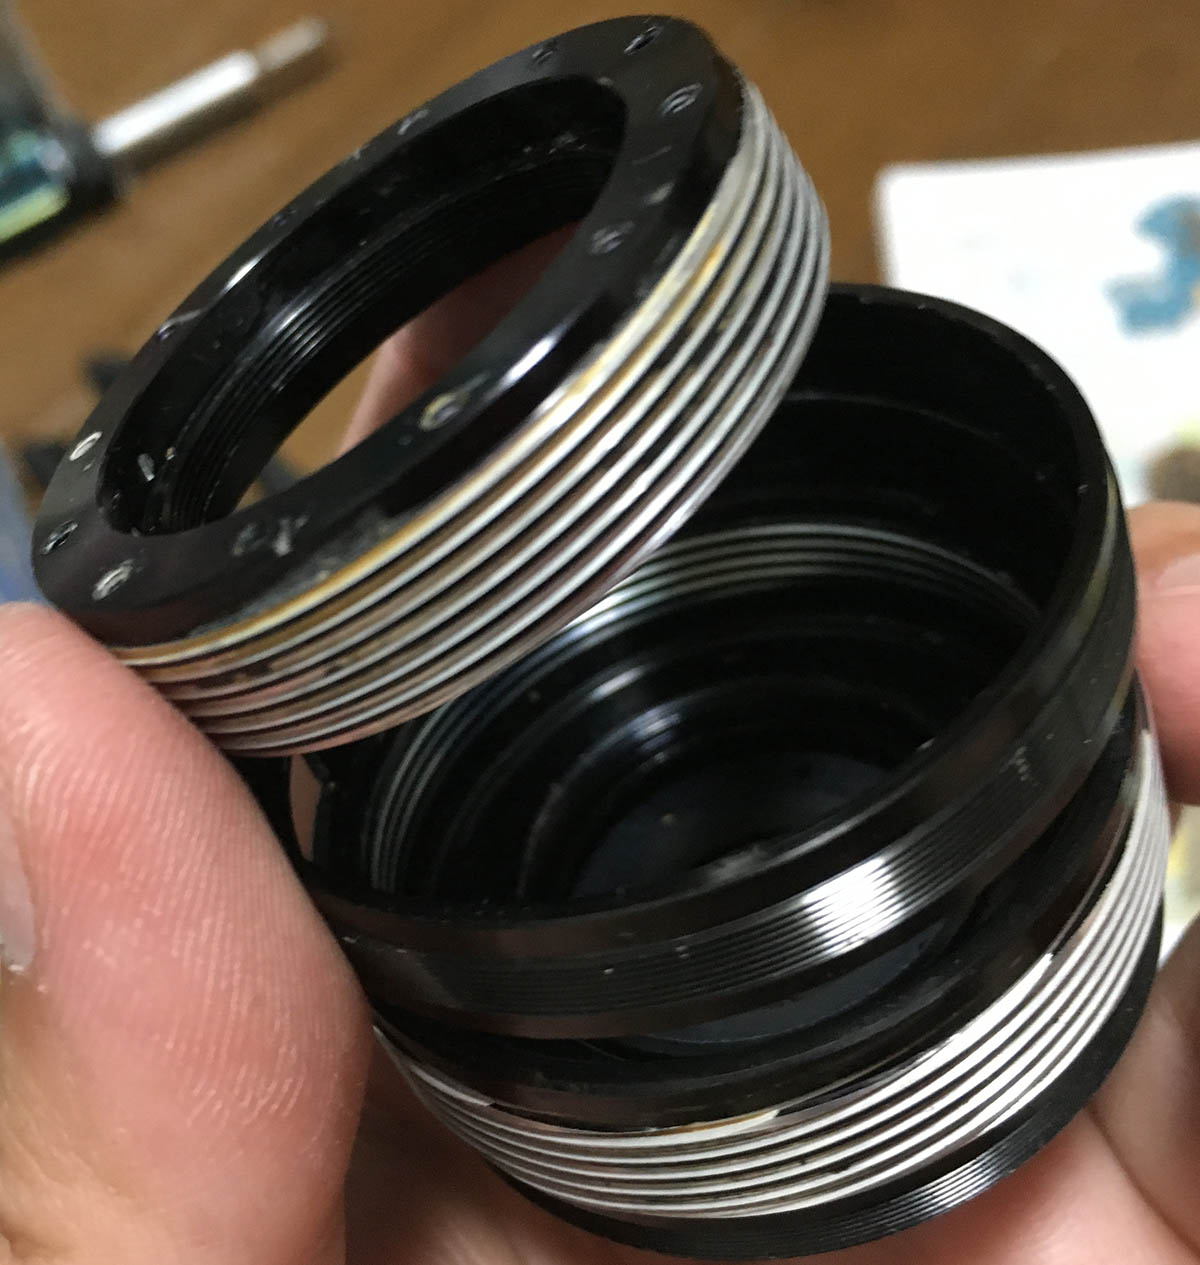
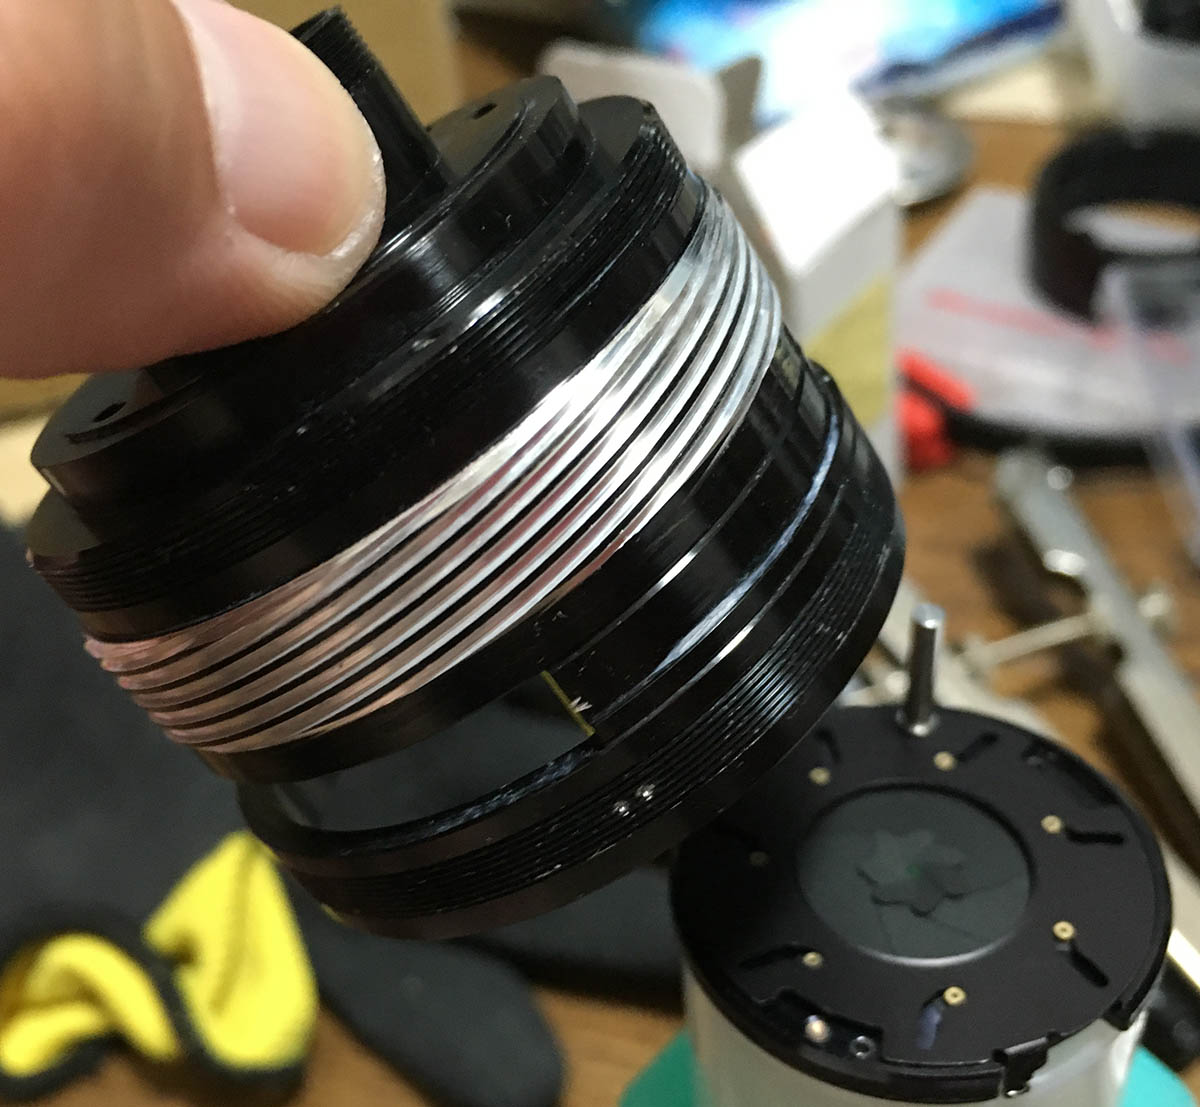
There are 2 screws here that you should extract. I’m not sure if there’s only one screw for other lenses but I have 2 on this one. Once they are gone, you can now unscrew the front barrel off.
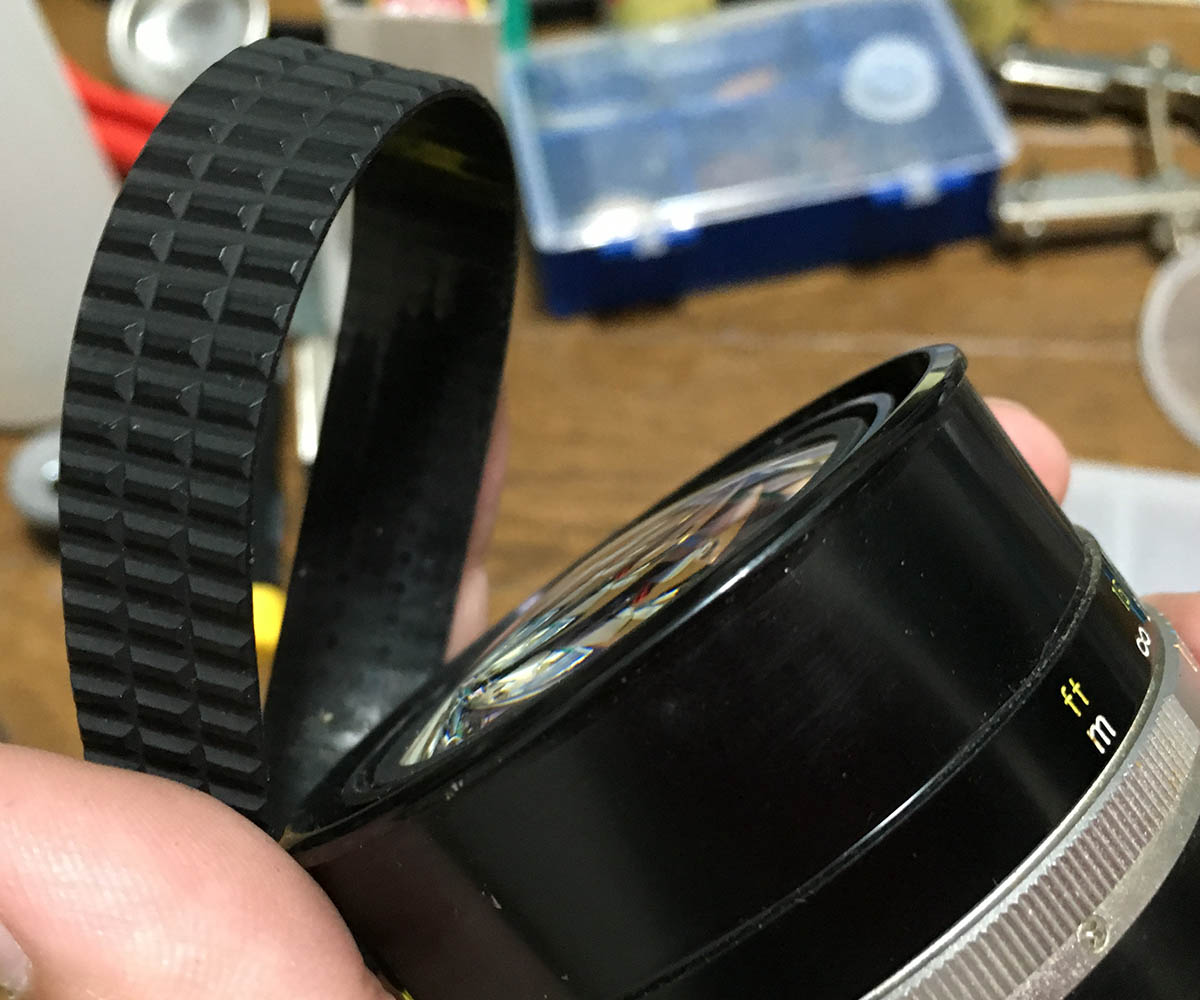
You can remove the rubber by running a small toothpick under it to lift this from the glue. Make sure that you don’t tear the rubber.
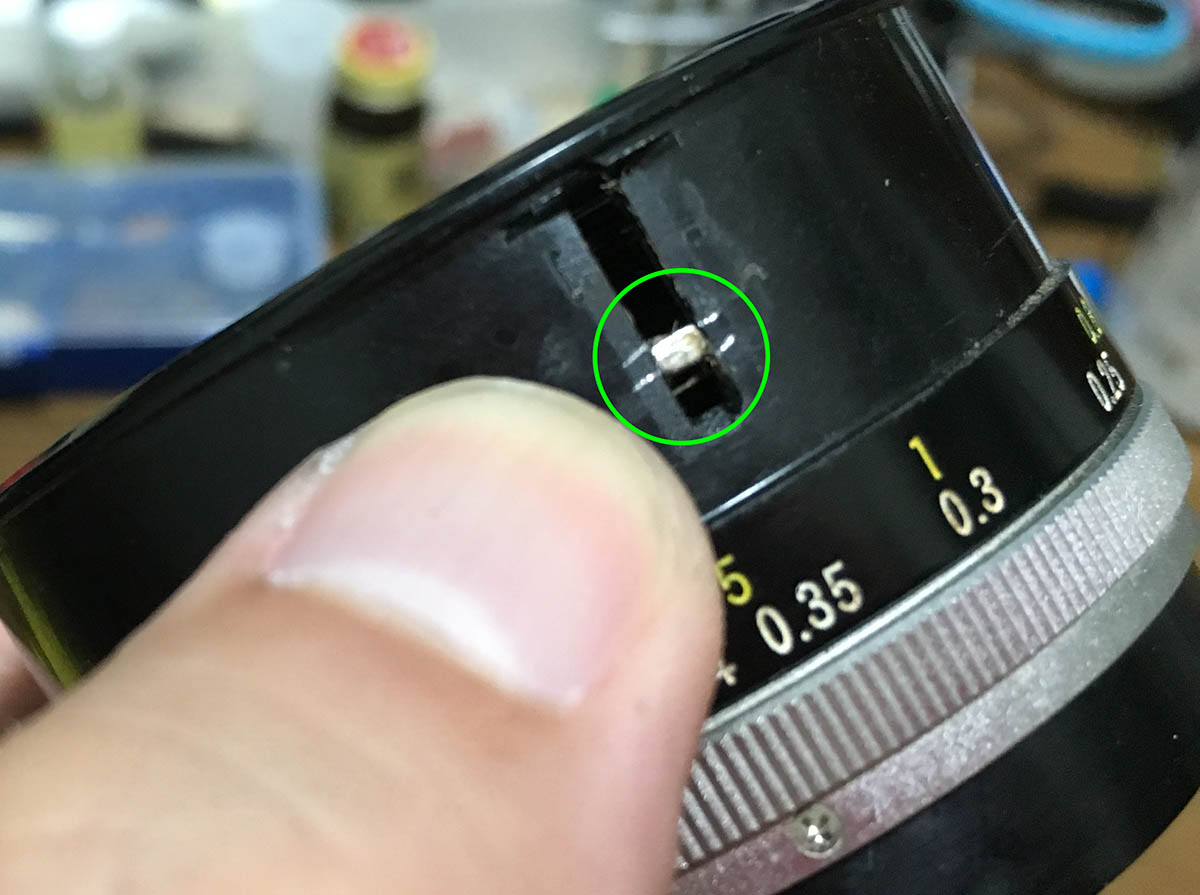
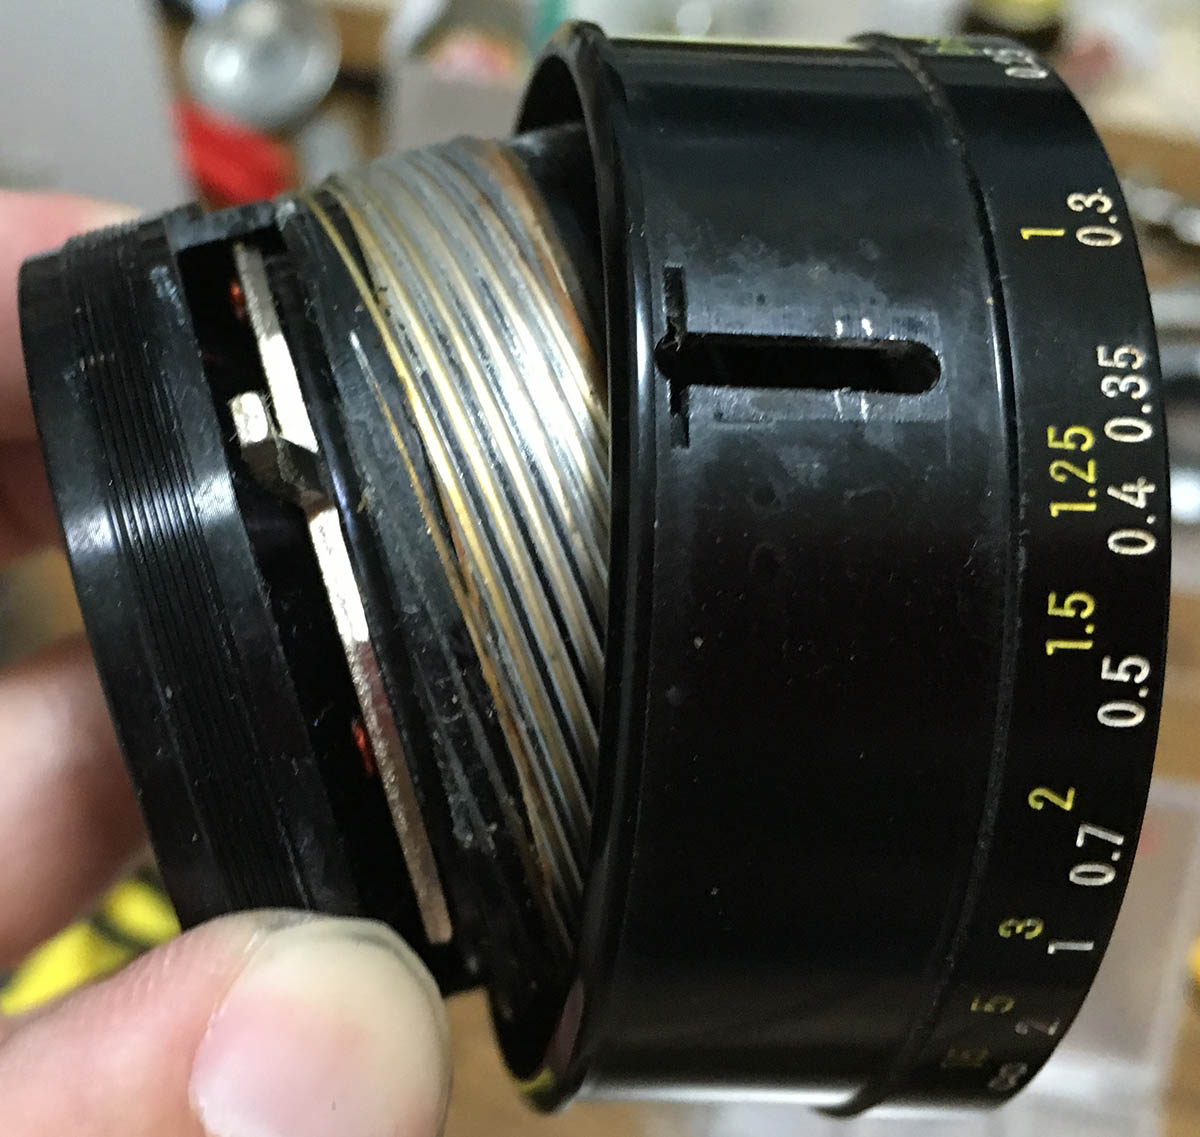
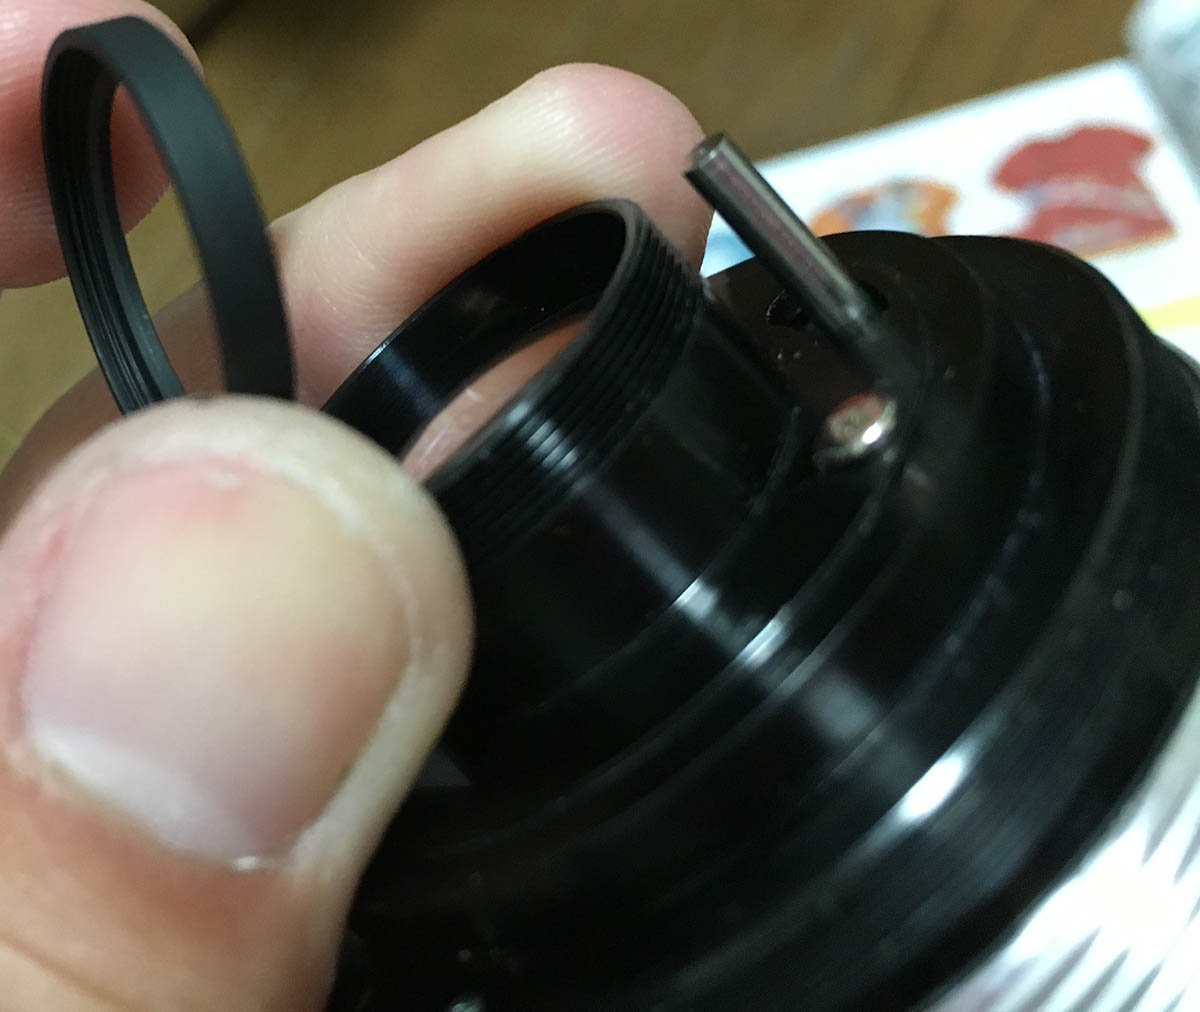
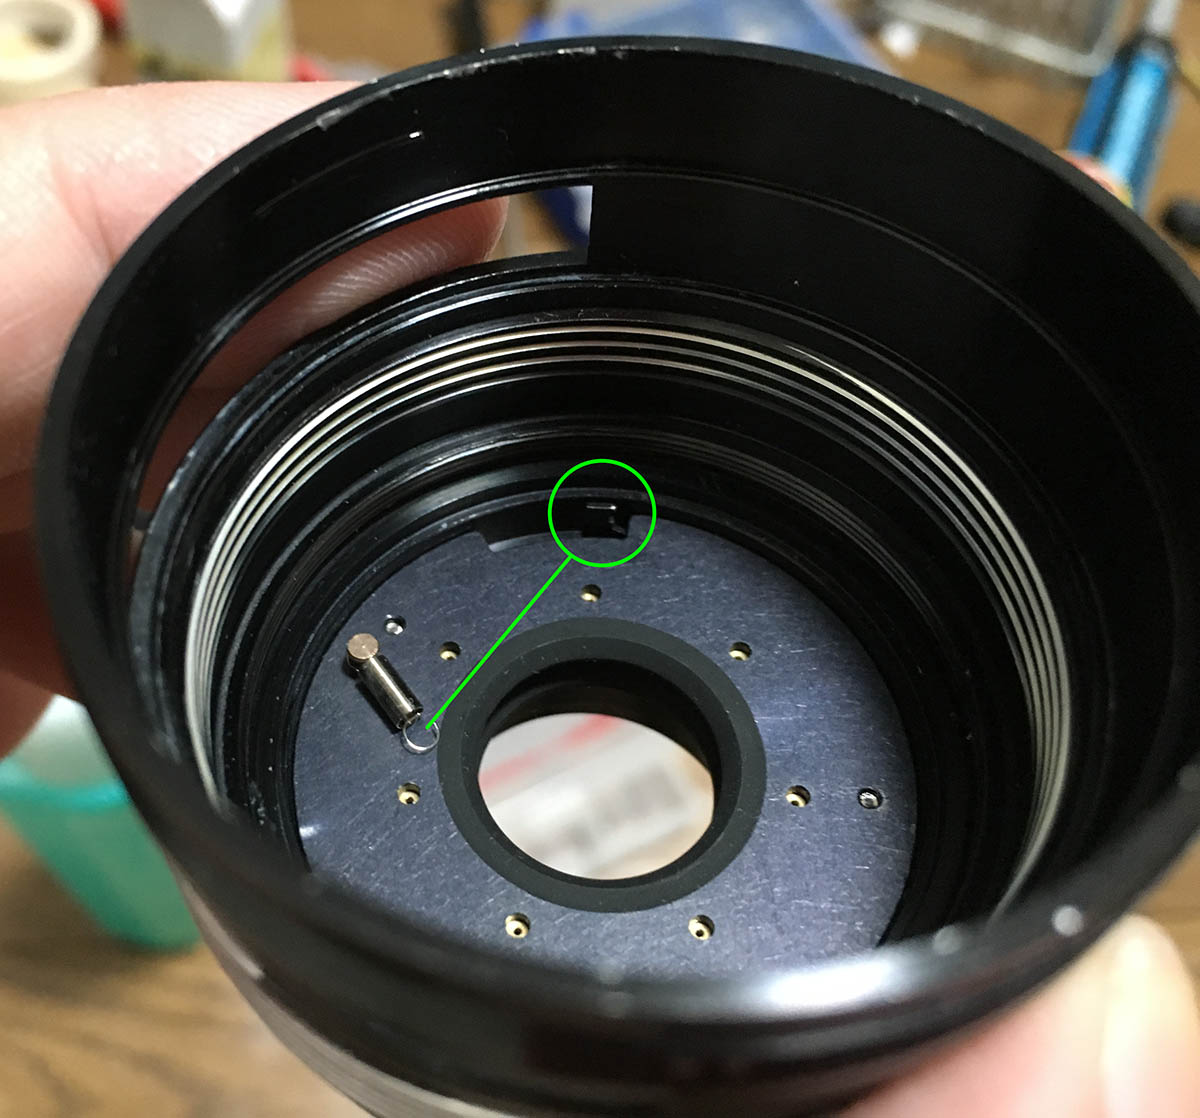
This is the tab for the CRC unit. It travels up-and-down along its slot as you focus. While it is turned to infinity, mark the position of this tab. You should check if it’s back at this position later during reassembly.
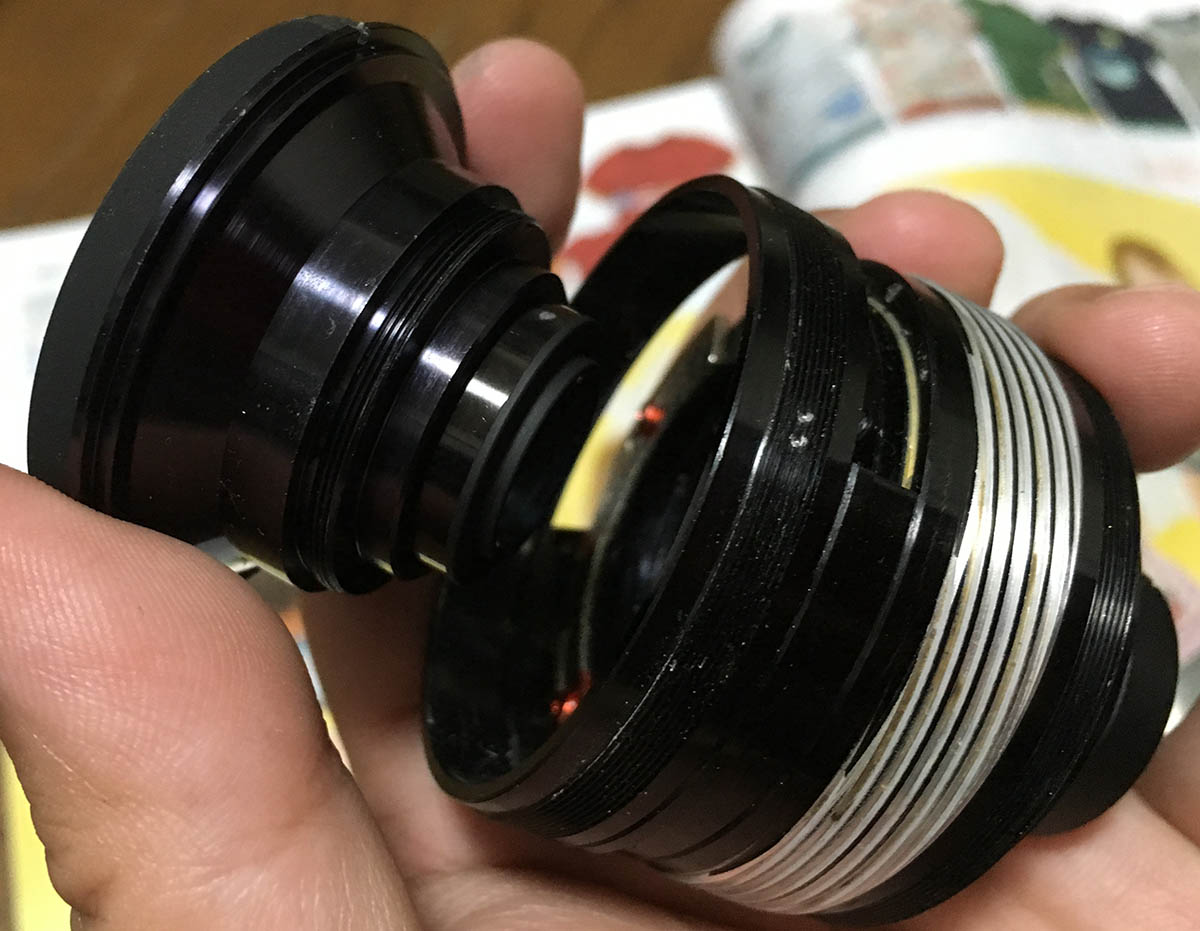
Now that we have taken note of all of the important landmarks, we can now proceed to separate the helicoids. Remove the keys, mark which one should go where. It’s best to put them back to their original positions, note that I made a small mark for this.

I would normally remove the focusing ring before separating the helicoids but the lens is a special case. There is a sequence for you to achieve this but it’s too much work so I settled with this. Always remember to mark where the helicoids separated because they should mesh in that same position. If you forgot to mark it then you will be wasting a lot of time guessing where they should mesh. If you haven’t read my article on working with helicoids then please head there to read it and watch the video.
Now that the lower half of the lens barrel is gone we now have more space to wiggle the focusing ring to remove it. The tab for the CRC is in the way so you will need to find a good angle to remove the focusing ring. The focusing ring is being secured by this brass ring. Remove these 3 screws to free it and you can begin the business of removing the brass ring. Take note that this is also where you should calibrate your focus later.
The focusing ring is now off. If I remember this properly, the front lip of the focusing ring can be unscrewed but it’s being secured by contact cement so I just left it alone. This will only soften when you saturate it with alcohol or soak it alcohol bath for some time before you attempt to remove it. It can be delicate so I just left it alone.
Remember to mark where the inner helicoid separates with the central one. Always make this a habit every time you work with helicoids.
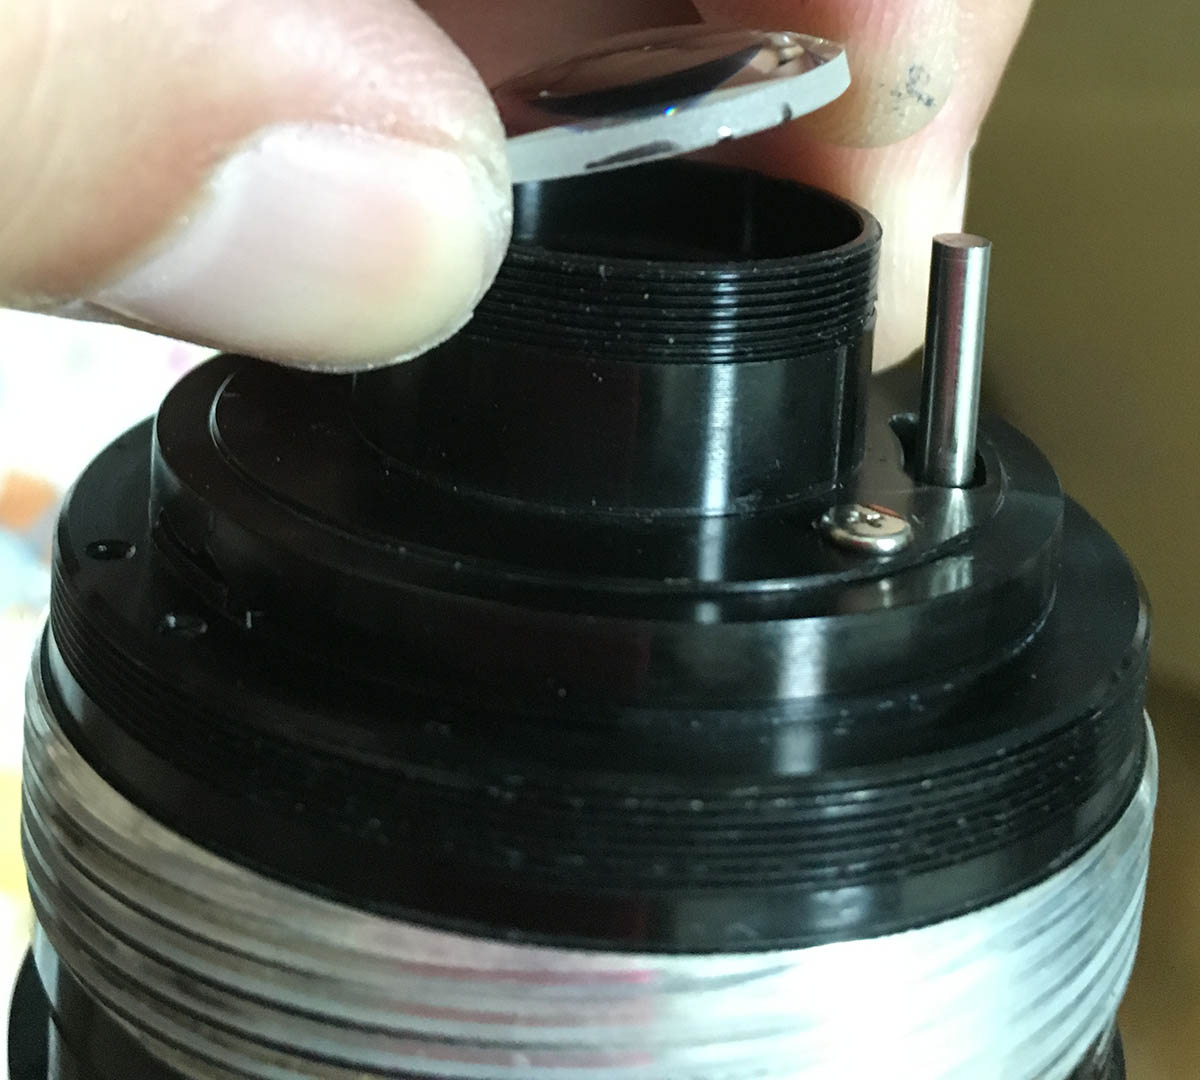
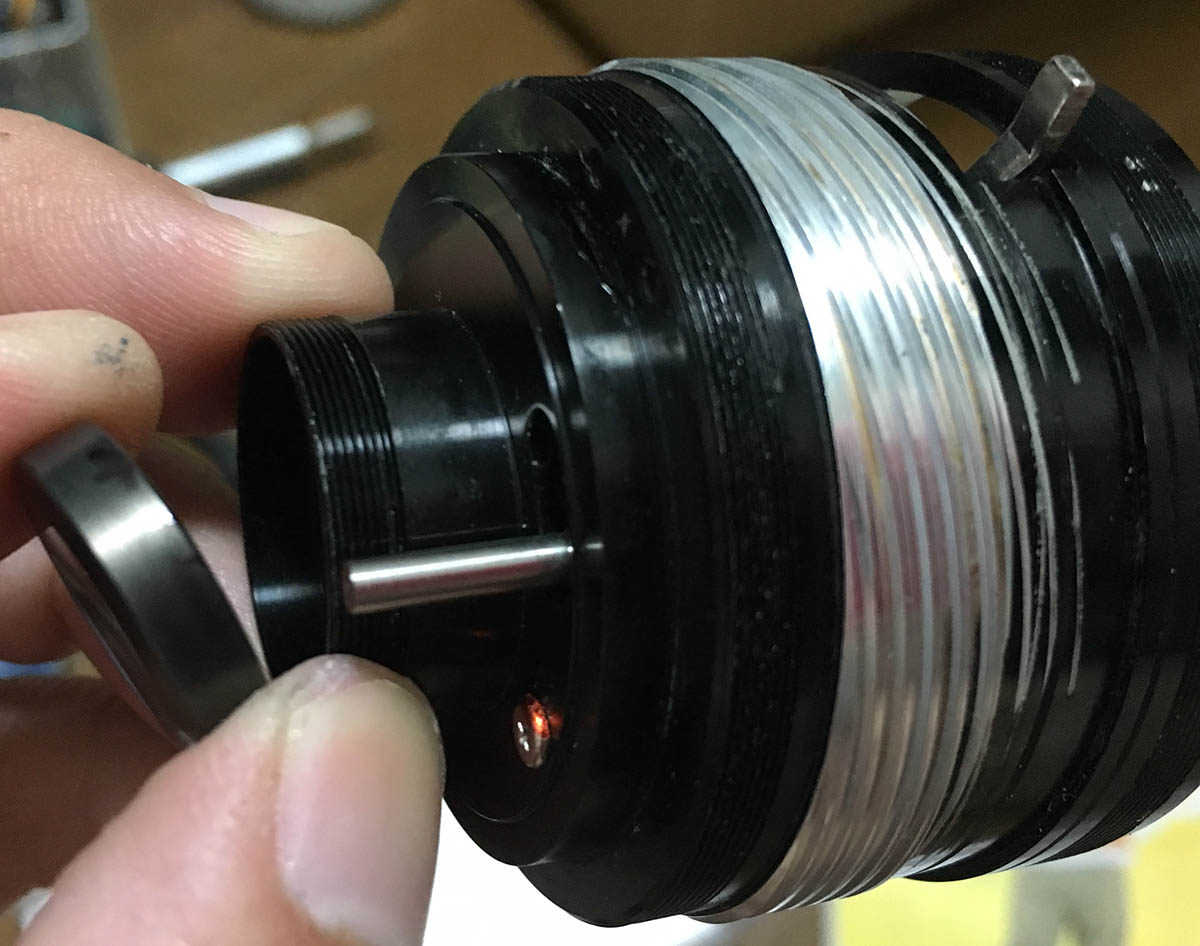
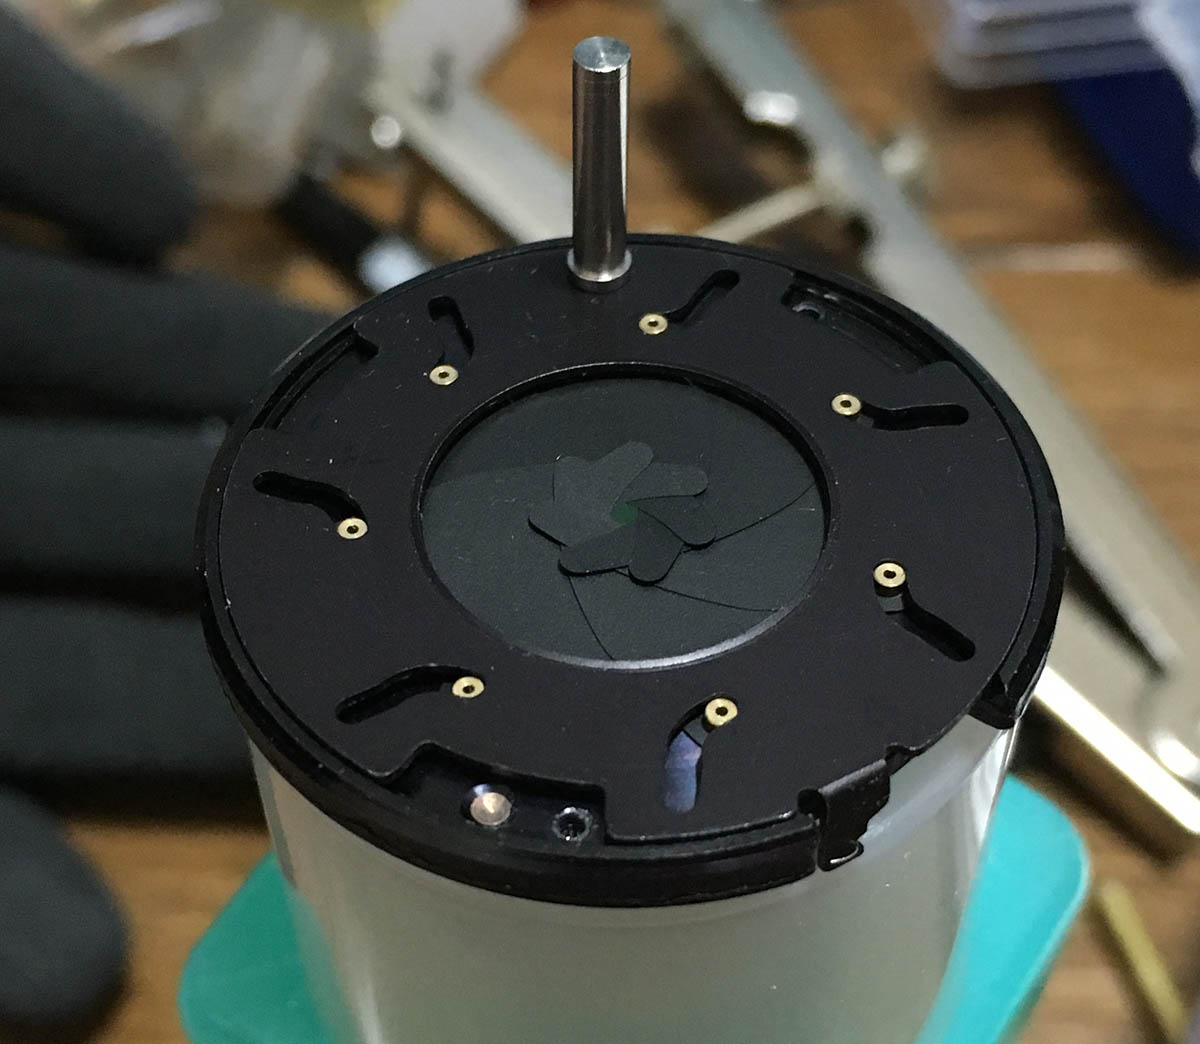
Time to remove the front optical block. You can remove this as soon as you can access it, I just removed it now because I don’t want to disturb the CRC unit’s orientation.
That’s all for the lens barrel. It certainly felt like a little puzzle while I was working on it. It took me longer to disassemble this lens because there’s so many things to take note of. Do not rush it and just take your time studying how it works and taking measurements and you should be fine later during re-assembly.
Disassembly (Objective):
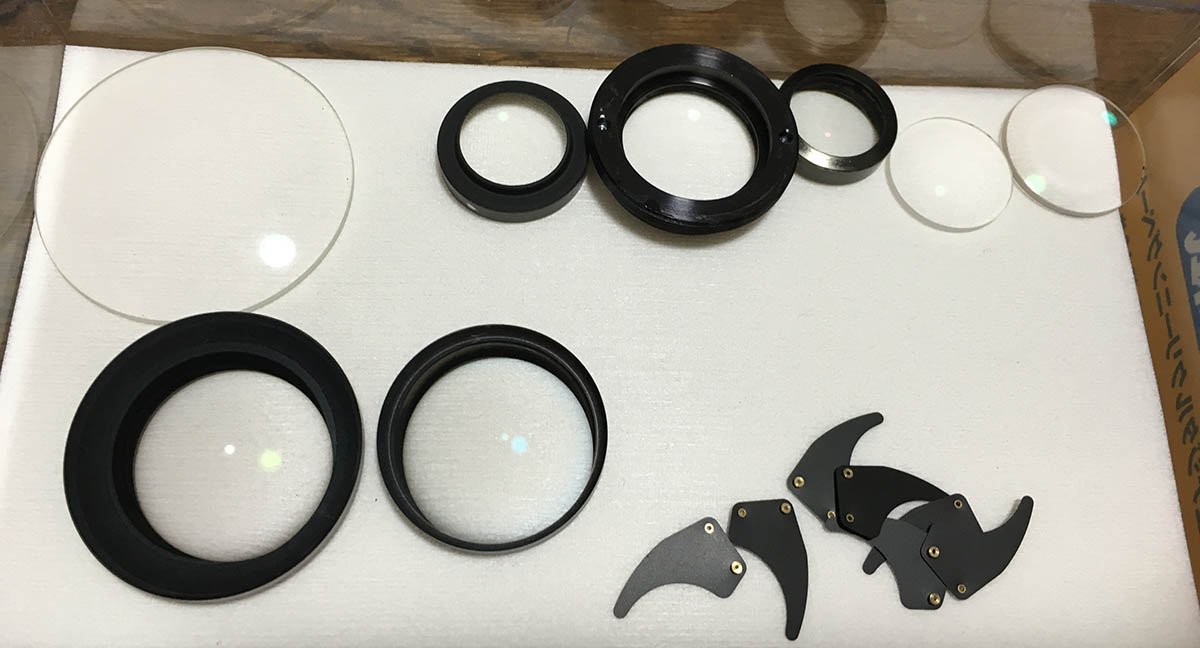
The lens elements can be removed effortlessly but just be careful with some of them because they may have been sealed with lacquer. This lens also has adjustable lens elements where it’s possible for you to fine-tune the position of your lens’ elements. Other Nikkors also have this but as far as I know, this is usually found on wider Nikkors with CRC implemented.

The rear element can be removed by unscrewing its collar. If yours is stuck, just apply a small drop of alcohol to its thread to soften up the lacquer used to seal this.

The rear element can be removed with the help of a lens sucker.
Remove this spacer and take note of which side should be facing forward. If you put it back the wrong way then you can damage the glass.
You can extract the next one with a lens sucker. Note that I have marked the leading edge with a Sharpie to remind me which side should be facing front. The number of marks also indicate the element number, this will be a good guide for you later in determining the elements’ order.
The last element on the rear optical block can now be safely extracted using a lens sucker. Again, notice that I marked it to help me later.
The inner element can be removed by unscrewing its housing with the help of a lens spanner. The 2 dimples should give you a clue on which tool to use. This lens has fungus damage but we will take care of that later. Note that it was sealed with lacquer so you’ll want to apply some alcohol on the threads to soften it first. This element was sealed by the factory because this can be adjusted for optimum results. If you’re really into it, you can measure how deep this thing goes before you remove it or mark its position with a small scratch on the walls of the housing, see how far it will go when you tighten it. I don’t recall making this but mine works fine, I’m just mentioning this to you so you will know where you can adjust your lens to get it to be pin-sharp. Many other Nikkors have this kind of adjuster.

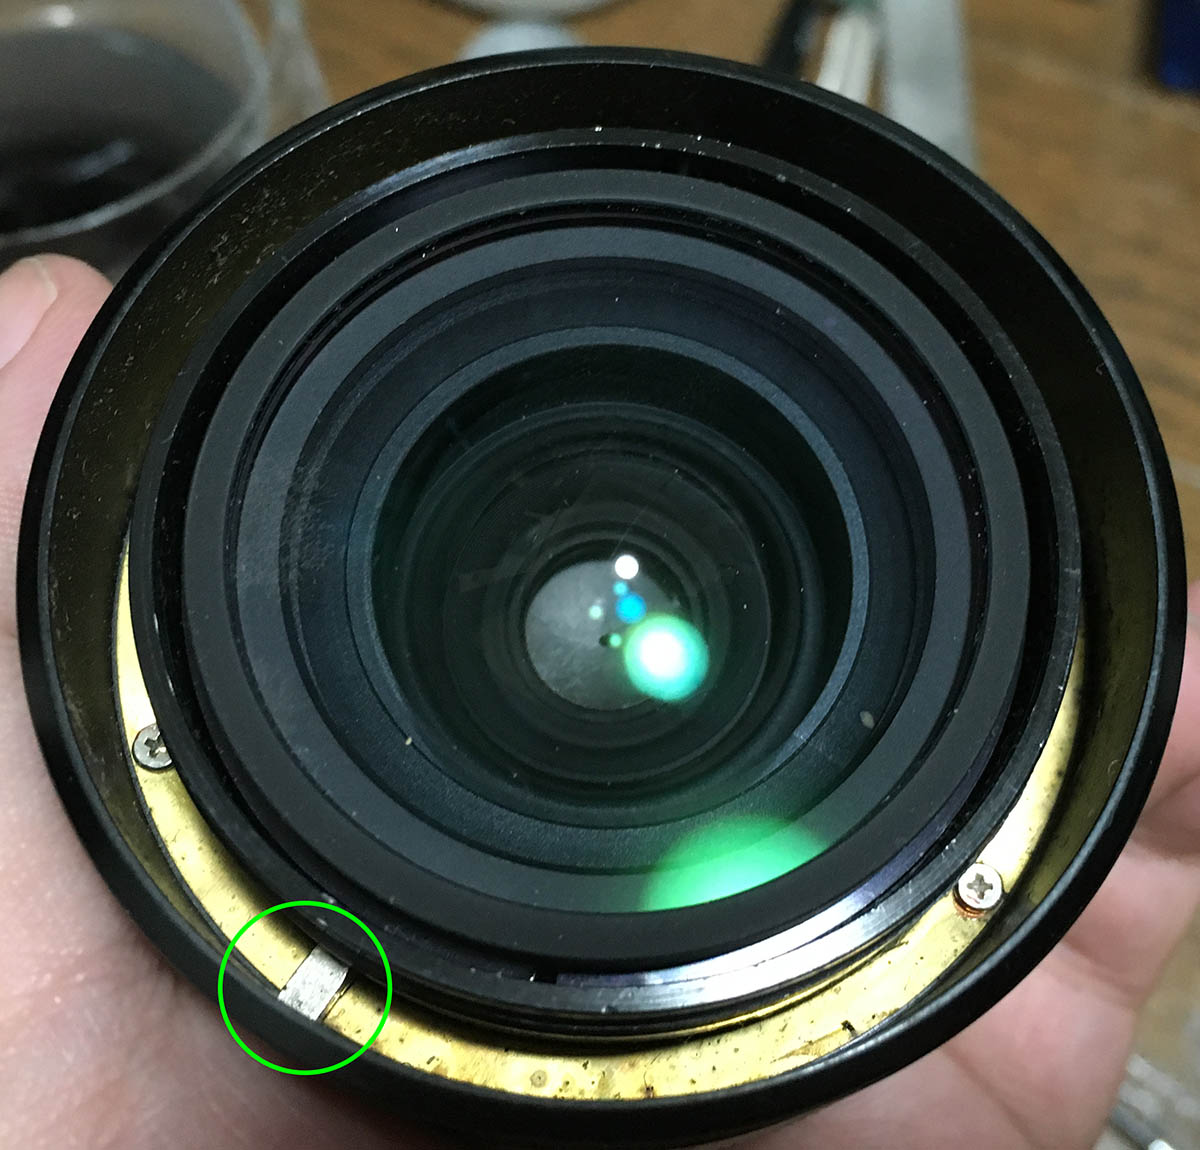
You can now extract this after you unscrew it from the objective’s housing.
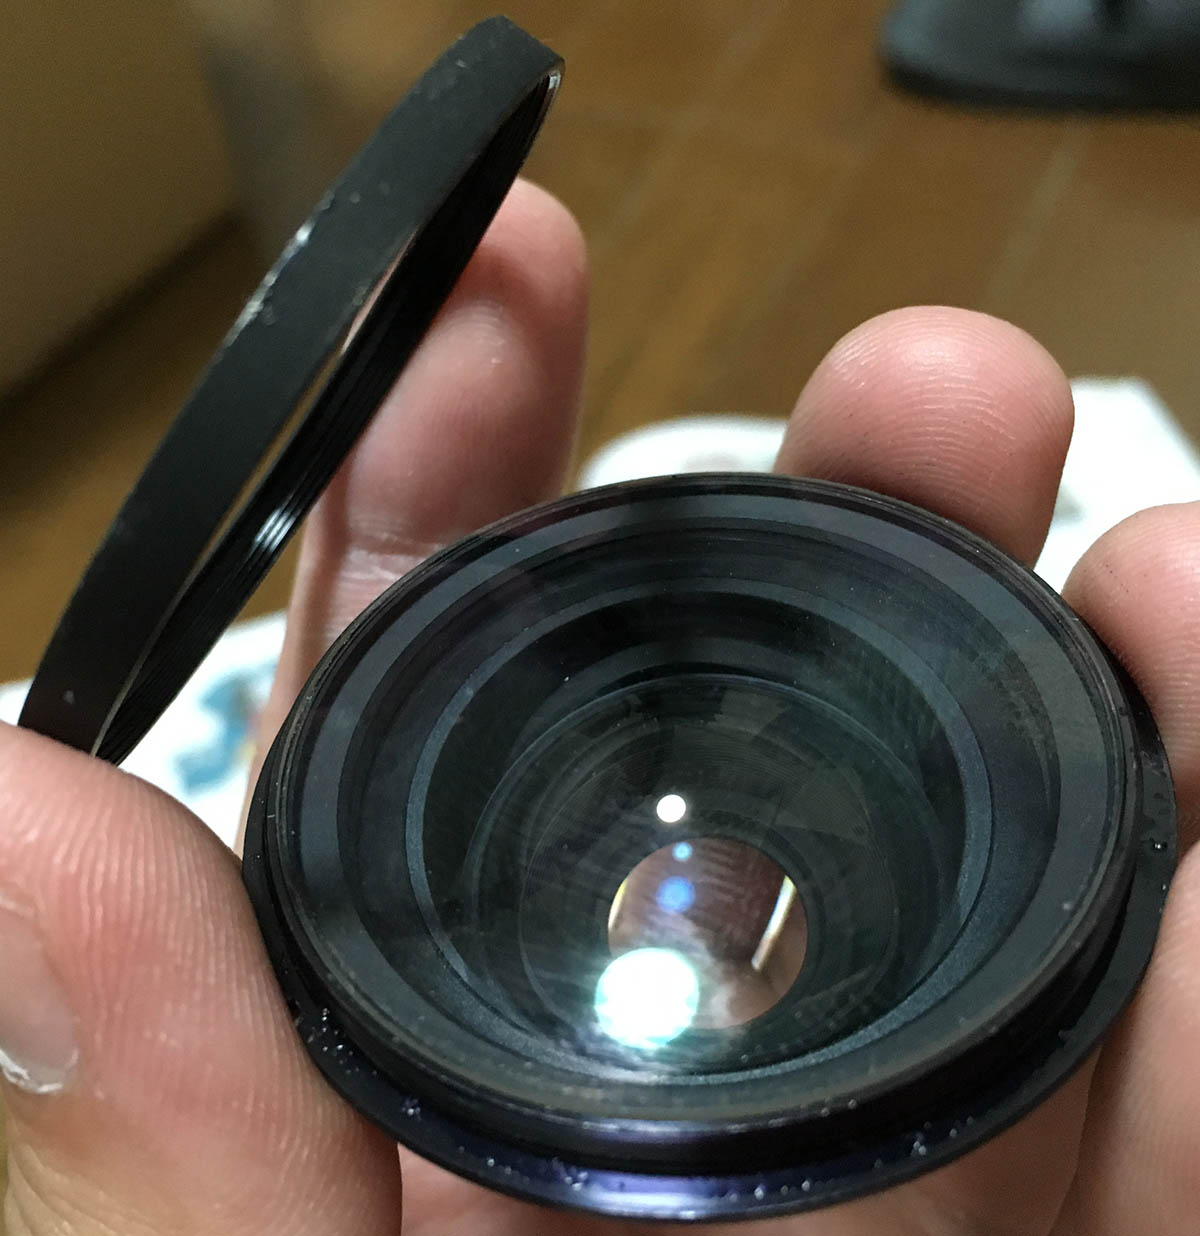
The front element can be accessed by removing its ring. If this is stuck just drop a small amount of alcohol to soften the lacquer.

Remove the front element with a lens sucker. Remember to always face this thing up all the time while you work on this or you’ll drop its contents to the floor.

Remove this spacer. Always remember where this thing should be facing.
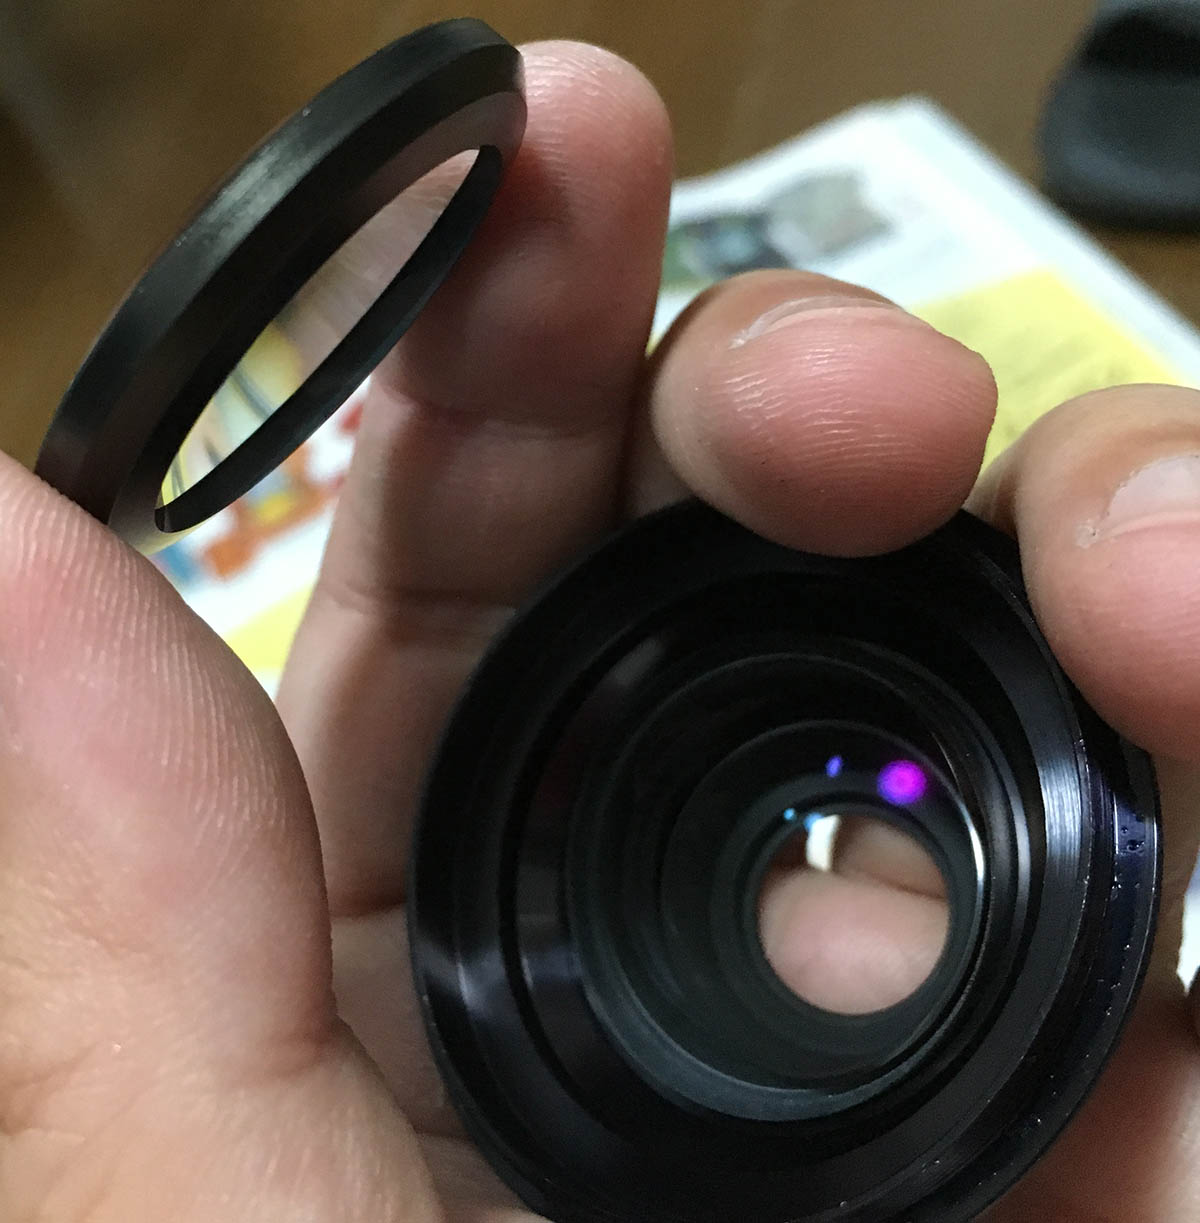
The 2nd element can now be safely extracted with a lens sucker.
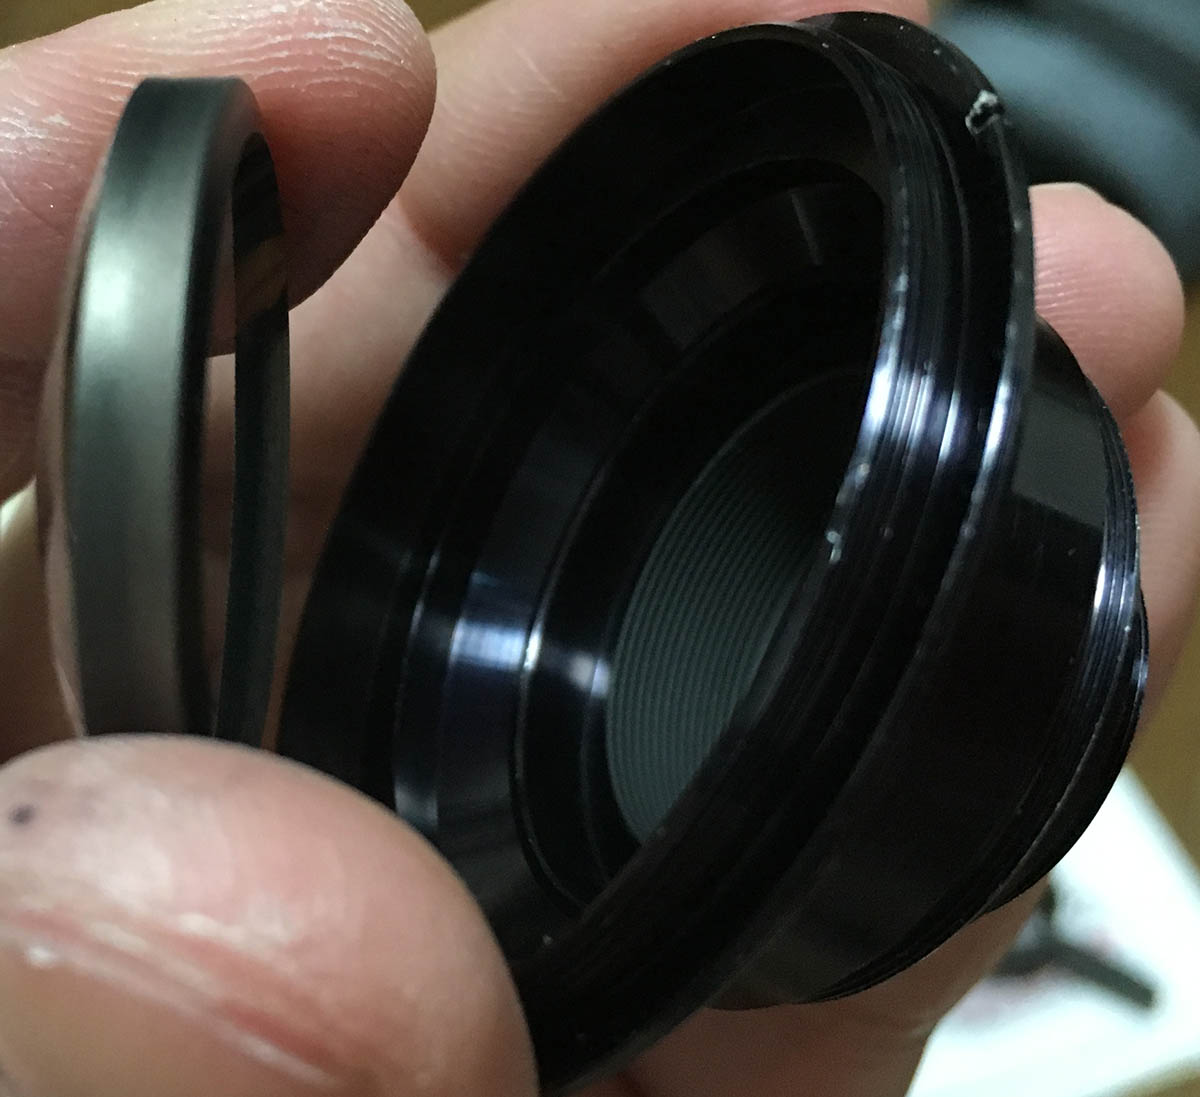
The same goes for the 3rd element.
The last element of the front optical block can be extracted with the help of your fingers. It’s not advisable to remove it from its housing, leave it there because this is sealed.
Make sure to clean the elements well before you reinstall them. A lens like this had to be cleaned thoroughly to prevent fungus from coming back. Sure, spores will be near-impossible to kill and all it needs is a single spore. Spores are everywhere so it’s important that we keep the lens clean and use it often to prevent it from fungus.
Disassembly (CRC unit/Iris Mechanism):
I decided to combine the CRC unit and iris mechanism into one section, they are situated in the same place and it’s simpler to read this article with them combined. This is going to be a bit difficult because there are many things that can go wrong here so please take as many pictures and measurements as possible. If you put the CRC unit back the wrong way then everything will be off-sync and your lens will not work optimally. It is absolutely important that you get this right.
The inner helicoid also houses the objective, it is kind of common for lenses in the Ai-S era to be made this way to save cost and to make things lighter. This has a big drawback because the objective and the iris mechanism are sitting really close to the helicoid so any oil that migrates from the helicoids has a big chance to settle in the iris mechanism. This is the reason why this lens is prone to the oily iris problem. The CRC unit is also close to it and sits right above so that’s also another source of contaminants.

Time to dismantle the CRC unit. Take plenty of notes on its orientation and positioning. It is also important to make measurements whenever prudent. Before removing the tab, be sure to mark its position. I marked the ends of the tab on the metal surface that it is on so I will know how to put it back. Notice that Nikon sealed it with lacquer, this isn’t only to make sure that it doesn’t move but it’s also Nikon’s way to see if anyone worked on it before. If that’s gone then it’s most likely tampered with.

Here is where I made my marks. I only needed one, but I just wanted to be sure.

Mark the height of the tab for reference, this is really important so you will know how to put it back the right way later.

Take as many pictures of it before you remove it, this is your last chance.
The point of no return! Don’t worry, I made a mark to help me later on.
Time to to remove the CRC unit’s helicoid, mark where these parted so you’ll know how to put them back.
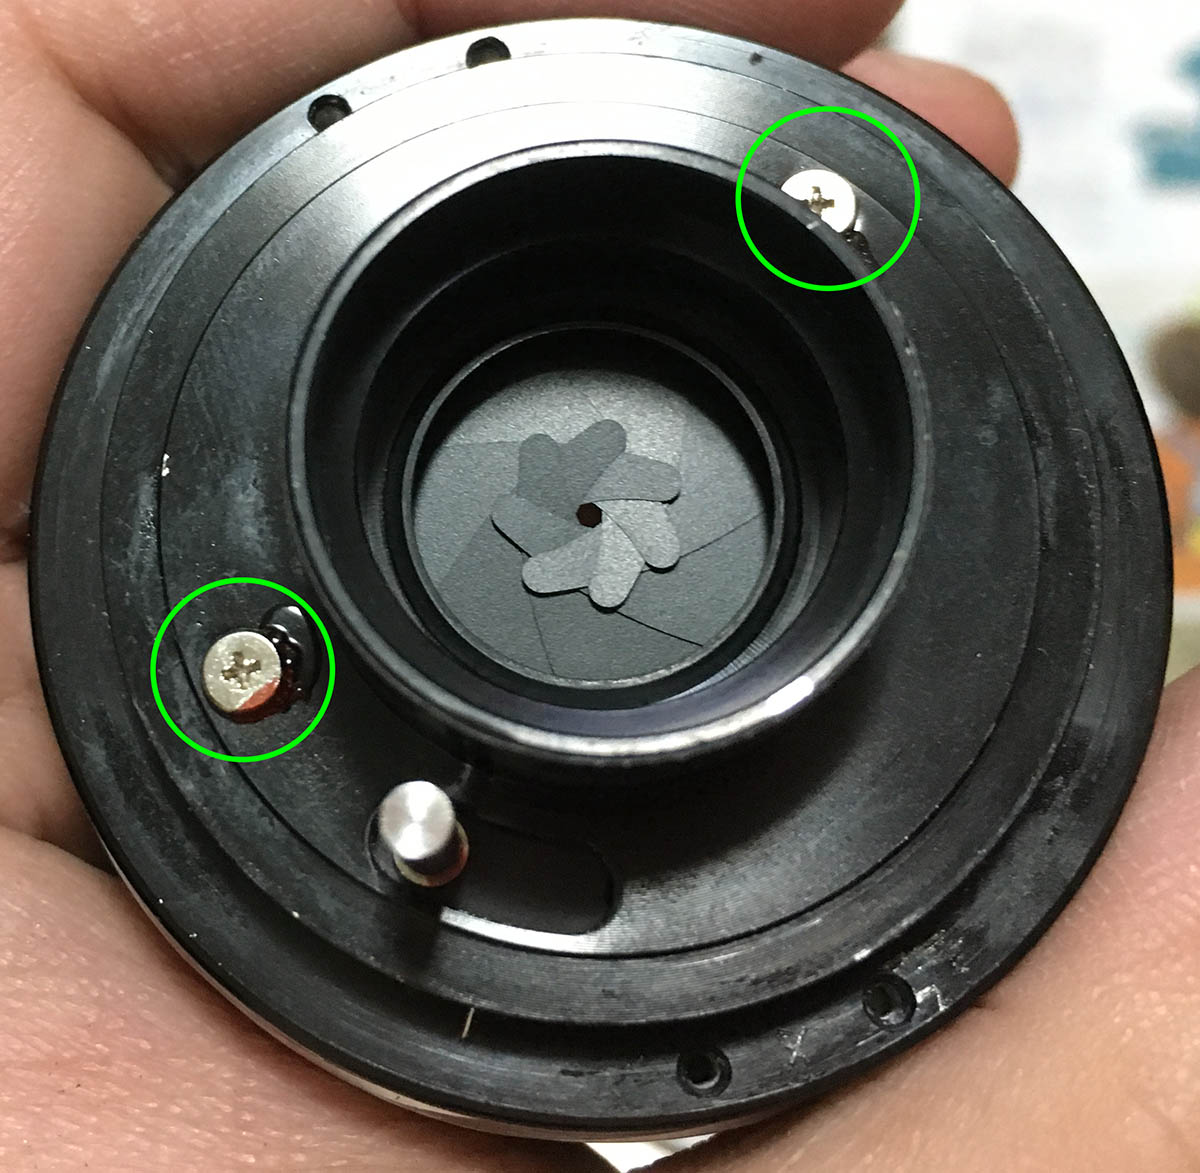
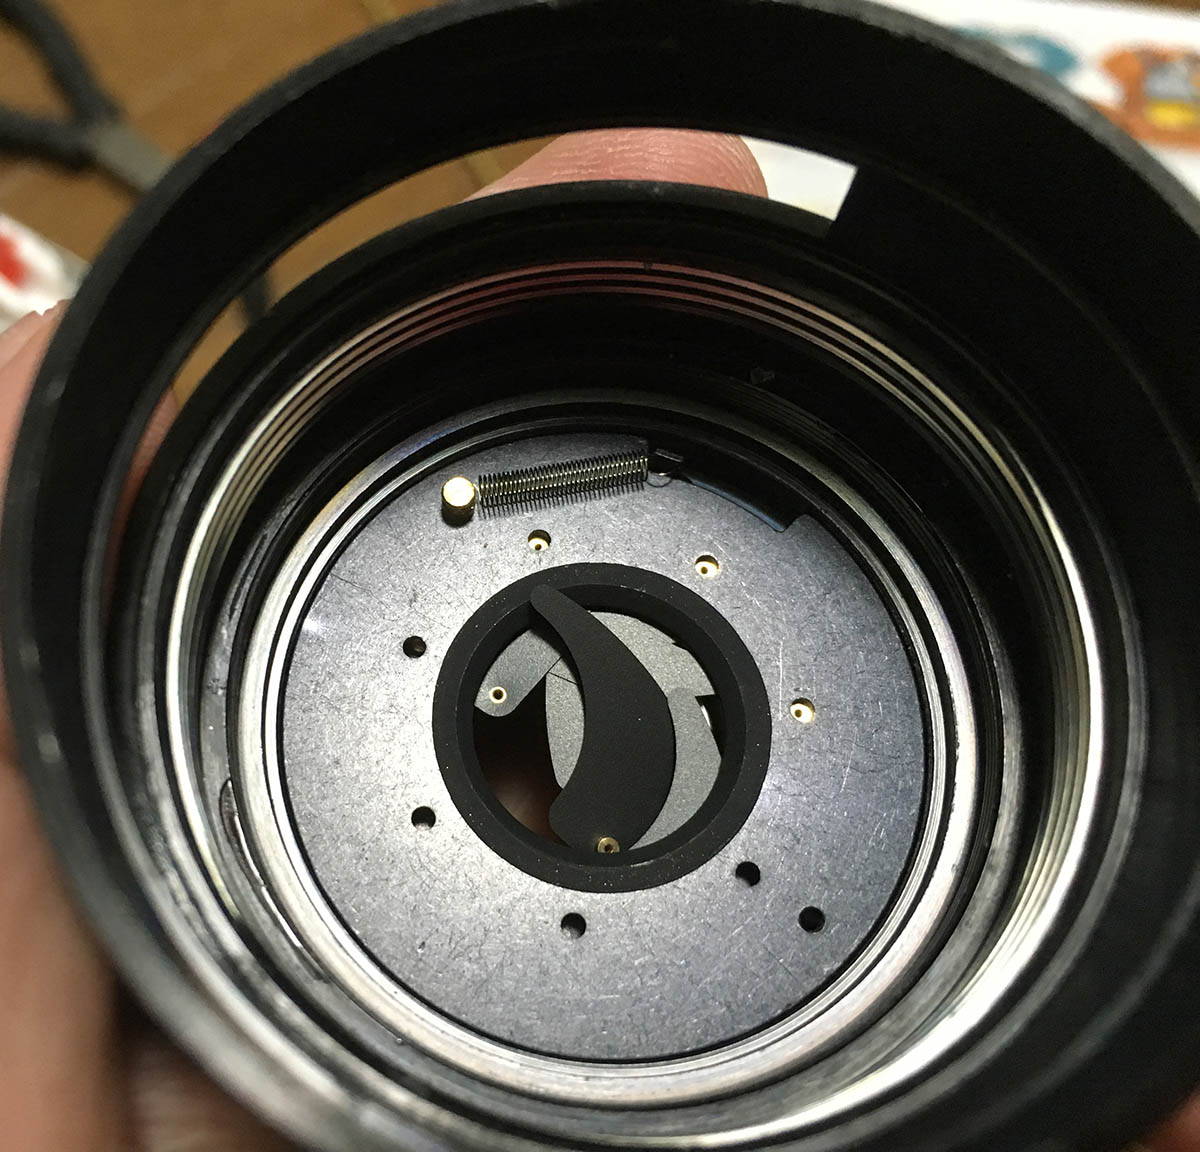
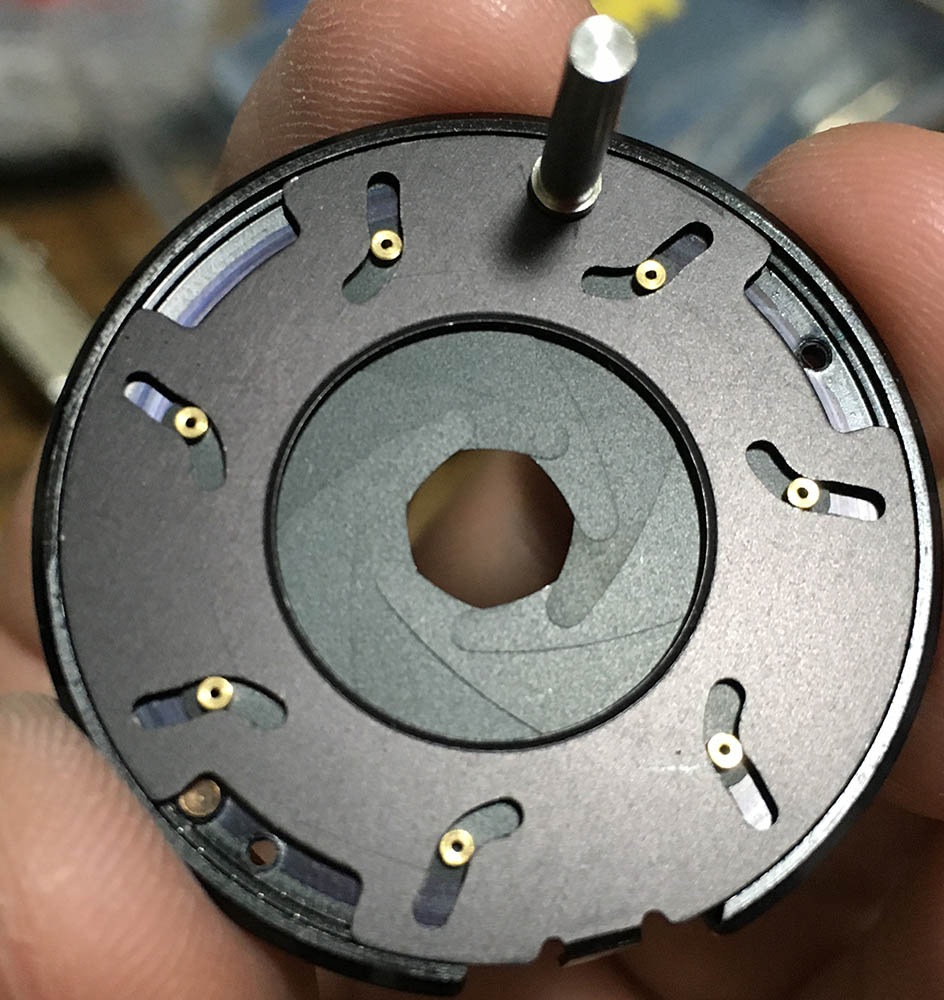
The iris mechanism is secured by these screws. These are also adjustable if I’m correct. Mark them properly so you’ll know how to put them back later.
The iris is also sealed by this collar. Use a lens spanner to unscrew this. See the lacquer? Do that alcohol trick again here. Mark how deep this thing goes as I suspect that this is another adjustable part.

Remove it when you’re confident that you can put it back together properly again.
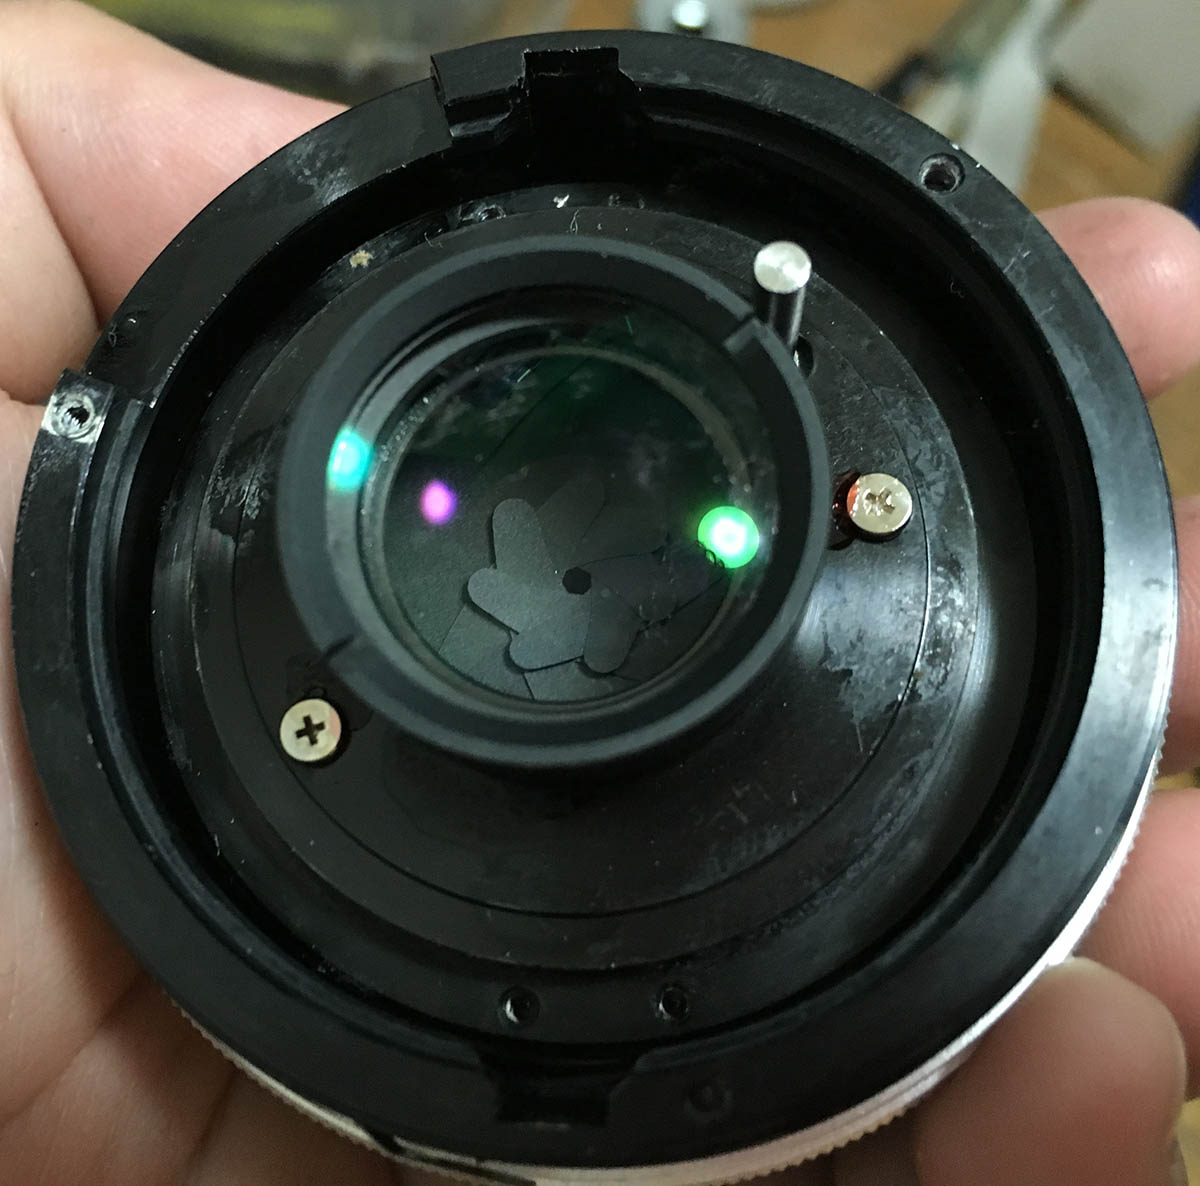
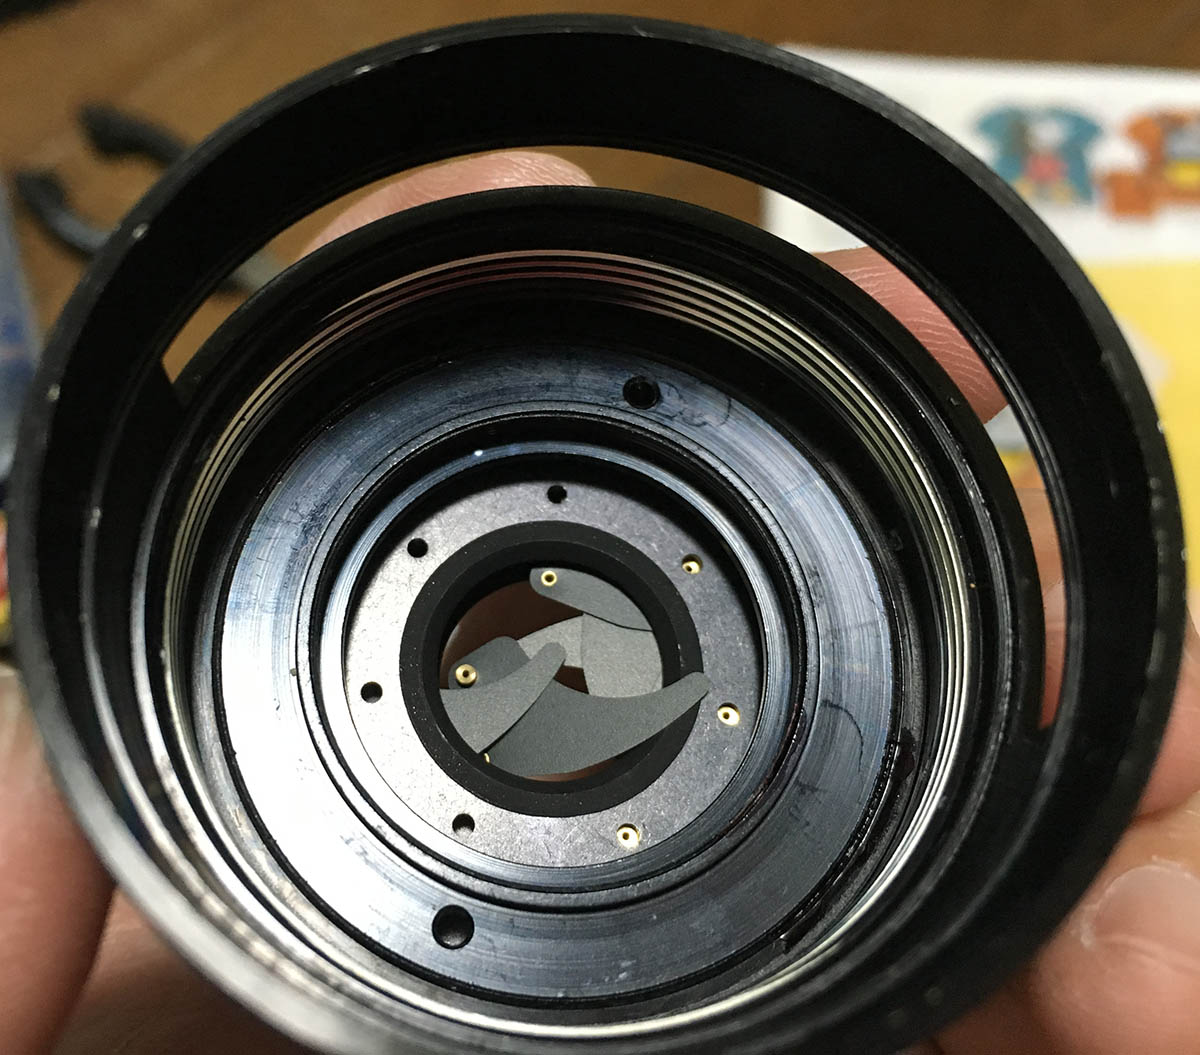
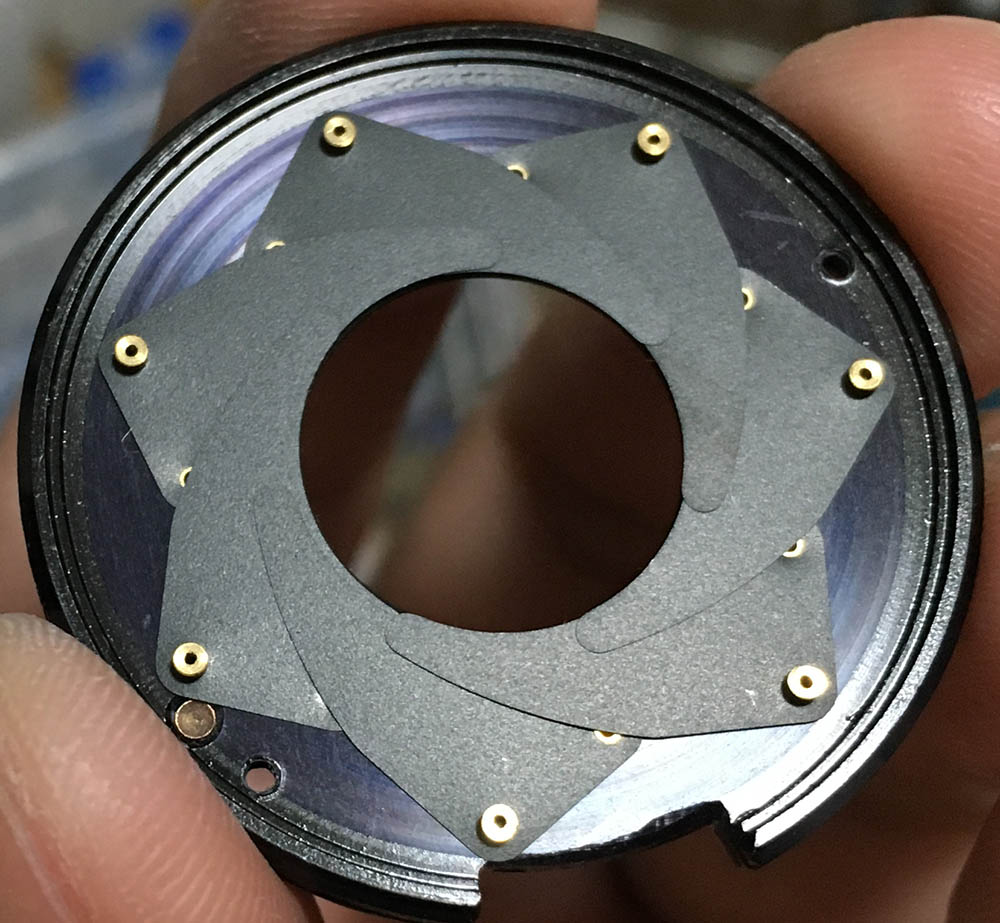
The iris mechanism can now be accessed. All that effort just to get to it.

This can be easily removed by pushing on its post from behind and lifting it off. It’s spring-loaded, be careful or your iris blades will fly across the room, damaging them forever. Decouple the spring just to be safe.
It’s now ready for a thorough cleaning.
The helicoid for the CRC unit should only be lubricated with a very thin film of grease. I’ll caution you against putting too much grease because there is a big chance that the grease will migrate to the iris mechanism. Use a lighter type of grease here, a thick one will only make your lens difficult to turn. You’ll be turning 4 helicoids in all so the resistance from each set will add-up. If your helicoid has dried grease, I would even use a very fine steel wool and scrub away any hard deposits. It’s not unusual to clean any dried-up grease with a sharp toothpick and you’ll have to do this sometimes when you find any caked gunk in your helicoids. Leaving it there will only make your lens feel gritty as you focus. They should feel smooth even if dry-turning them. If it’s rough then you will have to scrub it more using a kitchen sponge.
Conclusion:
This took me longer to put back because of the numerous parts involved. It also took time to make sure that things align properly before I re-assemble it. These lenses with CRC always take more time because you’ll need to test it after re-assembly. I just focus the lens at infinity and check its sharpness and do the same thing on the other end. The mid-ranges will also have to be checked just in case.
There are a couple of issues to look out for:
- Sharpness should be even, if one side is sharper or in-focus then you’ll have to see if you got the elements set properly.
- Weird artifacts on the edges if focused on its closest focusing distance. If it looked weird, you will have to adjust the central element’s height using its adjuster. This can be tedious and you won’t have to do this if you took measurements of its depth early on before removing it, that is if the lens hasn’t been tampered before.
- The lens should focus properly to infinity and be able to focus as close as 0.2m. You will have to calibrate your focus properly, if not then you have put the lens back the wrong way and you’ll have to reassemble it again until it this works.
Make sure that you don’t lubricate this too much, any excess grease will migrate to the iris or other areas. As a general rule, lenses with CRC should never be lubricated too much and you should use grease that isn’t so thin as to make it leak or a thicker type that will seize-up the helicoids. Only apply good grease for this like silicone grease that has been made for lenses to prevent it from caking and evaporating. Evaporated grease is going to settle on the lens elements and is one of the most common causes of haze.
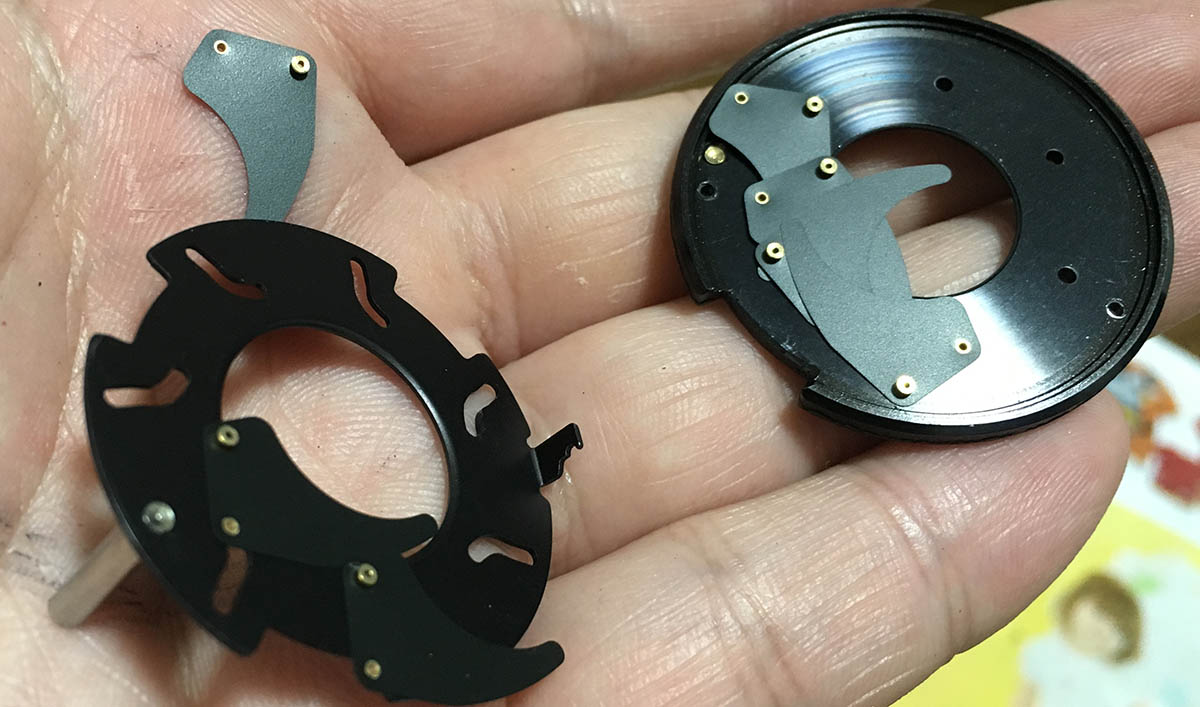
Here are all of the elements, they’re now clean and dry. I cleaned the fungus using the method shown in my very popular fungus removal article. The iris blades were individually cleaned, it’s important that you clean them really using with naphtha and carefully wipe them dry with lens tissue. Air-drying them will leave some drying marks depending on the solvent used. Careful not to warp them or else your iris will never operate properly again.
Carefully reset the iris blades back to their position. This is easy because it’s only a few blades. Just wait until you see how many blades a preset-type iris has.
Just look at how clean it is now. Just a couple of minutes ago this was filled with fungus.
The simplest way to put it back is by using something to prop-up the iris. I used my wife’s nail polish remover (acetone) bottle because the cap is of the correct diameter.
Carefully lower the objective’s housing over the iris mechanism.
Once you’re happy with it, screw it back together and you can now re-install the spring.

Time to put back the CRC unit’s helicoid. See how useful these marks are? It is my lens so I don’t care as much. For other people’s lenses, the marks are a lot smaller and they are made on more discreet places.

The brass ring secures the focusing ring. Re-build your lens back but do not put the front barrel back so you can access the screws of the brass ring. It is important for this lens to focus perfectly and this is where you can adjust it. Please read my article on how to calibrate your lens’ focus. It may take some time but it is going to be worth it in the end. No excuses here.

Look at how clean it is now! Even the black ink on the walls of the lenses is gone! I stripped that by soaking them in alcohol to remove the old black ink. This was necessary because the fungal infestation was so terrible even the black lining had to be replaced. I use the best India ink (China ink) I can get and I repainted the walls of the lens again with fresh ink. I can now be sure that the chance for the fungus coming back again is now much lower.

What a lovely lens, even the lettering look clean. It’s a satisfying experience for me every time I restore a lens back to working condition.
That’s all for the Nikkor 28mm f/2.8 Ai-S. I’ve been getting requests to do this for a long time but I only got into the mood to write this just now. I am busy juggling my time between doing this, work, family and my hobbies. I really do not have much time to be honest so I hope that you enjoyed this. There aren’t a lot of things online for it, I hope that this will be helpful for people who wish to repair this. This lens is not something a beginner should be working on and experienced repairers should be careful with this lens. If somebody quoted you a high price to work on this then you now know why. I would say that I will ask 150% more for this if somebody asked me to work on it just to cover for the time and effort needed to make sure that it works properly. This lens is very time-consuming to work on to state the obvious.
Thanks for following my work, if you liked this article please share this with your friends so it will get more views. This site earns around $0.30 a day, it’s totally reliant on views. You can also support this site, it helps me offset the cost of maintenance and hosting. You are also helping me purchase, process and scan film. This site promotes the use of film so we’re all in this together. See you again in the next article, Ric.
Help Support this Blog:
Maintaining this blog requires money to operate. If you think that this site has helped you or you want to show your support by helping with the site’s upkeep, you can make a small donation to my paypal.com (richardHaw888@gmail.com). Money is not my prime motivation for this blog and I believe that I have enough to run this but you can help me make this site (and the companion facebook page) grow.
Buy me a roll of film or a burger?
Thank you very much for your continued support!
$2.00
Helping support this site will ensure that this will be kept going as long as I have the time and energy for this. I would appreciate it if you just leave out your name or details like your country’s name or other information so that the donations will totally be anonymous. This is a labor of love and I intend to keep it that way for as long as I can. Ric.

May 14, 2018 @ 02:11:29
You’re doing God’s work, Richard. I hope you never stop while you have your health.
May 15, 2018 @ 14:00:19
Thanks, Bill! Just a bit tired lately. Ric.
Jul 04, 2018 @ 10:13:26
Hey Richard ! Thanks so much for this guide 🙂 it obviously took a lot of diligent effort, and time – much appreciated. I wanted to ask if I’ve completely bricked my lens by removing all the screws and tabs you say not to remove (set by factory, etc), or if there’s a way I can meticulously & patiently get it back together again, properly calibrated. What are your thoughts? Local repair shop wants $120 to do it (just a bit less than what I paid for the lens in the first place), so wanted to give it a shot on my own first.
Thanks again!
-Ray
Jul 07, 2018 @ 17:38:36
Hello. For that price it has to be a COMPLETE overhaul. I would charge about the same for that lens. I am not sure which screws you’re talking about or what’s going on with your lens. All I can say is that this lens is not for beginners. Ric.
Sep 15, 2018 @ 23:39:38
Thank you for yr labour of love.
I have learned a lot from your site.
I wish you good health and many happy days taking great photos and good time with family.
If you publish a book/ebook on this subject please let me know. I would be most keen to get a copy.
Sep 16, 2018 @ 22:23:23
Thank you! I am glad that you liked the site! I am feeling better now but still busy. I suspect that being too busy is affecting my health somewhat. I may talk to a publisher in the future. Ric.
Oct 10, 2018 @ 16:20:31
You do beautiful work. I have restored quite a few lenses and I must say I shudder at the thought of trying such extensive work on a CRC lens! I’m just an amateur, but I have been successful at cleaning and re-greasing helicoids, cleaning and reassembling elements, and resetting focus on the newer Ai-S lenses of my own. But I don’t touch CRC or older lenses. I got into trouble with an older Ai 135mm where I couldn’t proceed far enough to re-set the focus, and decided that was my limit! The lens works fine but focuses way past infinity now, which is not the end of the world but I think is incorrect! But it is very satisfying to restore old lenses.
Nov 03, 2018 @ 00:11:28
Hello. That should be easy to fix. Ric.
Feb 22, 2019 @ 18:08:39
Hi Richard,
I have two of these 28mm Nikkor lenses that need repair, as well as the Micro Nikkor 55mm F/2.8. Do you accept work? Please let me know via email at contact@fstopcameras.com. Thank you in advance, either way.
Jul 19, 2019 @ 01:03:21
Thanks for the article! Would you happen know the size of the two screws holding the front barrel? Mine are stripped (no slot for screwdriver) and I need to clean the aperture blades. I’m afraid to drill them out without knowing the correct size to use.
Jan 21, 2021 @ 21:06:06
Very nice work Richard!
You had to do the whole dissassambly.
For only cleaning the aperture blades, you could avoid to dissassamble of the front + back lens group, opening of the outer helicoid, removal of the rubber, removal of the CRC lens out of the outer Ring.
It is enough to
1. open the bayonet and screws, aperture ring on the back
2. front barrel removal, 2 screws
3. remove front lens group
4. mark tab position of inner CRC Helcoid , remove 2 screws + tab and inner helicoid(2 helixes here), 2 turns with mine
5. mark outer ring + inner ring of CRC -lens, apply alcohol to outer ring laquer
6. remove CRC lens with inner and outer metal ring on the outer! ring
7. remove 2 crews from the back, holding the aperture , Voila : aperture mechanism falls out of the front
Apr 20, 2021 @ 15:10:03
Hi there. I followed all the instructions no problem until ‘time to remove the front optical block’. How did you remove this? There doesn’t seem to be any screws holding it in place.
Jun 30, 2021 @ 12:29:48
Same problem for me. I
Aug 03, 2021 @ 17:44:35
This had me stuck as well, but I figured it out. Looking at the front element, there is a small gap between the inner and outer walls, within that gap are two very small depressions for a lens spanner. My spanner was a bit fat for this and I really needed to bear down and apply a fair amount of strength to loosen it. The unscrewing of this is opposed by the CRC tab, so get it positioned against the wall before you try to unscrew it.
Aug 13, 2021 @ 06:19:07
Thanks once again for your patient documentation of Nikkor lenses, Richard. This particular post saved the day! Beautiful lens I picked up cheap as it was somehow jammed at MFD. Now working once again 🙂
Jun 06, 2026 @ 03:03:33
Hello,
I am stuck on the step right after you remove the keys. I am unable to separate the helicoids from the lower base. Is it supposed to come right off? Do I unscrew it somehow. Your images weren’t clear.
Thank you.
Jun 06, 2026 @ 03:05:08
hello,
I am stuck on the step right after you removed the keys. I can’t seem to separate the helicoids from the lower base. Your images weren’t clear. How am I supposed to do it? Should it come off easily? Do I need to unscrew anything?
thank you.