
Hello, everybody. We’re finally here at the end of our Contax 2 article. In part 2, we took apart the rangefinder and removed the shutter mechanism from the chassis. It’s not an easy task to take this camera apart but the real fun begins here in part 3 where we repair the broken shutter and adjust it until we get something acceptable. This is probably the deepest most repairman will bother to open this camera to, any further disassembly will be too time-consuming and should only be done when absolutely necessary. The shutter’s clockwork mechanism should be left-alone as much as possible. A very good flushing of the gears and its parts is usually more than sufficient to get this camera back into smooth operation. If your shutter mechanism is corroded then a good ultrasonic cleaning will be the best option for you. Just don’t forget to clean it very well afterwards to prevent your shutter from corrosion due to residual salts or acids from the solution. Some liquids use citric acid or ascetic acid and that will eat-away at the metal and leave crystal-like white deposits as corrosion (“white rust”). Use distilled water to prevent mineral deposits. Use alcohol or naphtha to do a final flushing just in case.
 Does this look fun? Depending on who you ask, this can be a fun activity or a nightmare. The shutter of the Contax is a marvel of its time. I have never seen a shutter that is more intricate that this. Just think about it, it stood the test of time and it’s still functioning well into its 80th year. They really don’t make things the way they used to.
This part shows the more advanced maintenance routine for this camera and it’s advised that you send your camera to a competent repairman and not do this yourself if you are not well-versed in camera repair. This article is incomplete because I forgot to take some very important pictures for illustration but I will add more information here when work begins on my Contax 3. Again, never treat this as a repair guide because this article that I wrote is only meant to be a journal of some kind so I won’t forget what I did and it’s only for your entertainment and education so you will have a better appreciation of the work that’s involved in camera repair and this will also help you call your tech out if you think he messed up with something. Having said that, let’s begin with the last part of the series.
To help you navigate, here’s the link to the whole series:
PS: If you find anything wrong here and would like to contribute, please message me as soon as possible to prevent any wrong information from propagating. If you know how to fix these, please don’t keep it to yourself. I would also like to thank all the kind people who shared their knowledge with me on the Contax. Without their help, I wouldn’t have this very important piece of photographic history working. I dedicate this to all of you.
Before We Begin:
If this is the first attempt at opening a lens then I suggest that you read my previous posts regarding screws & drivers, grease and other things. Also read regarding the tools that you will need in order to fix your Nikkors.
I highly suggest that you read these primers before you begin (for beginners):
- Essential tools
- Best practices 1
- Best practices 2
- Best practices 3
- Ai conversion
- Working with Helicoids
Reading these primers should lessen the chance of ruining your lens if you are a beginner. Also before opening up any lens, always look for other people who have done so in Youtube and the internet. Information is scarce, vague and scattered (that is why I started this) but you can still find some information if you search carefully.
I highly recommend that you also read my working with helicoids post because this is very important and getting it wrong can ruin your day. If I can force you to read this, I would. It is that important!
For more advanced topics, you can read my fungus removal post as a start. This post has a lot of useful information here and there and it will be beneficial for you to read this.
Disassembly (Miscellaneous Parts):
Before we begin working on the important parts, it would do well if we removed some of the less important things that can get in the way or will require cleaning since we got the camera all-exposed anyway. It will be senseless to leave these things out and certainly a waste of effort. We need to clean as many parts possible because who knows when this is going to be opened again for servicing and by whom.
 The fork for the advance can be removed by unscrewing its fastener. Be sure not to lose any shims you see here. These are usually shimmed and you can find bushings, too.
 The cog for the advance fork can now be removed. Notice that it’s caked with old grease that has turned bad. Clean this very well because it’s starting to corrode the brass. There are shims here as well but you can’t see it because it’s hidden by layers of yucky grease.
 The self timer lever can be removed after unscrewing the big screw. Make sure that you use the correct-sized driver that fits the slot properly or you will scar the head.
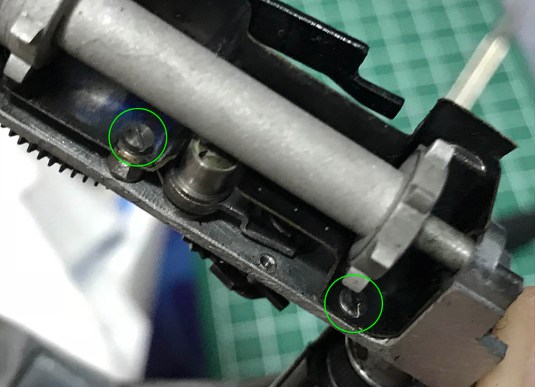 The baffle at the sprocket can be removed after removing these 2 screws. The lower one is a bit difficult to access but it can be done if you are careful. There are small shims here and you don’t to lose any of them. Make sure you know where each one came from.
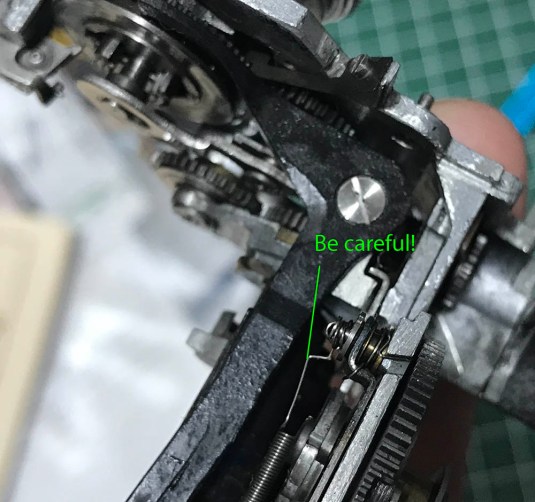 Make sure that you don’t dislodge this spring while you remove the baffle! Damaging it is not going to be good either so be very careful not to damage it.
 The baffle comes off just like this. You will find shims here and you should be careful not to lose any. This is a very delicate part, warping the baffle or losing any shims will make the shutter perform inconsistently because some parts will come get in contact with the parts that move while taking an exposure. If something is wrong after you reassemble it, this is the first place that you should look. Again, the shims are very important.
Clean the parts properly before you set them aside for reassembly later. I applied a fresh application of molybdenum grease on the advance fork’s spring and holes. This will feel really good every time you cock the shutter. The parts for the self timer were cleaned as good as I can because germs love to hide underneath this thing. You don’t need to oil this but it won’t hurt if you did either. As mentioned before, the baffle is very delicate and it’s important that you don’t warp or damage it.
Disassembly (Shutter Curtains):
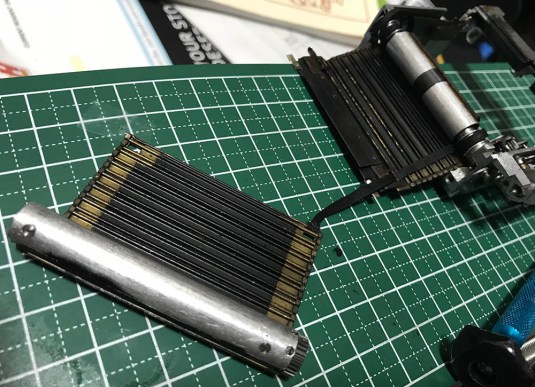
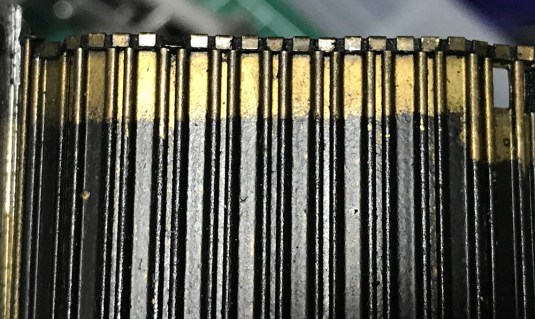
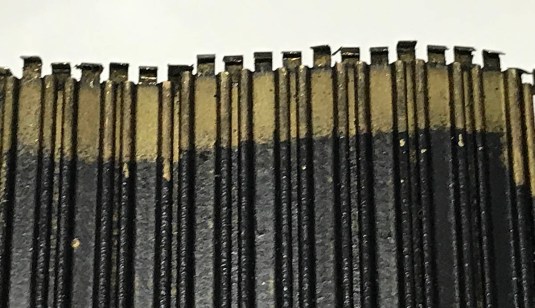
The shutter curtains of the Contax series are unique because they’re made of metal. They are also unique because they travel vertically. The curtains are made of interlocking slats very much like a metal accordion shutter. These brass slats are delicate and they can be easily damaged so take good care of them. A damaged slat can make the shutter travel in an irregular way. If the joints are bent then there’s little chance that you can get them to work perfectly again even if you restored its shape because the slightest deformation will affect how they travel. Grim can also accumulate between the links so I clean them very well with naphtha and then I use a blower to vigorously flush away any dirt in the links.
The good news is most of the shutter trouble of this camera can be fixed without needing to open the camera up to this state. Just remove the rear casting (part 1) and you can now access most of the shutter. Even a complex task such as ribbon replacement can be done with just removing the rear casting. It will be tight and stressful but at least you can fix it without ever opening the camera all-the-way. This is a very smart design when you think from a repair point-of-view but this makes the camera’s chassis a bit weaker because you don’t have one single casting and the strength associated with it.
A common problem for this camera are broken ribbons. These ribbons are made of silk and they deteriorate over time as they rub against the brass components of the shutter. It is also possible that over-tensioning the springs will cause stress the ribbons. One more cause is that the small metal spike on the shutter that catches the ribbons are sharp. This can cause the ribbon to fray or make the stitching unravel until the ribbon separates. It’s how my ribbons got damaged so to prevent this from happening anytime soon, the tapes will have to be replaced with new material and a combination of glue and stitching will have to be used to make the ends more resistant to wear. When stitching, get the thinnest thread and needle you can find but not so thin that it becomes pointless to use.
Shutter repair is a delicate and advanced repair and you will have to be skilled enough with your hands and have the correct tools to be able to do a proper job. I don’t work on anything that’s not Nikon often so what you see here is the bare-minimum in terms of the tools and setup that you’ll need to pull this job together. If I were repairing the Contax 2/3 cameras on a regular basis then a jig for this will certainly be very useful but that is not the case so I will have to improvise with what’s available to me.
 Before removing the lower roller for the 1st curtain, lay your shutter flat so you won’t do any harm to the shutter curtains. As you can see, one of the ribbons has already snapped and I removed it to get rid of any clutter while I work on the shutter mechanism.
 This pin is what’s securing the lower roller. This is easily stripped so use a driver that is a perfect fit for the slot and the diameter of the driver should be the same as that of the pin because you will need to use the same driver later when you adjust this later. You’ll need to shape and grind a screwdriver just for this pin. This pin is being secured with a hook, the hook is in turn secured by a small screw that is under the spring in the picture. It’s a bit tight here and you will have to work like a surgeon in order to loosen the screw while being careful not to damage this very important spring. If this spring got dislodges, you can put the other end back but it’s not going to be easy because the other end is hidden deep within the mechanism. It’s doable but it will take you some time, I should know.
Once the hook has been removed from pin by turning the hook to the other side, you can then try and maneuver the lower roller until it comes off. There is a cut at the bottom of the shutter crate where you can slip the roller in and out as a unit. It’s wide enough just to give adequate clearance for this to pass. As usual, don’t lose any shims here.
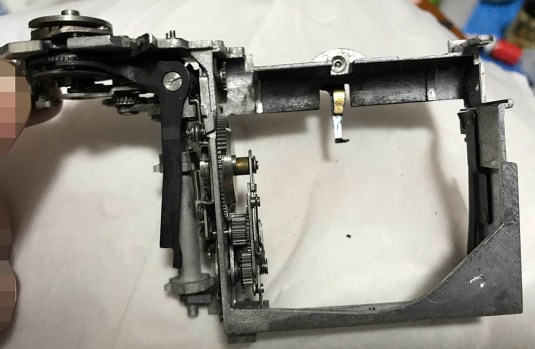 You can then examine the shutter crate and check for anything unusual like springs that has been undone or anything along that line. Clean this carefully with a small toothbrush and plenty of cotton swabs. I went even further and pickled this thing in a vat of naphtha to soften any old oil that has gotten trapped. Thomas Tomosy’s advice in his book is to use a freezer to chill this thing so that the old oil will be easier to remove. I forgot if he said to heat this thing to melt the old oil but you can try putting this on top of a radiator and see if the oil will creep out of the assembly. The most important part to clean here is the big fly wheel. You can remove it if you want to but be careful about how that should be put back because if you put it back the wrong way then everything will be off. This is only for the advanced repairer to do. The important thing here is that every cog should turn very easily and smooth, if not then the higher speeds will not work smoothly or you will need to tense the main spring too much just to get the proper speeds working. This will stress the spring and the curtains and you will end up with bad springs and ribbons soon. This is also the cause for a noisy Contax, a properly-repaired Contax shouldn’t be noisy.
Lubricating the shutter requires that you use the best oil available to you. Watch/sewing machine oil of the highest grade is ideal. I use Launa Oil, the same oil used by the camera and precision machine manufacturers. It’s not cheap but it’s the best I can find. I dilute it with naphtha and apply it with a syringe. Naphtha helps thin it so it can reach the insides of the part that needed oiling. Once the naphtha has evaporated, it leaves a nice even oily residue and your parts feel like it’s gliding on teflon. Mr. Sasabe of Japan Hobby Tools is selling these so just message him and never forget to tell him that Richard Haw sent you!
You only have to apply a very small amount of this to the pivots the gears and just let the oil do its thing with capillary action. Using too much oil is even worse than using less and it’s very important that you don’t overdo it. Some parts need to run dry like escapements but in general, I just apply a little bit of oil on the pivots of the gears that move when you make an exposure. I rarely apply grease on these parts and the only place I apply grease is the parts that are manually-turned such as the advance and rewind cogs. Even then, it is important that you only apply grease on parts that needed it such as the teeth. Just like oil, you don’t want to apply too much grease. A thin but even film of grease is more than enough! I use high quality molybdenum grease for this because molybdenum grease will dry as a powdery residue that is easy to clean while other grease will turn into booger.
 Inspect the lower roller to find anything bent. The junction for the curtain and the roller is susceptible to damage and that’s the first place where you should look at.
 There are shims here at right-end of the roller and a bushing that you will never want to lose. This bushing should be reinstalled on the pin before you put the roller back to the shutter crate. Notice the dirt and corrosion here. This is also one reason why a shutter is performing inconsistently because the grime will not make the operation smooth.
 To remove the curtain from the roller, you will have to remove the cap at one end of the roller. The cap is secured by a small screw. Make sure that you don’t strip the head of the screw by using the correct-sized driver.
 Removing the leather counterweight will reveal 2 screws. You can remove these now or later depending on whether you want to disassemble the roller or not. It is not important to dismantle the roller completely but it will be nice if you can clean the inside of this. It’s not easy to put things back together so I am warning you now. Do not lose or damage the leather counterweight because you will have to reinstall it later.
 The curtain is being secured by this ring. This ring has a gap so the end of the curtain can pass-through it. Going back to the 2 screws. There are 2 more screws on the other side of the roller that you should remove in case you want to dismantle the roller.
 Rotate the ring and align it with the slit on the roller and you can slide the curtain away. This is a delicate task and you should handle this with care.
 Once the screws are gone, you can slide the casing of the roller out of the lower roller. It’s a tight fit so be careful when doing this or you risk damaging this very delicate assembly. Notice that I also removed the cap on the other end of the roller.
 Inspecting the spring shows that it’s in very good condition (just dirty). You don’t have to further disassemble this thing. If your roller doesn’t have any tension in one or both ends then you will have to check the springs and see if the ends of the springs are in place. It’s important to check if the springs work, the center of the roller holds tension for the first curtain and the ends of the roller is for the second curtain. I forgot if both ends should be spring-loaded or not so please find this out for yourself.
 The old ribbons were measured. While this will not make any sense because I’m going to replace them with new ones anyway, I did this just to see how long they were. They were already replaced with non-original material by the precious guy so I am not counting on the length of the curtains to be correct. Depending on who you ask or who your sources are, the length of the ribbons from end-to-end should be about 107mm to 114mm. I don’t remember how long my curtains were but your curtains shouldn’t be too far from what I gave you. There is a way to determine the correct length and that involves putting the 2 rollers back into place and making sure that the gears are meshed correctly and then do your measuring while the shutter speed is set to 1s wherein the whole length of the tapes should be used. I am not going to show it here because it’s too much of a hassle but this is the more accurate way to determine how long your tapes/ribbons should be.
 Here are the new ribbons. The ribbons should be about the same thickness and weave as the original ones. The materials used has to be silk as well. I use Asahi Aki’s ribbons but I find them to be only very slightly thinner but hey do work fine. A good source for these are medical supplies. You can find silk ribbons used for surgery but just make sure that the weave, material and size is the same as the originals. The curtains rely a on friction to make it work properly so it shouldn’t be overly thick or thin in either dimension.
 Using a jig to accurately measure and fix your tapes is the way to go but I am ghetto so it is just a matter of using tapes to secure both ends of the curtains for me. It’s not the best but it worked fine for me! The important thing is that both ends are secure while you fit the ribbons. Be careful how the ribbons should be placed and which hole they should be able to slip-through!
 I don’t have a guide for sewing and securing the ends of the ribbons but you can read the excellent guide written by Rick Oleson. I didn’t follow his way as I have my own method of sewing the ends of the tapes. My method is to sew it in an “X” pattern after gluing the the flaps with contact cement. Only when the bond is secure and the stitching is done, I’ll then cut the extra material and heat the ends so that they will not fray. Be careful while you heat the ends because you may damage the work that you just did.
To make things simpler, I secured and stitched one end of both ribbons to one roller. It’s a matter of preference on which roller you want to do this with. If you want to do what I mentioned a few steps back where you roll the curtains back to the shutter crate to check for the correct length then you will want to secure the upper rollers first. Otherwise, it is easiest to just secure the lower rollers first like what you see in the picture above. You’ll have to remove both caps from the ends of the roller so you can slip the ribbons through easily. Be mindful which direction the ribbons should be laid on the lower roller.
 Here is my beautiful (to me!) handiwork! One important thing is to check the parallelism of the curtains. The edges of the curtains should be as parallel as possible when pulled at both ends. If this is not the case then you will have to redo this! To prevent wasting time, I will advise you to check the parallelism before you stitch the ribbons and while the glue is still workable. Once the glue has cured you’re too late, you only have a few minutes to do this and get things right. Don’t worry about redoing anything, it’s OK to waste ribbons now by redoing everything than end up with curtains that literally won’t pass the grade!
This section went on longer than expected. There are many things that we can talk about but I don’t have the time to put them all here. The thing that you should remember here is to not take apart more than what you should unless you know what you’re doing.
Disassembly (Curtain Straps):
The shutters of the Contax have very thin strips of leather crimped firmly on both edges. These leather strips can deteriorate due to age and wear and you should replace them in case your shutter is skewing too much. The strips help the shutter retain its form and it’s important that the shutter doesn’t flex side-ways (skew) too much or else it will affect it’s travel and you end up with slightly inconsistent speeds.
 The leather strips looks good here in the picture but don’t trust what you see! upon closer examination, you will find that they’re not even. Skewing the curtain will reveal that it’s skewing more than what’s kosher so the leather strips will have to be replaced.
 The ends of each brass slat was bent slightly outwards with an X-acto knife. Just bend it so that you can pick on the old material with a needle and you don’t need to bend these too far or else you will fatigue the metal.
 This is how the old material looks like. Almost all of them are already in this state when I picked them all out using the end of my knife!
 Once all of the old material has been picked-off, I aligned the curtain with 2 rulers so that I am sure that I got the slats as straight as possible and then I taped the curtain to secure it. I work on one edge at a time to make things a little bit more manageable for me.
 New material was cut from a piece of scrap leather. The material I got is red and it is the thinnest one I can get. I think it’s pig or goat leather. It’s thinner than the original leather strips that came with the curtain. A trip to the milliner’s shop or the upholsterer is a good idea, just go in and ask for scraps. Leather is the best material for this, I don’t know if you can use something vegan for this as the property and longevity is hard to equate. Leather is a wonderful material for many things and it’s hard to find a replacement for it. I am a Buddhist so I would prefer a non-animal replacements but I am also pragmatic.
 Here’s how it looks like after I mount it. It’s so nice seeing it and it doesn’t skew as much! See how nice it retains its form? It doesn’t feel as flimsy as it did before the replacement.
Once you are done restoring the shutter, it’s a good idea to lubricate the links with a thin mixture of oil and naphtha . Naphtha will thin the oil and capillary action will take the oil and distribute it evenly along the insides of the links. This is what many people forget to do. You may sometimes notice that these shutters are sometimes shiny when you first see it and that’s due to the oily residue left on the surface of the slats. Remember not to use a lot of oil because an oily shutter is just worse than a dry one! Clean any mess with Q-tips saturated with naphtha and make sure that oil is not seeping out of the links. Too much oil will also result in oil spatters on your film and lens. While this is an extreme case, it’s something that’s not far from impossible.
Conclusion:
That’s about it for the insides of the Contax 2! Gather all of your notes and prepare your tools and gather all of your patience for the reassembly. Reassembling everything is not a complicated task but there are some things that you will need to consider.
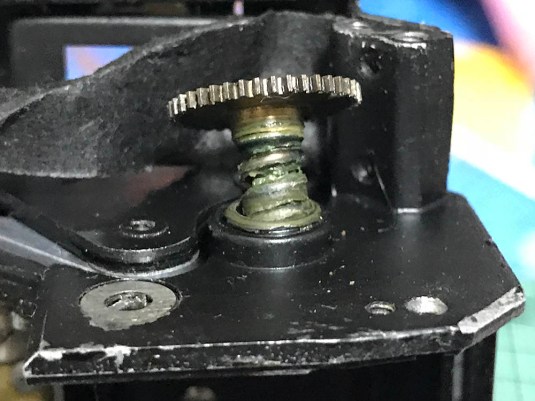
 This is the spring for the curtains and they help the lower curtain “cap” to the upper one when you wind the shutter. If your shutter isn’t capping properly and it falls as you wind the shutter then this is the first place that you should look. If this thing is damaged or the tension is not enough, simply remove this and then carefully bend near the outer edge of the 2 holes. Bend it ever so slightly as you don’t need too much tension or the shutter will not separate when it hits the brakes at the ramp. This is a very delicate operation and it’s really not necessary unless you have to.
 Reassemble the lower roller and tense it by turning the pin. Remember to use the special tool that I asked you to make as it’s crucial that you don’t deform the head of the pin. Just tense it a bit so you have some tension and then lock it by hooking the head with its hook and then tighten the screw of the hook. Notice that the head of the pin is oval, the curve of the hook is filed to shape that will fit the oval head of the pin perfectly so make sure it is a perfect fit! To make sure that the lower curtain doesn’t lose any tension while you do the business of securing it with the hook, press on the pin using the special screw driver and apply constant pressure. While you push on the pin, lock the hook to the pin’s head and tighten the screw of the hook. This will take several tries if you are new to this. It can be frustrating at first but you will get the hang of it. You will need some tension so that it is possible for you to proceed on the next step. Turning it counter-clockwise will tense it.
 When putting the shutter back, just follow the steps in part 2 on how to reset the shutter the shutter’s clockwork. Resetting the shutter simply means that you will put the shutter back to its state RIGHT AFTER an exposure was made. While all the cogs are reset, install the upper curtain and secure its pin with a strip of tape. Make sure that 1/1200s is set in the shutter speed selector (left-most/last notch, counter-clockwise) and wind the shutter. You should get a slit that’s about 1.5mm wide or about the same width of a single slat. If you got it right then wind the shutter again after firing it and see if it’s consistent. This is the size of the slith at 1/1200s. If I recall, 1/1000s should be about 2mm.
 This is an illustration of the inner surface of the rear casting. Notice that there are 2 rails here. These are parts of the shutter mechanism casted on the rear casting. These rails are there to push on the curtains so they will always stay in-place and latch together. These 2 rails are sometimes lubricated by a very thin layer of oil by some people. I just polish the rails to a very smooth finish while taking care not to remove too much material. A cotton cloth with metal polish is more than enough to polish it to a near mirror-finish. If you’re testing the shutter without the rear casting installed, you will need to place your fingers near the shutter to simulate what these rails are doing so your shutter won’t fly out and not latch together when they meet. Since this is an important part of the shutter’s design, I suggest that you reattach the rear casting when testing your shutter so you will get real accurate results. Calibrating your shutter without this installed is pointless anyway.
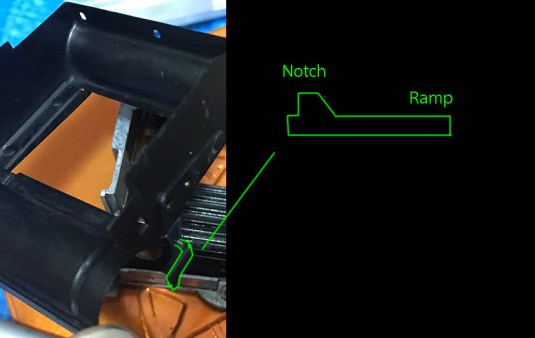 Pay attention to this picture and see the small tab on the protective cover/baffle. That’s a very important part of the shutter. There’s another of these on the opposite side but that is screwed to the shutter frame. These 2 are ramps that guide the shutter as they travel up and the notch act like a brake to help stop the lower curtain so it will disengage with the upper curtain. The lower curtain is then held by a big hook. Never mess around with the screw of the hook, that’s a cam that will adjust the height of the hook. You will end up with a malfunctioning shutter if you got it wrong so just leave it alone.
Apart from the rails you see at the picture above, there are 2 more guide rails found near the center of the shutter frame. These 2 are very delicate and it’s best to leave them alone apart from cleaning them carefully. The shutter is a very clever design it’s hard to think that this design was conceived in the early 1930s!
Now that the shutter is working, it’s time to test and calibrate the tension of the spring! It is tedious because you cannot really do much to affect the curtains independently, both curtains travel as a single unit in this design but don’t worry, it’s easier to work with this than say the newer cameras from the 60’s. The important thing is to get the speed right at 1/25s and every speed should follow properly. Sounds easy, right? Well, there’s more to it!
The prerequisite for working with shutter calibration is to have the right tester. Use one with at least 2 sensors, one for each end of the film aperture. Now, this camera’s shutter travels vertically so you will need the sensors to be vertically-aligned with one at the top and another at the bottom. This is important and if you don’t have this then forget about it until you find one!
Test the shutter at 1/25s and then see if it’s traveling too fast or too slow. Since we gave it just a little bit of tension in the previous step, chances are your shutter will need to have its tension upped a bit. To do this, press on the lower roller’s pin with the special driver and then unhook it. Make sure that you keep pressing on the pin or else you will lose all tension and your back to the point you started! Now, turn the pin counter-clockwise by a half revolution or a full revolution to tense the shutter up. Lock it with the hook and then do another series of tests at 1/25s. Repeat the steps and add or decrease the tension of the lower roller as you see fit. Repeat these tedious steps until you’re satisfied.
Now that you’ve got 1/25s working, check on all of the faster speeds. You should get them all spot-on except probably for the fastest one. If the fastest one isn’t working properly or the rest of the faster speeds aren’t accurate then clean the cogs and again and apply oil to the important cogs. Repeat and see if it helped. As far as I am concerned, I had to clean it until I got the speeds really close, to my satisfaction. Remember that these cameras were made before the war and they have no accurate way of testing the shutter so if you get a little off from the desired results then accept it as satisfactory. So long as it’s not so far as more than 1/3 of a stop off then it’s OK. I got mine to be pretty close but not perfect! I can get my Nikon F to be spot-on on almost every speed right down to 5% with patience but I cannot expect this camera to perform the same since it’s of a way older vintage.
 Before you put the camera back together, leave out the top casting and the front bezel so you can adjust your rangefinder. Vertical adjustments can be done by using shims under the cylindrical prism. This is usually not necessary as the vertical adjustment is almost impossible to knock-out of calibration. The horizontal adjustments can done by nudging the prism assembly left or right after you loosened the 2 screws securing it. Alternatively, you can also adjust it by loosening the screws of the prism’s frame and nudging it. Please see part 2 for more pictures related to the rangefinder assembly. Also read what I wrote on the Nikon S2 because adjusting the rangefinder of both cameras involve similar if not identical principles. The short story is you will have to adjust it while the rangefinder is focused to infinity and then nudging the prism a bit to make the rangefinder patch align.
Be aware that you should do the rangefinder adjustment only after you have reinstalled the helicoid. If the image at infinity is off by a lot the first time you check then you have reinstalled this incorrectly and you should backtrack a bit. If you reassembled it properly the image should not be off by much and it’s just a matter of fine-tuning the rangefinder to get things as perfect as you can. Remember that you should get as close as you can, it’s very important because if you got it way-off at infinity then all of the distances engraved in your scale means nothing and you’ll end up with a camera that cannot focus correctly.
 Here’s the proof! Everything looks OK! All that hard work certainly paid off after seeing this for the first time. This camera will certainly out-last me and will still be shooting film as long as it works. It’s just 20 years before this camera turns 100 and I am sure that this will still be shooting a long time after that! Just imagine the history this camera has!
That’s all for now. I would like to write more about this camera and I will add more later as I remember more details about this. I also welcome corrections from my readers since I am not an expert on the Contax. If you found anything wrong, please contact me ASAP! I don’t want my blog to propagate wrong information so please chime in. Thank you all for supporting this blog. If you think this is useful, please don’t forget to share this with your friends. If you want to buy me a cup of coffee or a burger from Mac’s, you can do so by donating to the blog. This will help ensure that I am awake and nourished enough to write more articles in the future. A malnourished amateur repairman is no better than a Contax with broken ribbons. See you guys again next time for the Nikon S article! Ric.
Help Support this Blog:
Maintaining this blog requires money to operate. If you think that this site has helped you or you want to show your support by helping with the upkeep of this site, you can simple make a small donation to my paypal.com account (richardHaw888@gmail.com). Money is not my prime motivation for this blog and I believe that I have enough to run this but you can help me make this site (and the companion facebook page) grow.
Leave me some tip?
Thank you very much for your continued support!
$2.00
Helping support this site will ensure that this will be kept going as long as I have the time and energy for this. I would appreciate it if you just leave out your name or details like your country and other information so that the donations will totally be anonymous it is at all possible. This is a labor of love and I intend to keep it that way for as long as I can. Ric.

Jul 16, 2020 @ 05:05:23
hello, I have one Contax II from 1936. There is one ribbon which is broken. Is it possible to repair this by you? How much it will be costs?
Best regards
J. Kurzaj
Mar 15, 2021 @ 13:55:02
Very well done. I have repaired cameras all my life very successfully. I am still doing it at the age of 76. Many times I wished I took the time to record my work but did very little of it for lack of time. A huge pile is waiting for me as I write this. I enjoin your detailed instructions. As you suggested, this is not a job for a non camera technician to attempt, at least not to this depth. Thank you .
Aug 24, 2022 @ 19:25:15
Warning for anyone working on this: be careful with Oleson’s instructions, particularly with the second curtain roller tension. Mr. Oleson says to give it 15 revolutions after reinstalling, but that might have meant 15 HALF revolutions. I ended up having to disassemble the curtains again because it turned out my replacement ribbons were too thick, and upon doing so I noticed the spring action on the second curtain was different from what it was before I tensioned it. Took it apart, and found the middle spring an absolute mess. Now I’m trying to figure out whether I can fix this without *really* taking it apart (as in removing two springs entirely, which would be a headache on it’s own later for reassembly).
Dear everyone: a revolution means a 360° turn (not so in Mr. Oleson’s notes, apparently). Please keep this in mind if you ever write instructions for something like this.
*I AM thankful to Mr. Oleson for taking the time and effort to upload instructions detailing how to work on lots of different cameras, which took him many years to develop and perfect. It’s just that the sight of the messed up spring pisses me off lol