
Hello, everybody! How have you been? It’s been a long time since I published anything, I have been really busy at work writing code for our new motion-capture pipeline at the company. The current one was too complicated and the code was too bloated so the guy I am working with couldn’t maintain it. I was tasked to write some new tools with Python and I suggested to make the code simpler. In a production environment the decision to go simple is a wise one because if things go wrong things can easily be fixed and you can also expand your program when you need to. I used to work more on the creative side as an artist so I know what should work and won’t. I drew this inspiration from Nikon and I will show you one example in today’s article where this philosophy was implemented!
Introduction:
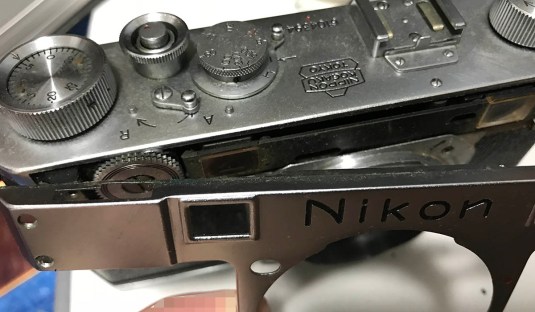
This series is going to be special because we are going to talk about the Nikon S! This is a very special camera because this camera is Nikon’s first 35mm camera design. It’s just an update of the Nikon I/Nikon M models that came earlier and you can consider them to be the same camera in most respects because the differences aren’t that great. This is the camera that started it all for Nikon and it can be considered as one of the most important Japanese camera design ever. Many “experts” consider this to be a clone of the venerable Zeiss Ikon Contax 2 but I will show you that that’s not really the case in this series and I will also make a video about that so please watch it later in this article!
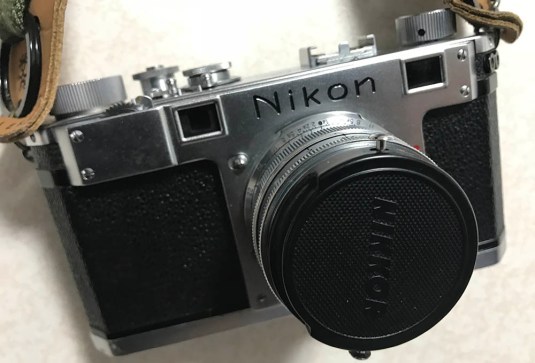 The Nikon S is a very sexy camera. The straight lines give it a brutalist profile and it gives this camera very solid feel in the hand. Its heft also gives you the added confidence to use slower speeds than usual because the weight will somehow give your setup stability. This is a serious tool for professionals and it earned its reputation in the harsh Korean winter fighting during the Korean war. I can confidently say that you can maul a person with a well-placed whack to the face with the bottom of this camera. Yes, I am serious.
The Nikon I (used to be just “Nikon”) is Nikon’s first consumer camera design. The design was drawn right after the war and it was sold in late Spring 1948. It had a rather odd size or format of 32×24 when people are used to 36×24 (that we still use today). This format is called the “Nippon format” and was designed so that it would frame better with common paper sizes available locally here in Japan. In order to target the international market, it was redesigned to have a 34×24 format and a few minor improvements and introduced as the Nikon M. These 2 early models were not sold in large numbers and were only sold for a short time and are now considered to be highly-collectible. The final iteration is the one we are featuring here, the Nikon S.


This camera is not a copy of anything (not directly, that is) but a hybrid of two venerable design paradigms for 35mm cameras, it gave us the best of both worlds. While some hate the Contax 2’s quirky handling, many people prefer using it (including me) but wouldn’t want to put up with a shutter that’s overly-complicated and prone to jamming if misused. The Leica-type’s shutter is reliable but the camera’s handling can be awkward.
Quick Comparison:
Here’s a quick run-down of the more important aspects of both camera designs. Like a lot of things in life, you can’t have everything in one package.
 To know more about the Contax 2, read this series of articles that I made. Read and look at the pictures to see see how the mechanism looks like and how unique it is.
The Good:
- Ergonomic design, all important controls are at the top.
- Coupled rangefinder and viewfinder in one window.
- Easy to load film via a removable back.
- Focusing wheel for one-hand operation.
- All shutter speeds in one common dial.
- A bayonet mount for quick lens changing.
- Metal shutter curtains to prevent burn-holes.
- Fast and easy operation.
- Nothing moves while taking an exposure.
- A self-timer.
- A very accurate rangefinder due to the very long rangefinder base.
- The rangefinder remains accurate up to 200mm.
The Bad:
- Very complicated camera design to manufacture and repair.
- Fairly reliable but not as reliable as many people wanted it to be.
- Expensive to manufacture.
- Difficult to service shutter.
- Helicoid can turn gritty when not taken-cared of.
- Easy to jam if you’re not careful.
 Read more about the Barnack-type cameras here in this Nicca-3s article. Look at all of the pictures in the article and study how the shutter works.
The Good:
- Very simple and reliable shutter design.
- Easy and cheaper to manufacture.
- Very reliable design overall.
- Easy maintenance.
The Bad:
- Separate coupled rangefinder and viewfinder wondows.
- Slow and annoying to load film, can be an expensive repair if you got it wrong.
- Separate dials for slow and high speeds.
- Slow operation, easier set the high shutter speeds only after cocking.
- High-speed shutter dial rotates when you make an exposure.
- Tiny peep-holes for framing and focusing.
- Short rangefinder base, not very accurate for longer lenses.
- 135mm is probably the limit for the rangefinder’s accuracy.
The above comparison should make it clear to you that the Contax 2 handles much better at the cost of a series of complicated mechanisms. The Barnack-type’s design is known for being reliable but handling the camera needs plenty of getting used to.
The Solution:
Here’s Nikon’s answer, a happy compromise between 2 popular camera designs and lots of new improvements incorporated to make it more reliable. It was so reliable that other camera designs froze in the harsh winters of the Korean War while Nikon’s cameras still work even after all that action. This would cement Nikon’s reputation for manufacturing tough and reliable equipment for the professional photographer at a time when cameras were’nt perceived to be such. I know it sounds funny but the concept of the professional camera didn’t mature up until the late 1950’s to the early 1960’s.
 Nikon incorporated the superior ergonomics of the Zeiss and used Leica’s shutter design for their first camera. While all of the controls are at the top panel, the shutter speeds are still sperated into 2 different dials. The good thing is that both dials are very close to each other so you won’t have to take a look at the front of the camera to see the slower shutter speeds. The mechanisms inside were simplified, making them more reliable and simpler to manufacture or service compared to comparable mechanisms in the Zeiss. If you want an accurate description of this combination, you can say that it’s a Leica trapped inside a Zeiss body. The rangefinder and shutter mechanisms are influenced by Leica but heavily-improved by Nikon in some aspects (most notably, the rangefinder).
 I currently own 4 Nikon S cameras, one of which is the expensive early version with the M initial before the serial number. Contrary to what many people claim, the ones with M in the serial numbers are Nikon S cameras (Nikon M/S). True Nikon M models don’t have flash sync built into the side of the body (they were NEVER synced). The Nikon I model is basically the same camera with a different aperture gate size which is smaller than what we are used to now and is called the “Nippon format“. Nikon had to abandon that format because they were aiming for overseas market which use the standard format what we all use up til this day. Other than that, there are some small variations inside the camera and there are few cosmetic differences that set it apart from the usual Nikon S.
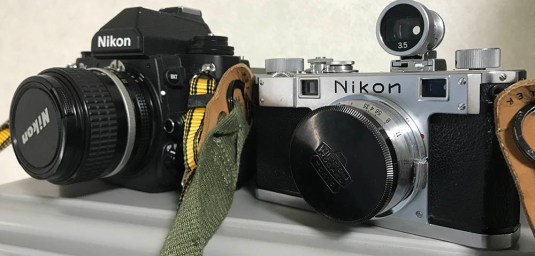 Here’s the Nikon S beside my Nikon Df for size comparison. It is a tiny camera compared to the modern Leicas but it’s still a large camera when you compare it to a Barnack-type camera. The heavy brass construction will need some getting used to for those who were used to carrying lighter cameras. I will admit that my neck hurts a bit after carrying the Nikon S for a whole day. It’s the heaviest Nikon rangefinder as far as I know.
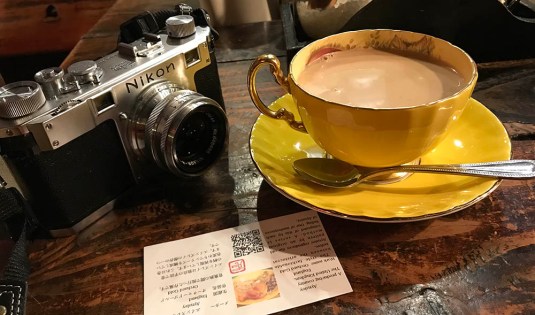 The classic style is at-home with period settings. The classic lines never gets out-of-date, I feel like a classy gentleman whenever I carry this with me. It’s a beautiful camera and it’s a decent camera for daily use. If you’re itching for more expensive German models, why not try using a classic Nikon S first and see if it will satisfy your your need to feel classy.
I hope that this introduction will spark some interest in these cameras because I think it’s a very solid design despite its quirks. These are very underrated machines and if they’re given a good overhaul by a decent repairer, these cameras are a joy to use. It’s an easy to service design for somebody competent but this is something that I will not encourage a beginner to work on until they have mastered the most basic of 35mm camera designs, the Barnack-type cameras. If you haven’t mastered this camera then forget about fixing a Contax because that’s a more complicated design. The Nikon S family is a great balance between these 2 camera designs and it’s what I would consider to be the superior design. It has the reliability of a Barnack-type camera without the cumbersome handling and it has the great design and ergonomics of the Zeiss Contax 2 without its complicated design for the shutter and rangefinder.
I’m writing this guide not to encourage people to do their own repaird but I want people to understand how much effort it takes to make a classic camera work properly again. I hope that people don’t start opening and butchering these valuable cameras because it’s such a waste and if I can’t encourage you to let a professional repair this then I hope that I will at least mitigate any damage that a beginner might make. I would like you to know just how much work goes into servicing these properly and I hope that people will find out for themselves why I charge so much for a complete overhaul of a Nikon S when it’s assumed to be such a simple design. Let’s now begin with the repair article!
Before We Begin:
If this is your first attempt at repairing a lens, I suggest that you see my previous posts regarding screws & drivers, grease and other things. Also read what I wrote about the tools that you’ll need.
I highly suggest that you read these primers before you begin (for beginners):
- Essential tools
- Best practices 1
- Best practices 2
- Best practices 3
- Ai conversion
- Working with Helicoids
Reading these should lessen the chance of ruining your lens. Before opening up anything, always look for other people who have done so on the internet. Information is vague and scattered but you can still find some information if you search carefully.
For more advanced topics, you can read my fungus removal article. It has a lot of useful information, it will be beneficial for you to read this. I also recommend that you read the working with helicoids article since it is very important!
Disassembly (Front):
Before we begin repairing this, be sure that you have good-quality screwdrivers. This is a must because cheap mainland Chinese junk is no good and they will just damage the nice finish of the screws. The screws are an important part of this camera’s character and it’s very important that don’t damage them as much as possible. There’s nothing sadder than a scratched camera or screw due to improper tools and techniques. Make sure that your drivers have the same width as the screw’s head and the thickness should be as close as possible to the thickness of the slot. This is why camera repairmen have multiple sets of drivers in assorted sizes. When removing screws that seem stuck, don’t force it! Just use a drop of alcohol or oil and let that sit for awhile (overnight preferably) to soften it up. It should be easier the next time you try another attempt.
For most people with a proper working Nikon rangefinder camera, the only maintenance you will have to do is to adjust the rangefinder patch if it got misaligned. To do that you’ll have to remove the front bezel/front plate and adjust the vertical alignment from there. I will also show you where to adjust the horizontal alignment in the next section so do not be impatient, we’ll get to that in this article. Another more thing that you can do is clean the helicoids properly. These things can get squeaky as they get contaminated from bad oil and dirt. While we’re at it, you can also clean whatever is accessible to you.
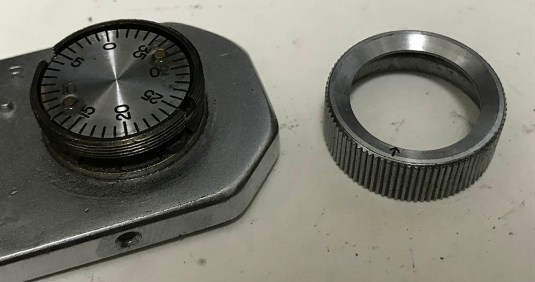
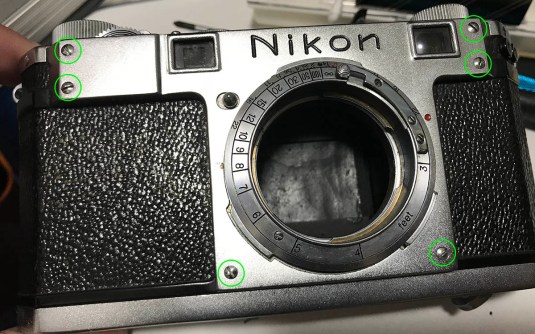 To remove the front bezel, you will have to remove these 6 screws. Take note that not all of them are identical, some of them are a bit longer so you will want to take notes so you will know which one came from which hole.
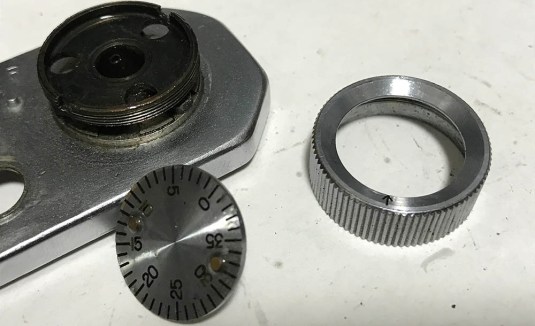
 You can now carefully lift and remove the front bezel but you will have to be careful, the top part interlocks with the serrated focusing wheel.
 You will have to press on the locking lever behind the focusing wheel and try to move the bezel back-and-forth to wiggle it free from the wheel. Note that this step is much easier if you remove the top panel first before you remove the front bezel so you may want take it off first before doing this step, it all depends on your skill and confidence.
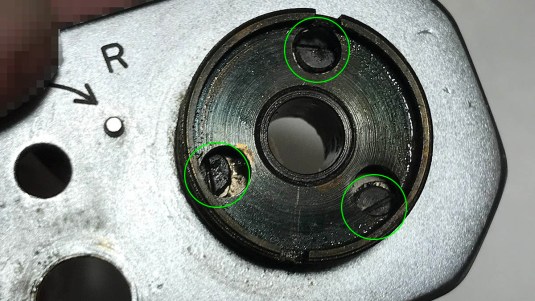
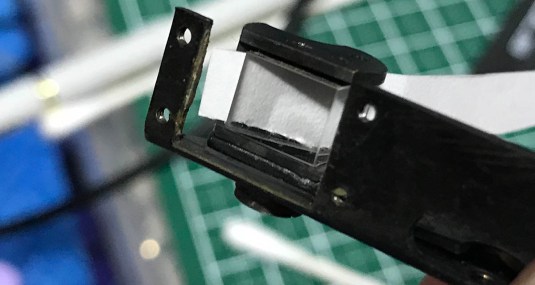
 Once the front bezel is gone, you can now access these 4 screws that secure the bayonet mount. Carefully remove them but be careful not to lose any of the shims underneath the bayonet mount. They’re very important and you will have to put them back the way that you found them. Mine never came with these so I assume that the previous guy who did the maintenance on this camera lost them. I have spare shims from my parts box so this was easily corrected later during reassembly.
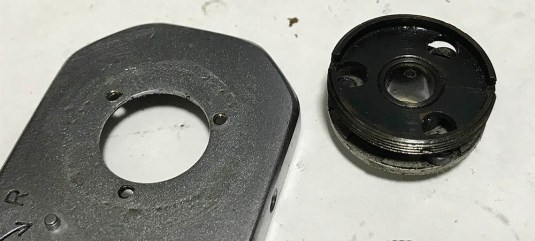
 The bayonet mount assembly can’t be lifted from the camera that easily because you will have to be careful about this lever. It can be easily warped if you’re not careful.
 Carefully maneuvering the whole assembly will enable you to remove it safely.
 The helicoids can easily be separated when you push the lever so the lock disengages. It’s very important to mark where they separate, mine separated at this point. Remember it carefully because this is also the same point where they should mate.
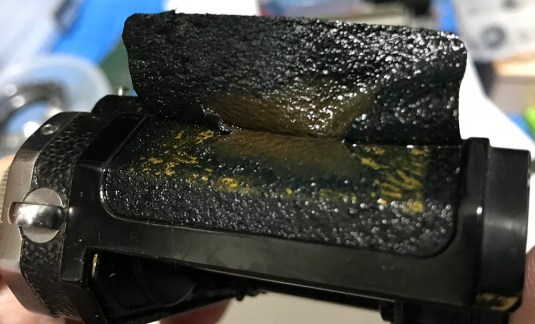 There really is nothing to be gained by removing the front leather (yes, it’s real leather). I will advise you to leave that alone unless yours needs to be replaced. It’s difficult to get it off without damaging it somehow so be prepared. I saturated it with alcohol to soften up the adhesive used on this thing then I carefull peeled it off.
This is just the beginning. Like what I mentioned, removing the front bezel will be easier if you remove the top panel. If you want to clean it really well or do a thorough job it will be best to remove the top panel so you can access what’s inside. I will show you the way to remove the top panel in the next section.
Disassembly (Top Panel):
Here’s where things get more interesting. Aside from using the proper drivers, you need will to have a friction wrench in order to remove the top panel properly. While the steps aren’t difficult at all you will need to pay attention to what you remove and take plenty of notes and pictures. Some of the parts here are glued or just stuck from decades of dirt and hardened toe jam. If that happened then just go at it slowly or drop alcohol on all of the screws and get back to it the day after. As always, use the right-sized driver so you’ll avoid scarring the screw heads and end up with an ugly camera. While this is sometimes not avoidable you will want to prevent something like that from happening at all cost.
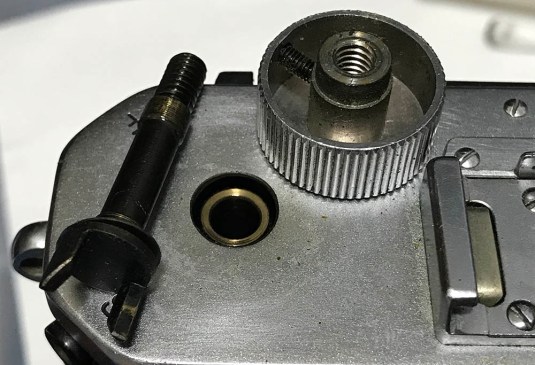
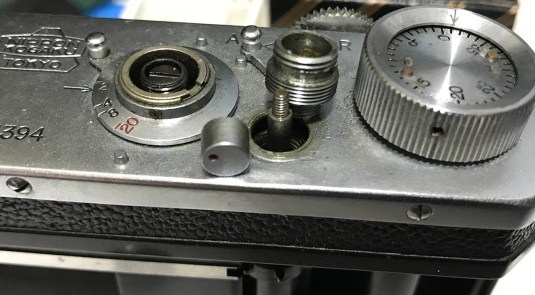
 The rewind knob can be removed by loosening this long set screw. You don’t have to get it off but it really doesn’t matter since it’s easy to put it back. The eyepiece should be left alone, you cannot remove it without special tools so don’t bother. I used a flex clamp for removing the eyepiece. They are stuck but can occasionally get lost (like mine).
 Once the set screw has been loosened enough, grab the rewind fork with your fingers or jam it with a pair of disposable chopsticks. Unscrew the knob until it comes-off. If yours is stuck, you may want to use a pair of rubber gloves to help you grip it or make sure that the set screw is not getting in the way. Don’t forget to take notes and pictures of these, it’s always important to take notes because these usually come with washers and springs. It’s important that you put those small parts back where they should belong after cleaning it.
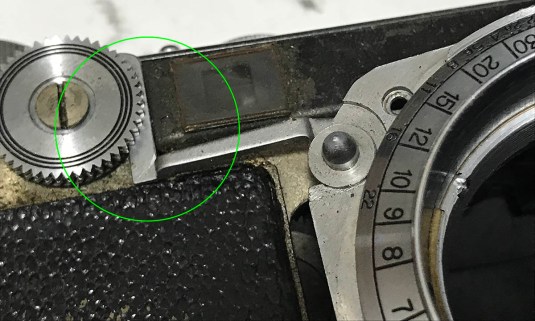
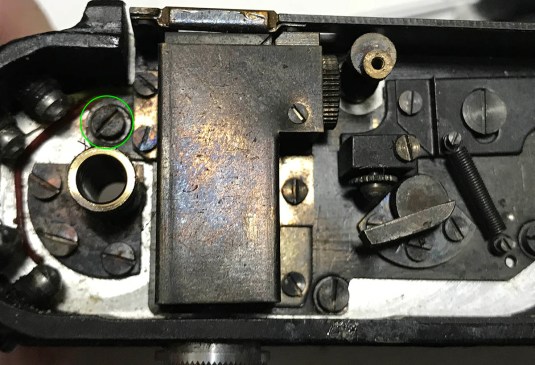
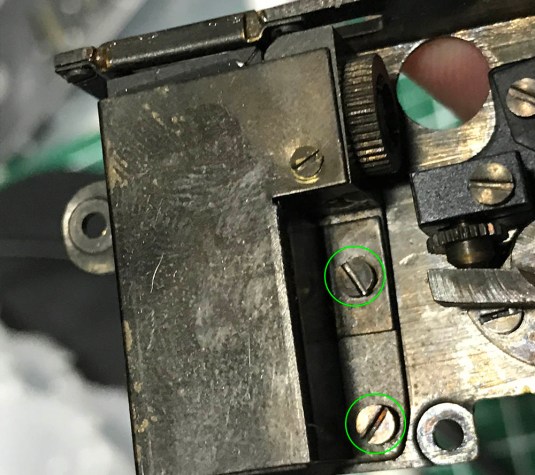
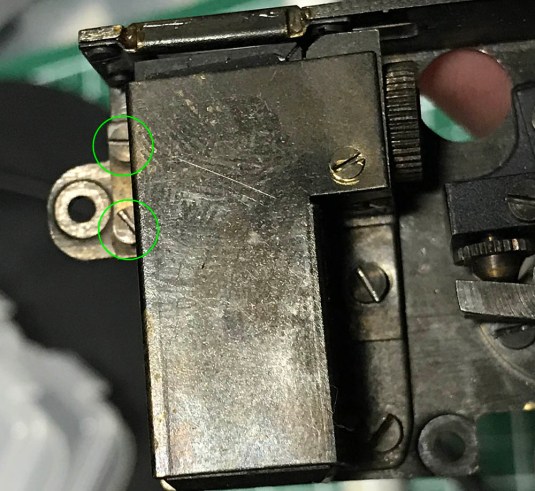
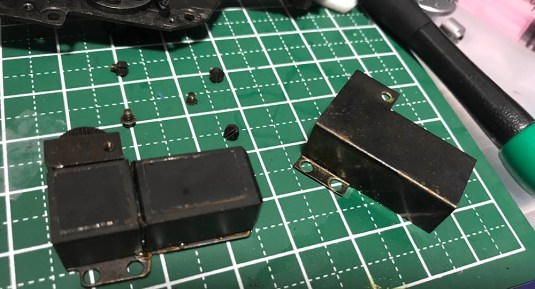
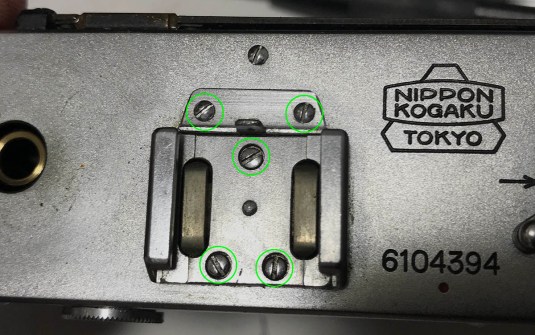 There are 2 panels here. The smaller one at the top can be removed so you can access the cog for adjusting the horizontal alignment of the rangefinder. The bigger one also serves as an accessory shoe. You should remove these 2 panels by unscrewing their screws.
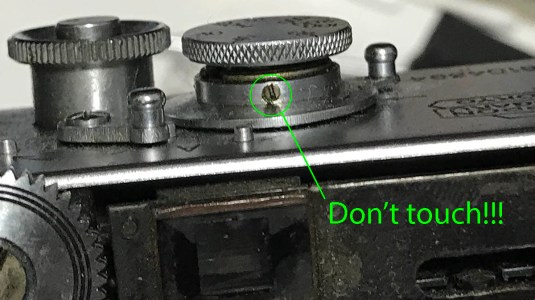 Whatever you do, don’t ever loosen this screw or the one opposite to this. The dial for the slow shutter speeds’ adjustment will be affected if you did that.
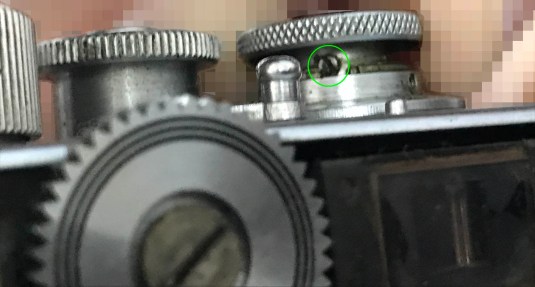 The dial for the high shutter speeds can be removed by unscrewing this set screw. This is hidden so you will have pull the dial up to reveal it and then turn it so that it’s aligned to the small gap at the collar of the slow shutter speeds dial. This will give you a little bit of space so you can safely remove the set screw. You will have to remove this screw because it will snag when you try to unscrew the shutter speed dial. It can be a bit difficult to put it back but we have no choice in this case.
 The dial can then be unscrewed. Be careful when removing this because it’s connected to the rear rear curtain drum.
 The shutter guard can be easily removed with your fingertips. There’s nothing securing it so you can occasionally find cameras missing this important part.
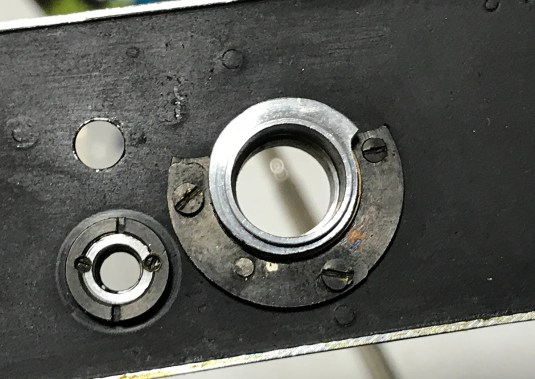
 Once the guard/collar is gone, you can now use a flex wrench to remove the plunger. It’s simply screwed to its base so it should be easy to remove.
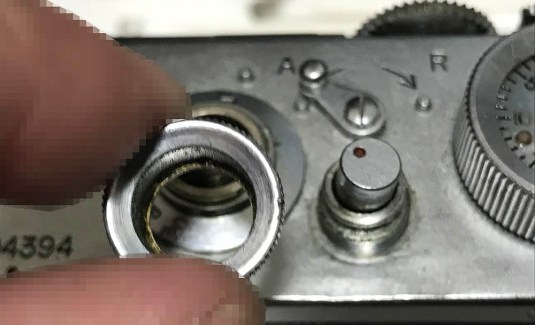
 Here’s how it looks like when you unscrewed it. That threaded collar shouldn’t come-off easily but mine did just that. It’s secured with a small set screw at the other end but mine didn’t have that (at least for this camera). There’s a thread and a screwhole present but it doesn’t have the set screw there so I guess somebody misplaced it long ago.
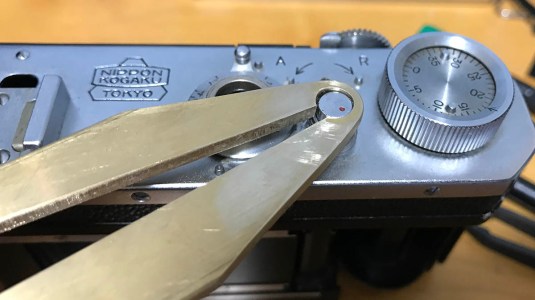
 The A/R lever can be removed by unscrewing it. Be careful not to scar it.
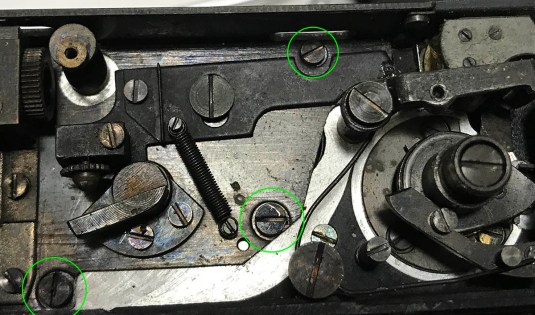
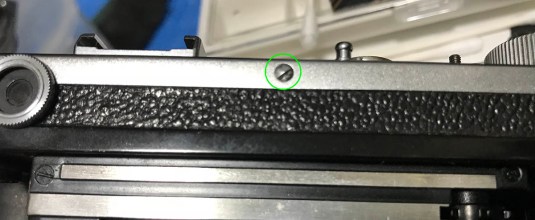 The whole top panel is being secured by these screws. I think there are 5 of these around the lip of the top panel. Carefully remove these using the correct type of screwdriver.
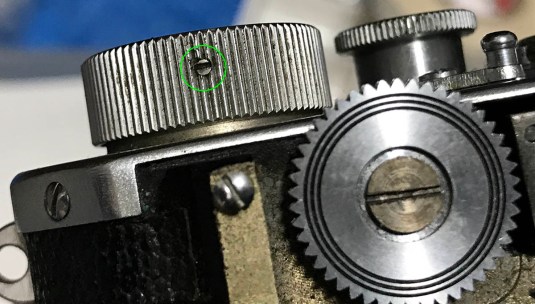 The advance knob is being secured by this small set screw alone. Remove it carefully so you can unscrew the big knob’s ridged dial. I must mention that removing this knob isn’t a necessary step in order to remove the top panel but removing it will make things easier later. If you are unsure then I will recommend that you remove the knob later removing the top panel first so you can grab the other end of the knob to give you a better grip.
 This is how the advance knob comes-off. It can be difficult to unscrew at times because it is jammed with old oil and dead skin cells. If that thing happened, don’t force your way, it can easily be cross-threaded. To free this when it gets stuck, you will have to remove the whole top panel assembly and grab the other end with a rubber glove and try to unscrew this with steady pressure. If that didn’t work, just put some penetrating oil or gas and just wait for those to soften the gunk before you do another attempt.
 The frame counter dial can then be removed by picking on its underside with a pin. The dial itself is held in-place by friction so you will have to put a little bit of effort to remove it if yours is stuck. Whatever you do, don’t scar the engraved face of the dial.
 The advance knob’s can be removed by lining-up these holes to the screws underneath. I would advise you to use a good set of drivers when removing these as they can be tough.
 The advance knob assembly can be removed just like this after the screws are all gone.
 You can further disassemble it like this. It separates once the cog underneath it is free. It has a small set screw securing the cog if I am not mistaken. When putting this back, don’t forget which side should be facing up when reinstalling that disc-spring.
Clean all of the parts very well, I am sure that you will find lots of dried gunk and crap at the places that can’t be reached by cleaning. Use alcohol or whatever you have. You can’t clean it very well unless you killed the germs here so the sun’s radiation will also help. It is a good idea to use an ultrasonic cleaner if you have access to one. Some of the dried-up lubricants can only be dissolved with a petrol-based solvent so use caution when this had to be done. Camera repair is a field that requires you to be exposed to strong hazardous chemicals and the best way to negate that is to use proper protection and ventilation. It’s not my business if you get sick or hurt while following this blog because you didn’t take any preparation when handling hazardous substances.
Disassembly (Rangefinder):
For most people, this is the point where things get really serious but thing are just getting started for me when I get to this point! The rangefinder usually gets dirty and will need to be cleaned thoroughly. It’s not difficult but it can be daunting for beginners and some experienced repairers who aren’t familiar with this camera but don’t worry because I am going to guide you step-by-step! Be very careful when working with the rangefinder.
 The rangefinder assembly can be removed by unscrewing a couple of screws, here’s one.
 Here’s another 3. The whole assembly is being secured by these 4 screws. The pivots for the rangefinder’s armature is clearly visible here. You should clean it very well and use a very small amount of oil to lubricate the pivots. Never use too much oil on this part.
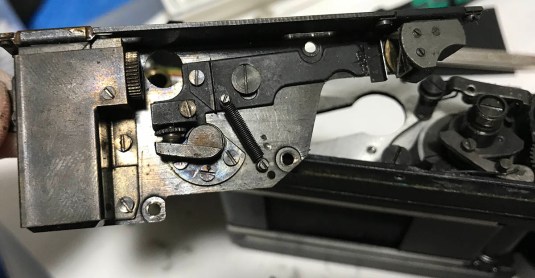 The whole rangefinder assembly can be removed as a single unit. You will have to press on the rangefinder coupling lever to help position it so that it won’t get caught when you try to remove this assembly. Remember, if it didn’t come-off easily then something from the rangefinder assembly is getting caught so go about slowly.
 Here’s the arm of the rangefinder. This should be cleaned as much as possible. The wheel can be removed by unscrewing the big screw that’s securing it. This assembly needs to be as clean as possible so your focusing will be smooth since this is one of the things that is adding resistance to your helicoid as you turn it.
After flushing all of the yucky stuff here, apply a very small amount of oil at the pivots. It should move freely in order for the rangefinder to move smoothly.
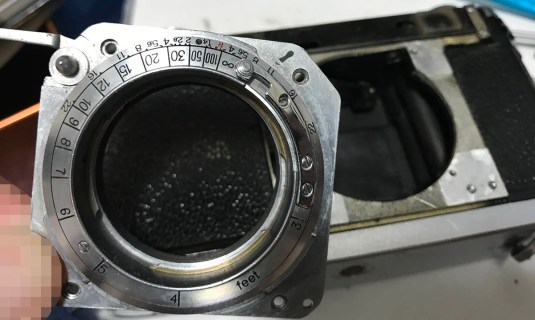
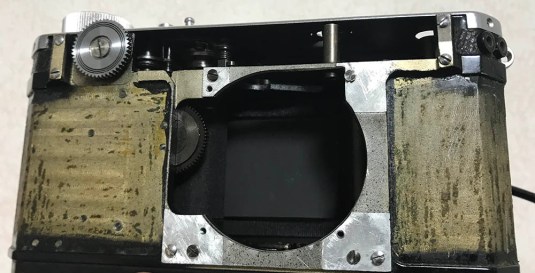
 The whole optical block (consisting of prisms) can be removed as a single unit. It’s being held by 4 screws, here’s 2 of them.
 There are 2 on the other side as well. You see that serrated wheel? That’s the vertical cog for adjusting the vertical alignment (Y) of your rangefinder patch.
 The optical block can be picked up as a single unit just like this. Be careful not to drop it!
 You can clean it if you wish but opening it to this state is not necessary. I would even ask you not to do this because the cover is usually glued to the glass so forcing it will remove the silver from the glass and you will end up with a damaged finder. I only removed this because I felt that the glue has dried-up so there was no risk in doing this.
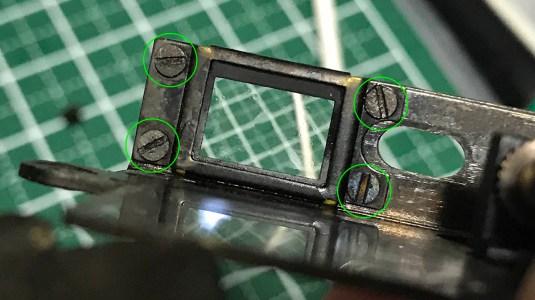 The frame for the viewfinder window can be removed by unscrewing these 4 screws. It’s not necessary to remove this in order to clean the glass but you all know me and I had to do this so I can clean it very well. If you cracked the glass, you can replace it by cutting a replacement out of very good quality microscope slides.
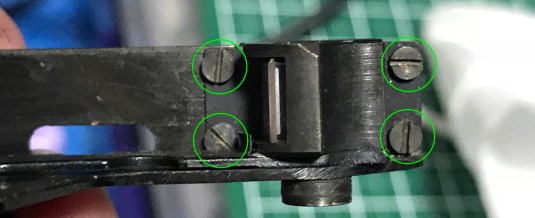 To thoroughly clean the rangefinder prism and its protective glass, unscrew these so you can remove the frame that’s holding its glass cover.
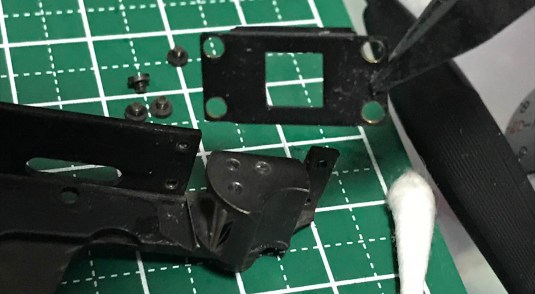 Carefully remove the frame along with the glass using a pair of tweezers. Make sure not to accidentally scratch the prism block as it’s very delicate.
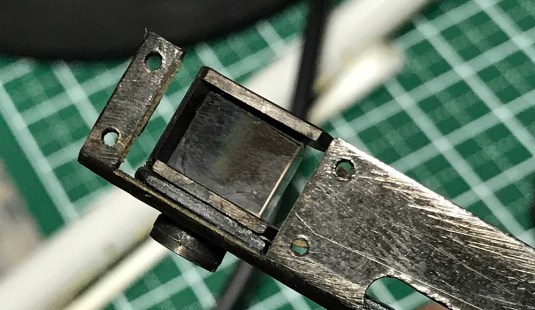 Carefully clean every accessible face of the prism. This one has some fungus damage but I cleaned it as much as I can so it looks great now.
 The inner surface of the prism is the hardest surface to clean. To get to it, you will need a strip of stiff paper. Make sure that the paper is clean and saturate it a bit with solvent. It is important that the strip of paper fits properly because it may dislodge the prism if it’s too tight a fit and it won’t do much cleaning if it’s too narrow. You will have to do this a couple of times until you are satisfied that the prism is as clean as possible.
That’s all for the rangefinder. I will show you how to adjust it in another article when it’s time to put things back and finish the overhaul. The screws here aren’t all identical so it’s a good idea to use a parts organizer or stick the screws to a tape to group them properly. I’m not sure but I think that nobody on the net has tackled this subject for the Nikon S so I am proud to be showing this to you.
Conclusion:
We’re just at the end of Part 1 but it already feels like a lot of work. Trust me, this is going to be a long series. I will show you what’s going on and how much effort is needed just to make a complete overhaul of this camera. If somebody charged you $450 for a complete overhaul of this camera to the extent that I am going to show you in this series then you can consider that cheap. I sure won’t be doing all this for that amount of money. I am not saying that I am an expert but I am going to expose myself to chemicals and use plenty of my personal time for this so I may as well charge something decent for this level of work.
I will mention a few things in this section that’s relevant to what we did in this article. It is not a good idea to simply gloss-over the pictures and assume that what’s needed to be done can all be followed using the pictures. There are also things that I forgot to mention so I will be mentioning them now in this section.
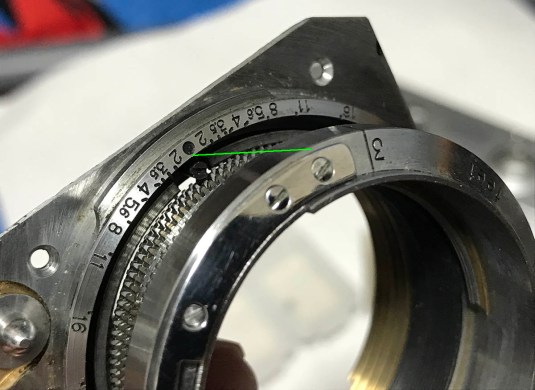
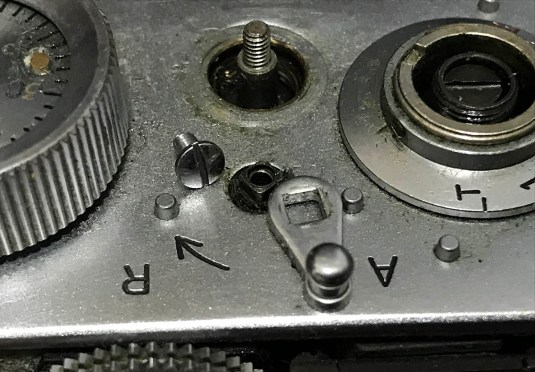
 Please resist the urge to mess around with these screws. You don’t need to remove these, they’re for securing the slow shutter speed dial. I’ll show you how to adjust it next time.
 My camera’s leather is a mess and they had to be replaced. I removed the old material as much as I can so the replacement material will have a good surface to attach to. I had to use a brass wheel-brush with my Dremel to do a thorough job.
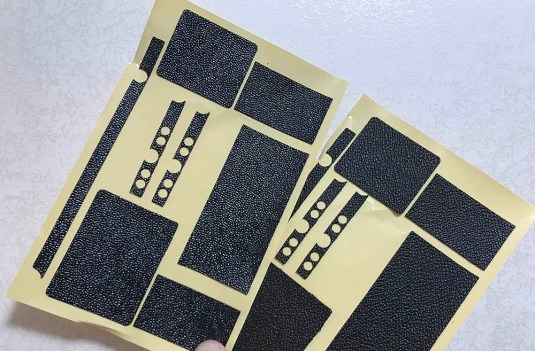 The replacement material came from Asahi-san, they fit perfectly but the material isn’t as thin as the original goat leather. It’s probably 0.35mm thicker and the pattern looks a bit different from the original but it looks very close. You won’t see the difference unless it’s in front of your face! I suspect that the adhesive-backing is what’s making it thick so you can also try removing it if you wish. These are made from real leather, too.
 My helicoid feels a bit gritty so I had to lap it. I don’t have any fine lapping compound at that moment so I used some jeweler’s rouge. This may be too abrasive for what we need but I had no choice. You can also use metal polish if you want but that’s going to take lots of time. You don’t want to overdo this because you want the tolerance to remain tight.
 After turning the helicoids a few times, you will see excess material come. Clean these up and continue lapping a bit more. Don’t apply too much abrasive or the helicoids will get stuck and that’s going to be a big problem. Once you are satisfied, clean this very well. It’s very important that you don’t leave any abrasive on the helicoids. Dry them up and try a quick test by mating them together and see if they feel smooth. If you lapped these more than needed then you will feel the helicoids wiggle a bit. It’s best not to overdo this.
That’s all for Part 1! I hope that you enjoyed this article because I’m going to write more for this series. This is a very important series because nobody is talking about this thing and most specially its repair anywhere on the net. This is a very lovely camera and this series will help introduce this camera to more people and inspire collectors to just shoot with these cameras. These are very underrated machines to say the least.
Please come back again for the next installment. I will try and update this as soon as my schedule permits. Writing original content is never easy and it takes plenty of time. This is the reason why I am pissed when people just re-blog my work without my permission. There was this blog that’s doing this and there’s nothing I can do to prevent that. Don’t go out stealing other people’s hard work, that takes away the valuable clicks from my blog. I intend to make this blog self-sufficient so if you keep on doing that I might as well stop it. I’m sorry for the rant and I don’t want to end this article in a bad mood but I just have to say this because it has been happening for some time now so I hope you will understand me. Maybe I need a shot of gin to cool me up. See you guys again next week, I’ll promise that I will be in a better mood next time. Ric.
Help Support this Blog:
Maintaining this site requires resources and a lot of time. If you think that it has helped you or you want to show your support by helping with the site’s upkeep, you can make a small donation to my paypal.com at richardHaw888@gmail.com. Money isn’t my prime motivation for this blog, I believe I have enough to run this myself but you can help me make this site grow.
Leave me some tip?
Thank you very much for your continued support!
$2.00
Helping support this site will ensure that it will be kept going as long as I have the time and energy for this. I’d appreciate it if you just leave out your name or details like your country’s name or other info so that the donations will totally be anonymous. This is a labor of love and I intend to keep it that way for as long as I can. Ric.

Jun 04, 2023 @ 21:50:50
Bless your soul, been contemplating getting into rangefinder prism for about a year now.. still not sure if I should or not.. cmeraseems to work fine.. took self portraits last summer.. camera works very good with weston master 4 meter and open aperture all way open and 5.6 or so got decent selff porait withou tripod.r
Jun 15, 2024 @ 23:17:18
Hi Richard,
This is unbelievable. Such a work of love. I have my dad’s S and it works perfectly except the viewfinder is so dark it is very hard to focus. I had it repaired maybe 20 years ago or so in West Palm Beach by “Photo Equipment Service Company” it says Napet on the small sticker placed in the film roll chamber. The shutter curtain was replaced.
I need the viewfinder to be cleaned or replaced. Very hard to see through. Can you or do you know of someone who can fix this? I do not have any mechanical skill nor tools. I would buy another S for parts but that seems cruel. Any thoughts? I figure this repair would be expensive but worth it for me.
Mauro Diez, nick name Frank
In Orlando
Jun 28, 2024 @ 21:10:24
Hi Richard,
thanks for your skilled and accurate tutorials. I just received a Nikon S – apart from manky shutter curtains, its rangefinder doesn’t work. The “roller” inside the lens mount doesn’t follow the lenses’ cam, and when I move it by hand, the rangefinder spot doesn’t move.
Is the roller/cam follower spring loaded, and where’s the spring? Can you please give me another hint what might be blocked?
Thanks
Robert