
Hello, everybody! How are you today? It’s Summer here and my head is painful from the walk this afternoon under the sun. I feel dizzy as I write this article but I really wanted to finish this one for you tonight. It feels like my vision is blurred, it feels like I was looking-through a fast telephoto lens! A fast telephoto is great for many things such as nice bokeh and subject isolation. Today, we are going to see a very important Nikkor that people can agree with me as being one of the best lenses produced in the 1980’s.
Introduction:
The subject of this article is no other than the legendary Nikkor 180mm f/2.8 ED Ai-S! It’s a very good lens and it is the successor to the excellent Nikkor-P.C 180mm f/2.8 Auto. This lens had a rather big task, to out-perform its excellent predecessor which is considered to be quite an excellent lens even by today’s standards and this lens did just that. The optics were designed from scratch and the then-new E.D. glass technology was implemented to the optics to give it better performance. It did improve the slight color-fringing that you can sometimes see while using the older lens design but sharpness and rendering were left nearly the same as far as I can tell. I am not a technical photographer shooting plants or bricks and masturbating to the results at my monitor so you will probably get concise answers elsewhere. I use my lenses and enjoy them as-is, taking notes on my impression while using them and remembering details that matter in real-world use. With that said, I will say that this lens will still give you a big smile each time you use it because it’s just that good and I can guaranty this to you unless you got a lemon for a lens.

It was built tough with all the metal parts in-and-out of the lens, you can feel the quality just by holding it in the hands. It is quite hefty because of the big glass so it’s going to be a very stable setup no matter what camera it’s mated to. This is very important, the long 180mm focal length will be a bit tricky to steady when you are shooting this hand-held since the weight is going to help you stabilize it to some extent. You will also want to shoot it with a shutter speed that is no-lower than 1/200s to prevent blurry results or so they say. This is not a rule but a guideline that many people follow. It just means you shouldn’t use a speed that is lower than the focal length of your lens. This is more relevant for the SLR because the mirror is going to add some vibration to your setup. I skip this guideline when I shoot with a rangefinder because there’s no mirror to shake my setup. This lens also comes with a built-in hood, it is very useful and convenient since you won’t need to carry a separate shade for this.

The lens is a bit smaller than its predecessor which is a big-fat lens. This is very good and it will make this lens a bit easier to carry all-day. The older lens was made tougher in my opinion because of the thicker metal but this doesn’t mean that this lens was made weak. It’s still going to out-last many of the plastic lenses made in recent years. This had a long production run from 1980 to 2005 and it was still being made even though the AF models that replaced it in the catalogs went through several versions. This just proves how good this lens is for Nikon to keep it in the production line for so long. AF is convenient but it’s not everything to a photographer who values rendering more than anything.

Up until now we are only talking about the pedigree of this lens but how does it perform in real-world use? Here are some uninspired pictures that I took with this lens, I shot the samples below this afternoon in the hot Tokyo weather. I took these in haste and I do not have any models to shoot so please forgive my poor samples. Some of the pictures aren’t in perfect focus and I will point those out when I mention them. It was not easy to focus this lens when your subjects aren’t cooperating for a pose so I did what I can. All of these were taken wide-open so the depth-of-field is shallow which made focusing even harder.


(Click to enlarge)
The minimum focusing distance of this lens is somewhere areound 1.7m, this is too long for many people but what do you guys expect from a telephoto lens? The pictures above were taken close to the minimum focusing distance and the pens in the bucket were shot at about 1.8m, you can see that it’s sharp and there is no CA on the metal parts. I took this on purpose because shooting shiny objects wide-open at the minimum focusing distance is one of the ways that I use to judge a lens’performance. If this lens is a dog then we will see plenty of magenta and green near the shiny metal things. The masks of the zebra and the chicken were taken about 2m away, even at this distance I was able to fill the frame. I can say that the pictures are as good as it can get and they’re sharp! The 3 samples above show how beautiful this lens renders and how sharp they are when you nail your focus.

I took the picture the picture above to see how it renders patterns of high-frequency like wood grain and textured metal. The resolution is pretty good wide-open but I think that if I stop this down to f/4 I will get even better results. Again, I didn’t see any “color-bloom” where the focus shifts. This is the power of ED glass! By the way, the term ED is the slang for erectile dysfunction in Japan and this has been an in-joke for photographers here.


(Click to enlarge)
I took the series of pictures above at f/2.8, f/4 and f/5.6 to show how things change as you stop the lens down. The lens shows great performance at the center wide-open, you can also see how nice the character of the bokeh is. It’s smooth and you can’t see any harsh or uneven rendering. The only questionable results can be seen at the 3rd set with the bulbs as the subject, the bokeh feels uncomfortable to me but that may be due to the lines at the background. Repeating lines with the same angles in varying depths can cause this thing to happen. The quality of your bokeh relies largely on how you frame and compose, too.
At f/4, sharpness improves slightly but the resolution and contrast improves greatly. This is not to say that the lens isn’t sharp but the opposite is true, the lens is already sharp at f/2.8 and stopping it down won’t change it by much! You can see this very well at the 2nd set because the subject is flat. The bokeh is still exquisite but the background is not quite as smooth as when it was shot wide-open. You will notice that the depth-of-field starts to get deeper and you can get more things in-focus. I shot 4th set to illustrate this for you. It can be seen that while it’s sharp (but mis-focused, sorry) wide-open, the thin slice of DOF can make things seem soft. I also shot this set because the weave is great for showing any weakness of a lens, it’s also great for revealing how nice things transition from what is in focus to what’s not. This lens is amazing in how smooth it renders as you can see here.
Stopping it to f/5.6 will bring more things into focus and the sharpness / resolution begins to peak at this aperture. This is what you would want to use when shooting this lens at a studio when shooting with strobes. This lens is close to perfection if you know how to use it, because everything is still smooth even at this aperture. It’s very hard to point a finger at what makes it look great but the results are there for you to see.


(Click to enlarge)
Now, let’s see how this lens performs in the real world! I would like to remind you that I was shooting this hand-held and focusing can be difficult with moving subjects so please forgive me for the missed-focus. The lens renders your subjects beautifully, this is what’s going to bring you the money if you’re a wedding photographer. It looks cinematic if you can use that word in this context and the blur is very organic unlike many of the lenses that we see in recent years (ART lens?). The look is very natural which will complement your pretty subjects. The girl in mustard-colored shirt is not in-focus but is still lovely.


(Click to enlarge)
I know that these are stolen shots but I took these to simulate taking portraits at this kind of distance (for head-shots). The pictures of the wind-blown girl and the lolita look lovely despite not being in-focus. They show how nice this lens renders your subjects and make it look so natural. At this focal length, your compression is so flat that you can make nice things if you know how to frame your subjects properly. You can also make them appear skinnier or taller with this trick. The lady with the hat shows how nice this lens separates your subject from the background. This separation is very nice and flattering. Please look at the picture of the lady with the glasses. This picture is in perfect-focus and you can see just how sharp and beautiful this lens is for portraiture. You can see all of the details well and despite being sharp, it’s not so sharp to the point that you will see every pore in your subject’s skin. This is what a portrait lens is all about, it should be sharp but not overly-so that you will make your subjects look like textured plastic (fake). It’s all about rendering and the “intangibles” as I call it. Charts and numbers mean nothing if your lens renders poorly, there’s more to a lens than what can be measured in metrics.
This lens is also great for indoor wildlife photography where you can get closer to the animals and the long focal length can help a lot in blurring your immediate foreground, making barriers such as screens and glass “disappear” when you shoot with the front of the lens literally in front of them. The relatively bright maximum aperture is also great since you will mostly be shooting in under less-then-ideal conditions, just enough for you to shoot with 1/200s with a moderate ISO to prevent blurry photos.


(Click to enlarge)
The lens is amazing, its sharpness is undeniable. The photos to the left were not cropped while the ones to the right were cropped a bit tighter you can see more details. The rendering is nice and vivid, the background is so blurry that you won’t even notice that the photos were shot within a building, with metal parts and concrete.

Photography is similar to hunting, except that you don’t hurt anything and you capture moments instead of lives. They both need a lot of patience, too. Shooting with a manual lens is demanding but also very rewarding, you feel like a skilled hunter once you got a keeper. This is one reason why many people gravitate towards older lenses these days aside from the money one can save.

This is a cropped photo, about 2x to be precise. The contrast looks amazing, rivaling even the best lens currently sold. I understand that having VR and autofocus helps a lot but if you could do without them then this lens will save you a lot of money, enabling you to buy more things.


(Click to enlarge)
I am satisfied and convinced with this lens’ performance for indoor animal photography, it’s superb. I will admit that sometimes I wish I brought a fast 70-200mm class zoom instead with instantaneous autofocus and VR but I stuck to my skills and patience. It’s not as easy as you think, I lost many shots but the few ones that I’ve kept are more memorable because I remember how difficult it was to capture them.


(Click to enlarge)
Luckily for me I have pictures that I took a bit over a year ago when I was testing this at Shinjuku right after I repaired it. You can see how nice the subject separation is and how the compression can be used to your advantage in composition. If this lens has a shorter focal length then the compression won’t be this obvious. This is how you make far away subjects look bigger and “closer” to things that are closer to you, negating foreshortening and its effects. This is how you make the moon look large in your picture, a long lens will have greater compression than say a 50mm lens. This is how you use focal lengths to tell stories and compose your scene so that the viewer will understand it better. I use this at my job for years so I should know.
We have now seen how this lens performs with digital so now it’s time for us to see some pictures that were taken using film. Film has a unique look and it’s going to help us with evaluating a lens better since we see how it performs in 2 different mediums. It also has a unique look that’s impossible to simulate with film, grain looks organic and different to noise and you will never make the 2 match. This is not saying that one is superior to the other, all I am saying is that these are 2 different things. Since this lens was made during the film era it’s beneficial for us to see how it performs with film so we will know what’s on the mind of the lens designer when he made this which brings us closer to the essence of this lens. The pictures were taken using a Nikon F5 with Kodak Ultramax 400. All of the pictures were taken wide-open since I wanted to use the fastest shutter speed allowed by the camera since it’s a cloudy day.

This shot shows how exquisite the rendering of this lens is. Notice how nice the character of the bokeh is, it’s polite and you won’t see any nervous characteristics. It’s near-perfect, I also love how the grain interacts with the blur in the background because it looks really organic. The details of the subject’s hair is also rendered beautifully.

Despite being sharp, the lens has the ability to render skin smoothly. This makes the skin of your subjects nice and is helpful for hiding small, un-wanted imperfections. The focal length is also great for compressing the frame, making it more “flat”.

Here’s another example of what I was talking about. The skin looks nice and you can see a feint “glow” around the highlights. Is this the work of spherical aberration? Whatever it is, this lens certainly knows how to make your subjects look better.

The ability to make your subjects look better can only go so much but you can’t deny the sharp but dream-like rendering of this lens. I love the contrast and resolution of this lens, it’s really good even wide-open. It leads your eyes to hers, imagine printing this big using the best paper available and have people look at her eyes.


(Click to enlarge)
The ability to throw the background out-of-focus is determined by the positioning of you and your subject but this lens will help make it easier for you. The background turns into a dreamy, surreal wash of colors similar to old Chinese watercolor paintings.

Throwing the background out-of-focus is a way to make un-interesting elements within the scene disappear. This used to be considered lazy but the trends these days favor this so you can get away with. Notice how nice the 3D-effect is in this picture, lenses today are made differently so we see less of this. This is again linked to changing trends because it’s ultimately the market that decides what the designers make, this is the reason I like older lenses and continue to shoot with them today.

The shallow depth-of-field is going to work against you if your subjects aren’t in the same plane. Notice that the cute miss to the right is focused properly while her pretty friend to her right is slightly blurred. This is one of the challenges when shooting with a long and fast lens wide-open in close-up pictures.

You can use the thin plane-of-focus to your advantage because it’s helpful for separating a subject from another person in the frame.

You can use this effect to emphasize your subject and help with visual story-telling. I like to use this effect at work when I used to be involved more in the creative part of things. I use this to build anticipation or tension between the character and the situation she’s in.


(Click to enlarge)
Here are more pictures that were taken with this lens and film combination. I am loving this film a lot, this is the 2nd roll that I shot so far but I will definitely shoot more because I will be making a review of this film in the future.
So, what can you say about this lens? While my samples are poor, I am sure that they are enough to show you just how beautiful this lens renders. This is the lens for you if you’re a portrait photographer. This lens also has a long focus throw and I found it a bit hard to focus on moving subjects because of this. If it were shorter than I could have focused on to my subjects faster. Turning it wasn’t easy because of the girth. This is great if you’re a studio photographer because you can focus carefully but it can be hard for wildlife and sports photography where your subjects can be unpredictable. I know that this all relies on your skill but saying that this isn’t a factor is like saying that a car doesn’t need a good set of rubber to enjoy a smooth drive on wet pavement. I imagine that this was designed for a portrait photographer’s needs that’s why a lens with a longer throw is desirable.
I will recommend this lens to everybody who shoots portraits, this lens and the amazing (but expensive) Nikkor 85mm f/1.4 Ai-S will be a great combination for you. These lenses are considered to be legendary in their own right during their time and they are still nice lenses to use even today after more than 35 years since these were introduced. Look out for nice copies of this lens and make sure that it focuses properly before you buy it. It has to focus-past infinity but should be accurate when you reach the infinity symbol when it is focused at something really far. These can be had for $300 or so and I will consider this to be an honest price for a good sample. A junk will cost significantly less but will set you back $100 or so for repairs. I should know because I won’t charge anything lower since it is a larger lens that takes more time to clean properly as you will see in the main part of this article. Let’s now begin he repair article.
Before We Begin:
If this is your first attempt at repairing a lens then I suggest that you check my previous posts regarding screws & drivers, grease and other things. Also read what I wrote about the tools that you’ll need to fix your Nikkors.
I suggest that you read these primers before you begin (for beginners):
- Essential tools
- Best practices 1
- Best practices 2
- Best practices 3
- Ai conversion
- Working with Helicoids
Reading these primers should lessen the chance of ruining your lens if you are a novice. Before opening up any lens, always look for other people who have done so in YouTube or the internet. Information is scarce, vague and scattered (that is why I started this) but you can still find some information if you search carefully.
I highly recommend that you read my working with helicoids post because this is very important and getting it wrong can ruin your day. If I can force you to read this, I would. It is that important!
For more advanced topics, you can read my fungus removal post as a start. It has lots of useful information, it will be beneficial for you to read this.
Disassembly (Lens Barrel):
This lens doens’t have lots in common with the Nikkor-P 180mm f/2.8 Auto, this design is completely new inside-and-out but you can read the article for that for hints. This lens is big and most bigger lenses are a bit more difficult to work with because the parts and the screws are all bigger. I will not recommend this lens to a beginner but somebody who is experiened with lens repair can work on this wit no problems at all while following this article. This lens can be challenging even for seasoned repairmen if they don’t know how or where to open this lens so I hope that this article will be a welcome resource for you.
You will need the correct JIS drivers for this in various sizes, never use philips drivers or you risk stripping the heads of the screws. You will also need plenty of solvents to soften the adhesives used on this lens and a mini butane torch for those screws that are stuck. It is important that you know when to use or not to use heat when removing screws so this article will help you determine which screws are the nasty ones. A pair of rubber gloves will be handy to add friction to your grip.
You have to be careful when working with this lens because the glass chunks are big and there is a real danger of dropping them or cracking them due to clumsy hands or a worn set of tools. Take extra care with your tools especially when using them near the glass.

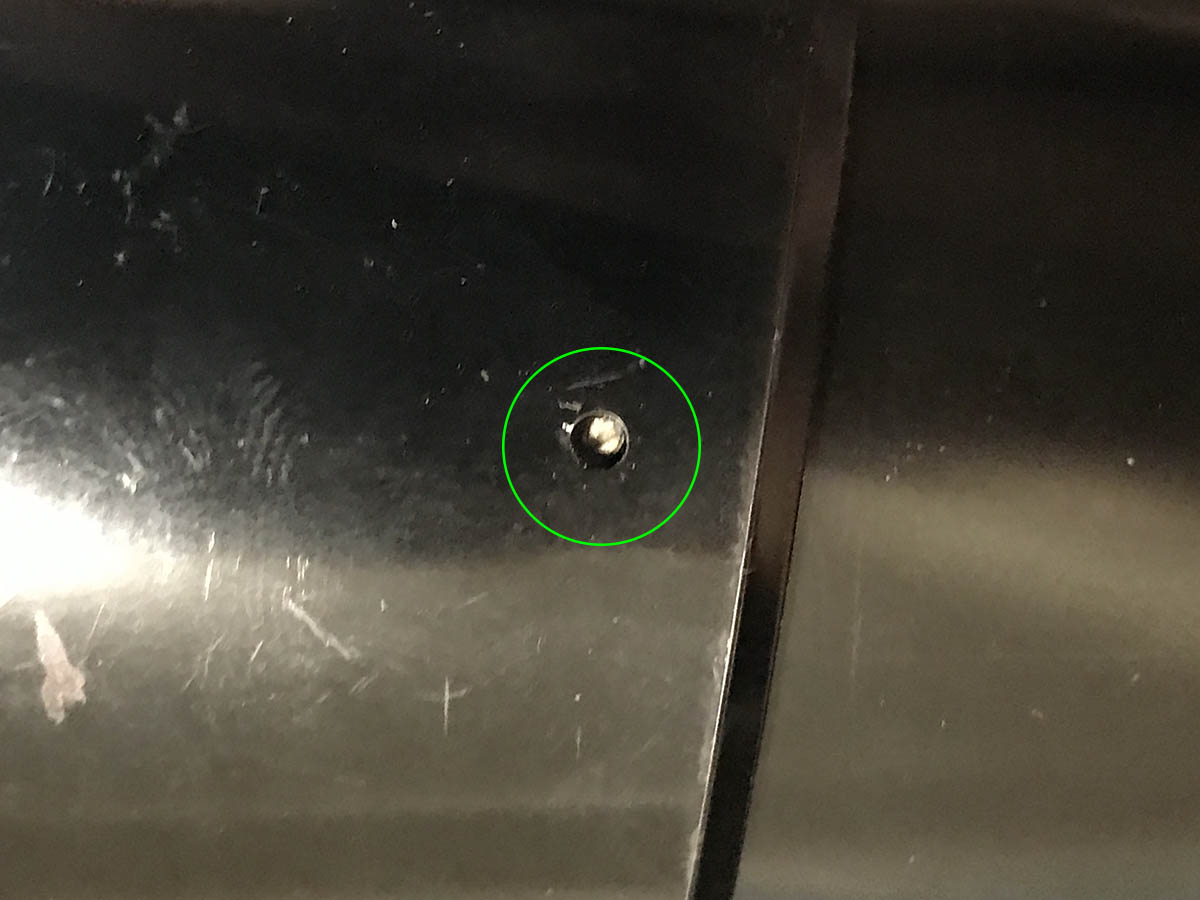
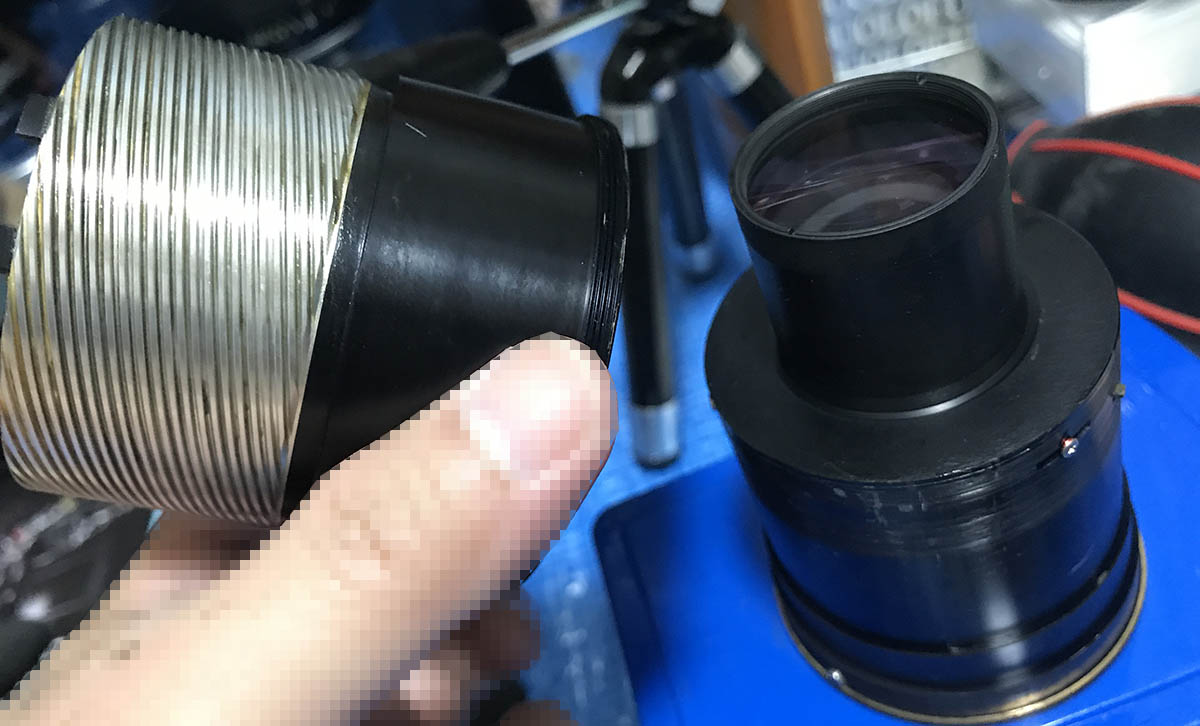
First, to separate the front parts you will have to remove this little set screw. You’ll need to extend the lens hood first in order to see it.

The nose of the lens can then be carefully unscrewed until its removed. If yours is stuck, use some alcohol to soften any glue used on this part and then try again.
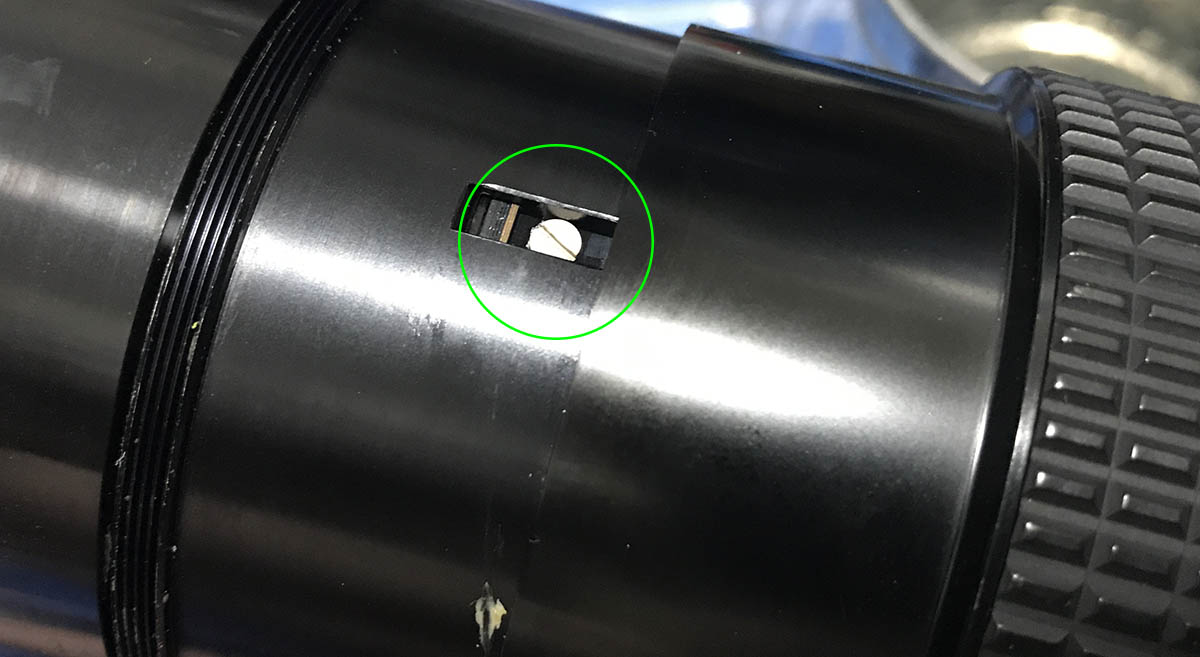
The front ring can be removed after extracting this set screw. You can locate and access it via a small hole on the shade. It can be hard to locate so be patient. The front ring can be removed by using a rubber tool for friction but it’s not essential for you to remove it just to clean the lens. I would suggest that you leave that alone unless you need to get it out.

If I am not mistaken, the beauty ring is being secured by a set screw. It can be unscrewed like this but just be careful not to damage it because it’s delicate. There’s dirt underneath it and I wanted to clean it as thoroughly as possible so I bothered to remove it.

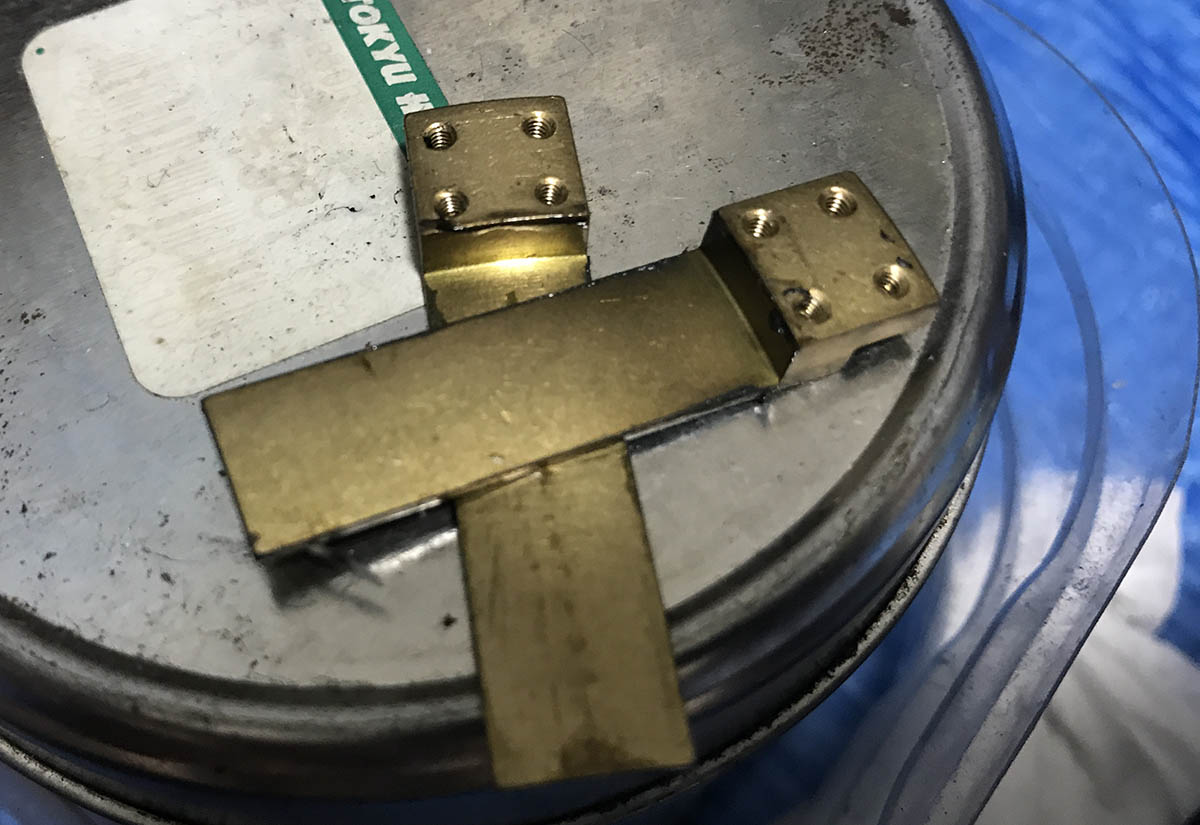
The “gold” ring comes off just like this. It’s actually pretty delicate and it can easily bend if you’re not careful. If you manage to warp this part then your lens will forever be ugly.
Extending the lens will reveal this screw. Please don’t mess around with this thing, never give-in to the urge to scratch that itch!
Important:
I will jump a few steps in the next series of pictures because I went ahead and worked on the rest of the lens while I was waiting for the solvent to work. You should follow what I have here because this is the ideal order in which you should go about working on this in my opinion based on my experience. Sorry for the confusion but my priority has always been to take notes for my own convenience before thinking about presentability for this blog. I hope that this will not confuse you as much as I feared. Ric.
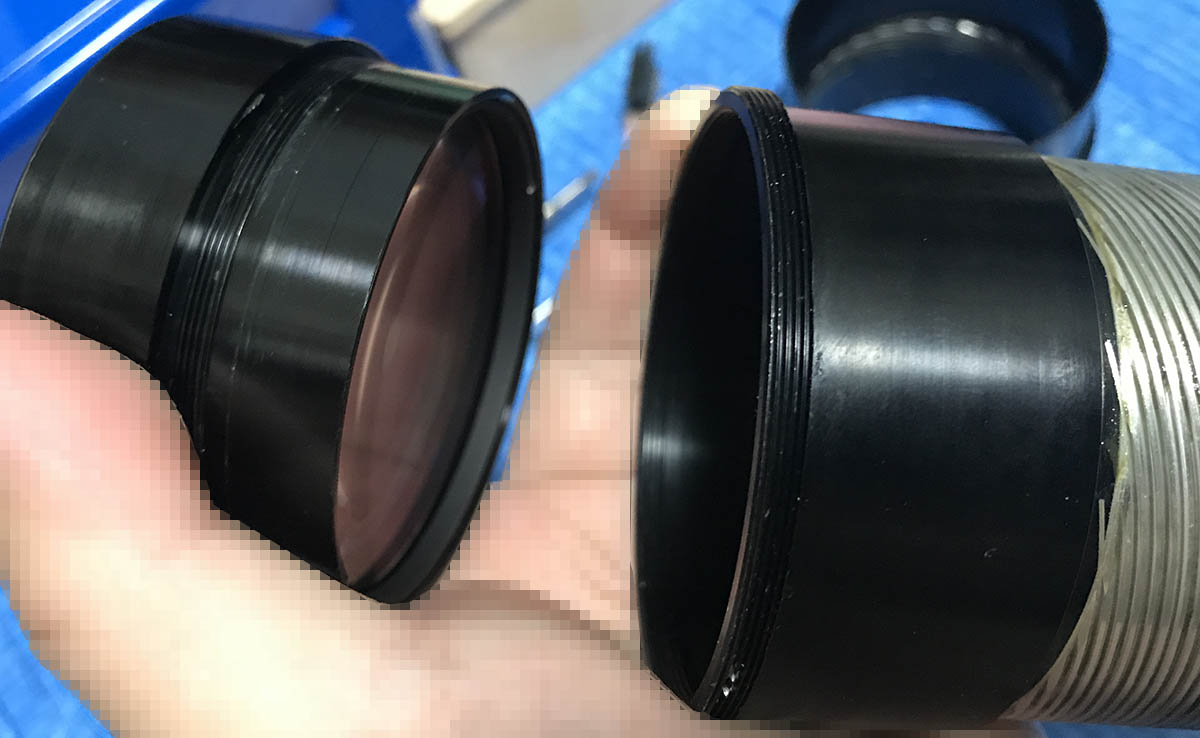
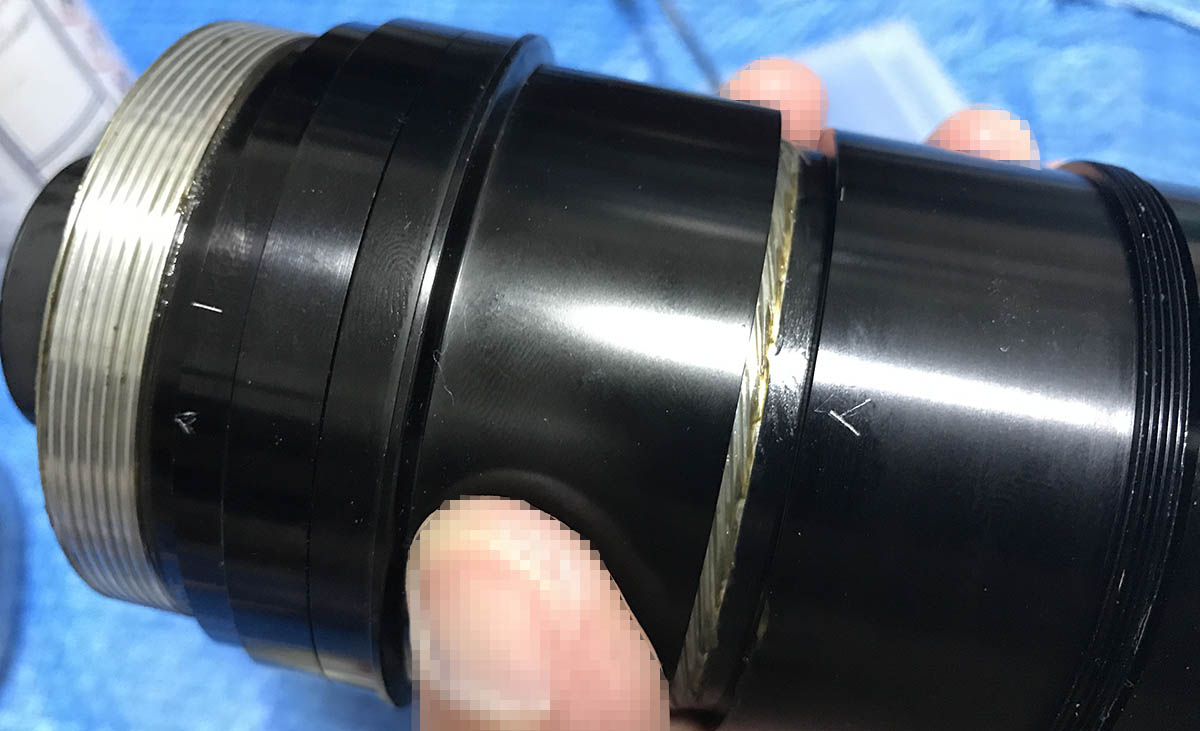
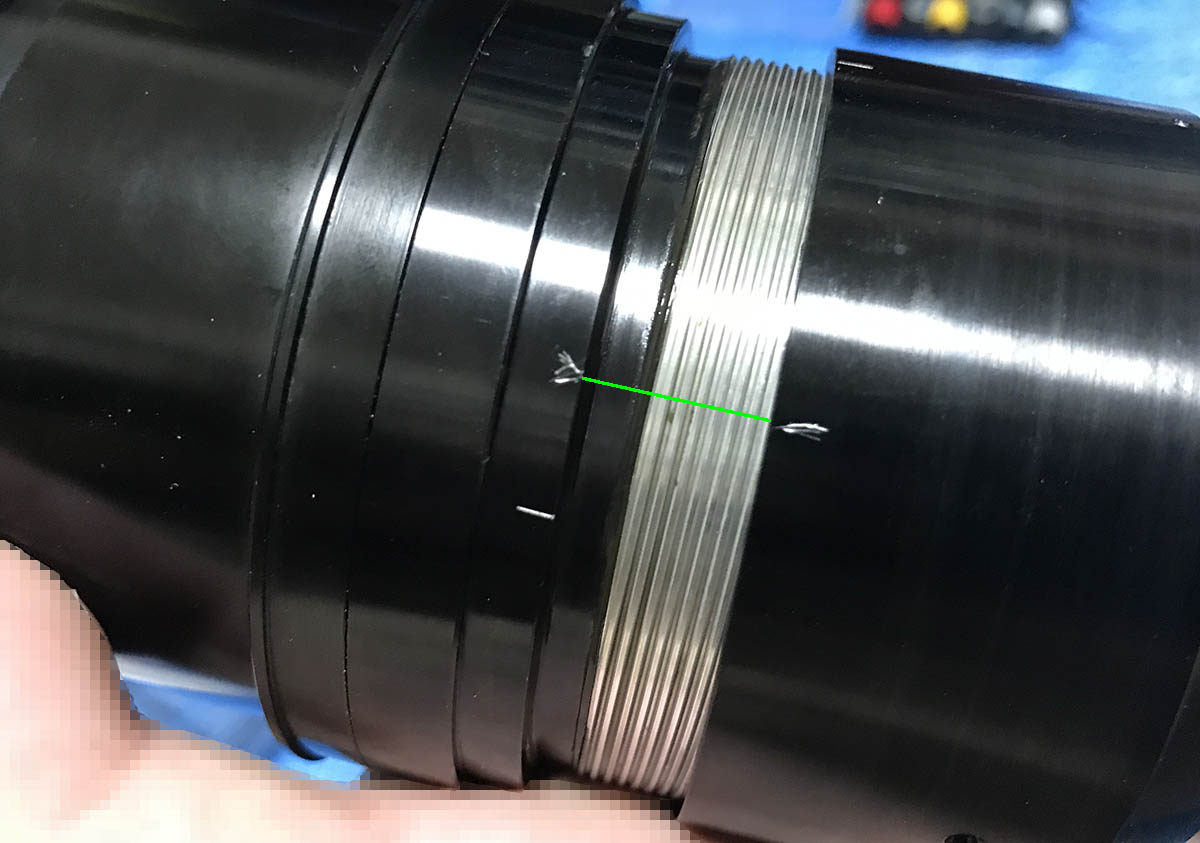
To separate the objective from the rest of the lens barrel, you must first remove the front part of the objective. This acts like a cap of some kind to keep the lower-half of this part secured. This is usually sealed with lacquer at the threads and you will have use solvents and apply it to the threads and wait for it to soften the bond before you remove this. You should be careful while removing this thing or else you may ruin the delicate thread.
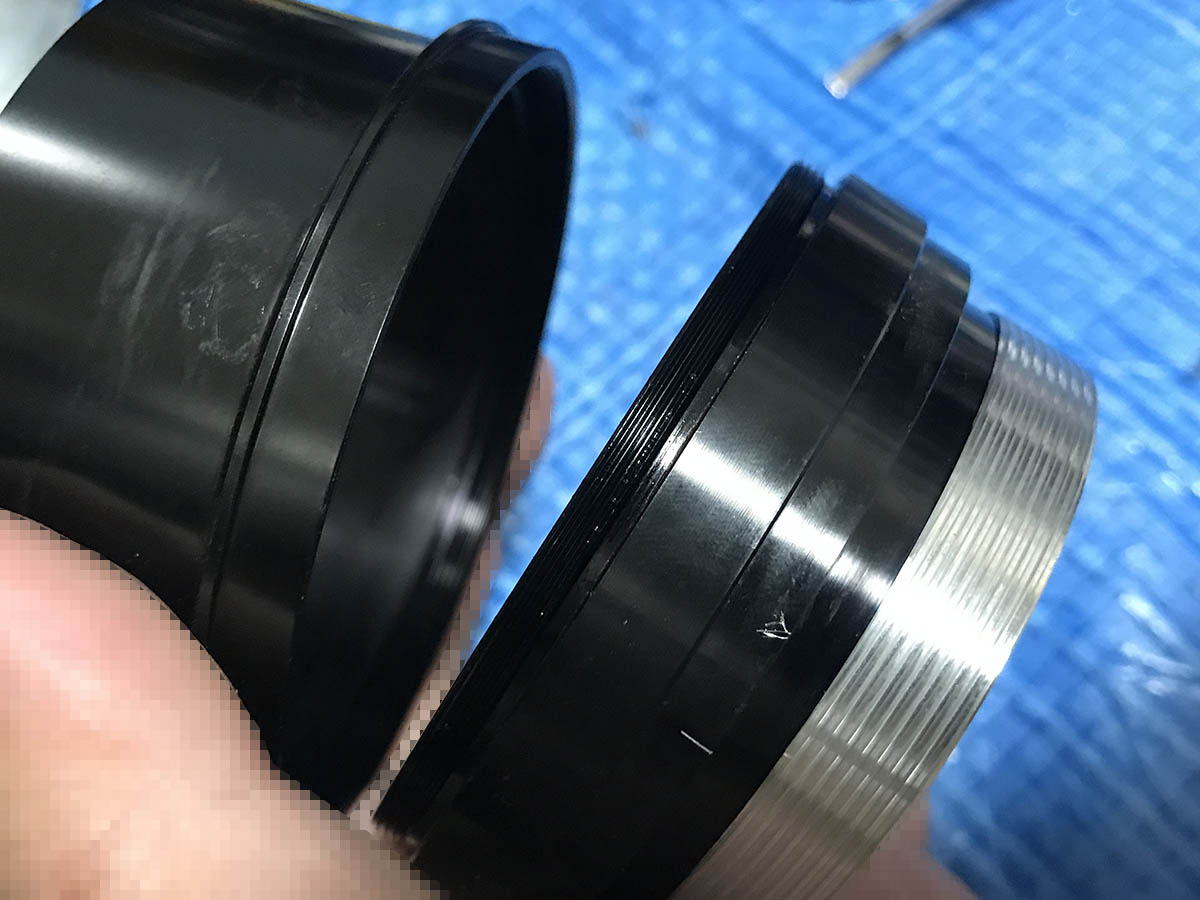
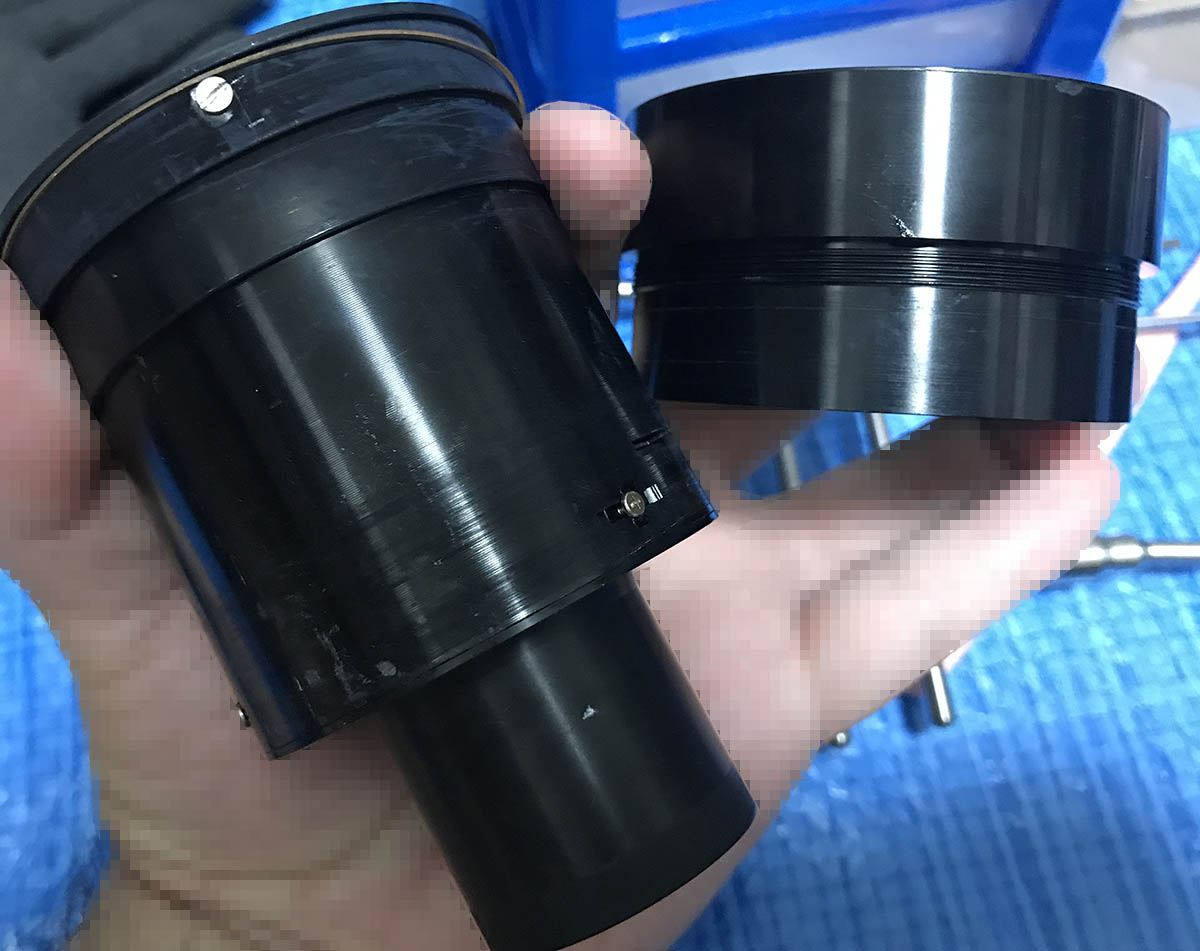
Once the front part is gone, you can pick the objective’s casing with your fingers. It can be a little stiff but it should come-off just like this. Carefully store the objective in a safe and clean place. Make sure that they won’t roll-off the edge of the table!
For people who only wanted to clean the optics of this lens, this is probably the furthest that you will have to go and dismantling the lens barrel will have no benefit to you.

Let’s move to the rear of the lens for now. Remove these 5 screws to remove the bayonet mount. If you are new to this, make sure to read my article on screws and how to remove them. Many people get stuck because they stripped the head of these screws by using the wrong type of drivers! Don’t ruin your lenses and read what I have to say.
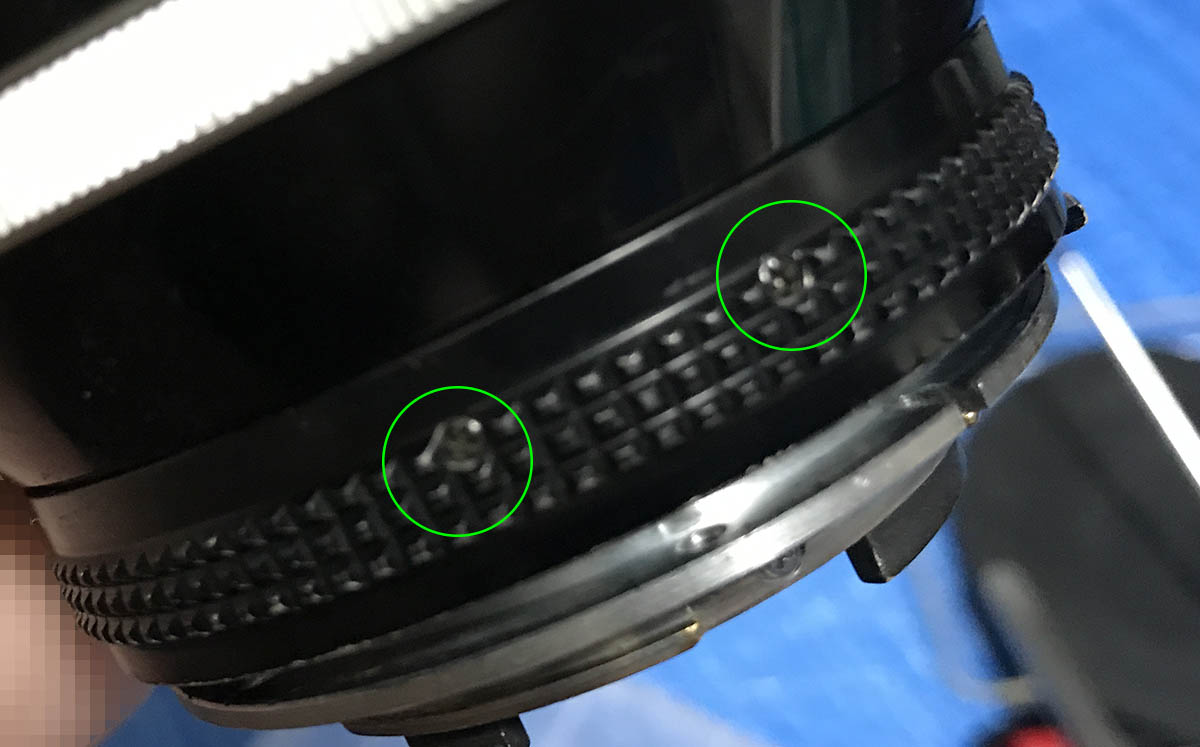
It’s not a bad idea to remove these 2 screws first before you remove the bayonet mount. These 2 screws secure the iris-coupling lever.

You can remove the bayonet mount just like this. It can be difficult to remove because of the long stop-down lever so be careful while pulling this off. Damaging the lever is never an option, this part is delicate and if it got warped then your iris won’t actuate properly. I will also recommend that you extend the lens because that will make it easier to pull this from the lens barrel since the objective is further forward.

The aperture ring can now be safely removed, just don’t forget to remove the 2 screws or you won’t be able to remove this at all.

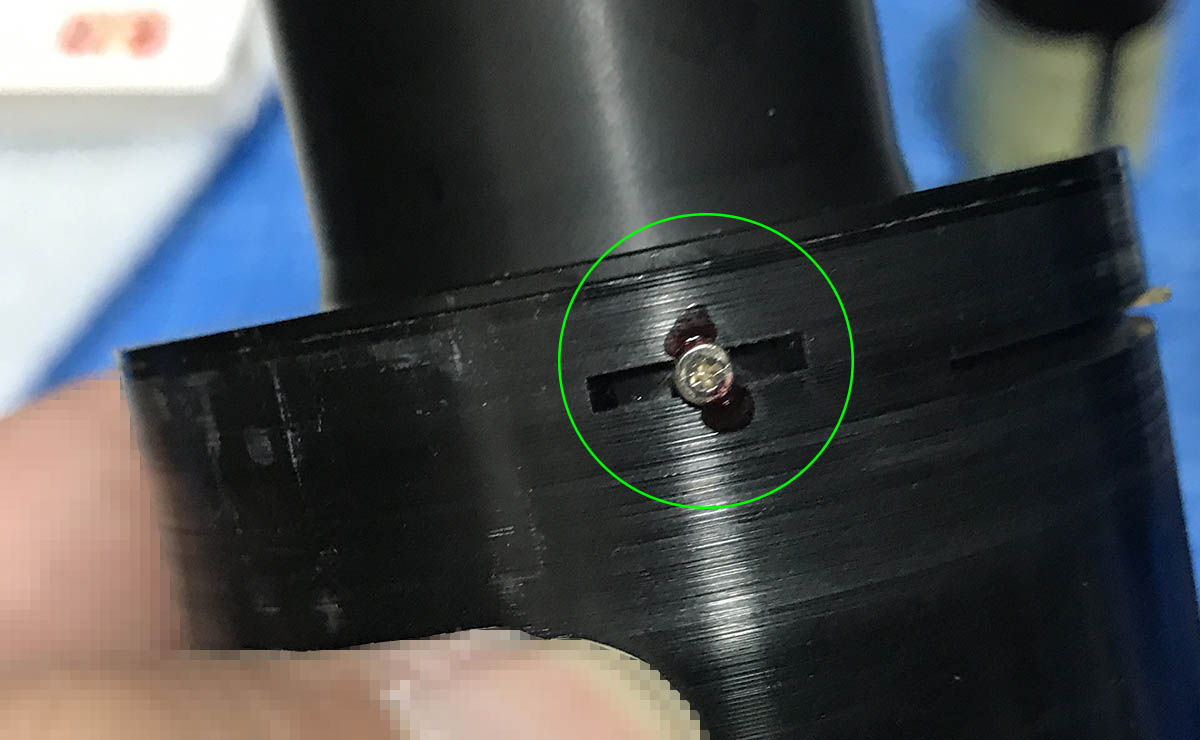
This is the coupling lever/fork. The slot at the middle couples to a small screw ata the iris mechanism, moving the aperture ring will move that screw and affect the iris.

These screws secure the shiny metal grip. Be careful when removing these because if you used a driver that doesn’t fir perfectly then you will risk damaging the metal around the screw. A smaller driver won’t be any good also because it can strip the screw’s head.
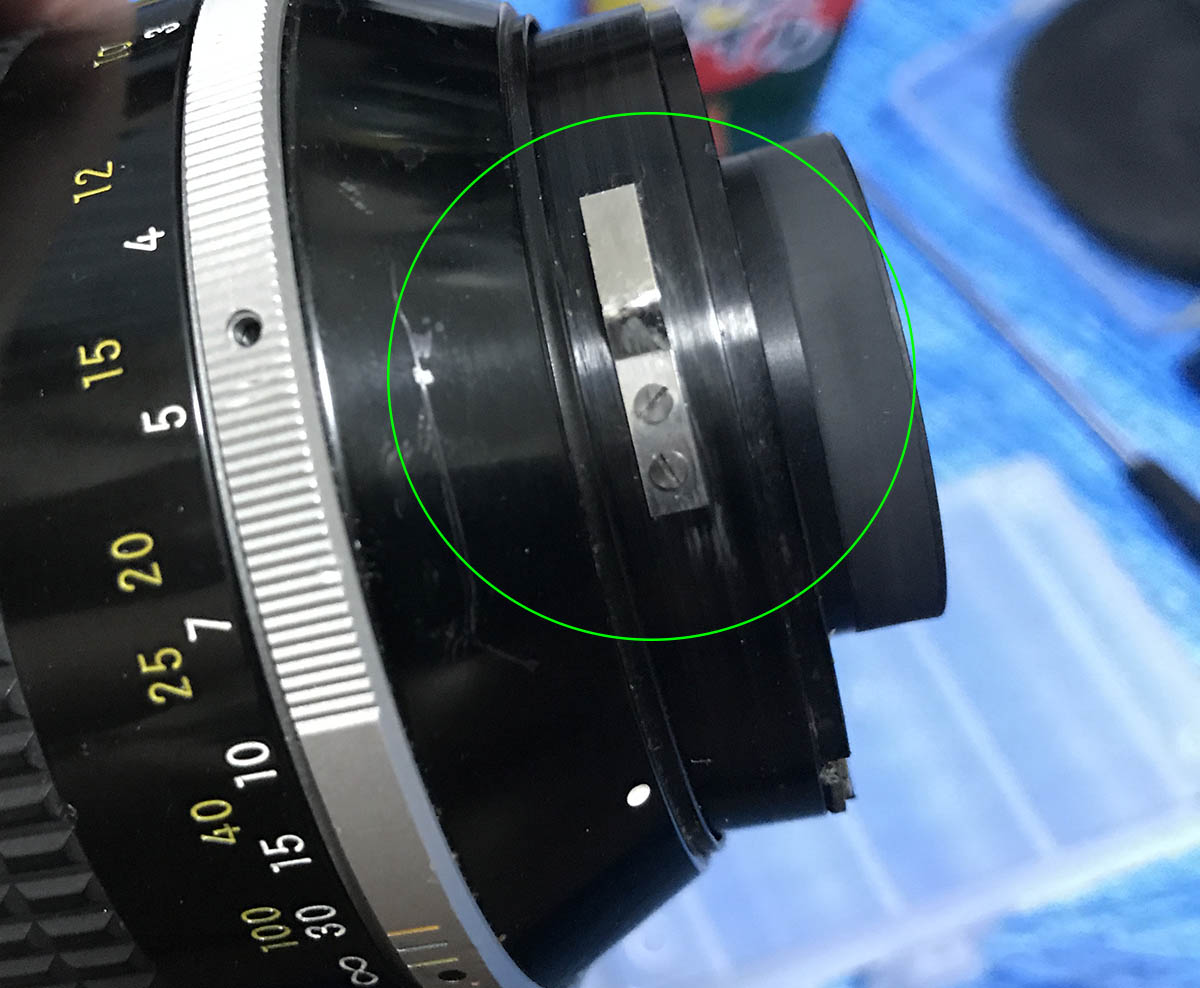
Once the screws are gone, you may be tempted to remove the grip but this flat spring will be preventing you from doing that. This spring is the one that makes your aperture ring click on every stop. Before you remove this you will want to note its position because it’s an adjustable part. Your clicks won’t be as accurate if you got this wrong.

The grip and the lower shroud can now be removed. Do note that the grip also serves as a limiter for the focusing ring and it restricts its movement to its focusing range. You can separate the grip from the sloped shroud and clean what’s underneath them. There’s old oil and other junk underneath these things as usual and I won’t tolerate that.

You can now dismantle the focusing ring. You can remove the rubber by running a small toothpick underneath its circumference to lift it from the old glue. You can then carefully pick on it and pull it off but you must be careful not to tear it. The safest way to remove it is to unscrew the front part of the focusing ring so there’s no undercut that will snag but doing so requires a lot of effort and it’s not always easy because that part is glued to the focusing ring more often than not. You can see that part in this picture. This part is made of plastic or some kind of soft alloy and it can be damaged easily if you use lots of force.

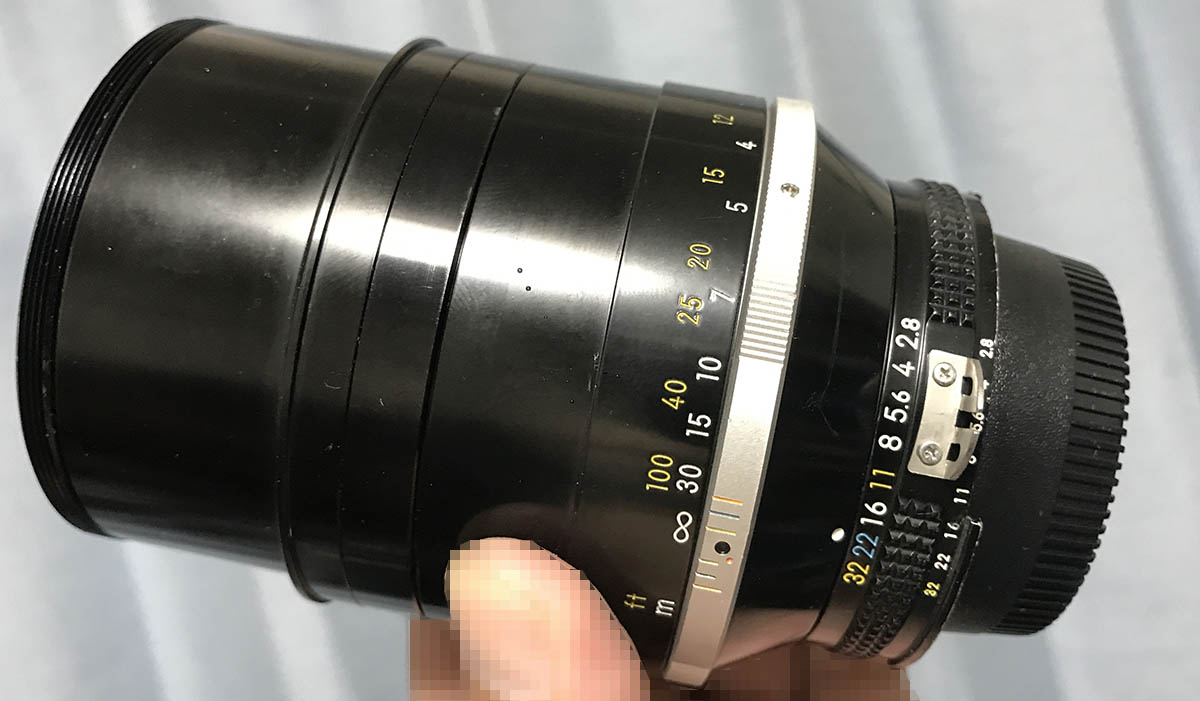
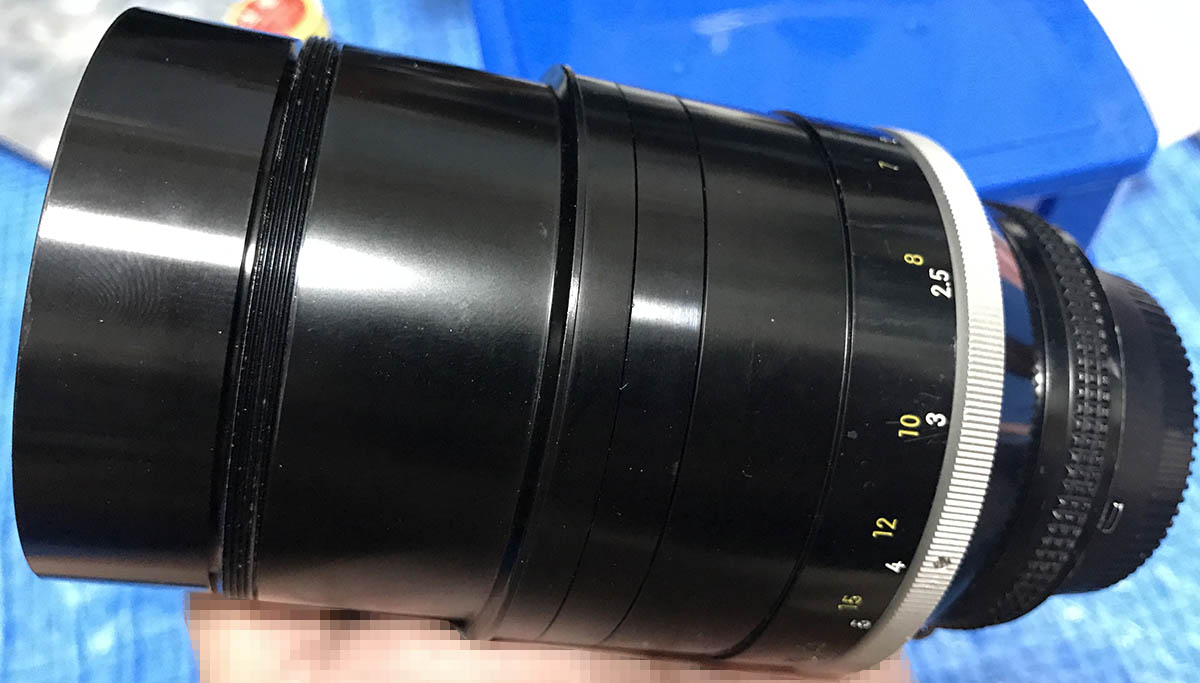
Like most Ai-S lenses from teh 1980’s, this lens’ focusing scale was simply taped-on and it can be easily removed by peeling the old tape away. Do note the position of this scale and remember that this lens focuses-past inifinity. This will help you reinstall part this later.
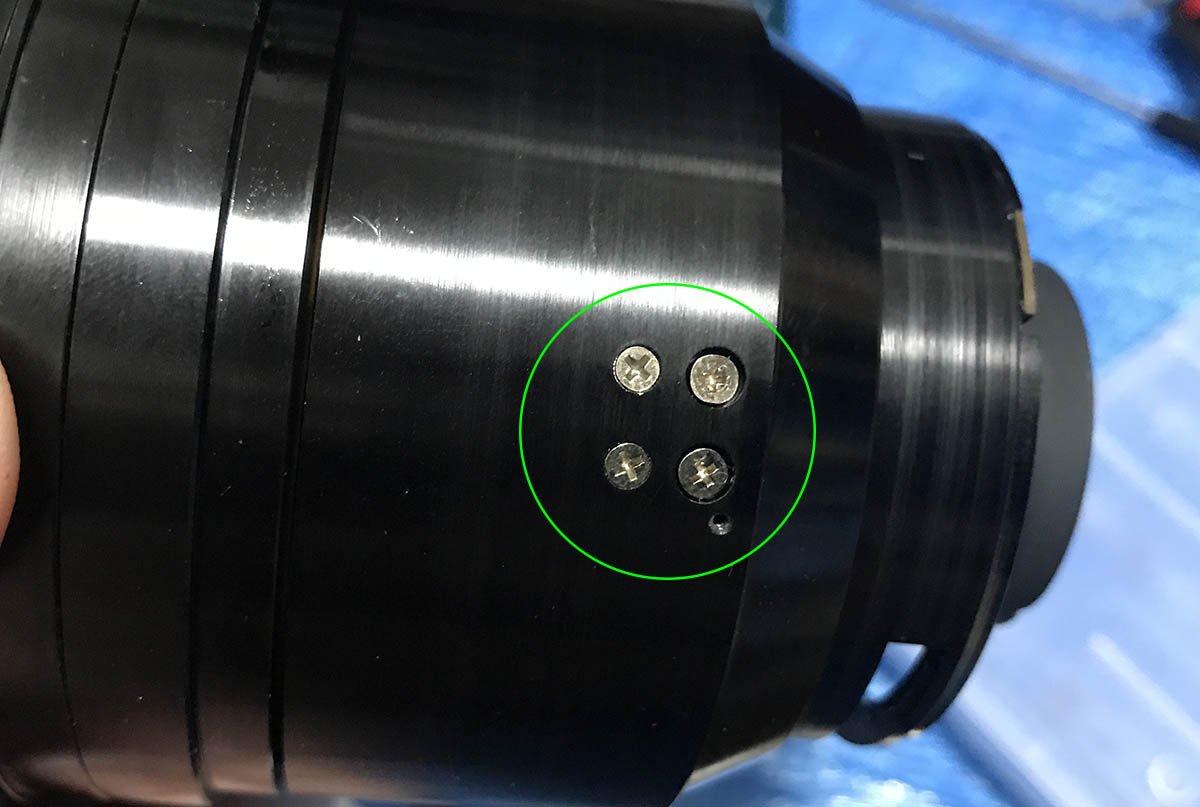
Now that the focusing scale is gone, you can begin removing the helicoid keys so that you can separate the helicoids. Don’t forget to take notes on how the helicoids turn and move. These will help you later when you’re reinstalling the helicoids after cleaning them. You can remove the helicoid keys (2 of them) by removing their screws. These screws can bea pain to remove because they were glued at the factory with epoxy. I used a torch on this one to soften the epoxy because epoxy doesn’t respond well to solvents. I extracted these while they were still hot, doing this prevents any damage to the delicate screw heads.
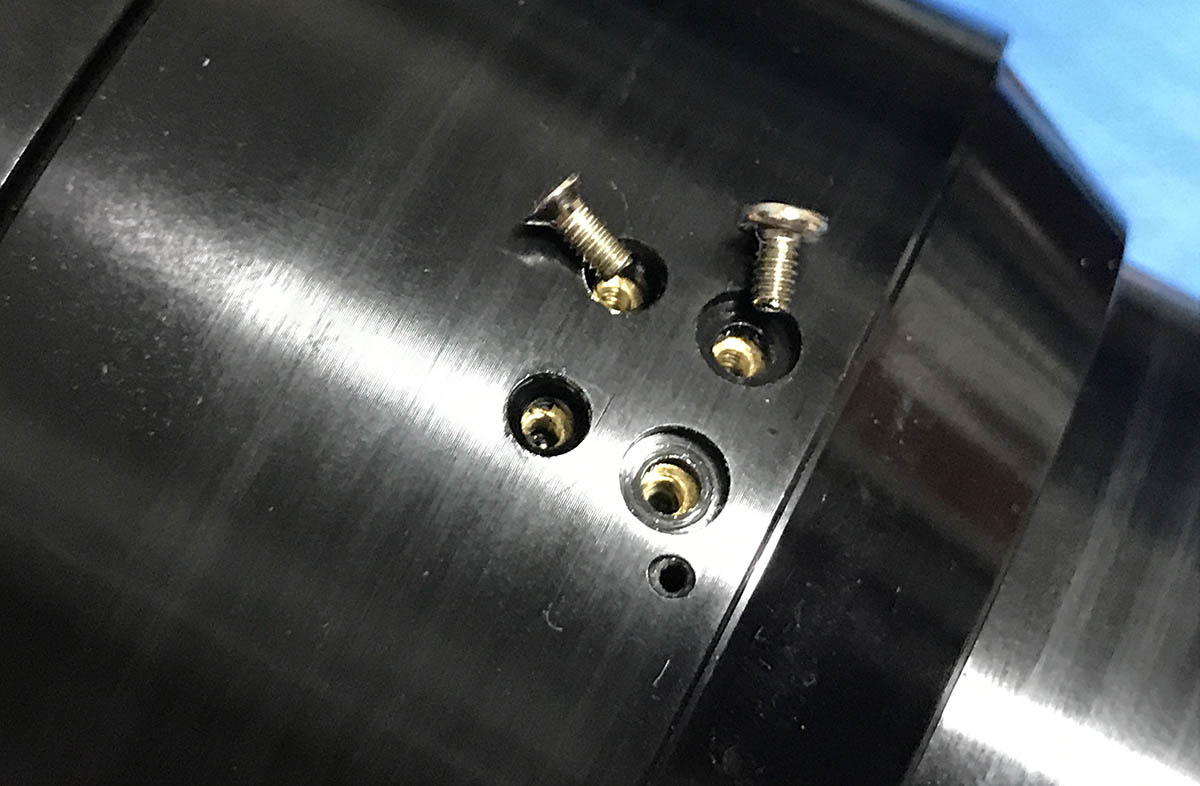
Here’s how it should look like once the screws are gone. Notice that the screws aren’t all the same for all 4 holes, there are counter-sunk screws and round-head screws used here so remember which screw came from which hole! If you look closer at the holes you will see some white stuff there, these are the residues of the epoxy used to glue the threads.
Here are the 2 helicoid keys. Clean them very well and don’t forget to take note on which helicoid key came from which side because these things are broken-in very well with use so you’ll want them back where they were originally for a smooth-turning focusing ring.

Now that the helicoid keys are gone you can now turn the helicoids past their range. This is a mark that I made so I will know how it should looks like when the central helicoid is turned all-the-way so it’s completely compressed. If I got the same result after I put them back then I have reassembled the helicoids properly. If it’s off by a lot then I’m screwed!
It’s now time to separate the central helicoid from the inner helicoid! Always take note of where your helicoids separated because this is also the same point where they will mesh. Many people forget to do this and they end up with a lens called Humpty-Dumpty since nobody can put it back together again. Don’t make the same mistake and read my article on how to work with helicoids. If you messed this part up, please don’t message me!
The inner helicoid can now be separated from the central helicoid. Don’t forget to do the same here and mark where they separated! Notice that the inner helicoid and the outer one has different turn rates judging from the angle of the threads.
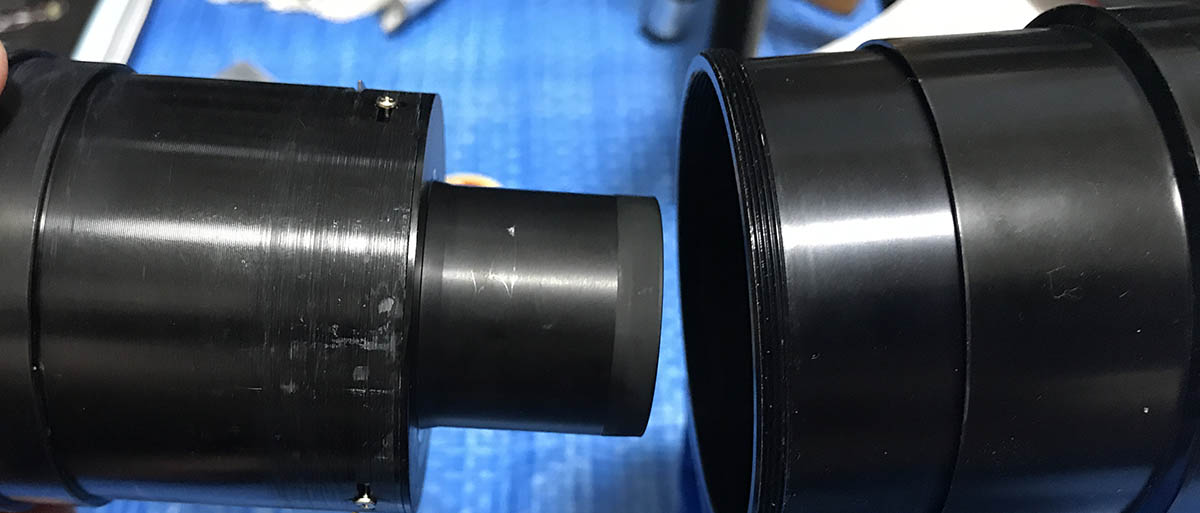
This tube is screwed to the central helicoid. You may want to use some solvents to soften the glue first before you attempt to unscrew this.
The helicoids were really dirty and they had to be cleaned very well with solvents. If you are concerned about your health then pickling the helicoids in strong detergent will also work. Whatever you do, always remember to clean them very well with a brush and pick any hardened gunk with a sharp wooden wedge. Make sure that they feel smooth when you do a test after cleaning them. If not, then clean them until they feel super-smooth.
The helicoids will benefit from a light grease with not a lot of resistance. A thicker type of grease will just make this lens too hard to focus. This lens has a rather long focus-throw, I will not want this lens to be so stiff that merely focusing it will burn me some 20 calories. Do not apply too much grease on the helicoids because they will collect somewhere and it will pool and reach the sensitive parts of the lens such as the iris and the glass. Apply it in thin applications and then add more as you go along. Remember, the lens will be a lot smoother as you use it more and more.
A word on the helicoid keys. Never over-tighten them when you resintall them at first. It is important to leave it a bit loose and then turn the helicoids to settle the keys into their respective slots. Tighten each screw at the same rate so they will tighten evenly. Exercise the helicoids again and tighten the screws again by a bit and repeat and see if the focus is still smooth. If it felt a bit gritty or rough then loosen the helicoid keys again and repeat it until you’re satisfied. If tightening the screws all-the-way will result in a slightly-rough or gritty focusing then don’t tighten the screws too much, just tighten them enough so that it will not make the helicoid wiggle too much. This is very important so remember this. It is one of those things that professional repairmen won’t share with anybody else.
Disassembly (Objective):
The objective is of conventional design so it’s not difficult to dismantle it for those of you who are experienced with working on Nikkors. It’s not too different from the Nikkor-P.C. 180mm f/2.8 Auto lens so you can use that as a guide somewhat but don’t expect them to be identical because they aren’t. You can read the other repair articles that I have here in my blog and look for lenses similar-looking objective housings. This particular lens that I have in this article has somewhat clean optics so I didn’t need to dismantle it completely, I was lucky that this lens was a beater lens that the previous owber used professionally so it has great optics despite of the rough-looking exterior. All I had to do was clean-off a bit of dust inside the lens and wipe-away any smudges, that’s all.
The objective comes in 2 parts. It’s pretty easy to clean them if you’re experienced since they’re of conventional design.
Never loosen these screws because they are used to secure and adjust the iris. It’s a very precise adjustment made at the factory so your lens will meter and expose properly. See the red lacquer used to seal the screws? They’re applied at the factory as a seal so that it can be determined if a lens has been tampered with and at the same time to secure these so they won’t be loosened by vibration and rough-handling.
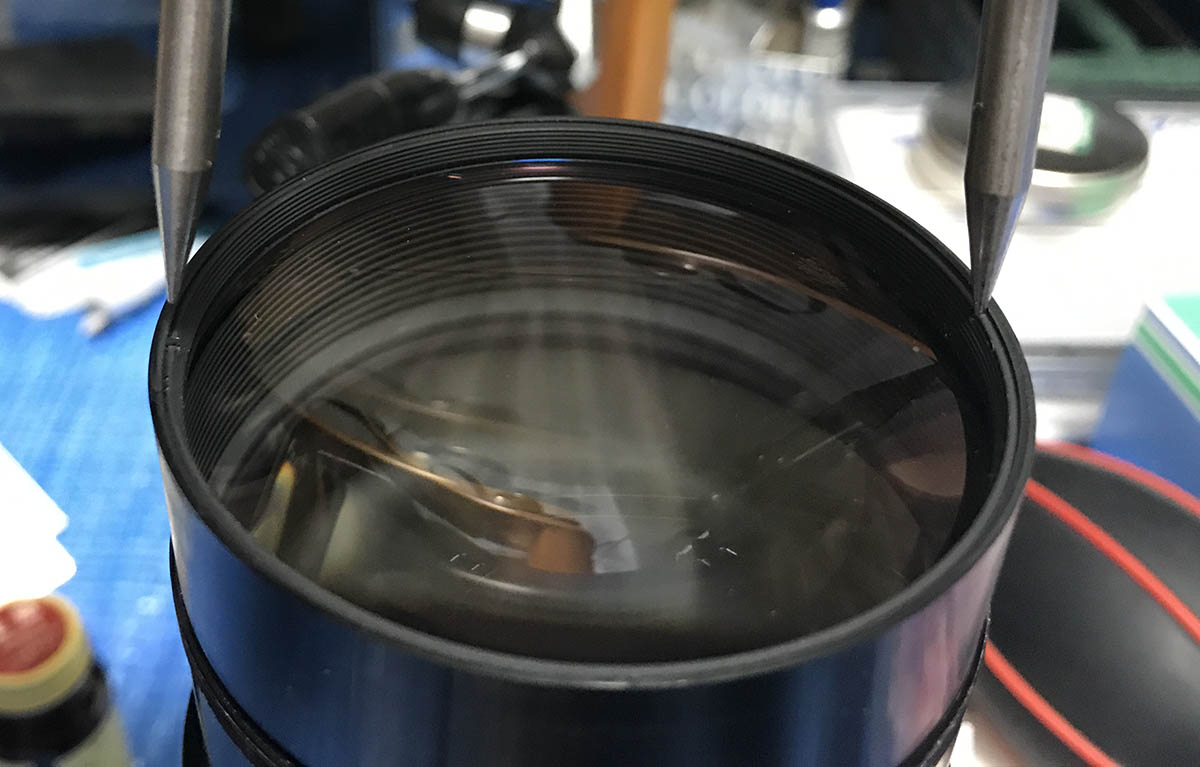
The front element can be removed by using a lens spanner. It can be risky to do this as it has a rather wide diameter so only remove this when it’s absolutely needed.
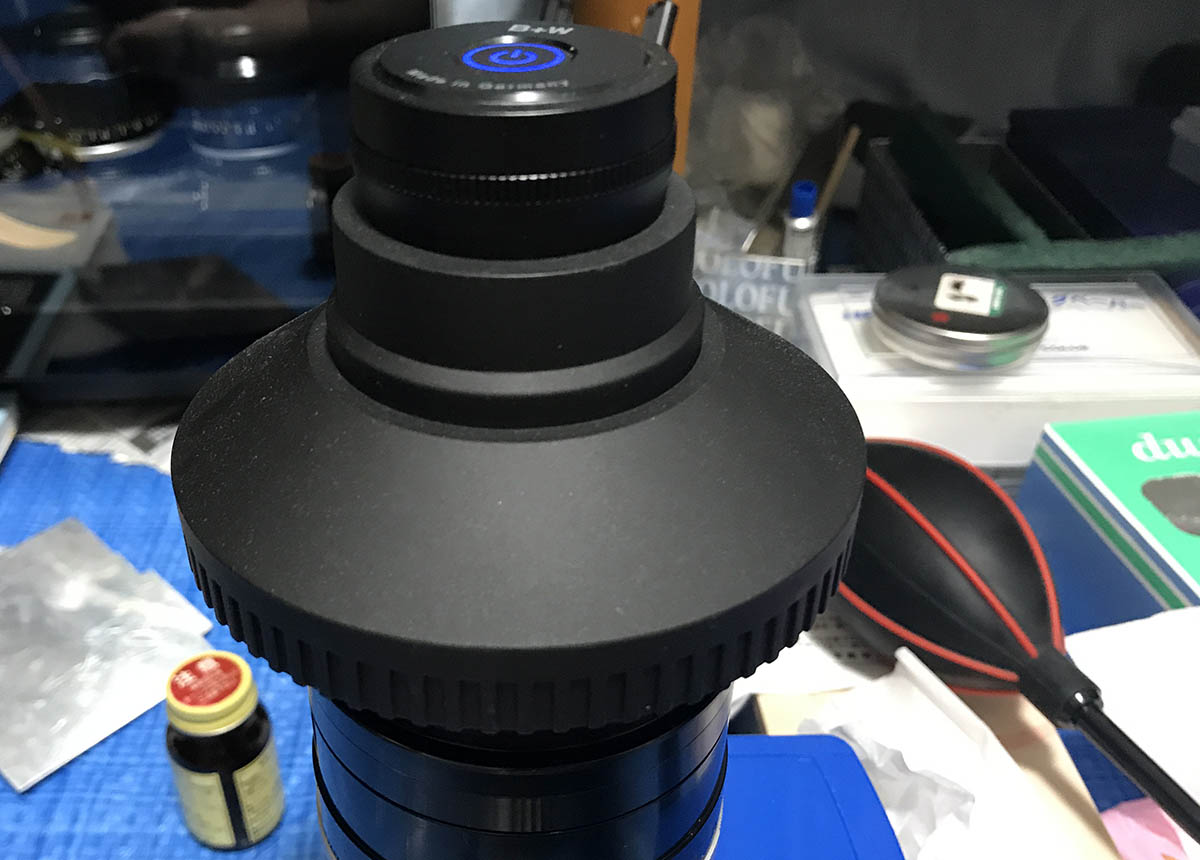
Here’s me disinfecting the inner parts of the lens with a gadget that I suspect to be fake. I was sceptical when I saw this but I bought it anyway, I suspect this to be the work of the dastardly mainland Chinese crooks who’re just interested to make a quick buck from the unsuspecting masses. Whatever, I have already parted with my money so I may as well just use this. Be very careful with your hard-earned money!
That’s all for the optics. There’s not much to talk about it since there wasn’t anything that was worth noting (at least for me). Be very careful with the ED glass because they can be easily damaged like any glass. If you have trouble opening something, just wait a bit and use your better judgement before you proceed. Maybe just leaving it alone is better than having a damaged lens that is beyond-repair.
Conclusion:
This is the last section of this article, by the standards of this blog I will say that this is not a long one but it has filled a big hole in my repair resources. Repairing this lens took me a couple of hourse because I had to clean so many things and the lens is bigger than your average smaller prime lenses which means that there’s more area for me to clean. Lucky me, the optics of this lens is clean so I didn’t have to clean it. If this lens had an oily iris, I would have had to clean that as well. While that will make for a more interesting article, I would have preferred not to do it as much as possible because doing so means that this lens’ iris mechanism had to be opened and realigned again back to factory tolerances as much as possible. If I had to do that then I will definitely spend more than an hour doing just that. While we’re at the end of another article, do note that we still have to calibrate this lens’ focusing back to how it was or at least close to it. Stay and read how I did it.
Here’s the lens barrel after a thorough cleaning. I reassembled it by following all of the steps in reverse. I cleaned it properly and did my best to kill the germs. Take note that it’s one of those lenses that are calibrated to focus-past infinity. This was required because it has glass elements that expand when used under hot environments. Many tele lenses do this so take note if yours do this or not!
The optics were reinstalled and secured, now it’s time to calibrate the lens’ focusing so it will focus properly at infinity. If you don’t know how to do this, please read my article on how to calibrate your lens to focus at infinity. This is very important because if you got it wrong then your lens won’t focus properly and the focusing scale will be useless.

Once you are satisfied with your adjustments, secure the focusing scale with tape. Repeat your tests just to make sure and then tape the scale completely to seal the scale. You’re at the very last steps of your repair when you reach this point, congratulations!
That’s all for today’s blog post! Did you find this interesting? I hope that you learned how to open this lens properly with this article. If your lens needs to be serviced and you have no or little experience working with lenses then I would suggest that you just pay a real repairman to work on your lens. He has the proper tools and experience to do this. If you want to waste money by butchering this job and buying tools just to sacrifice this lens for your experience then be my guest. The alternative to this is to just buy a used one that is clean, this will end up being cheaper for you unless you repair lenses.
If you liked this article, please share this with your friends at social meda. Show my blog to your friends at the camera club and help spread the word about this blog! Show them a new pass-time, reading is a very good exercise and it’s free these days. See you guys in the next article and please come back for more interesting stuff. Ric.
Help Support this Blog:
Maintaining this blog requires money to operate. If you think that this site has helped you or you want to show your support by helping with the site’s upkeep, you can make a small donation to my paypal.com (richardHaw888@gmail.com). Money is not my prime motivation for this blog and I believe that I have enough to run this but you can help me make this site (and the companion facebook page) grow.
Buy me a roll of film or a burger?
Thank you very much for your continued support!
$2.00
Helping support this site will ensure that this will be kept going as long as I have the time and energy for this. I would appreciate it if you just leave out your name or details like your country’s name or other information so that the donations will totally be anonymous. This is a labor of love and I intend to keep it that way for as long as I can. Ric.

Dec 18, 2019 @ 21:53:32
Hi. Today I rebuilt an AF Nikkor 180mm 1:2.8 which I think is the one after the AI-S.
One of the shafts that drives the focus cam has a very thin bearing made of die cast metal (so not strong) and I think that someone had forced the focus ring and busted it. You can read my write up here https://nikonites.com/prime/43882-af-nikkor-ed-180mm-f-2-8-anyone-ever-dismantled.html
Feel free to steal the words and or pictures if you want to make a page on richardhaw.com about it.
regards, Philip aka dieselnutjob
Dec 21, 2019 @ 03:15:51
poor lens 😦 hope you find replacements.
Feb 22, 2021 @ 19:29:38
Hi, can you please explain how did you disassembled the AF 180mm, I have one with haze but havin’t found yet a safe way to disassemble it.
Dec 30, 2020 @ 07:38:39
Hello
Do you have or plan a tutorial for the AF version of this lens?
Nikon Nikkor AF 180mm F/2.8D IF-ED
Regards
Peter
Jan 08, 2021 @ 20:44:10
Richard Thanks for another very helpful article. Some of your photos seem to be cut off.
Feb 23, 2021 @ 17:31:49
Dear Richard. Thank you for your efforts to upload all these things you have done. Your repair article made a huge impact on me to get a Nikkor 180mm f/2.8 ED Ai-S. Now I have a marvelous copy. Stunning. Love it. I use it for wildlife photography since a year or so. Recently some eagle shown up in my local area (Eastern Hungary), so I have came to the part where I need some extra reach and your wise point of view: Do you recommend Nikon teleconverters at all? Can you help to confirm if the Nikon TC-14A 1.4X is what I need to accompany this lens?
Jul 05, 2021 @ 10:29:31
Dear Richard, my lens needs a cleaning of the irsi – it closes some time to slow – is it possible to remove it an clean in a ultra sonic bath?
May 24, 2023 @ 05:29:26
I think that the pictures you took look very nice!
Jun 14, 2023 @ 20:33:28
This article will be very useful in disassembling my 180 f2.8 which has a slow moving sticky diaphragm (no visible oil and does move fully closed but too slowly)
Can you point me to an article of yours which deals with sticky diaphragms.
Thanks hot your help.
Jun 13, 2024 @ 10:26:59
When i disassembled my lens I could see the aperture fork connected from the rear mount was rubbing up against the inside the lens barrel that was giving something similar to what you describe
Jun 13, 2024 @ 15:47:36
Yes my problem was also in the linkage not with the diaphragm itself. Easier fix.
Jun 13, 2024 @ 10:20:30
Great write up as usual.
With regard to the front optical block, did you figure out how to free the rear element of that block?
It has a notch for what looks like a retaining ring on mine but no amount of acetone or ipa in the threads will let me turn the ring