
Hello, everybody! I was looking for some cheap eats the other day and I discovered this shack near my work where they sell nice meals for $4.50 only. The meal was great for its price and despite the cheap-looking exterior the meals inside can rival a more expensive restaurant’s offering. It’s the same camera equipment, there are times when some of the better things cost less and if you consider using it despite its age and appearance then it’s going to satisfy you so long as you know what you are looking for. Today, we are going to talk about one of the better deals today in AF zooms. Read my article and enjoy.
Introduction:
Today, we’re going to talk about the AF-Nikkor 70-210mm f/4 zoom! This lens is a favorite of many film photographers back in the day because it’s lite and compact. It’s a very good lens for traveling lite for people who use autofocusing cameras. Its popularity has waned a bit during the DSLR days because it lacks coatings on some of it’s rear elements and we all know that sensors are more reflective compared to film. It has gotten a bit of hype in recent years due to reviewers and online personalities expounding the lens. Let’s see if it really lives up to the hype and I will also show you how to clean this “forgotten” classic.
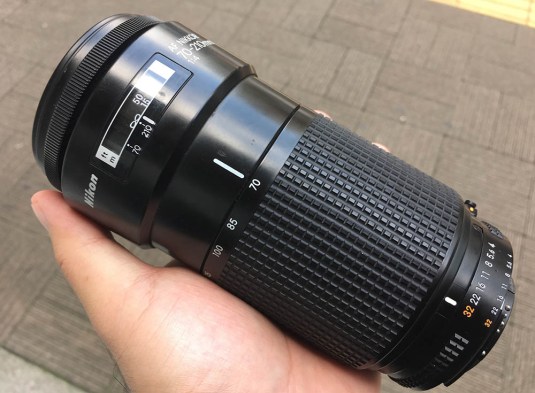 The lens is small for a tele-zoom with a constant aperture. It’s liberal use of plastics is the key to this lens’ weight. If you’re backpacking then you will know that every gram counts in the field. Despite the plastic housing, the lens feels solid and will tolerate some abuse.
The AF-Nikkor 70-210mm f/4 is one of the first AF lenses for Nikon and was made around the mid 1980s. The optical formula was inherited from another classic, the popular and cheap Nikon 70-210mm f/4 Series-E lens. The Nikon 70-210mm f/4 Series-E was a very well-made zoom lens and despite the Series-E tag, it was built much better than the rest of its peers in the line. The optics were also good despite the cheap and frugal use of coatings and it’s a favorite of many photographers even to this day. Nikon probably decided to use this one instead of the professional Zoom-Nikkor 80-200mm f/4 Ai-S lens as the basis for this lens because they don’t want the AF-Nikkor 70-210mm f/4 to compete with their pro lens and AF was considered a gimmick back then for prosumers until the advent of the Nikon F4. It’s a mystery why Nikon never made a successor to this until 2012. If Nikon did make a lens in between this one the recent 2012 AF-S NIKKOR 70-200mm f/4G ED VR then it will definitely be a huge success because not everybody needs an f/2.8 zoom. The 1-stop slower f/4 maximum aperture (constant) does not bother a lot of people and many people like me will want to shoot at f/4 anyway for added DOF when shooting portraits because f/2.8 is sometimes too shallow which may cause the other eye of the model to be blurred. It is the current trend of “bokeh” that has many people wanting this. There’s a right place and time to for “bokeh” and if I want that then I’ll just use my trusty Nikkor-P 180mm f/2.8 Auto lens instead. Pros will want f/2.8 for their specific needs but for most cases, f/4 is just as good so long as you aren’t shooting in poorly-lit places because the smaller aperture is going to make your viewfinder a little bit dark.
 This is the Nikon 70-210mm f/4 Series-E lens mounted on my Nikon D4. It’s the thing right at the back and not the double tonkatsu with curry from Go Go Curry. This will give you an idea of how the predecessor looks like. Are you hungry now? Am I punishing you? I’ll tell you now that Go Go Curry is just as hyped as this lens. It sure is good there but it’s not something that you should go on a pilgrimage for and it’s not cheap either.
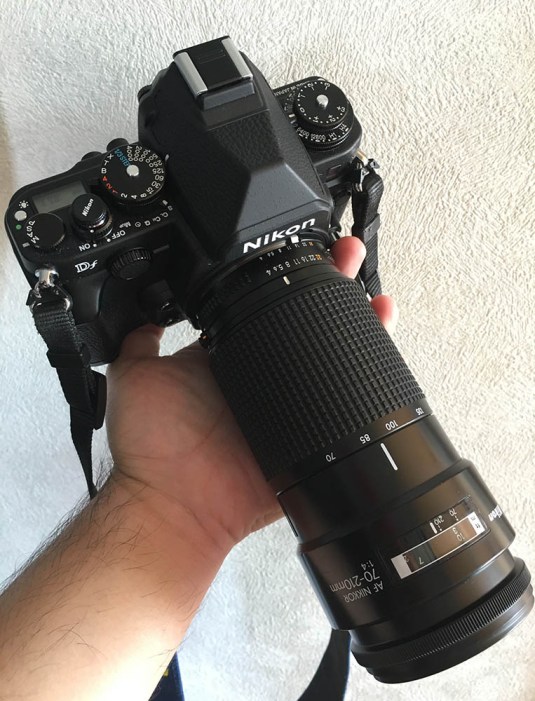 Here it is with my Nikon Df. The AF-Nikkor 70-210mm f/4 balances really well on smaller bodies and isn’t so bad with larger professional camera bodies like the Nikon D4. Despite all the plastic parts, the lens feels more solid than recent kit offerings. This was built to a much higher standard compared to 3rd party lenses of the same vintage and category.
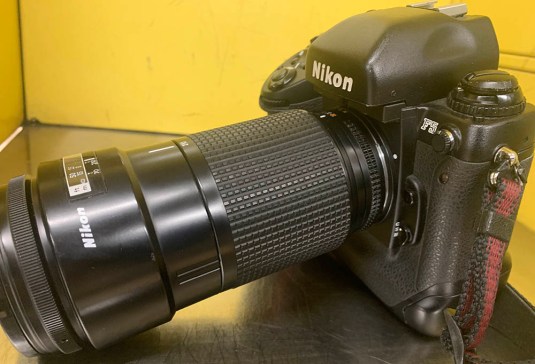 It focuses fine on most cameras but the mighty Nikon F5 and its brutal motor’s torque is going to make it focus even faster. It feels great with the Nikon F5 and it feels like it was made to be mated to this beast-of-a-camera. It feels like driving an old American car with a V8 engine under the hood. It does feel flimsy compared to the Nikon F5 but I don’t care because I need that powerful motor to make this lens focus faster.
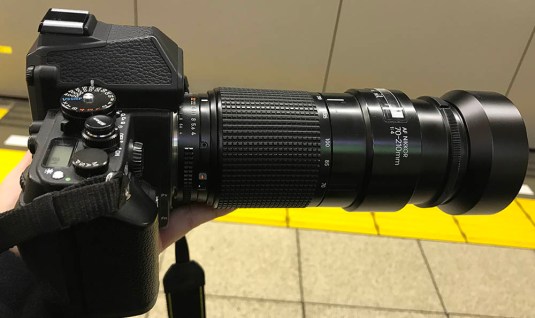 The handling of this lens is nice due to the very broad zoom ring but unfortunately it is too broad. Nikon could have made it a bit narrower and use the space instead to add the all-important tripod collar! Shooting this lens on a tripod is not fun because it’s too long so it’s front-heavy, straining the lens mount and the lens’ bayonet. Shown with the lens here is the optional Nikon HN-24 hood. It does add a few inches to its overall length but I would say that this is essential because of this lens can be prone to flare. Its focusing ring is also too thin just like all early AF-Nikkors tend to have. It’s a bit pathetic but useable. It also uses a 62mm filter so if you are invested in 52mm filters then it’s bad news for you.
The AF-Nikkor 70-210mm f/4 can be had for under $100 up to $250 depending on the lens’ condition. A beater or junk can even be had for less. I got mine for less than $19 in a junk box because it had dirt inside and a bit of fungus. This lens won’t even focus properly so I was taking a huge gamble when I bought this. Autofocus lenses can be fragile inside, any mechanical problem like this can be very risky and anything related to the electronics is “fatal” to the lens. I was waiting for a reasonably-priced AF-Nikkor 70-210mm f/4 and this is my chance so I just bought it hoping that I can fix what’s wrong and it all paid off. This isn’t the best-looking lens around but it sure gets the job done!


(Click to enlarge)
Here are 2 images to illustrate the difference between 70mm and 210mm. For those who are new to photography, I hope that these 2 images will give you an idea of how different the 2 focal lengths are. 70mm on full-frame is still wide-enough to give you a normal field of view that’s closer to 50mm. Sure, it’s longer but still enough to get plenty of things into the frame. 210mm on the other hand is very long and the compression is quite different. It’s a very useful focal length to flatten your framing or give you the reach that you need.
The biggest complaint with this lens is the rather slow and noisy AF. The noisy autofocus is dependent on the camera body you use it with. On modern Nikon cameras, the noise is not as loud compared to the cameras from the ’90s and earlier. The speed will depend on which body you use this lens with. The professional Nikon F4 has powerful motor and it will help with the speed issue but the cheaper bodies like the Nikon F80 will give you the slow AF that people are complaining about. The AF speed isn’t so bad on my Nikon Df so I can live with it. Most, if not all of Nikon’s earliest AF lenses have a longer focus throw like that of their manual focus predecessors. Nikon learned to get around this by making the focus throw a lot shorter on successive designs. Nikon was thinking that people manually focus the lens from time-to-time but it turned out that people were mostly using AF so it became apparent that a shorter focus throw will be more beneficial for AF lenses. If you are thinking of buying this for your Nikon then make sure that it has an in-body motor or else it you will only be using this as a manual focus lens!
 This is another sample shot wide-open, this time on some real subjects. The shutter speed was slow and the subjects are moving. I shot this to see how well this lens will track them in this kind of light. Sure enough the lens was hunting a bit but I managed to nail them in a split-second. I love how the lens renders the old couple and how natural the picture is.


(Click to enlarge)
This lens can focus really close just like its predecessor, it has a “macro mode”. This just implies that the lens can be extended even longer for the closer focusing. The minimum focusing distance is just around 1m and that is pretty close for a tele-zoom! You can use this for taking pictures of wedding rings or the figurines on a wedding cake. While this is generally thought of as useful, it is also one of the causes for this lens’ slow AF. The motor has to turn the AF drive more because there is no limiter on this lens and when you lens is hunting for focus, the lens will focus from one end of the helicoid to the other. If Nikon added a focus limiter switch like the next generation of AF lenses then this lens would be a lot faster since the helicoid doesn’t have to travel this long.


(Click to enlarge)
The above images were shot wide-open at 70mm, 135mm and 210mm respectively. Don’t mind the boring subject, it’s just my wife’s cluttered make-up kit! Vignetting is heavy but I just wanted to illustrate how sharp this lens is. Many zooms exhibit poor performance at one end or both and then improves a lot at the middle of the range but this lens shows that sharpness is quite good across the focal range at the center. Very nice for portraits or newbies who like to pixel-peep at the center of the frame. The corners tell another story.
 This picture was shot at f/8. Despite stopping it down by 2-stops, the corners aren’t getting any better. It’s poor and disappointing. If you are going to shoot landscapes with this lens I will caution you about the corners and not put anything important there.
 This is how vignetting looks like wide-open. There is considerable vignetting and I would advise that you stop-down a bit when this bothers you specially when shooting the sky. I would say that taking normal pictures with this lens is perfectly OK since I was shooting this picture heavily underexposed just to exaggerate the vignetting for us all to see.
The following sets of images were shot from f/4, f/5.6 and f/8. I chose to do the test during the night so you can see the bokeh balls and judge how it is for yourselves.


(Click to enlarge)
The bokeh balls look smooth wide-open and it gradually turns into polygonal blobs when you stop it down. As expected, the subject looks great even wide-open. Even when I was shooting at around 1/30s, I managed to get it this sharp. You will want to shoot at around 1/200s and no slower than that (ideally) when shooting at longer focal lengths.


(Click to enlarge)
Here are some more samples shot at f/4, f/5.6 and f/8 respectively. The vignetting is more noticeable this time and it makes your image look underexposed at f/4 but stopping the lens down a bit helps a lot. It’s sharp at the center from f/4 and it’s great by f/5.6 and the center looks excellent at f/8. Don’t be afraid of shooting this lens wide-open but you need sharp images at the center and still maintain some background blur then by all mean, do shoot at f/5.6 and be happy with it. I’m being a bit conservative here so don’t worry.
 Like what I mentioned before, flaring is a problem with this lens on digital sensors. This is how terrible it looks. You get a “dreamy” image when shot into the sun even on a dark and cloudy day. If you want to shoot something for the Sgt. Pepper’s Lonely Heart’s Club Band then this lens will take you to a nice acid trip! You may see Lucy in the sky, too!
 Chromatic aberration will exhibit itself as magenta and green flares on highlights on this lens. It’s not apparent here but you’ll see it when you shoot shimmering water or other similar scenes where there are bright specular highlights or reflections. It’s not that bad but just be aware that this lens has a tendency to show such things.
 Here is Mr. Magoo thinking about what he’s going to have for lunch. This was shot at f/4 I believe. Nice detail and rendition. I had to tweak the dynamic range a bit at post because of the strong sunlight. A strong light source will cast an equally strong shadow.
 A very boring and uninspired shot of some ducks at the pond. Just adding this picture so you’ll see how this lens performs when taking pictures of ducks relaxing on a cold day.


(Click to enlarge)
Some foliage shots to give you an idea on how this thing renders leaves. Check out the far corners of the frame and see if it’s acceptable to you. It’s a nice walk-around lens but not for critical corner sharpness, you will want to use a different lens for that.


(Click to enlarge)
Surprisingly, this lens exhibits very low distortion for a zoom. If you are shooting some architectural shots then this lens will be very useful for you. Long zooms usually show some barrel distortion at the wide-end and pincushion distortion at the other end.
 I was hoping for nicer sunstars but this isn’t going to show it. Maybe I should shoot some street lights if I want to get them or at least stop this lens further. Again, check out the far corners of the frame and see how terrible the corners are even at this small aperture.
Let’s now see some samples that were shot using film. This lens was designed during the film era so shooting it with film will make us know more about what the designers were thinking when they calculated this lens. Film also has a unique look that you cannot get by simulating it in digital so seeing how a lens performs in both digital and film is going to be beneficial for us if we want to study a lens better. I shot these with the Nikon F5 and I used Kodak Ultramax 400 because it was a cloudy day and the slight yellow cast that the film has will help make things look better. I shot everything wide-open because I wanted to use the fastest shutter speeds available to me since this is a long lens.
 The AF performance of this lens isn’t the best but the powerful motor of the Nikon F5 will make it focus faster. Fast-enough to track this bird in C mode. This is the “mejiro” (目白), a bird that’s active and doesn’t stay-still. It heralds the coming of spring as it eats cherries. I love these birds because they are very lively.
 This is a tricky shot as it was back-lit, the Nikon F5‘s spotmeter works perfectly for this. I was able to use the right-most AF point to meter-off the lady’s skin. Zoom lenses are great for these kinds of situation because you have the flexibility to change focal lengths. I love how sharp this lens is even when shot wide-open.
 The lens is handy with a useful zoom-range. I think this was taken using the 70mm end, I find it really useful in fast-changing situations and changing lenses will only result in me losing “the moment”. The compression a long lens offers is useful for framing, you can’t frame this shot with a 35mm lens since it’s going to make the lady furthest to you smaller and the 2 ladies more prominent. Using the right focal length is important in telling your story and it will make or break a shot.
 The lens has decent subject separation properties but it’s mostly depenedent on how you position your subjects in relation to the background and your camera.


(Click to enlarge)
Here are two pictures showing how positioning can determine the extent of de-focusing or blurring of the background. The closer your subject is to you, the stronger the effect of de-focusing is to the background. Use this trick if your background isn’t interesting, if the details in the background distracts your eyes then it’s best not to have them there at all. If they’re blurred then it’s just as good gone.
 It’s a surprisingly capable lens, one that can easily-replace an f/2.8 zoom in my bag if I’m not in the mood to carry a bazooka. This lens is fast becoming one of my favorites and it’s going to see more use from now.


(Click to enlarge)
The lens is more than capable as a portrait lens. It’s sharp and the contrast is beautiful, it doesn’t have the delicate rendering of the Nikkor 180mm f/2.8 ED Ai-S but that is a legend amongst Nikkors so it’s not fair to compare this with that lens.
 The lens can sometimes be too-sharp for portraiture but it’s still a good choice because of the convenient zoom range. You’ll also notice that this lens can render a nice 3D-effect in the photos taken with it, something that’s lacking in many lenses made in recent years. It can be blamed to pixel-peepers who value a lens’ score in the charts rather than how the lens renders its subjects. These said pixel-peepers hold considerable influence, beginners who don’t know any better listen to them and buy the lens with the best score. Sales will finally dictate what marketing wants and that will dictate what the designers make.


(Click to enlarge)
These were taken using the 210mm end, the compression is great for making the subjects look “flat”. A shorter focal length will make them look larger in relation to everything so I always use a focal length that’s longer than 85mm for portraits like this, 85mm is nice for portraits that show the body more. I don’t feel that 85mm is long enough for this kind of framing, you will want a 135mm lens for this at least.


(Click to enlarge)
Here are more pictures that I took with this lens and film combination. These should be good enough to give you a good idea on how this lens performs with film. It sure isn’t the best lens available out there but it’s still a good lens despite its age. You cannot go wrong with this lens specially at the prices that they’re being sold for these days.
Having seen my sample images, I hope that you get an idea on how this lens performs. It isn’t really as bad as what you think I’m trying to imply but it certainly is not the miracle lens that some people make it out to be. It’s a pretty good lens for its price these days and I would recommend this lens to anybody looking for a nice and cheap AF tele-zoom. Just don’t expect too much from it and you won’t be disappointed. Part of using any tool is to learn its strengths and weaknesses and this lens is no exception. The price of this thing has appreciated quite a bit lately due to hype and whether the hype is real or not is only dependent on your own judgement and this article will help you decide for yourself.
Before We Begin:
If this is the first attempt at opening a lens then I suggest that you read my previous posts regarding screws & drivers, grease and other things. Please also read what I wrote about the tools that you will need in order to fix your Nikkors.
I highly suggest that you read these primers before you begin (for beginners):
- Essential tools
- Best practices 1
- Best practices 2
- Best practices 3
- Ai conversion
- Working with Helicoids
Reading these primers should lessen the chance of ruining your lens if you are a novice. Before opening up any lens, always look for other people who have done so in Youtube or the internet. Information is scarce, vague and scattered (that is why I started this) but you can still find some information if you search carefully.
I highly recommend that you also read my working with helicoids post because this is very important and getting it wrong can ruin your day. If I can force you to read this, I would. It is that important!
For more advanced topics, you can read my fungus removal post as a start. This post has a lot of useful information here and there and it will be beneficial for you to read this.
Disassembly (Lens Elements):
This is probably what most people here will be interested in. Many samples of this lens in the used market have some form of dirt or fungi in the inner elements and this is how you can access the lens elements. I am not going to open every cell up for you to see but I will show you how to access them. If you need to open up the cell/groups and you’re new to the camera repair thing, I suggest that you read my other articles so you will get ideas on how to properly work with lens elements and how not to get them all mixed-up. I am going to also tell you to open and work on one optical cell at a time so you won’t get into a mess and forget which part should go where or what direction a shim or spacer should be facing. I am lucky that I didn’t have to open these up and I also didn’t have to open the rear optical cell/lens elements group. If you need to do that then I apologize because I’m not going to show you how to do that here. Maybe if I get the chance do that in the future then I will update this article but for now, this is all I can show.
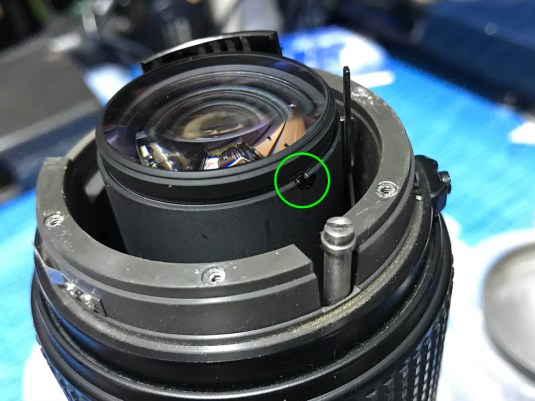
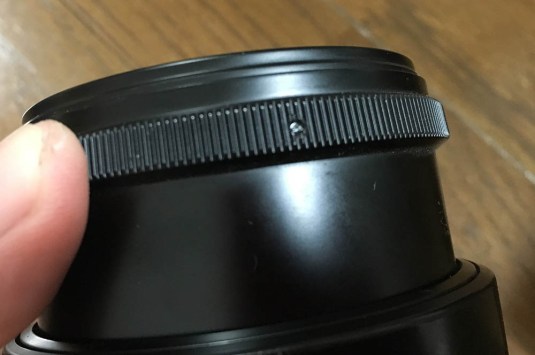 Remove this grub screw so you can remove the front elements group.
 The front elements group can be removed by unscrewing it. Mine was kind of tight and I had to place a few drops of alcohol on the seams to soften up the glue on the threads. The front elements group was still a bit stiff but at least it’s not stuck anymore. I had to use a rubber pad to help me add friction to my grip and then I finally unscrewed this thing off.
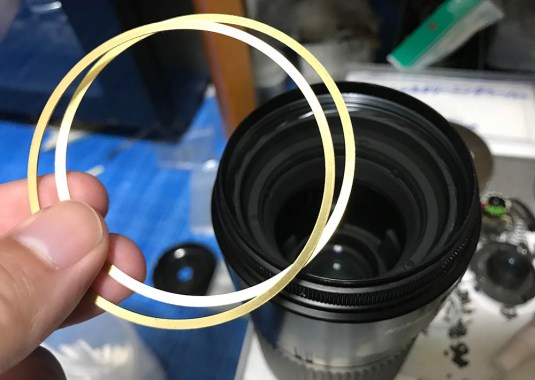 These brass shims are used by Nikon to adjust the infinity focusing of the lens. These are unique to every lens so don’t lose or damage any of these! Proper focusing is achieved on this lens by how deep the front elements group is seated. You can probably find these at some specialty shops but the combination to achieve the correct thickness will be hard to match if not impossible. Each lens will have a unique combination of these brass shims.
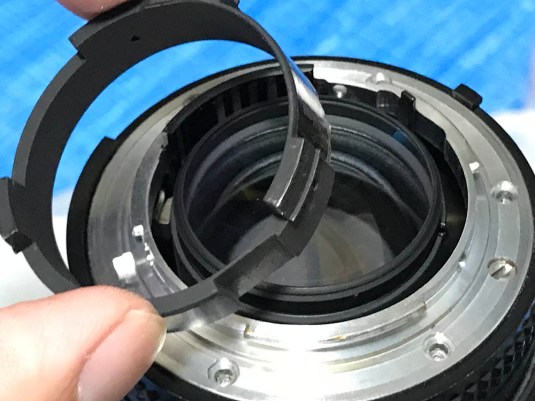
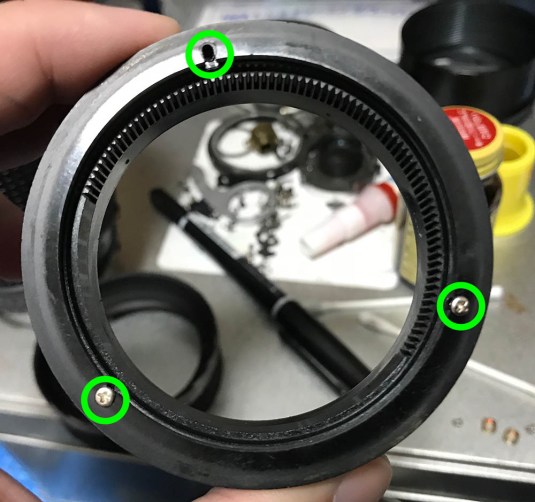
 Once the front elements group is gone you can now access some of the inner parts of this lens. You may need to zoom in or out in order for the 2nd elements group to be shallow enough for you to reach it. Get a pair of lens spanners and remove this part by using the 2 dimples encircled on this lens and be careful not to scratch anything with your tools!
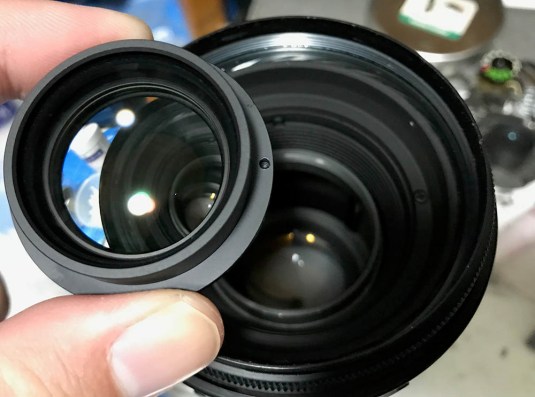 The 2nd elements group is shallow enough for you to pick it up with your fingernails but if you have a lens sucker at hand then that would be even better. Don’t drop this thing!
 The 3rd elements group can also be removed using a spanner that is long enough for the tips the reach these slots. This is trickier to remove so you must be really careful and use the right tools for this. A slip of the hand can lead to a very expensive accident.
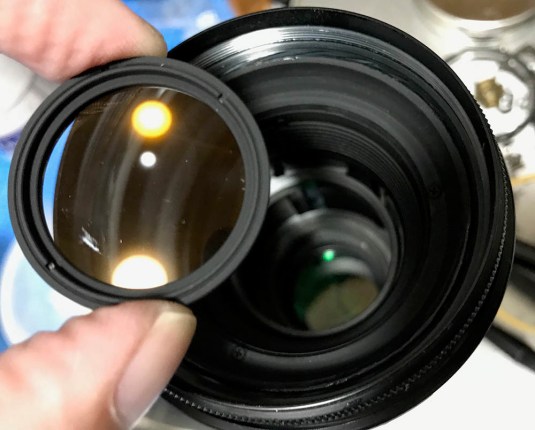 Extract this using a lens sucker because this will be too deep for your to reach with your fingertips. Never ever invert a lens expecting that you can drop a part onto your palms. I avoid doing this because the glass may get caught up with something and get scratched.
 To access the rear optic block/lens elements assembly, you will have to remove the lens’ bayonet. First, you will need to remove the baffle. Remove all of the small screws found on the throat of the bayonet and if I recall, there are 4 or 5 of them including that tall one that prevents the lens from overturning in the bayonet. The screws here can be fragile.
 The rear light baffle can now be removed by carefully pulling it away. Be careful with the contacts block because it is connected to a rather delicate printed circuit strip/ribbon.
 Remove all of the screws on the bayonet and you can pull the bayonet off. The aperture ring can also be removed at this point. Take note of that long post for aperture coupling. The aperture ring may get caught so be careful while pulling this off or you may damage anything in this part of the lens. If I recall, this can get caught on a small metal part here.
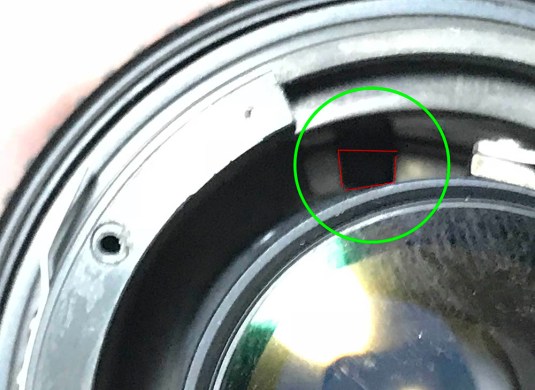
 The housing for the rear elements assembly can now be accessed. There are 2 slots in the housing (1 shown here) that you can use a spanner with. Make sure that your spanner’s bits are thin enough to reach it because on my lens the contact block is on the way of one of the slots. Be careful not to damage anything while you extract the rear optical block. I also flushed and lubricated the base of the screw-drive while it’s accessible. There is also a relay gear underneath its base and I put a small amount of oil on it to help prevent it (not shown here) from squeaking. Remember to only use high-quality watch repair oil.
 You can now extract the rear optical block just like this. Do not lose or damage this shim because it’s important to the lens’ optical performance as it’s needed to maintain proper spacing of the lens elements. Just like the other shims, this is unique to this lens. If you’re keen-eyed, you will notice that the contact block is now dangling loose. Be careful with it or you may damage it and brick your lens. A simple routine may become a big disaster!
 While putting the aperture ring back, do take note that the post of the aperture coupling pillar should fit inside this slot. Plenty of patience and a steady hand is needed here.
That’s all as far as accessing the lens groups. Autofocus lenses are not as tough as manual lenses when it comes to build so go about carefully or you may accidentally damage any delicate electronic parts and this lens has a few of it despite being mostly mechanical. Its ribbons an printed circuitry can be delicate and make sure that you don’t touch anything with your barehands because static electricity can ruin the electronics.
Disassembly (Focusing Unit):
You normally would not want to do this with your AF lenses because these are meant to run in an almost-dry state and with the minimum amount of grease. In fact, only a very thin film of grease is used here just to prevent squeaking. You will also need a special or very thin optical grease for this. Only do this when you have to! This lens was definitely dropped or squashed so it cannot AF properly so I had to do this to investigate. Doing this just for the sake of it is not a good idea and is unnecessary so long as the lens’ AF is OK.
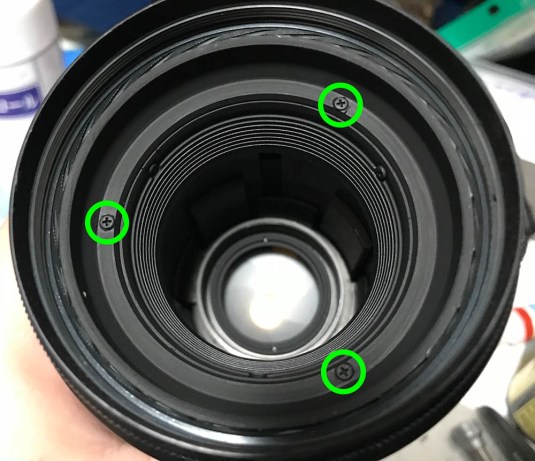 The focusing unit of this lens can be removed by unscrewing these 3 screws. Before you remove these, take some notes on the orientation of the focusing unit because you’ll have to put it back the same way you got it out. These screws sometimes get loose and end up rattling inside the lens. How they manage to get themselves loose is a mystery to me.
 The focusing unit can now be safely extracted. You may have to wiggle it a bit to get it off because the gears may be locked to the plastic teeth of the helicoid’s housing.
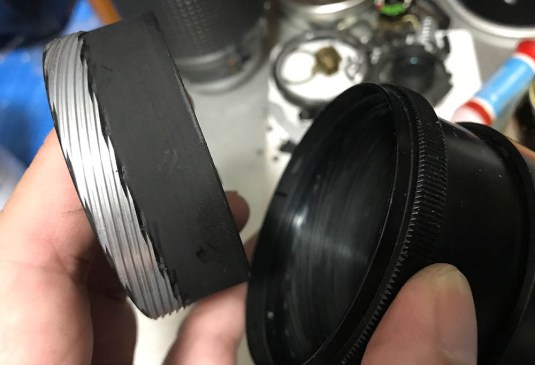 The helicoid can now be removed. Before removing this, never forget to mark where the parts separated. Read my excellent writeup on how to work with helicoids just in case.
 The thrust cam can be separated by removing 2 guide keys. The thrust cam is the thing in the lens that extends and retracts as you focus in and out.
 Here is another one on the other side.
 The thrust cam/front barrel can now be safely removed. Make sure that you take note of its orientation because you don’t want to put this back in the wrong way! If you did, your lens may not focus properly and you will have to open it up again! A waste of effort.
 These gears engage the AF drive’s gear. You can remove it by unscrewing these 3 screws. The threads are plastic so go about it carefully. Just like the previous parts, these should be put back in the same orientation you got it out so take some notes.
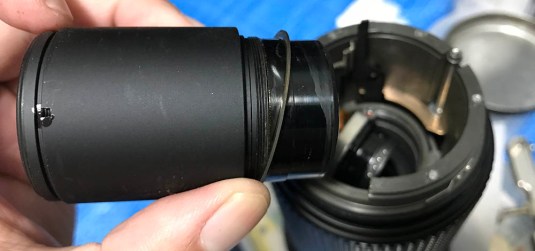
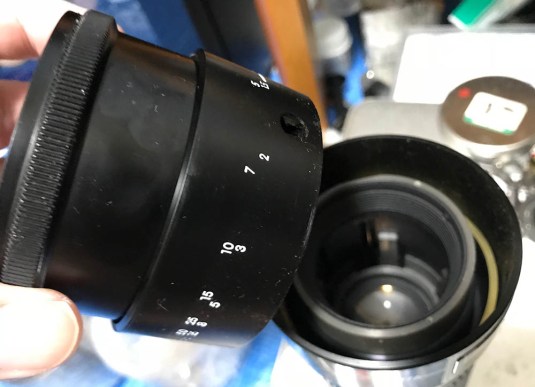
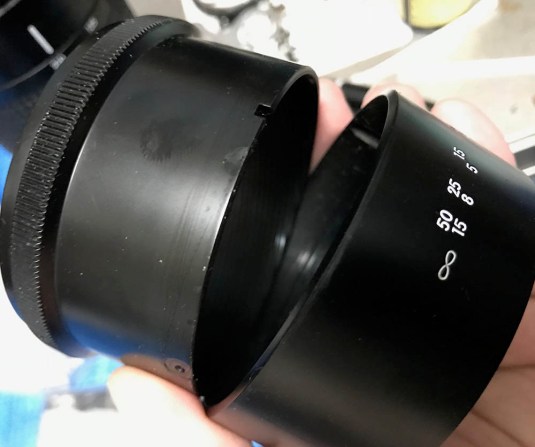
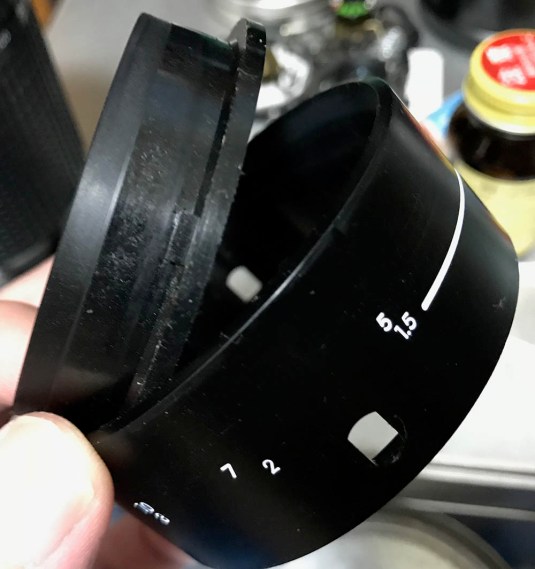 You can now separate it from its casing. The casing also has the scales printed on it. This thing rotates as you focus in or out and you can actually see it through the window of the focusing scale. Be careful not to rub the white paint off or you’ll have an ugly lens.
I can surmise that the lens has been dropped or squashed at some point because its front part (of the barrel) where the scale is located has been warped. It’s not perfectly round so that says a lot. The good thing is it isn’t touching the front barrel when it rotates or else I will to re-shape it with heat or shaving some bits off from it. I am guessing that the teeth on the cam got dislodged with the AF drive’s gear and that kept the lens from focusing or extending properly. I also took the time to clean everything since everything is exposed and it wouldn’t make any sense for me not to.
Conclusion:
This was a fun project and it did not take me long to do. I was disappointed to see lots of plastic parts on this lens but plastics was the big thing back in the ’80s! This lens felt like a Series-E lens than a Nikkor because of the plastic parts inside. The Series-E DNA is most apparent when I saw some plastic threads for some of the screws. Plastic threads are no match to metal ones and a simple knock will ruin the threads and make it loose. I am not even sure if you can re-tap it properly with normal hand taps.
Like what I previously mentioned, you normally wouldn’t want to open up an AF lens in this manner and clean the helicoids like what you would do to a manual focus lens. This is a waste of time and if you don’t have the special thin grease for the job then forget it.
 These are my special grease for AF lenses. These are the same things that the camera and lens makers use. They don’t sell these in small quantities by the way, only in gallon tubs.
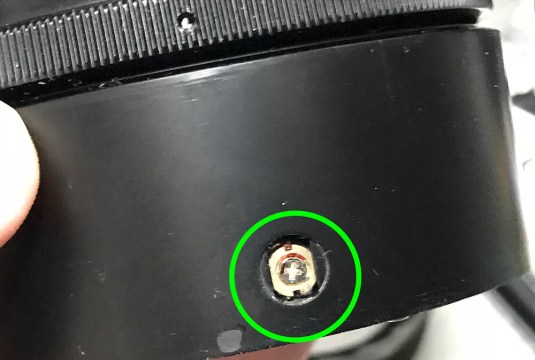
 This gear was oiled using a very small drop of precision watch oil. Never put too much or it will spatter and soil everything inside your lens as the oil will migrate everywhere. I’m getting lazy these days, the proper way of doing this is to flush it first with naphtha and exercise the part to dislodge any dirt that has been solidified then blow some air with a rocket blower to get rid of excess stuff and dirt. Only after doing this can you be sure that your mechanism is ready to be oiled. I should probably slowdown a bit and stop being so lazy. Maybe I was just tired that night and I just wanted to finish this as soon as possible.
Here’s the lens after I’ve worked on it. I am just showing this to you to demonstrate that it doesn’t squeak anymore. Many people report that this lens squeaks while you do this and it sounds like a high-pitch grinding sound akin to opening a zipper on a bag. This is proof that the lens can be silent. It depends on the quality of your speakers but it does not sound terrible to my ears and I was surprised at my work. Good job, Richard!
Here it is now. At least it can now focus properly and smoothly. It’s not the fastest AF lens I have but it’s not so bad depending on which camera body you decide to use it with. The lens is equally slow on the Nikon D5 as it is with the Nikon Df just for your information.
I’m very much satisfied with how the AF is working now. I would have preferred it to be faster but that has more to do with the AF drive’s gear ratio and the helicoids’ design. I’m glad that I got it to work again considering that I got this in such a bad state where the AF isn’t working properly and is kind of stuck. There is also a small fungus infestation going on in the central elements and the overall state of the lens was poor. I’m glad that it can now be used normally and I may even bring this lens to a portrait shoot in the future. I’m going to enjoy this lens until it breaks down to pieces. It’s such a lovely lens and is really a keeper. Thank you very much for reading another of my articles! I hope that you liked this one. I have not seen anybody talking about repairing this lens on the web or at least not as far as what we have tackled here (which isn’t saying much anyway). I am sure that most people who come looking for my article would just want to clean the glass so this is probably more than enough and I hope that this helped somebody. See you again, Ric.
Help Support this Blog:
Maintaining this blog requires resources to operate. If you think that this site has helped you or you want to show your support by helping with the upkeep of this site, you can make a small donation to my paypal.com account (richardHaw888@gmail.com). Money is not my prime motivation for this blog and I believe that I have enough to run this but you can help me make this site (and the companion facebook page) grow.
Leave me some tip?
Thank you very much for your continued support!
$2.00
Helping support this site will ensure that this will be kept going as long as I have the time and energy for this. I would appreciate it if you just leave out your name or details like your country and other information so that the donations will totally be anonymous it is at all possible. This is a labor of love and I intend to keep it that way for as long as I can. Ric.

Nov 19, 2017 @ 15:43:13
It is a super article, work and pictures !!! 🙂
Nov 19, 2017 @ 15:43:41
Thanks!!!
Nov 19, 2017 @ 19:36:56
Very well done Richard. I am a camera repairman and have been since 1980. I use to be the lens repairman at Nikon factory repair facility in San Francisco up until they closed. You are very thorough, I wish I had your repair knowledge back in the day.
Nov 20, 2017 @ 00:11:11
Thank you, Steve! I mess up my job sometimes 😦
Do you accept repairs? Do you have a website in case people ask me for recommendations? Ric.
Nov 23, 2017 @ 17:04:47
Hi Richard,
I have two 70-210mm F4’s. I do like these lenses, but I find myself with two of them
with fungus behind the front element. So I removed the grub screw, drizzled cellulose thinners into the seam to soften any glue. But neither will shift. I have been pushing down hard on a rubber pad. Absolutely no joy. How can you grip as there is sol little showing to grip on ???
Any advice would be fantastic
Steve Henesy (UK)
Nov 23, 2017 @ 23:13:48
Hi, Steve!
Use a pair if rubber loves. Did you read my fundamentals? Ric
Nov 24, 2017 @ 13:45:19
Hi Ric,
Yes used rubber gloves. Not something stupid like left hand thread ??
Both just show no sign of movement !
I am assuming that celluloise thiiners does the same job as alcahol ?
If I can’t shift, might just end up selling both as spares / repairs which would be a shame
Nov 24, 2017 @ 13:47:38
Steve, try alcohol or MEK. They have been most likely secured by lacquer so alcohol should do the trick. It can be hard and it took me a lot of effort. Ric.
Nov 24, 2017 @ 18:57:50
Hi Richard – Thanks for the advice, just ordered some MEK !
Steve
Nov 29, 2017 @ 13:57:30
Hi Richard,
So I got my MEK and one of the lenses has now given in and I have been able to remove the front group (HOORAAAHH). So inevitable next question, does the front group split as it look like there are two lenses there ??
Thanks
Jan 13, 2018 @ 19:28:20
Richard Hi,
I have an autofocus 180mm that seem to have loose or broken focusing mechanism and needs repair. I managed to disassemble back and front part of the lens but the focusing mechanism is inside a metal cylinder that I don’t know how to remove. Do you have any ideas?
Jan 14, 2018 @ 02:30:31
Hello.
Which version is it? Ric.
Jan 14, 2018 @ 13:11:18
Nikon ED AF NIKKOR 180mm 1:2.8, it looks exactly like the D version
Jan 14, 2018 @ 13:28:36
let me check when I have the time.
Mar 19, 2018 @ 18:01:17
Hi Richard
Thanks for the detailed information above!
I just got this lens for 140 $ on ebay. The optics are fine but the af makes a terrible noise. It’s not so much the inside of the af but it seems there is a rubber that doesn’t allow the focusing tube to go in and ou smoothly. Your’s sounds wonderful after repair compared to the one I have. I’m not at all good in repairs and will not risk to open the lens. Is there a chance that I can fix this otherwise ? To use oIl or graphite is probably no good idea.
Mar 19, 2018 @ 23:12:10
Hello. That lens is usually noisy and it can’t be helped. It sounds like a zipper. Try using it with a camera and see if it’s still noisy. Ric.
Mar 19, 2018 @ 23:46:40
Thanks!
Before I asked you I did 200 test shots with it on a D810. It sounds like that:
https://www.dropbox.com/s/osxpoh62rly7n37/210-70-focus-noise.m4a?dl=0
Very different from yours. I guess I’ll have to live with it since a repair will be more expensive than the lens itself.
Sep 06, 2018 @ 06:12:13
Great work, thank you for the information.
Sep 16, 2018 @ 22:31:45
Thanks!
May 23, 2020 @ 10:14:42
Thank you, foe an interesting read…
I higly enjoy my 70-210mm f4, I got it for 40 usd, a bargain!
Feb 14, 2021 @ 11:30:40
Hi Richard
Just cleaned the front lens group, as there was some fungus, now it looks lovely again, thank you for the article, I sent you a small donation…
Regards
Peter
Feb 17, 2021 @ 21:32:27
Hi Richard, in order to clean and lubricate the helicoid only, is it needed to remove front elements group and unscrew these 3 screws for removing of the focusing unit? Or is it anyway needed to unscrew the 2nd elements group?
Jun 23, 2021 @ 17:44:06
Hi Richard
Thanks again for a very handy and informative guide.
Chris
Sep 15, 2024 @ 04:54:36
do you have the instructions for disassembly the whole lens? Cause a screw has fallen inside the lens and I want to take it back. Thanks sir