
Hello, everybody! I hope that you’re all doing well despite the coronavirus scare. I’ve never experienced this in my entire life, I do not even recall that the SARS epidemic back then to be this severe. I hope that this thing will go away in the coming months, it’s making people act irrationally and you get news of people panic-buying disinfectants and toilet paper. The only thing this does is frustrate people who actually need them. Toilet paper is now a luxury, it’s something that we took for granted but now that it’s starting to become a valuable commodity we have to make the most of what we have. Speaking of luxury, I will show you something that’s fast-becoming one, it’s not a rare lens at all but the prices of these things are going-up in the used market since collectors and casual shooter are finding that these lenses are superb. These will become scarce in the coming years, too.
Introduction:
The W-Nikkor•C 2.8cm f/3.5 debuted in 1952 and it was considered to be the fastest lens of its class when it came out. At a time when wide-angle lenses for the 35mm film format were as slow as f/6.3 or less, this lens surely made things more interesting. This was based on an old aerial photography lens made by Nikon for the Imperial Japanese Military, it had low distortion and good resolution. It was miniaturized and that became the W-Nikkor•C 2.8cm f/3.5. This is a compact lens, its simple 6-element construction is really small and delicate. I’m sure that Nikon could’ve made this even faster but I do not know what’s keeping them from doing it since there is enough space in the barrel for a bigger objective, your guess is as good as mine.

The W-Nikkor•C 2.8cm f/3.5 is a very compact lens. If you think that this lens looks similar to the W-Nikkor•C 3.5cm f/3.5 then you’re guess is correct. This lens’ barrel was based on the W-Nikkor.C 3.5cm f/3.5 so the handling is very similar between them. It’s easy to mistake one for the other, you can end up bringing the wrong lens with you if you’re not careful.

It’s compact you can even store it in your pocket. Despite being tiny, this is a heavy lens, it certainly feels dense. This is because this lens uses brass in its construction. There’s no light alloys used on this, the perception of quality is apparent once you picked one up. You’ll immediately feel that it was made to last more than a lifetime.

It balances perfectly with the Nikon S2. You will need a separate viewfinder for this and any accessory viewfinder will do, even the ones made by Leica or Contax. If you own the Nikon SP then the edges of the wide-finder frame is equal to 28mm. I often mount this lens with the Nikon SP just because of that built-in wide-finder for 28mm.
There are 2 major versions of this lens, one is the standard one that you see here in this article and a later one that was made with a black barrel. There is also the W-Nikkor•C 2.8cm f/3.5 LTM version which was kind of rare but it seems that you can get one these days quite easily, that is if you are ready to pay the price for one. I got mine cheap because I was lucky.
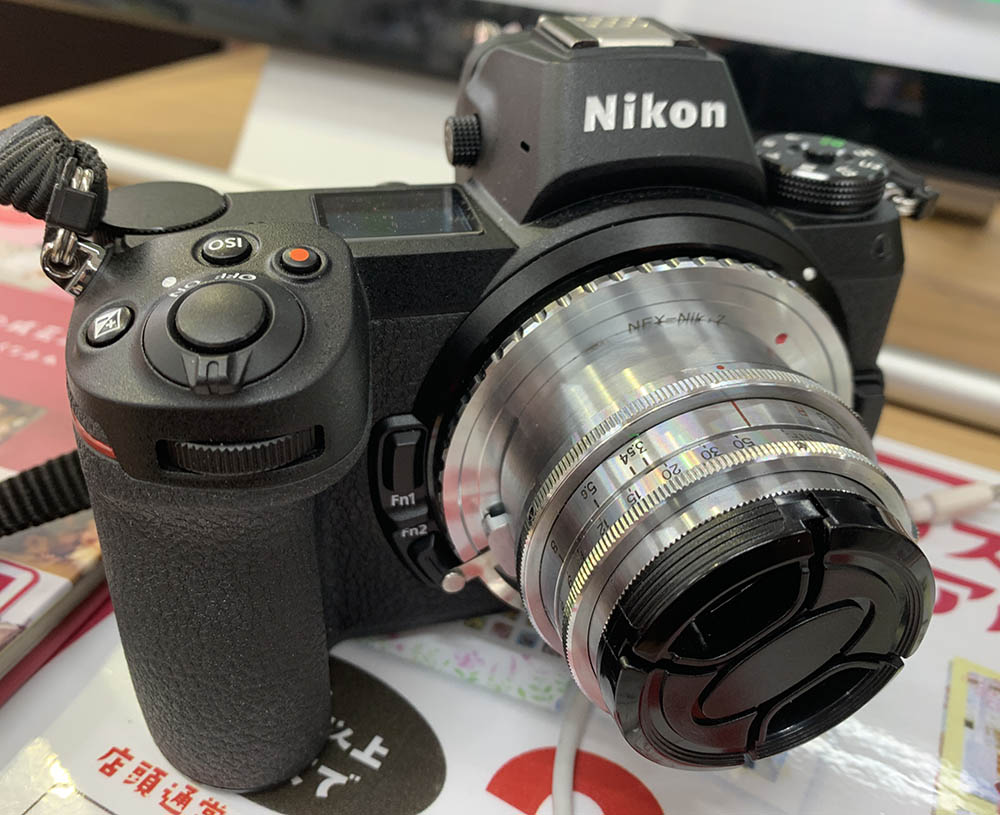
The Nikon Z6’s excellent viewfinder makes it easy to focus this lens. This is a big relief because you can now see through-the-lens and not rely on a small external viewfinder or the Nikon SP’s tiny window.
Time to see some sample photos. Learning how a lens performs is essential, you’ll learn how to maximize its strengths or workaround its weaknesses. It will help you decide whether it stays in the box or gets in your bag. The next sets of photos were shot from f/3.5, f/5.6 and f/8 from left-to-right. These are the apertures where you will see the most changes and I assume that people will be shooting this lens with these values frequently.


(Click to enlarge)
Vignetting is ever-present, it’s heavy wide-open and it won’t go-away even if you stopped the iris down to f/8. Distortion control is excellent, the lines are mostly straight even the ones near the edges of the frame. It’s impressive, it can do something that not a lot of wide lenses can. Flaring is terrible, you’ll also get ghosts, too. You can get ugly rainbow-colored artifacts when you’re shooting against the sun. All of the above are related to coating technology, this lens has really old-tech coatings so this is forgivable.
This lens has some of the ugliest bokeh quality I have ever seen. That’s fine, you don’t shoot this lens for that. On the positive side, it does give a natural, pleasing rendering on the things that are focused. Some call it the “vintage-look”, you either love it or hate it.


(Click to enlarge)
Some of the photos here have cropped duplicates so you can look at them at near-1:1 to see the details better. This lens is sharp wide-open, it’s amazing how the center doesn’t improve much as you stop the iris down. I can’t find any noticeable traces of chromatic aberration with this lens but you can see some spherical aberration in some of the photos which isn’t bad at all. Stop the iris down to f/5.6 and the center looks a bit better, the corners look nicer at this aperture. The lens is performing at its peak by f/8, you won’t notice a big change at the center but the corners do seem to improve a bit more. It’s a sharp lens from edge-to-edge, this is the strength of this lens. The bad side is the vignetting won’t really go away and you’ll still get it even if you stop it down to smaller apertures.

It’s a nice lens specially if you have adequate light, for night photography, it is important that you use a tripod with it.

This photo should show you that there aren’t any noticeable distortion from this lens. It’s impressive considering that this is almost 70 years old. The one thing that’s really bothering me is vignetting, there’s lots of it wide-open. It won’t seem to go away even if you stop it down and you’ll still see traces of it at smaller apertures.

Chromatic aberration is visible at the top part since it’s over-blown there. It also shows spherical aberration to some extent and that’s the worst that the lens can give you.

It can get hazy when shooting scenes like this and a daylight filter may help. This lens has really old coating technology, it’s not a bad lens at all but it has certain limits that you should be aware of.


(Click to enlarge)
Here’s its real weakness. Flare and ghosting are both terrible with this lens. Despite the big red “C” designation in its name, the coating is inadequate by today’s lens standards. Stopping it down only solidifies the ghosts and help alleviate the flaring a bit. If you want an exotic lens for the flare and ghosts then this lens is for you.


(Click to enlarge)
Here are a series of pictures shot from f/3.5, f/5.6 and f/8 respectively. Wide-open, the lens is already showing a strong center. It’s sharp and stopping it down does not really make it any much sharper. Vignetting is almost ever-present. Never mind the thing on the lower-right corner, that is my finger covering the frame.


(Click to enlarge)
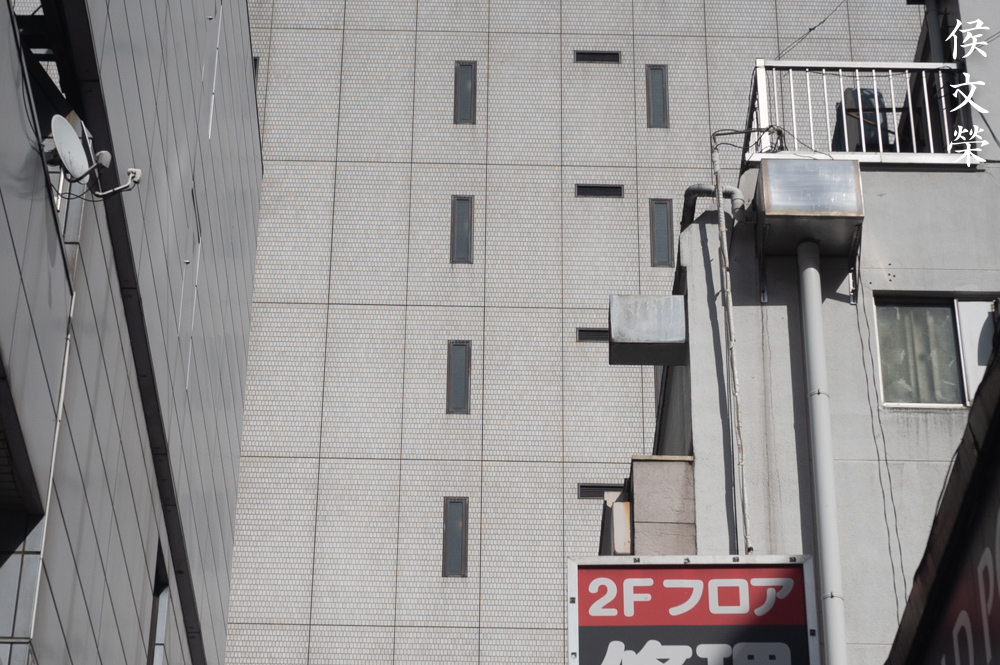
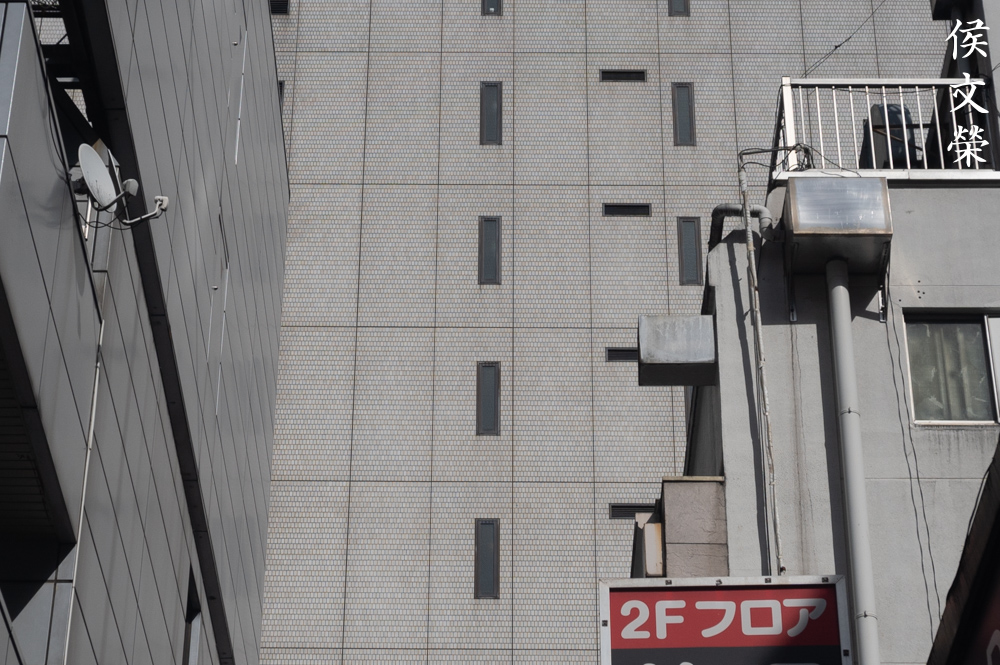
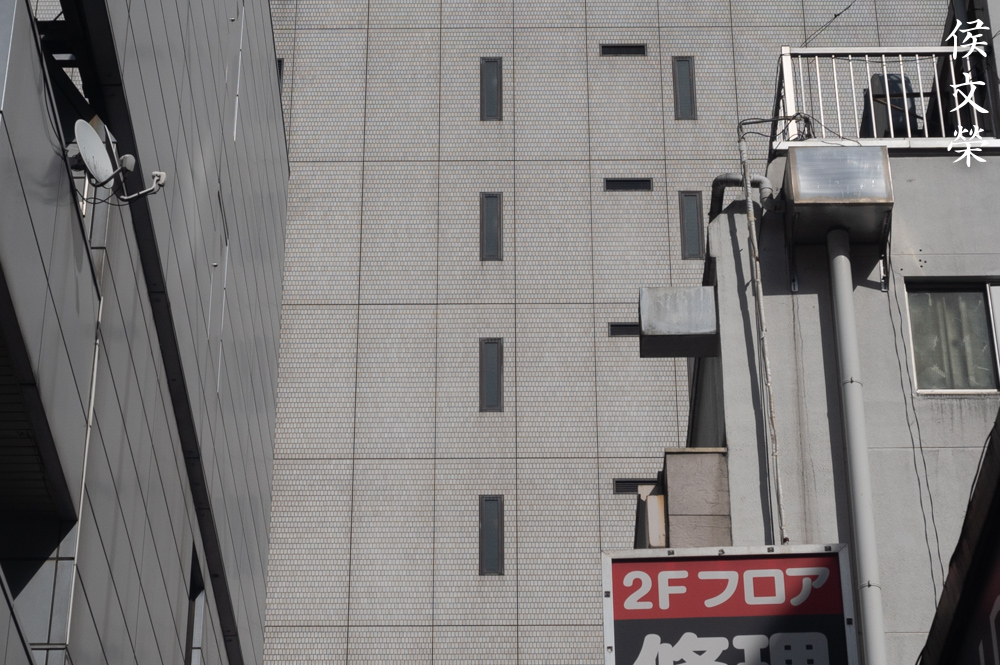
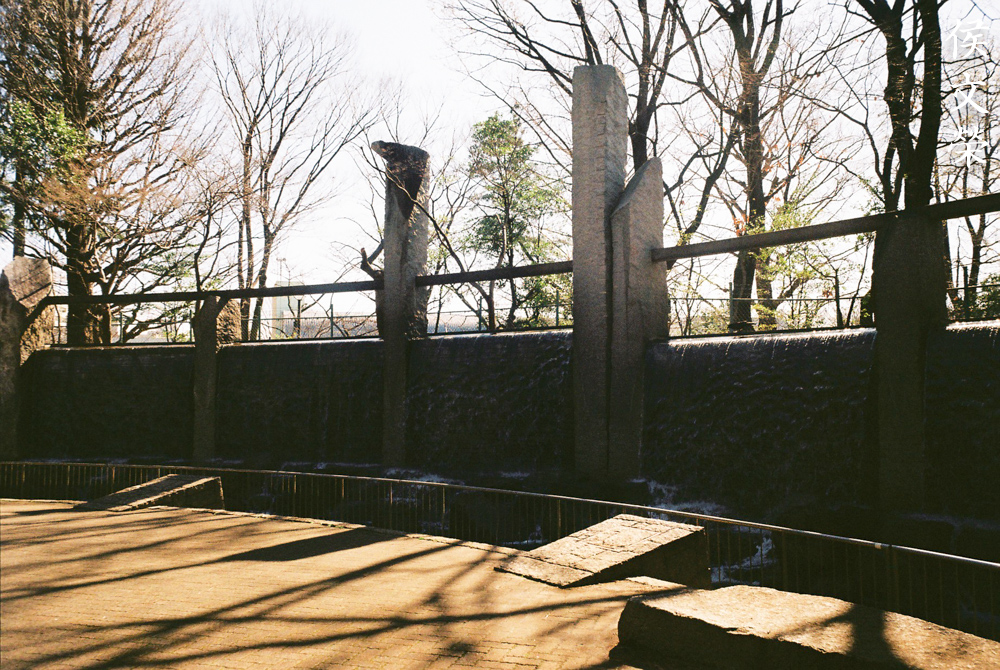
These photo shows how beautiful this lens is when used for its intended use like architectural photography. The vignetting doesn’t really show up in real use, the straight lines all remain straight. Color rendition is on the cool side, typical of older lenses, these were corrected for use on monochrome film.
This was made during the film era so it’s only fair that we judge this with its intended medium. Film has a unique look thanks to film grain, it can either mask or amplify a lens’ flaws. This is also the reason why it’s simulate film’s look with a digital camera. I think that this lens is best used with film and it is the reason why I am showing you these. I shot these with my Nikon S and the film I used is Kodak Color Gold 200.


(Click to enlarge)
Poor coating technology (by today’s standards) makes it vulnerable to flare, ghosts and other related issues. It’s hard to avoid this even with film. Film’s emulsion-side isn’t as reflective as a digital sensor so it is less vulnerable to reflected light from within. You will either love or hate what you see here, I personally don’t mind it except for the last photo where you can see streaks across the frame. That one’s strange, is this caused by balsam separation? It doesn’t seem like my lens has lens separation but it does have a slight haze.
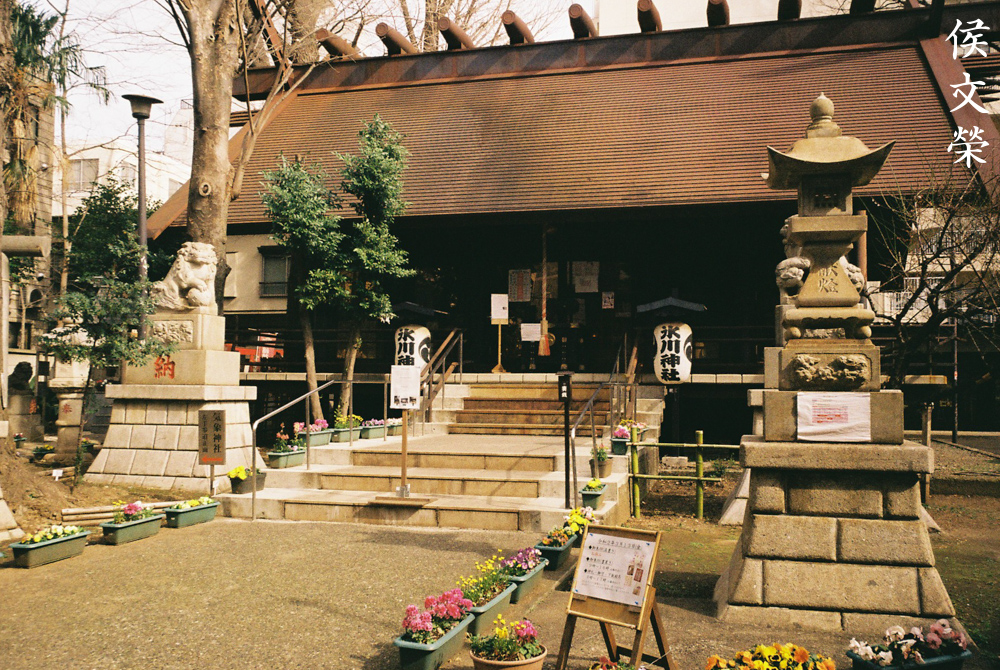
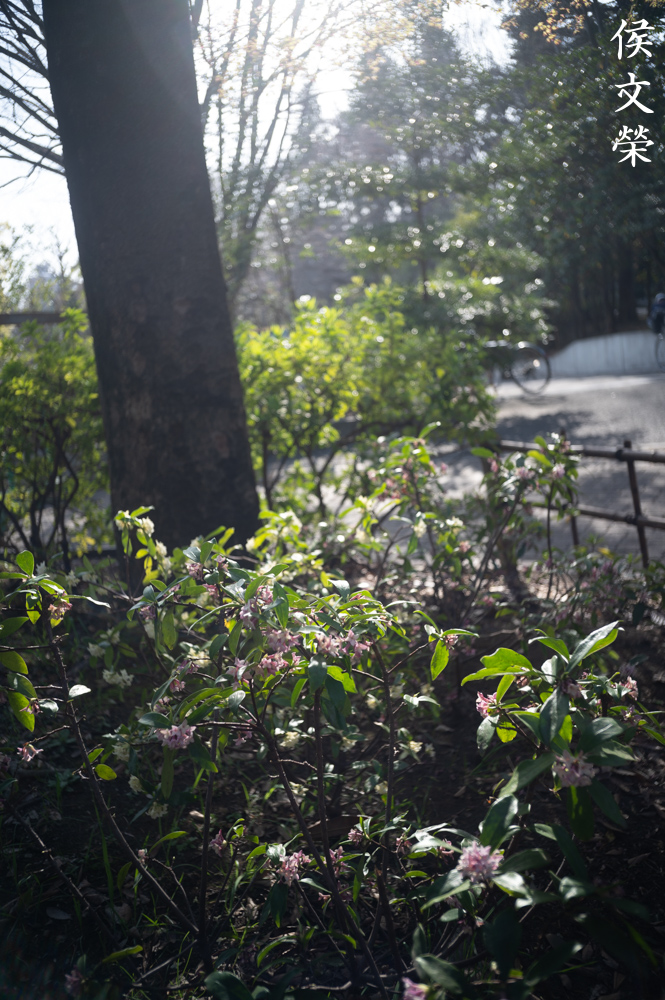
When you’re not shooting against-the-sun you’ll get amazing, sharp photos. I love this lens’ resolving power at smaller apertures and the contrast looks great, too.

Lovely colors, I think I shot this with the iris wide-open. This is a great lens for walking-around town.
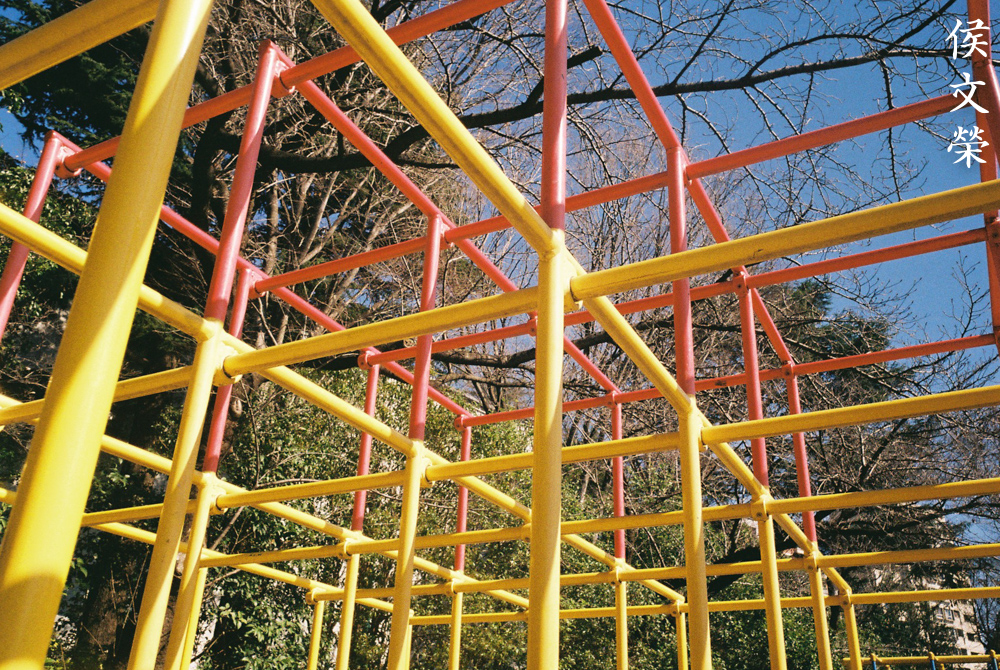
The yellows here look washed-out, probably due to my exposure settings. I can only see slight traces of distortion in this photo, this isn’t bad at all.


(Click to enlarge)
Here’s the rest of the roll. I love using this lens for shooting with film, you’ll see that it has a unique-looking character to the photos, that “vintage-look” that some people strive to achieve in post. Why do it with software when it can be easily achieved with the right tools?
Let’s now see some black-and-white photos. I think I took these using Kodak 400TX. Using this with black-and-white film takes us closer to its designer’s original vision since color film wasn’t as popular back then and who would have thought that digital camera would ever exist?


(Click to enlarge)
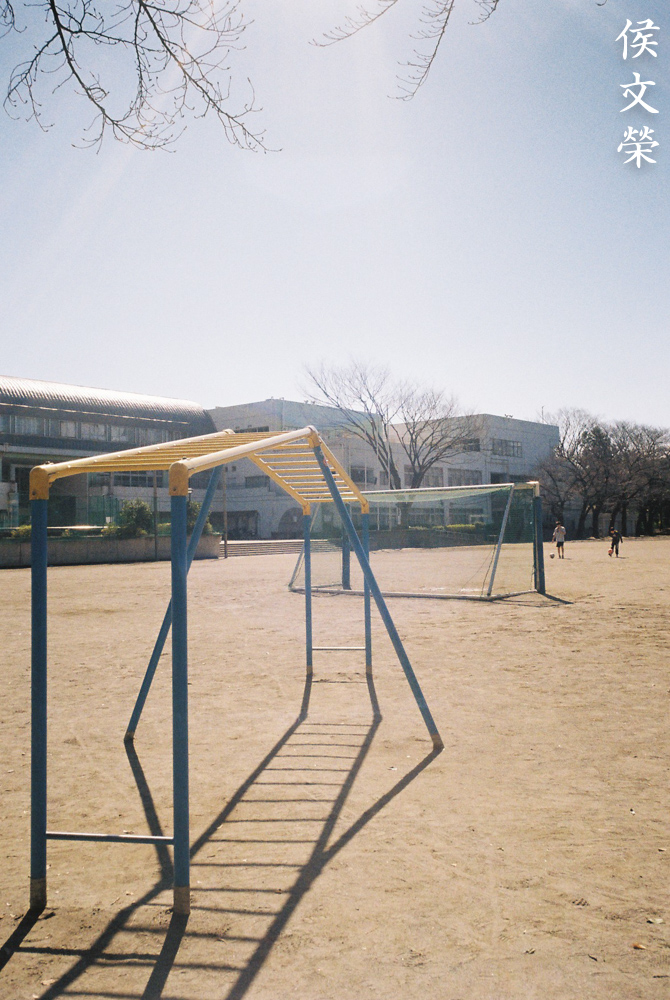
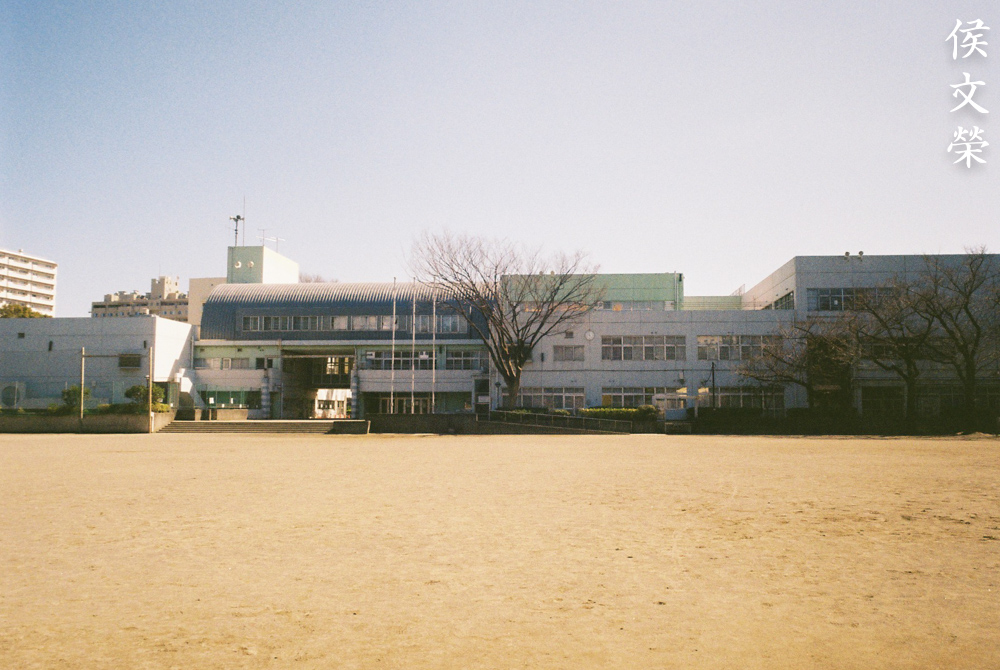
Wide-angle photography is generally dominated by pictures of architecture or nature. It’s natural to grab the widest lens you have to shoot these. This is great since the distortion really isn’t noticeable in my pictures. The lines all generally stay straight. I’m sure that you can find some distortion when you shoot a brick wall but don’t worry about it for practical photography. Just go out and enjoy shooting with it.


(Click to enlarge)
28mm may be too-wide for street photography but it’s certainly useable. In fact, some people prefer using it over 35mm. I am fine with either, I use the 28/50 combo when I go out shooting. Shooting with a 28mm lens also means you have to get closer to your subject, be prepared. You can see that the old guy on the picture to the right isn’t in-focus. That’s because my lens’ focus is not optimum, I’ll show you where and why this happened later.
That’s it for the introduction. This lens is nice for practical use and its flaws are compensated by the sharp center and excellent distortion control. One important feature is lacking but that has more to do with the limitations of a rangefinder system than the fault of lens and that is the inability to focus really close. For a wide-angle lens, its ability to focus close is what makes or breaks it. Even if you use adapters with it, the built-in helicoid won’t let you do this. I guess thing can’t be helped in this case and we should just accept it as it is. I highly recommend this lens to everyone shooting a Nikon or Zeiss rangefinder camera. It’s a very handy lens for travel, despite it’s slow speed this lens is capable for use in less-than-ideal lighting situations, just use film that’s rated higher than ISO400 and you should be fine. It’s a wide lens, you will be able to drag the shutter longer than usual.
Before We Begin:
If this is your first attempt at repairing a lens then I suggest that you check my previous posts regarding screws & drivers, grease and other things. Also read what I wrote about the tools that you’ll need to fix your Nikkors.
I suggest that you read these primers before you begin (for beginners):
Reading these primers should lessen the chance of ruining your lens if you are a novice. Before opening up any lens, always look for other people who have done so in Youtube or the internet. Information is scarce, vague and scattered (that is why I started this) but you can still find some information if you search carefully.
I highly recommend that you read my working with helicoids post because this is very important and getting it wrong can ruin your day. If I can force you to read this, I would. It is that important!
For more advanced topics, you can read my fungus removal post as a start. This post has a lot of useful information and it will be beneficial for you to read this.
Disassembly (Lens Barrel):
This is an easy lens to work with so long as you have the proper tools. You’ll need to use screwdrivers that fit properly to prevent stripping the heads of the screws, be careful not to scratch the beautiful chrome finish because it’s such a very prominent feature of this lens. Maintaining the beautiful finish is important to restoring these shiny things. I wouldn’t recommend this to a novice but an experienced repairer should have no problems with it.
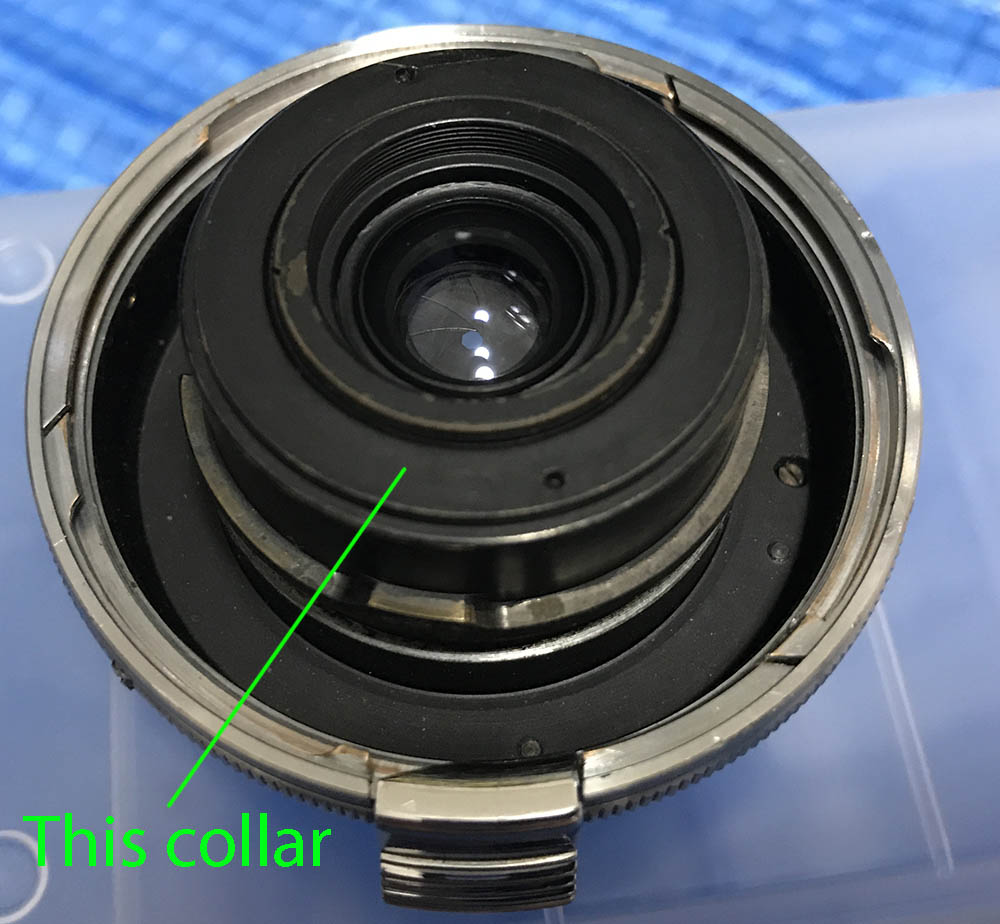
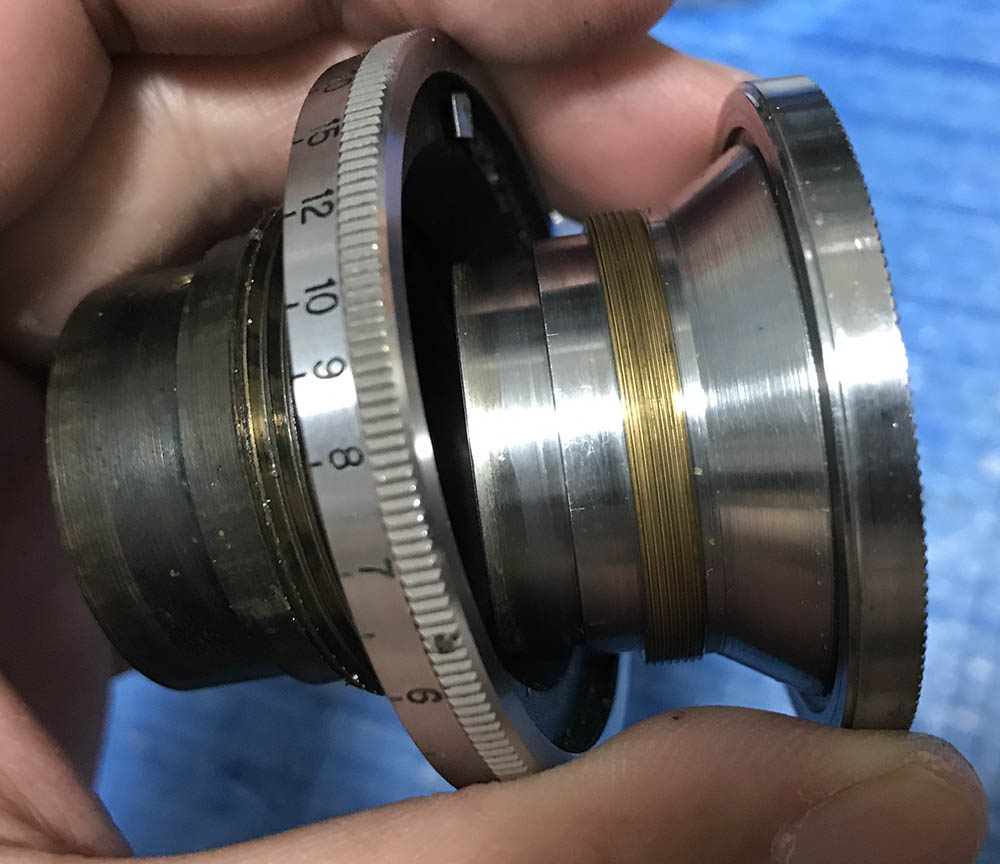
Just like any W-Nikkor from this era, this lens is being held-together by this collar. It serves as its crucible and removing it will separate the lens into its two main components.

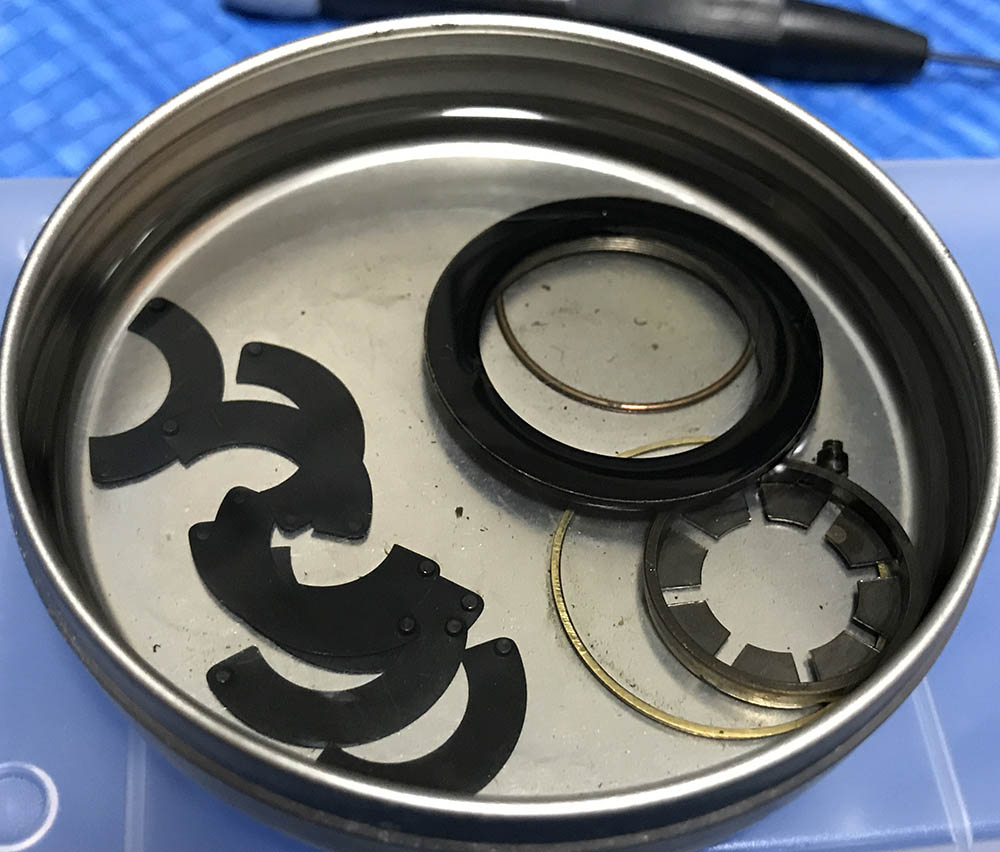
Here’s how it should look like once you’ve removed the collar. Now that you have seen this, make sure not to drop anything to the floor while removing the collar. The objective is a heavy assembly and it can free-fall to the floor if you are not careful. Also make sure not to misplace or damage that shim because it’s used to help calibrate the lens so that it can focus properly and it is pretty much unique to every lens.
Store the objective in a safe place and make sure that it doesn’t roll-off from the edge of a table or workbench. Storing it in a film canister is a good idea.
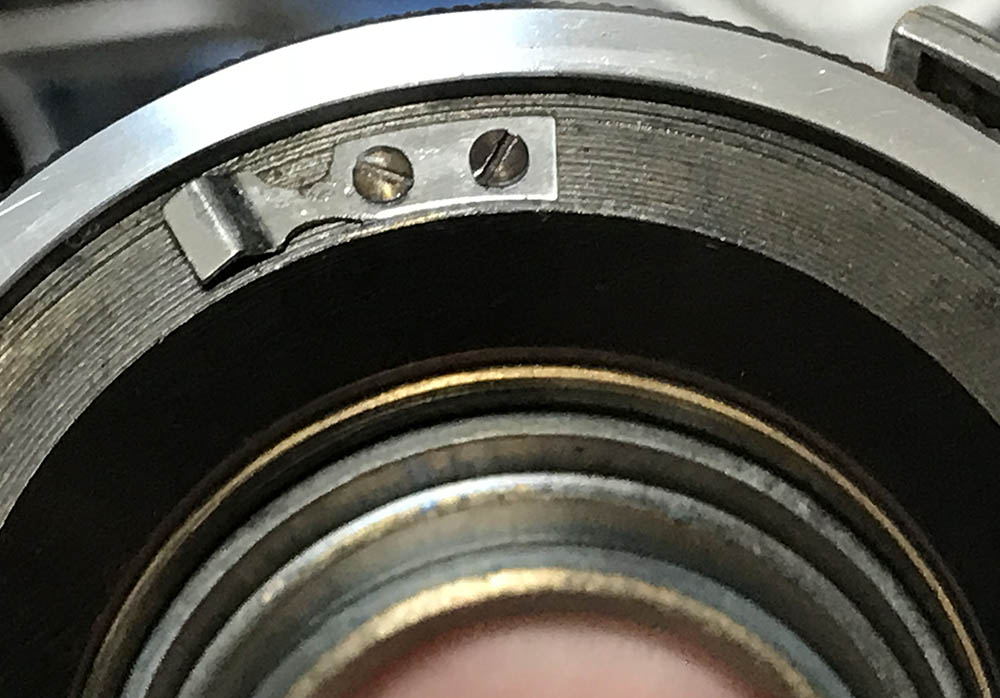
To remove the rangefinder coupling cam, you will need to remove this big screw. Make sure that you don’t damage it while you remove it. The spring should also sit properly on top of the screw when you put everything back together.

The cam can now be removed once the screw is gone. The screw is the only thing that’s keeping it all together. This couples to the rangefinder inside the camera, enabling the lens to help move it so that the little rangefinder patch moves left or right.

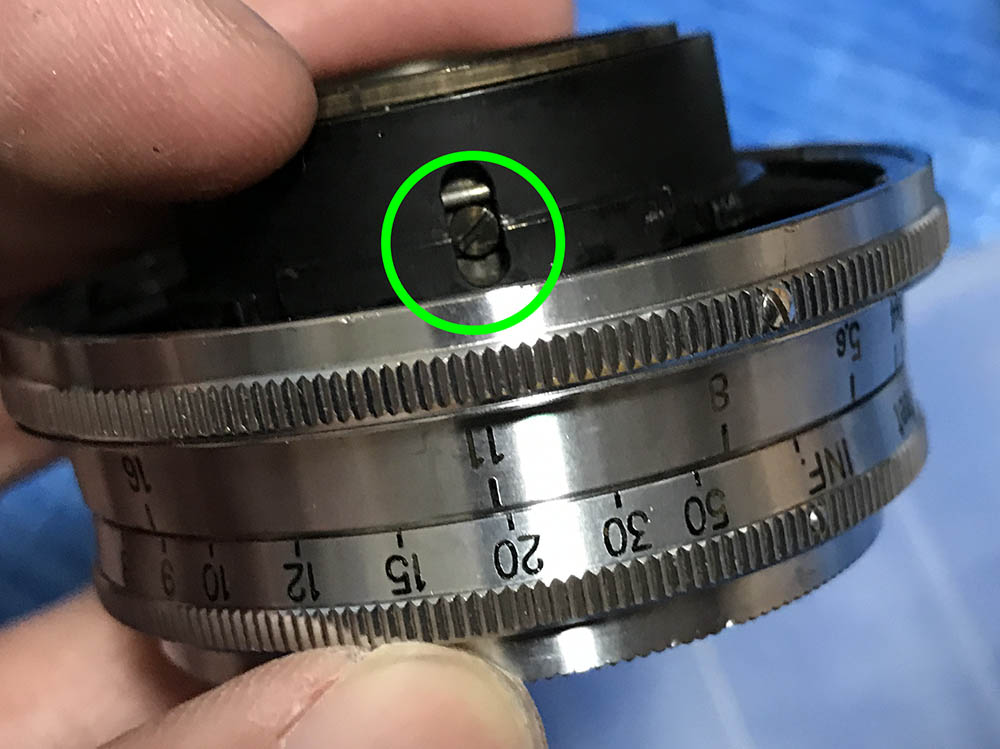
Before you can separate the helicoids you must remove this screw. This can be delicate, I would use caution when removing this because if you bend or broke yours it’s going to be a big problem to get this out. The metal used on this can get brittle, it may break or get stripped easily. I think this was made from brass. This acts as a stop of some kind so the helicoid remains within its rotation range.
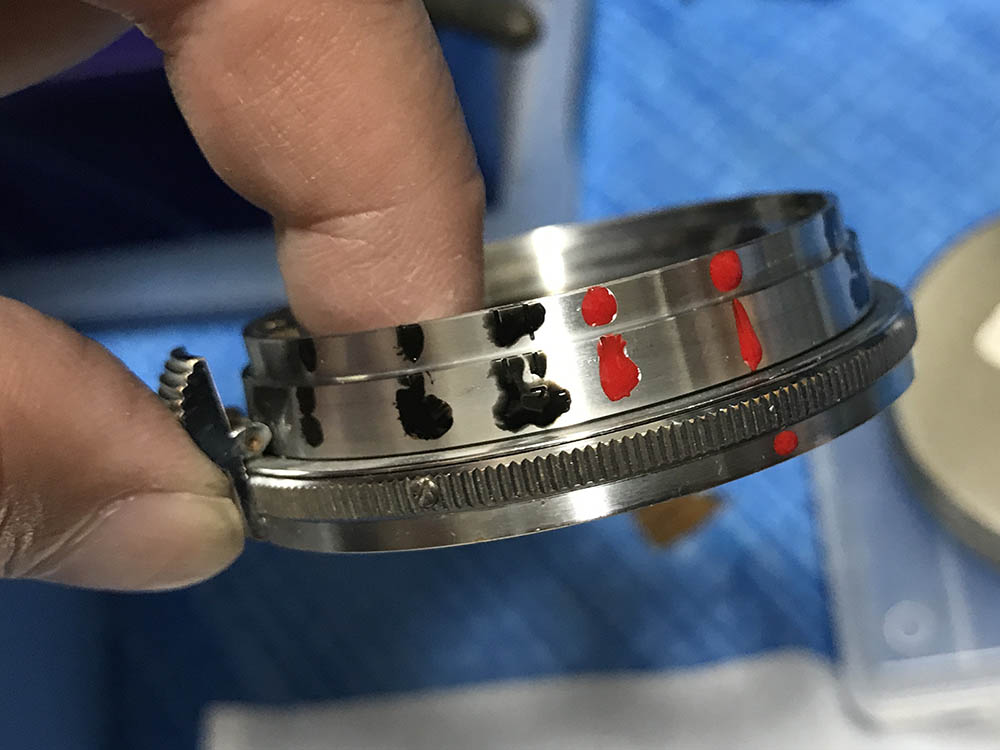
Now that the screw is gone, you can now rotate the focusing ring beyond its range. This is how much it can go when you retract the lens. When I put the lens back, I should get the same result. If I got a different orientation then I screwed up the helicoids’ mating position.

You can now unscrew the helicoids but make sure to remember where your they separated. Mine separated roughly at this point. The helicoids should mate where they separated, if you got this wrong then you won’t get it back together properly. Read my article on working with helicoids if you’re new to lens repair so you won’t get stuck.
Finally, the aperture ring (or cup in this case) can now be unscrewed.
This is its detent spring. This catches-on the notches on the inner side of the aperture ring so you will feel a click whenever you change your aperture.
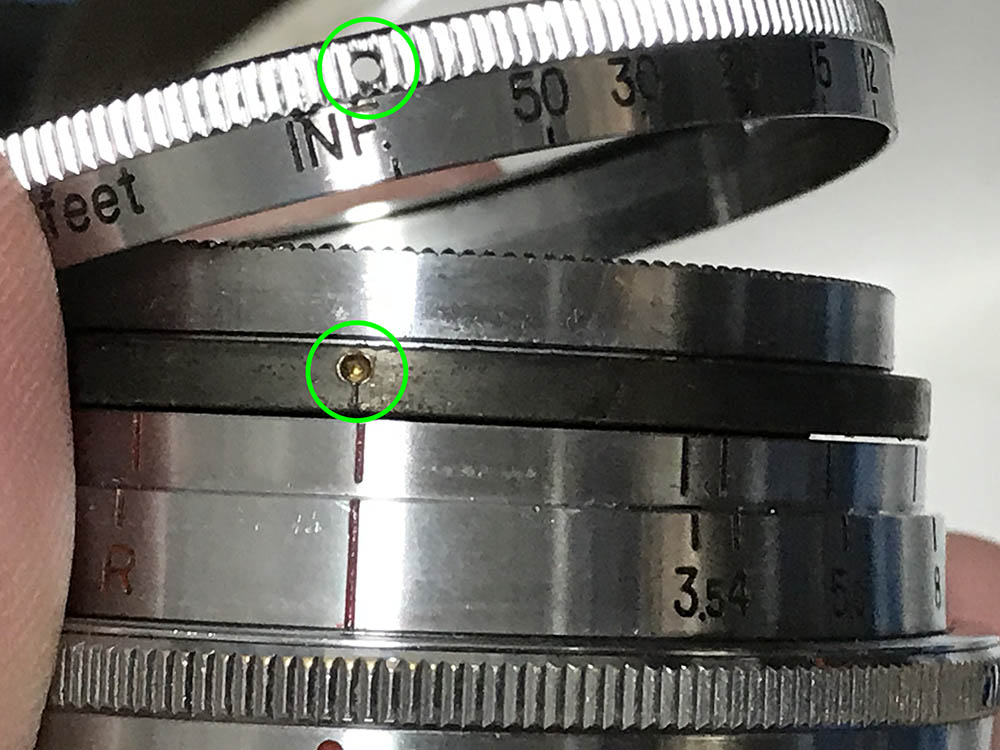
The focusing ring can be easily removed by unscrewing its grub screws. It is not essential to remove it but if you really have to, this is how you can do it. Notice that the screw holes on the focusing ring corresponds to the dimples on the wall of lip of the helicoid. Make sure that you line these up properly or else your grub screws won’t sink-in properly.
Rangefinder Nikkors are easy to work with compared to an F-mount Nikkor. They have less parts and the assembly is usually straight-forward. This lens is no exception and its construction is conventional in every way.
One very important word about choosing which grease to use on this lens. Make sure to use the lightest grease available to you when you lubricate the helicoids. This is because there are 2 sets of helicoids that you must turn in order for this lens to focus, one at the camera and the one that’s built-in to this lens. If you used a heavier grease then that will just add to whatever friction you’re getting from the camera’s helicoids and things’ll add up and you end with a stiffer than ideal feeling when you turn your focusing ring and it’s also going to be wear-out the gears of your focusing wheel each time you turn it because the added resistance will ear the brass teeth easier. I hope that you follow me on this.
Disassembly (Objective):
The objective is of conventional design but it’s really well-made. It is a great example of how things were built in those days before companies employed “planned obsolescence” to force the consumers to upgrade and spend. This is easy to work with and it will take you only a couple of minutes to pull it off so long as you have the proper tools to do this. Having the right tools is key to a successful repair.

The front elements assembly can be easily removed by unscrewing it with your hands. It has an exposed back to be careful not to chip it or your lens is going to be an expensive junk.
The front element can be accessed by removing the bezel using a small lens spanner or a rubber cup. Be careful not to drop the tiny front element to the floor.

You can open it up further by unscrewing this collar. The lens elements are tiny and delicate so special care has to be given in handling these.

You can remove the rear lens assembly with a rubber stopper or with a pair of specially-modified tweezers. Don’t force your way or else you may damage the rear element.

The inner element assembly can be removed by using a small lens spanner. Make sure that your hands won’t slip.

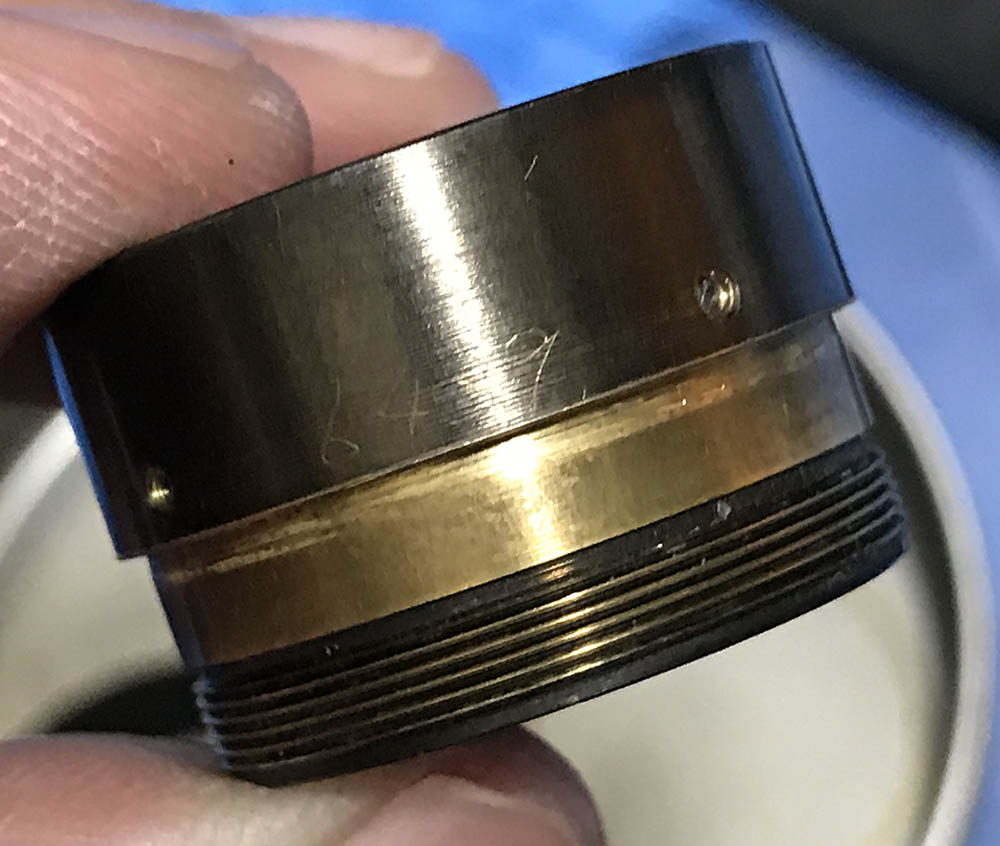
It’s made of solid brass, you rarely see something this well-made today.
This should be an easy task. The parts are so small and delicate, I sometimes used a Q-tip to access some of the parts. It only took me a couple of minutes to clean this, it was a joy compared to some of the other more difficult lens designs that I have seen.
Disassembly (Iris Mechanism):
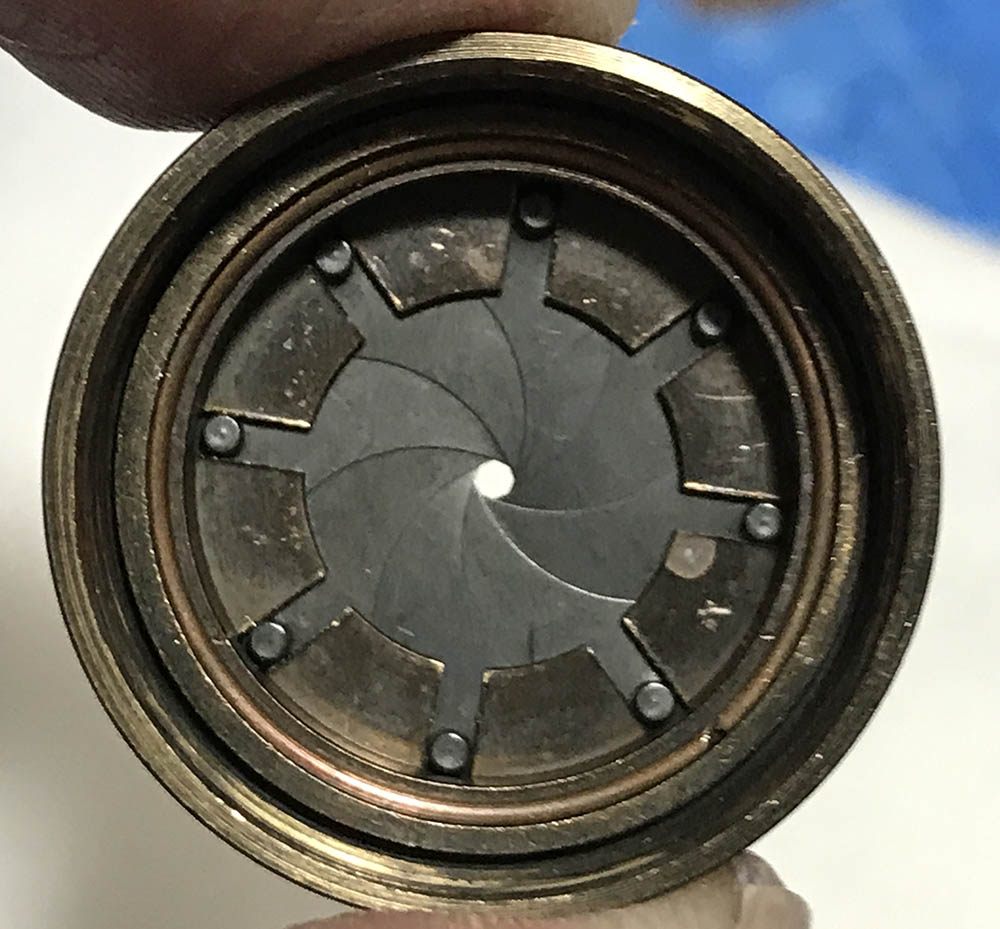
The iris mechanism is pretty conventional. It’s similar to many lenses from this era. This is not difficult to understand in terms of how it operates. The whole thing was made with thick-gauged brass, it’s a premium product. It’s not easy working with this since the iris mechanism is tiny but this should not be problematic for veterans like me.
This is how solid the housing is. Don’t bother to remove the set screws here because they are used to regulate the size of the iris. I would just leave them be if I were you. It’s a precise adjustment made at the factory and is best left alone.
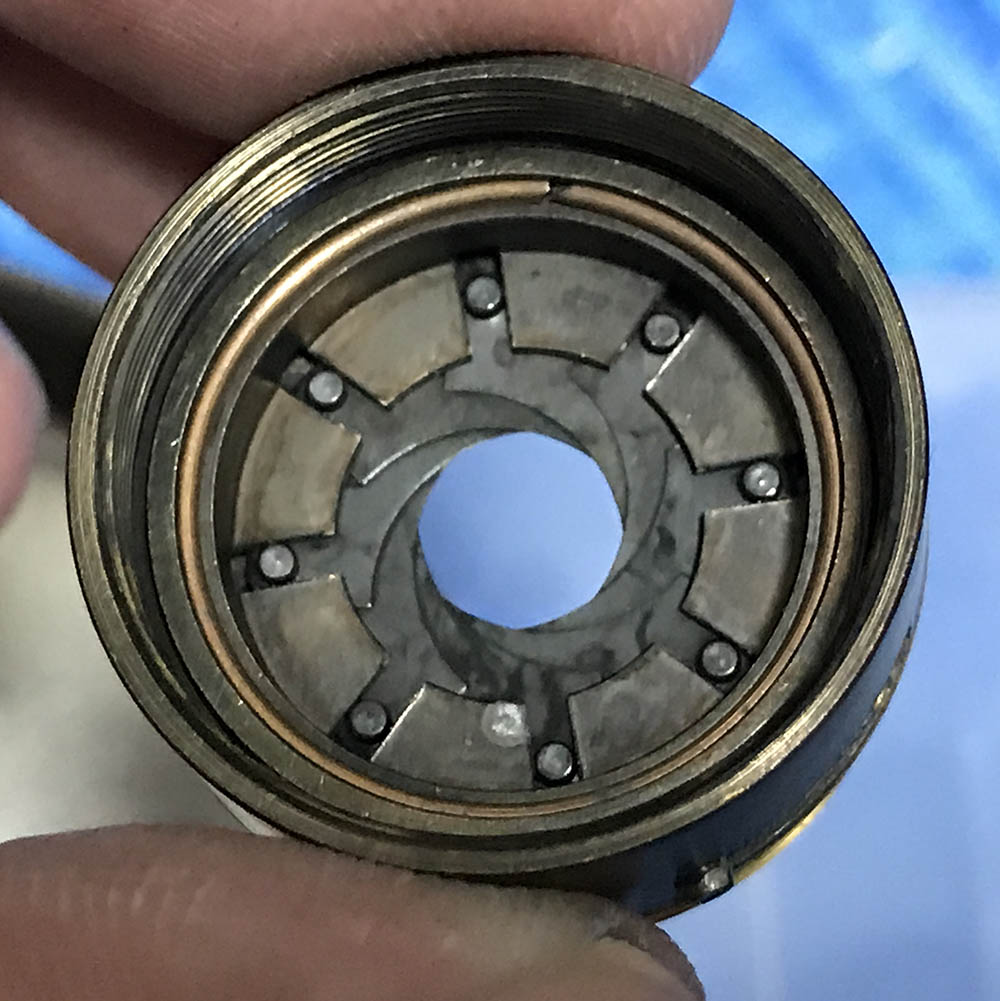
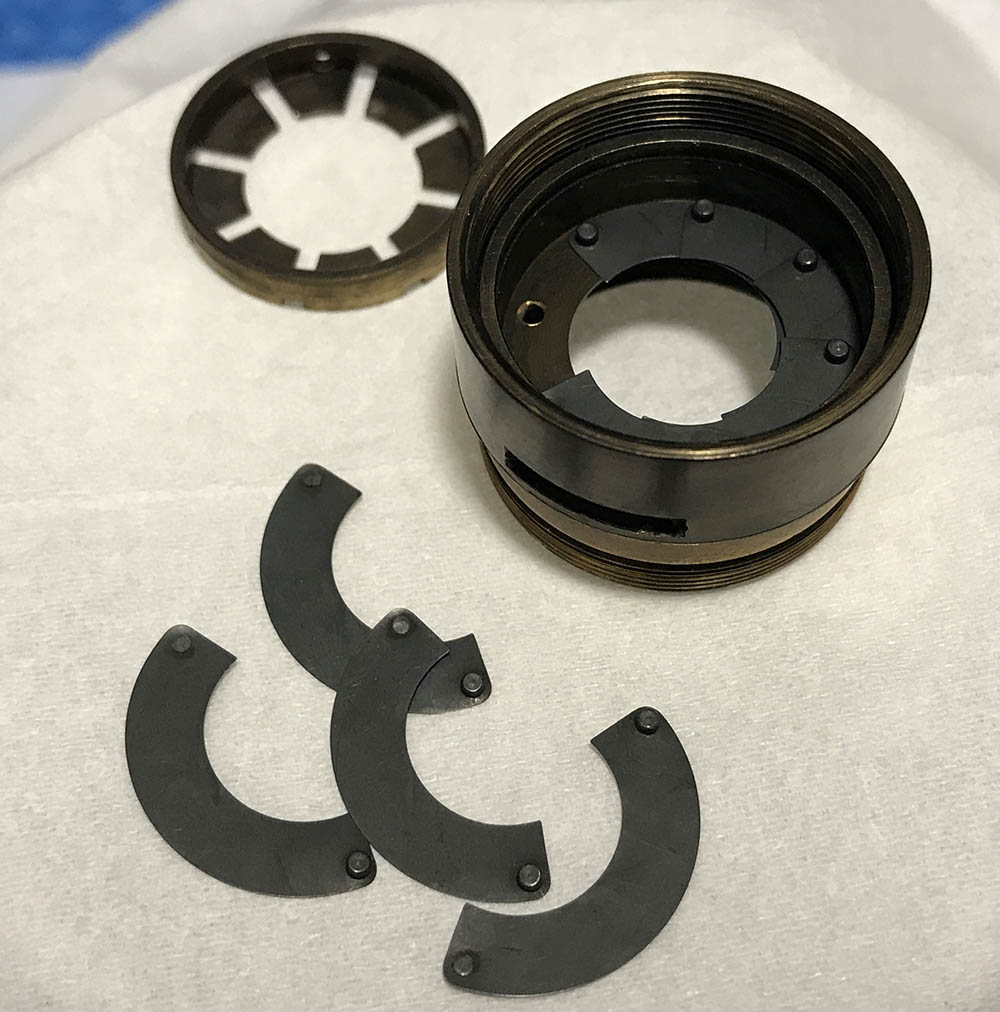
The iris mechanism is being secured by the brass retainer. You can carefully remove it by using a small screwdriver to carefully pick it out. Look at how dirty the iris was, you’ll see later what a proper overhaul can do.
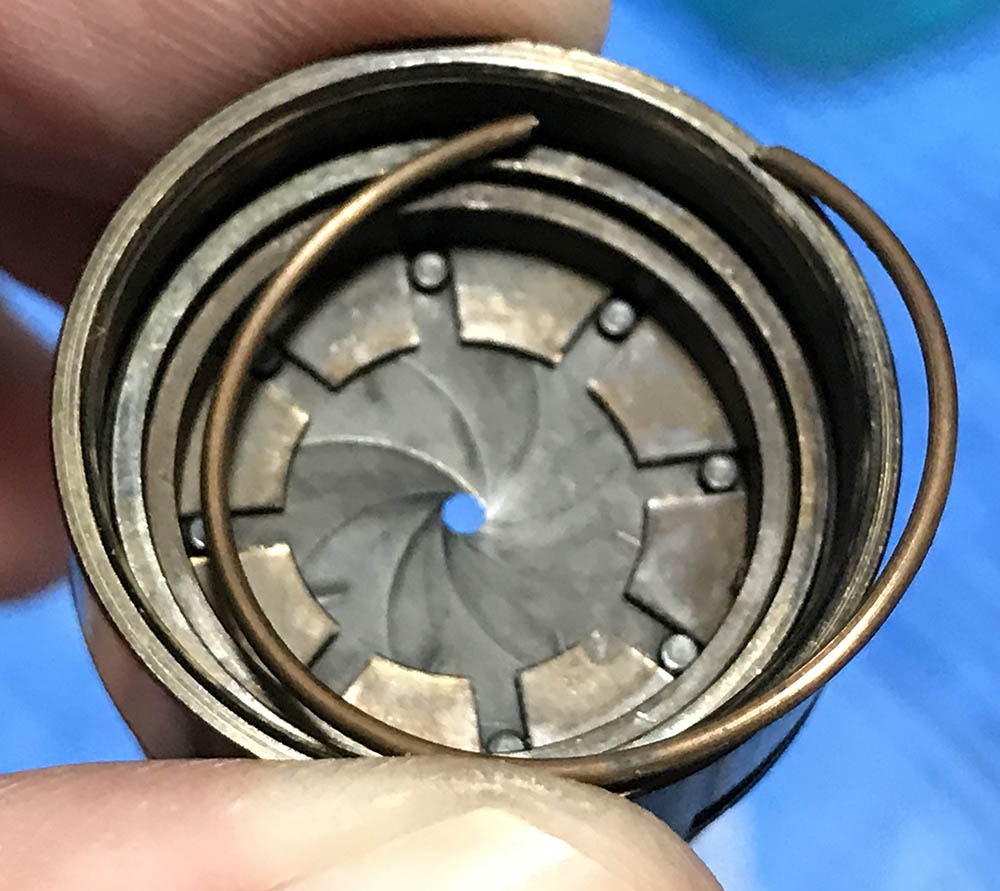
Make sure that you don’t damage the iris while removing this.
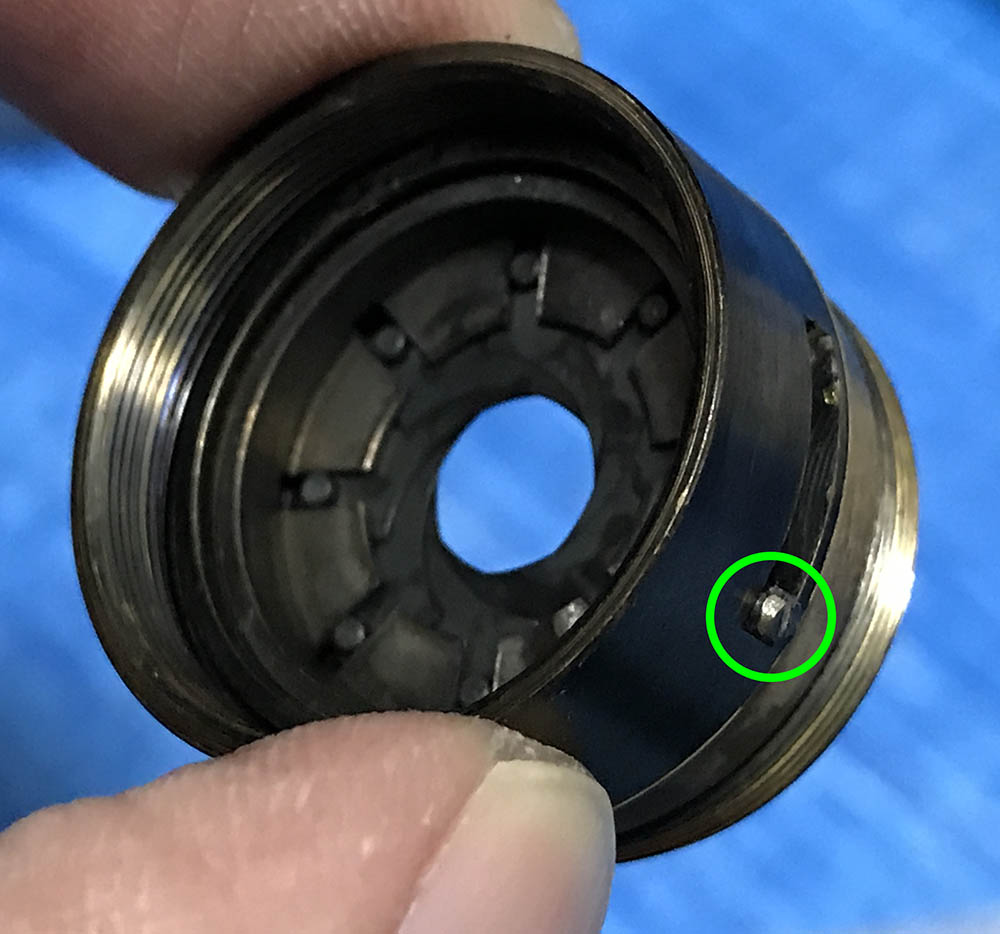
The rotator cup for the iris is being held by this screw. Carefully remove this so you won’t snap it.
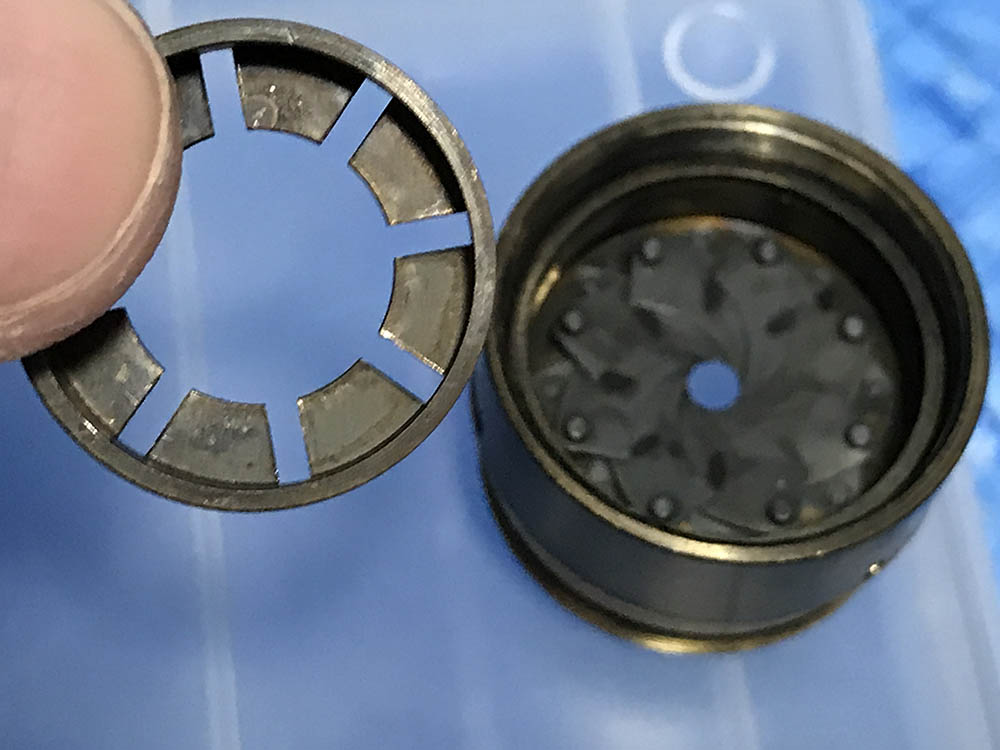
Here’s the rotator cup. Carefully remove it with your fingers if they can fit. I will occasionally use a pair of sharp tweezers, too.

Carefully remove the blades by gently poking at the rear, at the pegs of each blade. These are delicate, you can easily damage one if you’re not careful. If you are curious about repairing irises, read my post on how to fabricate iris blades to see just how much effort is needed to create one from scratch.
Soaking the parts of the iris assembly in solvent will dissolve any residue.
Carefully wipe each leaf with a soft lintless tissue. Never let them air-dry or the solvent will leave drying marks.
Despite its tiny size, the iris was not difficult to put back. Read my article on how to work with preset-type irises to know more.
That’s all for the iris assembly, It can be difficult to work with something as small as this but it certainly isn’t impossible if you’re used to it. Some people would just soak the whole iris assembly in a can of chemicals, hoping that it will clean everything. That’s not the proper way to do things and there is no substitute to cleaning an iris assembly the right way.
Conclusion:
It’s an enjoyable lens to work with and despite its conventional schematic I learned plenty of things. I hope that you guys learned something here and I hope that this article reaches somebody who would want to open theirs but don’t have a clue on how to work on it. If you have no experience working on lenses then please do yourselves a favor and just send this to a qualified repairman, go show them my blog. It’s going to be cheaper that way, buying the proper tools will cost money. If you screwed up your repair attempt due to inexperience, this will end up costing you more. This blog was originally made to inform on how a lens is repaired and to help people determine if a repairman did a good job or not.
Before I can put everything back together, I will have to do somethings first. Since this was made almost 70 years ago, the old, faded lettering was not as nice as it used to, it had to be worked on just to make it look acceptable. I’m not a collector so I don’t mind this at all. Collectors will never like this, they want the lens to be as close to original as much as possible.
The lettering was touched-up by using enamel paints. My article on how to restore the lettering on old lenses will be helpful in case you are not familiar with this process.


I also had to fabricate a new shim to add to the existing one. It is just 0.2mm tall and this is how delicate adjusting the focus can be. Some idiot may have lost one of the shims or an idiot at Nikon may have approved it so it passed quality control, this isn’t acceptable to me. That 0.2mm difference is causing my lens to mis-focus, instead of having infinity at the end of its focus range, I have my infinity set to around 15ft. This is probably the reason why I am getting some blurred shots with film. I am pretty good at guessing distances with a focusing scale but if your focusing scale is correct but your lens isn’t seated properly then we have a problem. This new shim was made from a length of stainless steel wire. I needed 0.2mm so I had to sand it down to get that.
This is a trick that I use when I encounter things like this. It’s very rare that I have to do this but this is how you can solve this. Fabricating parts is part of every repair and maintenance hobby, this is no exception.
We’ve reached the end of another article. I hope that you have enjoyed this one because I’ve put a lot of effort into this. I strive to give you the best and I hope that you’ll continue to follow my blog. If you enjoyed this post, please share it on social media, this will help our community grow bigger, we can reach more and more people who wish to get entertained while learning. If you want to see this blog continue, please consider supporting my work. It’s a big help since it offsets the cost of hosting, you also help me purchase film. Thanks again and see you on the next article, Ric.
Help Support this Blog:
Maintaining this blog requires money to operate. If you think that this site has helped you or you want to show your support by helping with the site’s upkeep, you can make a small donation to my paypal.com (richardHaw888@gmail.com). Money is not my prime motivation for this blog and I believe that I have enough to run this but you can help me make this site (and the companion facebook page) grow.
Leave me some tip?
Thank you very much for your continued support!
$2.00
Helping support this site will ensure that this will be kept going as long as I have the time and energy for this. I would appreciate it if you just leave out your name or details like your country’s name or other information so that the donations will totally be anonymous. This is a labor of love and I intend to keep it that way for as long as I can. Ric.

Jan 02, 2018 @ 04:58:54
wow, thanks a bunch. Beautiful pictures
Jan 02, 2018 @ 09:59:53
Thanks! iPhone pictures only unfortunately 😦
Jun 27, 2020 @ 17:23:28
I have the NIKON 2.8CM (28MM) F/3.5 W-NIKKOR-C(L39 mount Leica). Is there an adaptor for me to use it on my Nikon D850? I see you used it on you Z6. I also have a z6.
Jun 04, 2022 @ 16:19:43
Thanks for this article. You are providing a great service to keep up interest in these great cameras as well as teaching others how to continue to keep more of them in circulation so that others can enjoy them in the future.
I recently received a 3.5cm 2.5 lens that is in great shape except the aperture click stops are off. I haven’t found any articles that address it – This 2.8cm article of yours is the closest yet because the construction looks similar to the 3.5cm 2.5 lens. Also, I haven’t found service documentation for the 3.5cm 2.5 either. I’m told (by the seller) that this is an easy adjustment. Do you have any pointers about that adjustment?