
Hello, everybody! Have you been to a Burger King lately? I love their food, it is the luxury version of McDonald’s for me. The burgers are grilled and they have better quality, too. They’re juicier, fresher and thicker in my opinion. I always crave for a Whopper whenever I see one of their restaurants. Do you like onion rings with that? Hell, yes. Speaking of luxury, today’s camera was the luxury version of any Japanese camera back in its day. It has set the bar so high that it remained as the king of Japanese rangefinder cameras to this day. Some people will be upset by my last statement but I’m sure that many people will agree with me.
Introduction:
We are going to talk about the awesome Nikon SP today. This is Nikon’s best rangefinder camera, this represented the ultimate development of Nikon’s rangefinder camera system. The Nikon S3 came after this, it’s just a cheaper derivative so a few things were omitted. There were prototypes made that will surpass the Nikon SP but none went into production so we can consider this to be the last of its kind. The rangefinder camera system (35mm format) that had so far dominated the market in the years leading to 1960 was met with a big challenger in the form of the Nikon F and the SLR system quickly overtook rangefinder camera sales until it became the the dominant system in 35mm photography. This spelled the end for the Nikon SP but many still use them well into the 1980s up until today because of its nice handling and reliability. It was then reissued in 2005 together with the W-Nikkor.C 3.5cm f/1.8 as a kit for a limited time. You can find the original or reissued ones for sale online, these are never sold cheap and they’ll appreciate in the coming decades.

The Nikon SP is a very handsome camera and many photographers consider it to be the Cadillac of Nikon’s rangefinder system. This is a fine machine but acquiring one in nice shape can be a bit difficult these days but you can get lucky. They don’t cost as much as Leicas so their prices are still realistic and within-reach for most photographers.
It debuted in 1957 to replace the Nikon S2. It’s am ambitious camera that’s made to challenge whatever the Germans had. Even Canon had nothing to counter this. Some will say that the Canon 7 is a better camera, I though so as well until I took one apart and discovered that it’s just a toy compared to the Nikon SP. The build quality is terrible, akin to Yashica’s Electros which were made for the lower-end of the consumer market. The Nikon however, is a real camera that was made without compromises as you’ll see later.
It’s handling is great because it’s the basis for the Nikon S3. The Nikon F was heavily-based on the Nikon SP’s chassis, if you are familiar with using older Nikon SLR cameras then transitioning to the Nikon SP should be easy.
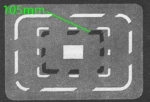
What makes it such a wonderful camera is its revolutionary viewfinder and how it can display 4 different frame lines on-demand. It also has parallax-correction to help you accurately compose your frame. If you thought that this was boring then wait until you see what is beside the main viewfinder, the Nikon SP has a smaller 2nd viewfinder where the 35mm frame lines are and the whole area of that mini-viewfinder represents 28mm. This now has a total of 6 separate frame representations in one camera. No other camera did this and it took Leica many years to match this while Canon took a few years to get that in their rangefinder system.

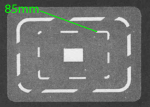

(Click to enlarge)
This is a representation of the Nikon SP’s viewfinder. These frame lines are additive, it is always the inner frame line that’s the active one. You change frame lines by turning that big dial just below the rewind crank. Take note that the pictures are just copied from the user manual and the actual frame lines are color-coded so you won’t get confused. I like these subtleties, these set Nikon apart from other manufacturers.

This is a representation of the Nikon SP’s wide finder. The frame line at the center is the 35mm frame line, the inset is used for parallax compensation. The entire border of the frame represents 28mm. This is a unique concept and it was very difficult to achieve this in production. I will show you how delicate this is in part 3 of this series.

Its exceptional rangefinder was regarded to be very accurate, when Nikon’s staff reverse-engineered the Nikon SP for the 2005 reissue model they were impressed at how accurate the rangefinder is and marveled at how people at the factory did this in the late 1950s using older, manual methods. This is important when using long or fast lenses with thinner depth-of-field. Nikon made some of the fastest lenses for their rangefinder system, it should have an accurate rangefinder patch to match.
The Nikon SP is also the first Nikon to come equipped with Nikon’s famously reliable and tough titanium shutter curtains (on later models). This made it immune to burn-holes but it also made the shutter a bit louder, accidentally jabbing it with a thumb can crumple it and affect its operation. Despite this, the titanium shutters would stay with Nikon until the Nikon F3 more than 20 years after it was implemented.

In a time where many cameras have their slow and fast speeds set using 2 separate dials the Nikon SP only has a dial to set all of its speeds from 1s to 1/1000s. The film counter also automatically resets each time you open the film chamber. These were great, the Nikon S2 never had these refinements. The mechanisms are also refined and smooth that comparing the Nikon SP with other Japanese cameras of the time is like comparing a nice bottle of gin to cheap moonshine. Japan has never made anything like this before.
All of this may sound trivial but if you put everything into context and think about when the Nikon SP was introduced or which models were competing against it at that time it that will give you an idea about how revolutionary the Nikon SP was.
Having mentioned all of the the above, it comes as no surprise that this is a very complicated machine. Of all the Nikon rangefinders that I had opened, this thing is by far the most complicated, there are so many things crammed inside such a small space. I can’t imagine how complicated it was to design such a camera let alone manufacture it at the rate that Nikon did. This truly is a modern marvel of camera manufacturing.
I’m done with the introduction, I am now going to show you how I cleaned and restored my Nikon SP back to working order. I got this as a junk with a couple of problems but I’m thankful that nothing was beyond my abilities. This is going to be a long and detailed one so it makes sense to separate this article into 3 parts in order for me to keep up or I’ll just get burnt-out. This is going to be the most complete resource online (as of today) for the Nikon SP despite me not showing how to completely dismantle one. I can if I must but it does not make sense for me to fix something that’s not broken. I was lucky that I have a Japanese repair manual, without it I would have never dared to open this. It is not a cheap camera for me to experiment and I just can’t afford to mess this up. I’m very much aware that this is no Nikkormat so you can bet your $1 that I was sweating my nuts when I was working on this. One mistake is all it takes to ruin the job. If you are inexperienced with working with cameras then I’ll ask you to kindly give this to an experienced repairman or to a reputable shop like Kiitos to service. This is the best way to do it and since there aren’t many of these around, you are also doing us all a big favor by not diminishing what’s left. There will come a time when there will be none of these for sale. Just give this a couple of more decades and you won’t see them anymore.
Before We Begin:
If this is the first attempt at opening a lens then I suggest that you read my previous posts regarding screws & drivers, grease and other things. Also read regarding the tools that you will need in order to fix your Nikkors.
I highly suggest that you read these primers before you begin (for beginners):
Reading these primers should lessen the chance of ruining your lens if you are a novice. Before opening up any lens, always look for other people who have done so in Youtube or the internet. Information is scarce, vague and scattered (that is why I started this) but you can still find some information if you search carefully.
I highly recommend that you read my working with helicoids post because this is very important and getting it wrong can ruin your day. If I can force you to read this, I would. It is that important!
For more advanced topics, you can read my fungus removal post as a start. This post has a lot of useful information and it will be beneficial for you to read this.
Disassembly:
This is not an easy thing to do but if you must, do yourself a favor and buy slotted drivers in various sizes and widths. Have a metal file handy because you’ll need to file-down some of the drivers’ tips to make them fit precisely. Screwdrivers are cheaper these days so don’t be cheap when buying them. They should fit the slot properly, the width of the driver should almost be as wide as the screw’s head. If the tip is too wide it may scar the surrounding metal. If it’s too small the driver will strip the slot, damaging the screws. Its screws are prominent features in the camera so make sure not to damages these.
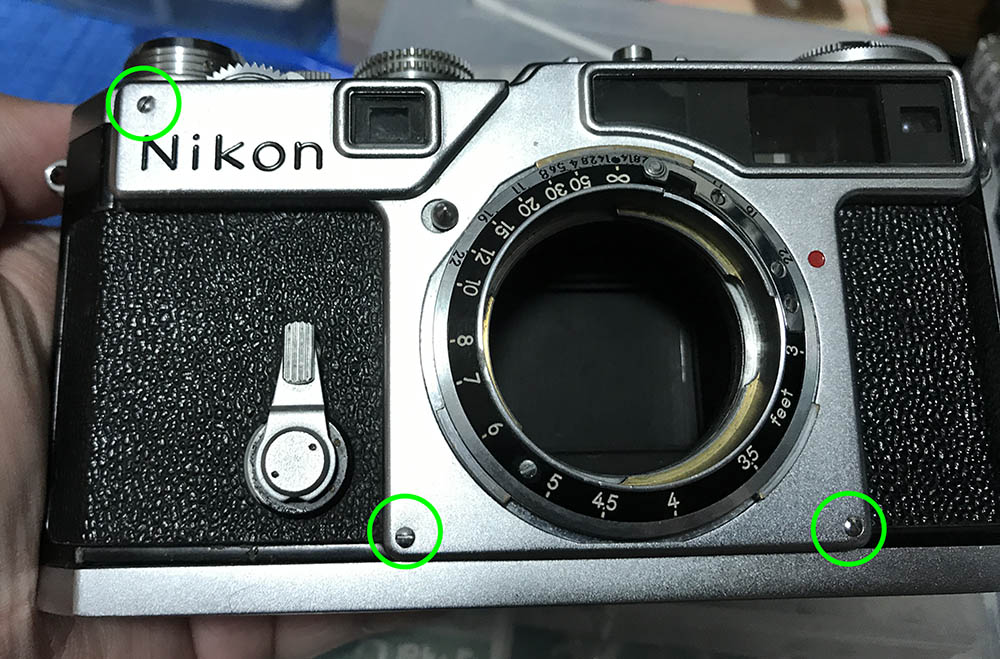
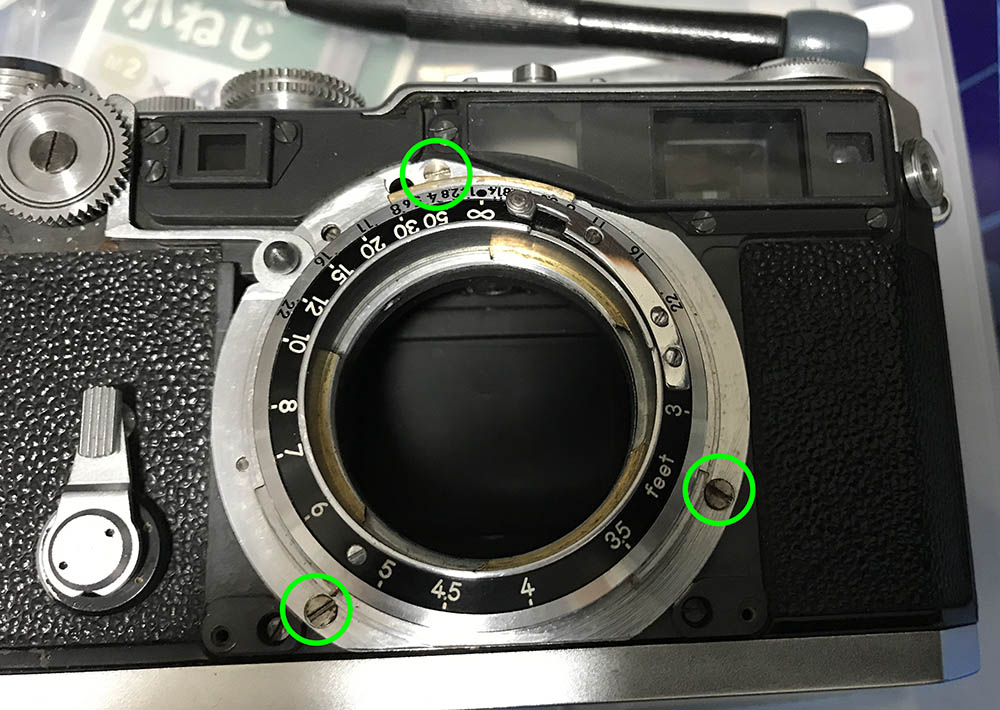
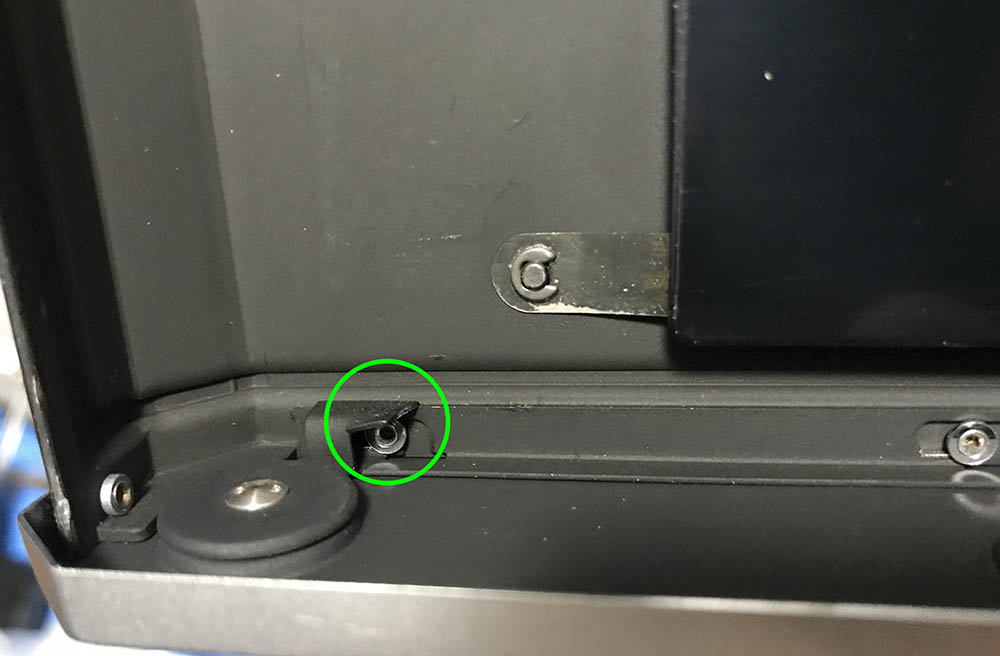
Begin by removing these 3 screws from the front bezel. These vary in length and size so make sure that you remember which one came from what hole. I tape these to a piece of paper in the orientation that they came off to help remind me where each of these came from. While screwing these back, do not force them into their holes or else you’ll stress the bezel or the threads. Another way is to screw them back to their own holes right after the bezel is gone. This way you won’t have to deal with loose screws hanging around in your work desk or screws organizer.
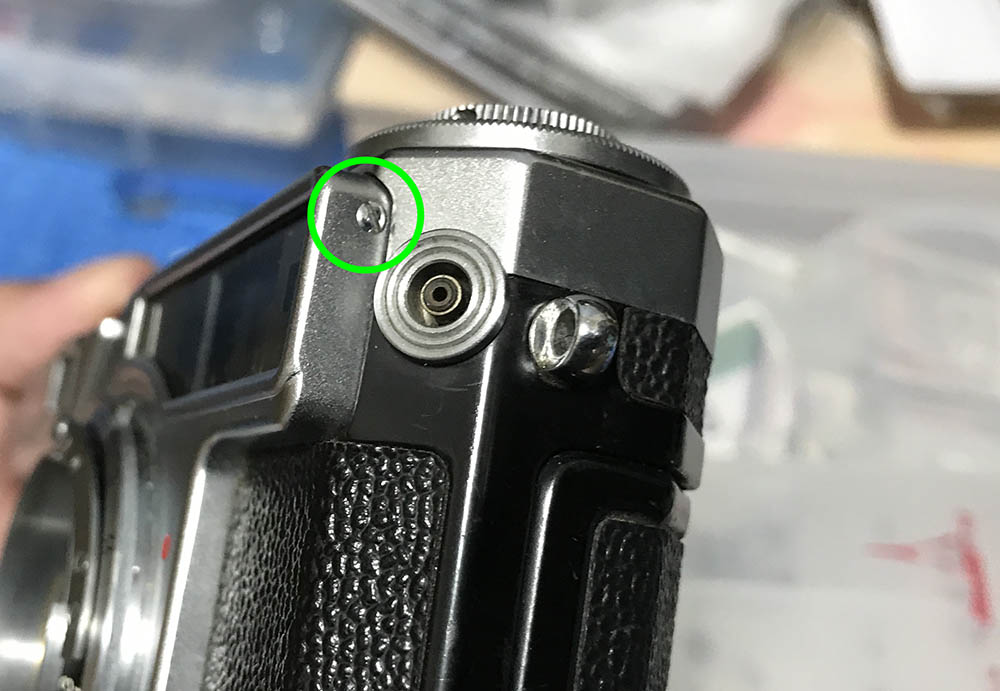
This is the last screw that you will have to remove.

Carefully lift the bezel from the bottom and be careful not to warp the it or put a ding on it. The bezel is made of thin metal, the top part slides between the top panel and the body casting, applying too much force will easily bend it. You’ll also need to feel for it carefully because the focusing wheel and its lock slides into a slot on top of the bezel. You’ll need to play around with the focusing wheel and its lock to help you free the bezel. This may take time so just be patient.
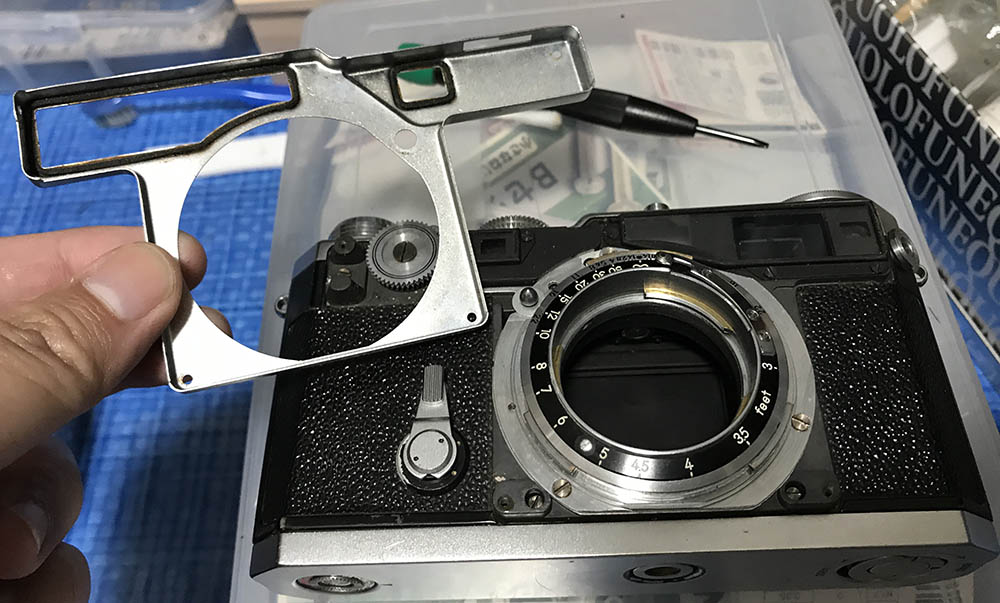
You’ll see the slot for the focusing wheel on the right-hand side of the bezel. See how delicate it is? If you bent it you’ll end up with an ugly camera. You will find foam strips around each window to help shield the viewfinder and rangefinder window from dust and moisture. Mine is crusty and old it looks like it was never replaced. You can replace yours with 1mm foam strips.
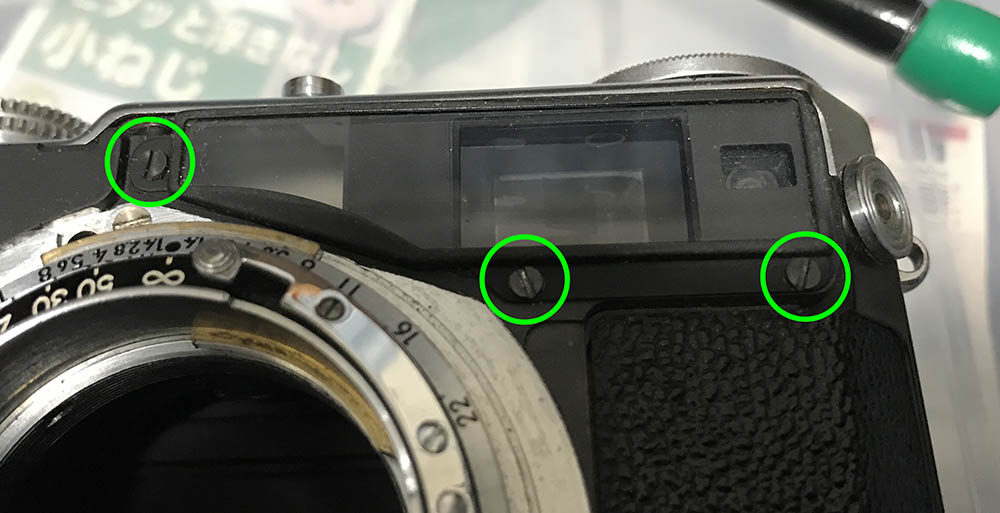
To open the viewfinder window frame you should first extract these screws. If I’m correct, these are also of varying sizes so be careful to put them back in their correct positions later to prevent stripping their threads.
This is the last one. Ideally, you would want to remove the top panel before removing it but it’s possible to remove it while the top panel is installed by carefully unscrewing it. It’s important to remember not to scar the metal on the top panel. Putting this back is a bit tricky but it’s possible. If I’m correct, this is the smallest screw of the 4.
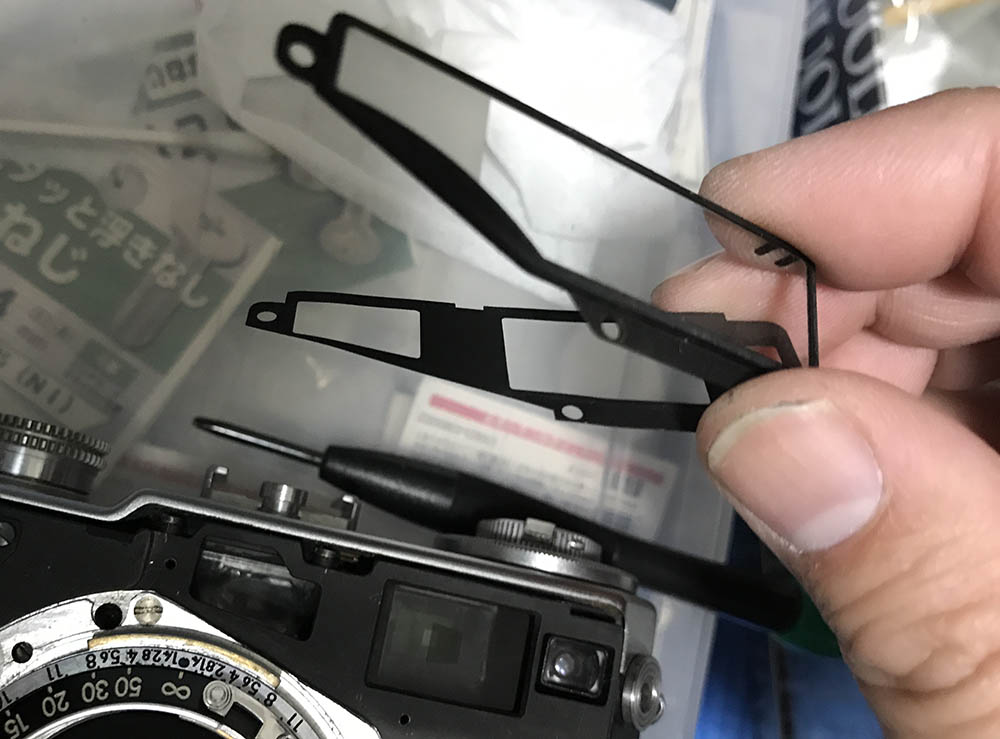
The frame should come-off easily. You can then clean the glass and remove fungus or dirt that has accumulated here. The baffle is very thin, you should be careful when handling this. If you bent yours then say goodbye to it.
The rangefinder window is the largest window and the wide-finder sits just beside it, it’s the smallest one. Only clean these 2 windows. I use alcohol and naphtha to remove any oil or dirt. Gently wipe them with lens tissue, blow a bit of air from a bulb blower. Never use canned air since the pressure is too strong. Do not use excessive pressure when wiping these or you may nudge them out of alignment.
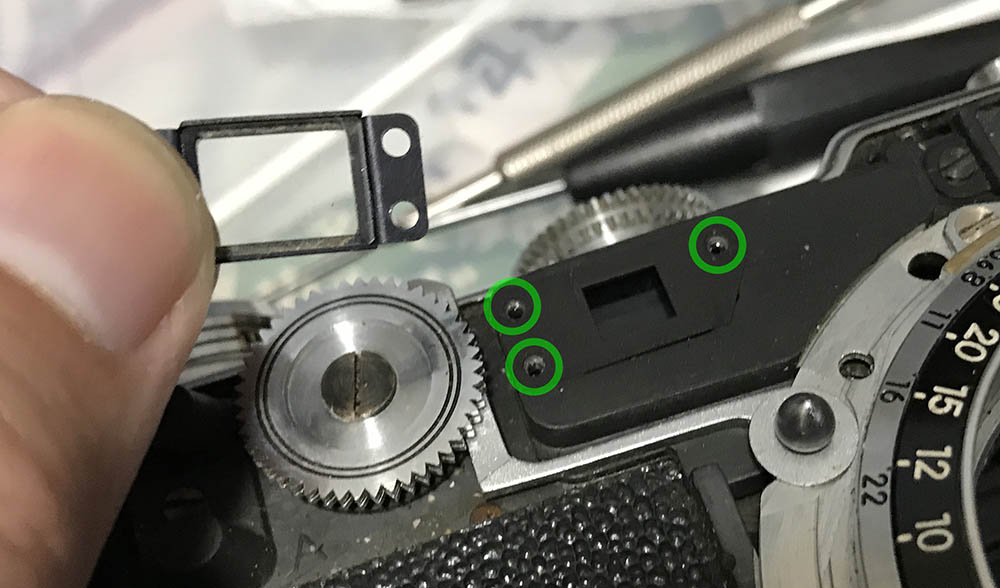
The rangefinder window frame can be removed by unscrewing these three screws. There’s a baffle for this just like the one in the rangefinder window. I won’t clean the rangefinder window directly unless I needed to. If yours is dirty, just clean this the same way you cleaned the rangefinder window but this time apply less pressure and use more care cleaning it. The rangefinder is a very delicate and precise assembly.
Now that the windows are clean, replace the frames and baffles back, screw them back into place to protect them from damage and dust. Leaving them exposed is a bad idea.
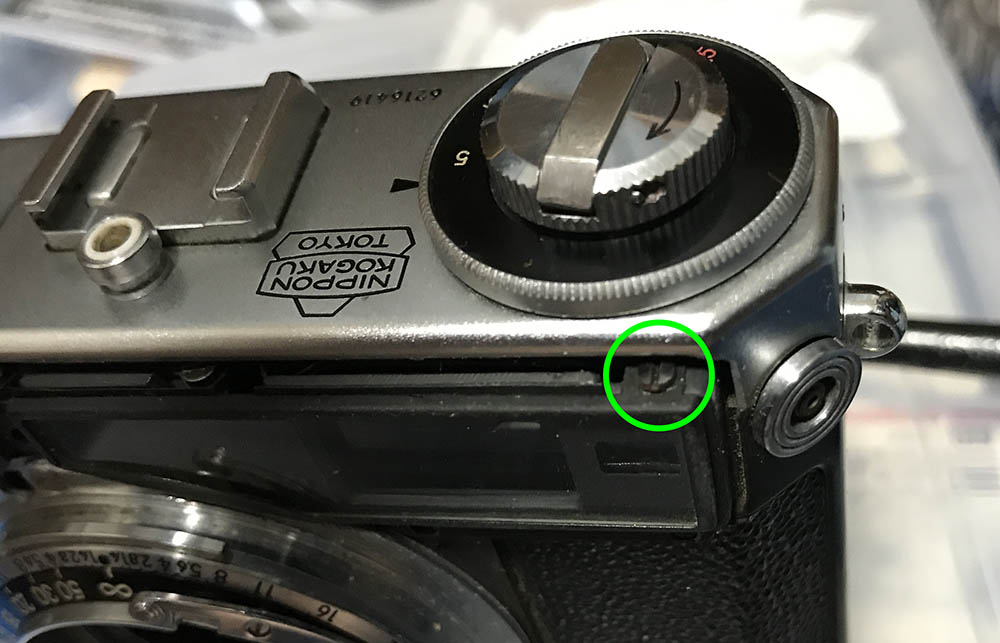
To remove the helicoid, simply unscrew these screws. These can be hard to extract. If yours is stuck, heat them up with a soldering iron. Unscrew them while they’re hot. Do it one-at-a-time and you should be fine.
When doing this, make sure that the camera is facing the ceiling. Be careful or you’ll drop the shims under each screw and lose them forever. You’ll also need to remember which shim should go where that’s why I’m advising you to have the camera face the ceiling when you do this.
Once the screws are off, carefully lift the whole helicoid assembly from the camera. It’s going to be stuck, part of the locking lever is under the focusing wheel. Press on the lock and carefully separate the helicoid assembly from the camera. Again, do this while the camera is facing the ceiling, remember the shims. You may want to remove the shims if you want to, just remember which one should go where.

Look around the mount and you will find 1 shim on top of each screw hole. These shims are used to fine-tune your camera’s flange distance. These are tiny, you should never lose any of them. They’re also unique to each hole so mark them properly. I mark them by drawing dots on them, one dot for the top-most and 2 dots for the next one, you get the idea. Just do what makes a lot of sense for you. I use a permanent marker like Sharpie due to its ink. A paint marker will leave a thicker mark and a difference of a few tenths of a millimeter is enough to offset it.
The main gear for the focusing wheel is now visible in front of you. You will need to open the front panel in order to completely clean that assembly but that’s too much work, we just clean it by flushing it with naphtha or wiping it clean with a lintless tissue. Repeat until you’re satisfied. Finally, lightly oil this with high-quality watch oil. You don’t want to overdo the lubrication on this or the excess oil will end up elsewhere.
You should wipe away any grime you see. Use a Q-tip saturated with solvent and just do it the old way. A soft toothbrush is also a good tool to scrub away any stubborn dirt.
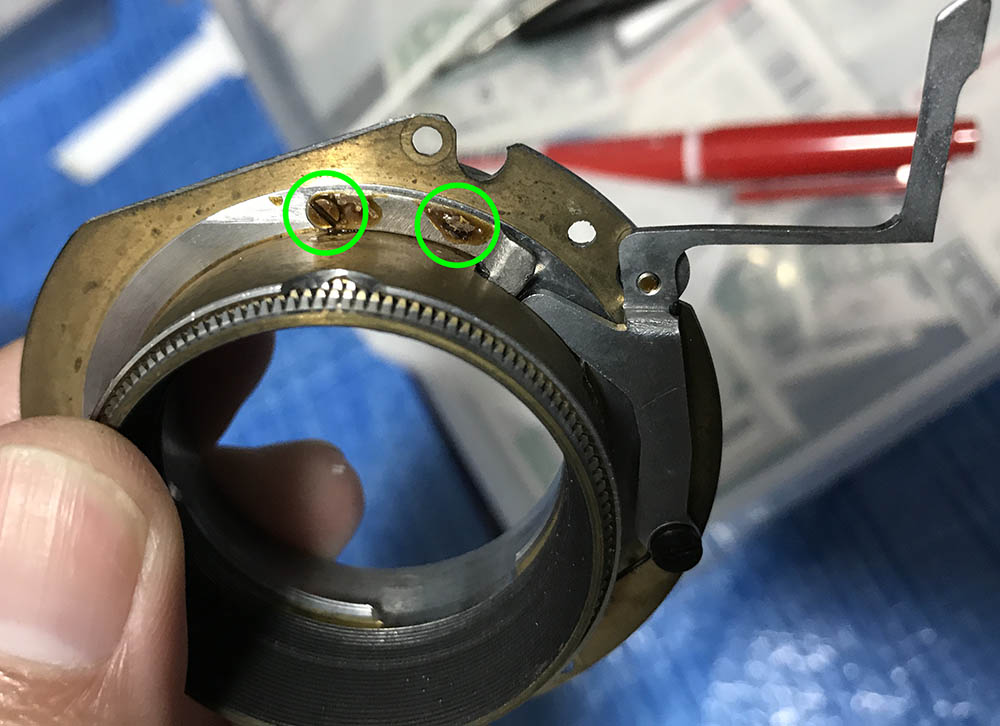
Here is the back of the helicoid assembly. These screws hold the stop for the helicoid. It is there so teh helicoid won’t turn-past its range and undo itself. They are locked at the factory with lacquer so you must dissolve them first before you unscrew these. I remember that the screws are not the same so be careful. If they’re still hard to undo, these will have to be softened using heat from a soldering iron.

Once the stop is gone, just depress the lock or press on that conical thing to lift it and you should be able to separate the helicoids. As with all helicoids with multiple entry points, mark where these separate. If you got it wrong then good luck putting this back again and don’t message me how to do it. Mine separated here. See the fine teeth? They mesh with the focusing wheel and they are delicate so make sure you don’t damage this. Handle this with care because they’re made of brass.
I cleaned these by rinsing them with solvents and then dunking them in an alcohol bath after. Use a toothbrush to scrub them, make sure that there are no hardened gunk left in them. Don’t lubricate any of the helicoids with oil, they’re designed to run dry or they are lubricated with graphite powder. Oil or grease will just make these squeaky as dirt or grime contaminates it.
If you must lubricate yours, just use the lightest grease available to you and only apply a very thin film. I’ll admit that I grease some of my rangefinder cameras and I’ll tell you that this is more of an educated decision, I did that knowing the risks. Lubricating them will only make your focusing heavier when you use a lens with a built-in helicoid. It may be nice to use with the 50mm lenses that don’t have helicoids but it can be hard to focus for those that have the them as the resistance add-up, it ends up being really stiff.
Be careful while cleaning the helicoids because the lettering is just painted-over and if you used a strong solvent, the lettering might get dissolved. Use a soft paint brush to clean the lettering as a toothbrush is too-stiff.
Calibration:
The Nikon SP’s focusing patch is the most difficult to calibrate since they’re not so easy to access. The space is so cramped and you may end-up pushing something else and do a botched job. The good thing is that the steps aren’t too different from the other Nikon rangefinders, you can read my old article about how I calibrated my Nikon S2 since most of what I said there is going to be relevant here.

This is the grub screw that secures the vertical adjuster. You won’t need to loosen this too much and never over-tighten this. It’s a very delicate thing and it can be brittle due to its age. Once you have loosened this screw a bit, you can adjust the large gear just left of it. Use a plastic toothpick to nudge it up-or-down. Remember to make small, precise turns. Turning it too much is not good, this is the reason why it is a good idea to not loosen the locking screw too much, just make sure that it is loose enough for you to move the gear without it coming into contact with the grub screw.
It’s best to adjust it while the frame for the rangefinder window is off. I took my pictures with them installed.

Here’s a closer view so you can see what’s there. I shot this when I took the rangefinder assembly out for cleaning. The locking screw is a tiny set screw. Just immediately to its right (left in this picture) is a serrated wheel and that is what you should be adjusting, nothing else. They are best accessed when everything is exposed. If not, carefully probe for the wheel. Remember, only use a soft plastic toothpick for this.
This is the horizontal adjuster, it’s easier to access. Just adjust it gently with a small screw driver, it should turn the focusing patch left-and- right. Again, small increments are best when you are adjusting this.
You can seal the locking screw with lacquer to make sure that it stays. Apply it with a brush, nail polish will also do. Remember not to put too much of it, a small dab is more than enough.
Bonus:
Here are some things that I usually do to my rangefinder cameras and I am sharing these with you. You can check your camera to see if you need to do these or not.
This was bent at the factory but it can wear-out with regular use. Just bend it to adjust how tight you want the lock to be. Be sure that you make small adjustments and not over-bend this part. The proper tool for this is a sheet metal bender and it is easy to fabricate. I will show you how to make one in the future.

These can sometimes be bent, just carefully bend them back to your desired tolerance. I’m fine with mine but these can easily be bent from regular use or if the idiot who had this camera forced this back cover when he wants to put it back to the camera but forgot to turn the locks underneath.
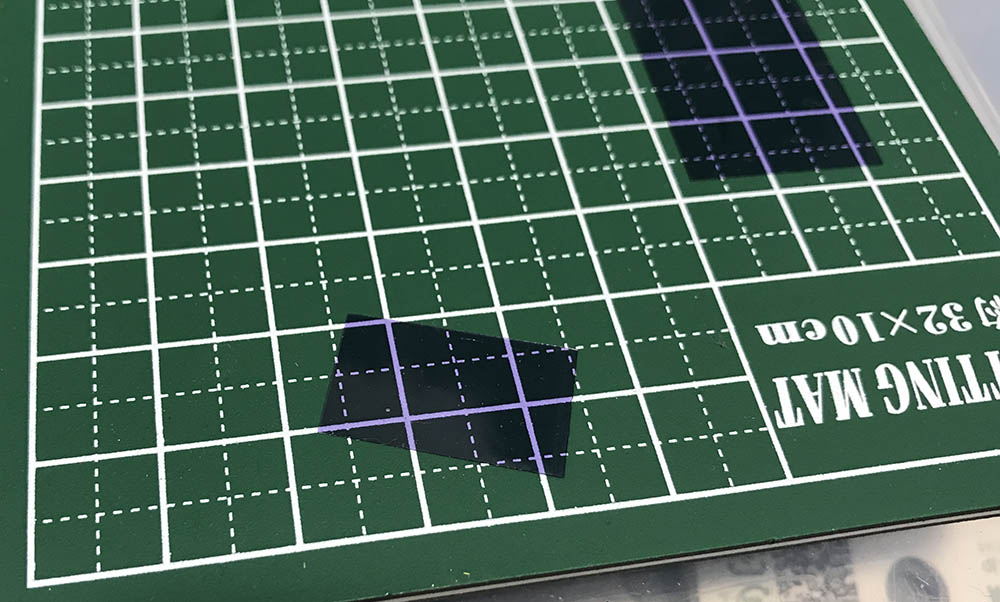
The viewfinder window was also tinted. I do this since Nikon’s rangefinder patches are a bit of a pain to view unlike Leica or Contax patches because they have feathered edges. It can be difficult to view depending on the light angle or brightness. Sure, the clarity of a rangefinder patch has more to do with the materials used and how clean it is but this is a good hack to make you see it better. This mod makes a whole world of difference.
Just like with my Nikon S2, I went ahead and tinted my viewfinder to help me see the tiny patch better. If I am not mistaken, I learned this trick from Jon who’s a smart guy in every thing rangefinder-related. I was about to cut a real glass filter to replace the protective glass on the rangefinder window with it when I got this idea from him. It sure saved me a lot of time.
I just cut a piece of gel filter, placed it between the glass protector and the rangefinder window. Make sure that you cut it about 4mm bigger on each edge. Keep it between the rangefinder window and the glass protector and trim down any excess so it won’t cover up another window. Leave it there, don’t bother to use any adhesives, the window should be enough to secure it in-place.
Conclusion:
That’s all for part 1, make sure that you go about each step carefully. This is not an easy task, a Nikon SP is not something that you should mess around with. It demands respect, if you’re not sure about your skills just send yours to somebody who knows their thing, better be safe than sorry.
In the next part, I’ll show you guys how to partially strip your Nikon SP and it’s going to be exciting. Thank you for following my blog. As always, if you love my work please share it with your friends at social media, if you really love my work then do not hesitate to buy me a Whopper by donating to this blog. Thank you again and see part 2 for more exciting stuff. Thanks, Ric.
Help Support this Blog:
Maintaining this blog requires money to operate. If you think that this site has helped you or you want to show your support by helping with the site’s upkeep, you can make a small donation to my paypal.com (richardHaw888@gmail.com). Money is not my prime motivation for this blog and I believe that I have enough to run this but you can help me make this site (and the companion facebook page) grow.
Leave me some tip?
Thank you very much for your continued support!
$2.00
Helping support this site will ensure that this will be kept going as long as I have the time and energy for this. I would appreciate it if you just leave out your name or details like your country’s name or other information so that the donations will totally be anonymous. This is a labor of love and I intend to keep it that way for as long as I can. Ric.

Sep 03, 2020 @ 03:49:45
Thanks for sharing this info! It gave me the courage to clean out my viewfinder 🙂
Dec 17, 2020 @ 02:28:16
“Some will say that the Canon 7 is a better camera, I though so as well until I took one apart and discovered that it’s just a toy compared to the Nikon SP.” Lost me right there. I’ve seen Canon 7s apart and talked to repairmen who work on them… nobody buys this. Gotta remember to put the lid back on the ether jar before blogging…