
Hello, everybody! Do you like Culture Club? I love Boy George a lot, his voice is unique and that adds a special something to their songs. One of their best songs is Time, it’s catchy and you can dance to it, too. It doesn’t sound old, it is a great example of how creative people were in the 1980s. People are not afraid of experimenting with different styles and express it. This is why I’m so in love with the decade, it’s a special part of my life. I’d love to go back in time and enjoy the decade all-over again for a day. While we’re on the topic of time, I will show you how time is handled in a Nikon. I’ll show you how it is controlled and how to make sure that your camera works flawlessly.
Introduction:
The Nikon F’s shutter is legendary not only because it’s reliable and tough. It is a very convenient design that allows you to turn it continuously. This was called the “endless shutter” by Nikon’s marketing a long time ago and it was coined during the Nikon SP’s debut. This was a huge step for Japan, this was something that no Japanese camera did, you could turn the dial “endlessly” without having to stop and turn the other way to get to the other end of the shutter-speed’s range. Since the Nikon F inherited the shutter mechanism of the Nikon SP you can treat its operation as fundamentally identical despite some minor differences in operation.
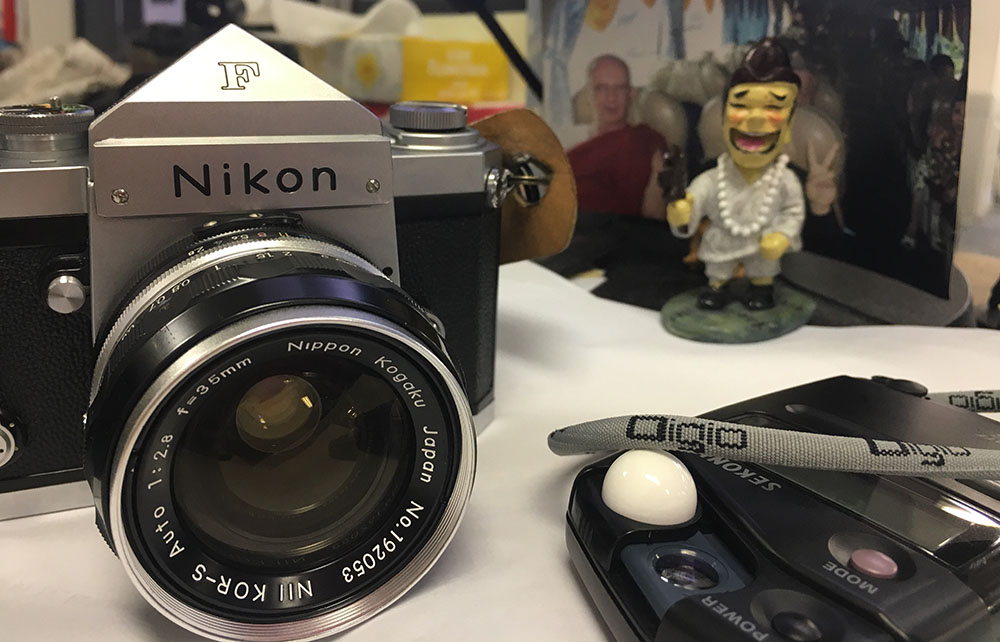
The Nikon F’s shutter is a joy to work with, it enables you to change it with a quick turn of a knob. This is beneficial when shooting street photography, it can mean a lost shot if you’re not quick enough. The perfect companion for this is a Nikkor-S 35mm f/2.8 Auto, street photography demands that you use a 35mm or 50mm lens.
I love using this camera a lot, its sharp, angular profile fits my hands better, I dislike the rounded silhouette of many later cameras for some reasons. It’s also quieter than a Nikon F2 since the mirror is smaller and shutter is not as powerful since it only goes to 1/1000s compared to 1/2000s on the Nikon F2.
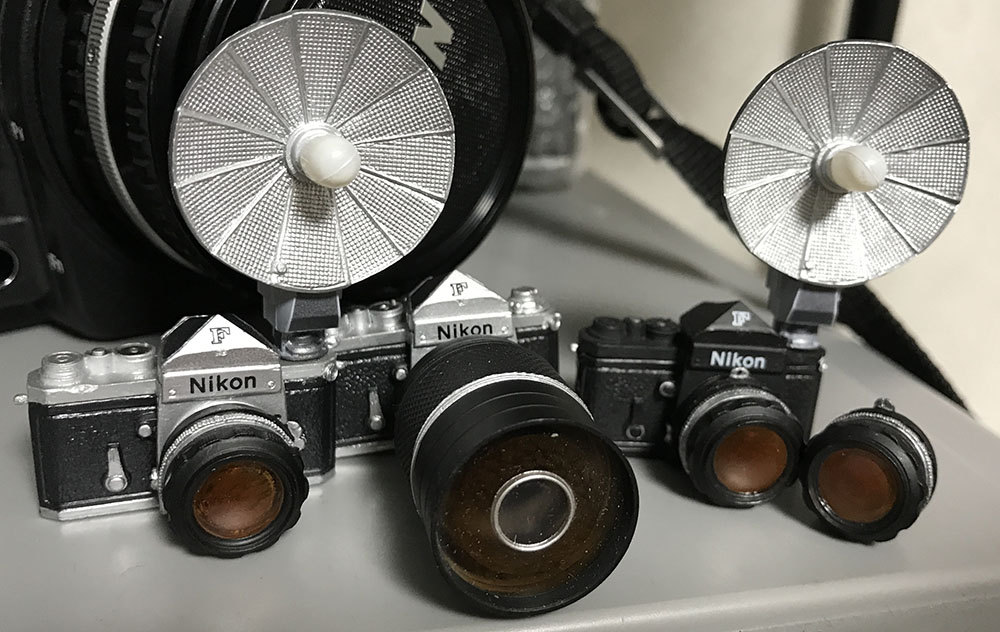
The Nikon F is such an iconic part of Japanese culture you could even buy a set of miniatures. This is the cutest part of my collection.
We’re going to get deep inside a Nikon F in this article. Please don’t treat this as a repair manual, this is merely for your entertainment. If your camera is broken or needs servicing, send it to a repairer. This is not something that’s possible to work with if you don’t have the right tools and experience. Your camera deserves professional treatment, support your local repairer. If you don’t know who’s capable of repairing these, ask people on the internet and let them guide you to a reliable and honest one. There are many charlatans out there, faking their reputation until they found somebody dumb enough to listen to them. They will ruin your camera and may even hold it hostage. Only support the reliable ones, it is our duty to keep their craft alive. Let us now begin with the main article.
Before We Begin:
If this is your first attempt at repairing a lens then I suggest that you check my previous posts regarding screws & drivers, grease and other things. Also read what I wrote about the tools that you’ll need to fix your Nikkors.
I suggest that you read these primers before you begin (for beginners):
Reading these primers should lessen the chance of ruining your lens if you are a novice. Before opening up any lens, always look for other people who have done so in Youtube or the internet. Information is scarce, vague and scattered (that is why I started this) but you can still find some information if you search carefully.
I highly recommend that you read my working with helicoids post because this is very important and getting it wrong can ruin your day. If I can force you to read this, I would. It is that important!
For more advanced topics, you can read my fungus removal post as a start. This post has a lot of useful information and it will be beneficial for you to read this.
Disassembly (Slow-Governor/Retarder):
The slow-governor or retarder is responsible for delaying the activation of the rear curtain. It’s a standalone assembly which gets charged by the slow-lever’s lower arm via the shaft as it turns, it gets the kinetic energy from the slow-lever’s upper arm when the curtain’s pawl strikes it. This sounds very familiar, doesn’t it? That’s because all of Nikon’s cameras were based on the Leica-type shutter design from the pre-war, this persisted until the Nikon F2 came about. The design of the retarder hasn’t really changed much from its original design in principle but it’s not right to say that they’re all identical. There has been a lot of changes done to it since 1947 up to this point.
This is an important mechanism, if this gets dirty or jammed your camera’s slower speeds (below 1/30s) won’t work properly, they’re either be too-slow or they just won’t work and get stuck. It’s in an unfortunate place within the camera’s body and you’ll have to remove a lot of things just to access it. This is a common problem for many Nikons that were shelved for a long time, it can get rusty without exercise and the only way to repair this problem is to take this assembly out and clean it properly.
I’ll use the term slow-governor and retarder interchangeably from now on, I have to make it clear to prevent any confusion. Both names are valid and people call these with the same names regardless of model and brand.
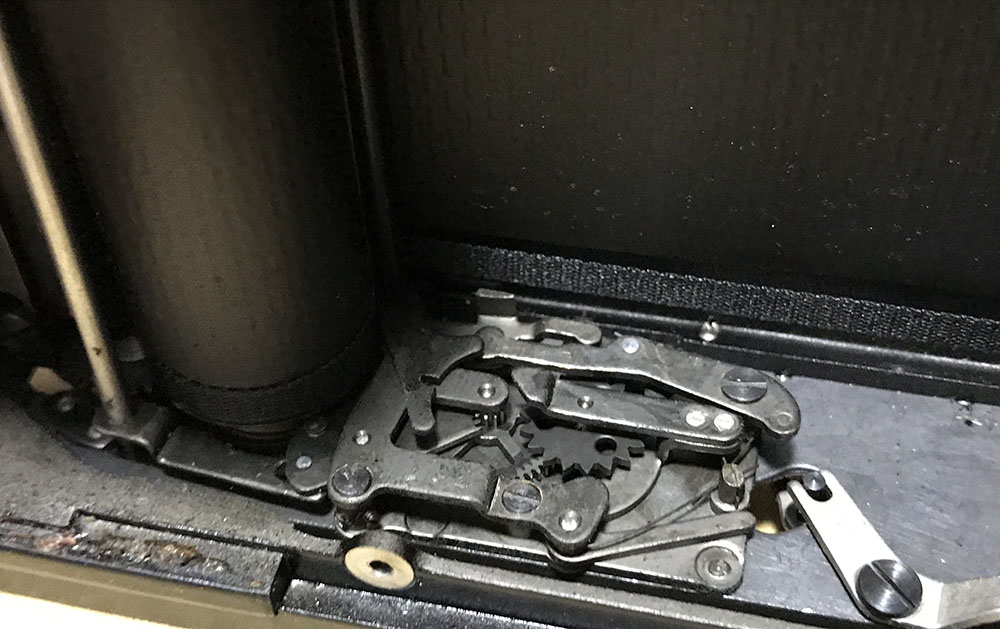
The slow-governor is under the mirror-box like nearly-all Barnack-inspired cameras. It’s susceptible to dirt, corrosion and molds since it’s at the bottom where light doesn’t really reach it and moisture can get trapped. I have seen lots of nice cameras with the slow-governor in poor state.
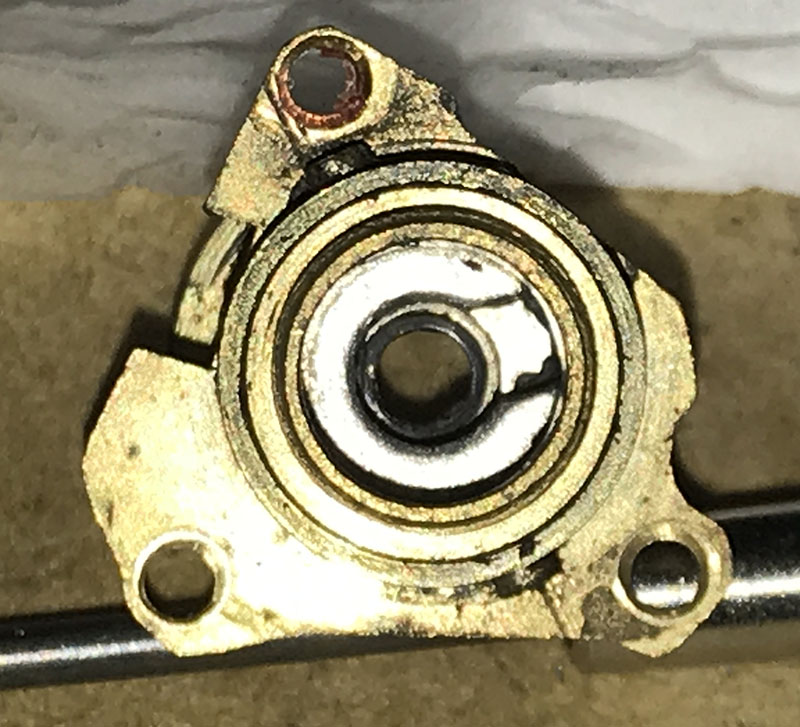
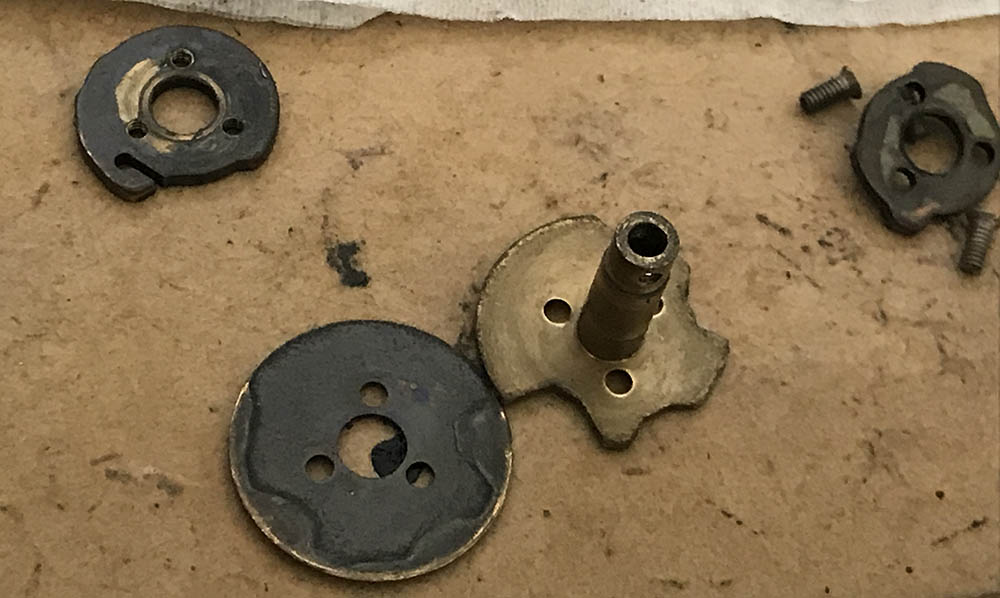
Inspect the original position of the retarder, it can be slightly adjusted so its original position is important. You’ll have to adjust it later anyway but it’s a good practice to know where your starting point is.
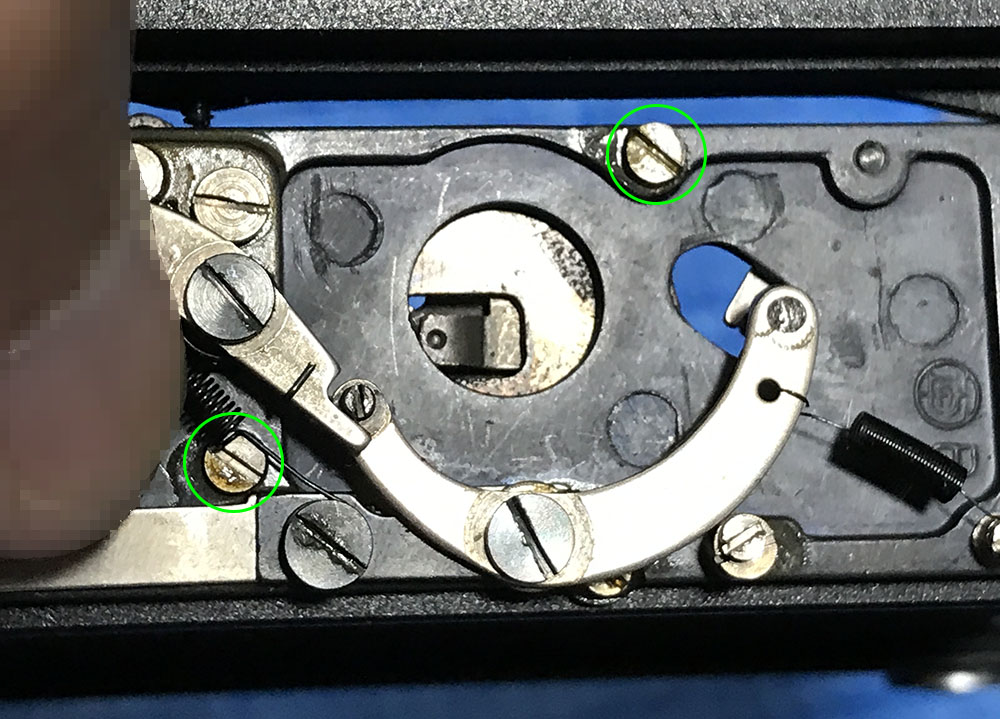
These screws should be extracted in order to remove the retarder. Get some MEK to soften the seals before you extract these. These aren’t identical, one of them is shorter, putting the longer screw in the hole for the shorter one is not a good idea since it will interfere with the movement of the elbow.
This one doesn’t look so bad, I have seen worse. I use a few methods to help me clean-away corrosion, my favored way is to soak it in WD-40 overnight. I know some people don’t like this but it’s a very effective way of cleaning the rust off. Flush it with naphtha and alcohol after so you won’t leave residues. Another way is to scrub it in citric acid solution after soaking it for around 5 minutes or so, this is very effective but it will remove the patina. It’s potent, you can accidentally etch or dissolve soft metals with it if you left it for long periods of time, which is about 30 minutes or more. You must clean all of its joints so leftover acid won’t accumulate there and corrode the parts without you knowing over a long period of time. The best way is to simply soak it in naphtha and a few drops of machine oil overnight. This is the safest way, it’s only reserved for retarders that are in good-enough condition. If it’s clean, I usually just flush it with naphtha and alcohol and that’s it.
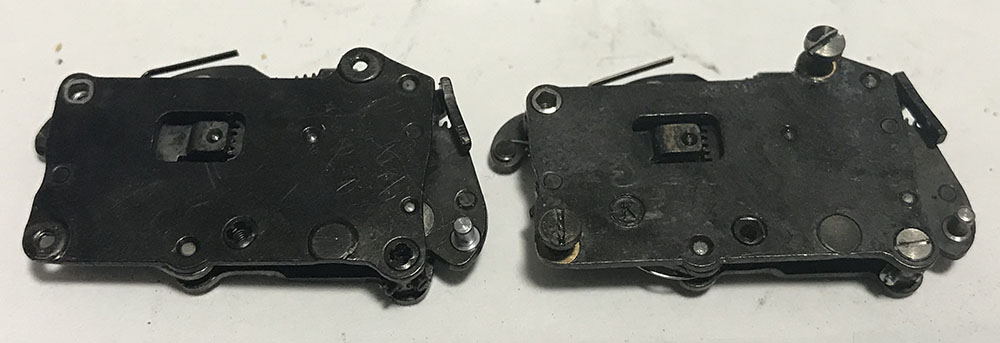
I suspect that these were made by different subcontractors, you’ll find some differences between models. It’s either Nikon improved on the design or it’s been farmed-out to smaller companies around the facility. This is how a lot of Japanese companies work, a larger company would usually keep smaller companies alive by providing them with small tasks such as making screws or other fittings and assemblies.
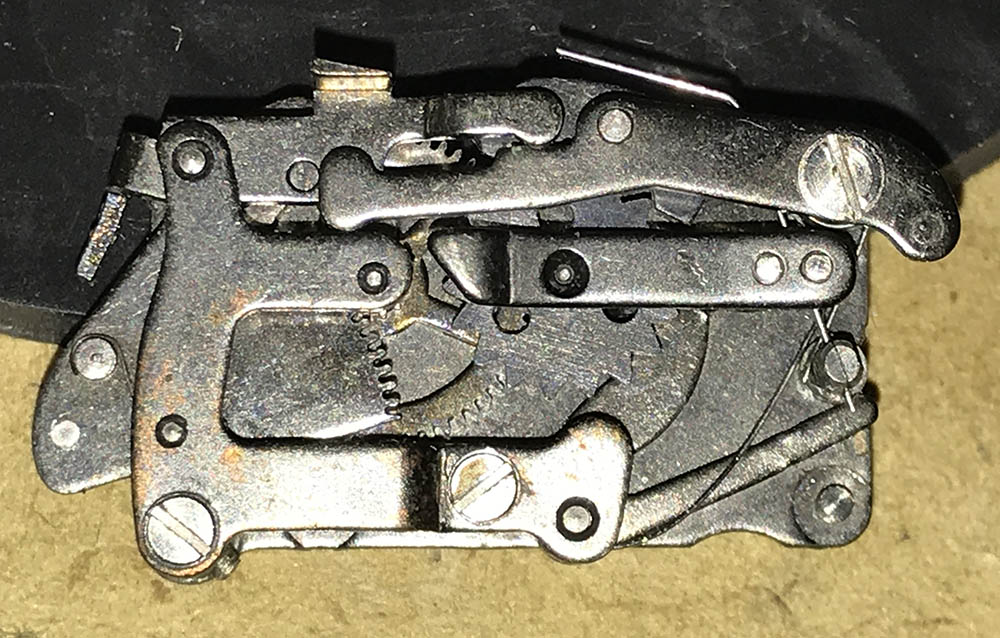
This is an example of a badly-corroded retarder. The only way to clean this is to dismantle it and then clean the parts with citric acid.
Nikon doesn’t recommend dismantling these as they were precisely-made. I don’t have anything to lose so I did it anyway.
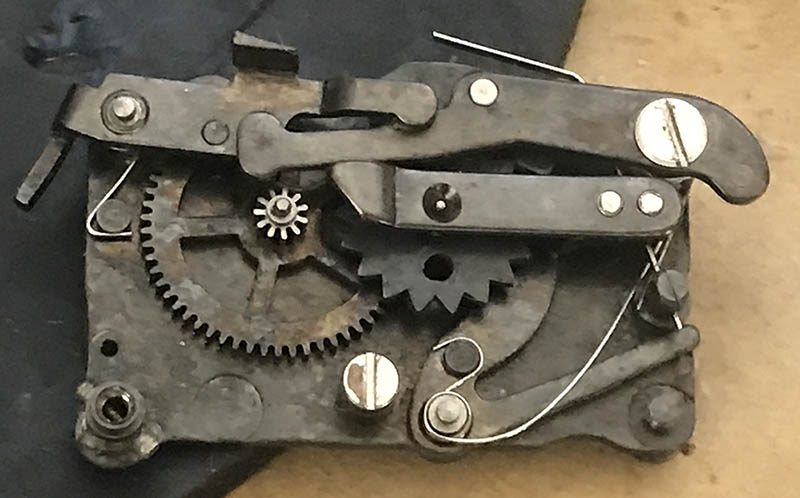
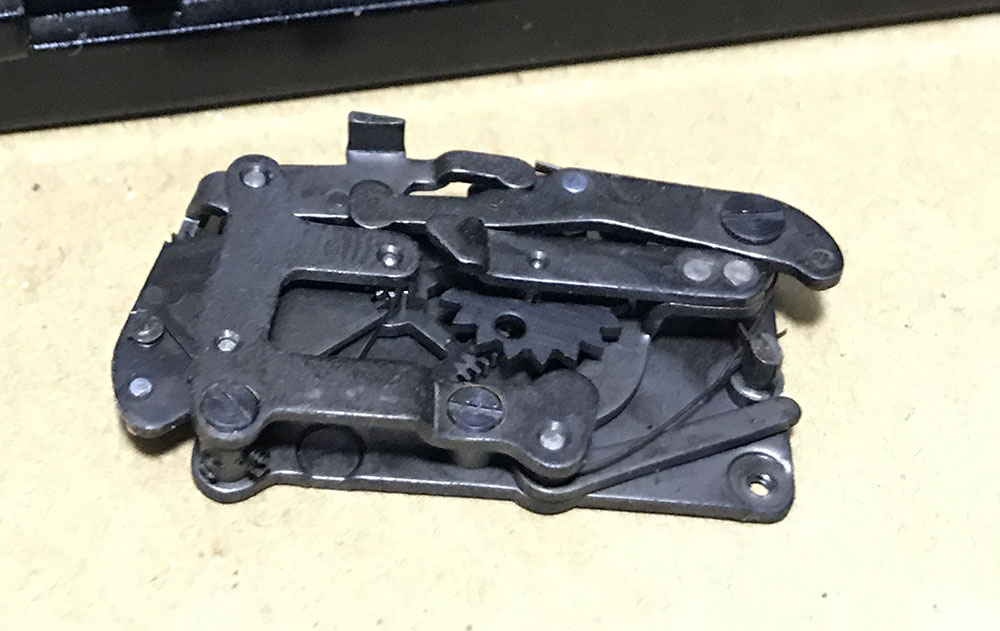
Study how the springs and levers connect to each other.

It’s now ready for cleaning. I’m not sure but this is probably the filthiest one that I have seen.
Once the retarder is clean and dry you should apply a very small amount of the finest-grade watch oil to its joints. Not all joints need lubrication, there’s a few that should operate dry. Use a small sewing needle as an applicator, a file will be handy to grind the needle’s eye to form a U-shape reservoir. Use that to hold a tiny amount of oil. This technique is used by watch repairers, it’s something that I picked-up as a young apprentice. Wipe-away excess oil and make sure that you don’t apply too-much. Excessive oil isn’t good, it will coagulate with dirt later and jam the mechanism. Some would even skip the oil and just leave it to operate-dry. I used to do this but I thought that a well-serviced retarder needs to be properly-oiled so I changed my methods.
Disassembly (Speed-Selector Mechanism):
This is the most delicate part of repairing a Nikon F in my opinion since it’s easy to get things wrong, damage the parts and ruin the camera forever. It’s the part where I spend the most time with and only a successful cleaning of the parts here will be satisfactory in order to make the camera works great. The parts here interact directly with the shutter’s operation so everything in this are needs to be clean.

Extract these screws to remove the A/R selector assembly but you’ll have to remove the clip of the plunger first. Be careful so you won’t lose the spring, shims or any smaller parts here. They should be installed in the right order, too. Taking plenty of notes will help you later.
Extract the whole thing and set it aside. You may need to wiggle it a bit and turn it slightly to remove it.
Note the position of the parts here since all of these should align properly. It also has a shim inside of it, don’t lose that.
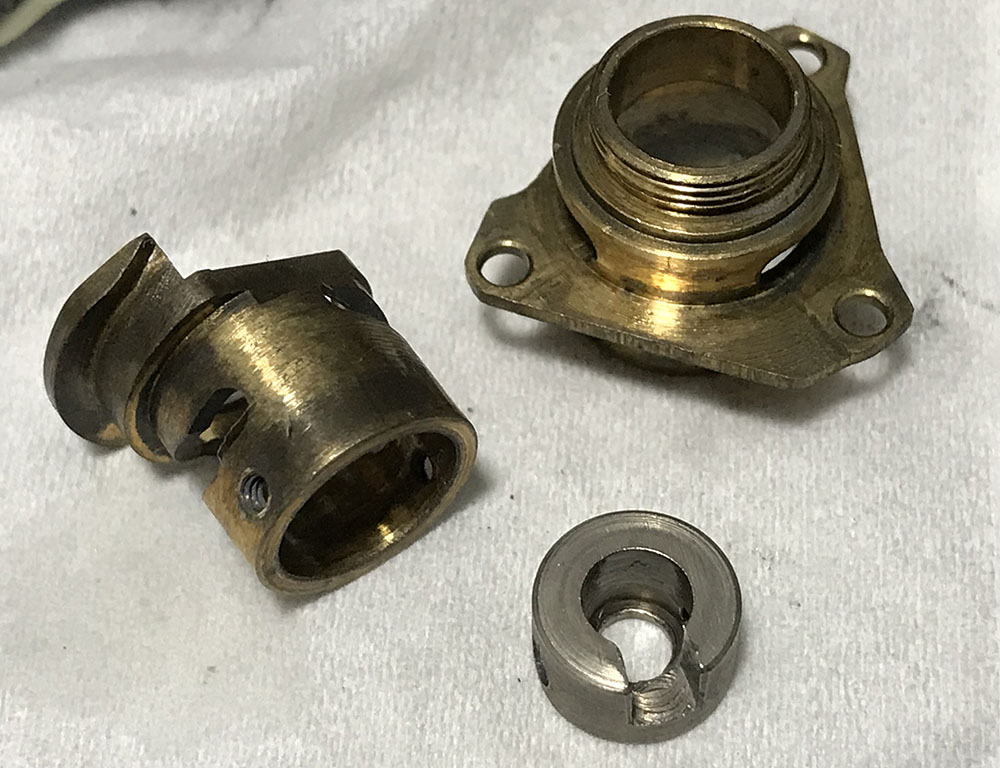
This thing is usually dirty and should always be taken-apart in order to do a proper cleaning. Don’t forget which screws should go where, the taller ones are the screws found on the top. You won’t believe how much dirty can get, this is the dirtiest part of the camera in my experience.
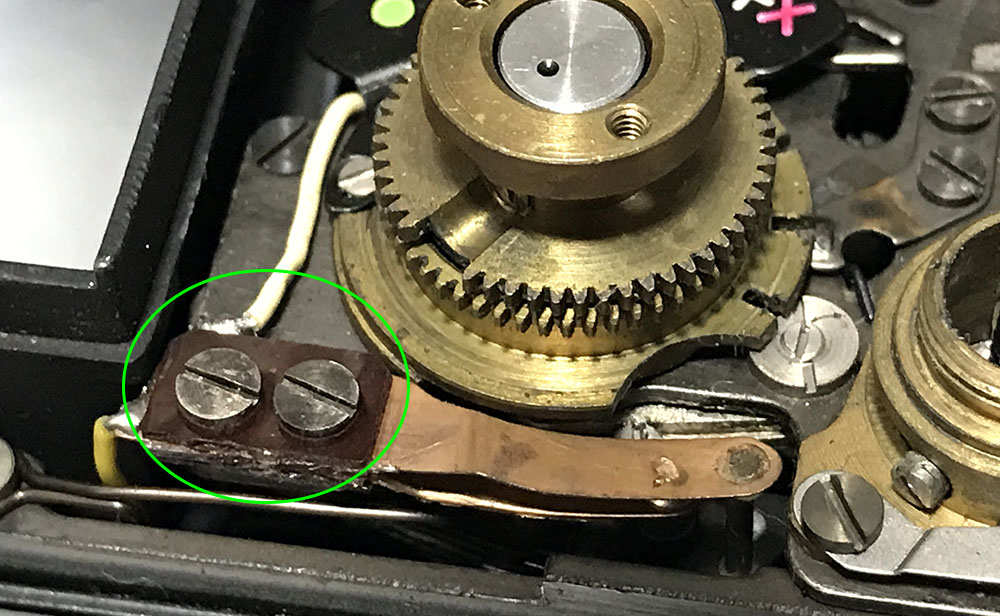
You should also remove the contact for the flash-sync, extract these and the whole thing can be removed. The terminals here contact each other before an exposure is created, forming a circuit and that will trigger the flash. This can get rusty so the contacts have to be cleaned. I never do this since I don’t shoot my Nikon F’s with a flash anyway, I don’t think it’s practical to fix the flash-sync because I believe that nobody uses this function these days. It’s a nice thing to have and it’s not difficult to fix, just not worth all the bother.
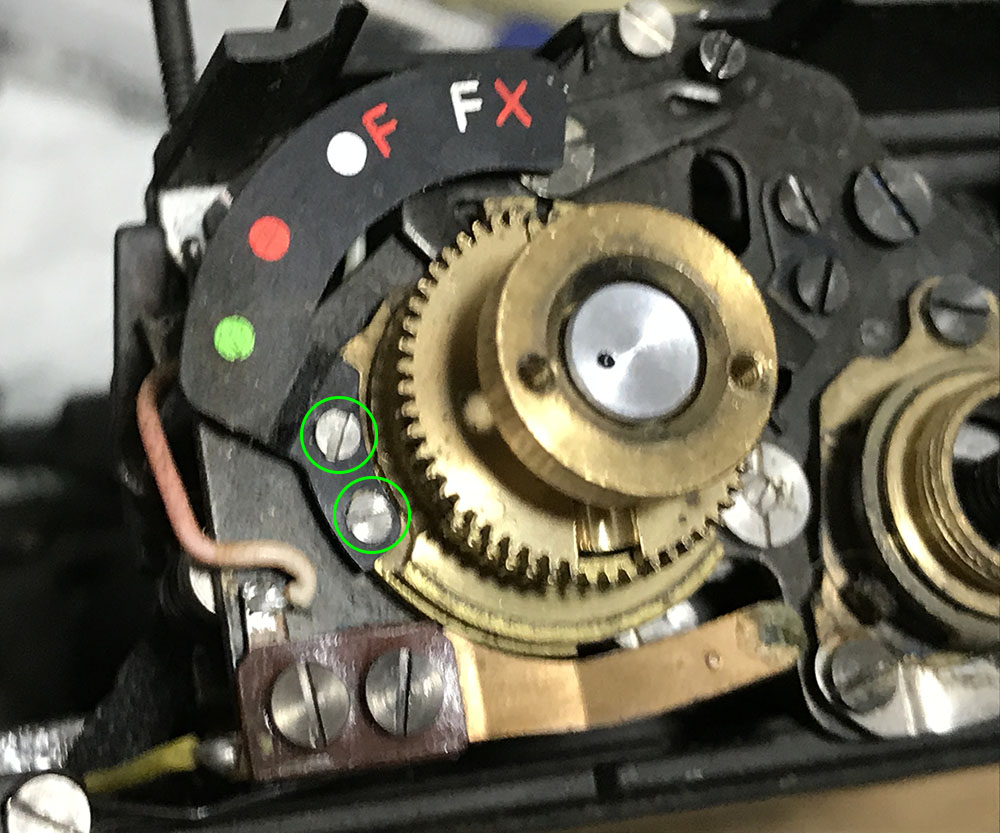
Remove the flash-sync type’s display palette by extracting these. Removing this and the part before will help you work on this without having to worry about bending or damaging them.
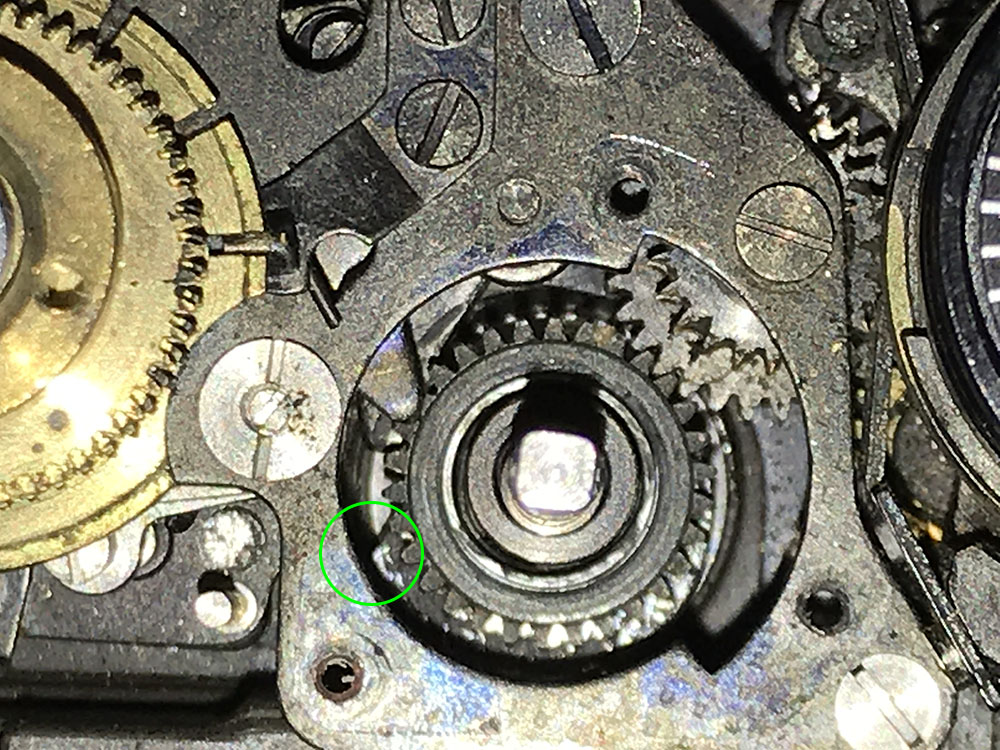
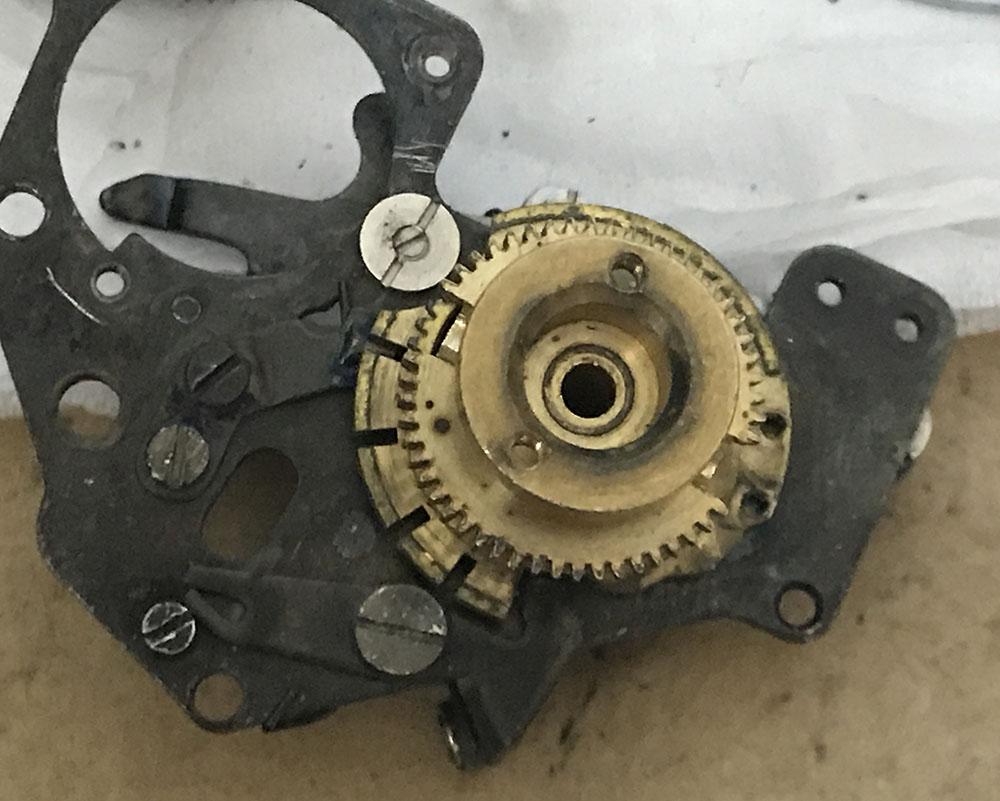
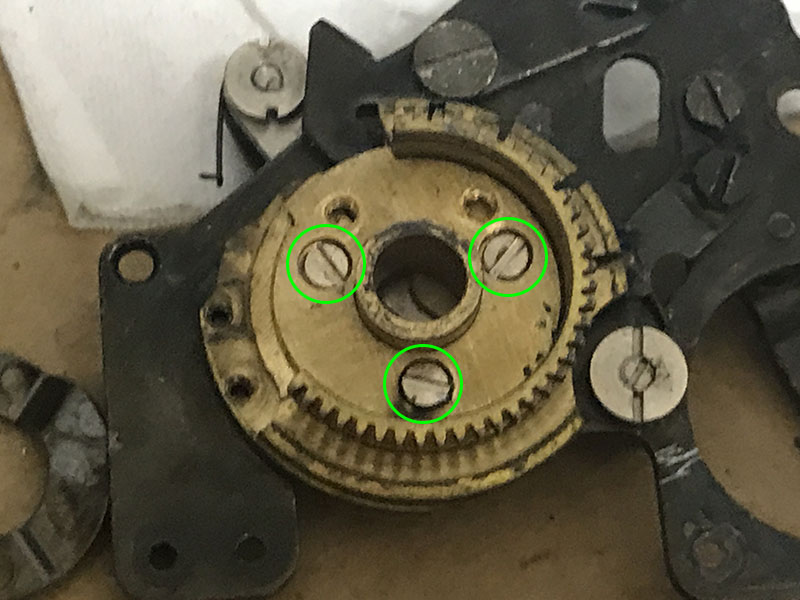
The position of this notch is critical, you should get this right or else it won’t charge the mirror at the correct time or not at all. The main coupling gear’s notch is what sets this thing apart from its rangefinder sisters since it’s also involved in charging the mirror.

The speed-selector’s assembly is secured by these, don’t forget which screw should go where since these aren’t identical. Some sit flush while some are long and they also secure gears. Don’t remove the assembly yet, you should read the next steps first.
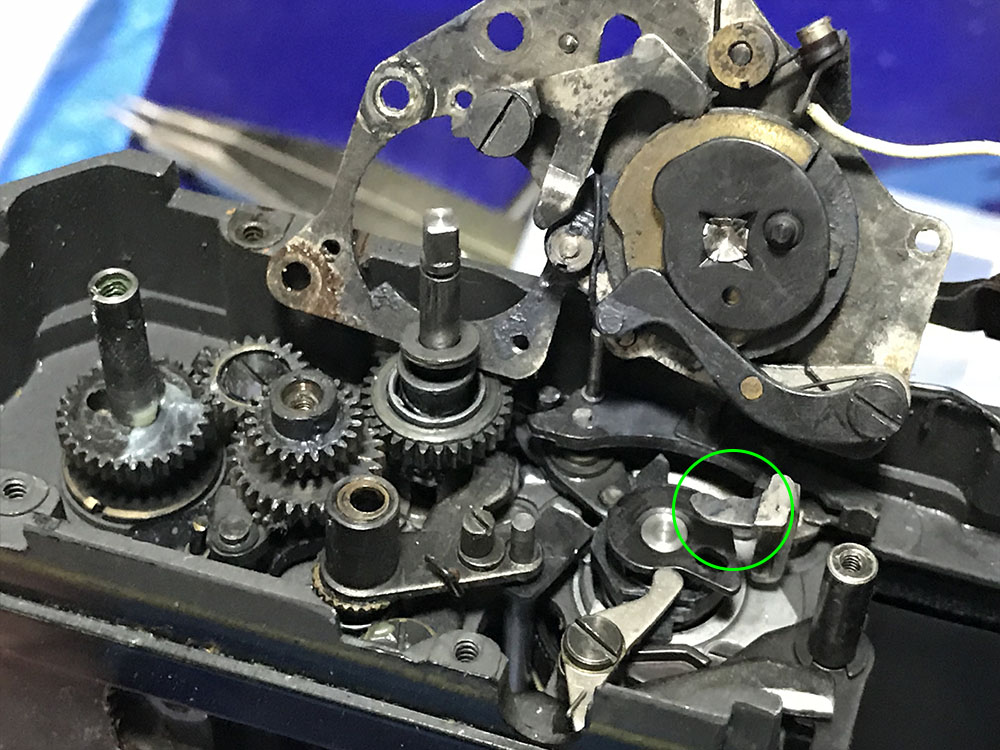
Gently push this towards the back of the camera while the speed-selector is being removed, you’ll bend its upper arm if you don’t do this. Do not push it with a lot of force or you’ll bend this which will cause problems when your firing the shutter at 1/8s and 1/15s. This is called the change-over speed and it’s involved in regulating the speeds where both slow and high speeds are working simultaneously.
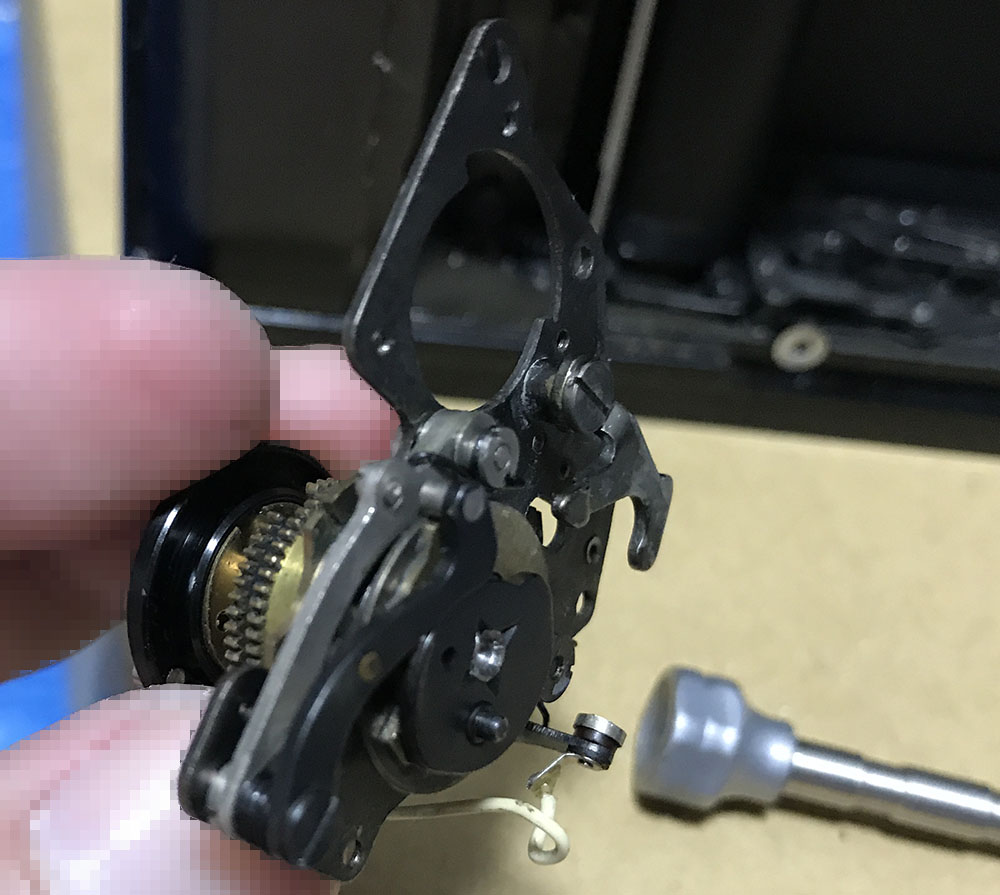
Carefully remove the assembly while you push on the change-over lever, it’s a bit tricky removing it since you can’t just pull this off, there are parts that hinge or couple to it so remove it carefully. Inspect it carefully and check its parts if there’s something that looks wrong. It takes experience just to know if something is wrong here or not.
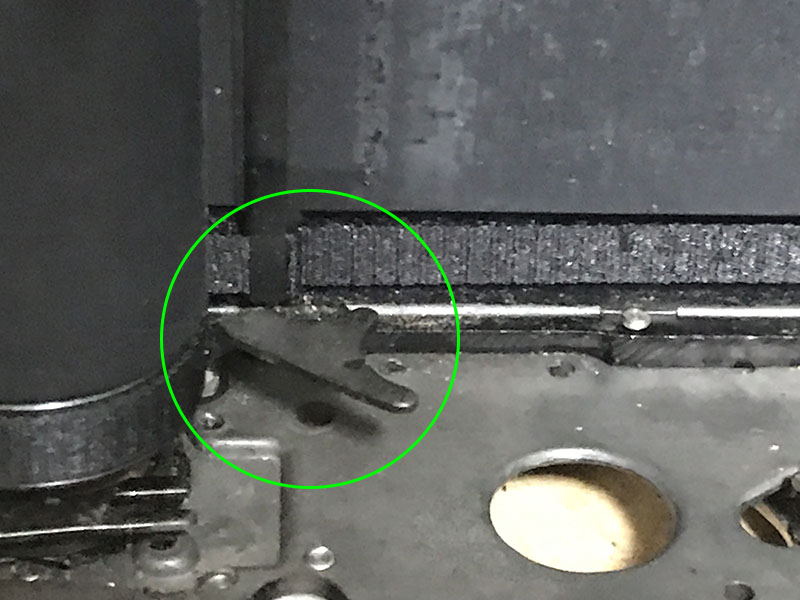
This is the arm that I was talking about, it gets caught in the selector’s lower palette so make sure it’s not in-contact with the selector when removing the speed-selector assembly.
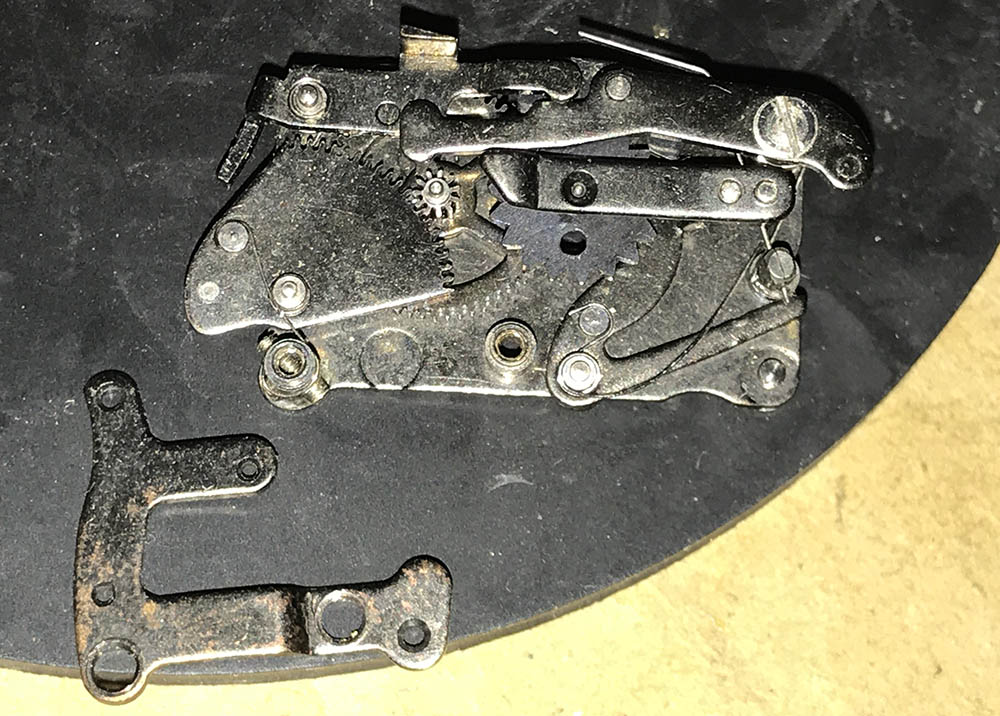
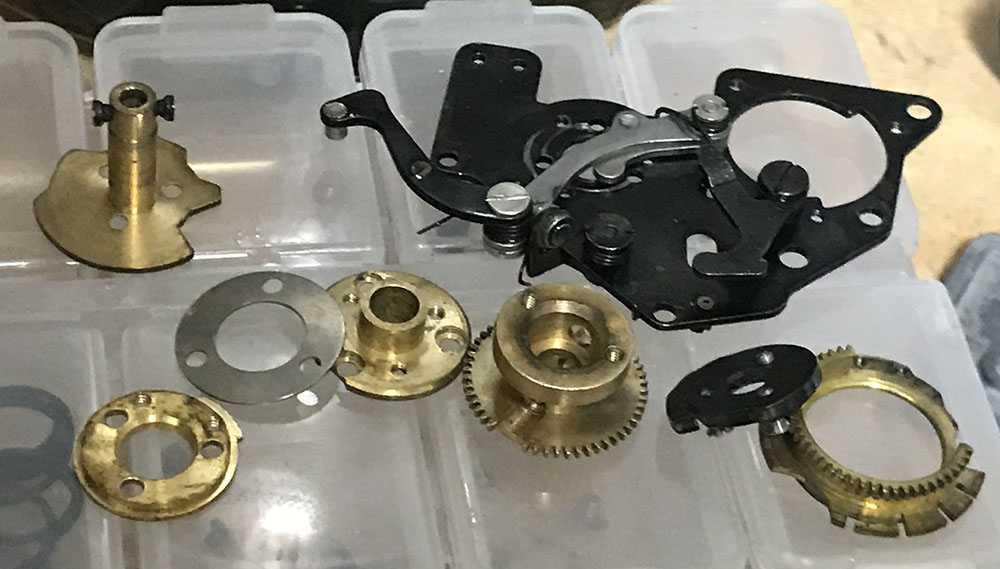
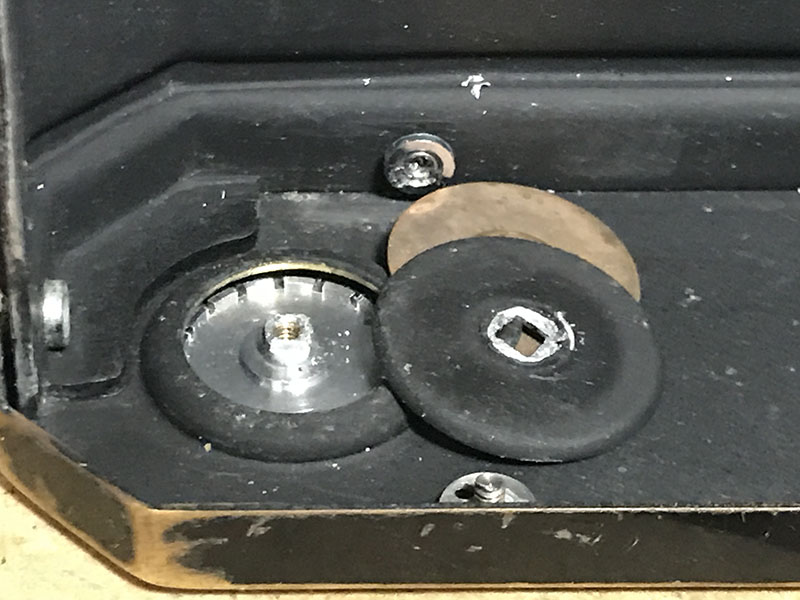
This is an example of a clean one, it’s still filthy but otherwise in good state compared to the one you saw earlier.
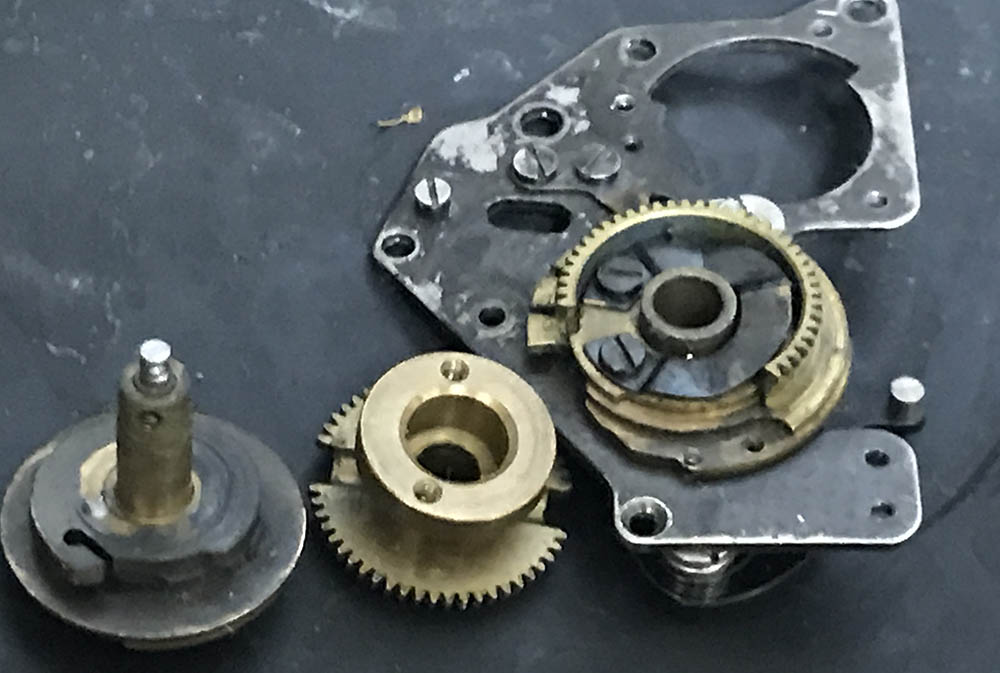
Remove the plunger and the main coupling cog. You’ll discover many small parts in this assembly so make sure you don’t misplace anything here. They should also be reinstalled in the right order, too.
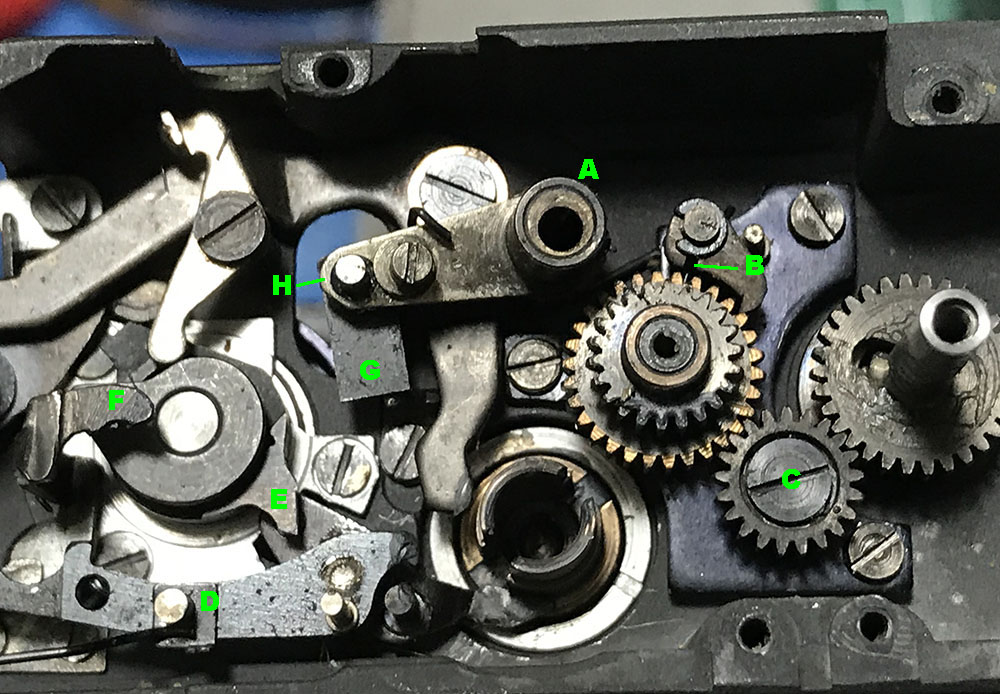
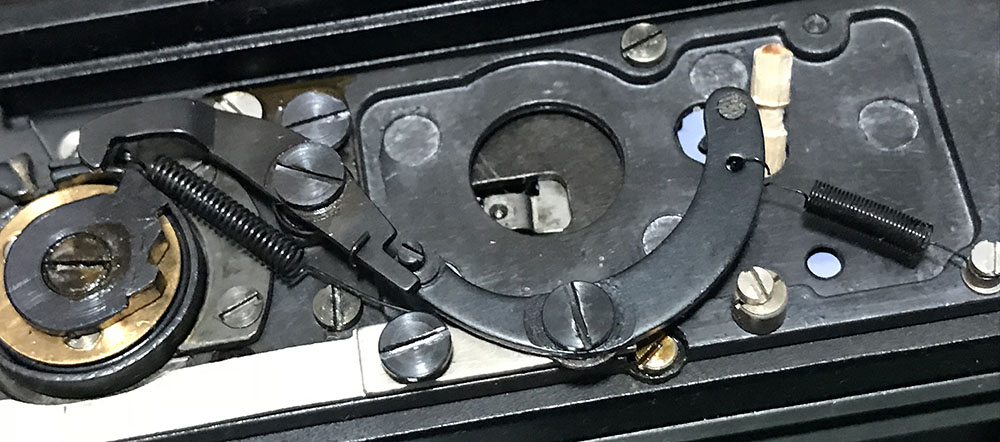
Here’s a short explanation of what you’ll see here:
- A is the slow lever’s upper arm. It comes in 2 parts, an outer one and an inner one. You should clean this very well, also note the eccentric hole’s position so you’ll know how to put this back again. You’ll need to adjust this later anyway but it’s good to have a starting point.
- G is the slow-speed arm’s lever, this gets kicked by the spinning pawl and it charges the retarder. Apply a bit of grease to its tip, I forget to do this occasionally. Be careful when handling this, it’s just crimped.
- H should be lubricated with a bit of oil since it’s a pivot. This should move freely without any resistance.
- B is the a ratchet so you can advance sequentially. There is a hooked wire here and the tip of that hook has to be inserted inside the slot.
- C can be removed after you unscrew its post which is left-handed, it can be removed by turning it clockwise and tightened by turning the screw in the opposite direction. It can be hard to remove so adding a bit of MEK helps a lot.
- D is a lever, it releases the curtain once it gets kicked by E. I usually remove it by uncoupling its spring and pulling the whole thing off. I then clean everything and oil its pivot. The spring is delicate, you’re not going to get an accurate shutter if its tension is modified. There are times when I have to bend this thing since it will lose tension if it was stored for a long time.
- E’s leading-edge should be greased a bit, I sometimes forget to do it.
- F’s tip should be greased a bit, I also forget this sometimes. It’s really delicate so careful not to bend this or your change-over speeds won’t be accurate since it connects to the change-over lever at the bottom.
The gear-train of the film advance mechanism has to be greased but only at the teeth of the gears. The pivots of the gears will benefit from a little bit of oil. Clean everything here very well to ensure smooth operation.
The following steps aren’t required and should only be done if the camera is exceptionally filthy. You can do more harm than good if you do this without any experience, the parts here are delicate, you can easily bend the parts, it is reserved for people who know what they’re doing.
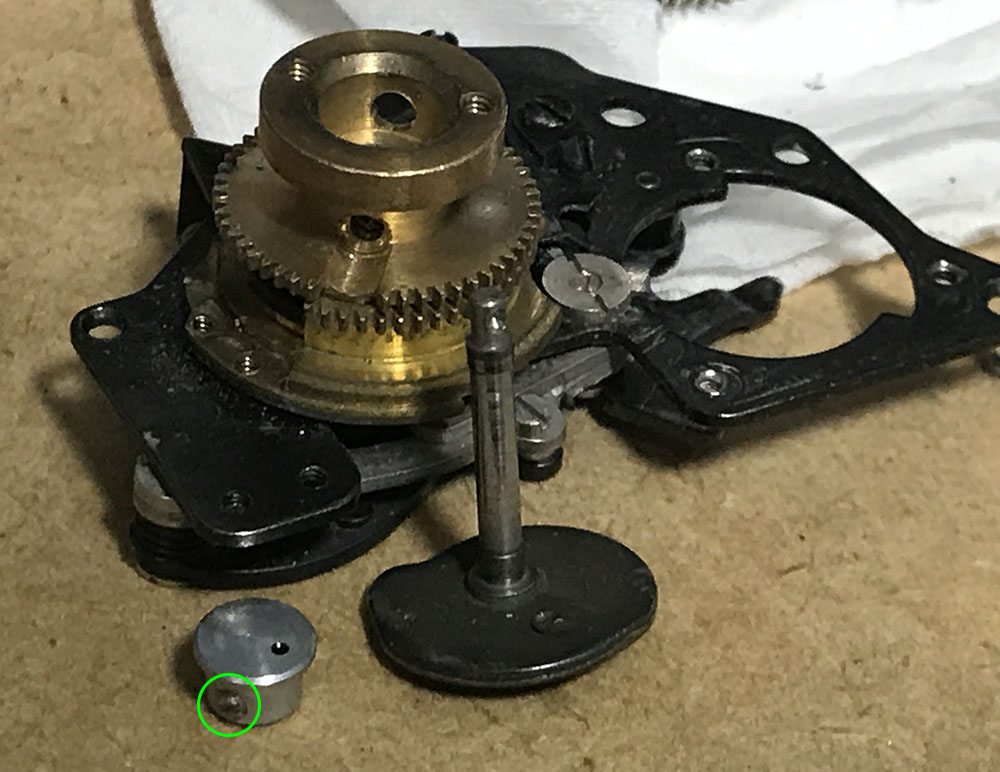
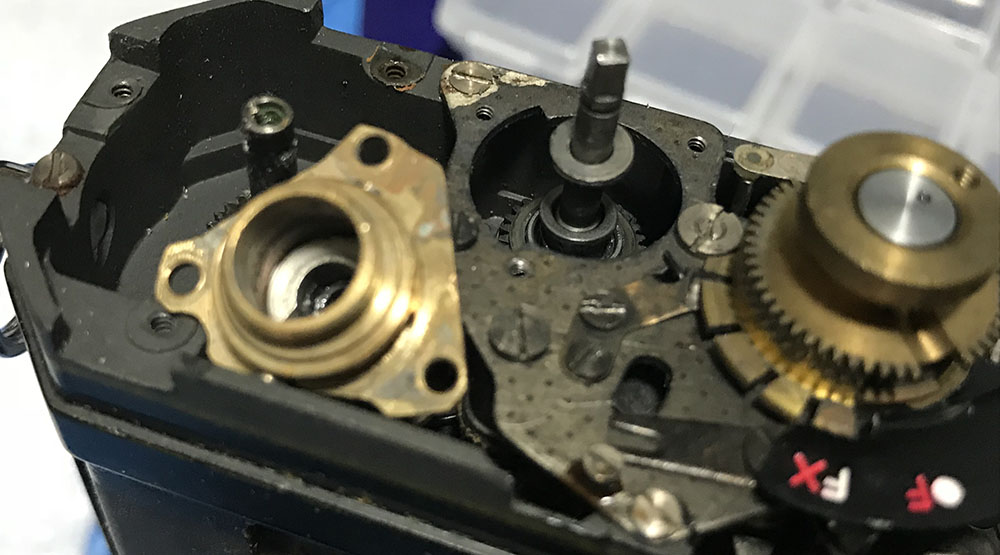
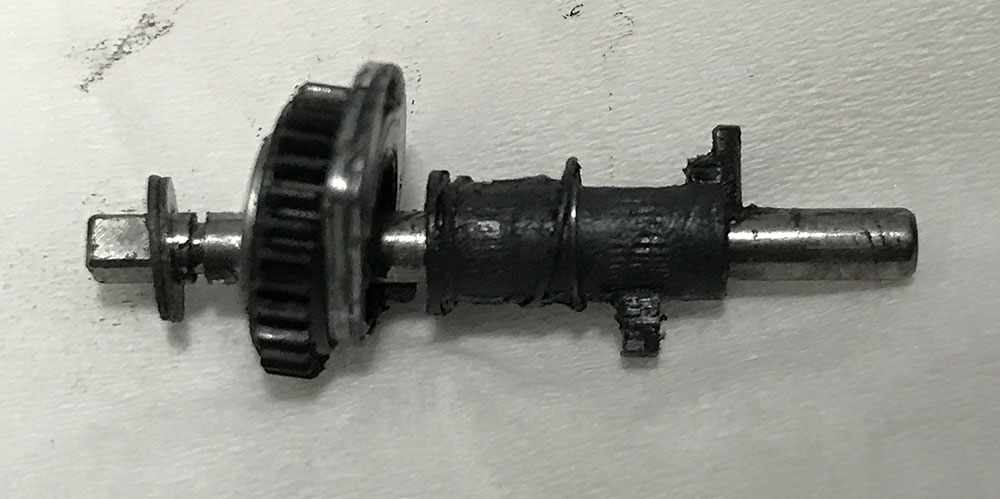
The spinning kidney-shaped cam has a shaft and it runs-through the entire height of the assembly. This thing has to spin freely so I oil it but you’ll find a few people applying a light grease here which is fine, too. To remove this, locate and extract the little screw found on its top. Removing the top allows you to remove the whole thing, it should free-fall and should not be stuck. If your is stuck then there’s a good chance that the shaft is bent. The shaft has to stay-straight or else it will impact the shutter’s accuracy, giving erratic or course operation which you may not feel while operating the camera but it will be obvious once you run it through a shutter-tester. Clean this very well and avoid bending it so only clean it with a brush.
Inspect the assembly so you’ll know how to put it back.
The speed-selector dial’s top assembly can be removed by extracting screws that can be found on both sides of its neck. I don’t have photos of it but you can see one of the holes near the tip of the palette’s tube in this picture. You will also see that the shaft for the spinning part is still here. It’s stuck on this camera which I found unusual and the culprit is the shaft itself, it’s bent. It’s replaced with a good one from my spares box. Visible here is the tongue for adjusting 1/1000s, it’s situated deep within the assembly so I wonder how it was adjusted at the factory, it must be a time-consuming process.

Mark the position of the spring so you’ll know how to put it back again. This aligns the position of the shutter-speed dial and its numbers so aligning this spring is important.
Extract these so you can remove the palette of the flash-sync selector. There are lots of coagulated gunk that can be found here, clean it later.
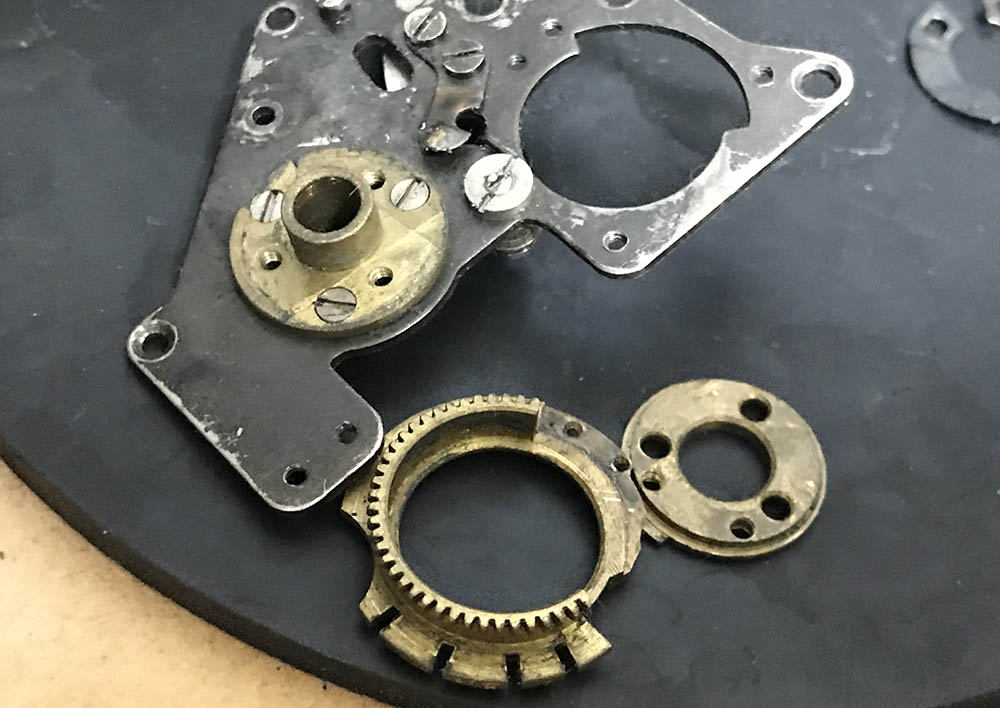
Remove the palette and extract the screws underneath it.

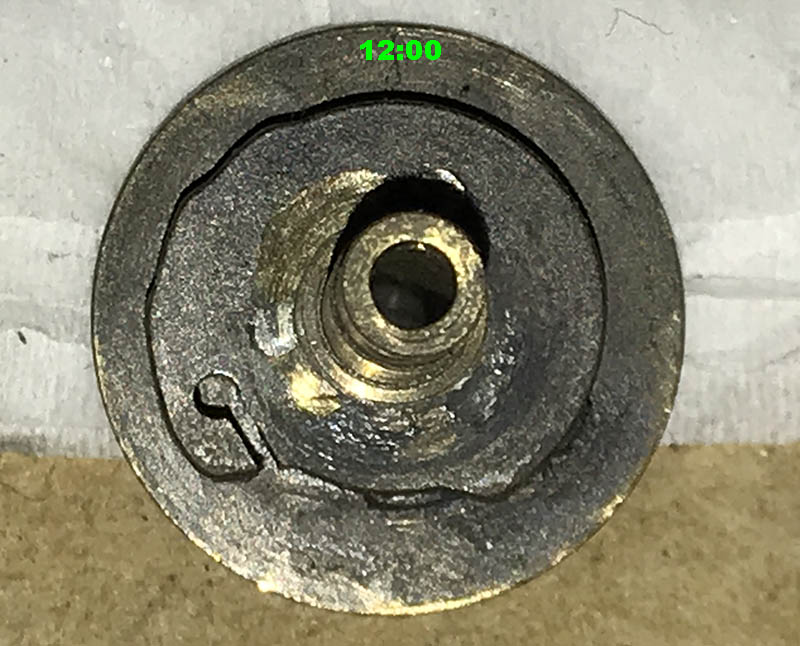
Note the position of the base before you remove it. There’s a notch that can be found on the 12:00 position, you can use that as a guide.
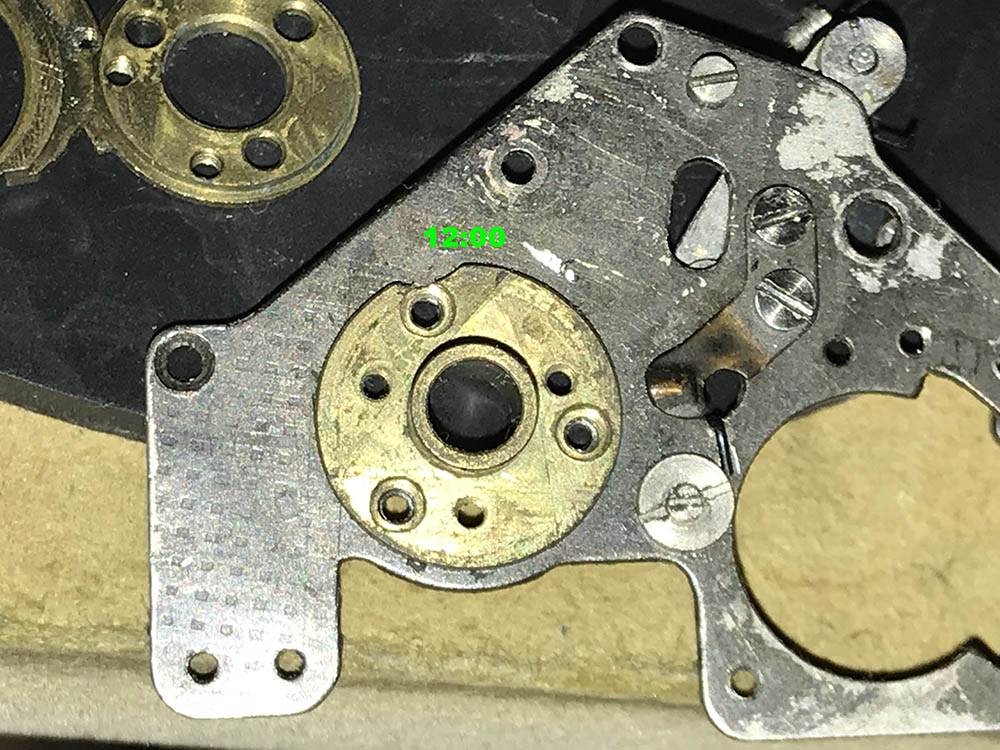


(Click to enlarge)
I took these photos to remind me how the parts should align before I extract anything. If you got this wrong then the speeds won’t be correct, the shutter may not even operate at all since the positions of the levers and cams won’t be correct. This is how delicate this step is, getting this wrong will result in a lot of wasted effort as you’ll have to open the thing again just when you are about to finish your repairs.
Clean everything well to remove any gunk. These are usually very dirty, it’s important to brush everything well and don’t leave any residue. You can use an ultrasonic cleaner to clean this part, too.
Here’s everything, I cleaned the parts with a stiff brush and made sure that I left no residue. There’s a steel shim here, that’s not part of the camera and it’s there by accident. Clean the joints well by flushing them with naphtha. I don’t advise dismantling them since you can bend the arms accidentally. It’s also important not to lose the alignment of the parts here, the timings of the shutter’s high-speeds rely on the precise alignment of these joints.
Clean everything really well, specially the parts where the shaft is located. I brushed everything with alcohol and pickled the parts in a pot overnight. It removes any residue and a final brushing is required to make sure it’s clean and shiny. The holes and tubes were cleaned with a small pipe-cleaner, you can get one from a hardware store or simply make one from toothpick lined with cotton, you’ll be amazed at how dirty these can get. Only apply a small amount of grease to these so they won’t get clogged again and only at parts that need them such as the edges of the cams or things that contact with the numerous arms and levers. This will help make the operation smooth.
Disassembly (Back Cover):
This step isn’t mandatory but it helps a lot if the camera is dirty or the back won’t close properly. I typically don’t bother to do this but it’s sometimes an essential step given the fact that most of my cameras were bought from the junk section.
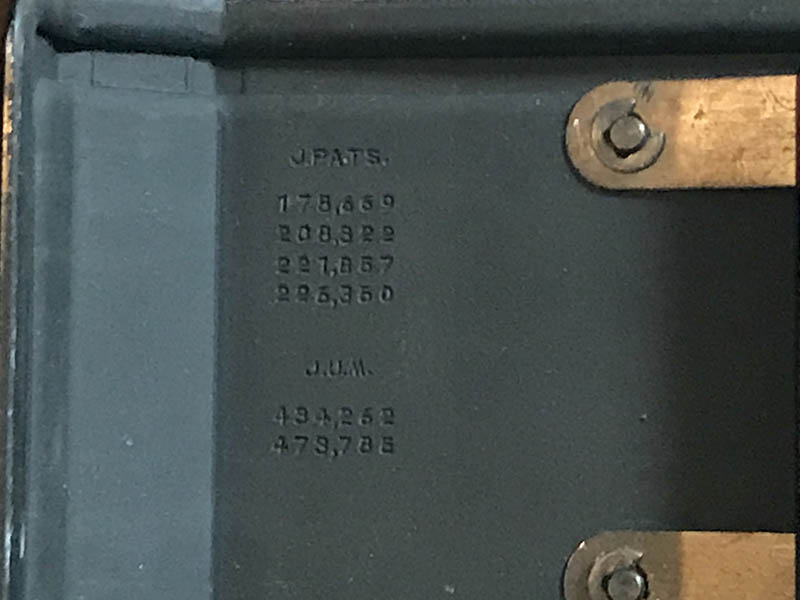
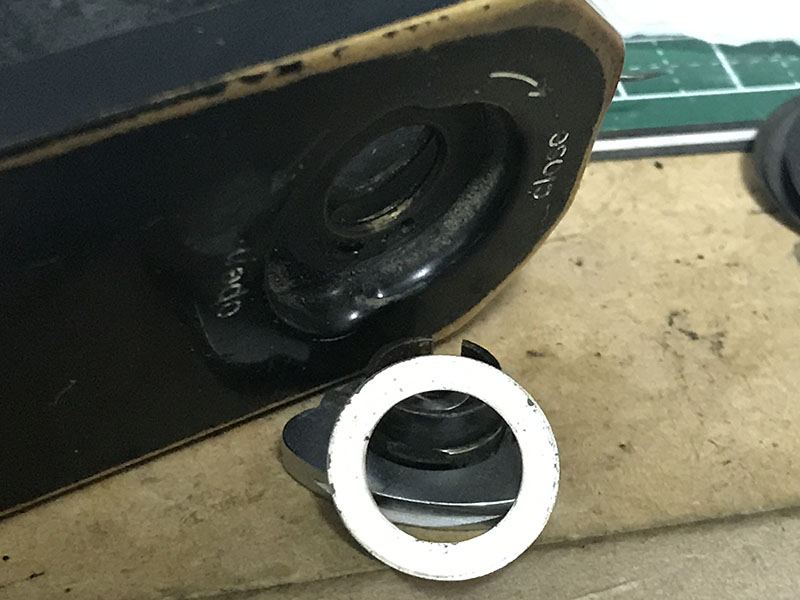
Earlier models will gave these engravings, later ones don’t. If your camera is of a later model but it has these or vice-versa then the back and camera are not matching. It will operate without any problems but it’s something that a collector will be worried about.
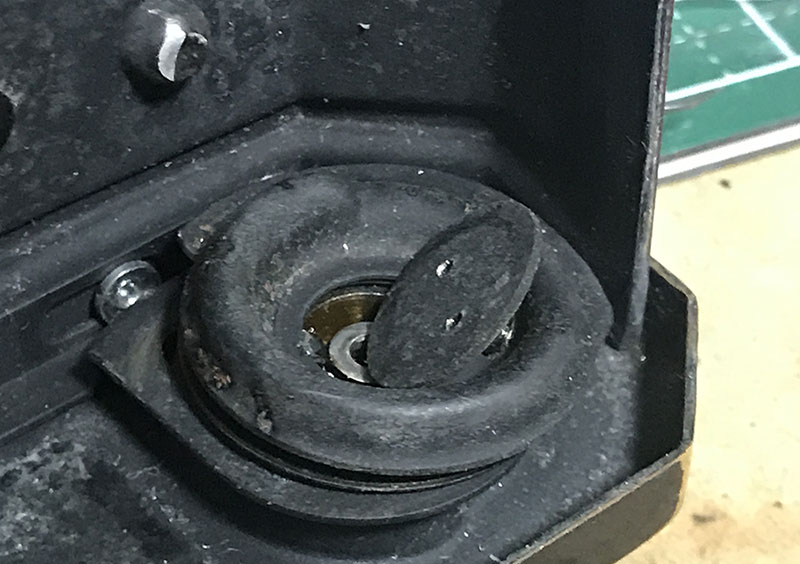
This is an example of a really filthy camera as evident by the molds. This is one of the filthiest cameras that I had to repair. The back doesn’t close shut, this is caused by wear and prolonged-abuse of the camera. Carefully extract the cover to separate the parts. You may need to heat this part or apply lots of alcohol to dissolve the glue.
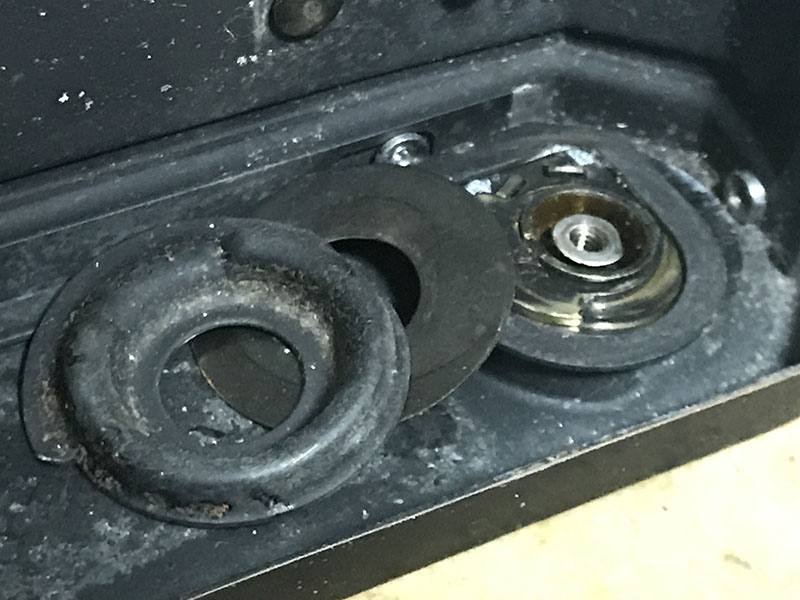
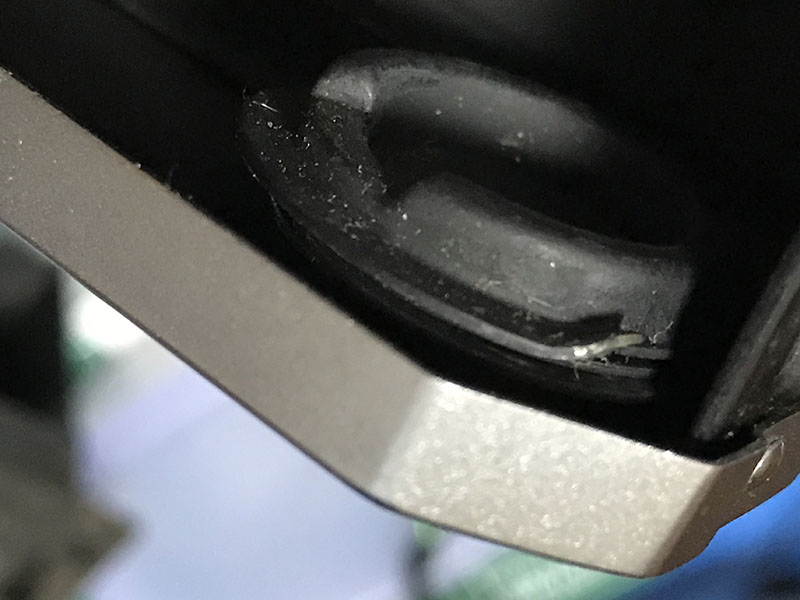
Be careful with the shims that you will find here, some cameras have more of these while some will only have a single shim. It all depends on how high the rim sits, this is adjusted at the factory.
The same can be said of the lock. There’s a spring here that can get worn, it can be fixed by bending the spring a bit to give it more tension. This isn’t an unusual occurrence, if the camera was stored with the lock’s tab up then it’s going to weaken the spring specially if it was stored for years in that state.
This part is the one that secures the back, you can either replace it with one from your spares box or you can bend the rim.
This may be too-much, it will make the back secure but it can be difficult to turn. I never grease this part.
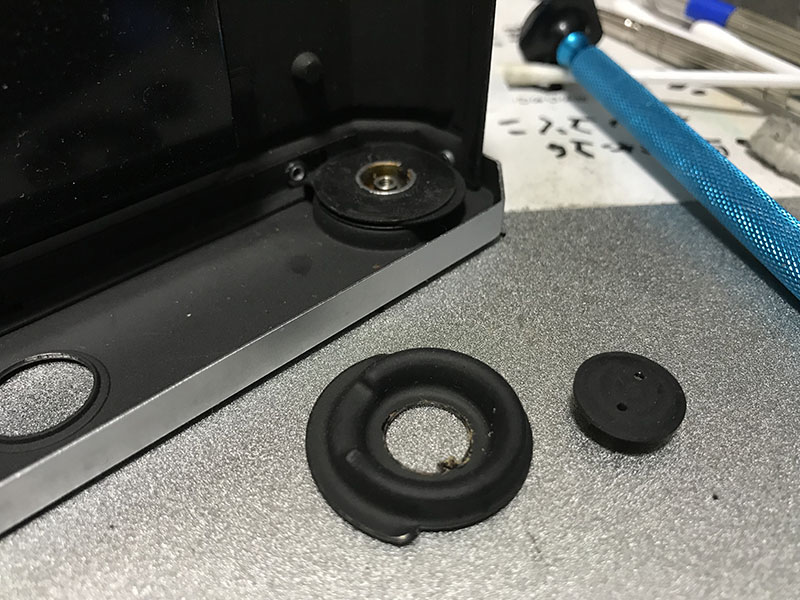
I never bother to do this but you can remove the film indicator’s dial, too. It has a small 1mm ball here that can get lost easily so be careful when you do anything here.
Clean everything well, the parts here can get really dirty. Apply thick grease to the parts that need them. You can also remove the pressure plate if you’re really inclined to, simply extract the 2 clips and you can slide it off. You can polish the pressure plate if you want to, if you can feel any roughness when you run your nails on the edges of the pressure plate then that is a sign that it needs to be polished. A rough or nicked pressure plate will result in small scratches in your film. In case you’re wondering how I cleaned the mold off from the paint, I just scrubbed it with strong kitchen detergent and let it dry for a day. You can’t clean that off with solvents, this is the most reliable way that I know. The spores will still be there, the best way to prevent this from happening again is to use the camera regularly.
Conclusion:
This is one of the most time-consuming part of repairing a Nikon F. I usually don’t do this but if I do that takes me an extra 2-3 nights. Many repairers do not accept filthy cameras for repair since it will take them a lot fo time to do it properly. It’s not cost-effective at all, I will charge a premium if somebody have me a camera in this state since cleaning the parts will require time, it’s also important that you should have spares handy in case you need to find a replacement for some of the parts. You normally won’t have to but it’s great to have backups.
This is an old video that I made discussing how the retarder works. Watch it and find out how it works.
This is probably the only article that you can find that gets this deep, it even discusses things that aren’t found in the official repair manual. People don’t usually clean their Nikon F’s down to this state, if ever someone will ask me to repair their cameras the way I demonstrated here in this article I will ask for 2x the amount. As you can see, it’s a tedious process but this will ensure that the camera will operate smoothly for many years to come.
If you liked this article, please share this with your friends. The coronavirus problem has hit my ad revenue pretty badly, I only get $0.60 a day. I know it is annoying to see ads but that helps keep this site alive. Share this article so it will help me keep this site alive. You can also consider supporting this site by making a small contribution. It helps me offset the cost of hosting this, it also helps me purchase, process and scan film. This site promotes the use of film and you’re also helping the film industry in the process. This site would not have lasted this long without your support. Thank you again, see you in the next article, Ric.
Help Support this Blog:
Maintaining this blog requires money to operate. If you think that this site has helped you or you want to show your support by helping with the site’s upkeep, you can make a small donation to my paypal.com (richardHaw888@gmail.com). Money is not my prime motivation for this blog and I believe that I have enough to run this but you can help me make this site (and the companion facebook page) grow.
Leave me some tip?
Thank you very much for your continued support!
$2.00
Helping support this site will ensure that this will be kept going as long as I have the time and energy for this. I would appreciate it if you just leave out your name or details like your country’s name or other information so that the donations will totally be anonymous. This is a labor of love and I intend to keep it that way for as long as I can. Ric.

May 24, 2020 @ 05:52:02
In part 3 of the NIkon F repair page, under cleaning the retard parts you say “I brushed everything with alcohol and pickled the parts in a pot overnight.” What was the pickling solution that you used?
Apr 17, 2021 @ 17:50:59
Hello! Do you know where I might find a replacement c clip for my nikon F pressure plate? Lost one as my film door flew out my lap on the bus. Let me know 🙂 thanks!
Jun 22, 2021 @ 12:41:41
I have a md-2 motor drive
I discovered that any radio control unit will work with it if you just wire the two pins of the drive
I have an MR-3 motor drive release which has the plug to connect to the firing pins
I would like to take it apart and hot wire the plug
There is a very tiny screw holding it together
Wondering if any one has modified this to work with a radio control
Alternatively i can cut the wires off my MC-10 but that would be a waste
FYI i have tested few different radio control units by touching the pins and they all work
FYI don’t use IR remotes as they are line of sight limited distance and unreliable
Regards
John Cairns CPA retired
Aug 11, 2021 @ 17:57:30
Just donated. this part was worth its weight in gold. Doing a deep clean and restore on my beloved early 60’s Nikon F. I didn’t remove the shutter rollers or bearings. Was planning to oil those. is there a goo insertion point to il the left and right side shutter drums to get down in the bearings without taking it apart?
Feb 08, 2022 @ 16:57:26
I removed the bottom plate on one of my Nikon F’s to check if there was in need of cleaning. When I remounted the bottom plate, the camera will not release the shutter. The shutter release mechanism hits the bottom of the bottom plate. If I leave a small gap on the shutter release side, the shutter will release. The problem will occur again when I put the film back cover back again.
Oct 17, 2022 @ 18:09:41
I have a request because I need some advice. I have acquired a never used Nikon F from 1968. The camera is intact without any blemish or mold or rust. It has been stored dry and warm. What should I do before I wind the shutter for the first time? Thank you very much. Mike