
Hello, friends! This week was just a pain for me – literally! I had a new gout attack and my left foot was super painful! I haven’t gotten anything like this for 2 or so years now and as my doctor told me, it might be an indication that my uric acid level is going down. My foot is feeling much better now and I should be OK by Monday. The pain associated with gout is just as painful as manually focusing a fast prime on modern DSLRs like the Nikon Df and I will show you how I made my experience a lot better in this blog post, making me hate this camera a little less.
Introduction:
Today, I am going to show you how I replaced the original matte screen that came with my Nikon Df with the FM3A’s K3 screen for better focus confirmation with faster manual focus lenses (f/2 and faster)!
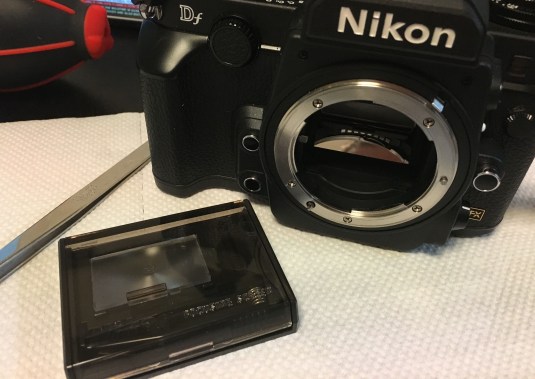 This is all we need for this project. Be sure to work in a clean place!
By now, regular readers should know that I shoot people on the streets everyday using my manual focus lenses. The Nikon Df’s matte screen coupled with Nikon’s focus confirmation dot on the viewfinder just makes things a lot more comfortable than regular Nikon DSLRs wherein the focusing screen is made finer to benefit it’s use with autofocus lenses. I like older manual film cameras because I can change the focusing screen with something that has a split prism in the middle. This will give me additional feedback as I focus in and out of my subject.
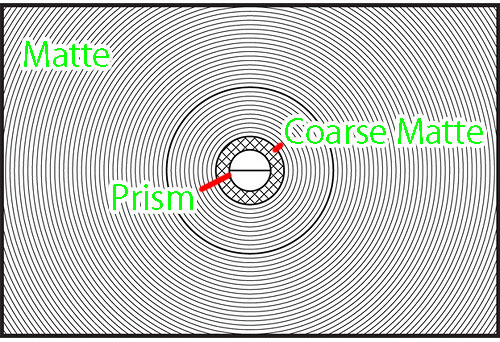 I like the FM3A’s K3 screen because it has a split prism in the middle (3mm) and a small area of coarse matte surrounding it. I consider this to be the best for my intended purpose and the fact that you can still buy these new is also a big selling point. They are inexpensive, I got mine for around $19.00 here in Tokyo.
These screens are delicate so please handle them with care. You can opt to buy used a one as well but be sure to check that for scratches and damage as majority of the used screens found on the market are not in pristine condition.
I prefer original Nikon focusing screens because I can be sure of the quality. There are also replacement screens similar to this being sold online from Mainland Chinese companies and I strongly advise against buying from them because you cannot be sure of the quality and they are not exactly cheap. Some of them may actually be good but I’ve got conflicting reports and that is enough of a turn-off for me.
If you want good screens that are custom-made for you then you should definitely check focusingscreen.com – a Taiwanese company. What they do is buy original screens from the big companies like Nikon or Pentax and grind or fit them to the same dimensions of your camera model. The best aftermarket focusing screens (off-brand) can be bought from the now-defunct katzeye optics and their reputation is pretty good. They are currently selling old inventory and will not make new ones so buy from them while supplies last!
Before We Begin:
If this is the first attempt at opening a lens then I suggest that you read my previous posts regarding screws & drivers, grease and other things. Also read regarding the tools that you will need in order to fix your Nikkors.
I highly suggest that you read these primers before you begin (for beginners):
- Essential tools
- Best practices 1
- Best practices 2
- Best practices 3
- Ai conversion
- Working with Helicoids
Reading these primers should lessen the chance of ruining your lens if you are a beginner. Also before opening up any lens, always look for other people who have done so in Youtube and the internet. Information is scarce, vague and scattered (that is why I started this) but you can still find some information if you search carefully.
I highly recommend that you also read my working with helicoids post because this is very important and getting it wrong can ruin your day. If I can force you to read this, I would. It is that important!
For more advanced topics, you can read my fungus removal post as a start. This post has a lot of useful information here and there and it will be beneficial for you to read this.
Replacing the Screen:
Replacing the screen was not difficult, it is in fact pretty straight forward. The only things that you need to be aware of are safety and cleanliness. Be very mindful not to damage any part of the camera as well as work in a clean environment so that you will not accidentally introduce dust or dirt in the exposed prism of your camera. The steps that I mentioned in this post can also be applied to other Nikon FX DSLRs but I cannot guarantee the results. I will also not be held responsible for anything by the way – just stating the obvious.
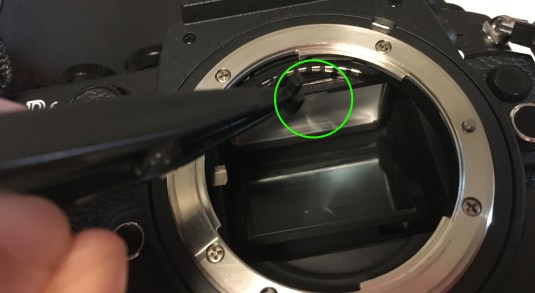 Using the hook of the tweezer that came with the K3 screen, pick the raised portion of the bracket immediately behind the foam seal. Be careful as you do not want to damage or put a scratch on anything in this part of the camera. Only use plastic tools for this like the one in this picture.
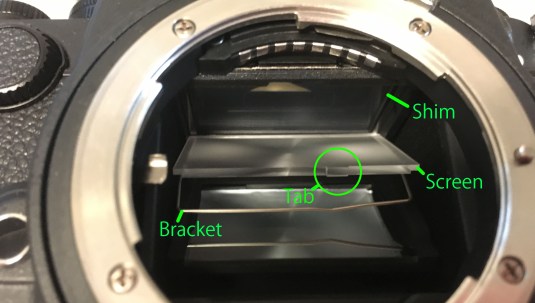 Once the bracket has been undone, the screen should pop open along with the shim used for adjusting/securing the screen. Do not lose or damage any of these because they are not available in the hardware shops. To be safe, do this while the camera’s back is lying on top of something soft like a kitchen towel or some rubberised mat.
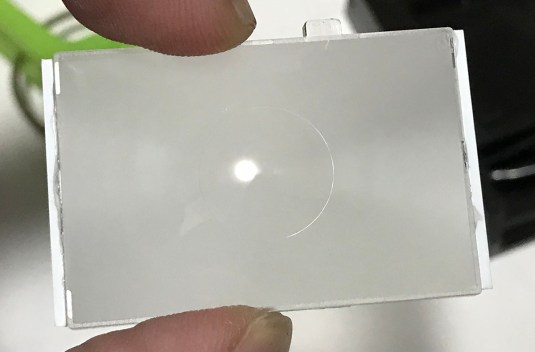
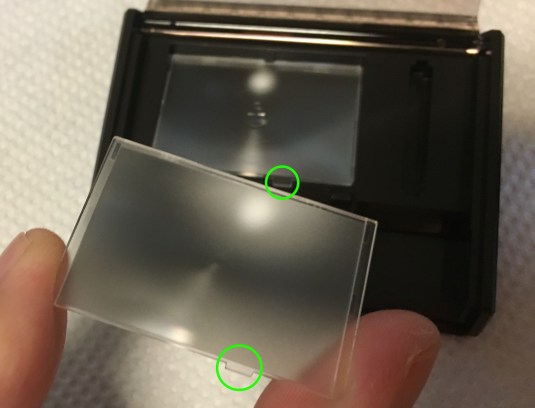 Carefully remove the original screen using the previously mentioned special tweezer. The tweezer has a notched tip and you use that to hold on to the tab (circled) on the screen. See the picture and you will notice that the tab is located approximately in the same place on the leading edge of the screens. The screens are made of acrylic and the matte side of the screens are very delicate so please be careful not to scratch that side or the screen will be ruined! You will see some uneven illumination, scratches or dark spots on your viewfinder if you damaged it.
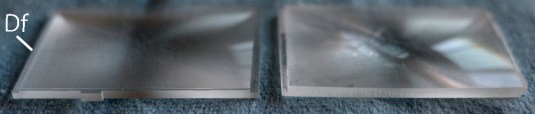
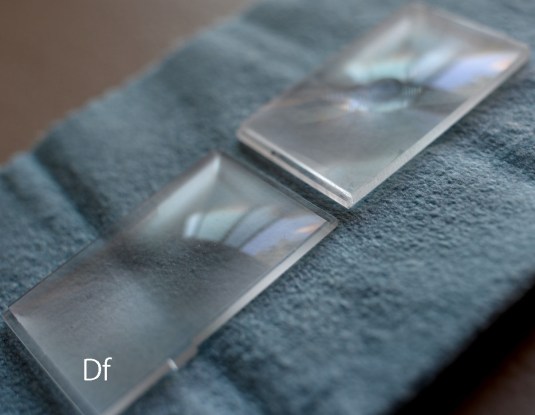
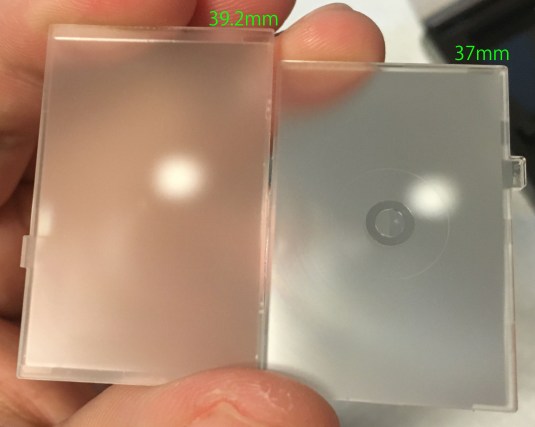 Here are the 2 screens side-by-side. You will notice that the original Df screen is a couple of millimetres wider than the Fm3A’s screen. I haven’t measured the height and thickness of both screens because I got lazy. The measurements on the picture above is just a close approximation using a calliper. My foot is painful so I want to get through this as quick as I can!
Our friend Hugh Gunn was in the mood to be helpful and he shared his measurements for the benefit of the many; what a nice guy. His measurements can be found below:
- Nikon F100 = 36.6×25.1
- Nikon FM3A = 36.8×24.8
- Nikon FM2T = 36.8×24.8
The differences may seem small but they actually affect a lot of things. I am yet to measure the screen from an F6 because I suspect that they are bigger because of the big viewfinder coverage.
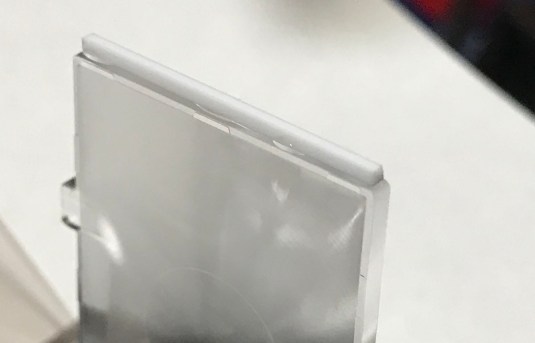
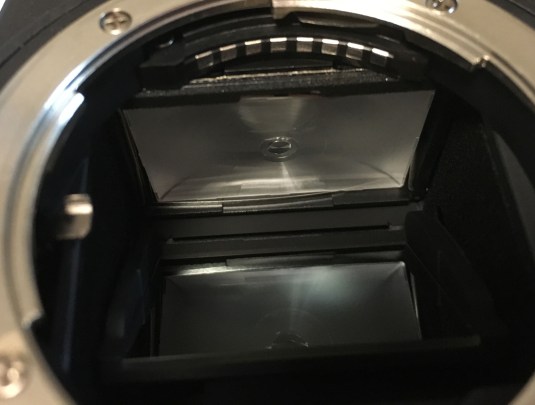 Here it is with the K3 screen installed. Notice that the bracket is not pressing on the edges of the K3 screen because it is physically shorter than the original screen of the Df. Be sure that the bracket is installed properly by listening for a small but audible “click”. The gloss side of the screen should be facing down (the mirror) by the way. If you install it in reverse then the convex shape of the glossy side of the screen will damage the prism above! The matte side is flat so it will not damage the prism.
I got lucky the first time I attempted this and I now conclude that the Fm3A screen has to be extended in order to fit properly and this is how I did it with inspiration from Lloyd. I am not sure how and why my first attempt was successful despite the screen being short. Maybe I was just lucky that the springs caught the tab and that secured that in-place?
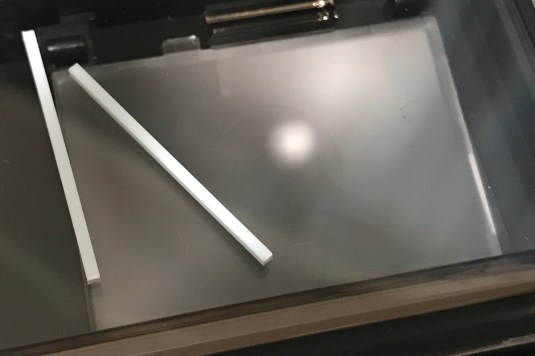 I trimmed 2 strips of styrene of the correct thickness, 0.5mm thickness should be enough.
 I then used a clear adhesive that wouldn’t fog glued the styrene strips to the edges of the screen. Make sure not to apply too much like I did to prevent creating a mess.
 the excess glue was carefully wiped-off with a toothpick saturated with alcohol. Let is sit overnight to cure just to make sure the fumes won’t damage anything.
 Clean the screen properly with a very soft lens tissue and blow any dusts off its surface. I can now install this to my camera.
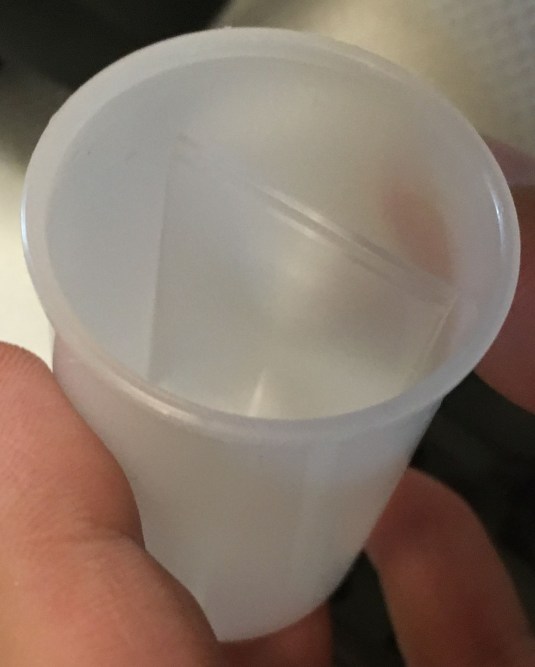 I would usually store the old screen on the same plastic case that the replacement screen came with but since the size of the screens doesn’t match I stored the original (old) one on a discarded film case for safe keeping and labelled it with a marker. Keep this safe because you will never know when you would want to have it back again or for resale’s sake.
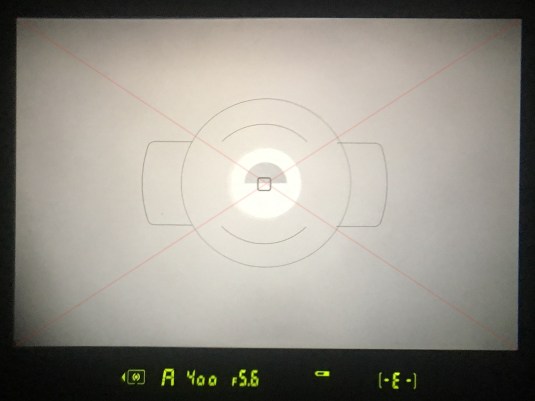
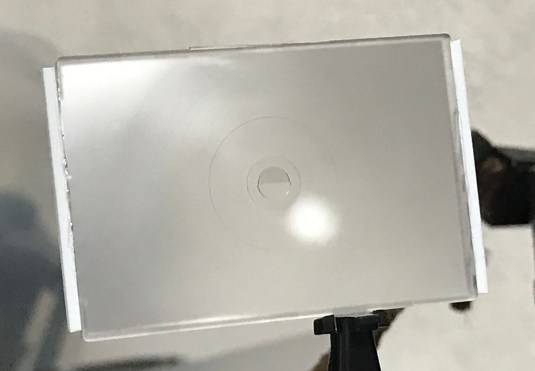
Here is the screen as viewed from the viewfinder. As with my D7200 split prism project, it is a little bit off-centre by less than 1mm. When the central AF point is highlighted in the viewfinder, you will see that it is not perfectly centred within the 3mm circle of the split prism.
I drew lines to indicate where the centre should be. It seems that the new screen’s centre is closer to the centre point of the viewable screen and the Df’s central AF point along with it’s AF area patch is off by a bit. Which one is correct, I don’t know. This is not bothering me at all because even aftermarket off-brand screens will exhibit this offset and I am just happy that this thing is secured and ready to use!
Customising the Df:
To comfortably use the new screen with the split prism, you will need to setup your Nikon Df’s menu so that the new screen will synergise with the camera. I use manual lenses on this camera almost exclusively so the changes I made on the menu is what I would want it to be 99% of the time except for that odd moment when I would attach a modern lens with autofocus on it. If you occasionally or rarely shoot with manual focus lenses then it would be wise to make the changes on a different Custom Shooting Menu which you can switch to when it suits you.


You would want to have a clear view as much as possible when using the split prism screen for manual focusing. Just follow the settings above to hide the AF point. You can highlight the AF point anytime you want by pressing on the OK button in the middle of the joy stick if you wanted to see where it is currently at. I would even go as far as lock the AF point by turning on the LOCK switch. This way, I have emulated my experience with manual film cameras on the Df. The Df is starting to become more useable for me with this mod!
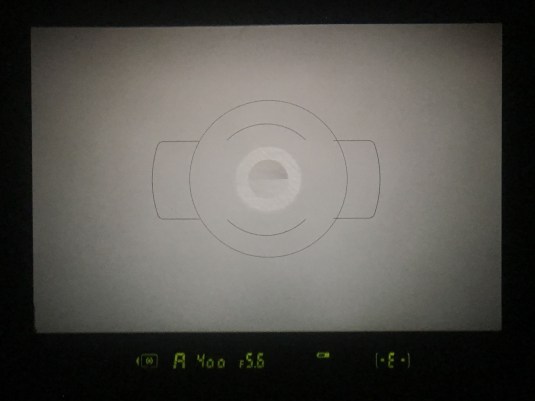 See how clean the viewfinder is when the AF point is not visible. Now, if I can only find a way to hide that big AF patch then that would be perfect! I do not like cluttered screens so EVF’s do not appeal to me. Optical viewfinders are also fast and there is no lag as well. The best part of it is it doesn’t require power to display anything.
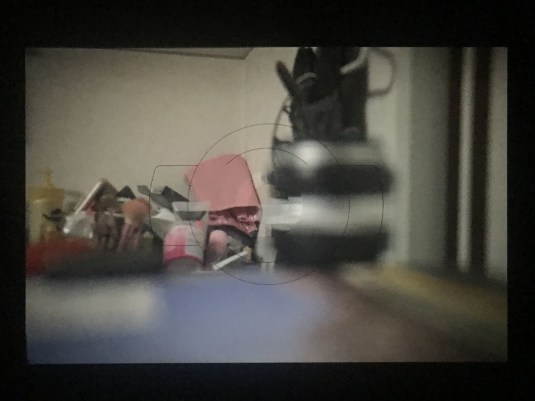 Here it is in action. See how the matte screen surrounding the split prism helps you see if something is in focus or not. Areas that are not in focus appear course and the split prism will make vertical lines split into 2 separate lines to indicate that something is not focused properly. Please disregard my wife’s beauty kit in the background.
With this, I now have 2 levels of focus confirmation. The new screen helps with the quick focus confirmation while the AF confirmation dot is used for fine tuning my focus. This is very helpful for my kind of street photography wherein lightning-quick focusing is very important, specially when using fast lenses. The original matte screen of the Nikon Df is a big improvement over the current screens of other DSLRs because the fresnel is coarser, making focus confirmation easier but there are times when that is not enough and you will want to have a real split prism installed.
Conclusion:
I tried shaking the camera in every possible direction and shot a series of test images with CH mode (continuos high) expecting the mirror slap to dislodge the screen but nothing was wrong with it so far. If you are the type that is not easily convinced then by all means, buy from focusingscreen.com for that peace of mind. It is also good because you are ensuring that they will not go belly-up like the other companies. Their English suck but so far I am only reading good news from people who have dealt with them.
 Now, I would not call this an ideal test situation but this should give you an idea. I need to focus on this old lady quick enough before she looks elsewhere. She noticed me in the pic and in less than a second she looked the other way to avoid being photographed. I shoot with the focusing scale and that helps a lot with manual focusing but this screen is just so helpful in making sure that I get things properly focused.
Metering was unaffected as far as I can see. Some people note that changing their focusing screens gave them inconsistent exposure on certain exposure modes like spot metering or sometimes, matrix metering. The difference tend to be on the range of -0.5 to -1.0EV for some people but it is also important to note that some people actually didn’t find anything wrong. I usually meter by eye on a bright and sunny day so any differences in exposure will not affect me much if indeed something was affected. Autofocusing seemed OK on an old AF-Nikkor 50mm f/1.8 (the 1st gen) lens which I used to take a picture of my super energetic toddler.
 Lloyd – another tinkerbug gave me permission to share his screen mod. He did what I was originally planning which is to add material to the sides of the screen to make it as wide as the original screen for the Nikon Df.
 Here is another view of Lloyd’s handiwork; clean,isn’t it? I think the screen came from an old Nikon F3 and according to him, the screen is just as bright as the original one. He also said that the bracket is not touching the screen at all and it was pressing on the new added material and it gave him some peace of mind.
Another friend which we will call Mr. A had a very different experience. He used the screen from an old Nikon FE2 and according to him, did not seat properly into the frame. He also shared that his Df has 2 shims instead of the usual 1. He will try again in the future and we wish him the best.
Thank you very much and I hope that you liked this! Please do not forget to share this, Ric.
Help Support this Blog:
Maintaining this blog requires money to operate. If you think that this site has helped you or you want to show your support by helping with the upkeep of this site, you can simple make a small donation to my paypal.com account (richardHaw888@gmail.com). Money is not my prime motivation for this blog and I believe that I have enough to run this but you can help me make this site (and the companion facebook page) grow.
Helping support this site will ensure that this will be kept going as long as I have the time and energy for this. I would appreciate it if you just leave out your name or details like your country and other information so that the donations will totally be anonymous it is at all possible. This is a labor of love and I intend to keep it that way for as long as I can. Ric.

Sep 11, 2016 @ 04:10:39
Bravo Rick. I know I made that request to do this on the Df, and I am glad there is no trimming involved, although there is some gap in the focusing screen. Wonder if by using a K or a K2 screen would there be any issue on exposure? I think they are both darker than the K3 screen, so some exposure compensation (-1/3?) may be required?
Sep 11, 2016 @ 04:55:45
Just stick to the K3 I think…they are good
May 02, 2018 @ 08:23:34
I think K2 and K3 are equal in bright. The steep in bright was beetwen K and K2. I think the comfusion come because the Nikon FM2 need compensation to use K2 or K3, but it is because Nikon FM2 come from factory with K focus screen,
Nikon FM2n (the popular one with flash sinc. speed 1/250) start to use K2 (like FE2 and FA).
See here: http://mir.com.my/rb/photography/hardwares/classics/nikonfeseries/fefmshared/html/screens.htm
May 06, 2018 @ 04:14:08
Yes, the old screens were dark.
Oct 23, 2016 @ 13:02:43
Sir, I couldn’t find an email to send to you directly… Re: your gout, I had the same a while back. and like you, mine went away for a long while. Toward the end of my attacks, I saw a rheumatologist and her advice and treatment was GOLDEN. This worked wonders for me. She prescribed Colcrys andd Indomethecin. I’m pretty sure you’ll know about Indomethecin, but the Colcrys was vital to stop the pain before it starts. What I was told to do is, as soon as I feel my joint/toe stiffening and things start to get tender, I was told to take 1 Colcrys tablet and then Indomethecin until it was gone. In every case (about 4 times for me) the gout was stopped dead in it’s tracks. I take Allupurinol now as a gout maintenance kind of thing. Just wanted to share because I know how painful and debilitating gout can be. Best wishes and thank you for all of your great articles. Mike
Oct 27, 2016 @ 00:08:50
Hello, Mike!
Sorry for the slow reply, I was super busy. Thanks for the tip! I am not sure if these are available here. My gout was triggered by my sudden coffee drinking habit. Coffee is like alopurinol, if you are a gout sufferer you should drink it regularly. I stopped the habit for a couple of months and got back to drinking coffee every morning so I got a flare after a year of nothing.
Gout is debilitating. They are not kidding when they say that this is painful. Had a flare once on my middle finger and people were giving me the stare all day. Not fun. Thanks again, your advise and concern is very much appreciated, Ric.
Apr 09, 2018 @ 11:22:43
Hi Richard, thank you for sharing. for me i bought the focus screen from focuscreen K3 type, the screen have to use along with the two plastic shims to focus accurately. My dilemma is, upon changing focus screen, some dust trap in… i repeatedly remove and blowed, dust trapped still… your photo shown a very clean screen, how did you do that?? i notice some stain upon touch onto the focus screen accidentally also.
Apr 22, 2018 @ 04:24:32
Hello, doc!
Well, I clean the screen with warm water and dishwashing soap. Solvents will craze the acrylic if you are not careful. Having said that, I sometimes use solvents but I am always very careful. Plain dishwashing soap without scents and oils are the way to go. What’s more important is the type of tissue you use to wipe it after. As for the trapped dust, it may be in the deeper parts of the finder so it’s going to be difficult to clean. A vacuum cleaner will not be of any help here and may even do more harm. Ric.
Apr 23, 2018 @ 13:34:40
what type of tissue, vaccum cleaner not helping at all?
Sep 14, 2020 @ 18:35:54
I apologize for bringing up old topic, but may be it will be useful for somebody.
Just installed F6 type L screen into D700. Originally it measures 38.1 x 26.0 mm (without tab).
Couple of years ago did the same for K3 screen into D200. Not exactly a way to compare directly, but subjectively F6 type L is brighter and more precise.
Jul 23, 2023 @ 19:30:00
Nice update of pictures with highlights. This is very helpful! Just got my DF, and am thinking hard whether to try a split prism. I got this camera for manual lenses only.
Nov 17, 2023 @ 23:50:27
I tried with a K2 screen (FE2, FA) and was able to get it to stay in place for test shots with just the metal clip holding the plastic tab. However the focus was pretty far off with a 50 1.2 AI. Rangefinder dot remained dead on. My Df has the two metal shims and I removed one with no positive effect. Seems like the same situation as Mr A.
I’m going to try going with a focusingscreens.com solution if I can and see if that succeeds.
Nov 20, 2023 @ 15:35:10
Update on this. Made another run at the K2 (FA, FE2, FM2) and it worked once I added the side strips and tried again. Focus is bang on. A couple of notes
* Used 0.5mm polystyrene sheets from Hobby Lobby (US store). Trimmed with metal ruler and xacto knife to 1.25mm each by 24.5mm long.
* Attached the polystyrene to the k2 with PVA (Elmers glue) – about 7 dots with a toothpick – the tweezers supplied with the K2 were very helpful in holding the screen. Let it dry overnight.
* Took me a while to figure out the unlatching process from the description and another video. The wire hooks under a latch and the latch doesn’t seem to move. Pulling the latch didn’t unhook it. You can push the wire away from the latch but you’re then pushing it toward the screen and when it gives, the tweezers go right toward the screen. I didn’t scratch the screen the first 5 times but scratched the original the last time. Fortunately the K2 was unscathed.
* Not sure why the focus was so off the first test and it was perfect now. Maybe it was actually in the wrong place the first time. Or maybe I had it flipped and the shiny side the wrong direction.
* K2s currently are much cheaper than K3s. Got the K2 for $25. K3s are running $120.