
Hello, everybody! I just spent $8 on a cup of coffee. It was exquisite and it’s smooth, rich and refined. It does not leave a harsh after-taste in your mouth or throat just like what many cheap instant coffees tend to. I appreciated it but I won’t drink it regularly because I can just use that amount to buy me a decent lunch. I’ll assume that many will do the same and some people won’t even think of spending that much for coffee. I’m not an expert on coffee but I do appreciate a good cup. Today, I’m going to introduce to you a lens that’s only appreciated by people who know their lenses and the going price for these things today will turn many people off. It’s a very special lens and it has a special part in Nikon’s history. Please read the article to find out what that is.
Introduction:
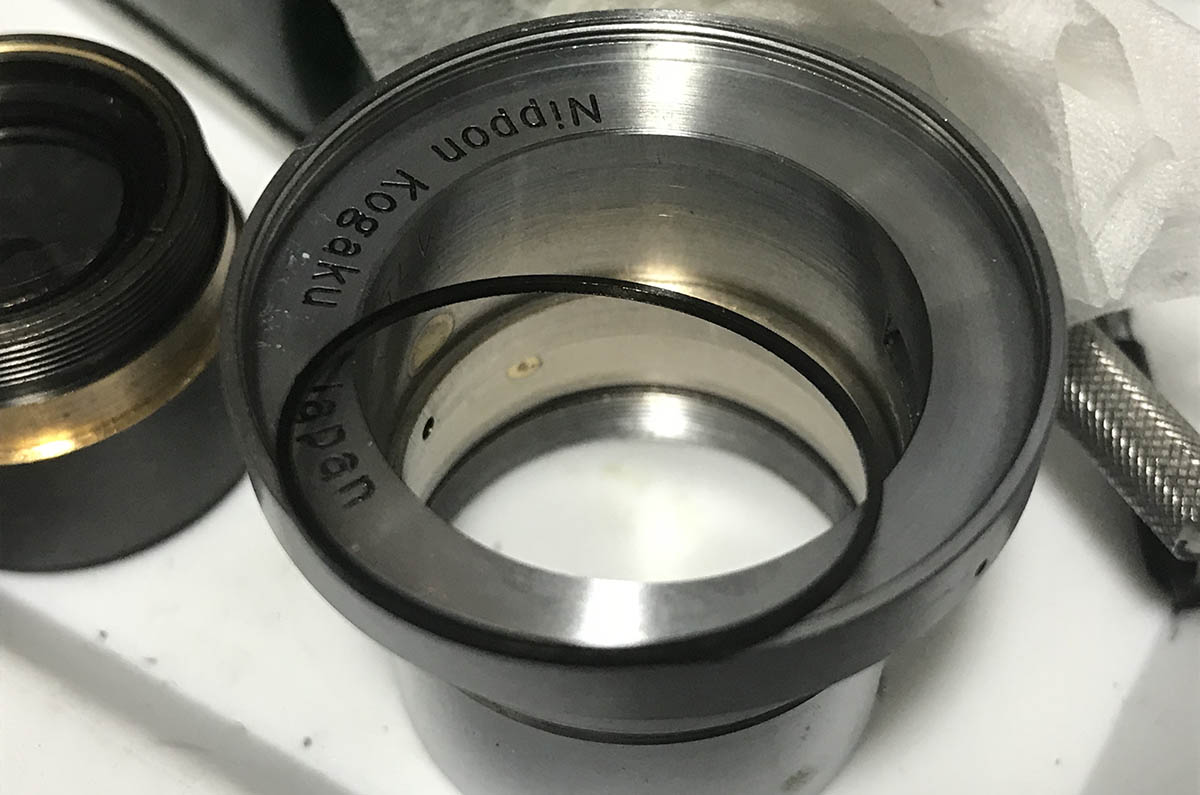
This is the Nikkor-Q•C 5cm f/3.5, a rare lens that not many knew about. It is Nikon’s version of the then-popular Zeiss Tessar and its simple 4-elements-in-3-groups design is a near-identical copy of the Tessar design. This design is one of “Nikon’s” oldest lens designs, it was first utilized on the 1935 Hansa Kwanon if I’m correct and it was popular until some time in the early 1950s as a cheaper alternative for shooters looking for a 50mm Nikkor. This is the later “rigid” version, the earlier version collapsible and is considered to be rare. I documented that lens in my Nikkor-Q•C 5cm f/3.5 (Collapsible) article. Apart from the barrel design and position of the iris you can consider both lenses to be the same since they share the same optics. This was made in the mid 1950s to refresh the collapsible version’s design so Nikon can stretch its profits from this old but tested design. This particular version was not made for long, it was only made for about a year or so compared to the collapsible version which saw a long production life since 1940 and sold in numerous versions. The unusual thing about it is this lens is easier to find compared to the older collapsible one and it costs much less, too.

The lens barrel design in unique amongst Nikkors, you can easily recognize it because of its pudgy look. That long post you see is used for constraining the focusing ring so it won’t turn beyond the lens’ focusing range since it is in the way of the infinity lock. This lens has a special feature, it can extend below the usual focusing range so you can focus even closer but it’s now de-coupled from the camera’s rangefinder. This will allow it do “macro mode”, that’s something that it shares with other Nikkors like the Nikkor-H.C 5cm f/2 (L39). You cannot use the rangefinder to focus in this mode and you must focus by measuring the distance between your subject and your film plane which is indicated as a red dot or a black circle with a horizontal line across it. I’m not sure if other brands offer this feature as well but it’s certainly one of the things the LTM Nikkors are known for.
The lens feels dense because it was made with brass plated with chrome. Its weight gives you the impression that it’s a well-built lens, it also helps make your setup a bit more stable. The distance scale and other engraved details are beautiful to look at but it’s cumbersome to use this lens because you’ll have to look at the front of your setup just to see the DOF or distance scales. The first generation of Leica lenses mostly have it like this and this is why I prefer the Contax system from Zeiss. The aperture ring does not have click-stops to indicate which aperture you’re at and this can be easily turned by accident so keep an eye on it before you take your shot. Click-stops weren’t implemented in the early years of 35mm photography, it was considered to be a novelty back then but soon became mainstream.

It’s a tiny lens compared to what we’re used to seeing these days, the Nikon Z6 makes it look like a miniature. The truth is this is one of the bigger L39 Nikkors under 50mm but this is much smaller than the Nikkor-H.C 5cm f/2 (L39) which is almost 2x bigger. Its construction is simple since it was sold as a cheaper alternative to Nikon’s more expensive lens variants so people on a smaller budget can also buy a 50mm Nikkor.
Let us study how this performs when shot with film and digital. Knowing how your lens performs will help you maximize it as you work-around its weaknesses and exploit all of its strengths to help you create a picture that you have in your mind. You can also use any of its flaws to your advantage by incorporating them into your pictures and give it that unique look that many people are into these days.


(Click to enlarge)
The pictures above were shot with the lens wide-open and stopped-down to about f/8 or so to give you an idea of how this renders. Wide-open, you will notice that there’s some vignetting at the corners. It won’t go away even if you stop the lens down to a small aperture like f/5.6. This will be a problem if you shoot pictures with the sky in your frame. Sharpness and contrast is typical of a Tessar-type lens, the center shows nice sharpness and contrast even wide-open and it improves considerably upon stopping the iris down. The corners are poor compared to the center which is a signature of Tessar-type lenses from this period, it is a “feature” that was deliberately-designed into the formula because it helps emphasize how good the center is. This is the defining trait of a Tessar and any lenses that were derived from it. The performance does not change by much whether you’re focusing close or at infinity. The character of the bokeh is somewhat “chunky”, it isn’t as smooth as the bokeh of a Sonnar-type lens. This hints that this lens is over-corrected somewhat to give you higher contrast even wide-open at the expense of the smoothness of the bokeh. It’s not bad at all to be frank and I wouldn’t call it ugly. In fact, it adds a certain character to the pictures it produces. Sphero-chromatic aberration is not really a problem with this lens at all even wide-open which is a good thing.

Here’s an sample of the “chunky” bokeh that I was talking about a while ago. I took this with its special “macro mode” feature to exaggerate the effects of the out-of-focus characteristics (bokeh) and also to see how it performs up-close. It’s still good but I can see a small drop in performance. I am not sure where to attribute this to but I suspect that this lens was not calculated for being used like this.


(Click to enlarge)
Flaring can be terrible because of the old coatings but you won’t see plenty of ghosts as this lens only has 4 elements and the Tessar design seems to be rather good at countering this. There is a weird artifact that appears when shooting against very bright sources of light such as the sun. Many vintage lenses with outdated coatings will do this such as the Nikkor-T 10.5cm f/4. I find this distracting but I’m sure that others will find a use for this. The sun-stars look great because of the preset-type iris which has plenty of blades.

Here’s a picture illustrating how Tessar-type lenses have great centers but the corners look terrible (by-design). I do not really mind this but you will have to keep this in-mind as you use the lens. Position your subjects at the center of your frame and you’re good.
Subject isolation isn’t something that you will notice much with a lens from this class. If your subject is further-away from you then you’re not going to notice this effect at all.

If your subjects are closer to you then you’ll get more separation. This lens is great when shooting at closer distances even wide-open. Notice how nice the details of the cardboard fish is and how it “pops-out” of the frame in a 3D-like manner. Resolution isn’t bad considering that this was taken wide-open.

The colors look nice and neutral so far with only a very slight hint of blue. I don’t know if you noticed something from the photos I have been showing you but if you didn’t, I will point it out to you now. The colors look rich and the contrast is unusually high for a Nikkor from the rangefinder era. This is also another trait of the Tessar that I love so much, notice how nice the reds look like and how rich the blues are despite the scene being shot in a not-so-sunny side of town.


(Click to enlarge)
Here are some more pictures that I took with this lens. It certainly has that vintage feel to the photos that many people are into these days. I know that this is subjective because you either hate this look or you like it.
Now that we’ve seen how it performs with digital, it is now time to see how it performs when shot with film. I used Fujifilm Industrial 100 film for these and I used a Nicca 3S with it. This setup is probably how many people used this lens in its day and this will give us a more “authentic experience” when using it. We take pictures that were shot with film to see how this performs with it because this was calculated during the film days and this is the only way we can see how this lens performs as envisioned by its designer.


(Click to enlarge)
These show the (older) Tessar characteristics really well. The center is sharp but the corners are so-so. This design was originally used on many low-cost lenses because Tessars offer nice performance at the center even wide-open and its very simple (but slow) design makes it perfect for a certain segment of the market where cost-to-performance is a big factor. Its slow maximum aperture and its bokeh are trade-offs that many will happily ignore. “Bokeh” in the modern sense and how people use it these days is a recent concept. It didn’t become “a thing” until about 18 or so years ago.


(Click to enlarge)
Stopping it down will give you great colors and details. Shooting it with film makes it even more special, there’s something unique about this when used with film, you cannot get this with digital. You get rich saturated colors and the contrast is great. I love the results I get from shooting with this lens on a sunny day using film. You can also see that there’s a bit of distortion on the horizontal lines in the picture but it’s not bad.


(Click to enlarge)
Using this lens in the correct setting will give you nice pictures with plenty of “character” and rich “atmosphere” which adds what we call “layering” in my profession. It adds a lot to your composition and also adds another layer of intangible quality that makes it stand out from other pictures. This is the vintage-look that many people are so into these days. The term “layering” is just an artist’s way of saying how a picture is “layered” into several sections divided by depth with each layer having a distinct feel or the elements that separates it from the rest.


(Click to enlarge)
Here are some more photos that were shot using film. You can see from the photos that it has something special despite all of its “flaws” and limitations. It makes for a good walk-around lens for any Barnack-copy camera because of the mentioned characteristics and it’s a small lens that goes well together with the small Barnack clones. I’m really liking it a lot and I will use it more these days.
But wait, there’s more! I took some more photos with this but this time It’s with Kodak’s Color Plus 200. Most of the photos in this set were taken with the iris stopped-down.

Amazing colors and sharpness! I think this was taken at around f/11.

This was either taken wide-open or stopped-down a bit.

Pardon the missed-focus, this was taken wide-open. It’s great for portraits as long as you know how to compose your shot since 50mm isn’t what I would call a portrait lens.

This was probably taken at f/8, notice how nice the contrast is and how rich the colors look.

Definitely something that should have been shot with a faster lens. The f/3.5 maximum aperture won’t help much with blurring the background of your photo but it will do its job when you don’t have any choice.

This is a fun lens to use and people will react positively seeing such a quirky gadget taking a photo of them.

I love the nice 3D-like photos that I get with this lens. The transition is not as smooth as what a Sonnar-type lens would give you but that’s how it is with this lens.


(Click to enlarge)
Notice the beautiful vintage-look that you can get with this lens. It is subtle and looks really pleasant without making the photos look or feel “cheap”.
So, what did you learn from the samples that I showed you? Do you think that this lens is worth buying? These things do not come cheap these days and they are usually being sold for about $300 or so. I got mine for about $90 only because it was sold as junk. A collector will probably have one in their collection by now and casual shooters will want to buy a good sample of the Nikkor-H.C 5cm f/2 (LTM) instead because it’s faster and usually costs much less than this. This is a special lens and only people who love Tessars will be enticed to buy and use this. This lens is just one of the options that a Leica shooter is given when they want a Tessar because I don’t believe that Leitz made one since Tessars were made by Zeiss and copied by everybody who made lenses outside of Germany. The Leica equivalent is the Elmar but it’s a bit different despite the similar-looking optical formula. That’s all for the lens’ introduction and review. It’s time to proceed to the repair section.
Before We Begin:
If this is your first attempt at repairing a lens then I suggest that you check my previous posts regarding screws & drivers, grease and other things. Also read what I wrote about the tools that you’ll need to fix your Nikkors.
I suggest that you read these primers before you begin (for beginners):
Reading these primers should lessen the chance of ruining your lens if you are a novice. Before opening up any lens, always look for other people who have done so in Youtube or the internet. Information is scarce, vague and scattered (that is why I started this) but you can still find some information if you search carefully.
I highly recommend that you read my working with helicoids post because this is very important and getting it wrong can ruin your day. If I can force you to read this, I would. It is that important!
For more advanced topics, you can read my fungus removal post as a start. This post has a lot of useful information and it will be beneficial for you to read this.
Disassembly (Focusing Unit):
This lens was made during the early years of Nikon so it’s a simple design. It can easily be separated into 2 basic assemblies and I’ll show you how to do it in this section. Just like most lenses you see here at the blog, you’ll want to separate the optics first so you can work with the rest of the barrel without worrying about damaging anything delicate so that is the first thing that we will do. This is the easiest part of the article but it gets harder as we go. If all you want is to lubricate your lens then this is all you’ll need to do.

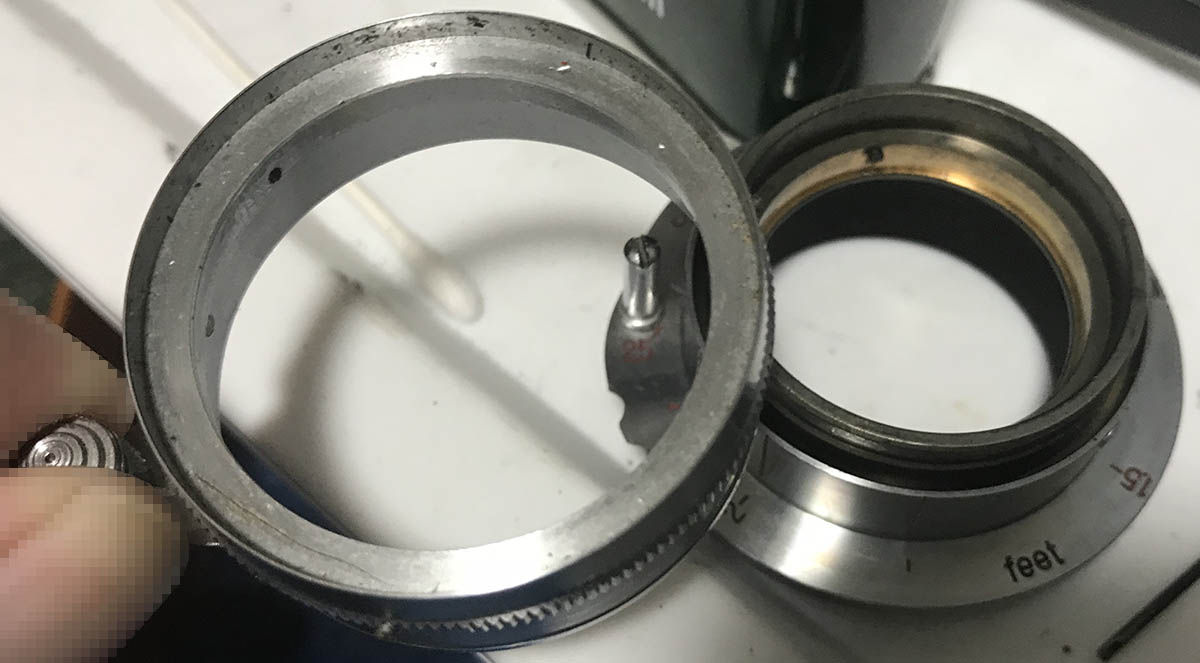
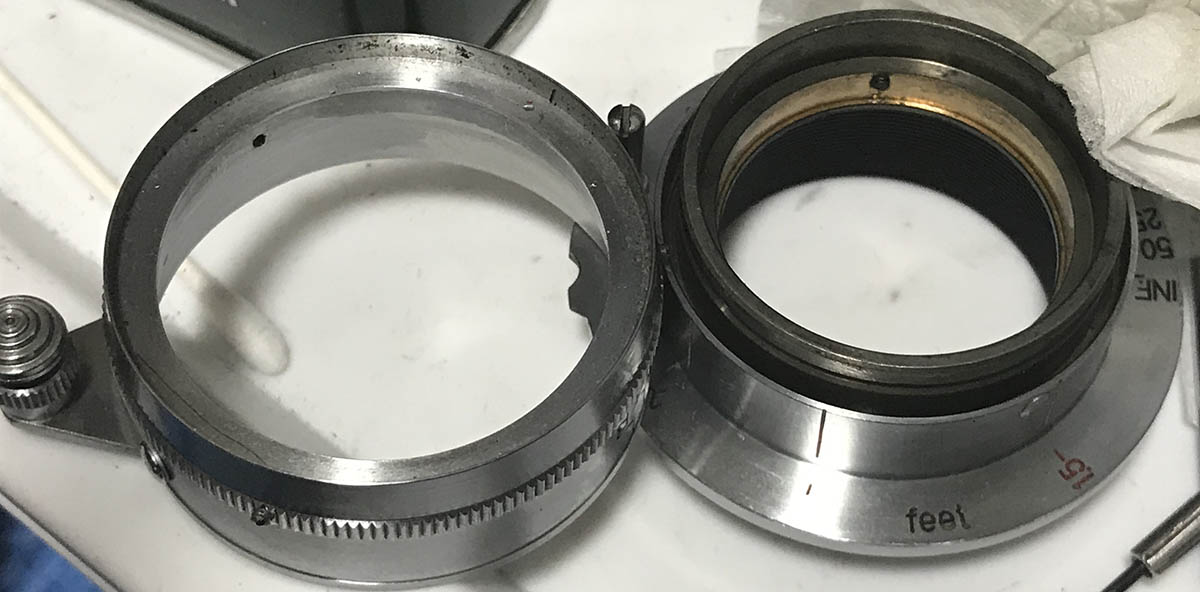
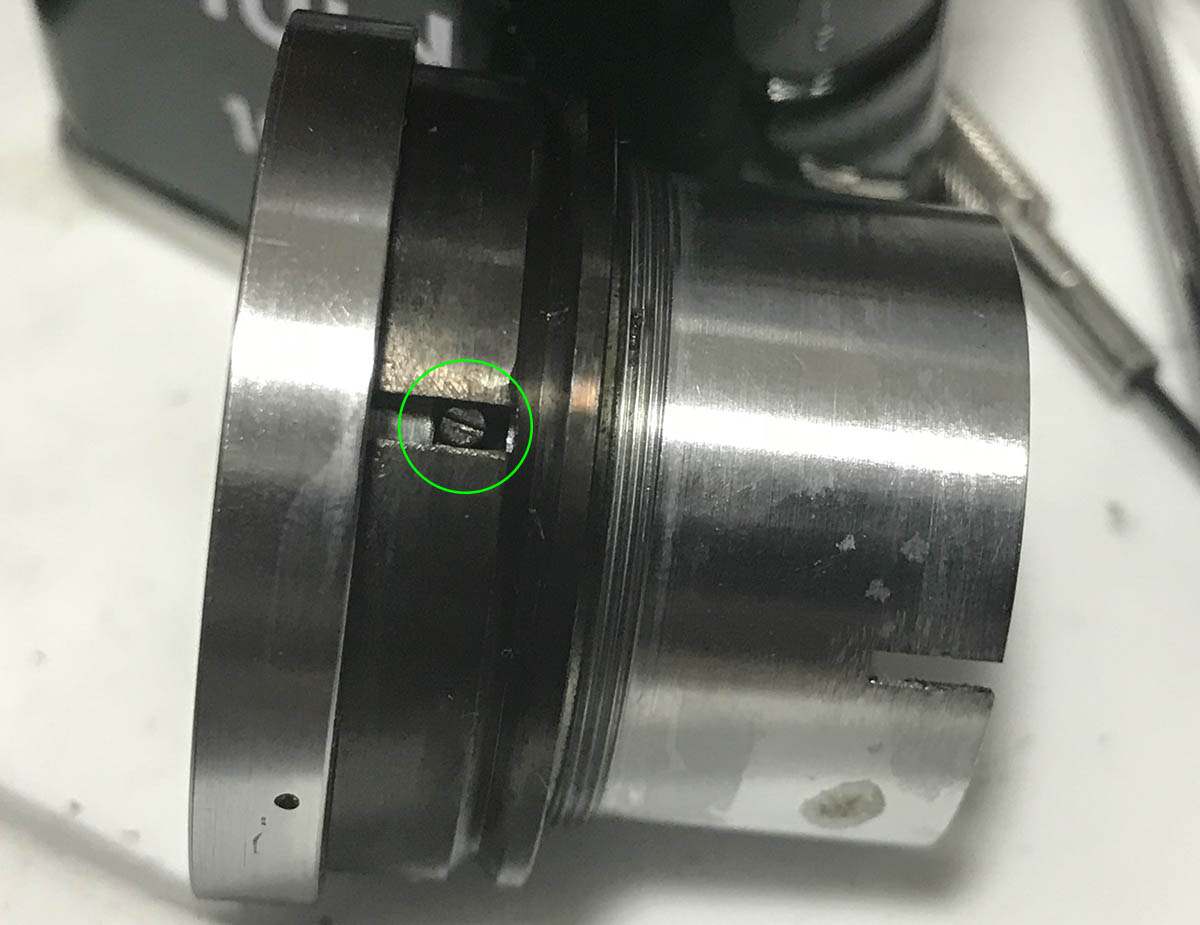
Just like many Nikkors that were made during the early years, this lens can be separated into its basic components by removing a retention collar at the rear. Make sure that you focus the lens to infinity and do your best to keep it that way while you’re working on it.

Keep the barrel facing down while doing this and make sure that it’s sitting safely on top of a stable and flat surface. This collar is the only thing that’s keeping the heavier-half of the lens from falling so make sure that you keep it safe while you remove the collar.

You can remove the focusing unit from the front part of the lens. See what I mean? It can drop to the floor if you are not careful when you remove the retention collar. Store the front barrel in a safe place while you work on the focusing unit.

The focusing unit can be easily removed by unscrewing these grub screws. The focusing ring is adjustable so you’ll want to note its orientation before it is removed. I didn’t bother with it because I will adjust it later anyway but it is not a bad idea to mark its position so you will have a good starting point later.
The focusing ring can be easily removed just like this.
There’s no point in disassembling the focusing any further. Just clean it very well using a lot of alcohol and Q-tips or soak it in an alcohol bath to kill the germs or soften anything that has hardened like old grease. Mine was really oily as the old grease had deteriorated and its oil has separated from the soap base.
The helicoid for this lens is easy to work on since it only has a set instead of the usual 2. I took some notes on where they separated so I’ll know where they should mesh. If you are new to lens repair, please read my article on how to work with helicoids to make sure that you do not make the mistakes that many beginners do and get stuck.

Clean the helicoids really well to make sure that the fresh grease won’t mix with anything foul and contaminate it. I cleaned these using a brush and a coarse plastic kitchen sponge, the helicoids were then picked with a wooden pick to remove anything too-hard for the sponge to get rid of. I tried mating them to see if they turn smoothly and thankfully I did not have to lap them this time to remove any corrosion.
I use the best grease available to me and chose one that isn’t too thin or too thick so it’s easier for me to turn this lens. This lens has a long focus throw that’s typical of lenses from this period and using a thick grease with more resistance than I wanted will make it difficult to turn and cause me to lose a shot. The thick grease can potentially cause an accident to happen because the torque can potentially loosen the lens from the camera. This is from the older type of L39 lenses with no locking pins, many screw-mount lenses in the junk section have dented front rings because they were dropped and it’s easy to link that with this. This is the reason bayonet mounts is the best way to mount a lens to a camera as it’s more precise and secure.
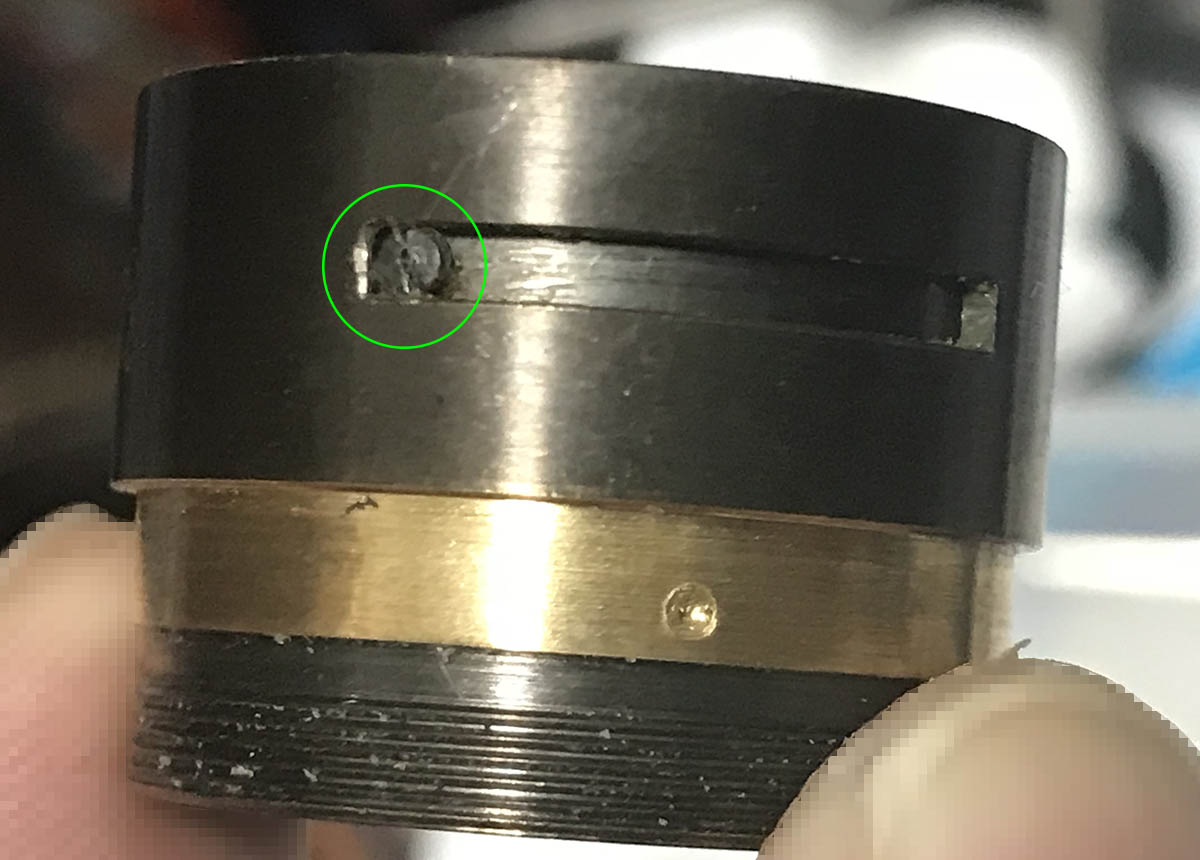
You’ll also want to apply a little bit of grease to the small bearing-ball in the inner part of the focusing ring because that thing is responsible for the click that you feel when you focus the lens pass the rangefinder’s focusing range in close-focus mode. Greasing it will make sure that the click feels smooth and the parts involved doesn’t wear easily. Do not dismantle the mechanism for the clicks because you will need a special tool to unscrew the fasteners. There is not much to gain from removing it so it’s best to just leave it alone.
Disassembly (Front Barrel):
The front barrel is rarely dismantled unless you need to clean the iris or the aperture ring is not turning as smooth as you wanted. Oil from the helicoids can easily migrate here and cause a big problem just like what you will see here in this section.

This is composed of several mechanisms along with the objective. It’s easy to work on it so long as you don’t have to work on the iris. I will show you how to properly dismantle this thing so you won’t make any mistakes.

The aperture ring can be removed by loosening these set screws. Be careful so you will not scar the screws’ slots or scar the surrounding knurling.

Like the focusing ring, the aperture ring can also be adusted. See all the oil underneath it and how it has evenly coated everything inside the lens? This is a sign that the lens spent a long time in this state and the oil has migrated all over the lens. We just don’t see from the outside because the oil is wiped-clean through physical contact.


(Click to enlarge)
The collar that couples to the iris assembly is secured with a retention ring. There are 2 set screws that secure it, just loosen them and you can unscrew it.
Here it is. Everything was oily so I left the ring pickled in an alcohol bath.
This pillar screw serves as a pin to couple the aperture collar/ring to the iris mechanism. Carefully remove it and make sure that you don’t snap it. These can be delicate and its head can snap if you’re not careful, these things are old and the metal can get corroded.
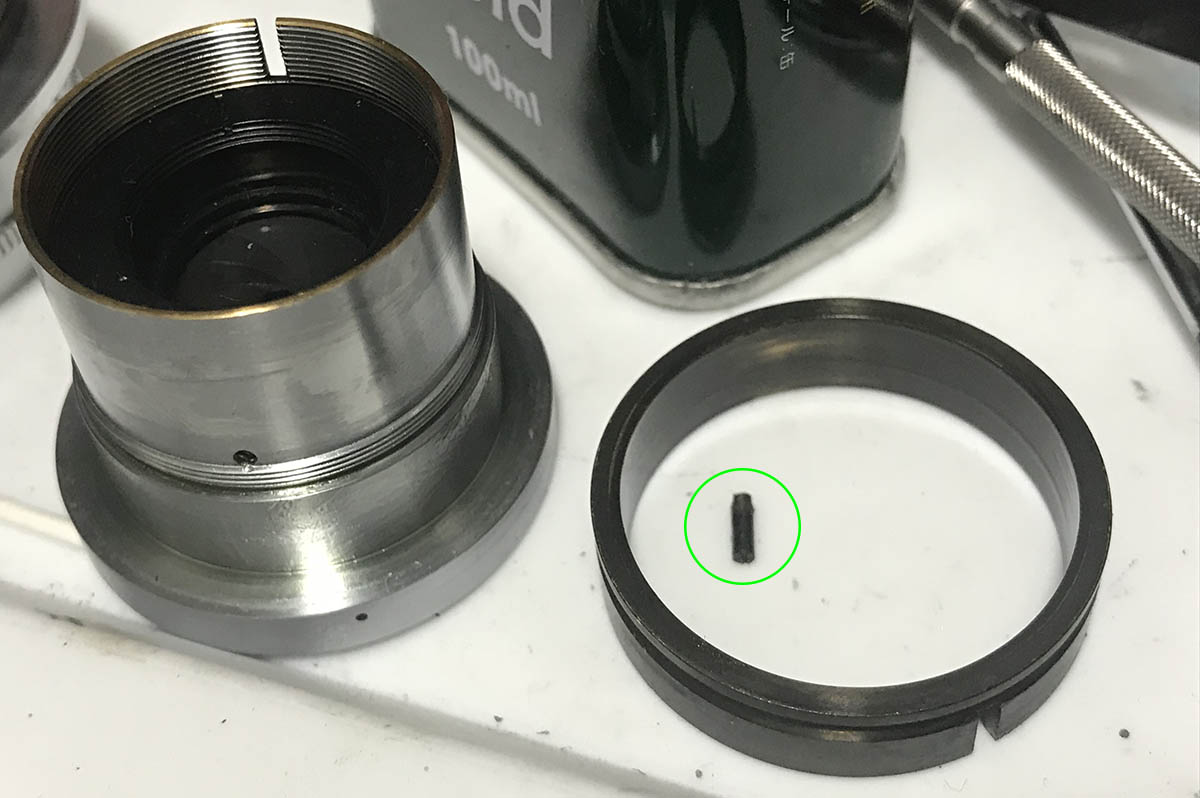
Here’s the pin and the aperture collar. Make sure that you do not misplace this little screw as you won’t find any replacement for it unless you salvage one from another lens.

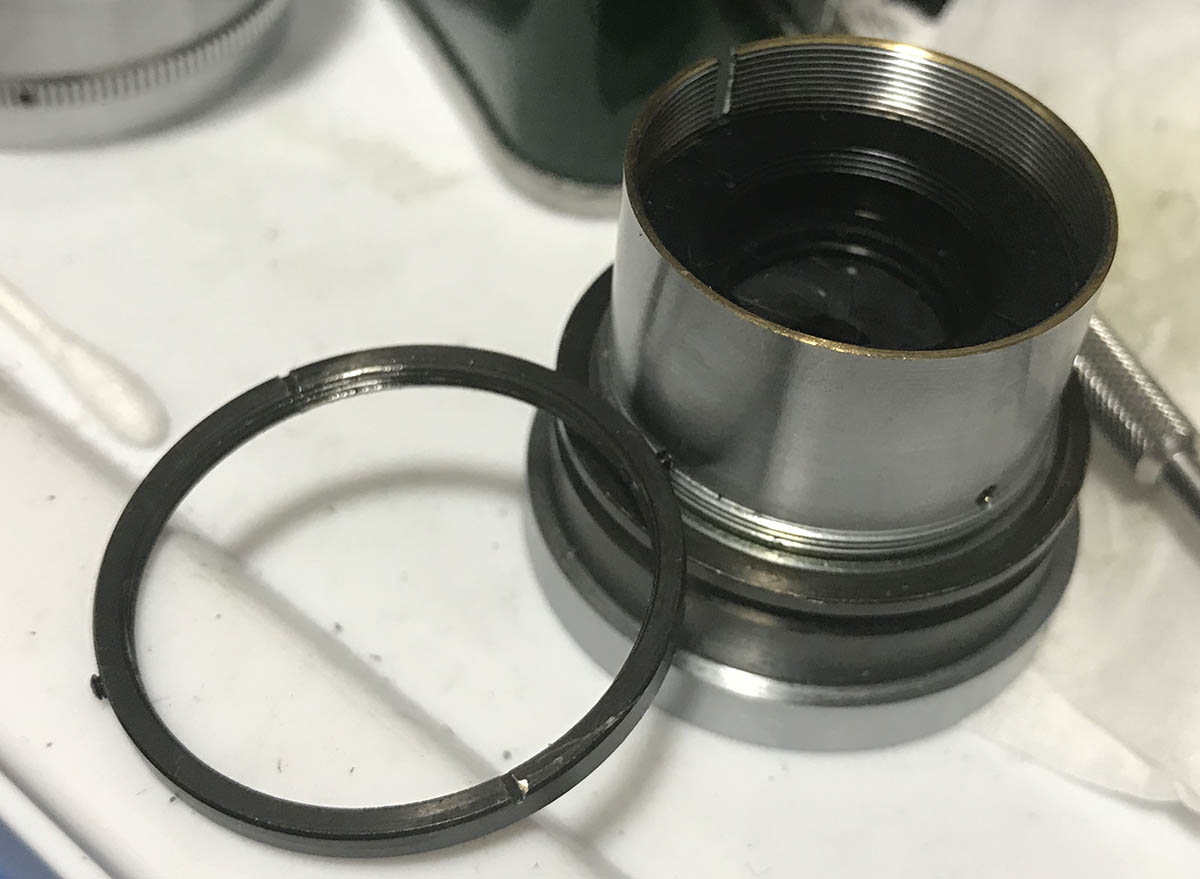
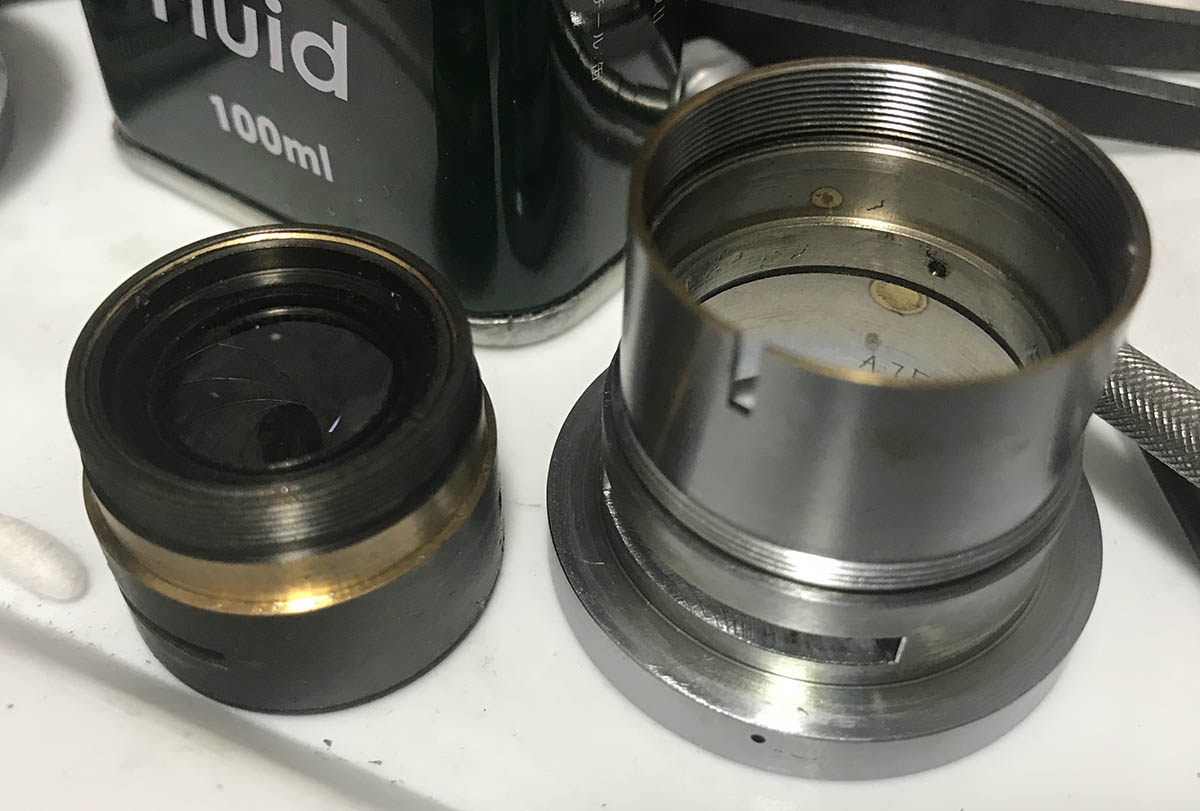
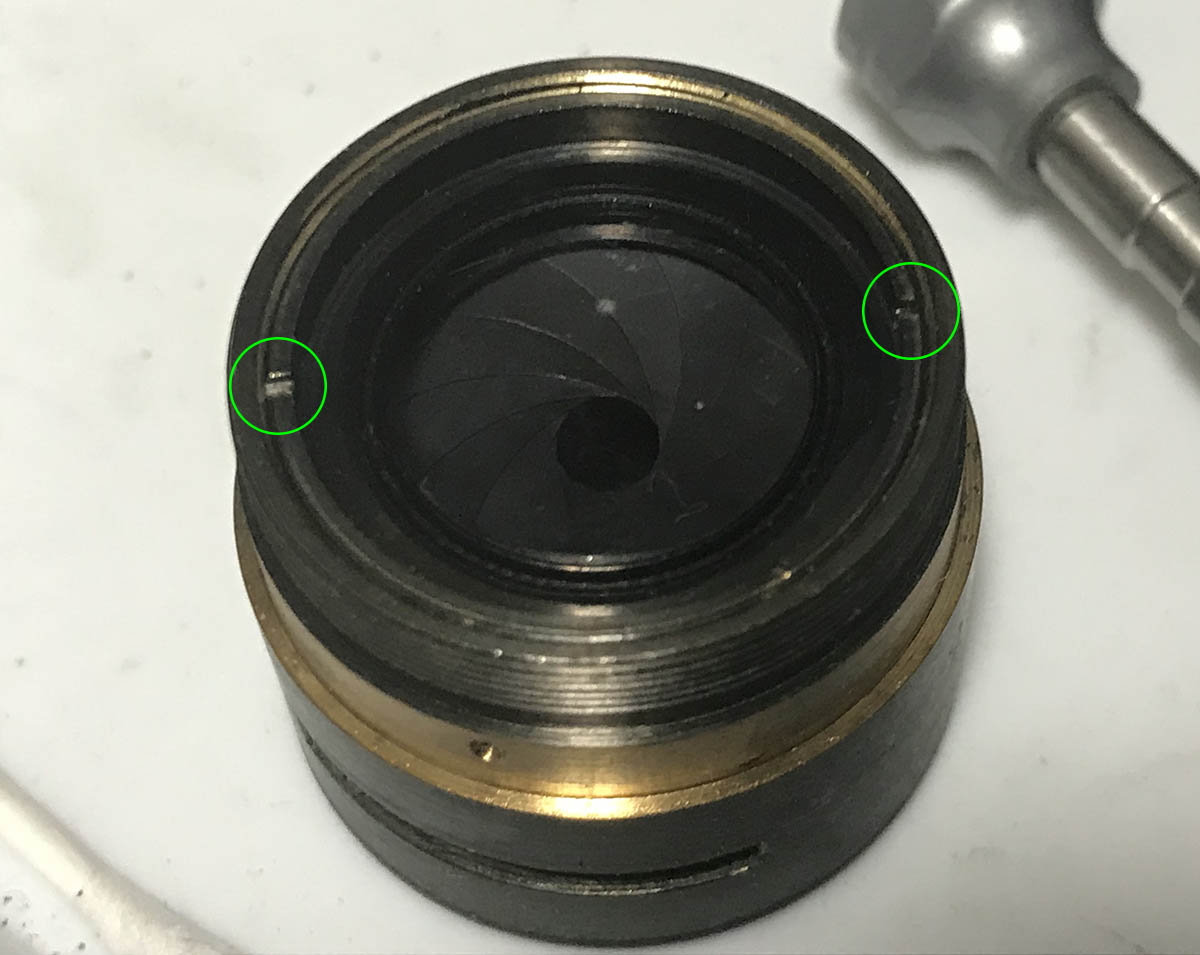
This collar secures the objective so carefully remove it so you won’t drop the objective. It can be removed using a lens spanner, make sure that your hand doesn’t slip or the glass can get scratched!

It can take many turns to remove it but it shouldn’t be a problem. If yours is stuck then just use a bit of alcohol, apply it to the threads to soften the seal before you attempt to remove it again.

This little set screw makes sure that the objective doesn’t turn as you change the aperture. It also helps secure the objective so you should also remove it.
The objective is now free to be removed.
Make sure that you don’t lose this shim washer. These are used to calibrate your lens so it can focus to infinity properly. These were made-to-fit at the factory and are unique to the lenses they came with so don’t damage or lose these.
That was easy. It is only going to get harder from here so prepare yourself. For a lot of people whose only concern is to lubricate this lens then this is the furthest you’ll want to go. For problems that are related to the objective such as dirty optics or an oily iris, the next section should show you how to service it.
Disassembly (Objective):
The objective is tiny and working on it can make one nervous because it’s so easy to damage it by using the wrong tools or not having the right skills and experience to tackle such a delicate task. Many of these are in bad shape at this point and most show signs of an oily iris and the only way to fix these is to overhaul them. I will show you how it’s done but don’t do it if you do not have the right tools.
Cleaning the optics of this lens is easy enough but getting to the glass can be difficult due to the small parts used on it. You will need special tools to open them such as a pipe key, small lens spanners and other custom-made tools that only a decent repairman have. It’s best that you let somebody with the right tools work on this than damage this lens, they’re not cheap and there aren’t many around today.
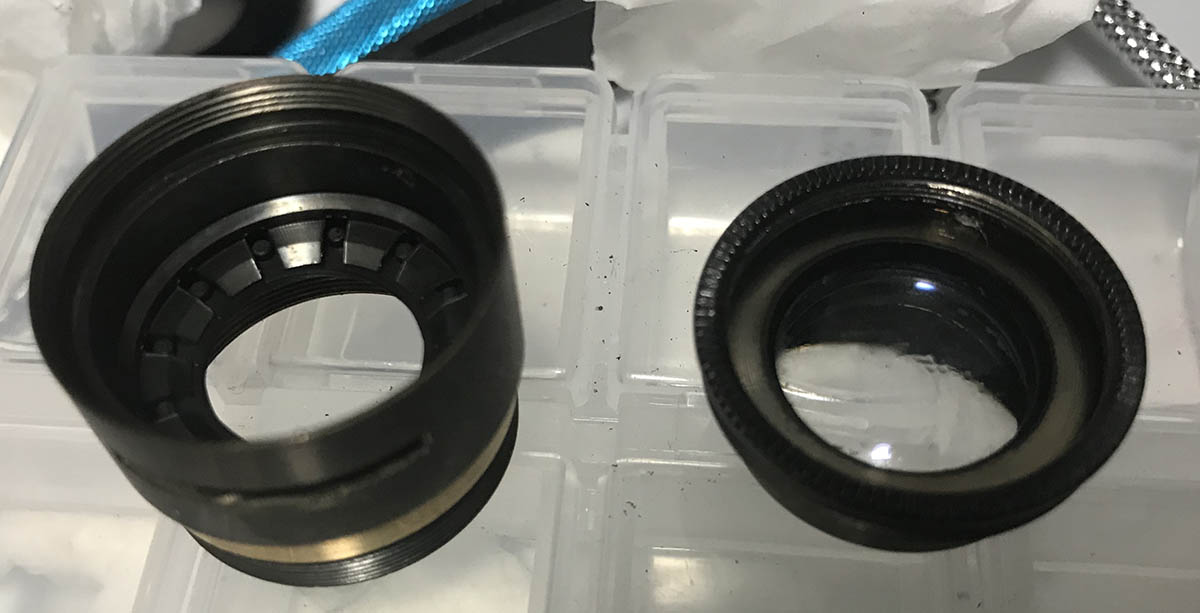
The rear elements assembly can be removed using a lens spanner. It can be tight so use a bit of alcohol on the threads, be careful not to apply too much because the rear element assembly has a cemented group and alcohol can harm the cement.

It comes-off just like this. You can separate the optics from its housing but I don’t see why that should be done. It’s a very delicate procedure because it’s such a small part.

The front bezel can be removed by unscrewing it but you don’t have to do it because you can clean the glass without removing it. I just had to because of all the oil.
The front elements assembly can be unscrewed just like this. It can be hard to remove, it is usually so tight that only a special rubber cup will be able to grip it so you can have more friction to turn it. Get a pair of rubber gloves to help with your grip.
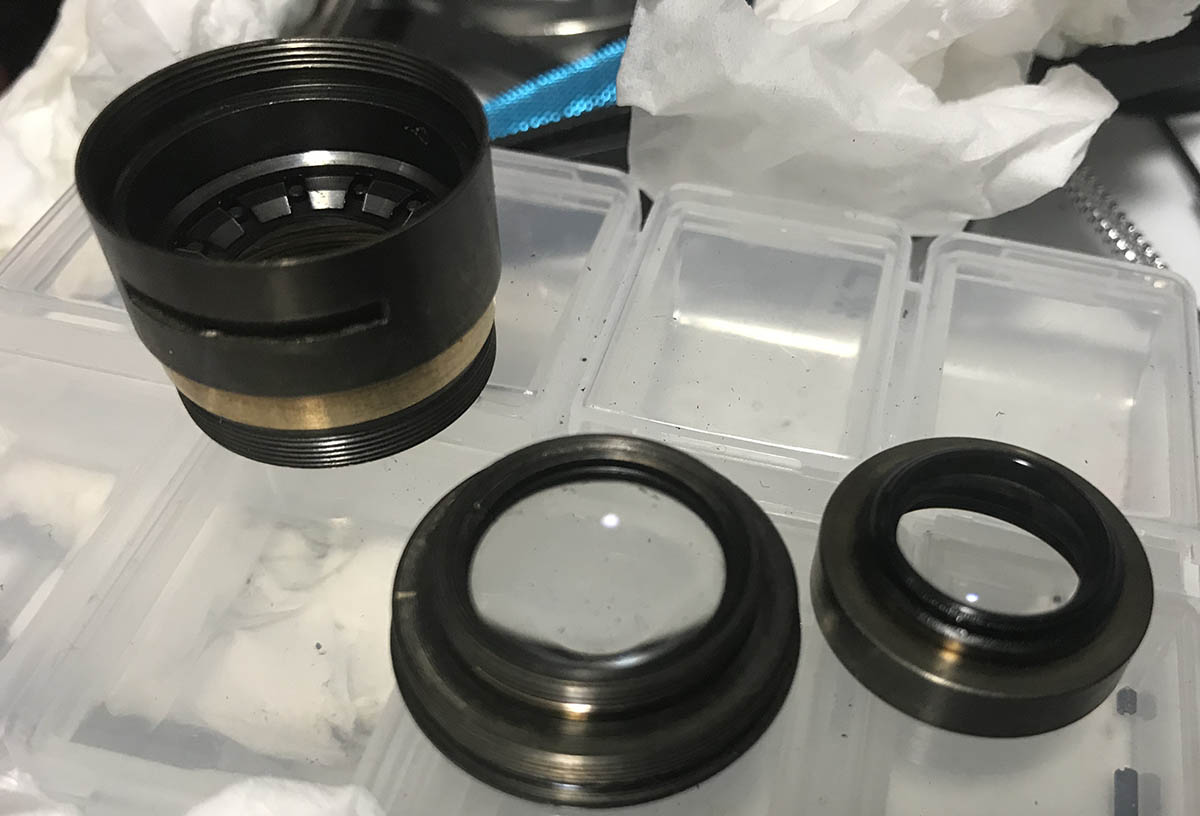
The front elements assembly can then be separated further by unscrewing its rear. Don’t dismantle the housing of the 2nd element, you won’t be able to do it without damaging it and there’s no point in doing it.
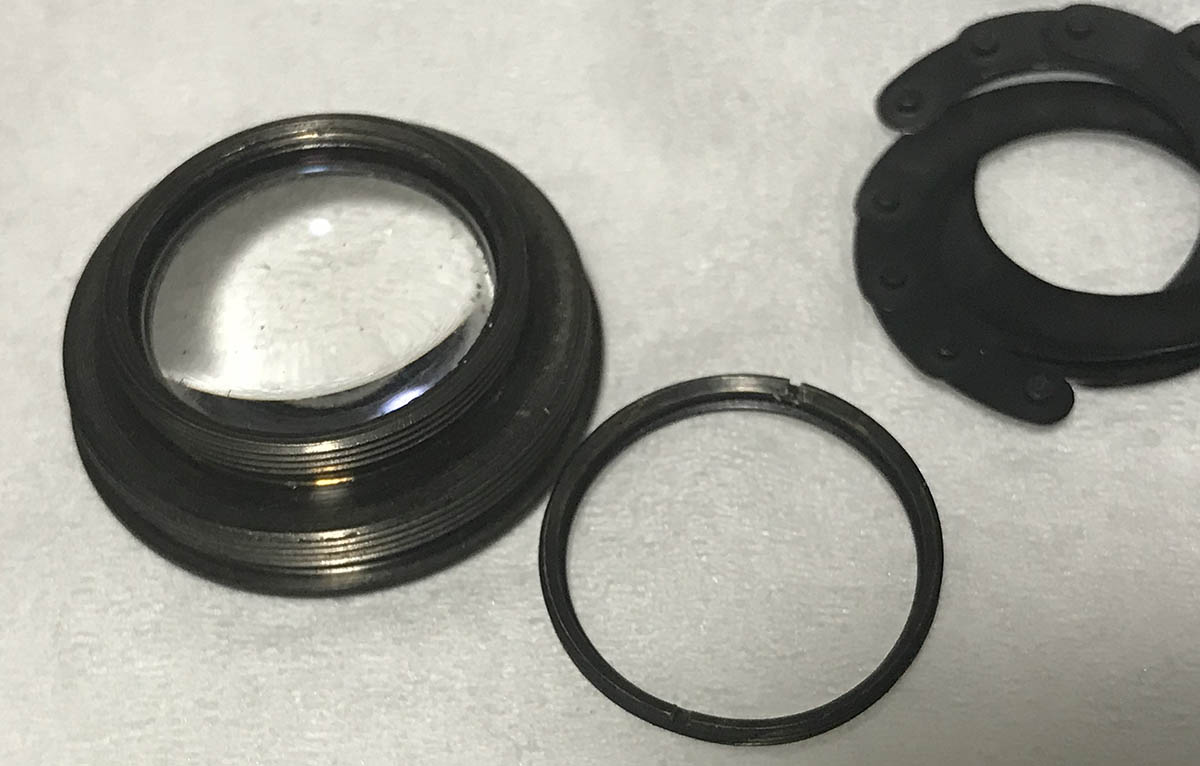
The front element is secured by a retainer ring. I carefully remove it using a special tool I made called a pipe key. It can be scary to remove it because it’s so small and a slip will be enough to turn this lens into a total junk.

The front element can now be extracted. Put it back properly because it can be hard to see its curvature since its rather flat and ambiguous to the touch.
The iris mechanism is being secured by this screw. Carefully extract this so you can get the rotator cup off to get to the iris. This is how this should look like if the iris is wide-open.

This is the rotator cup that secures the iris. Make sure that you put this back properly, the cup has a hole for the screw and it should line-up perfectly or else your iris won’t open or close properly.
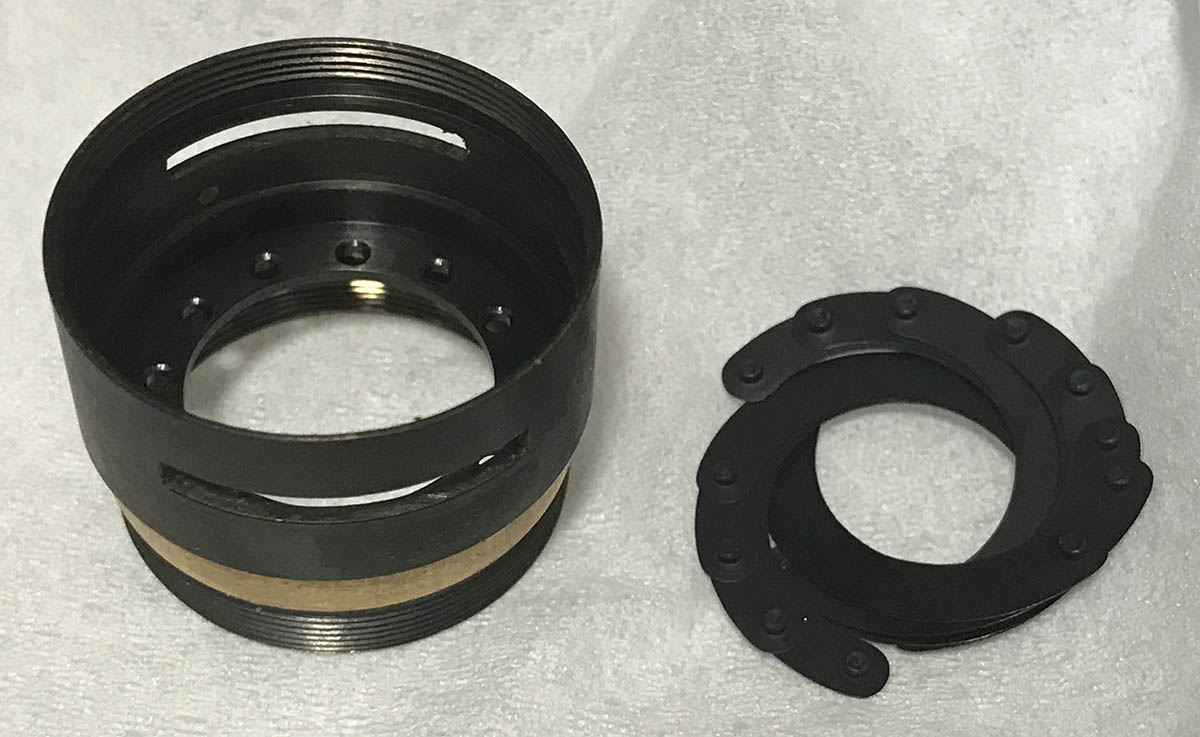
The iris leaves were so oily that the whole iris came-off in one piece!
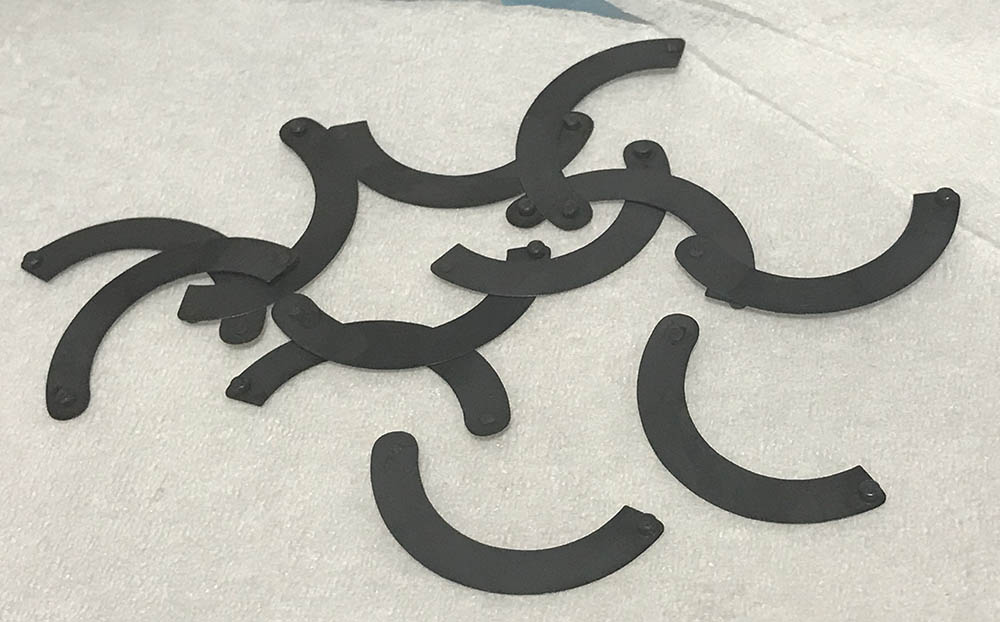
Each leaf was cleaned properly using naphtha and wiped-clean using lens tissue. The pegs at each end were peened, they can get damaged if you are not careful. They look big in this picture but they’re really tiny.
That’s it for the objective. This is its most complicated mechanism and don’t dismantle the iris if you don’t have to. If it’s just a little bit oily then you can remove the optics and then dunk the whole assembly in naphtha and let it pickle for some time and flush-away the grime with a bulb blower and pray that it will be good enough. This way isn’t acceptable if oil is everywhere or has coated everything. A repairman should clean this thoroughly and that’s the only way to go. An oily iris is seldom just that, it can sometimes trap dirt and a thin layer of rust can also form and those had to be cleaned properly. The lazy way I just outlined is only reserved for the inexperienced repairer and is not the proper address to fix this.
Conclusion:
This was easy to dismantle but it took a long time to put-back because the iris is tiny and too delicate for my clumsy fingers to repair and it took me numerous tries until the iris was re-assembled. I hadn’t repaired anything for months, the lack of practice was a big factor for wasting so much time on the iris. Overall, it took about a night to fix this and most of the time was spent cleaning it and putting the iris back together. I also fixed the posts on the lens as they were wobbly. They can easily be lost if you’re not careful so I’ll advise you to secure it with lacquer or apply a bit of solder on the other side to make sure that it won’t loosen itself. The soldering part is a delicate job and only reserved for a master repairman with the right experience or else it will impede the lens when you fix it to your camera. I will not show you how to do it here because I didn’t do it for this lens.
The engraving had to be restored, too. I re-painted them to make them look nice and to help me see them better. I did it with a method that I described in this article. If you got this far in repairing a lens then why not just go all-out? That’s my reasoning because I am not just a collector but I also use the equipment that I repair. I also want them to last longer so I can use them longer and maybe my children can inherit them once I’m gone.
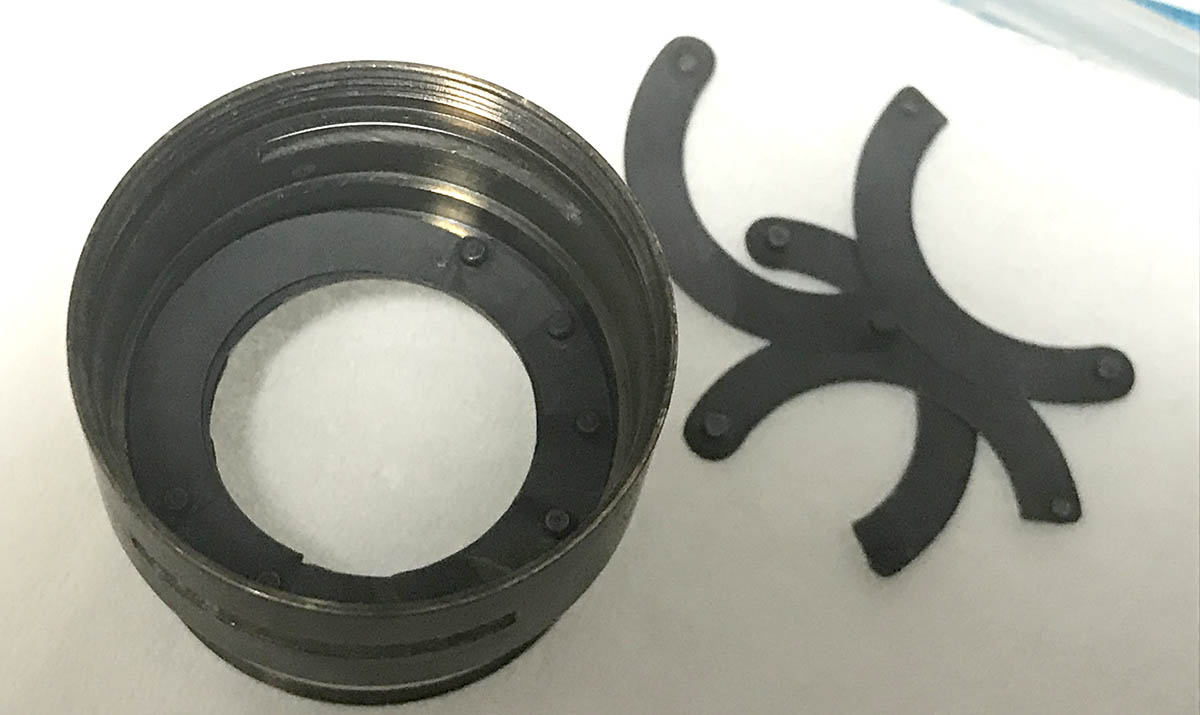
It took me several tries before I got them back! The trick is to put them back together and don’t worry about the pegs too much. I used a very small pick that I fashioned from a needle that I bent into shape to pick the pegs from underneath to put them into their respective holes. The leaves were secured using the help of a small cup so they won’t shift. If you are not familiar with working with this, read my post on repairing preset-type irises to guide you through the whole process.

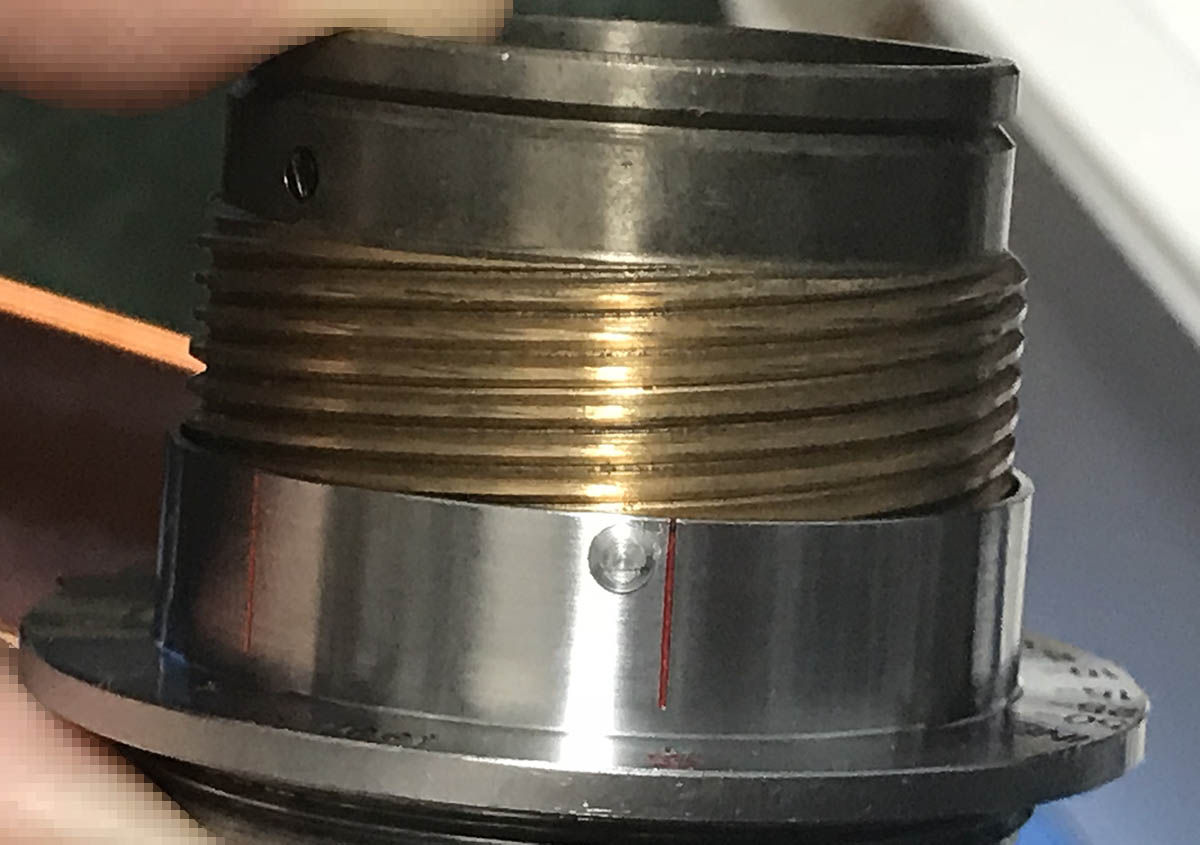
Adjust the focus of your lens so it can focus all-the-way to infinity, assemble the lens so you can use it with a camera. I usually use a digital camera for calibrating a lens’ focus so it’s accurate but I won’t do that this time because most mirrorless adapters are not accurate and I can’t trust them because of that. What I do is I mount any lens that’s not F-mount to a camera with the same mount (L39 in this case) and calibrate the focus with it. To know how I do it, read my article on how to calibrate your lens using the film plane. Now, to do that with this lens you must first turn it to infinity and make sure that the lock is engaged and the post is touching the lock like what you see here on this picture. You then turn the lens using its front barrel and check and see if it’s focused properly to infinity. You do that by focusing on something really far and make sure that the image you get is sharp. Once the resulting projection is sharp, tighten the screws of the focusing ring. If you’re a keen observer then I’m sure that you now know how to adjust the aperture ring after reading this. It’s basically the same except that you check it with the opening of the iris instead of the resulting image at the film plane.

I love this lens, I use this it my Nicca 3S a lot. It’s such a lovely lens now that it was overhauled and cleaned thoroughly. Couple this with the Voigtländer VC Meter and it’s now complete. The feeling of rebuilding a junk lens back to working condition is hard to explain and the sense of accomplishment that you get is priceless!
That’s all for this article. I know that my rangefinder-related articles aren’t popular but I have to write them because not a lot of people will do it. This article fills a big hole in the “internet knowledge database” and I hope that people will appreciate this article of a rare lens that not many people talk about. Not only did we tackle about the images it produce, we also touched on the topic on how to overhaul it thoroughly. This is the only place where you can access this bit of information. Thank you very much for patronizing and following my blog, I will continue to write articles for this blog as long as I have topics to write and the resources to purchase equipment to repair. I am tightening my purse in the past couple of months and I will continue to do so in the coming years but I still have a lot of information in my notes to keep me busy for a couple of years. Thanks to you again and see you in the next article, Ric.
Help Support this Blog:
Maintaining this blog requires money to operate. If you think that this site has helped you or you want to show your support by helping with the site’s upkeep, you can make a small donation to my paypal.com (richardHaw888@gmail.com). Money is not my prime motivation for this blog and I believe that I have enough to run this but you can help me make this site (and the companion facebook page) grow.
Leave me some tip?
Thank you very much for your continued support!
$2.00
Helping support this site will ensure that this will be kept going as long as I have the time and energy for this. I would appreciate it if you just leave out your name or details like your country’s name or other information so that the donations will totally be anonymous. This is a labor of love and I intend to keep it that way for as long as I can. Ric.

2 Comments (+add yours?)