
Hello, my friends and readers! It is getting really cold these days and I am getting lazier to do even the most basic of tasks and prefer to just hide under the thick blanket. I was really thinking of skipping this week’s post but I saw people clicking on my site just to see if any posts got published and this gave me the strength to write this. My readers usually come from Indonesia, Philippines and the EU and for you, I will dedicate this week’s post.
Introduction:
Last time, we talked about the marvellous Nikkor-O 35mm f/2 lens. I also mentioned that I got the lens from the junker and that the middle element had some cosmetic problems but since it was being sold for an agreeable price and the problem doesn’t affect the images it makes then it was a fair purchase for me.
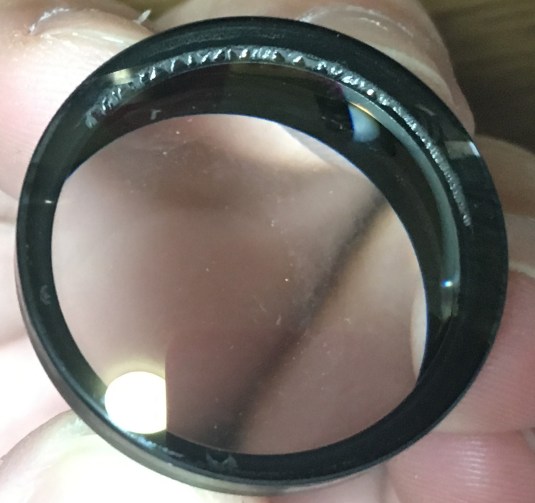 Here is a closer look of the lens element that is going to be the topic of this week’s article. I am sure that some of you guys have seen this and wonder what this is and how do these affect the lens and the images it captures.
Age, temperature, humidity, contamination, atmospheric pressure, hygiene, stress, poor quality control and other factors will all contribute to the deterioration of our lenses. Some of them look serious but do not actually do anything much while some of them are difficult to spot yet they will affect the resulting image when shot with just the right conditions. I myself have seen plenty of these since I frequent the camera shops here almost everyday and even with that, some things still get past my eye.
I wrote a lengthy post regarding fungus on lenses and now, I will begin talking about the lesser known problem of cement separation. This topic is kind of difficult to fit in a single post so I will write it in separate parts depending on my mood.
What is cement separation? Lots lenses have elements that are cemented together to form a single unit. These are called doublets or triplets depending on how many individual lenses are involved. This is necessary because some designs are difficult, costly or impossible to manufacture as 1 single glass element so a solution has to be made.
The cement used to bond these is usually a substances called Canada balsam. This thing is a natural organic substance (resin) so it deteriorates over a long period of time. The bond is usually strong enough and will last more than a lifetime but sometimes if the condition is enough then the bond will fail. An engineer told me that synthetic ones are OK but Canada balsam is still the best at what it does despite being organic and the curing time can take a very long time. There are people here in Japan who are adventurous enough to try other materials as a replacement to Canada balsam. They range from nail polish to some sort of clear glue, I was told that clear epoxy is also a very alternative but my experience with it during my scale modelling days is that they turn yellow over time. The best alternative I know and tried is the cement used to bind the magnifying glass to a watch’s crystal. This substance is clear and doesn’t yellow over time, it is also cheap and comes in a convenient tube so it’s not messy. Unfortunately, I forgot what brand our watch repair technicians were using back in my grandfather’s watch repair shop so I cannot recommend any. You will have to find that out for yourself.
Before We Begin:
If this is the first attempt at opening a lens then I suggest that you read my previous posts regarding screws & drivers, grease and other things. Also read regarding the tools that you will need in order to fix your Nikkors.
I highly suggest that you read these primers before you begin (for beginners):
- Essential tools
- Best practices 1
- Best practices 2
- Best practices 3
- Ai conversion
- Working with Helicoids
Reading these primers should lessen the chance of ruining your lens if you are a beginner. Also before opening up any lens, always look for other people who have done so in Youtube and the internet. Information is scarce, vague and scattered (that is why I started this) but you can still find some information if you search carefully.
I highly recommend that you also read my working with helicoids post because this is very important and getting it wrong can ruin your day. If I can force you to read this, I would. It is that important!
For more advanced topics, you can read my fungus removal post as a start. This post has a lot of useful information here and there and it will be beneficial for you to read this.
Repair:
This is an advanced operation and you would require the proper equipment to pull this off but more importantly you need to have the confidence and guts for this because this job is very risky. If you are not sure about your own abilities, just send this to a professional. Like everything in my blog, I am not taking any responsibility for anything. This is a hack.
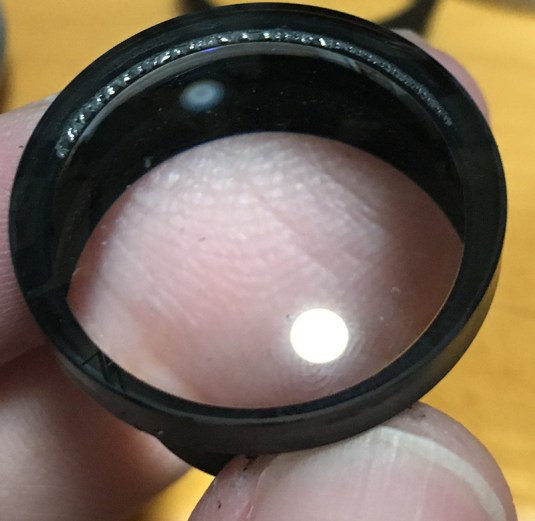
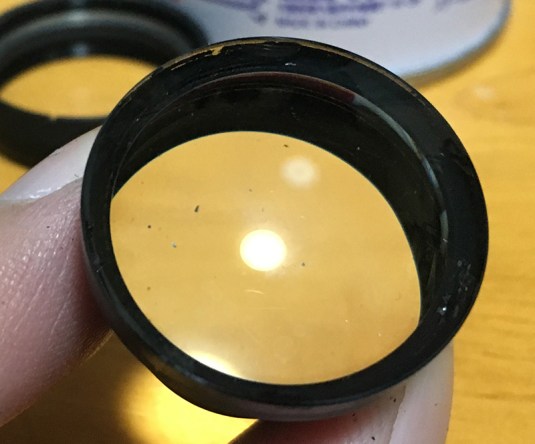
 Here is a better picture of the cosmetic problems. From this picture you can actually see 3 problems in this element:
- Cement separation (Edge) – See the cracked glass effect? That is the cement cracking due to mechanical causes. It could be that the lens contracts and expands due to the constant temperature changes where it is being stored or was stored throughout the decades. The failure could also be from the age of the cement,too. Remember, this is a lens that is made from the mid ’60s.
- Balsam Separation – This is related to the 1st one because it’s also a manifestation of the cement deteriorating. It can be seen as a greyish line beside #1. This just shows the beginning of the problem, worse cases look very different from this and will show up like some flower or snowflake patter, rainbow-coloured streaks in the lens, milky film on the element (like this one), numerous small spots and bubbles in between the elements and so forth. This will affect the image on very advanced stages.
- Schneideritis – The name came from collectors and photographers who notice this on their older Shneider lenses and the term stuck and is now widely to describe this flaw. This is simply the black paint separating from the walls of the lens element/s and is showing up as spots where the paint has peeled. This also happens to modern lenses.
All of the 3 issues mentioned above are merely cosmetic and will only begin to affect image quality on very advanced stages. They are not an indication that the lens was poorly made and should be treated as something natural that occurs over the life of a lens as thinning hair in men – it is a badge of honour and a sign of wisdom!
 I used a hobby knife to carve and chip off the edges of the cement to remove as much of the cracked cement from the edges while making sure that I didn’t remove too much of it and ruin this doublet. This picture shows me at the start of the process.
 Okay, this took me some time. See the dimpled edges? That is where the cracked cement used to be. I also sanded it using a fine-grit sandpaper just to make the cracks smoother as well as to remove the paint from where some of the Schneideritis is. The paint used for this is water soluble by the way so it might be acrylic paint.
 After making sure that the area where I sanded and carved is clean by wiping the area with alcohol and letting it dry, I used a permanent marker to paint over the exposed parts and this picture shows me in the middle of that process. You can use a flat black acrylic paint if you want but I was too lazy to bother with that at this specific moment so the black marker would do.
Conclusion:
The steps mentioned here are for the advanced hobbyists because it requires a fair deal of dexterity to pull this thing off. A slip would scratch your lens element and ruin your day. I examined the lens and so far, there is little traces of the cracked cement visible. It is never going to be perfect but at least it’s not as bad as it was before the procedure. I skipped the parts where the Schneideritis isn’t as obvious, I do not even need to fix this but since I am stripping the area with crack I might as well work on the surrounding area as well.
The problems shown here occurs only on cemented elements and while not serious, they can be used to your advantage to lowball the seller into selling the lens to you for a cheaper price. I would still buy lenses with these flaws provided that the price is right. I would only avoid it if there is an advanced case of balsam separation, fungus means nothing to me.
I would consider balsam separation to be critical but there are cases when it can be easily repaired by using heat which I will show you in the future. This method has a rather high success rate when done correctly but has a high chance of failure when overdone. It is very risky but it’s certainly worth the gamble. It’s not the proper way to fix this and is more of a hack but that’s for next time since I didn’t the procedure.
I am currently asking myself this question – is this worth all the bother? For this lens, yes! This is only something that I would attempt on a worthy lens. If it’s cheaper for me to just salvage another lens element from scraps then I will do so or if the lens is really worth the effort because it has sentimental value or expensive.
So, do you have any old and valuable lens that has these problems that you need to fix? Be aware that those lenses will function perfectly fine and if it really bothers you then don’t forget to check this article out or send your lens to people who would fix this for you. There are repairmen who would fix this for a fee, some even have an ebay.com page. I don’t have any feedback regarding these people and their services so I’m not recommending anybody at the moment. I would appreciate if anybody would give any feedbacks.
Thank you very much, next time we will look into another Nikkor!
Help Support this Blog:
Maintaining this blog requires money to operate. If you think that this site has helped you or you want to show your support by helping with the upkeep of this site, you can simple make a small donation to my paypal.com account (richardHaw888@gmail.com). Money is not my prime motivation for this blog and I believe that I have enough to run this but you can help me make this site (and the companion facebook page) grow.
Helping support this site will ensure that this will be kept going as long as I have the time and energy for this. I would appreciate it if you just leave out your name or details like your country and other information so that the donations will totally be anonymous it is at all possible. This is a labor of love and I intend to keep it that way for as long as I can. Ric.

Nov 12, 2016 @ 12:56:59
Thank you for posting and sharing your knowledge – which is vary scarce online about these lens repair topics! I definitely have a severe case of Schneideritis on my LF lens and maybe now someday I can dare to repair it.
Nov 13, 2016 @ 00:45:49
Hi, Brian!
I don’t have that much knowledge to be honest but I sure hope that people who do would write or teach more. 🙂
Schneideritis is usually very obvious on older LF lenses, maybe because the thick glass magnifies the tiny flaws. Is it that severe that you need to have it fixed? If it is then you may want to do a complete strip of the black paint but make sure that that lens unit is a single element and not a doublet. go to your hobby shop and buy acrylic flat black or panzer grey, that should do the trick. Ric.
Dec 21, 2016 @ 09:49:28
Hello Richard!
Haven’t visited your blog for a while, as i was too busy with my job.
Appying new cement is not that much simple and straightforward, as cement index of refraction must be matched with both lenses index for best possible optical performance. I have no idea if index values are documented or not in the service manual, and measuring them requires refractometer.
https://www.thorlabs.com/newgrouppage9.cfm?objectgroup_id=196
http://www.edmundoptics.com/lab-production/adhesives/norland-optical-adhesives/1597/
As you can see,these adhesives come in a variety of refractive index values
Dec 21, 2016 @ 23:47:59
Hello, Charlie!
Yes, I saw that from Google some time ago. These are definitely for super precision optics. As for IOR, I believe it is the same across the board for glass company-wide unless they made a different one like flourite. Sorry, I am not very knowledgeable with this. The only times I encounter IOR is at work when I play around with transparency for CGI. I will ask some veteran repair guys here in Tokyo when I encounter them. Ric.
May 23, 2020 @ 12:31:10
Thank you for your post. My Leica 20mm has Schneideritis. Do you know any camera shop that can get rid of it in the NYC area? Thanks much.