
Hello, everybody! I just had some old-school ramen together with my family. It’s not the same as what people are used to today and its taste hark back to the pre-war years. I enjoyed the taste’s simplicity and lightness of the soup. It showcased the bare-basics of ramen very well that you do not need to add anything more to make it tastier. Today, I am going to show you a lens that’s not quite old but it has faded into obscurity to younger photographers who prefer what’s “cutting-edge”. This lens is a keeper if you know how to use it and I will teach you how in this article.
Introduction:
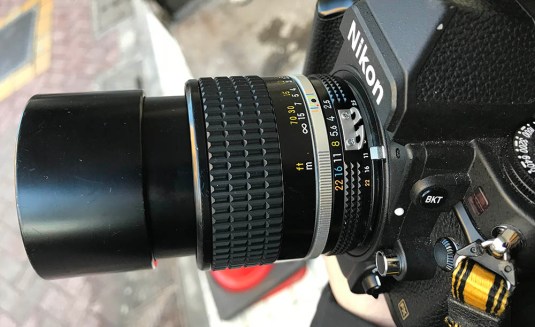
We are going to talk about the legendary Nikkor 105mm f/2.5 Ai-S and this is the final lens of the popular 105/2.5 lens line. This lens got its fame because this was supposedly used to shoot the photo of The Afghan Girl. It is the final and best version of a long line of lenses, I say it’s the best (optically) because it has the best coatings used and it has that very useful built-in lens shade. It is a nice lens to hold because it feels dense despite being compact, this thing is going to last you more than a lifetime if you take care of it.
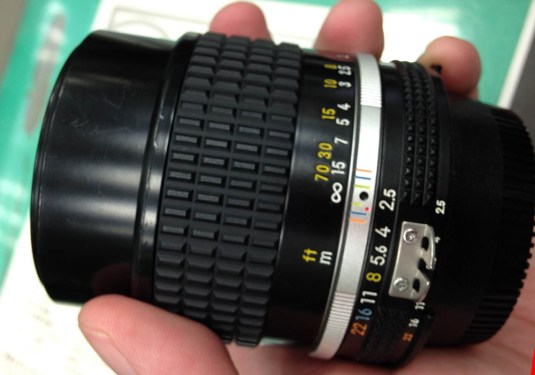 The Nikkor 105mm f/2.5 AI-S lens gives you the impression of reliability and quality when you hold it in your hands. It inspires confidence with its very well-built barrel. It’s the real deal, a lens that was made for professionals to use in and out of the conflict zones.
 Optically, the lens hasn’t changed from its predecessor but the latest models of this lens made from the ’90s until its final run in 2005 has the best multi-coating applied to it. The optical formula has not changed but I suspect that Nikon tweaked the design slightly. This is just my suspicion so don’t take this as the truth. If I recall, a Nikon engineer told me once that they do not mess-around with the optical formula once it has been proven and the only thing they change is the shape of the walls to make the elements fit their updated housing if ever the housing was also revised on a newer version of a lens. I am sure that there are exceptions to this.
 This is the only version of this lens with a built-in hood. It is very handy but some people don’t like it at all because it can easily be retracted when it gets knocked hard enough. It’s very convenient to shield that large front element from stray light hitting from an angle. I am not sure why the other versions never had this convenient feature.
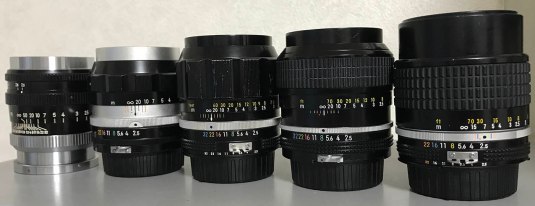 These are all of the major versions of this lens. It started production in 1953 as a rangefinder version and the last one came out of the production line in 2005. This is almost 5 decades of continuous production! Nikon would never make another lens in this line due to the modern zoom lenses’ performance making this lens line obsolete and redundant (to marketing, that is).
The major versions of this lens family are (left to right):
- RF-Nikkor-P.C 10.5cm f/2.5
- Auto-Nikkor-P 105mm f/2.5
- Auto-Nikkor-P.C. 105mm f/2.5
- New-Nikkor 105mm f/2.5
- Nikkor 105mm f/2.5 Ai-S (this lens)
There are numerous minor updates in-between these versions but they are too minor to mention here. They’re insignificant to our article and will only confuse you that’s why I’m only showing you the major updates to this lens. They’re all optically excellent and I love all of them so much that it literally takes me minutes to decide which one I should bring when I need a 105mm lens for portraiture. This is one of my secret weapons and I’ll show you why with my sample pictures below.
I do not think that I need to take plenty of samples for this lens because the optics is the same as the one in the New-Nikkor 105mm f/2.5 but for the sake of discussion, I’ll show you some pictures that I took under real-world use. I will skip the usual photos where I show how a lens performs under various wider apertures to observe the rendering. If you want to see those, read my article for the New-Nikkor 105mm f/2.5 and check the “tests” there instead.


(Click to enlarge)
See how sharp it is wide-open and how smooth the transition is from what’s in-focus and what’s blurred. The relatively-low element count also gives this lens a very natural rendering of the scene. The rendering is exquisite and it can capture subtle tones without making the scene look flat.


(Click to enlarge)
There is no better way to show you how good this lens is than to shoot some portraits using this. This was designed to excel in portraiture because Nikon found out that people are using the 105/2.5 lenses more for portraits and so they calculated this to draw beautiful and natural-looking skin, just look at how nice her skin looks in the photos. If I’m not mistaken, I believe this shift happened with the decision to use the Gauss-type design for the New-Nikkor 105mm f/2.5 since this is the only big change this lens family ever had in its nearly 50 years of production. This was documented in one of Nikon’s lens articles so if you’re interested in this subject just search for it online.
It is time to see some sample pictures that were taken with film. Film has a unique look that is impossible to simulate in digital due to grain and how it records light. You may get it to look close but without the organic structure of grain you won’t get it to look exactly the same. This lens was also made to be shot with film so seeing pictures that were taken with film will help us in understanding the lens better since it’s working with its intended medium. I took these pictures using Fujifilm Industrial 100 with a Nikon F6. Most, if not all of the pictures were taken with the lens wide-open.
 Beautiful rendering! See how sharp it is wide-open. The exquisite quality of the bokeh looks gorgeous, there’s no harshness to it and the transition looks clean. It’s as sharp as the Nikon 100mm f/2.8 Series E but the character of the bokeh is much smoother and cleaner.
 The sharpness is nice and doesn’t look “forced” or over-corrected like what you see with the Nikon 100mm f/2.8 Series E. The look certainly doesn’t look “cheap”. What I meant to say is that there’s enough resolution to match this this lens’ sharpness so you’ll see finer details get rendered with fidelity. I’m not an expert at this but that’s how it appears to me.
 Here’s another photo showing how this lens can resolve fine details. Look at the bangs, it looks great despite this film’s larger grain.
 Lots of squinting people that day, I don’t know what was going on. See how nice the subkect isolation is. This makes it nice for portraiture and its “slow” maximum aperture is just right so people won’t be tempted to shoot with it wide-open all the time and cause one of their subject’s eyes to be blurry and the other one sharp. It’s all about the “bokeh” these days.


(Click to enlarge)
Here are some more pictures that were shot using this lens and film combo. The pictures have a nice, natural feel to them thanks to the low number of elements used. The result is a subtle, rich picture with tones that you would otherwise not notice if this lens was over-corrected as in the case of many lenses made today with the exception of the AF-S NIKKOR 58mm f/1.4G. It is a masterpiece and it shows that charts and scores don’t mean everything in lens design. I hope that people will begin to look at lenses this way again.
That’s all for this introduction. If you want a more complete history of this lens, please go and read about the other versions that I have featured in this blog. This is one of Nikon’s more popular lens family and is one of the lenses that gave Nikkors a highly-respected reputation. This lens family took some of the most important photos in the past couple of decades, from Vietnam to more recent conflicts. In fact, I read about a photographer who still uses his lens to take photos in conflict zones. This is one of the best deals in portrait lenses so if you ever saw one but make sure that the iris is not oily. The iris can be prone to oil migration and you will see why in the coming section. It is being sold from $130 up to $200 these days depending on condition, it is a small price to pay for one of history’s most important lenses in terms of the photos it made. If you don’t care much for history or its improved handling, the older versions of this lens will just be as good, minus the comfort. Your also going to deal with the longer focus throw which can drive people nuts. It may be great for studio-use but can be frustrating to focus on real-world use where your subjects won’t stay-still for you. Having said all of this, you can never go wrong with any of these.
Before We Begin:
If this is your first attempt at repairing a lens then I suggest that you check my previous posts regarding screws & drivers, grease and other things. Also read what I wrote about the tools that you’ll need to fix your Nikkors.
I suggest that you read these primers before you begin (for beginners):
- Essential tools
- Best practices 1
- Best practices 2
- Best practices 3
- Ai conversion
- Working with Helicoids
Reading these primers should lessen the chance of ruining your lens if you are a novice. Before opening up any lens, always look for other people who have done so in Youtube or the internet. Information is scarce, vague and scattered (that is why I started this) but you can still find some information if you search carefully.
I highly recommend that you read my working with helicoids post because this is very important and getting it wrong can ruin your day. If I can force you to read this, I would. It is that important!
For more advanced topics, you can read my fungus removal post as a start. This post has a lot of useful information and it will be beneficial for you to read this.
Disassembly (Lens Barrel):
The main barrel is of conventional design and it isn’t difficult to take apart for somebody who have been working on Nikkors for some time. It shares plenty of similarities with its smaller brother the Nikkor 85mm f/2 Ai-S and if you have repaired that lens then this lens should be familiar to you. The glass is big and heavy so be careful when you’re working on this. Make sure that you have the correct tools and skills, if you don’t then it’s best to give it to a reputable repairman. This is not something for the beginner to butcher.
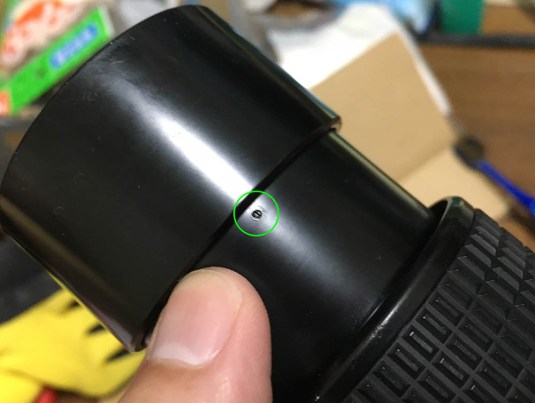
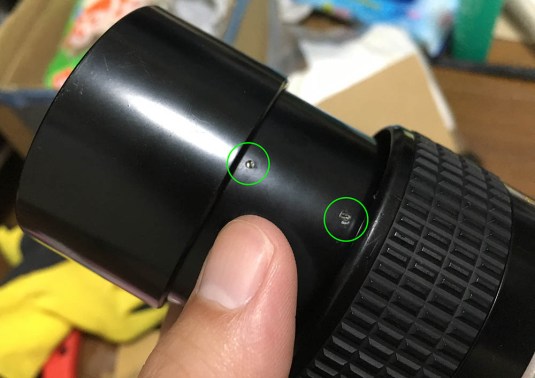 Begin by removing these screws.
 And here’s another one.
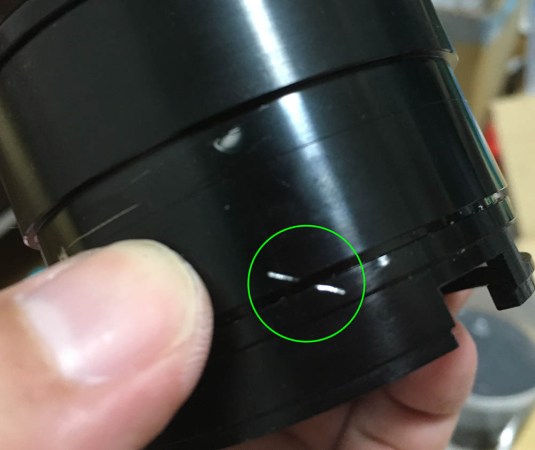
 You can now safely unscrew the front barrel from the rest of the lens. The bigger screw is used for securing the front barrel and the 2 smaller ones are for the name ring.
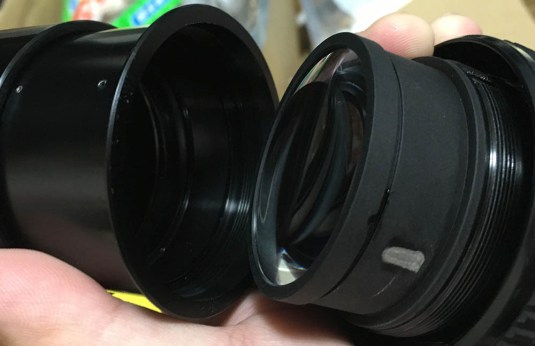
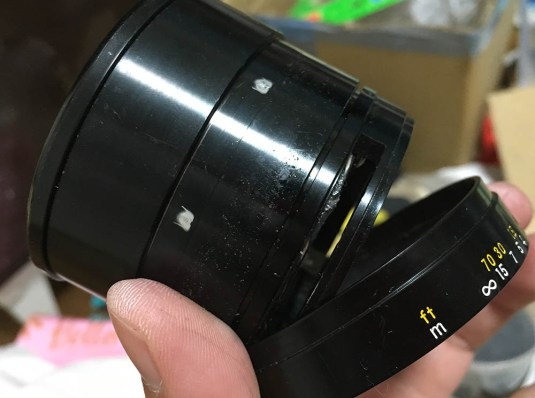
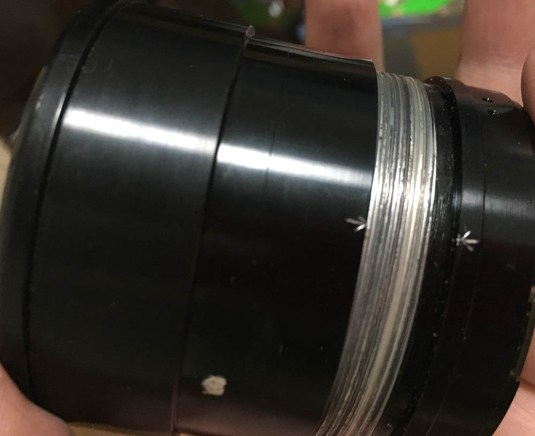
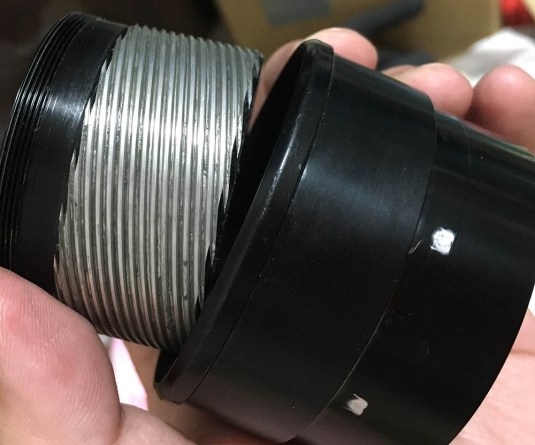
 The front barrel secures the objective so you can safely extract it now that it’s gone. Store the objective in a safe place to prevent damaging it while you work on the main barrel. It is dense and heavy so make sure that you don’t drop this to the floor!
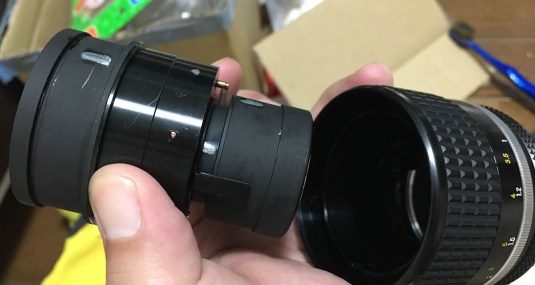
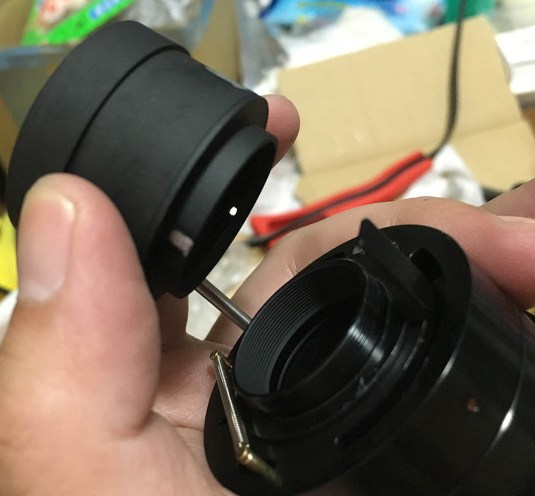
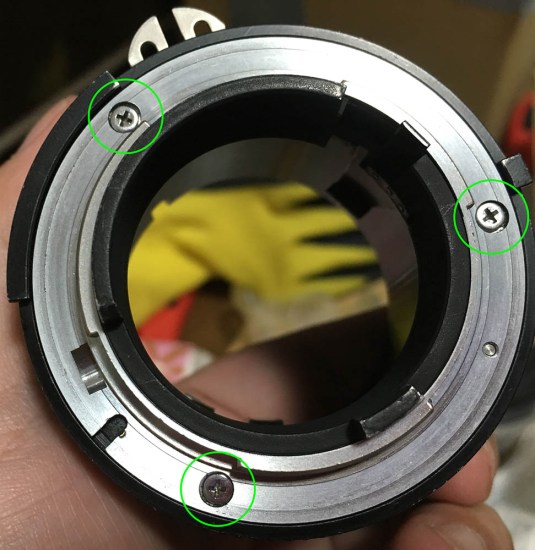 Now that the objective’s gone, you can now safely work on the barrel. There are 3 screws that secure the bayonet and you should remove them carefully. Read my guide on removing screws to prevent damaging yours. Be sure that you use the right screwdriver type because these are not Philips screws. It’s important to only use JIS drivers for Japanese products and many people do not follow this rule so they end up stuck because they stripped their screws.
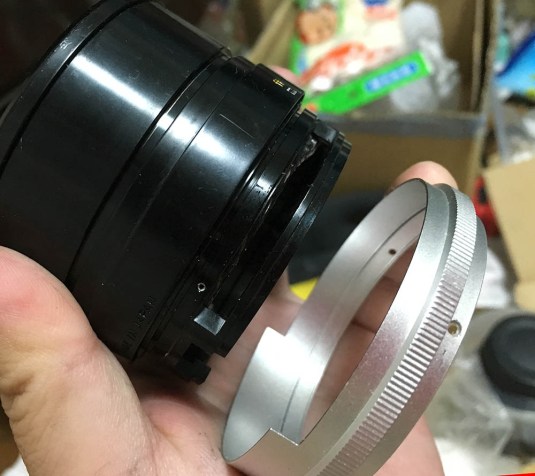
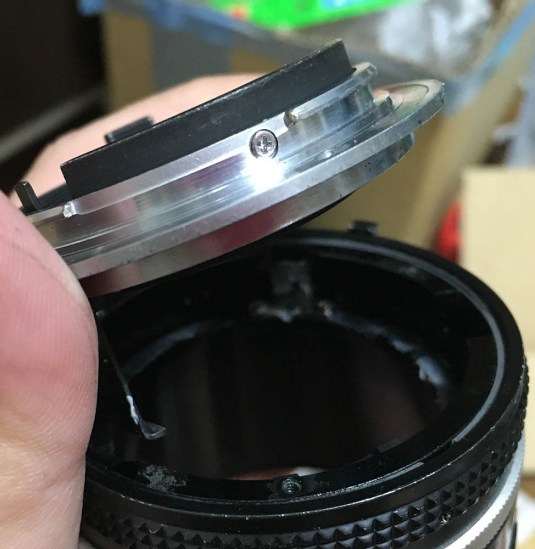 The bayonet mount should come off easily now that the screws are gone.
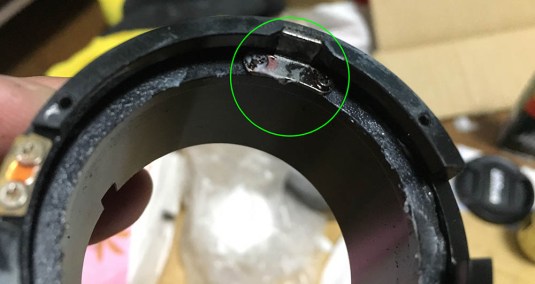
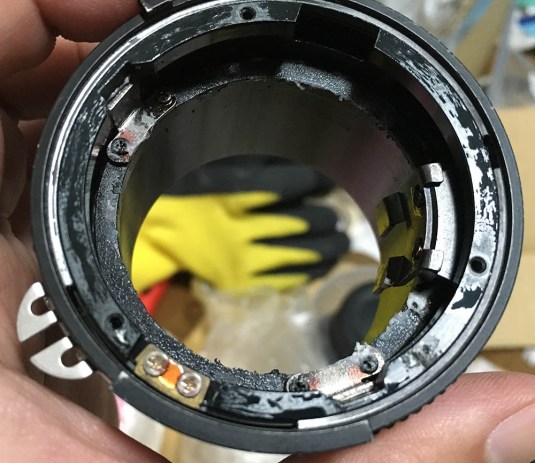 Wow, just look at that! Just like what the sailors say – “She may look clean…”; I’m glad that I took this lens apart because this is unacceptable. If I left the lens like this for a couple of months more then it may have been a disaster! Remember to never put too much grease on the helicoids because this lens can be prone to the oily iris problem.
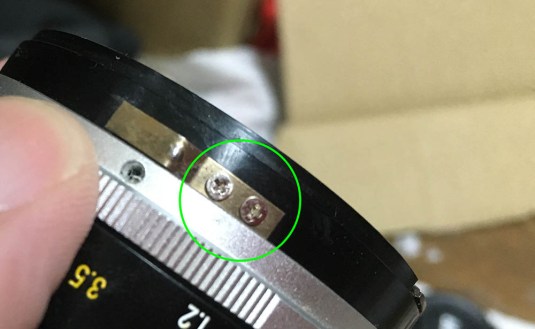
 The aperture ring can’t be removed just yet. You will have to unscrew these first because they connect the aperture ring to its fork on the other side.
 Once the screws are gone, you can now safely remove the aperture ring.
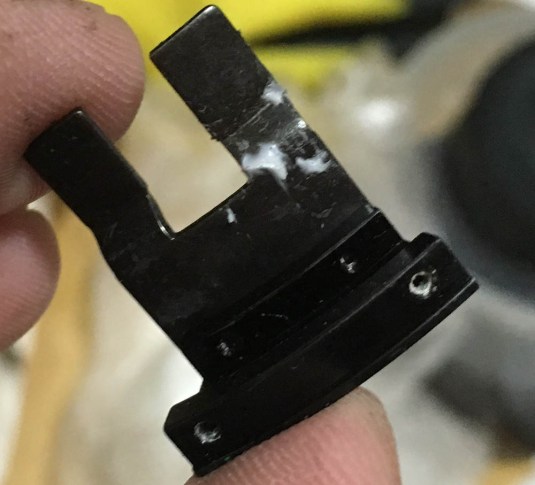 This is the aperture fork. It couple the aperture ring to the iris mechanism inside the lens so the iris can open and close as you turn the aperture ring. See how greasy it was? Don’t apply any grease on this thing because any oil on this part may migrate to the iris and it’s going to be a problem when that happens because you’ll have to open-up the iris just to clean it properly and overhaul this lens again just to make sure that it’s clean.
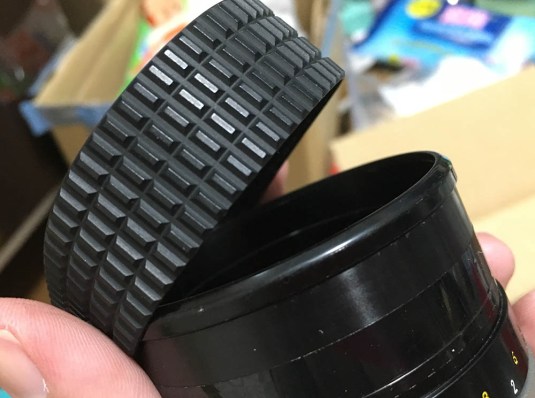 The rubber grip has to be removed so you can take apart the focusing ring. Use a wooden toothpick and run it underneath the whole circumference of the grip so that it will lift the rubber from the glue that was used on this. Be careful not to tear it.
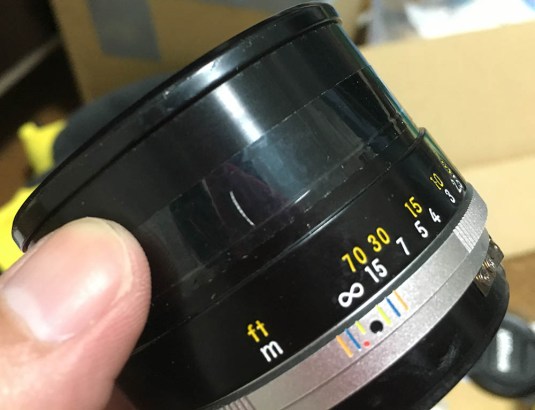 The distance scale was merely taped-on. It’s flimsy but it works, many Ai-S lenses have the same thing. This is cost-cutting and there are times when it would undo itself and cause the scale to be off by a bit. You can remove the tape now or you can opt to remove it later,
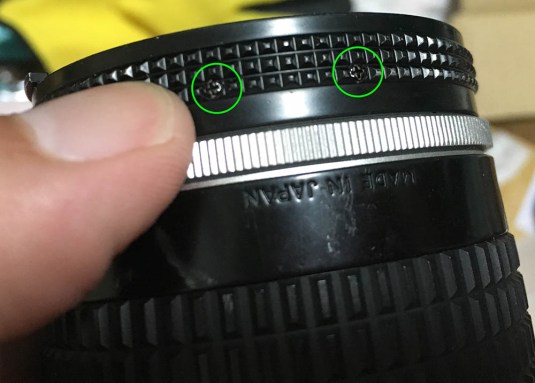
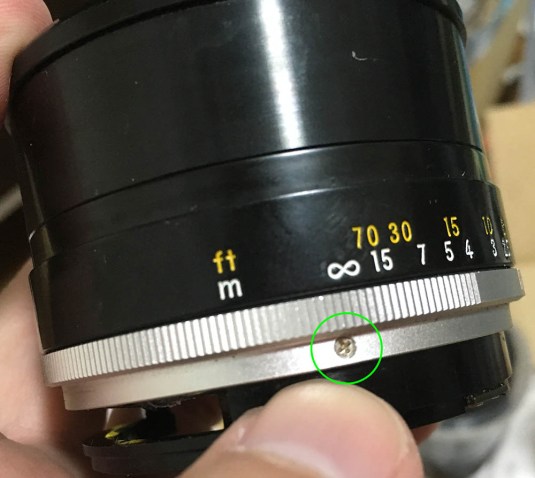 Get a proper-fitting screwdriver and remove these small screws. There are 3 of these and they secure the shiny metal grip to the main barrel.
 Before you can remove the grip, you will have to remove this clicker spring because it is in the way. Don’t forget to put this back later.
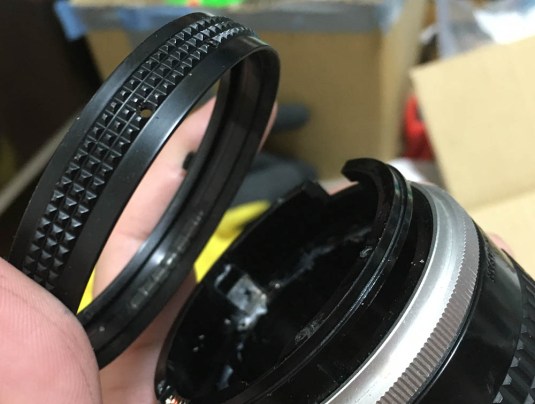
 The grip can now be safely extracted.
 The focusing scale can now be removed. Notice that oil has settled underneath it.
 There are two helicoid keys on this lens and this is one of them. The helicoid keys are used for syncing the movements of the helicoids so you can focus it by turning the central one. Since there are 2 of them, mark one of them so you will know which key should go on which side.
 Now that the helicoid keys are gone, you can now turn the helicoids beyond their rotation range. This is how far the central helicoid will collapse and I made a mark just to remind me how far it goes. During reassembly, if I got the same alignment as the one here then I have correctly re-assembled the helicoids.
 Time to separate the helicoids. This is where they separated and this is also how they will have to be meshed together. If you are new to this, read my article on how to work with helicoids. This is very important because this is where many people get stuck. That’s why you will see some lenses that were badly put-together and then sold for junk online.
 The inner helicoid can now be extracted. Again, never forget to mark where the helicoids separated. It’s a simple routine but many beginners forget to do this despite all the warnings I gave.
That’s it for the lens barrel. Make sure to clean the helicoids properly before you lubricate it so the fresh grease will never be contaminated by the dirty one. It looks like this lens was once lubricated using a type of cheap lithium grease. I use good quality silicone grease for my lenses, never go the cheap route when dealing with lubricants. For this lens, I used a lighter grease so I will have less resistance when turning the focusing ring. Some people want something that’s more damped so this is a personal choice.
Disassembly (Objective):
Disassembling the objective is straight-forward. This is a conventional rack-focus type so there are no tricks involved in this lens such as CRC. The inner elements are prone to accumulating dust from the iris. Air gets sucked into the inner chamber where the iris resides each time you focus and the dust can come from a variety of places such as the gaps between the parts of the lens. There’s no way to prevent this, it’s just part of using this lens.
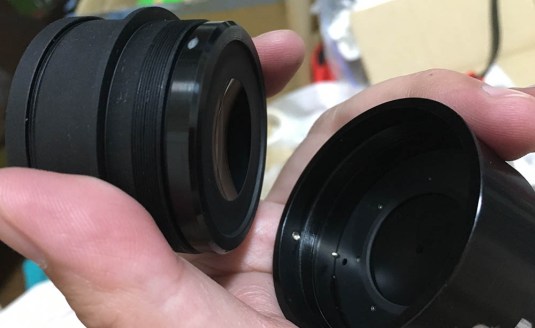 The front elements cell can be easily unscrewed with your barehands.
 The rear assembly can be easily removed with your barehands. Dirt usually settle in the inner walls of this and you should blow it with a bulb blower.
I said before that this lens can be prone to the oily iris problem because it is compact so the helicoids are much closer to the iris. Excess oil coming from the helicoids can travel to it via the aperture fork, etc. Fortunately, the iris on my lens is clean despite the disgusting oily mess that it had. If you need to clean the iris then just check out my article for the Nikkor 85mm f/2 Ai-S or other similar lenses like the New-Nikkor 105mm f/2.5 lens. Their design is similar so you can use those article for hints.
Conclusion:
That’s all for the this article, all you need to do now is adjust this lens’ focus. Reassemble the lens but do not reinstall the rubber grip and do not tape the distance scale. Adjust the infinity focus properly and then tape the distance scale to the focusing ring once your lens can properly focus to infinity. Make sure that the symbol for infinity is dead-center to the black dot found on the focusing scale before you tape it. You can now put-back the rubber grip. You may want to apply a bit of contact cement to make sure that it sticks better, you only need to apply just a little bit or else it will create a mess. If you are new to lens repair, read my old article on how to adjust your lens’ focus. It’s essential that you do this properly or your lens won’t focus properly and the distances on the scale and what your lens takes will never match.
 This lens deserves to be taken-cared of. It is one of Nikon’s best lenses of all time. It’s great knowing that the grease in there will last a long time before breaking-down again. You only have to do it once if you did it properly.
We have finally ended this series on one of Nikon’s most iconic lens family. For the people who know about this lens, this is just reaffirming what they all knew and why the lens is a keeper. For those who are new to this lens, I hope that this series will give you a better appreciation of what went before and also an appreciation of the finer things that older lenses are capable of doing today using modern cameras. Sharpness, bokeh and test charts aren’t the only things that matter when judging a lens, the final photos are more important.
Thank you for following this blog and I hope that this will be useful for you. If you’re new to repairs, just send the lens to a repairman. This is not a DIY project for a beginner. You may end up wasting more money if you ruined your lens as opposed to spending money for a repair. Remember, my blog is only here to entertain and educate you. If you really wanted to start getting into repairing lenses then start on a cheap Canon lens or anything that you can destroy without any guilt. This lens deserves to be respected and should never be butchered by a beginner. See you guys next time and if you liked my work, please share my blog to your camera group, Ric.
Help Support this Blog:
Maintaining this blog requires money to operate. If you think that this site has helped you or you want to show your support by helping with the site’s upkeep, you can make a small donation to my paypal.com (richardHaw888@gmail.com). Money is not my prime motivation for this blog and I believe that I have enough to run this but you can help me make this site (and the companion facebook page) grow.
Leave me some tip?
Thank you very much for your continued support!
$2.00
Helping support this site will ensure that this will be kept going as long as I have the time and energy for this. I would appreciate it if you just leave out your name or details like your countrym name or other information so that the donations will totally be anonymous. This is a labor of love and I intend to keep it that way for as long as I can. Ric.

Apr 07, 2019 @ 06:04:51
What grease did you use for this lens? I’ve tried S10 on various 50mm Nikkors and it always seems too think on Ai and Ai-S lenses. But works okay on the older pre-Ai scalloped focus ring lenses.
Oct 22, 2021 @ 10:37:21
Hi! Really apriciate your rewies nd tip how to fix lensen. I have loosen the three small screws but I cant get the front barell of, it sits verry hard – any tip?