
Hello, everybody! I don’t know if all of my readers are aware that I work for the Japanese animation industry. I am currently working on the latest season of “Ghost in the Shell” so I am currently busy with so many things that I cannot publish a lot these days. It’s a show with characters who had their consciousness “downloaded” to synthetic / robotic bodies. While they’re actually “people”, they’re not “humans” in the true sense of the word. This makes us question what it really means to be “human”. If you ask people who grew up in the New Wave era like me, my answer will be The Human League song and its lyrics! This may sound too simplistic but the chorus goes like “I’m only human, of flesh and blood I’m made.” and then it goes “Human. Born to make mistakes…” – this is where things get more profound. The last line of the female part goes “While we were apart, I was human, too.“, this line is the most powerful line in the song, it cements the idea that making mistakes is part of the whole package of being “human”. Before I get carried-away and sound like an old man contemplating about life I’ll show you something today that makes you question what it means to be a “Nikon” and how mistakes from its marketing and experience gave Nikon a lot of valuable lessons that they used to make one of their best cameras, read on.
Introduction:
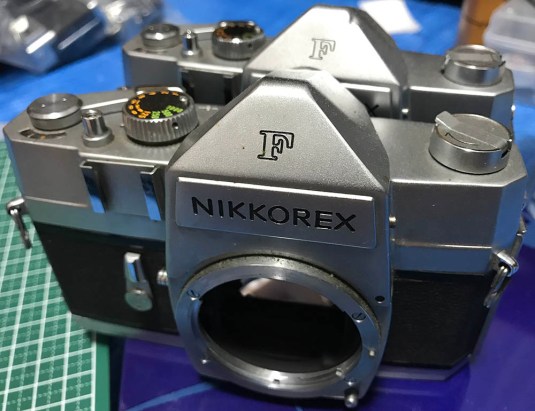
Today, I will talk about the Nikkorex F, it’s a camera that’s not being talked much about in many photography circles and many people are even ignorant of this camera. This is not a rare camera at all so its vagueness cannot come from its rarity, the reason probably lie in the fact that many people don’t consider this to be a real “Nikon” at all! Yes, this wasn’t made by Nikon but it carries the Nippon Kogaku brand so who made this and why? Well, the answer to the first question is Mamiya made it, the answer to the next question is the need to make a cheaper F-mount camera to sell along with the expensive Nikon F so that people will buy more Nikkors to use with their new “budget F“. Who proposed this idea is not really clear but one thing is sure, the late Joe Ehrenreich distributed both Nikon and Mamiya in America so he probably had a hand in this decision and so the Nikkorex F was unveiled in 1962, the 2nd F-mount camera to be ever sold!
 The Nikkorex F is a solid camera despite feeling “hollow” in your hands and not as dense as true Nikons tend to be. This is due to the numerous cost-cutting decisions so materials and assembly had to be compromised in some ways. It actually feels much like a Canon 7 or a Yashica to be honest, solid cameras that feel like a tin toys due to cheaper materials and simpler construction. You’ll definitely feel that this isn’t a “Nikon” right away.
Mamiya also made this camera for other brands and one of them is the Ricoh Singlex. You can say that this is kind of a “generic camera” in a way and all it needed is the nameplate of the brand that it’s to be sold as. This makes the camera sounds cheap (well, it is) but it has several redeeming features and the biggest one is the use of the first Copal Square to be ever mounted on a camera. The Copal Square shutter is a reliable design and it a true indigenous Japanese design. It’s tough, reliable, cheap and modular so it was popular. It’s shutter design is still being used to this day in many cameras but with modern electronic governors and parts, you can say that all modern focal-place shutters are Copals and you can’t be wrong most of the time, this is how prolific the Copals are.
 The Nikkorex F cameras are cheap and you can buy several ones and make a kit-bash so you end up with a working one if you want to save money. Mint cameras aren’t cheap, it can cost you upwards of $300 for a beautiful one with box and manuals. Black ones will cost you even more and the rare German export version will cost you a small fortune! I don’t have funds for that so I revive junk mechanical cameras instead.
The features of this camera aren’t shabby at all for its time. It has speeds from 1s-1/1000s plus B, an automatic and self-resetting frame counter, a returning-mirror, an automated stop-down lever, aperture preview button, self-timer and film reminder dial. All of these sound trivial today but these were decent specs back then. The Copal Square shutter also gave it a fast 1/125s flash sync speed, the fastest for focal-plane shutters in its time if I’m not mistaken. This is a decent camera when it came to specs and handling wan’t bad, too.
 You can also buy a clip-on meter for them! These meters cost more than the cameras and it’s rare to find one that works off-the-bat like this one that I have on teh picture. Speed is coupled along with the aperture so you can easily take readings, all you need to do is set the ISO of your film and your set. Mounting the meter can be annoying because you need to do a small ritual wherein you first set the meter and lens to f/5.6 before you mate them or else you won’t get an accurate reading. Some people will disagree with this but I tried it for myself and this is how it’s supposed to work. I will make a video in the future so it’s easier for you to see what I mean.
As a user camera, this is still a good choice if you are fine with its quirks. It’s noisy and it will surely turn a lot of heads each time you make an exposure. The mirror itself isn’t all that noisy but the shutter sounds brutal with an audible “clang” each time you fire it. The camera needs more insulation inside and the shutter will benefit from a damper, too. It’s the noisiest mechanical Nikon that I have ever used and I have used all of them! This isn’t a camera that you will want to shoot with inside a theater or church, you will be shown the exit if you did.
As good as these cameras are, they didn’t sell as well as everybody hoped and Nikon will not go into a similar venture again until the Nikon FM10 (Cosina) several decades after. It left a bad impression on Nikon because it wasn’t built to Nikon-standards and it hurts the brand as a whole despite it being a decent camera that’s quite reliable. Nikon didn’t have full control over its production and design, this lead to issues with quality, reliability and finish. This little experiment did have a silver lining because Nikon took from it valuable lessons in cost-cutting and what not to do next time so it lead to the successful Nikkormat series of cameras. Reliable, tough, high-quality but affordable true Nikons to complement the flagship models and to sell to budget-conscious buyers. This practice of selling lower- end models along with the expensive flagship models still persist to this day and it began with the humble Nikkorex F.
Before We Begin:
If this is the first attempt at opening a lens then I suggest that you read my previous posts regarding screws & drivers, grease and other things. Please also read what I wrote about the tools that you will need in order to fix your Nikkors.
I highly suggest that you read these primers before you begin (for beginners):
- Essential tools
- Best practices 1
- Best practices 2
- Best practices 3
- Ai conversion
- Working with Helicoids
Reading these primers should lessen the chance of ruining your lens if you are a novice. Before opening up any lens, always look for other people who have done so in Youtube or the internet. Information is scarce, vague and scattered (that is why I started this) but you can still find some information if you search carefully.
I highly recommend that you also read my working with helicoids post because this is very important and getting it wrong can ruin your day. If I can force you to read this, I would. It is that important!
For more advanced topics, you can read my fungus removal post as a start. This post has a lot of useful information here and there and it will be beneficial for you to read this.
Disassembly (Top Panel):
Cleaning of a Nikkorex F always involve opening the top panel. The top panel is very easy to remove but you will have to be careful with one thing and I will show you what that is in this section. You will require special tools to remove the top panel like a lens spanner and some special rubber tools. You will also need very good screwdrivers for this, not the cheap ones that you buy from dollar stores. If you don’t have the tools and know-how, it’s better to just give this to a repairman. I’m not sure how much they will charge for this, it is not a main-stream camera and many people may not even know about it. Looking for a reliable repairman is hard enough but looking for one who will work on this is harder. If you bought a really cheap one or a Ricoh Singlex for spare parts, you can use it as your practice camera for you to get your feet wet on camera repair. There’s not much harm in ruining a cheap camera with dings and other defects that you purchased for parts.


(Click to enlarge)
Begin by removing these screws. Use drivers that fit these properly so you won’t strip or scar the heads. You don’t want to have an ugly camera, do you?
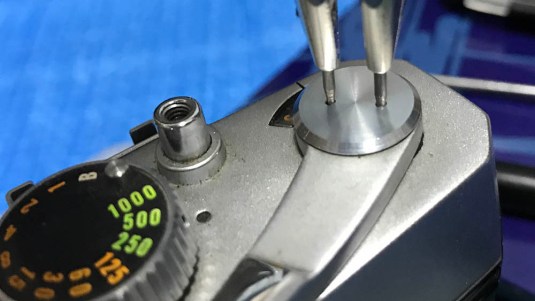 The cover for the advance lever can be removed by using a lens spanner with round bits. You can also try using a rubber pad first just in case because that’s the safest option since it won’t leave any marks. Despite being careful, it’s sometimes impossible not to leave a few repair marks on certain parts.
 You have to be mindful which direction you turn the screws and dials when it comes to a camera’s advance mechanism. Many of them turn the other way to unscrew because the whole assembly usually turns counter-clockwise when you operate it. This will prevent any of the important parts here from getting loose accidentally due to fatigue.
 You can now remove the advance lever and its spring.
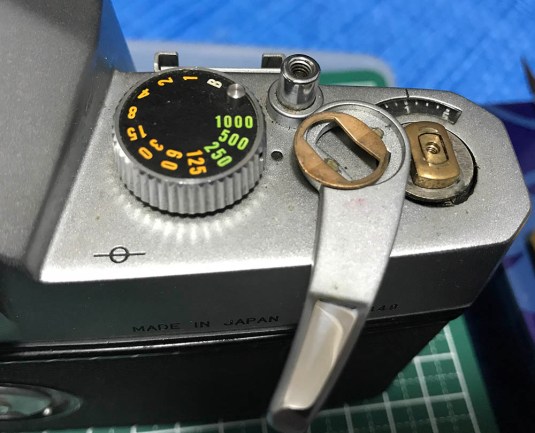
 The shutter speed dial can be removed by unscrewing these set screws. They can be hard to remove at times and you will need to apply some alcohol to help soften the seal. These can also break quite easily so use drivers that fit the slot perfectly to prevent snapping a screw or stripping the slots.
 Here’s how it looks like underneath.
 Removing the rewind crank is easy, just jam a piece of wood on the fork and turn the dial using the lever until it comes-off.
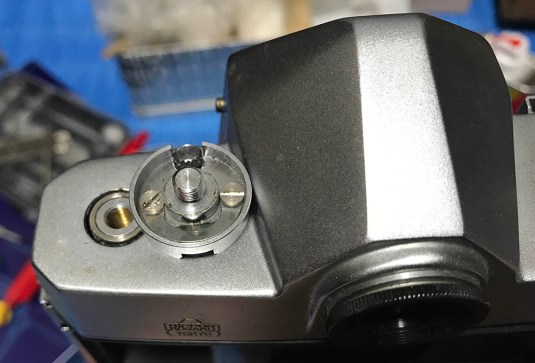 Be sure not to lose any shims or washers underneath the rewind dial assembly. You can now remove the top panel. Carefully lift it with your hands and don’t force it if it’s stuck. Maintain steady pressure and it should come-off easily. You can also remove the eyepiece just in case so it won’t catch anything while you lift the top panel from the camera.
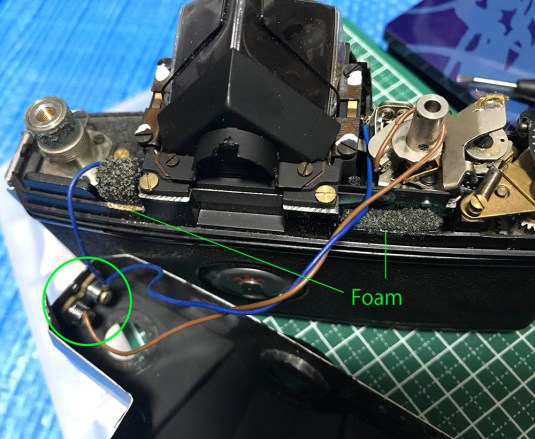 As soon as you removed the top panel, separate the wires from their sync terminals and you won’t damage anything when you accidentally pull any of them. Replace these thick foam dampers, mine were desiccated and all I had to do is blow these away to bits using a bulb blower. These serve as light seals and they also muffle the sound of the shutter to some extent. I was contemplating on using a few strips of velvet but the loose fibers are troublesome so I used masking tape instead. I know that this won’t help with easing the sound of the shutter but it is better than using a few strips of foam that can turn bad in the future.
 Here’s a closer look at the terminals so you will know which wire goes where. Loosen the fasteners and you can separate the contacts from the terminals. There’s foam around the opening for the rewind crank’s base. You should replace this using the proper material so light and dirt won’t get inside the camera.
 Clean whatever loose bits you have very well. The telescoping tubes at the middle of the dish is the plunger assembly. It can drop to the floor as soon as you remove the top panel so be careful. The decorative dial for the shutter speed selector is simply glued to it and it can easily be removed when you soak this part in solvent or alcohol for too long.
That was easy, there’s not a lot of things securing the top panel and it’s easy to remove all of the parts securing it. This is the first step to repairing this camera, most problems can be diagnosed and repaired from this area. Opening the bottom will also help you do that and I will show you how to do that next time.
Disassembly (Optics):
You will most likely need to clean the optics of your camera and I will show you how it is done in this section. It can be a delicate task but just follow my lead and you should be ok so don’t worry.
 The eyepiece assembly can be removed as a single unit after you unscrew these.
 Remove it for now and set it aside in a safe place while you clean the rest of the camera.
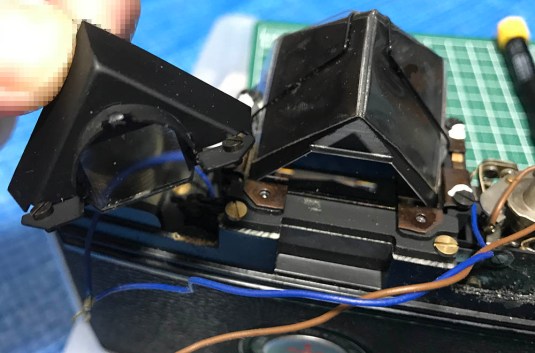
 A bent wire is used to secure the prism, un-hook one end of the wire so you can remove it. Be careful not to scratch the prism when doing this, there’s a plastic cover protecting it but don’t count too much on that.
 Make sure that you don’t bend this thing out of shape!
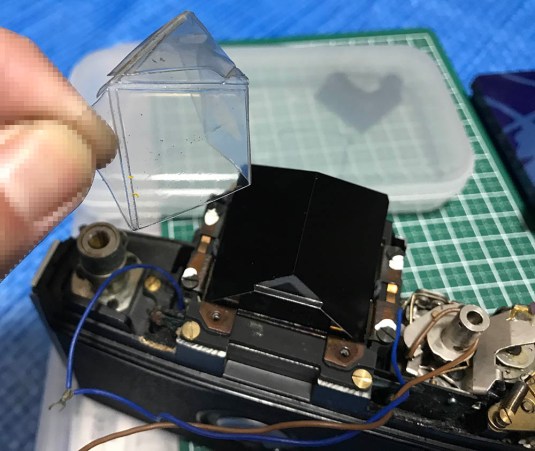 The plastic cover is beautiful, I wish all Nikons came with something like this! The prism is protected from nasty old bits of foam by this cover.
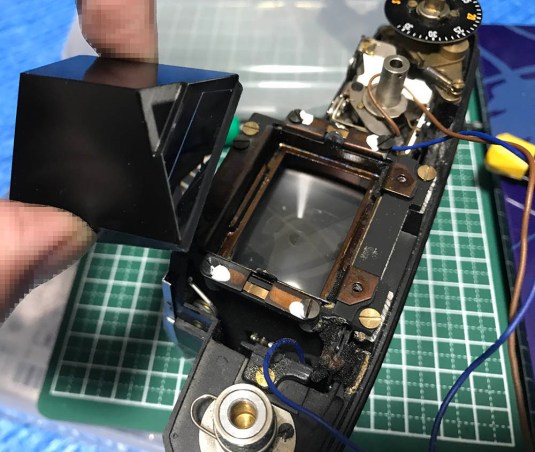 Pick the prism off using your fingers and clean it properly. Store it in a safe place just in case so you won’t scratch it accidentally.
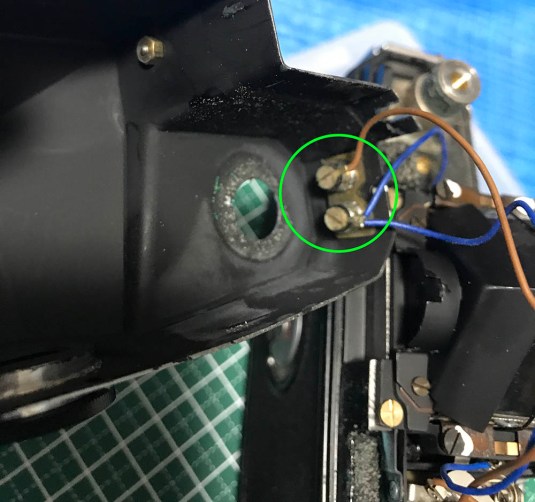
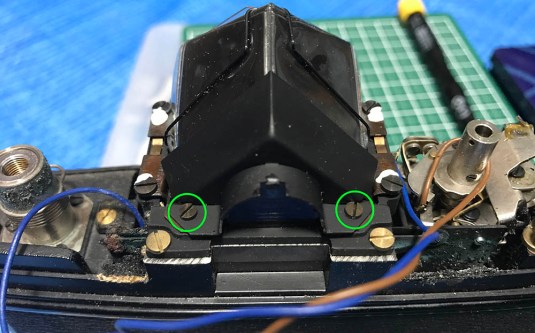
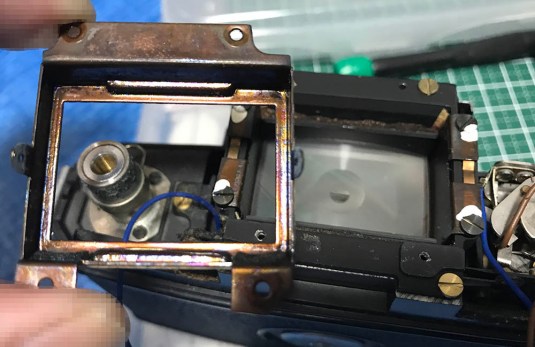
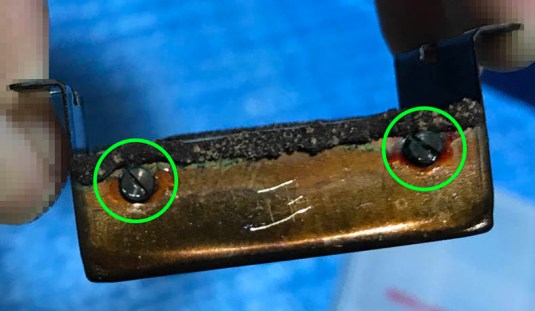
 You can remove the basket for the prism by unscrewing these (green), the 2 other screws at the rear were removed earlier when we removed the eyepiece assembly. Do not touch the screws (red), these were set at the factory and are used to calibrate the height of the prism! Instead of using shims, it only relies on how many turns are needed to adjust the height of the prism, this saves time and money so Mamiya can make these very cheaply.
 The basket frame can now be removed. Clean any bits of foam from it before you put the thing back later.
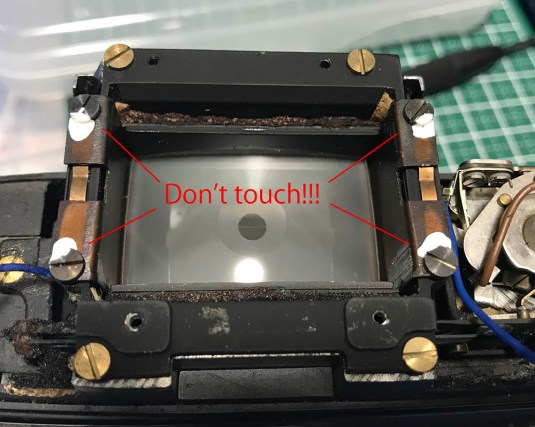 Again, never tough these things unless you have to! If you must, measure the space using a set of feeler gauges so you can put it back at the approximate height that was set at the factory. You can adjust it yourself later if you want but it won’t be easy. I’ll teach you how to do it later but my method won’t be precise, it’s still better than nothing.
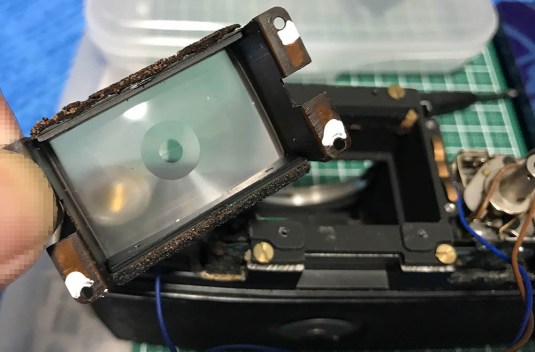 My focusing screen and its condenser lens are both riddled with fungi so I had to remove this frame. There’s no way for me to remove them unless I do this.
 Be sure that you don’t lose these springs, it’s hard to find replacements for these.
 These screws secure the focusing screen and its related parts. Loosen these so to remove them. Note that I wrote the character “正” so I will know which side should be facing the front later when it’s time to put this back. Clean all of the dirty bits of foam from this and make sure that you don’t leave any nasty bits remaining just in case.
 This is how everything looks like once you dismantled it. Do note forget to put these back facing the right direction. Their order is also very important, I’ve forgotten how it should exactly be but my guess is that the focusing screen should be at the bottom and then the shim should be at the middle then the condenser lens at the top. The condenser is made of glass and you can clean it with alcohol or naphtha. The focusing screen is delicate, it’s made from acrylic and the fresnel (rough) side is easily-scratched. You clean it by using a soft lens tissue with warm water and soap. Alcohol is also OK but be sure to chase it with water so it won’t damage the screen.
Remove as many bits of foam as you can, open the bottom so any bits of foam will drop to the floor instead of settling inside the camera and cause a jammed shutter. This is all you need to do as far as cleaning the optics of your camera goes.
Conclusion:
That all seems easy, right? This camera was made to be cheap so it’s easy to open it up for cleaning. Repairing the shutter is another issue and I will not cover it in this article but I will see if I can make a video about it in the future. Before you call it a day, you will have to do some more things before you close you put the top panel back.
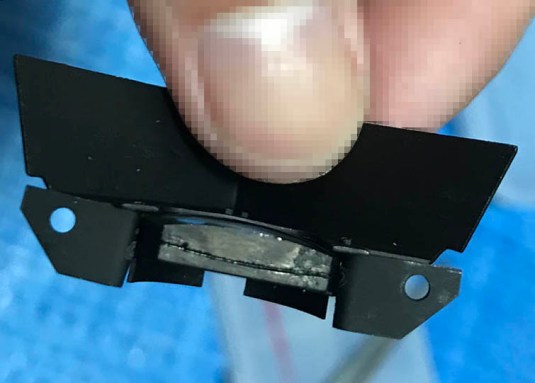 The eyepiece condenser is made up of 2 cemented elements. Do not clean this using any solvent or alcohol because doing so may damage this permanently. It’s easy to remove it as it’s just wedged into its housing.
 Remove and clean this very well. Don’t forget to put it back facing the right direction!
 Wow, see how clean it is now? I know the electrical tape approach looks cheap but this is what I did here as I don’t want to deal with any of that nasty foam again. You can try the stiff black card boards if you want, that’s still much better than foam in the long run.
 The Nikkorex F can be a handsome camera if you use it with a nice-matching strap. Many people turn their heads just to see what I am using or is it because of the pink strap?
Putting back the top panel is easy, you just follow your steps in-reverse and that’s all to it. This is an easy camera to tinker with and you won’t spend much time cleaning one until you have to open the camera further and work on the mirrorbox. We’ll get to that on the next part so please come back and see how it’s done. If you liked this article, please don’t forget to share this with your friends or consider supporting the blog. Your support will keep this blog afloat. Thank you guys again and see you next time for part 2, Ric.
Help Support this Blog:
Maintaining this blog requires money to operate. If you think that this site has helped you or you want to show your support by helping with the upkeep of this site, you can simple make a small donation to my paypal.com account (richardHaw888@gmail.com). Money is not my prime motivation for this blog and I believe that I have enough to run this but you can help me make this site (and the companion facebook page) grow.
Leave me some tip?
Thank you very much for your continued support!
$2.00
Helping support this site will ensure that this will be kept going as long as I have the time and energy for this. I would appreciate it if you just leave out your name or details like your country and other information so that the donations will totally be anonymous it is at all possible. This is a labor of love and I intend to keep it that way for as long as I can. Ric.

4 Comments (+add yours?)