
Hello, everybody! It’s getting cold now and the walls can get moist at times due to water droplets forming due to precipitation. While the air is generally dry around this time, it’s easy for fungus to form because of the said water droplets. You won’t know what’s there until you remove the furniture and see what’s under it. The same thing goes for cameras and clocks and I will show you once such camera today.
Introduction:
We’ll continue with our Nikkormat FTn series with this article. In part 1, we saw how the steps on how to remove the top cover properly. In this part, I’ll show you around what is inside of the top cover. Most, if not all Nikkormats require some work here so this is very important. There are a few articles online outlining what’s going on here but here’s what I do and I hope that I will make a better article.
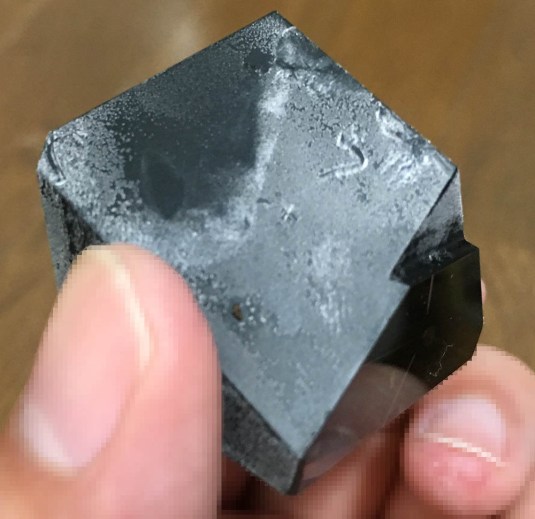
 Yuck, this is not my idea of a white Christmas! The good thing is it’s localized to this thing only and the other important things seem OK.
I am showing this video to you again in case you missed it last time. Please watch this as it contains plenty of useful tips when looking for a used Nikkormat FTn.
Before you start working on your camera, be sure that you have the right tools including a soldering bolt, flux, solder and other stuff. You will be dealing with electronic stuff here so be prepared. I won’t be responsible if you burn yourself so only tackle this if you have experience working with electronics! With that being said, let’s start.
Before We Begin:
If this is the first attempt at opening a lens then I suggest that you read my previous posts regarding screws & drivers, grease and other things. Please also read what I wrote about the tools that you will need in order to fix your Nikkors.
I highly suggest that you read these primers before you begin (for beginners):
- Essential tools
- Best practices 1
- Best practices 2
- Best practices 3
- Ai conversion
- Working with Helicoids
Reading these primers should lessen the chance of ruining your lens if you are a novice. Before opening up any lens, always look for other people who have done so in Youtube or the internet. Information is scarce, vague and scattered (that is why I started this) but you can still find some information if you search carefully.
I highly recommend that you also read my working with helicoids post because this is very important and getting it wrong can ruin your day. If I can force you to read this, I would. It is that important!
For more advanced topics, you can read my fungus removal post as a start. This post has a lot of useful information here and there and it will be beneficial for you to read this.
Disassembly (Upper Parts):
If you are lucky, most of what you will need to do will only have to involve what’s under the top panel. If you are working on a Nikkormat FTn or any camera from that family it’s almost certain that you should at least clean or replace the foam on this area. Most of the cameras you will get are neglected and stored in terrible conditions so they usually have fungi in the prism and focusing screen. Cleaning the optics of the Nikkormat FT series of cameras is always a pain so I try to avoid cameras with dirty screens if I can. Repairing a broken light meter is also one of the things that you can do here and I will show you how to do it in this article. Before we begin, I would like to say that this is something that’s not going to be suitable for beginners to do as their first project, you will need the right tools and know-how to do this properly. If my warning won’t stop you from experimenting on your camera then at least do it as carefully as you can and don’t expect too much from it since it’s your first job. Also expect that you may damage your camera in the process and your camera can end up in a worse state than when you started. If your camera needs to be repaired, please bring it to a repairman and just pray that he is competent.
 Be careful not to pull the flash sync wires, it’s best to desolder them while you’re working on the camera then solder them back again later before installing the top panel back. See the moldy prism? That’s what happens when a camera was stored in a humid place like a dark cellar. The mold won’t eat-through the paint but it will eventually when left like this for a very long time and cause desilvering of the prisms as it breaks-down the paint and lifts aluminium or silver used to make the prism reflective. This problem is common for many used Nikkormats so make sure that the prism looks clear or just a bit dusty since a prism that shows irregular black specs is a sure-sign of desilvering.
 The prism block itself is secured by 2 things, a pair of braces and a pair of springs. These springs are tough to remove and reinstall, I hate these things but they make for a secure and snug fit. Before removing the prism block it’s better to remove the eyepiece first and I will show you how to do it.
To remove the eyepiece assembly, remove the circuitry that’s screwed on top of it first by removing its screw. Never tighten this screw too much because older PCB substrates can be brittle and crack. Be careful with the wiring harness and be sure that you don’t pull it too much and break something.
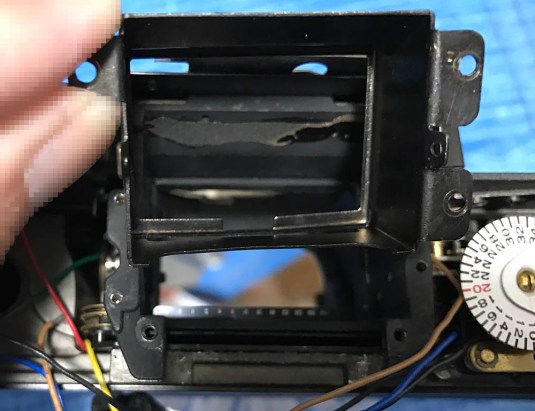
 The plastic housing for the eyepiece can be removed after you removed the 2 screws that are holding it down on both ends. There are shim washers underneath them so don’t lose these because they’re needed to make sure that the eyepiece is positioned at the correct height. Underneath the housing you’ll find a strip of foam that’s used to seal the shutter, I usually replace these things specially if their desicated. These are used as light seals and also keep dirt away from the shutter. When these things get corroded, bits of foam can be stuck in the shutter mechanism’s cogs and moving parts and result in a bad shutter. Once the old material is gone, blow away the old material that got loose. Removing the bottom will ensure that the bits of old foam will simply fall-through the opening. Never use any form of canned air as they’re too strong and you may accidentally blow the dirt to places where you can’t access and this will require you to open the camera even further. Note that the camera you see here is different and its prism block looks OK.
 Clean the condenser lenses for the metering cells using water and alcohol, they’re made from acrylic so solvents will craze them. The optics of the eyepiece are made of glass and you can wipe them clean using a Q-tip saturated with solvents or alcohol. Do note that it’s a cemented block so be careful not to damage the cement. I also replaced the foam and I stuck it to the bottom part of the housing instead of the space on top of the shutter. It’s to prevent this strip of foam from fouling the shutter and it’s easier to clean it like this than having to scrub the metal parts of the shutter. I sometimes use a strip of black electrical tape instead as that won’t corrode into bits. Use whatever you’re comfortable with.
 The prism block can now be easily removed after removing the 2 braces beside it. Store this in a safe place while you clean the rest of the camera. You can clean this by wiping it with alcohol and solvents but don’t scrub too hard or you’ll damage it.
 This is what you’ll have at this point. Make sure that the resistors are safe and don’t ever damage them since these fixed resistors were hand-selected at the factory to match what resistance was needed. I forgot to tell you but it’s a good idea to cover the shutter with a card to prevent any damage just in case.
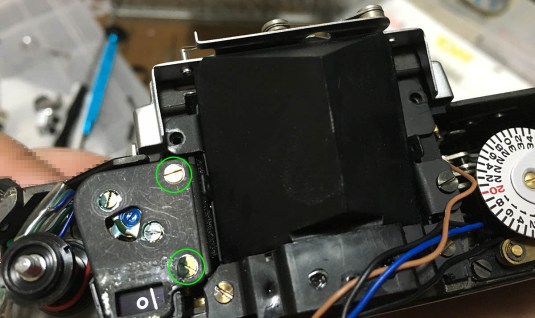 The basket for the prism block doesn’t have to be removed but there are cases when you will want to clean it, too. There are foam seals around it and they can get corroded, too. I rarely remove the basket these days as they require too much time to remove and install but if you need to remove yours then you should first remove the galvanometer housing. The needle and its bracket (with the +/- sign) is in the way and removing the basket while the needle is still there is obviously never a good idea. Remove these screws to pull it out, removing the column for the rewind mechanism will help you pull the galvanometer out easier. Unscrew it until it comes off, it can be tight but it’s not impossible to remove.
 Once the obstructions are gone, you can remove the focusing screen and its condenser in a safe way. You will have to be careful not to damage this strip of acetate. It has numbers printed on it so you’ll know which shutter speed you’re at, it is sandwiched between the focusing screen and the condenser lens. You can remove the basket without harming this if you’re careful, flip it up using a pair of plastic tweezers while you carefully extract the basket. This plastic strip has a length of thread sown-through it and you can easily pull or push it so it’s off-register. If that happened, simply pull one end until you get it right. Use a pair of plastic tweezers for this to prevent damage.
 Here’s what’s at the bottom of the basket, from left-to-right you have the condenser lens, the frame mask and the focusing screen. The condenser lens is made of glass so clean the condenser lens like you would any glass lens. The frame mask is a little delicate, wipe the metal parts with alcohol and be careful not to scratch the clear parts. The most delicate part here is the focusing screen that you find at the bottom-most layer of the assembly. It is acrylic and you never clean the fresnel (rough) side of it. Clean the smooth side using a mild lens cleaner and use 3M Magic Tape to clean the fresnel side by sticking the tape to it and then pulling the tape off so any dirt will stick to the tape. The fresnel is very easy to scratch and a scratched screen is annoying because you can see it at the viewfinder. Note their position so you’ll know how to put them back again later, there’s a ledge at the edge of the focusing screen and that’s where the plastic strip with the numbers should be.
 Here’s the most delicate operation of this whole article. There’s a space at the rear end of the basket and that’s where the plastic strip should pass-through. I am sure that there’s a smarter way of doing this such as undoing the thread to make it even safe for you to get the basket off but that’s beyond the scope of this article. By the way, there are 3 washers underneath this thing and they’re all located under the screw holes. Don’t lose any of the washers because they’re also shims and they’re crucial for your prism to achieve perfect focus. If the shims are gone or replaced with different ones with different thicknesses, it will easily be apparent because your focus will be wrong no matter what you do.
Clean whatever you can access very well, make sure that all parts are moving smoothly and all spring-loaded parts move effortlessly. You can choose to remove the film counter mechanism and clean what’s underneath it but I will not show you how to do that in this article. If you need to fix this part then you will have to read my Nikkormat FS article, I’ll show you what can go wrong there and how you can fix it.
Conclusion:
Part 2 is kind of short because I only needed to fix a few things in this camera. The good news is the majority of the Nikkormats that you will find will have problems that can be addressed in this article. Before we wrap-up this article I would like to show you some of the things that I usually do to these old cameras to make them function properly again.
 These are salvaged parts that I got from a junk Nikkormat FTn, these parts are still good so I bought the camera despite being in terrible shape. These cameras are all old by now and the only way to keep them going is to do transplants. The good thing is these are not expensive and can usually be had for a few dollars, they’re also abundant but that won’t be the case a few decades after.
 It’s easy to put things back, just back-track until you re-install everything.
 Mount a lens (preferably a bright 50mm) and then check and see if the meter is correct. I use another Nikkormat FTn that I know to be accurate as reference and then use a DSLR to counter-check my results. This is far from exact but this is the easiest way that I know. When you use th proper 1.35v batteries you should get a reading that’s not too far from acceptable. Simply adjust the claw inside this hole up or down to modify the position of the needed. This isn’t the recommened way to adjust the meter but it will do for now, the right way is to adjust it through the variable resister at the front and altering the position of the brush. This is too time-consuming and replacing fixed-resistors is a pain so this is what I do instead as a quick fix. I will show you guys how to convert these so you can use standard 1.5v batteries instead of the expensive 1.35v ones and you won’t need to use the expensive MR adapters. Just wait for my article and I will show you how it’s done.
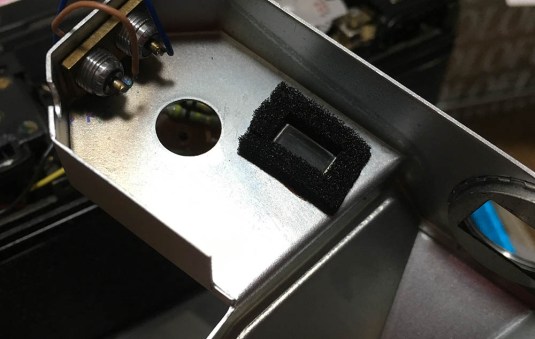 Re-solder the flash sync wiring to their respective terminals and don’t forget to replace a square patch of thick foam around the top meter window. This will prevent light leaks so it’s important that you replace this with fresh material.
Blow some more air to make sure that it’s as clean as possible before you reinstall the top cover. I will mention it again, remove the bottom cover so the dirt will simply drop to the floor instead of just hanging around inside the camera. Also be careful with the wires on the top part of the prism, they can get impinged so the top won’t close properly and push on the PCB wafer and the pressure is enough to crack it. I guess that’s all for the top now, I will tackle this part more in the coming articles and on different Nikkormat FT models. They’re all very similar around this part so what works for one will usually work for the other models. I will make articles for ALL manual Nikkormat models so be sure to follow this series!
So, did you enjoy part 2? Are you sad because you think that this is the last part? Don’t be sad because we still have a lot to discuss about this camera and I’ll show you more things that you can do to fix these so your Nikkormat FTn will work properly for more decades to come. If you liked this article, please share this with your friends or support this blog. I will continue to write quality content for all of you and I need your help to continue this. Thank you very much and have a happy new year! Ric.
Help Support this Blog:
Maintaining this blog requires money to operate. If you think that this site has helped you or you want to show your support by helping with the upkeep of this site, you can simple make a small donation to my paypal.com account (richardHaw888@gmail.com). Money is not my prime motivation for this blog and I believe that I have enough to run this but you can help me make this site (and the companion facebook page) grow.
Leave me some tip?
Thank you very much for your continued support!
$2.00
Helping support this site will ensure that this will be kept going as long as I have the time and energy for this. I would appreciate it if you just leave out your name or details like your country and other information so that the donations will totally be anonymous it is at all possible. This is a labor of love and I intend to keep it that way for as long as I can. Ric.

Feb 04, 2019 @ 21:23:58
Oh man, I’m so waiting to read how you lift the film advance plate so I can get to the underside pawl on the wind shaft………(under the frame counter, under the protection stack). I’ve tried to figure out the assembly sequence so I’d know how to disassemble and this is a mystery – maybe pull off the front of the camera and start by taking out the self timer mechanism? Oh please say there’s another way!
Mar 16, 2021 @ 10:38:30
It could be useful to show how take off the F mount, to clean the (if corroded) surface of the speed indicator which causes jumpy meter.
Mar 16, 2021 @ 11:12:29
Tom,
I’ve done this (twice now), the sequence is to set the shutter speed to either 1/1000 or B (one extreme or the other), remove the fasteners as they’re encountered, and keep track of the relationships of parts as you find them. It’s fiddly because of the auto-indexing (“Nikon Twist”) mechanism. There is a circumferential spring and latch mechanism that you have to pay attention to so that it goes back together as found, and if you don’t keep track of the shutter speed dial then the indexing with the mechanism and with the display in the VF won’t line up.
Meanwhile, I still have to figure out how to non-destructively remove the film advance plate – – – I’ve in the meantime learned how to deconstruct the rest of the camera….
Apr 27, 2021 @ 18:54:24
I have fixed my FTn. I needed to walk away for some months, periodically coming back to it hoping for an inspiration. At one point I opened the camera up, that is took out the mirror box,and found no problem. In the meantime I found out how the mirror and shutter mechanisms coordinate. It also gave me a chance to clean (with isopropyl alcohol) and lubricate (with the tiniest amounts of naphtha).
And then I noticed in the technical drawings that the screw at the top of the sprocket shaft is reverse threaded. Righty Loosey. With that, and the top of the camera already disassembled, I removed that screw (soaked with isopropyl alcohol first to loosen any glue or other restricting crud) and the collar underneath. Mirror box was already out so I took the small triggering bracket off the shutter release shaft. And now it was no problem to lift the advance plate (the shiny one with gears and a one-way ratchet on the underside, linking the take-up spool to the sprocket shaft. Here I found no obvious problem but on cleaning those gears with isopropyl I dislodged the tiniest piece of grit from the point at which the gears would no longer pass. Here was the problem that prevented me from winding film/cocking shutter.
The gear train was cleaned and lubed (as above) and the camera reassembled. I still have the front leatherette to re-install, along with a battery, but the film advance and shutter are all working just fine now.
Thanks for the inspiration to not cave in to the complex mechanical device. It took awhile, but this instrument – my first SLR, bought new in 1974 with savings from a summer of minimum wage jobs – will now return to regular use.
Sep 08, 2021 @ 18:05:10
Hello bro, thank you very much for sharing your experience in Nikomatt ftn maintenance. I encountered a problem that I couldn’t find similar faults on the Internet. Sometimes my Nikomatt ftn would have a problem. It will not appear every time I use it. When I pull the wrench and automatic rebound, the mirror and shutter would be driven directly. After that, wrench would be stuck. Then I need to press the shutter button to release, it will return to normal and I can pull the wrench again, take photo fine. what should I do, thank you so much
Jun 04, 2023 @ 15:21:08
Hi Ric, I just got a Nikomat from ShopGoodwill dot com and everything appears to be in good working order…except the light meter. I’ve replaced the battery and it doesn’t respond to any light, no matter how much. Seeking a fix brought me to this site. Thank you so much for this information!
Question after reading this article: is the (most likely) fix for a broken (unresponsive) light meter cannibalizing a working light meter from another Nikomat FTn? Or, is the cleaning of the condenser lenses you recommend (“Clean the condenser lenses for the metering cells using water and alcohol, they’re made from acrylic so solvents will craze them.”) likely to help? Thanks again and thanks in advance.
Jul 29, 2024 @ 02:07:47
I also have a Nikomat FTn that works perfectly but what happened is the shutter speed indicator thread has frayed over the years and snapped right where it passes through the acetate strip. Short of replacing the whole mirror box, I can’t find any information on how to replace the thread or where to get another acetate strip. I have it disassembled right now and have access to the rollers but the thread is so thin and the holes in the acetate are so small as to need an opthalmic needle to pass through it. Any suggestions on this problem? Thanks!