
Hello, everybody! I am pleased by the current development in the photography industry. The big boys have showed their mirrorless cameras and now even the small players are also in the game with Panasonic entering the elite club as well. Cameras has never been this advanced since they were made more than a century ago and it’s amazing what they can do these days. I sometimes feel intimidated by all the technology and I yearn for the simplicity of older manual camera. Being a Buddhist, I sometimes search for the “Zen” in my cameras and by that I mean having only the essential features available to me. That’s going to make me more creative because I think less about the gear and more into what goes on into making a picture. This is how I connect to the Buddhist concept of the being in the “present moment”. Today, I am going to show you such a camera that can help me with my “photography meditation” and how having less will yield more or better results.
Introduction:
The Nikon EM debuted in 1979 and it was designed to be cheap, easy-to-use, compact and light. At that time, Nikon’s cameras were mostly made of metal and were big, heavy and a bit difficult to master for beginners and women. I know that the inclusion of “women” in my last statement would cause many people’s eyebrows to raise but that was the 1970s, a different time with very different values. It was perceived that women and beginners in those days wanted a cheap, compact and user-friendly camera to take along with them. I think this is still true to this day for a portion of the said market segment to some extent regardless of gender, some people just wanted a simple camera that “just works” and the initial cost of acquisition is also very important for this market segment. Needless to say, the Nikon EM was a huge hit not only for the people that it was intended to be sold to but also for more advanced photographers who just want a small and light setup to bring as part of their travel kit. To be honest, I enjoyed using this camera a lot and I didn’t notice that I was using a cheap entry-level camera at all.
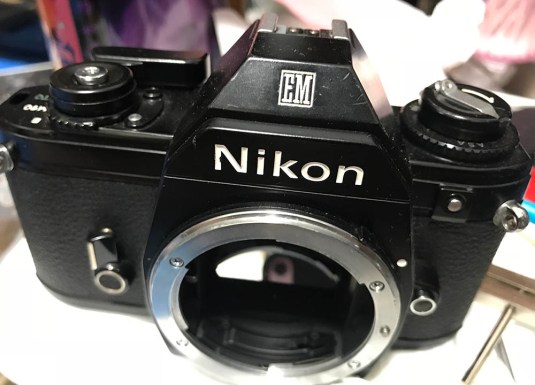 I got this from the junk section of the camera bazaar. These cameras have issues that are common to this particular model and I will show you some of them here in this article. I got this for ¥1,000 or less that $10.00 and I thought that it would make a good camera for this repair article because the meter is still working despite the needle being stuck. I will also teach you how to check Nikon EM’s so you’ll know and avoid problems that are too much to bother with. Choose your own battles and you will win all the time as they say.
The Nikon EM was embraced by many people and it was called “Little Nikon” or at times, “Nikon Junior” by its fans. Its features are rather basic, I will outline them below.
- Simple aperture priority (A) automatic mode (step-less), controlled by the meter.
- 1s to 1/1000s shutter speeds (with needle read-out inside the viewfinder).
- A traditional 6-/40 center-weighted metering pattern.
- A traditional Nikon K-type focusing screen.
- Bulb and M90 modes as back-up where the metering is de-coupled.
- It beeps when the shutter speed reading is beyond its range or if it’s too slow.
- A simple +2EV compensation button for back-lit scenes.
- A simple (and crude) motor drive in the form of the Nikon MD-E.
- Polycarbonate shell over a tough alloy frame, the same alloy used for the Nikon F3.
- TTL flash metering. The Nikon SB-E was made to be used with the Nikon EM.
- A battery-check LED that’s operated by a button.
- A coupling “feeler” within its mount to communicate the focal length of the lens.
- Ai-interface for easy metering with Ai and Ai-S lenses.
- Uses 2 common 1.5v batteries.
These are the bare-minimum that makes a decent film SLR in those days and I also think that it’s still more than enough these days. Some people thought that it was too-basic and so the Nikon FG series of cameras were made to address this. It’s basically a Nikon EM in essence but it has more advanced features like M and P modes to go along with the usual A mode.
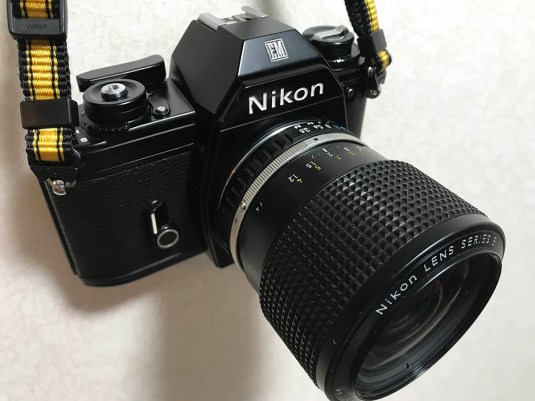
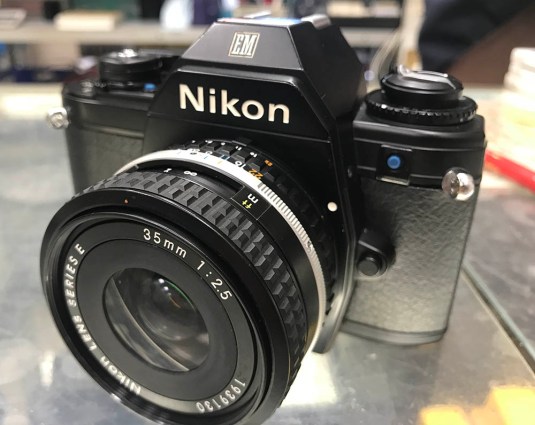 This is an early model Nikon EM, it has a different faux-leather pattern and really tacky blue buttons as opposed to the shiny metallic ones on the standard model. The lens here is the Nikon 35mm f/2.5 Series E, it is one of the lenses that were made under the Series-E brand name to complement the Nikon EM during its debut. Series E lenses were made as cheap as possible but still retain a decent-enough performance to impress first-time SLR users so the sharpness and contrast were rather high but the trade-offs are lower overall resolving power and somewhat “harsh” lens characteristics compared to true-blue Nikon Nikkors. They are decent lenses and many pros used them such as Galen Rowell and his Nikon 75-150mm f/3.5 Series E. These lenses have a strong following to this day and some people will pay more for them over Nikkors because of internet-hype.
 The Nikon EM (and its related cameras) is the smallest 35mm SLR from Nikon, it’s smaller than Nikon’s smallest 35mm DSLR – the Nikon Df. When you put these two side-by-side it’s nearly 1/3 the mass of the Nikon Df and that’s a really small camera. Pair it with a smaller lens like the Nikkor 50mm f/1.8 Ai-S and you got a setup that can fit inside your pocket.
 Even the littlest of Nikons has its own dedicated motordrive. The Nikon MD-E was made specifically for the Nikon EM (along with the Nikon SB-E flash). It makes your setup a bit chunkier and easier to hold but the main reason to get one is because it can advance the film automatically after each exposure. I like using this setup because it makes the whole thing feel “complete” for a lack of a better description.
Judging how a film camera works is pretty simple. Unlike digital ones, you’ll only have to see how well it meters (if it has one) to see if its metering is up-to-snuff or no good at all. Testing autofocus cameras is more involved since you’ll need to zoom-in and see if your picture was focused properly or not. Thankfully, the Nikon EM is a simple electronic SLR with none of the advanced features of its era. The pictures I am about to show you were all shot with Fujifilm Industrial 100. A caveat before we preceed, my camera’s meter is a bit out-of-spec and it’s metering +1EV consistently when compared with my Nikon DF. It’s probably OK because reversal color film loves to be over-exposed (usually) but to make it easier for me, I compensated it by -0.3EV because I know how this film behaves. I should have adjusted the meter while I can but that never got into my mind so I’ll just leave it as it is, color reversal film is usually very forgiving with exposure mistakes anyway.
 Exposure was spot-on, it’s very predictable and you can just trust the camera to guess the exposure for you. I just let the camera do its thing for me and it worked worry-free. Her skin was perfectly-exposed, I was worried that the meter would prevent the highlights of her hair from blowing-out but the 60/40 center-weighted metering saved the day because the bright part is just outside the circular patch where the meter would favor its reading.
 Shots like this where there’s the sky covering a large area of the frame can fool the built-in meter of most cameras but the meter of the Nikon EM got it correct in this shot.


(Click to enlarge)
During cases when the meter did indeed give suspicious readings because of strong back -lighting, you can correct that somehow by pressing a small button at the left of the body and it will give you an extra +2EV compensation. I did just that in the 2 pictures above, it was so predictable that I knew what the results would look like if I pressed that button.
So, do you want a Nikon EM now? Of course, you do! Before buying one, please watch my video below to help you test your potential purchase and see if it’s worth repairing or not because some problems are best avoided and isn’t worth the effort at all.
I hope that you enjoyed the video and hopefully learn something from this because you’ll find this video useful for similar cameras from other manufacturers, too. The price of an excellent-grade Nikon EM is probably around $70.00 and you can get them for much-less than that for one in well-loved condition, they are also plentiful so you don’t have to buy the first one that comes your way. Just let the deal come to you instead.
Did I get you excited? I think that everybody needs to own a Nikon EM just for the sake of having one. It’s a piece of history from a much simpler era where people complain about simple things and were satisfied by equally-simple rewards. Re-live those days and know how it feels to be young again, maybe the Nikon EM’s really a time machine in-disguise. I am now getting too nostalgic, let’s now begin with the repair article.
Before We Begin:
If this is the first attempt at opening a lens then I suggest that you read my previous posts regarding screws & drivers, grease and other things. Please also read what I wrote about the tools that you will need in order to fix your Nikkors.
I highly suggest that you read these primers before you begin (for beginners):
- Essential tools
- Best practices 1
- Best practices 2
- Best practices 3
- Ai conversion
- Working with Helicoids
Reading these primers should lessen the chance of ruining your lens if you are a novice. Before opening up any lens, always look for other people who have done so in Youtube or the internet. Information is scarce, vague and scattered (that is why I started this) but you can still find some information if you search carefully.
I highly recommend that you also read my working with helicoids post because this is very important and getting it wrong can ruin your day. If I can force you to read this, I would. It is that important!
For more advanced topics, you can read my fungus removal post as a start. This post has a lot of useful information here and there and it will be beneficial for you to read this.
Disassembly (Top Panel):
For most problems afflicting the Nikon EM, all you have to do is to open to top panel and see what’s going on. A stuck meter needle can be fixed without opening this so use your better judgement to figure out if you need to do this or not. Adjusting the camera’s meter, cleaning a dirty ISO FRE, fixing a bad speaker, cleaning the advance mechanism and also fixing the frame counter will all require you remove top panel at the least. It’s easy to get this done but you will have to be careful not to crack the polycarbonate shell. For plastic cameras and lenses, remember never to over-tighten screws and also to carefully replace the screws or else you will ruin the plastic threads. An easy trick is to first turn the screw in-reverse over the hole and feel for the threads to mesh before you screw them in using the correct direction for tightening. To prevent you from damaging the shutter, tape the shutter aperture over with a piece of cardboard. Don’t leave any batteries in the camera, you may short something and that will be the end of your Nikon EM!
 Removing the advance lever assembly is easy. Loosen this set screw but don’t remove it.
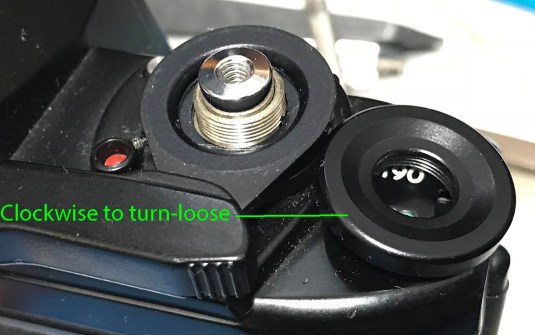 Once the set screw is loose, use a rubber cup and unscrew this collar by turning it to the right. This is a left-hand thread, many cameras have left-handed threads on this part of the camera so they won’t accidentally turn-loose.
 The advance lever can now be easily removed.
 Remove the rewind fork by using a wooden or plastic object to jam the fork and turn the rewind knob (to the left) to unscrew it. Using a metal dowel will scar the fork so I use soft materials like wood to prevent that from happening.
 It may be tight at first but you should get it off with no prolems at all.
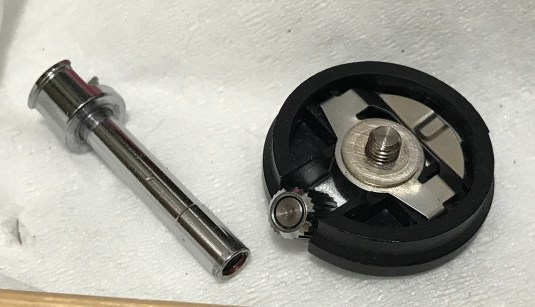 Here’s how it looks like after dismantling.
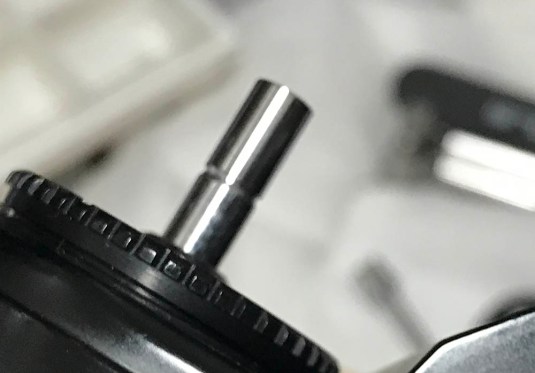 Pull this tube out of its hole and not which side should be facing up.
 This circlip is a pain to remove but I have a circlip plier and it came-off easily. If the back cover is closed, you will have a hard time opening it without the proper tool. See the tab inside the hole? Use a hook fashioned from wire and pull on the collar below it and you should be able to open the back. It can be hard to illustrate here but just observe how the mechanism works while the film door is open.
 The ISO dial can now be easily removed once the circlip is gone. It’s made of plastic and it’s easy to ruin this part so be careful when handling it.

(Click to enlarge)
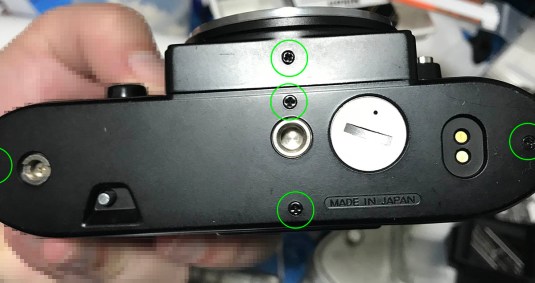
Remove all of the 6 screws from the top panel, I only showed 5 in the pictures above but I am sure you’re going to find them all easily. Note that the 2 screws at the front are longer than the rest so don’t put them back into the wrong hole.
 Carefully pry-open the top panel with your fingers until it’s open. The plastic will flex but you should still be careful not to crack it. Use even and steady pressure to lift it up, I lift it up from the back until it’s a bit loose then I continue with the front.
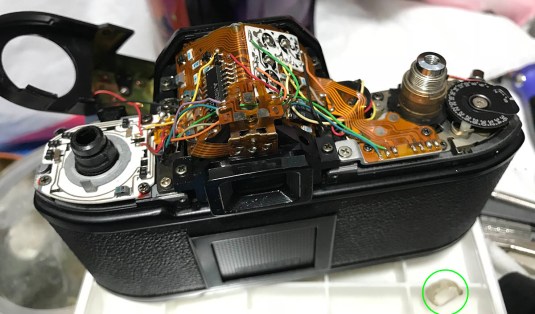 Gently remove the top panel so you won’t harm the soldering job. The speaker is glued to the top panel under the prism cover so be careful not to pull too much and damage it. It’s also worth mentioning that some things may fall from inside the camera just like what is high-lighted in this picture. It’s the cover for the film counter and it will be replaced later after I am done.
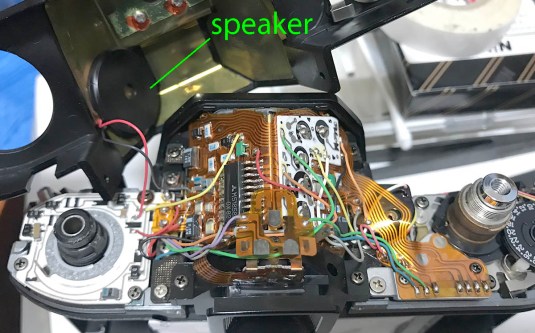 This is the annoying speaker that beeps when your exposure is beyond what the shutter can handle. I’m sure somebody killed this permanently but we’re not going to do that. It can be easily removed without harming anything by saturating the contact surface using alcohol to soften the adhesive film underneath it. It should come-off rather easily after a few minutes when you pick on it with your nails. You can see the potentiometers here in this picture (over the prism). You turn the resistor at the top-right corner to calibrate the meter and the turn the screw on the galvanometer to adjust its swing but I would never recommend you doing that because that rarely needs adjustment. There are actually 1or 2 other resistors that you need to calibrate for the meter but for the sake of convenience I am only going to point out this one that does the broad-stroke adjustment.
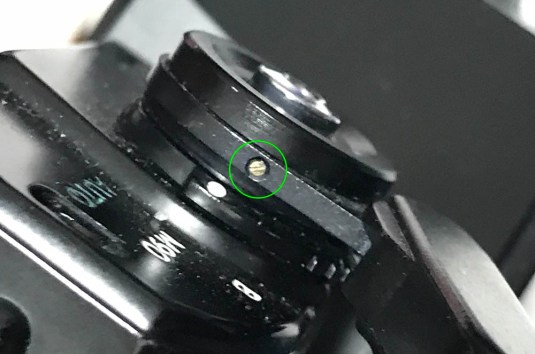
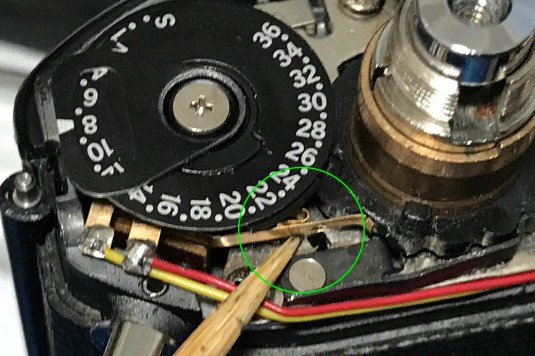 This part took me a long time to figure. You see these 2 contacts? The longer one closer to the toothpick touches the one at the back in order to form a circuit. It’s positioned away when you turn the cog it rests on via the collar for changing the shutter mode from B to M90 or Auto. It only touches the other contact while it’s on Auto mode so the meter only works during that mode. The contact at the rear gets into position only when the frame is advanced to a vaue more than 1 so the meter is turned OFF before frame 1. This is useful so the camera will only fire at 1/90s when you’re advancing your film to frame 1, it may fire at a really slow speed when you have your lens cap on and this may frustrate you. It can be modified by bending this but I won’t recommend it. My camera’s problem is that my meter would work intermitently and I traced that problem here after a losing a lot of time with my multi-meter which I’m no-good with. These are very delicate and they can be easily bent out of position through wear or accident. If your camera is displaying the same problem then this is one of the things that you should inspect apart from the usual suspects like oxidized battery contacts and wires touching anything metallic and causing a short circuit.
Electronic cameras can be difficult to diagnose and can be time-consuming. What I have shown here are just a few things that can go wrong with a Nikon EM, if you know other things that can go wrong and how to fix them, please share them to us in the comments section and I will add them here in this article in the future.
Disassembly (Front):
A common problem with many Nikon EM cameras is the stuck needle issue. If you search the internet for that problem you will get plenty of results and you can read some funny advices that people who have no clue give. Well, I will show you a way to fix it and this is the best way to do it in my opinion. You will have to be very careful when doing this, the focusing screen is easily-scratched so you will need a very steady hand and some plastic tools to handle the screen.
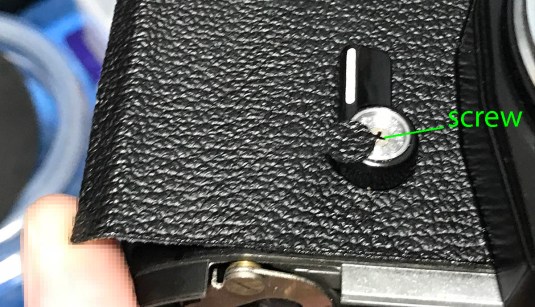
 The screen is secured by a frame and removing this screw will enable you to pull it down so you can access what’s underneath it.
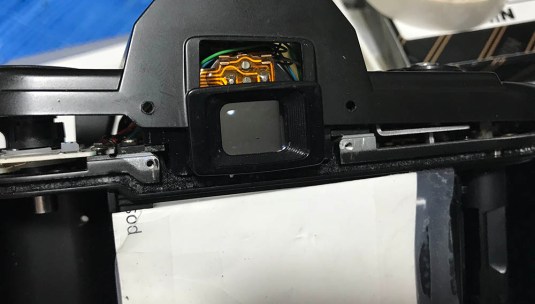
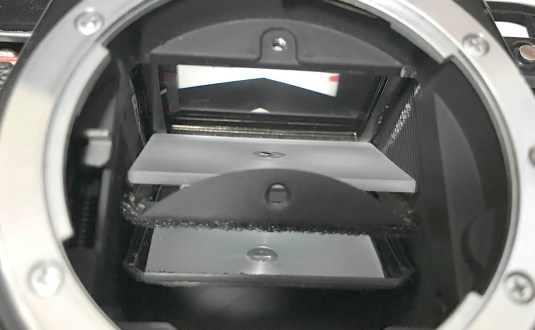 Once the frame is down, the focusing screen goes down along with it. Make sure that you won’t drop the screen and damage it. The screen was made using acrylic so scratching its surface will scar it forever. If you watched my video on the previous section, you will see that the foam lining underneath the frame is the cause for the stuck needle problem. It’s an old camera so the foam can deteriorate or corrode into small bits and jam your needle so it stays stuck. It can also turn into a sticky goo and stick to your needle. Replacing the old foam is easy but I opted not to do it because this can happen in the future again. I am better-off opening the frame and blowing air into the thing when dust gets in than clean clean the new mess again.
 This is how the focusing screen should sit in its frame. Make sure that the corners are all positioned properly in their yoke before you put the assembly back into the chamber. It’s now clean and I removed all traces of the old foam from the frame by scraping it using a sharp knife. I then soaked it in an alcohol bath to further remove any residue. Never use solvents for cleaning the focusing screen. If there’s dirt that can’t be removed by using a bulb blower or a soft brush then you can clean the screen using warm water and a mild detergent. This is something that you should only do as a last-resort because even that is sometimes abrasive enough to scar the sensitive screen.
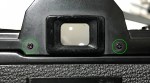
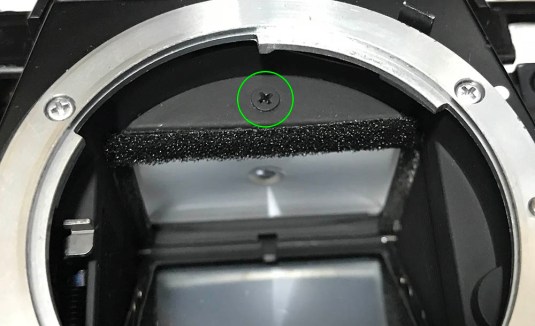
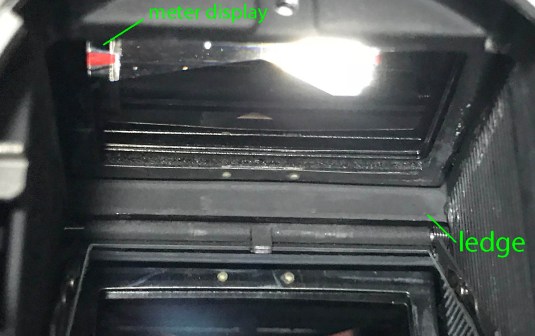 You can also clean the bottom part of the prism using a Q-tip saturated with solvent and wipe it carefully while avoiding the meter display so you won’t bend it. There’s a ledge in the well and this is where the edge of the screen’s frame should sit. Remember this when you’re putting the screen assembly back and you won’t be able to re-install it properly if didn’t position the edge of the frame atop this ledge.
 Here’s another view of the ledge just in case the previous picture didn’t make sense.
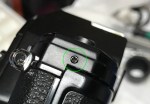
 For really serious problems, you will need to remove the front casting so you can access anything that’s deep-inside the camera. The self-timer lever can be carefully removed by unscrewing its fastener that’s hidden under a round piece of leatherette. You can peel the leatherette off by saturating them using alcohol to soften the glue and carefully use a flat screwdriver to lift a corner of the leatherette so you can pick on it with your nails.
 Once the self-timer lever is gone, you can carefully peel the broad pieces of leatherette at the front of the camera to reveal a couple of screws underneath them.


(Click to enlarge)
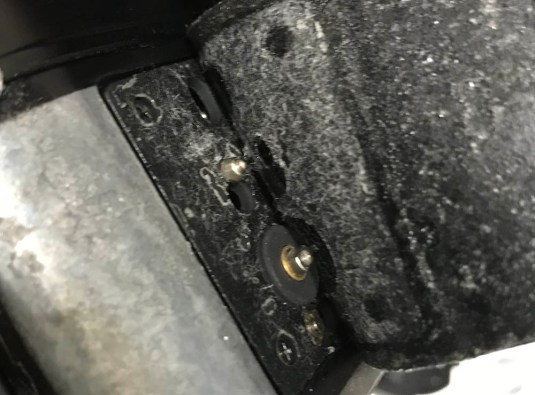
Here are some of the screws that you should remove in order to remove its front casting. There are a few more screws that you should remove near the prism and you should also un-solder some connections but I won’t show you how to do it. Never do this unless you know what you’re doing. I am only showing you this so you’ll know where to start if you are curious about what’s going on inside. If your Nikon EM needed to be opened like this then it’s not worth repairing in my opinion, go find one in better shape I just wanted the mirror to be oiled a bit so I did this otherwise I wouldn’t bother.
That’s all for the front part. I forgot to take notes on how to open the bayonet mount area to clean the aperture brush and contacts so I apologize for that. I’ll update this if I got the chance in the future so you will know how to fix it.
Disassembly (Bottom)
I am going to show you how to remove the bottom plate so you can clean what’s there. It is not necessary but you may want to clean this part just in case if you got a dirty camera. It’s rare that something goes wrong here but if your camera isn’t advancing properly or it doesn’t work properly with the Nikon MD-E motordrive then you should look here to see what’s going on. Dirt also tend to accumulate under this because of gravity.
 Remove these 5 screws in order to remove the bottom plate. Note which one came from which hole because one of these screws is longer than the others if I am correct. Remove the bottom plate carefully and be mindful of the undercut near the mirror housing.
 Clean these part properly by wiping them with a clean Q-tip saturated in naphtha. Oil the pivot of the latch with a very small amount of fine watch repair oil applied using a small needle. I usually grind the eye of a needle so it forms a small U-shaped prong and that is going to be handy for applying a minute amount of oil to anything. This is a watch repair technique that’s also useful for camera repair.
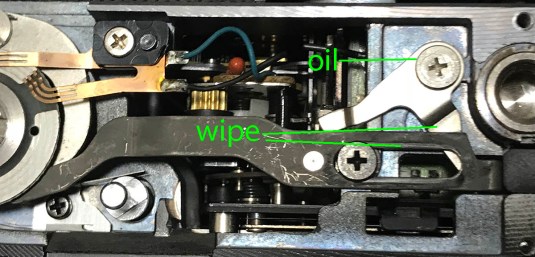
You may encounter a Nikon EM with a stuck mirror and advance lever and this is one of the places where you should look. The black thing charges the shutter and mirror when you cock the advance lever and this can get stuck at times so just clean it and hope for it to fix itself and it usually works! I don’t know what causes this problem but it seems to be fairly-common with the Nikon EM and related mini-SLR’s from Nikon.
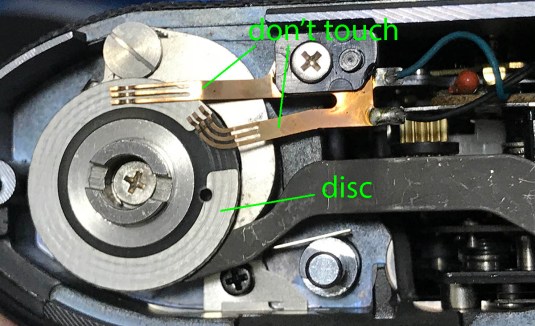 Wipe the disc clean and be careful not to disturb the brushes. This assembly is there so it can tell the camera what stage of film advancing the camera is so it can relay that to the Nikon MD-E to process. I usually see grime form at the surface of the disc and it’s always important to keep this part clean just in case. The big metal latch underneath needed to be cleaned because its dirty with oil a disgusting film has formed on its surface.
That’s all for the bottom part of the camera. This is completely optional for most cameras but at least you now know some of the things that can go wrong here. I forgot to show its other side, that’s where the Nikon MD-E communicates with the camera through contacts and those 2 contacts can get dirty or damaged so you won’t get a consistent performance from the Nikon MD-E because the contacts fail at times. The shutter is also charged under the back panel and so this is also what you will want to look at if the mirror or shutter is not charging/cocking.
Conclusion:
I was expecting to spend less than an hour on this thing but I ended spending more than twice that time because the problem was difficult to diagnose but I am pleased after the repair since I now have a working Nikon EM. After putting everythng back together, the old corroded foam seals had to be replaced before I run a test roll. The foam seals were put there to shield the film chamber from dirt rather than to keep light out but there is a place where light can sneak into the film chamber when not insulated with foam and it’s the area near the hinge so be sure to replace the foam on that spot with fresh material.


(Click to enlarge)
I replaced all of the foam seals at the film door and the thick one that serves as a damper for the mirror. If you are new to this, read my article on how to replace foam seals to help you see I do it. This is the easiest and fastest way for me so far.
 It’s now time for a film test! Pity that I didn’t calibrate the meter on this one because it’s consistently over-exposing by 1EV, I should have known better and tested this before the top panel was re-installed. I guess this serves as a big lesson for me, good thing that this is my own camera or else I would have to open this thing again to calibrate the meter. It’s good that everything works properly after the repair and I now have a working camera that I bought from the junk section for a very small sum. Fixing junks is the way to go, it’s sustainable and you will also enjoy every moment while doing it.
That’s all for the Nikon EM repair article! The camera is simple to fix so long as the issues aren’t severe and anybody with the correct tools and a some know-how with repairs will find this easy so long as you followed my advices and warnings. I hated working on these electronic cameras because you can’t see everything happen before your eyes and this is the reason why I love working on mechanical cameras. I hope that you enjoyed this blog post, I have been getting requests to do this for years but I only got the chance to do this now. If you have anything to add, please share your experience with us so we can learn from you! There’s no use keeping all that knowledge within your head, the world needs more teachers and mentors! Thank you very much for supporting this blog, your help is keeping this blog alive and we are able to write more quality content. Your contribution is helping me with the cost of film scanning and developing so that enables me to write better content with more pictures. If you enjoyed this blog post, please share this article with your friends at social media so our community can grow. See you again next time, I have many things that I plan to write but I just don’t have enough time. It’s hard to juggle work, family and this blog within an 18-hour timeframe and I am always amazed at how much work I get done everynight befor I go to sleep. Thanks again and goodnight, Ric.
Help Support this Blog:
Maintaining this blog requires money to operate. If you think that this site has helped you or you want to show your support by helping with the upkeep of this site, you can simple make a small donation to my paypal.com account (richardHaw888@gmail.com). Money is not my prime motivation for this blog and I believe that I have enough to run this but you can help me make this site (and the companion facebook page) grow.
Leave me some tip?
Thank you very much for your continued support!
$2.00
Helping support this site will ensure that this will be kept going as long as I have the time and energy for this. I would appreciate it if you just leave out your name or details like your country and other information so that the donations will totally be anonymous it is at all possible. This is a labor of love and I intend to keep it that way for as long as I can. Ric.

Nov 04, 2018 @ 11:40:09
This is great …
I always enjoy reading your articles…
Being able to buy one of this by 10 Euros is a miracle.
I would have to pay at least 50 to 70 … in Portugal.
Nov 04, 2018 @ 11:44:16
Pity that I didn’t calibrate the meter on this one because it’s consistently over-exposing by 1EV, I should have known better and tested this before the top panel was re-installed.
DO YOU HAVE AN ARTICLE EXPLANING HOW TO DO IT ?
Apr 19, 2019 @ 20:37:03
Hey great article!
Do you have any advise on how to fix a broken frame counter on an EM? I know it’s not the biggest thing and (I think) mine works just fine without it being accurate, but itd be nice to not have to keep track by hand. Mine will advance just fine, but when it resets it only resets to 25 instead of 0. Any ideas?
Thanks
Oct 01, 2019 @ 08:57:53
Without battery you can also shoot at 1 / 1000s in AUTO.
Greetings.
Oct 02, 2019 @ 13:36:22
Hi, my meter moves a lot up and down when try to metering something, and I don’t seem to be able to figure out if it actually works or not, do you have any idea? Also it seem to be changing the time when moving the aperture ring on the lense, but it will do so by oscillating a lot up and down.
Aug 05, 2020 @ 08:51:16
This is a classic EM problem – but Richard’s link doesn’t help – this is a rare event so Richard – please fix this!
The symptoms start with a jumpy needle: the lightmeter needle in the viewfinder jumps up and down whenever the aperture ring is turned. Before taking a shot you need to wiggle the aperture ring a bit to ensure that the exposure will be correct.
The repair for this was very easy: first, you unscrew the 4 screws that hold the lens mount. Next you remove the 3 screws that retain the plastic front plate. Be carefull when you remove the top, since this snaps under the top of the camera. You don’t want to break any plastics. Next you remove the lens mount, the metal ring and the plastic ring. At the top part you can see the variable resistor that implements the diaphragm sensor. It is a white plastic plate coated with 2 metal strips. The ring that sits around the lens mount contains a tiny gold plated contact at the back which drags over the 2 metal strips. The problem with the light meter is that the metal coating on the plastic has oxidized. To remedy this, take a cotton bud, dip it in contact cleaner if yiu can get it – alternatively us alcohol and clean the metal coating. I did this 3 times until the cotton but stayed more or less white. Don’t use too much alcohol. It’s a solvent and you don’t want to get any of it in the camera or on any contacts. If you have contact cleaner – this often comes in a spray can. I advise you spray this onto a cotton bud and use that and don’t just spray into the camera !!!
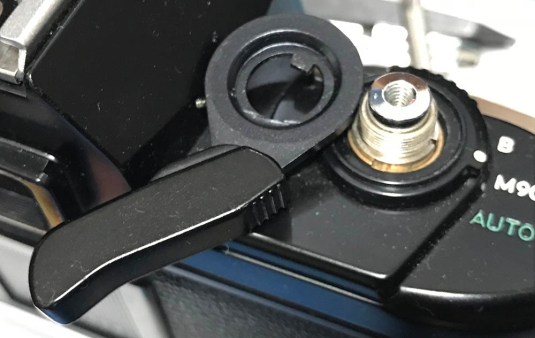
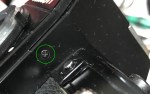
In reassembling the camera you need to pay attention to 1 thing: the diafragm ring is meant to be spring-loaded. The first time I reassembled this camera the metering ring didn’t return to it’s starting position when I turned the diaphragm. There is a small white gear (behind the red circle in my image) that is connected to a spring. This gear engages in the diaphragm sensor ring. If the spring is unwound when remounting the camera, it will not be able to do it’s job.
To wind the spring before assembly, you insert a small jewelers’ screw driver from the top in the screw that sits in the center of the spring (again, indicated by the red circle). You wind the spring all the way and then, whilst holding the screwdriver, replace the ring over the camera in the counterclockwise most position when looking at the front of the camera. Now the diaphragm ring will return to the resting position without trouble.
This lightmeter repair takes about 15 minutes in total and can probably be performed on any Nikon SLR with the needle lightmeter system: Nikom EM, FG, FM,FE and maybe also the Nikon FA (is has an LCD meter instead of a needle, but I think it still retained the same diaphragm sensor).
Dec 17, 2025 @ 03:24:27
The original post was great, but this comment described EXACTLY the fix i needed! Thanks so much!
Dec 22, 2019 @ 23:01:10
Great video! I just bought an EM and directly broke the ISO setting ring, is there any chance that the camera is still functional?
Dec 26, 2019 @ 19:46:27
I have a problem, doesn’t everyone, I have an EM that the lens won’t click into place. I figure it’s the camera and not the lens because the lens release button stays all the way in all the time. Is the camera only good for parts. Sad, because everything else works good.
Jun 14, 2020 @ 16:56:31
I have owned an EM since new. All the it’s cheap and baby Nikon is extremely frustrating. I do appreciate and note that you do nod to the fact that this camera is a massively capable piece of kit given the time to understand the basics of photography and film which I did as an enthusiastic teenager! A brilliant camera which has given me some truly wonderful photos and occasional awards against some equipment costing at least 10 times more. I do have an inherited Leica and a couple of others including a pricey Canon and a later acquired FM so my opinion is not biased but the EM remains massively underrated in my humble…
Jul 04, 2020 @ 19:51:20
Hey how much would you charge to repair my em, it beeps but the battery light won’t turn on and the needle moves but I feel is off
Jul 07, 2020 @ 17:10:48
Hi – can you recommend someone to repair our Nikon EM for us? Thank you!
Oct 31, 2020 @ 11:47:33
426/5000
Hi,I have a problem with the light meter needle being stuck in the top position. The shutter works in M90 and in automatic mode with a fast speed, but the meter emits the beep. I checked if the needle was trapped by removing the focusing screen but it is free and moves when I blow the chamber. What could be the problem and how to fix? Thanks
Mar 02, 2021 @ 10:32:29
My EM has an unusual (to me) issue. When wound on, moderate pressure on the aperture linkage (i.e. starting to stop down) causes the shutter to fire. Is this something that can be fixed by lubricating/cleaning rather than disassembly? The spring and mechanism is intact. Happens regardless of batteries being in or out, so must be mechanical.
Jun 02, 2021 @ 16:53:57
@Alessio:I have exact the same issue with the light meter. Did you fixed it ?
Aug 13, 2021 @ 22:25:07
My EM only fires at one shutter speed, the meter seems to be working but the shutter speeds never changes when in Auto mode and change the aperture, Can this be fixed or should I just look for a another body?
Sep 03, 2022 @ 08:59:10
I have the same problem as Dulce. The light meter works and changes with the aperture, but the shutter speed stays the same. How can I fix this?
Sep 26, 2023 @ 14:33:35
I had a nice EM that I used to take on mountain walks. I came home after one of them, the camera fell out of my (unstrapped) rucksack and landed on the asphalt yard. Its meter never worked again. I recquisitioned the EM that I’d given to my sister in law 20 yrs before, that she’d used for just one roll of film
Apr 04, 2025 @ 13:41:39
Hi , same issue here, were you able to solve the issue?
Jan 17, 2026 @ 04:40:50
did you find a solution ? (Same problème hère … ) The needle / light Meter is Working but it is always the same speed. (I put New battery but that’s not the problème)
🙏🏻
Nov 11, 2023 @ 01:52:59
A few notes on putting the focusing screen back in:
1) Angle the screen assembly 45 degrees down when putting it in.
2) Watch that you don’t scrape the mirror, maybe put a piece of paper over it?
3) Make sure the mirror can still flip up freely. I set the assembly in loose, flipped up the mirror flush with the bottom of the assembly (resting on the strip of foam), held it in place, and THEN screwed in the screw.
Getting the circlip out without the right tools:
I had needle nose pliers that barely fit in the gap of the C-shape. I could open the pliers just enough to get the opposite side of the circlip up where I could work a tiny flat-head screwdriver up to (gently) pry it off. Took probably 20 minutes.
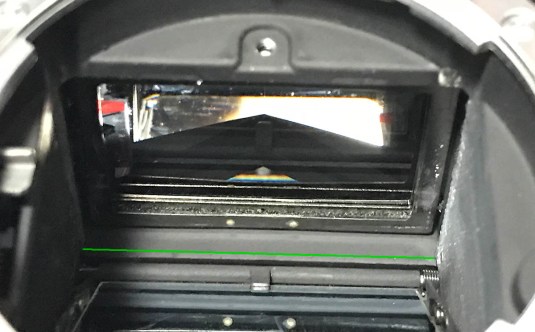
I know no one is going to answer, but: In the picture with the label “meter display” and “ledge” there’s a small gap below the horizontal glass and above the ledge. Is there supposed to be foam there? Mine suggests once upon a time there was.
Jun 09, 2024 @ 22:09:18
I paid a few dollars on eBay for a ‘Parts Only’ EM to practice on. I got lucky and was able to salvage some much needed parts from it to restore my favorite one in the stable. Hesitant at first to do any micro-repairs, I wait until the coffee has drained from my system so i am not shakey and then lay out a small white towel to work on. Keep a magnet handy to keep those little elves from coming out and stealing your small screws. Anyway, it is a big feeling of accomplishment when all your tedious work pays off and the camera is back working properly.