
Hello, everybody! I’m currenly saving money for the upcoming Nikon mirrorless camera and also for the school fees of my child. It’s not cheap sending a kid to school here so I’m going to save money whenever I can. This means that I only have a rice ball for lunch or a banana for breakfast. While it’s healthy for me, I would prefer to eat something that is more substantial. People who can’t afford stuff usually save money so they can buy what they’ve always wanted or settle for the next-best. In this articel, I am going to talk about something along the lines of economy and austerity and how you can make the most out of your money by buying something that has a high cost-performance ratio.
Introduction:
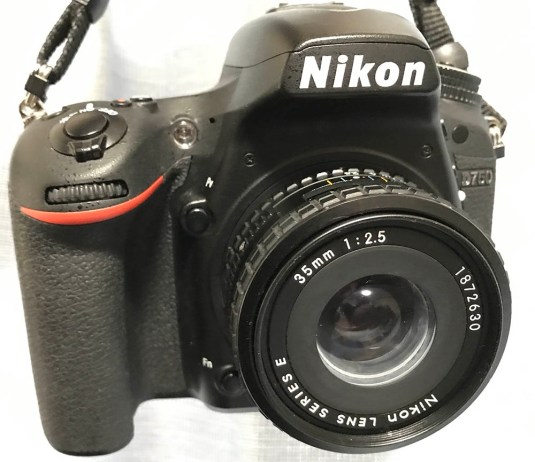
Let me introduce to you the Nikon 35mm f/2.5 Series E! This lens was made with economy in mind and just like the Nikon 100mm f/2.8 Series E, there were some cost-cutting and a lot of clever decisions made just to make this lens sell for a lower price and at the same time have acceptable performance. This lens has become quite popular lately because of the perceived value of this lens. They go from $50-90 in the used market and the optical performance is also more than decent. What many people don’t see is the lens was made using plastic and other materials that aren’t typically used in a Nikkor. This is the reason why the Series E (for economy) lenses were never slapped with the Nikkor tradename. It was sold as a product that’s below their top-shelf line because Nikon was pressured and felt the need to make products for the lower-end of the market mainly targetted at young amateurs, students and women. While this thing won’t fly these days because of political correctness and maturing social atmosphere, that was the case several decades ago. The product line along with the Nikon EM it was developed for revolves around ease-of-use, economy, compact size/weight and “good value”. The competition made a killing selling a lot of plastic cameras and lenses to this market segment and it’s big enough to get noticed by the senpai so something had to be done. At that time, Nikon products were perceived to be tough, expensive, heavy, professional equipment and while Nikon had to maintain this standard they also need to cater to the people with less buying power so the Series E line was born.
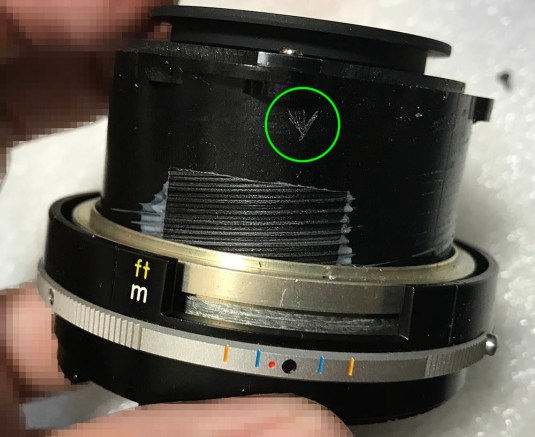
 The lens is compact and feels nice despite being mostly good-quality plastic. It’s light and it balances really well with smaller cameras. The focusing scale is pathetic because it has a really short focus throw of just about 90 degrees or so. I would love this lens to have a slightly longer focus throw because I usually focus using the scale and not through the finder. The red dot is for infrared photography and this is where you should focus when taking infrared photos. I am not sure how good this lens is in IR, Bjørn Rørslett will be a better person to ask for this at Nikon Gear.
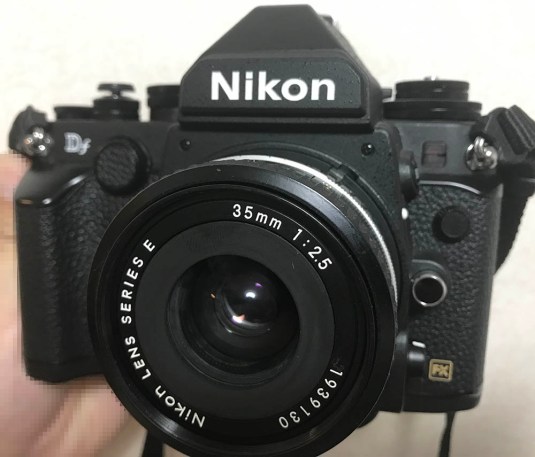
 This is how it looks like with the Nikon EM. The Nikon EM was developed to be small and light as well as cheap and easy to use. The product line was aimed at women and people who just wanted a cheap camera that’s easy to operate. It’s a very small camera and you can fit it in a coat pocket. The nickname for this is “Simple Nikon” or 子ニコン (Ko-Nikon) in Japanese which roughly translates to “Nikon jr.” or something like that. If it were made in Spain then the equivalent dimunitive term should be “Niquito“. If you’re old enough to remember, Toyota had something called “Toyopet”. This was how they separated the cars made for the higher-end market and the ones made for the economy segment.
 This is how the early version looks like. It looks like a plastic toy than a lens made by any decent manufacturer. I hated its apperance to be honest and so did many people when it was still being sold back then. This is why Nikon gave the Series E lenses a new look with metal trims and sexier grip that looks more like a proper Nikkor.
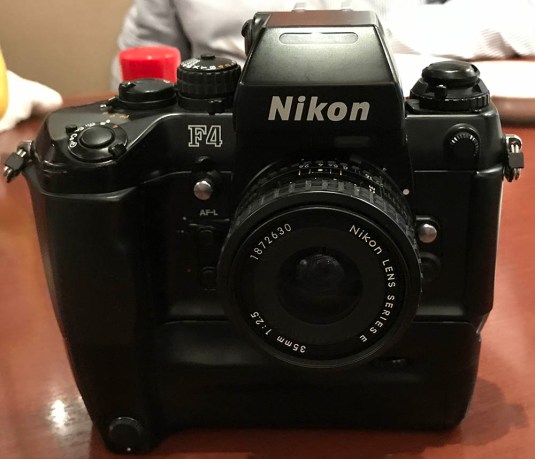 This is how it looks like when mated to a professional camera like the Nikon F4E. Despite being small and light, it doesn’t look out-of-place with a bigger camera body. Professional photographers used these lenses as back-up before and people who climb mountains like Galen Rowell prefer lighter equipment. He pioneered the hiker-photographer genré back when he was still alive. He showed us that equipment wasn’t everything because he used Series E lenses like the Nikon 75-150mm f/3.5 Series E for some of his masterpieces.
Knowing how a lens performs is key to using it successfully. I wil show you how this lens performs in the following series of photos so you will know what to expect from this lens and somehow shed some light as to how this lens performs and debunk the myths that a lot of other reviewers made. I am not an expert on this but I know how to take pictures that can show a lens’ flaws. Well, at least in the context of how I use it.
 Distortion can be a bit distracting if you’re shooting straight lines but otherwise OK when shooting real-world subjects and photos like what we’re really interested in. This blog is not for metrics and measuring things, we’re all for how a lens or picture “feels” like.
 The bokeh can be can be mediocre granting that it’s a decent f/2.5 but I feel that it can be much better because there’s some outlining happening at the edges of the balls. Despite this, I will say that the bokeh quality surprised me a bit since I wasn’t expecting a lens of this class to render some decent bokeh.
 It can focus all-the-way-down to 0.3m which is just over a foot from your film plane. This will give you some decent macro ability when taking detail shots. This is convenient and many manufacturers gave their lenses some kind of macro mode as a gimmick so people can use them to focus really close. This was the in-thing back in the ’80s to the mid ’90s. It is worth noting that the lens has above-average sharpness wide-open when shot at closer distances. I rarely shoot subjects that are far so I cannot comment much on how this lens performs when shooting far-away subjects but I suspect that it shouldn’t be too bad.


(Click to enlarge)
The pictures above show how this lens performs when shot in contra-light. The first one was shot wide-open I think and you can see how terrible the flaring is. Stopping the lens down to about f/16 or so makes it even uglier as you can see in the picture at the middle. A rainbow-colored blob also formed in the frame, if you think this looks familiar then I’ll tell you that this is how the Nikkor-T 10.5cm f/4 performs but only much worse. This is a tell-tale sign of cheap coatings used for lenses sold for cheap market segment. Remember that I said Nikon swore not to make another lens in a half-assed manner just so that they can sell them for cheap until the Series E? Well, this just proved my point. To be honest, I just read the following line in a Nikon publication (Japanese) and I was just repeating it for you but it did make a lot of sense. The sun-stars on the otherhand looks OK-ish, they don’t look as good as I hoped they would be but this is not too bad.
 When not shooting in contra-light, the problem with the cheap coating is less apparent as you can see from this photo. This was shot at f/8 and you can see that it looks great. Sharp at the middle but the resolution is a bit lacking. I noticed this pattern with Series E lenses, they are sharp but the resolution is just “not there” even when stopping it down. It looks great when zoomed-in to 1:1 at a big monitor but you have the impression that it should look even better at this aperture. I rarely see this happen with Nikkor lenses, not that I’m saying all Nikkors are excellent but all I’m saying is that a Nikkor will usually have better performance than this. Needless to say, this is not going to affect real pictures because it’s how the picture was framed and exposed that decides whether a picture sucks or not.


(Click to enlarge)
The pictures above were shot from f/2.5, f/4 and f/5.6 from left-to-right in that order. This is a sharp lens at f/2.5 as you can see from the pictures but the contrast is lacking a bit. It has more than adequate sharpness to make this lens usable wide-open. The background is reasonably blurred due to the somewhat decently-fast aperture of f/2.5. The bokeh can also have a “cheap” feel when the features are barely-focused but you really do not use a lens in this class for the bokeh anyway. An ugly rainbow-colored ring can also form if you have a strong light source just outside the frame as you can see in the last set. Note that I am basing most of my impressions on the sets shot in contra-light. Sets 1-3 were shot in a shaded environment so I don’t get this funky-looking “atmosphere”. To be honest, it looks pretty-damn good when there’s no bright light sources (or sun) just outside of the frame.
Stopping it down to f/4, you’ll notice that the contrast improved a lot but the veiling flare is still there. Don’t keep your hopes too high because I’ll tell you that it’s not really going away even if you stopped the lens down even further. Resolution improves a bit but it’s still generally so-so. The ugly rainbow-colored arch is now gone and the image looks a lot cleaner for the lack of a better term. When shooting in contra-light, this is probably what you would want to use as your fastest aperture. The overall feel is kind of washed-out or flat but it also renders a very natural-looking picture.
At f/5.6, you get more of the background in-focus and the picture does not really improve much compared to f/4 in terms of quality. You would expect a bigger improvement in the contrast and resolution but that’s just about it. You would only want to stop the aperture down for more DOF and to use a slower speed. This lens was calculated to yield sharper pictures wide-open and was aimed to “wow” beginners and desktop photographers and reviewers. Having said this, you can also capitalize on this feature and use it to your own advantage when taking photos or videos with this lens.
 Here’s a trippy photo shot at f/5.6, this lens can give a nice “atmoshpheric” look and you’ll probably want to use this lens for this effect. This is a term that we use at work when we want to say that an image needs to have some feeling of place, weather and time or just a way to tell the artist that you want to add some smoke or steam to give depth to an image as a form of layering technique to make the subject meld with the environment.
 This was shot at f/11 and as you can see the flaring didn’t really go away. If this was shot with film then the shadows would look muddy. Sure, this has more to do with lighting or its placement but this should give your an idea how flare can make or break a shot. If it’s your intention then this is the lens for you.


(Click to enlarge)
Enough of the flare and atmoshphere non-sense, Let’s talk about pictures that were shot in more practical environments! The pictures above were shot in different apertures and as you can see they all look great apart from the slight lack of resolution. The rendering of this lens reminds me a lot of the Nikon 100mm f/2.8 Series E in the sense that it’s a nice lens but really false short of being a really great lens. I think this is where the economic side of things come into play. This sounds like an artist blaming his tools but in order for you to use a tool properly, you should know how it performs first.
Let’s now see some pictures that were taken using film. Film has a distinct look that’s difficult to simulate using film because of grain and its structure. Film also reacts differently to light because film sensitivity works different from gain and the highlights and shadows look different from that of a picture that was taken using a digital camera. It’s important to see results from both media in order for us to assess a lens’ performance better. I took these using a Nikon FG loaded with Fujifilm Industrial 100 and I had the roll developed and scanned at the lab using Fujifilm Frontier SP-3000, the best in the Japan.


(Click to enlarge)
The results look great with film. The harshness that we saw with digital isn’t as obvious with film because grain masks some of it. This lens was made for use with film and this is what the designers were looking at when they calculated this lens and this is the reason why I said that it’s important to see how a lens renders with both film and digital. Sharpness is nice if you manage to get your subject in focus. I will admit that the tiny viewfinder of the Nikon FG made things a little bit difficult for me but I got most of my shots focused so far, only missing by a bit of some pictures. The contrast looks great and it matches the colors of the film perfectly, giving me saturated pictures without looking fake.


(Click to enlarge)
Here are some more pictures from the roll. The lens really captured the vibrance of Japan’s festival season! The focus throw is too-short for my comfort which made focusing a bit tough for me. I wonder why Nikon didn’t make the focus throw longer by a little bit because that would have been perfect specially if you need to focus precisely. This should not stop you from enjoying this lens and you should just get used to it.
Having said the above and shown you a couple of samples from this lens do you think it’s a great lens or not? This will all depend on your needs and what you’re looking for and if you’re going to ask me, I will tell you to buy this lens if you want something that renders unique pictures. If you want something that has a higher resolving power or much better coating then I will suggest that you spend $20-40 more and get a real Nikkor. This is what I was talking about when I said “false economy”. You saved a little bit of money of money when you buy something but at the end you are actually spending more because you can get a better lens if you just stretch your budget a little bit more. A Nikkor 35mm f/2.8 Ai is cheap enough these days that you can get one for $90 and even less than that if you wait and let the deal come to you. What you get is a tough metal lens with higher resolution at smaller apertures and coatings that work better. I know that I sound like I’m poo-pooing this cheap lens but I’m not. Like I said, it has a place in every creative’s kit and knowing when and how to use it is the key to using it successfuly. Now, on to the repair article!
Before We Begin:
If this is the first attempt at opening a lens then I suggest that you read my previous posts regarding screws & drivers, grease and other things. Please also read what I wrote about the tools that you will need in order to fix your Nikkors.
I highly suggest that you read these primers before you begin (for beginners):
- Essential tools
- Best practices 1
- Best practices 2
- Best practices 3
- Ai conversion
- Working with Helicoids
Reading these primers should lessen the chance of ruining your lens if you are a novice. Before opening up any lens, always look for other people who have done so in Youtube or the internet. Information is scarce, vague and scattered (that is why I started this) but you can still find some information if you search carefully.
I highly recommend that you also read my working with helicoids post because this is very important and getting it wrong can ruin your day. If I can force you to read this, I would. It is that important!
For more advanced topics, you can read my fungus removal post as a start. This post has a lot of useful information here and there and it will be beneficial for you to read this.
Disassembly (Lens Barrel):
The lens barrel is simple enough for a beginner to work on provided he has the tools and know-how to DIY this job. Just follow my notes and read my fundamentals so you will be on the right path. This lens also share lots common with the Nikon 100mm f/2.8 Series E, I will suggest that you read that article for hints, too. While some lenses can be dismantled by removing the parts in any order (mostly), this lens requires that you remove the parts in a certain order so that they will come-off in a logical way much like a puzzle or even a small engine like a compressor if you have repaired one. I will show you the best pattern or order to make it easier for you, I can do it my way but that’s going to be a bit difficult for a beginner to follow.
When working on the lens barrel, you should always consider that this lens is made out of plastic (mostly). You should treat the screw holes with care, one way to avoid ruining the plastic thread when screwing things back is to first turn it the opposite way and feel for the thread to engage. Once you felt the threads “bite”, slowly tighten the screw until it is fastened. Never over-tighten because it will strip the plastic threads. One more thing is you should only use alcohol to soften up any adhesives used on the lens. Acetone is going to craze the plastic and naphtha or other petrol-based solvents will melt it when they’re left too long. Needless to say, you should never use MEK with this lens. Heating anything is also out of the equation, this is a cheap plastic lens that has more in common with toys or junk from mainland China than real hardware from Germany or Japan.
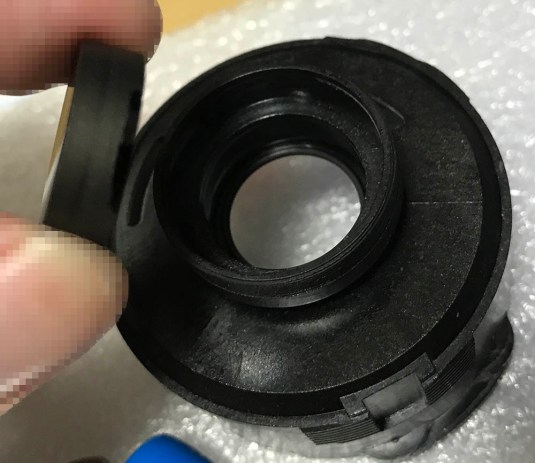
 Begin by carefully removing the rubber grip. Run a thin toothpick underneath its whole circumference to lift it off from the old glue then carefully pick it with your fingers. Make sure that you don’t tear this thing because you won’t get replacement parts for these.
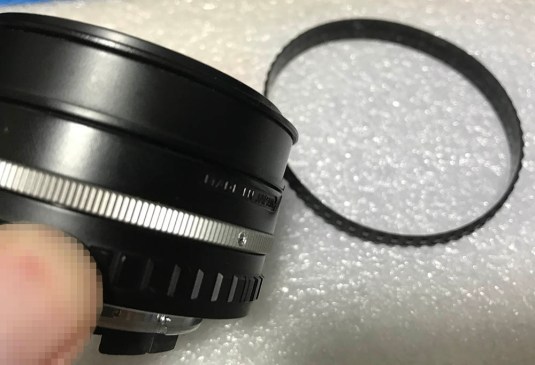
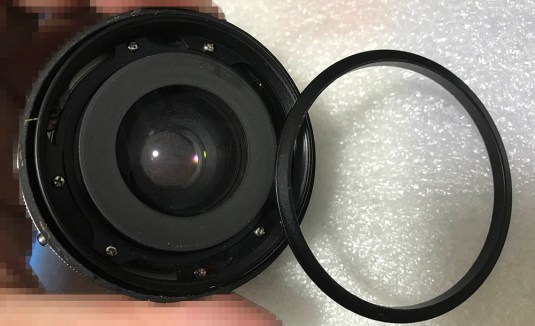
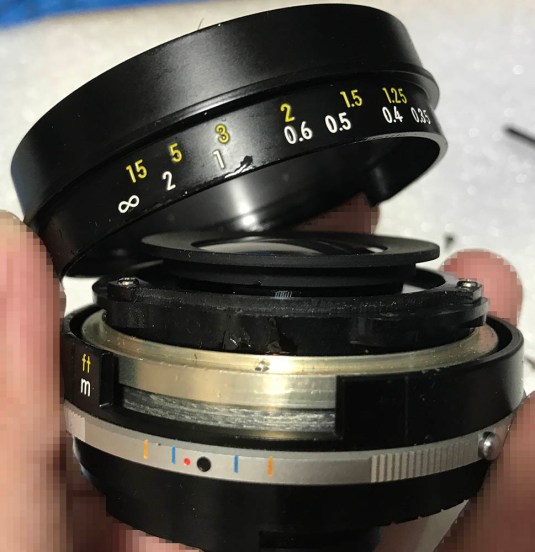
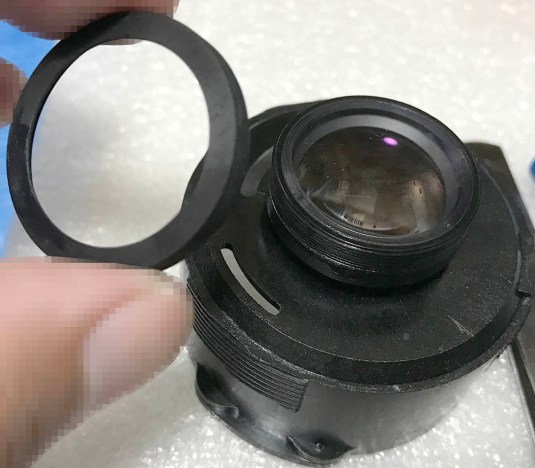
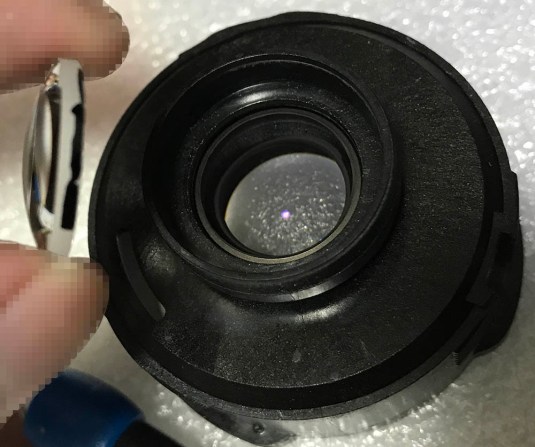
 The front bezel comes-off just like this. Use a rubber cup to remove this and if it’s stuck, it can use a drop of alcohol. Note that this thing is made of plastic so avoid using acetone or any petrol based non-polar solvent because they will melt the plastic. Never use MEK, it’s too strong for something like this. This is also true for the rest of the lens because plastics were used liberally. The threads of this thing is also soft and can be easily damaged.
 The front collar of the focusing ring can be removed by unscrewing it. It’s usually held by contant cement so drop some alcohol to soften it first. It may take some time or multiple applications so be patient, at the end of it all you’re still not guaranteed that it will come-off as easily as you like and if it didn’t then just leave it there than risk ruining your lens.
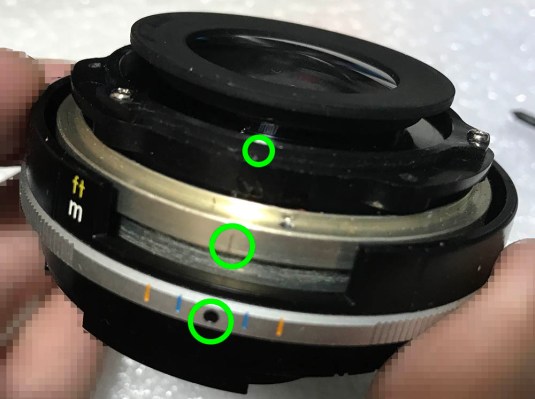
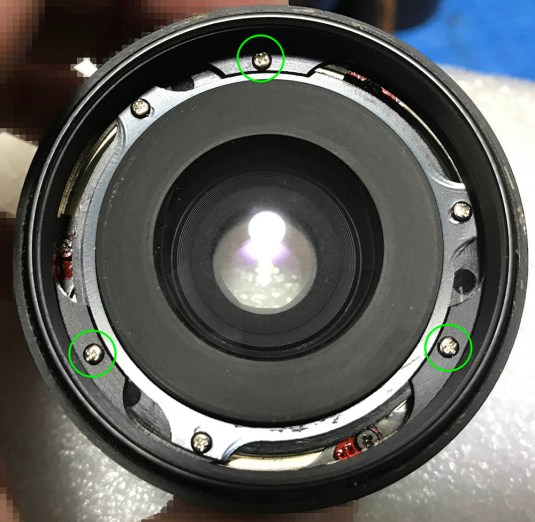 Remove these 3 screws to remove the front barrel. While the front barrel is metal (alloy, I think) the part it’s secured to is plastic. It’s very easy to cross-thread this so be careful.
Removing the collar from the last step will allow you better access to these screws but it’s not necessary for you to remove it in order to access these.
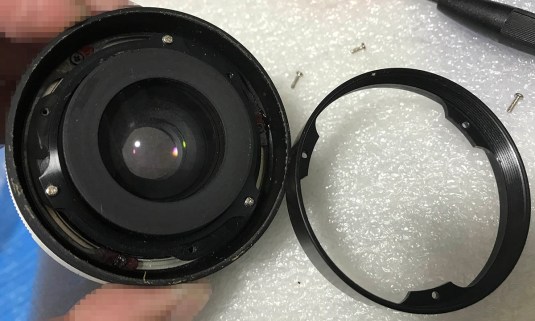 The front barrel can now be safely removed. These were never glued at the facyory so it will never be stuck. At this point, you can remove the front elements assembly because it can be easily unscrewed but I’ll leave that for later to make the article easier to follow.
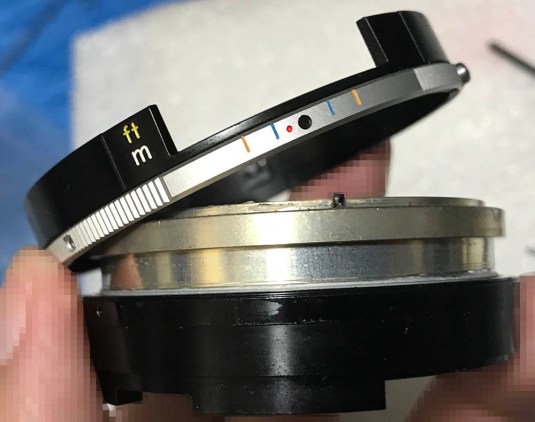
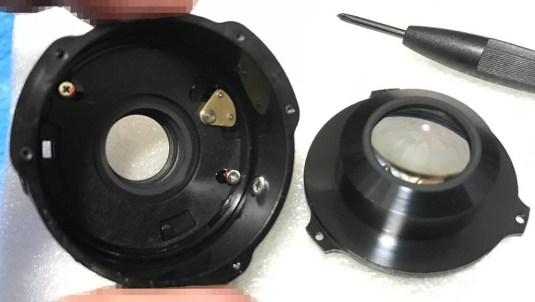
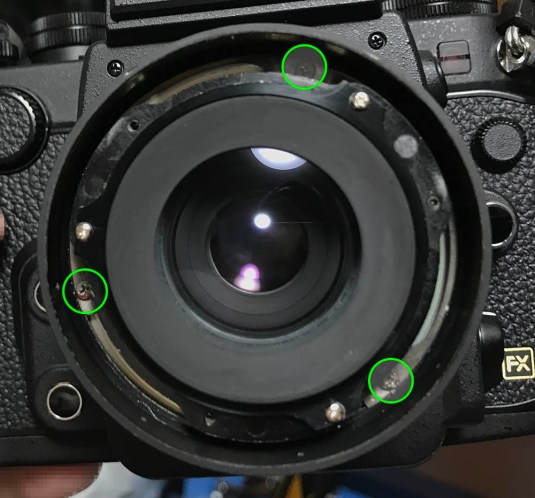
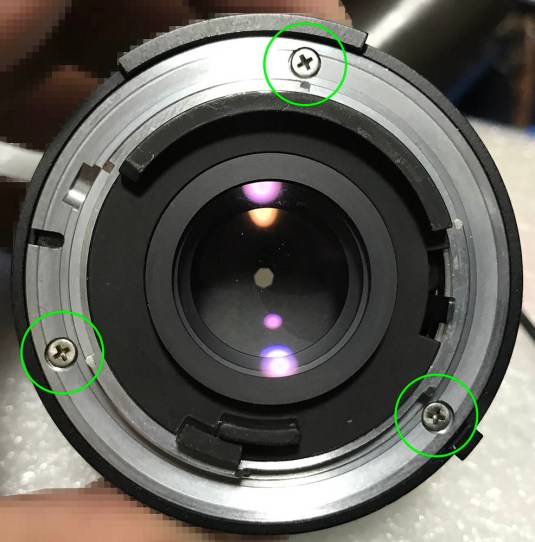 On to the back of the lens. Remove these 3 screws to remove the bayonet mount. If you’re new to this, make sure you read my article on removing bayonet screws so you won’t get stuck because you stripped the heads of the screws. Never use heat with this lens or any strong chemicals because those will melt the plastic parts if you’re not careful.
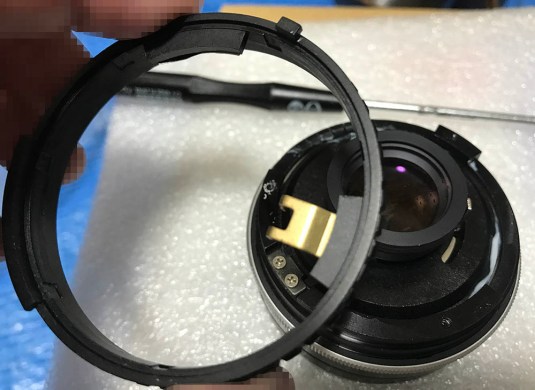
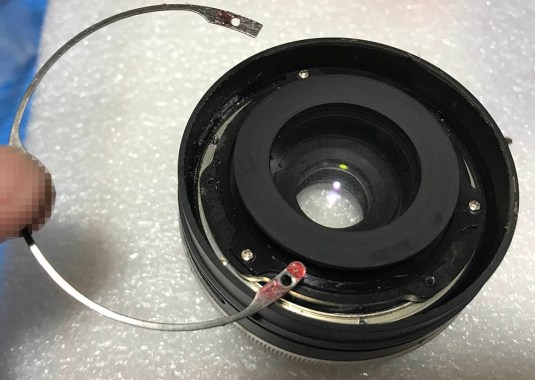
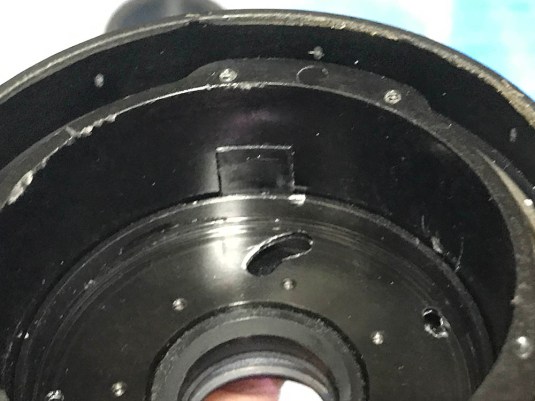
 The bayonet mount can now be safely pulled away once the screws are gone. See all that white grease? That’s a sign that the lens was recently serviced because the grease is still fresh. Don’t use a petrol-based grease with this lens because that may harm the helicoids since they were made of plastic. Use lithium or silicone-based grease for these like what we see here. I am sure that these are resistent to petrol-based greases but we just want to make sure that this is never going to happen with our plastic toy-lens.
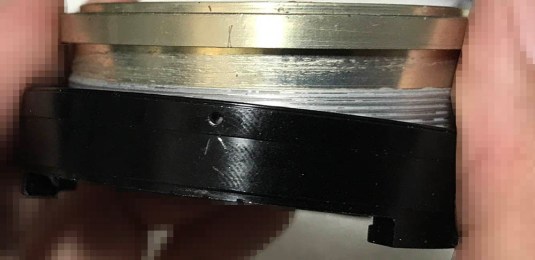
 The aperture ring is coupled to the iris via this brass claw. The aperture ring is plastic as usual and this brass claw is simply burnt-into the aperture ring at the other side just like what you would see from cheap dinky toys coming from “communist” mainland China.
 The aperture ring can be removed by pulling it off just like this.
 Take some notes and pictures as to how this thing looks in your lens. This is the helicoid’s key and it keeps the helicoids synched to enable the lens to extend or retract. When you put the lens back together later after cleaning it, you should get this same configuration when the lens is set to infinity. Always work with the lens focused to infinity whenever it is possible so you’ll have a point-of-reference and make things more predictable.
 Let’s now get back to the front of the lens. These 3 screws secure the ring that pushes the whole focusing ring into position. These are brushed with lacquer at the factory as you can see in the picture. The lacquer is not only there to secure it but more importantly, it’s an indicator if the lens has been messed with or not. You can find these in all adjustable points in a lens. If you see these, make sure you take plenty of pictures or notes so you’ll know how to put things back together “the way they were” as per to Barbara Streisand.
 The ring comes-off just like this. Alcohol will soften the lacquer easily so you can remove it without any effort. Remember the front part of the focusing ring that we removed near the beginning of this section? Removing that part will give you better access to this and it will also prevent you from stripping the heads of the screws because the drivers’ tips will fit the slots better. If you can’t remove the ring, just make sure that you use a driver with a thinner shaft to help you access the screws better.
 The focusing ring can now be removed. Remember to take notes and pictures before you remove this and make sure that you work while the lens is focused to infinity.
 This is how the helicoids should align when set to infinity. I made small scratches at the surfaces of the helicoids where they aren’t visible or where they’re not touching anything so the scratches won’t affect the ring’s movement and make it feel gritty.
 This is how the inner helicoid separates from the central one. I made a mark so I’ll know where I will mate them later when I reassemble this later. Many people get stuck here so I suggest that you read my article on how to work with helicoids in order to avoid getting into the same problem many beginners face. Always remember to mark the point where your helicoids separate because this is the same place where they will mesh properly!
Notice that you only get a small portion of the helicoid with this lens. This is a feature of the Series E lenses, if you can even call it a feature. This has more to do with moulding or the limitations of injection moulding techniques back in the day than cost-cutting. This is something I abhore but I think this had to be done in order to bring the price down and keep marketing happy so they can sell more of these to impoverished photographers. It’s the time of Live Aid and austerity, remember?
 To remove the central helicoid you must first remove the grip and the focusing scale. It’s secured by 3 screws at the grip. Make sure that you use a driver that fits just-right or it is going to scar the edges of the grip or strip the heads of the screws. These are important to the presentability of you lens so you will want to keep these looking good.
 We can finally remove the central helicoid from the outer helicoid or the main barrel of the lens. Again, I marked where they separated so I won’t get in trouble later. Notice that this set of helicoids have threads with a shallower angle. This can be difficult to reinstall because you can get it all wrong by turning it a little to much or too little. This is why we took plenty of notes awhile ago on how everything looks like before we dismantle them.
That’s it for the lens barrel. There’s nothing much to it for somebody who’s familiar with fixing lenses but it may be confusing for people who just got into lens repair. While this is simple enough for somebody who has a little experience working with lenses it is not a good lens for a beginner to tackle because you will need the right tools and materials. It’s better to spend a little bit of money and let a repairer do the job than risk ending up with a lens that can’t be used at all. Let’s now proceed to the objective section!
Disassembly (Objective):
The objective is simple to dismantle and fix for this lens but you’ll have to be careful with the glass and its coatings. They are delicate and are made from lesser materials so they’ll get damaged from the usual ammonia and peroxide mix that I use. If ever you want to do this trick, remember not to soak the glass in the solution but just wipe them with it using a lens tissue saturated with these chemicals. If you can, only wipe them with alcohol or a non-polar solvent. Carefully wipe it in a circular pattern so you won’t scratch the coating because its soft. Always remember that the majority of the parts here are made of plastic so you will want to be gentle with it to prevent it from cracking. The threads are delicate and are easily cross-threaded and worn. Just follow the trick that I mentioned above and you should be OK. You should be fine so long as you followed all of my pointers.
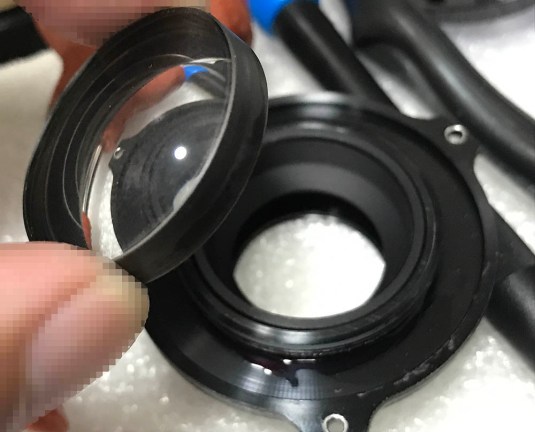
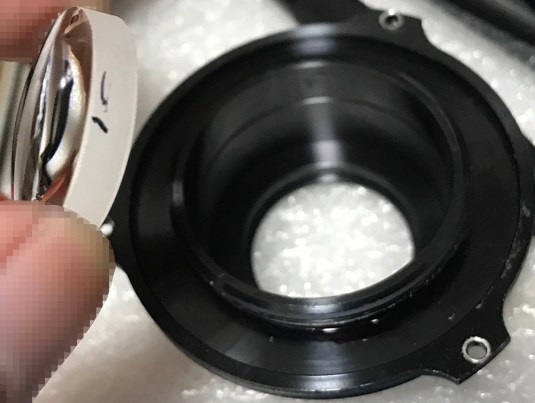
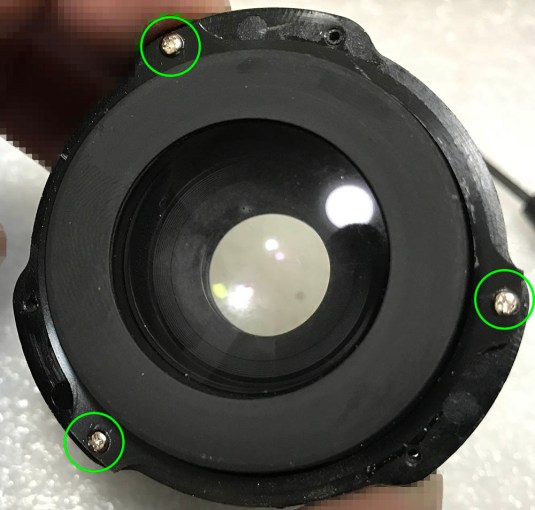 To remove the front elements assembly, remove these 3 screws and you can pull it away. You can do this step much earlier into the disassembly as soon as you can access these 3 screws. I could’ve done that but I saved it until now for presentation purposes.
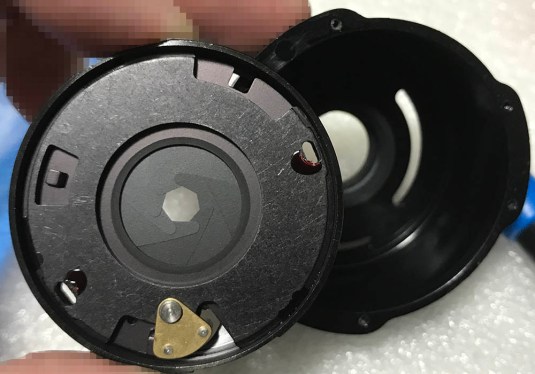
 This is how it came-off. Be careful not to drop this thing and crack the glass. I would also like to caution you about the concaved rear part which can easily be chipped. Please take note that the objective’s housing is also a helicoid. Ideally, the helicoids and objective are kept as separate assemblies to prevent the oil from the helicoid from getting into the iris but there are cases when this had to be done to save money, weight or space. Lenses with this kind of configuration can be prone to the oily iris problem so be careful about which kind of grease you end up using and only apply the correct amount to prevent this.
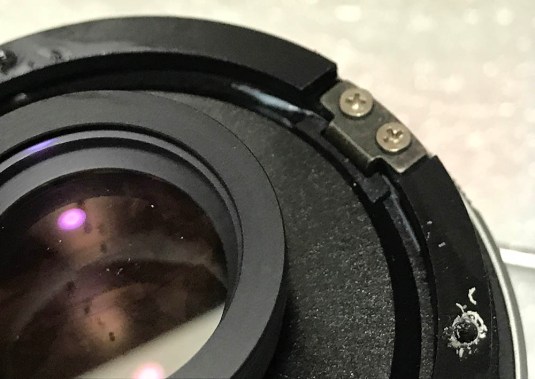
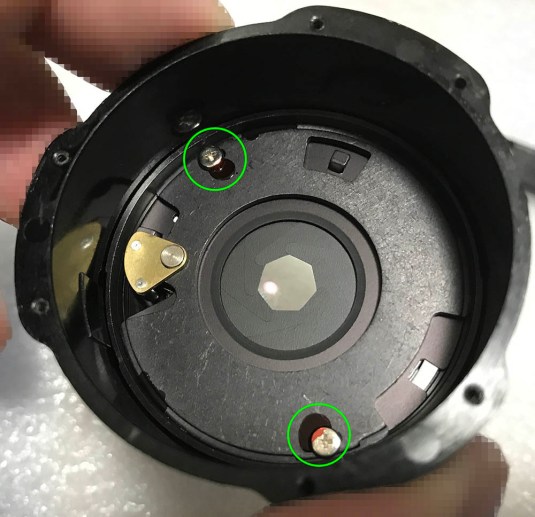 You don’t have to remove the iris assembly if all you want to do is to clean the glass but if you have an oily iris then this is how you remove it. Remove these 2 screws to separate it from the housing but take some notes first as to how it was originally secured. Again, see that lacquer? That’s just an indication that this part is an adjustable mechanism. You can set how big the iris’ opening is by nudging the whole iris assemble. This was done at the factory using precise measurements so don’t tamper with it or think that you can modify it to become larger or smaller as you please. If you did that then your camera won’t give you an accurate reading and your lens won’t give you the correct F-stop when you use it.
 You can actually remove the whole iris mechanism as a unit if you’re careful. It is being held-together by lacquer so you’ll want to be careful with it. If you’re clumsy then this is going to separate into its bare components once the weak bond is gone and you’re forced to clean and reassemble this properly. Putting this back can be tricky as you cannot just simply drop the whole mechanism into the housing. The correct way to do it is to slowly lower the housing onto the iris assembly, read my article on the Nikkor 85mm f/2 Ai-S to see how I do this. There is a link there to a video by Kenneth and that’s a useful resource.
 The rear element is secured by its retaining collar. These are usually easy to remove with your fingers but if yours is stuck, just place a small drop of alcohol to soften the lacquer. I will warn you not to put too much alcohol because it may reach into the cemented group and ruin the lens cement. The key is to apply just a little bit and repeat the process until it is soft enough for you to remove it. Remember that the housing is made of plastic and it can crack when you apply too much force.
 You can pick the rear element with a lens sucker. Don’t forget that there’s a spacer under it and you must put the spacer back properly with it facing the right direction. Mark the outer surface of the spacer so you’ll know which side should be facing where. There is a small mark on my spacer made at the factory during anodization and I use that as some kind of guide to help me later. I drew a small dot at the leading edge of the rear element to remind me how it should be oriented. Use a Sharpie for these or any black permanent marker that’s not water-based so it won’t rub away as you clean it.
 Here’s another one, a lens sucker will be very handy for this. See the black mark? I think I made it too big on this one, a small mark is all you need not something like this.
 And here is the doublet. This is made up of 2 cemented elements and this will separate if you’re not careful. Again, don’t forget to make a very small mark at the wall of this part. I usually just make a few dots at the leading edge and the amount of dots denote the order of the glass elements so I will know which one should be first or last.
 Once you remove the retaining ring of the front element, you can pick it off using a lens sucker. Notice that there’s lacquer at the threads on my sample, I used that alcohol trick to help soften it to prevent me doing any damage to the plastic housing.
 Pick the spacer with your fingers and note its orientation so you’ll know how to put that thing back facing the right direction.
 The 2nd element can now be removed. It’s deep within the housing so a lens sucker will be useful to get this thing out. Notice I made 2 small marks at the walls of the glass, these 2 marks mean that this is the 2nd element and their position denotes the leading edge.
Working with the objective is easy enough that you won’t require any special tools to get the job done apart from a lens sucker. If you need to clean the housing properly then you will have to remove the iris assembly so you can soak and clean the housing by itself. It’s very important that you don’t soak the plastic parts in alcohol for too long and only use a soft brush and some dishwashing liquid to clean the plastic parts. A high concentration is going to bleach or affet the plastic and remove the paint in the lettering. Having said this, you certainly don’t want to soak the plastic parts in the detergent for too long.
Conclusion:
That’s all for the dismantling and repair of this lens. Before you put everything back you should read these pointers just in case. When choosing the correct grease for this lens, it is better to choose a heavier grease because this is a wide lens with a short focus throw. I like lenses with shorter focus to feel as damped as possible. The resistance will make the focusing ring feel nice to turn and you can precisely turn it as oppose to something that’s loose. I also mentioned that you should stick to synthetic grease for this lens somewhere so please follow that advice. When applying grease, don’t apply too much or it’s going to end up in the iris somehow. The helicoids at the housing of the objective should only have a thin film of grease applied to it, this also goes for the opposing helicoid because if that’s oily then the gunk will travel to the casing, too.
 When putting the iris assembly back into the housing, please don’t forget that there’s this slot at the edge of the iris assembly’s housing that should align with a moulded part that’s raised. If you don’t do this then you will risk damaging the iris assembly so be careful!
Before you get too excited and grab some beer, don’t forget that you have to adjust this so it can focus properly! Just follow the steps below and see if you can make it focus or not. If you can’t make it focus properly then you probably got the helicoids wrong when you reassemble it. You should back-track and solve it before you can say that the job is done.
 Reassemble everything up to this point and leave out the front barrel and the front cover of the focusing ring so you can access these 3 screws. You can calibrate your lens’ infinity focusing by adjusting the focusing ring to the scale and tightening these screws once you are satisfied with the results. To know more about how to calibrate your lens’ focusing, I will point you to an article that I did on how to calibrate your lens’ focusing. Please read it so you will know how to do it properly.
 Once you’re satisfied with everything, you can continue and reassemble everything back to how it was and you’re done, congratulations!
We have now arrived at the end of another article, I hope that you enjoyed this one or at the very least learned something. I have a few days off from work so I had the time and I spent some of it writing stuff for the blog. I am not sure when I will write another one, it takes a considerable amount of time and effort to produce something like this and if you loved this article then please go ahead and forward this to your friends and camera club. This will help keep the blog going and also keep lenses from being butchered because it’s going to help show people how to dismantle lenses the right way, amateurs and repairers alike. See you guys again in the next article, Ric.
Help Support this Blog:
Maintaining this blog requires resources to operate. If you think that this site has helped you or you want to show your support by helping with the cost and upkeep of this site then you can simple make a small donation to my paypal.com account (richardHaw888@gmail.com). Money is not my prime motivation for this blog and I believe that I have enough to run this but you can help me make this site (and the companion facebook page) grow.
Leave me some tip?
Thank you very much for your continued support!
$2.00
Helping support this site will ensure that this blog will be kept going as long as I have the time and energy for this. I would appreciate it if you just leave out your name or details like your country and other information so that the donations will totally be anonymous. This is a labor of love and I intend to keep it that way for as long as I can. Ric.

Jul 13, 2020 @ 06:09:34
Hi there just wanna ask you something. “The front collar of the focusing ring” that you mentioned on this article. Can the front collar of the focusing ring of Nikon 50mm f/1.8 Series-E can be removed like this 35mm? Reason I am asking this is that, I have bought 35mm f2.5 Series-E lens and it’s missing the ring (“The front collar of the focusing ring”) and I am just wondering I could buy cheap 50mm Series-E and replace it.
Jul 13, 2020 @ 06:16:33
Or you wouldn’t have a 35mm sereis-e front collar ring would you? If you do can I buy it from you?
Apr 27, 2026 @ 00:54:04
Faascinating article. I think I am still competent to take off the bayonet, but further disassembly I dare not. My lens is v.1. It binds slightly when one begins to focus but otherwise it is completely undamped. It looks like I could introduce some specks of grease via a toothpick to the rear of the helicoid. True?