
Hello, everybody! I am still not feeling well because this is the peak of hay fever season. I will probably be sick until late Spring so please bear with me. Today, I am going to show you a very good lens. It’s very good not because it excels in one thing but it does almost everything quite decently. I almost forgot about this lens until I had to clean one for one of my coworkers and friend. I hope that you will enjoy this article.
Introduction:
The AF-S DX NIKKOR 18-200mm f/3.5-5.6G ED VR II was a real game-changer when it first came out. It was sold as the Nikon D300’s suggested companion lens and many people got one including pros. This was a lens that enabled people to go out and enjoy their trip and not think about bringing more than one lens. It’s still a very nice lens today and they are sold for not a lot of money used. Nikon updated it with a zoom-lock because it has zoom creep but it’s just a small problem compared to the freedom you get when shooting with this lens. You will be assured that you won’t lose a shot because you need to change your lens. I call this lens the “Super Kit-lens” because that’s what it really is. This will be a tour down memory lane and I will give you my assessment of this lens in today’s context.
 This lens feels kind of big considering that it’s a DX lens but it’s still compact considering all the features that Nikon has incorporated into it. This is the first true walk-around lens for the digital camera age.
The following pictures were shot about 10 years ago or more. I haven’t shot with this lens for almost 10 years so please pardon my dated pictures. I was transitioning from film at that time and it shows on my pictures in how I wanted my colors to look, etc.


(Click to enlarge)
This is a very nice lens for travel because it has all of the important focal lengths in one lens. I remember this lens was quite revolutionary when it first came out and the other brands don’t have an answer to this. They rushed to make something similar but they all failed to top Nikon’s effort until much later. This lens is a best-seller and it showed what the engineers at Nikon can really do. It was not designed to be the perfect lens but it was designed to do the job of many lenses while still displaying reasonable performance. This lens achieved a very good balance in almost every situation but is just not as good as the specialty lenses. For some, this is more than enough to get the job done. The autofocus is fast enough and the VR worked wonderfully. Sharpness is not the best but it’s sharp for most situations. The big surprise it this lens isn’t really all that expensive considering all the engineering that went behind it.
 The VR on this lens works wonderfully and I was amazed with it. Pictures like the one on the left were were considered amazing back-in-the-day because it was shot it with ISO1600. Back then, people will avoid using ISO values higher than ISO800 because the results you get beyond ISO400 is too grainy and useless for most situations.
Nikon made cameras that shot higher ISO’s with minimal noise. The picture to the left was shot with a Nikon D90 and it wasn’t at all possible with models that came before it unless you are shooting with the then-new Nikon D300 or a Nikon D3. Nikon had a big monopoly back then when it came to high ISO performance because they focused on high ISO performance over high megapixel count (like Canon). It’s now even these days but it was a very easy choice back then. For high ISO performance, you will want to go with Nikon, for high megapixel images then it is clear that Canon was the way to go. Choices were a lot easier back then to be honest. It is amazing that people have so many things to choose from these days.
With the amazing performance of the Nikon D500 and other lower-level Nikon cameras, I am tempted to get one of these again and go traveling across SE Asia to take pictures. It’s still an amazing travel lens despite its age and will still be relevant for a couple of more decades. Sure, the new one can zoom out to 300mm but that’s not really a big difference compared to 200mm and you won’t notice much of a difference in most situations unlike the wider-end where every mm difference counts. This lens also focuses quite close so it is an added bonus for people who like to take pictures of small details.
That’s it for the introduction. This lens was tested and documented by almost all camera review sites so if you want to read more about this or see more examples then please do a Google search and read all of the available material on the internet. Let’s start with the lens repair article!
Before We Begin:
If this is the first attempt at opening a lens then I suggest that you read my previous posts regarding screws & drivers, grease and other things. Also read regarding the tools that you will need in order to fix your Nikkors.
I highly suggest that you read these primers before you begin (for beginners):
- Essential tools
- Best practices 1
- Best practices 2
- Best practices 3
- Ai conversion
- Working with Helicoids
Reading these primers should lessen the chance of ruining your lens if you are a beginner. Also before opening up any lens, always look for other people who have done so in Youtube and the internet. Information is scarce, vague and scattered (that is why I started this) but you can still find some information if you search carefully.
I highly recommend that you also read my working with helicoids post because this is very important and getting it wrong can ruin your day. If I can force you to read this, I would. It is that important!
For more advanced topics, you can read my fungus removal post as a start. This post has a lot of useful information here and there and it will be beneficial for you to read this.
Disassembly (Front):
Working on this lens is relatively easy but it’s not something that a beginner should do. It is also very important that you have the proper tools for this so you won’t damage it and create a bigger problem. Servicing this lens is considered to be easy so just send this lens to a repairman, it won’t cost much anyway. I would rather pay a small sum of money for the cleaning of this lens than gamble with my chances if I were a beginner in lens repair.
 Get a pair of lens spanners with that are wide enough and carefully use it to remove the front elements cell. If you don’t have the right tool, use a piece of acrylic and make your own. Read my guide on how to make your DIY lens spanner if you haven’t seen it.
 The front elements cell comes off just just like this. Be careful not to drop it!
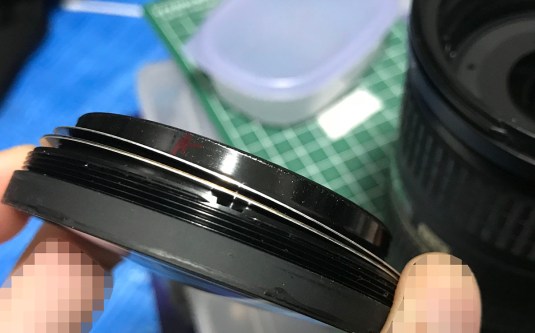 There are shims here that you don’t want to lose. These are used to ensure that the front elements cell is seated properly to achieve the correct elements spacing.
 You cannot go any further at this point unless you remove the seal around the glass. Use a bit of alcohol to saturate it so you can peel it off easily.
Never adjust the outer ring with the 2 holes! This was set at the factory so that your lens will focus optimally!
 Saturating the seal will weaken the adhesive and this will help you peel it off safely. Use a small precision screwdriver to pry at the sides of the seal to lift it off a bit then slowly go at it until you are able to effortlessly peel the seal off. Be careful not to damage this!
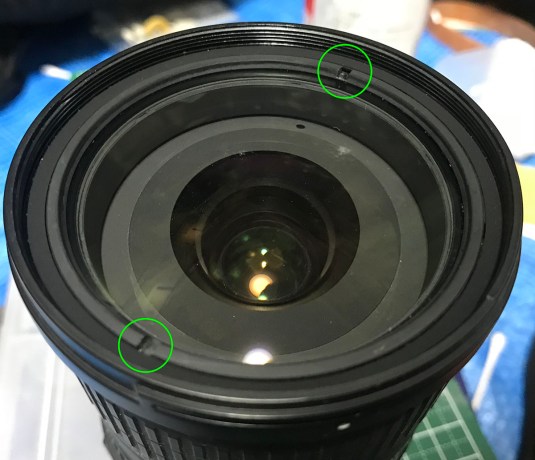
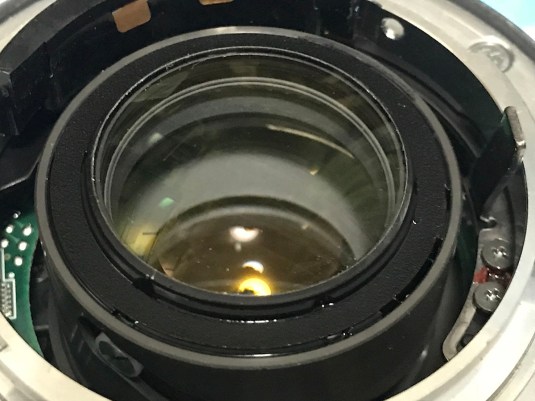
 You now have access to the slots on the housing of the floating element. As you can see, it has scars on the slots and that’s a sure indication that somebody else has worked on this lens before. Carefully use a lens spanner to loosen this part and be careful not to scratch the glass! The glass is already scratched when I got to it and I wonder what happened.
 You can then extract it using a lens sucker. Take note that there are also shims under the housing so please do not lose those, too.
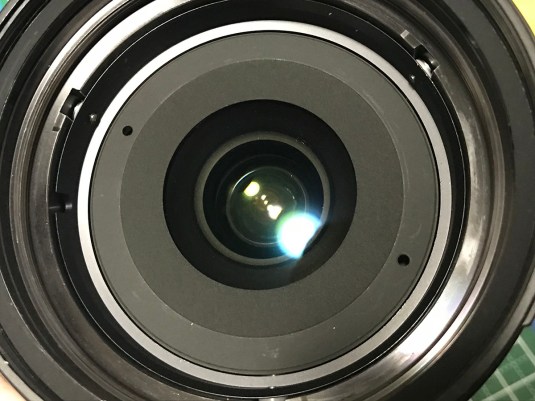
 You can now access the VR element. You can use a finger to depress the stop-down lever so the iris stays open while you wipe away any dirt or fungi from its surface. This is deep within the lens so I used a cotton swab to wipe it clean. You must work carefully with this because the VR element is sensitive and you don’t want to misalign it so be gentle.
This lens usually gets dusty inside because it’s what I would call a pumper zoom. It tends to suck-in dirt because of it extends quite a bit so every time you zoom-in or out the lens will suck air into the inner chamber of this lens. This is a very common problem for this lens and this kind of job is considered routine maintenance. Only clean this when there is a lot of dirt and don’t do this periodically. A few specs of dust is OK but a fungus colony isn’t. I would say that you will have to do this every couple of years if you use this lens all the time. Moisture can easily get trapped inside as well and that’s not good.
Disassembly (Rear):
If your lens also has dirt and fungi on the other end of the lens then you should open the rear as well to access them. If you don’t have anything to clean here then just skip this. It is important to note that electronic lenses do not need to be opened and overhauled like manual focus lenses because there are many sensitive parts involved so just clean what you need to clean and leave the other things alone if there aren’t any problems.
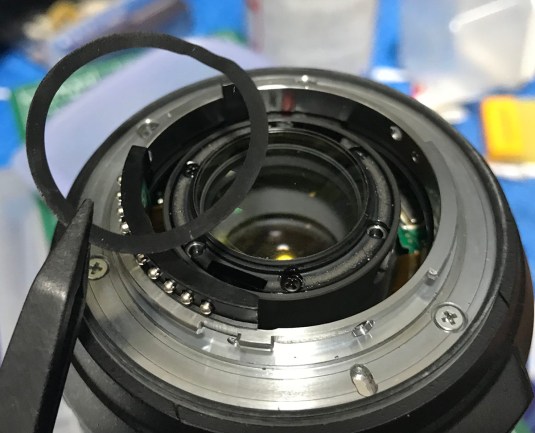
 Remove the rear baffle by removing 3 screws around located at the throat of the bayonet mount. Be careful when removing this so you won’t damage the contacts block.
 The rear elements cell is sealed with another strip of adhesive tape. Saturate it with some alcohol just like what you did to the one in the previous section.
 Carefully peel it off…
 There are 3 screws securing the rear elements assembly, carefully remove these and be sure not to scratch the glass. There are 2 slots on the housing as you can see in the image and you should align these again later when you reinstall this.
 You can then extract this with a lens sucker. There are shims underneath this and make sure that you don’t lose any of these.
Never open the rear optical cell! This was collimated properly at the factory so your lens will achieve proper focusing! Slightly moving anything inside will result in your lens not being able to properly focus!
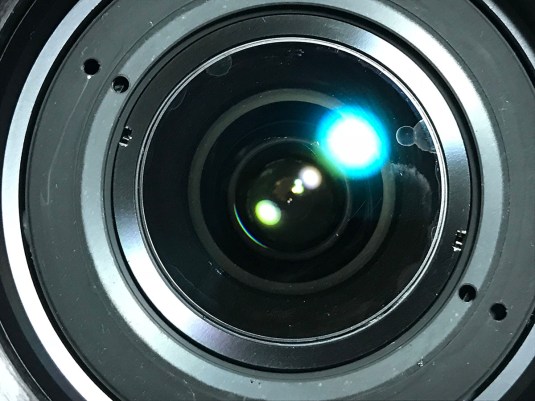
 The rear surface of the VR element can now be accessed. Wipe it gently so you misalign it because it is a very sensitive assembly. If you don’t see any fungi or hardened dirt then it is just OK to blow some air. Never used canned air for this, it’s too strong.
 If you find that you need to remove the lower half of the lens, make sure that you put the screws back together the proper way because one of them is shorter. You generally don’t want to do this unless the ribbon in your lens is blocked or you need to repair something that is deep inside the lens. I am just showing you this just in case.
That’s all you need to do to clean this lens. I wouldn’t advise you to do this on your own if you don’t have the right tools or experience. I just wanted to show you how to do this so you’ll know what kind of work is involved here and appreciate the work your repairman has done to your lens. This is easy for somebody like me but is not a job for a beginner.
Conclusion:
This probably took me less than an hour to do. Unfortunately, the fungi on the front lens assembly has eaten most of the coating and there is nothing much I can do. The coatings used on many newer Nikkors are soft but thankfully, they are used on the inner surfaces of the lens where you can’t access them. Fungus love to eat these and if you got a colony there, you can be sure that the coating there is gone and it will leave a bald patch in the nice coating. I remove fungus from lenses using this method but I will not use this for the lenses with the softer coatings as this will be too harsh. This method is OK for the harder type of coating used on older Nikkors but you will still have to be careful.
These lenses were usually bought by people who just wanted to have a nice setup and it’s always the case that these lenses are almost always found in terrible condition because it has not been stored properly.
That’s it for today. I hope that you enjoyed this post. I wanted to write a longer one but I am still sick from hay fever so I don’t have the time and mood for it. Thank you for all of the support and well-wishes. I will get back to writing more original and quality articles as soon as I feel better. Thank you again and don’t ever get tired of following and sharing my blog. See you guys next time, Ric.
Help Support this Blog:
Maintaining this blog requires money to operate. If you think that this site has helped you or you want to show your support by helping with the upkeep of this site, you can simple make a small donation to my paypal.com account (richardHaw888@gmail.com). Money is not my prime motivation for this blog and I believe that I have enough to run this but you can help me make this site (and the companion facebook page) grow.
Leave me some tip?
Thank you very much for your continued support!
$2.00
Helping support this site will ensure that this will be kept going as long as I have the time and energy for this. I would appreciate it if you just leave out your name or details like your country and other information so that the donations will totally be anonymous it is at all possible. This is a labor of love and I intend to keep it that way for as long as I can. Ric.

Mar 12, 2018 @ 22:43:40
Do you have a similar video for the Nikon 180 af-d prime lens , Nikon still make this lens apparently.
Sep 28, 2019 @ 22:08:50
Love this site! I was able to de-fungus several lenses. But when I reassembled the 18-200, the zoom only goes from 18 to 70. Took it apart again, can’t find the problem. where did I go wrong??
Jan 14, 2025 @ 22:45:22
Did you solve the problem? My son has repaired his identical lens and has the same problem when re-assembling.
Jun 10, 2021 @ 19:55:14
thank you, this article is very useful for me