
Hello, everybody! I was hungry this morning so I opened the refrigerator to look for something to eat. I found an old sandwich from a couple of days ago. I reheated it in a toaster and it tasted as good, if not better than it was a few days ago. Reheating old food could make it taste better at times because fermentation helps a lot in breaking-down some of the ingredients. This is also true with lens design but instead of fermenting it benefits a lot from newer techniques in manufacturing, enabling an old design to get new upgrades and performing a bit better compared to the older designs. We’ll talk about one such thing in this article.
Introduction:
The New-Nikkor 55mm f/1.2 was sold from 1974 to 1977 and it was followed by the Nikkor 55mm f/1.2 Ai which was sold for only a year up until 1978. It’s an update of the older Nikkor-S.C 55mm f/1.2 Auto. Most, if not all of Nikon’s lenses received an update in the 1970s and were sold as “New-Nikkors“. All of them have new barrels, some even have newer optics or better coatings to make the upgrade complete.

Here it is with the Nikkor-S.C 55mm f/1.2 Auto which it shares a lot in-common with. The new barrel enables it to be mass-produced easier and cheaper without sacrificing quality and other things. The dream of creating a 50/1.2 for the SLR system was only fulfilled when the Nikkor 50mm f/1.2 Ai debuted.
It retained the old 7-elements-in-5-groups design of the Nikkor-S 55mm f/1.2 Auto but with a slightly-modified optics due to a change in glass recipe, enabling this to focus a bit closer. Despite that, it’s safe to assume that it performs similarly to the older lens in many ways.

Here it is with the Noct-Nikkor 58mm f/1.2 Ai-S to the left and the Nikkor 50mm f/1.2 Ai-S to the right. It sits in the middle with a 55mm focal-length. Compared to the rest, it has the “dreamiest” rendering of the lot.
For those who are new to Nikon, here’s a recap of the f/1.2 family:
- Nikkor 50mm f/1.2 Ai (1978), this is the first 50/1.2 for Nikon, a game-changer.
- Nikkor 50mm f/1.2 Ai-S (1981), same optics but different barrel and iris.
- Nikkor-S 55mm f/1.2 Auto (1965), the first f/1.2 “normal” Nikkor for the F-mount.
- New-Nikkor 55mm f/1.2 (1974), new barrel but slightly-modified optics.
- Nikkor 55mm f/1.2 Ai (1977), appears to be the same as the one above.
- Noct-Nikkor 58mm f/1.2 Ai (1977), a legend with great performance for its time.
- Noct-Nikkor 58mm f/1.2 Ai-S (1981), same optics, different barrel.
One interesting story about this is how a special variant made for NASA was sent to space, it was used to take amazing photos of our ozone layer. This is something that you can be proud of if you are a fan of this it. This says a lot about this lens’ performance. More photos and information about space cameras can be found here in this article.
Studying how a lens performs is crucial so you could maximize it. You will know its strengths and weaknesses and that knowledge will help you determine which lens is the best for a job. I shot these from f/1.2, f/2, f/2.8 to f/4, we’ll see the most changes happen within these apertures. I also assume that these are the most common apertures that people would like to shoot this with.


(Click to enlarge)
The center is adequately-sharp wide-open but flare and other aberrations will make it appear soft. Its shallow depth-of-field is also another factor that makes it appear soft. The corners don’t look bad at all but they’re not in the same level as the center. Stopping this down f/2 will bring the resolution up. The center now looks a lot sharper and the corners improve somewhat. The center looks excellent at f/2.8 and the background now looks better. You’ll notice that the center is operating at its peak by f/4 and the corners look nicer, too. Stopping this down further only makes the corners look better and you’ll get more things in-focus. The bokeh quality is nice at best and mediocre to poor at worst but it’s safe to say that it’s better than a lot of lenses of its time.

(Click to enlarge)
Foliage and twigs are difficult subjects to render for a lens with terrible image quality but this one could do a great job.

There’s a bit of barrel-type distortion which is quite high for my taste but it won’t distract your viewers. You’ll be able to hide it somewhat by not positioning any straight lines parallel to the edges of the frame. It has high field-curvature which is something that you should be aware of when shooting flat subjects.

Vignetting is high wide-open but it improves considerably by f/2 and you’ll only see traces of it from f/4 on.

The discs have outlines and the core is not even when shot wide-open. Stop the iris down a bit to get a cleaner look. Wide-open, this lens is able to render with a “dreamy-look”, something that you could use to tell a story. I like how it does thing since I’m able to change the look of the photos just by stopping the iris down. This is an interesting feature that makes this lens a valuable tool in an artistic sense.

The looks can be overdone at times which can make things look disorienting but it’s great if you know how to use it to your advantage.

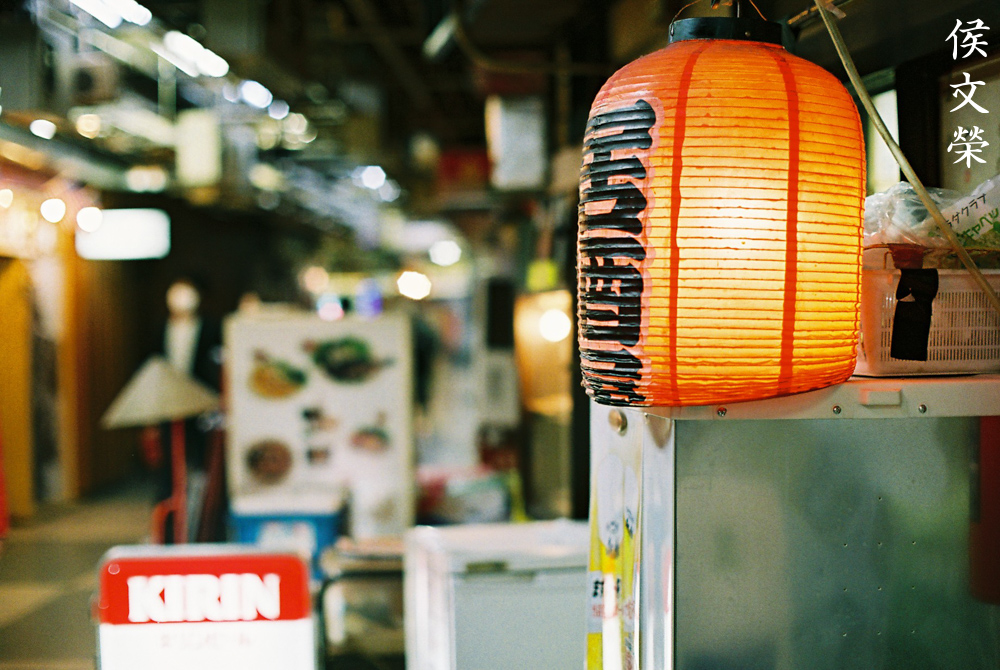
It flares terribly wide-open but not to the extent that it makes your photos look ugly. In fact, it does it nicely so you could use it as an element in your photo. You’ll also get blobs in your photos when you have a bright light source within the frame.

I consider f/2 to be its best aperture since it retains a lot of that “dreamy-look” but you’ll get sharp results with it, too. This gives you a photo with a balanced feel, something that is difficult for some lenses to do.

Shooting with it at f/1.4 is also a nice trick to get a bit off sharpness while still getting a soft, surreal look.

This was shot wide-open. The red nose of the mascot looks quite sharp.
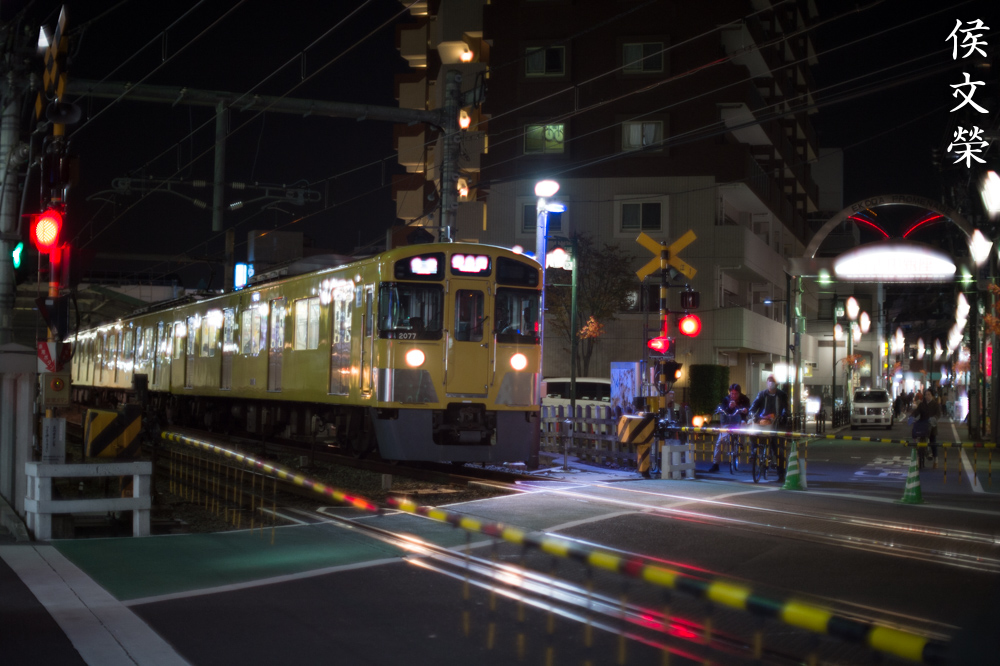
It’s great for shooting night scenes. It was shot wide-open, you can observe the effects of spherical aberration very well. Chromatic aberration can also be seen in the shiny parts of the train. Focusing it can be difficult, its thin depth-of-field makes it tricky to nail the perfect shot at times.


(Click to enlarge)
Shooting at ISO1600 at wide-open apertures is hit-or-miss. You’ll get great results if you nailed your focus but I tend to get a lot of misses specially with moving subjects.
Let’s now check some film photos. Film has a unique look that is hard to simulate with a digital camera thanks to grain. It reacts differently to light, this means that it could mask a lens’ flaws or amplify them. Since it was designed to be used with film, it’s best that we judge this using its intended medium. Most of these were taken with the iris stopped-down unless there’s not enough light. I shot some of them with Fujifilm Venus 800 while a couple of them were shot with Fujifilm Industrial 100.

This was taken with Fujifilm Venus 800. I think it was shot at f/4, this is a nice example of how nice this lens is when stopped-down to smaller apertures. It’s also perfect for showing its foreground blur characteristics. The details of the flag and kimono looks nice and the rendering of the skin looks beautiful. This a nice portrait lens if you could frame your subjects properly because 55mm is kind of wide for my taste.

Photos taken with it have a nice 3D-look, subject separation is nice and you can make your subjects stand-out from the background with the right framing. This could be attributed to its simple optical design.

Here’s another picture that was shot with Fujifilm Industrial 100. See how nice the subjects are separated from the background? I think this was shot at f/8, even at this aperture I was able to get nice subject separation. The background bokeh is smooth but you could get some rough-looking bokeh if you have twigs and foliage in the background. It isn’t as obvious here because of how film renders the blurry bits. It feels like grain helps mask the roughness to an extent.

Exquisite, see how nice the subjects look? Every detail was captured beautifully and the bokeh is smooth. The focus-transition is smooth so you won’t get a “wall-of-focus” effect. This is due to the higher field curvature of this lens, while it’s something that’s usually negative you could use this to your advantage.


(Click to enlarge)
These were taken with Fujifilm Industrial 100 at wider apertures since I was in the shade. This lens reveals its true character when shot at bigger apertures. While spherical aberration could be observed it’s not ugly at all and it adds a subtle “glow” around highlights. This makes skin look beautiful and healthy.

(Click to enlarge)
These were also shot at wider apertures. Despite having somewhat smooth bokeh quality there will be times that it will show some roughness if you’re not careful. It can look distracting at worst but it’s not ugly at all, at least for me.


(Click to enlarge)
Nailing your focus is difficult at times with this lens so a slight error will result in blurry pictures. This lens is not forgiving in this regard, you’ll want to be careful when you shoot with it wide-open on subjects that won’t stay-still and hold their poses for you.


(Click to enlarge)
Here are more pictures that were shot with Fujifilm Venus 800. I hope that you will appreciate this better after seeing these. Some people poo-poo it since they don’t know how to use it or they are probably expecting Zeiss Otus-level performance from it. That is unfair to judge something out-of-context, lenses should also be judged on how they render stuff, the “intangibles” as I call it. Lenses for me are like brushes, you just can’t put values on them through scores from a lab test, this is the reason why a lot of lenses these days render similarly. That drive to produce higher metrics has given us lenses that score high but their photos have no “soul”.
I highly recommend this to anybody looking for a lens that renders with a unique look. They’re not expensive these days but be sure to get one that has a factory Ai-ring installed or you won’t be able to mount them safely to newer Nikons that won’t allow you to flip the Ai-coupling tab. That alone will add $15.00 more to the price. I usually see these for $300.00 or so but you could get one for less if you’re lucky. If this isn’t what you want, get the Nikkor 50mm f/1.2 Ai-S instead. It’s sharper but it won’t give you that unique look that makes this so good. I can’t compare both since they’re more different than similar to each other. If you’re looking for one of these, it is important that you look at the iris and make sure that it’s dry and snappy when actuated. Turn the rings to see if they operate smoothly. The optics needs to be clean and clear, too. This is a great lens, it will bring you a lot of great memories while shooting with it. Videographers may want them, too. These are amazing lenses so I am sure that people will still shoot with them for decades to code. Happy hunting.
Before We Begin:
If this is your first attempt at repairing a lens then I suggest that you check my previous posts regarding screws & drivers, grease and other things. Also read what I wrote about the tools that you’ll need to fix your Nikkors.
I suggest that you read these primers before you begin (for beginners):
Reading these primers should lessen the chance of ruining your lens if you are a novice. Before opening up any lens, always look for other people who have done so in YouTube or the internet. Information is scarce, vague and scattered (that is why I started this) but you can still find some information if you search carefully.
I highly recommend that you read my working with helicoids post because this is very important and getting it wrong can ruin your day. If I can force you to read this, I would. It is that important!
For more advanced topics, you can read my fungus removal post as a start. It has lots useful information and it will be beneficial for you to read that.
Disassembly (Lens Barrel):
The construction of the barrel is conventional but that doesn’t mean that it’s easy. It’s cramped inside and you will need a lot of dexterity in order to position things when removing or putting them back. These lenses tend to have parts that were sealed with epoxy or lacquer, only heating the parts or dissolving the seals will make them safe to remove. You’ll require a few special tools to service this along with experience to make a precise judgement when things doesn’t go according to plan. If your lens needs to be serviced, send it to a repairman, be sure that he’s reliable so just ask your friends for a referral.
Since this lens was stuck in certain places I couldn’t remove the parts in the proper order so my photos won’t make any sense in terms of disassembly sequences but just follow the order of the steps, that should help you get your way around it.

Locate and extract this to remove the front barrel. It may be sealed with paint and only dissolving it will do. If yours is stuck simply apply a small drop of acetone to it to help soften the seal.

Carefully unscrew it.

Carefully pull the objective from the barrel and be sure not to scratch the rear element.

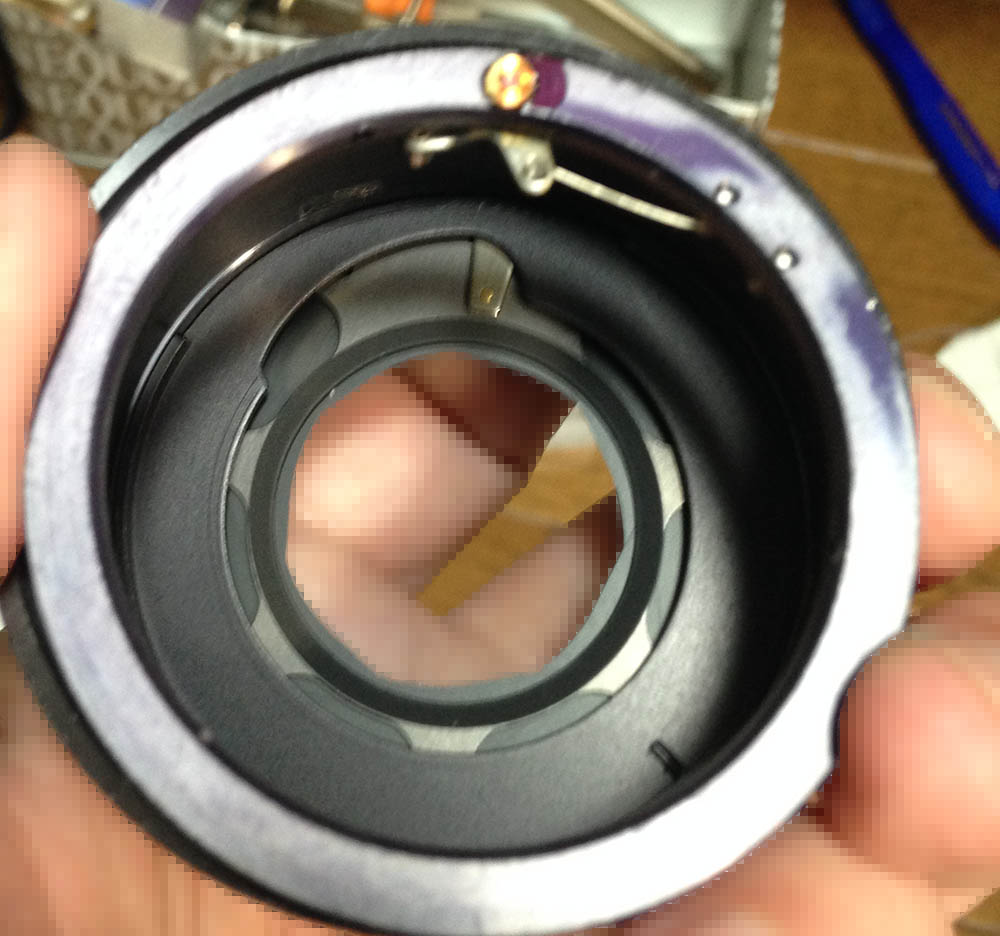
Extract these so you can remove the bayonet mount. Many people get stuck here because they have stripped them. To prevent this happening, read my article on how to remove bayonet screws.

Remove the bayonet mount and the aperture ring.

Carefully remove the rubber of the focusing ring to reveal these. Extract them to remove the focusing ring.

Remove the focusing ring, it shouldn’t be stuck to anything.

Carefully examine the parts and their alignments, this is the last chance for you to take notes. I also removed the grip by extracting its screws.

Carefully remove the sleeve to reveal the access holes underneath it.

Extract these to remove the helicoid stop, there are 2 of them.
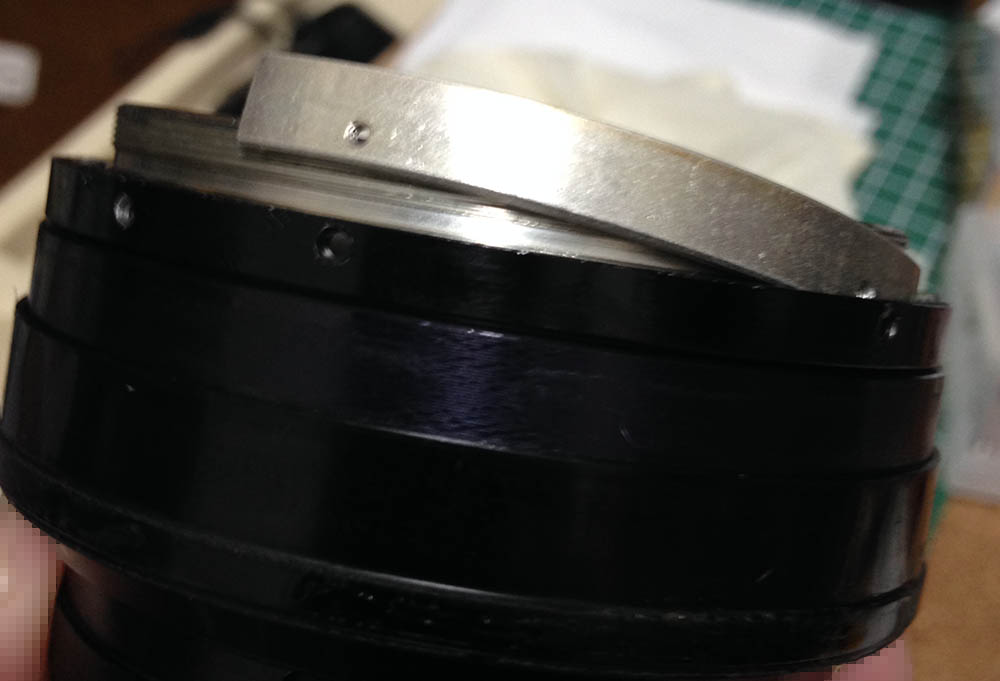
Remove the helicoid stop and don’t forget to note which edge should be facing the front.
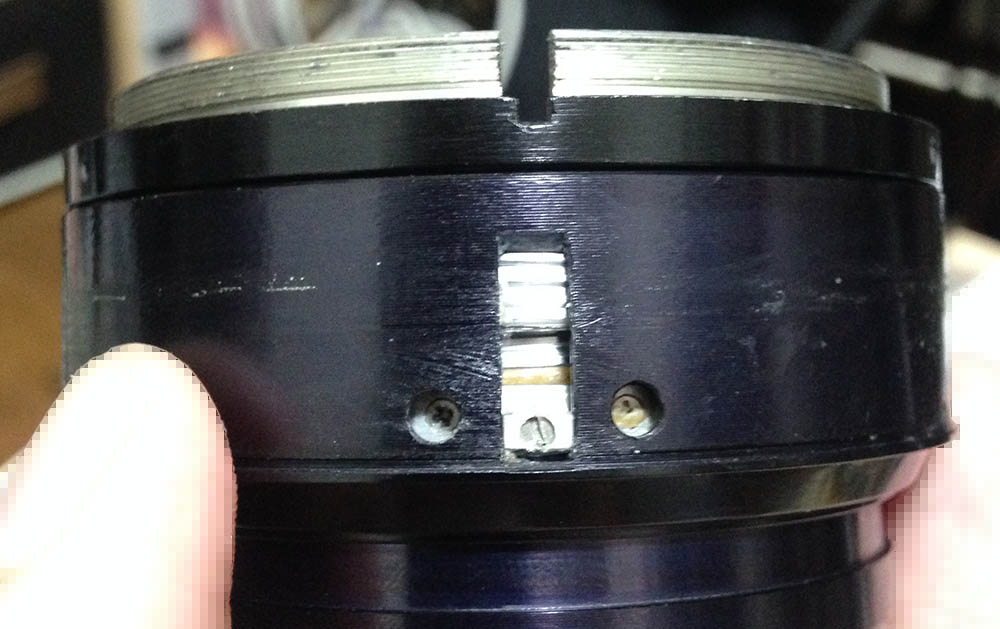
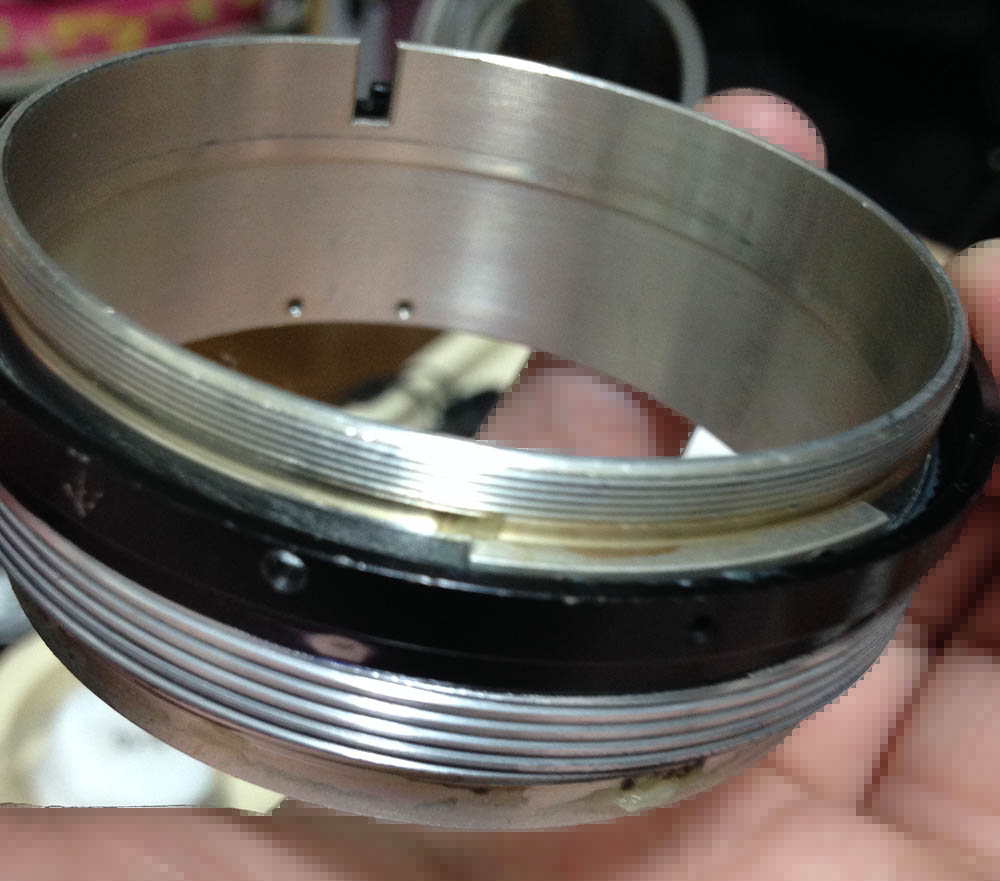
Extract these to remove the helicoid key. It keeps the helicoids synced so turning the central one will allow it to extend-or-retract the barrel. These can be hard to remove at times and only heat will soften their seals.

Separate the central helicoid from the outer one. Don’t forget to note where they parted since this is also the same spot where they should mesh. People forget to do this and waste a lot of time later figuring how to put these back. To prevent this from happening to you, read my article on how to work with helicoids.
Remove the helicoid key and clean it thoroughly.
Without the helicoid stop you’ll be able to turn the inner helicoid until it disengages.
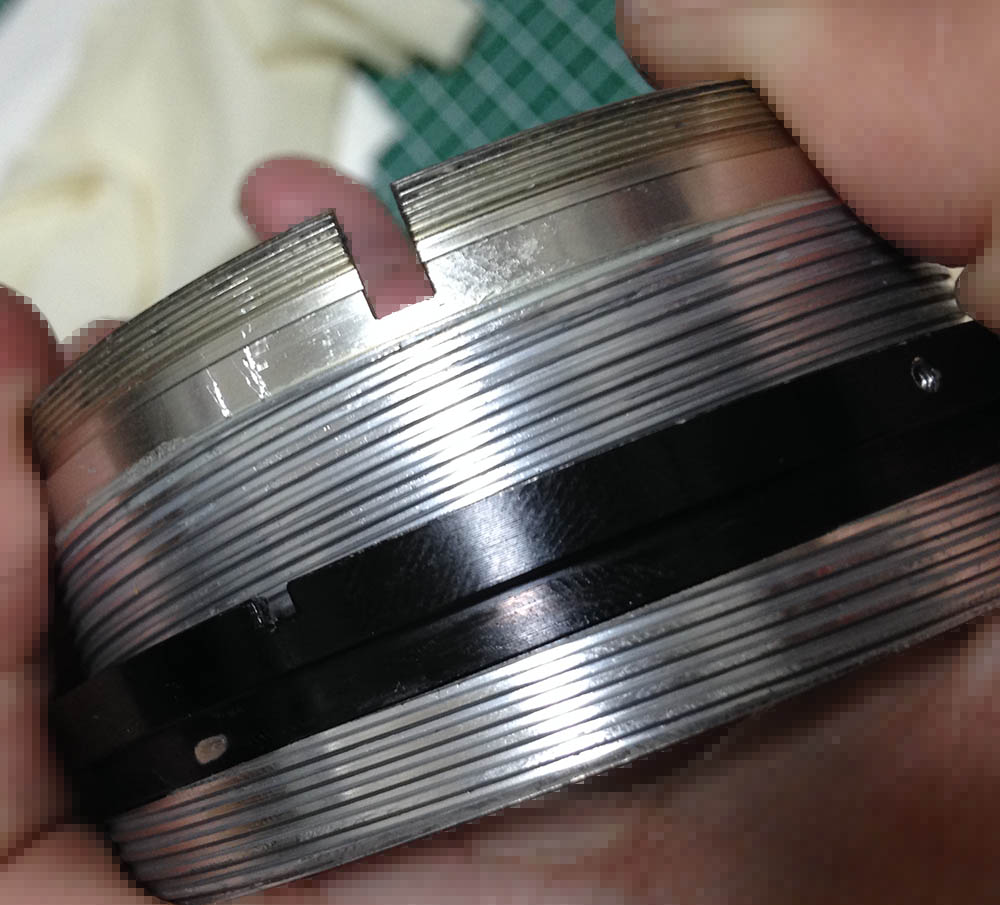
Separate the inner helicoid from the central one and don’t forget to note the spot where they parted.

If you want to dismantle everything read my Nikkor-S.C 55mm f/1.2 Auto article. It shows how to remove and repack the bearing. You’ll have to remove the brass ring here and decouple the spring to make it safe for you to work on the bearing.

Carefully clean the parts, never leave any residue. Scrub the helicoids, I would even polish the threads with a stiff-bristled brush. Hardened dirt can only be removed with a sharp toothpick.

After polishing the helicoids it’s now time to apply some grease. Never apply excessive amounts, a thin film is all you’ll need.
A thin-type of grease works best with this because the focus-throw is long, it will give the best results. Never apply too much grease or it will migrate to the iris mechanism and cause an even bigger problem. Only apply a really thin film to the slots of the aperture ring.
Disassembly (Objective):
The objective is conventional in terms of design but the elements are huge so you’ll have to handle it with care in order to prevent damaging anything. You’ll need special tools to remove the parts here and some alcohol to soften the seals. Never flood anything here with alcohol or solvents since there are cemented groups here. It’s best if you can read my Nikkor-S.C 55mm f/1.2 Auto article since I have the steps outlined there. The design of their objective is similar so you could use that article to help get guide you through the process, too.

Carefully remove the rear optics assembly and don’t forget to note its alignment as its not symmetrical.

The front optics assembly can be easily unscrewed.
Clean the glass carefully. If your lens has fungus, read my article on how to clean lens fungus. Do not use the solution at full-strength, thin it with distilled water. Don’t soak the elements in the solution for too long or it will dissolve the coatings. The cemented group is fragile so handle it with a lot of care.
Disassembly (Iris Mechanism):
The iris mechanism can be easily serviced but it requires a lot of care since it’s adjustable. Take lots of notes to help guide you through everything so you’ll know how to put this back properly again later.

Since the iris mechanism is adjustable be sure to make a few marks so you’ll know its precise alignment. Place a few drops of acetone on the screws to dissolve their seals before extracting them.

Inspect and study how the iris mechanism works before you dismantle it.
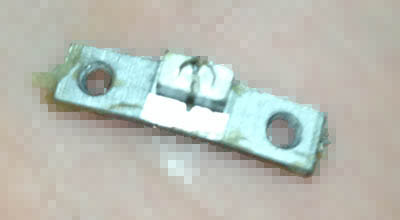
Remove this ring with the regulator lever carefully, it can be a tight-fit.
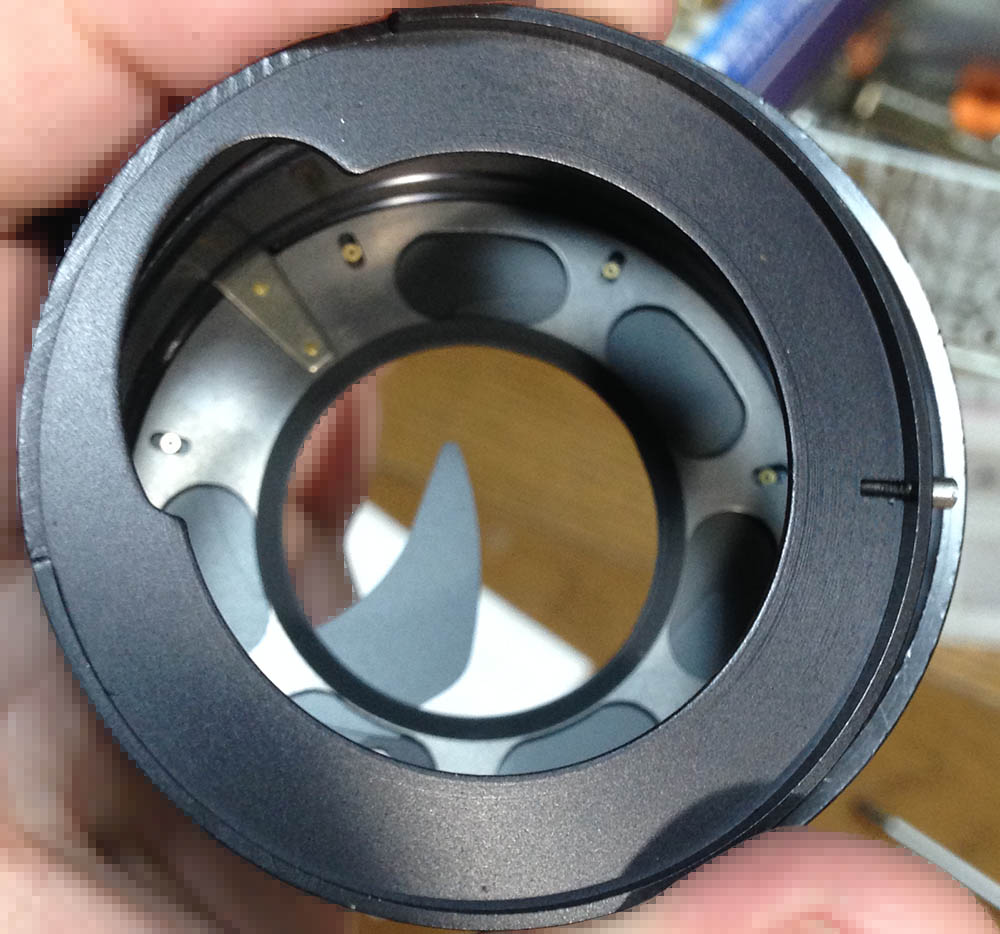
Extract the screw of the regulator before you remove it.
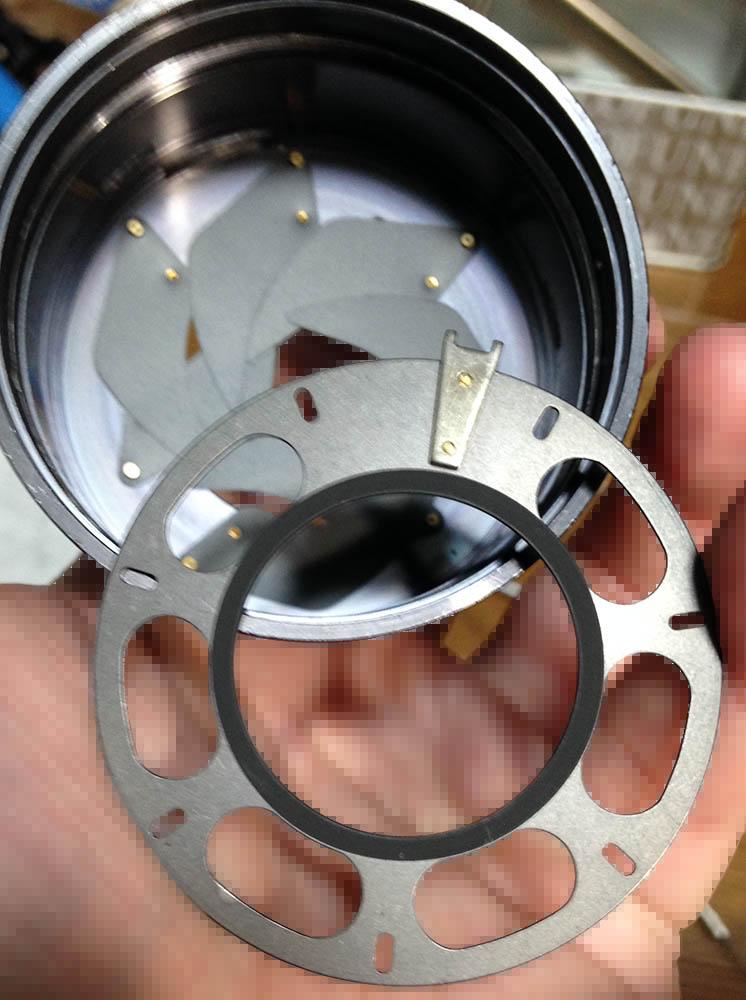
Carefully remove the diaphragm plate and don’t forget which side should be facing up.
Carefully remove the blades, only handle them by their pins. These are delicate, never warp any of them.

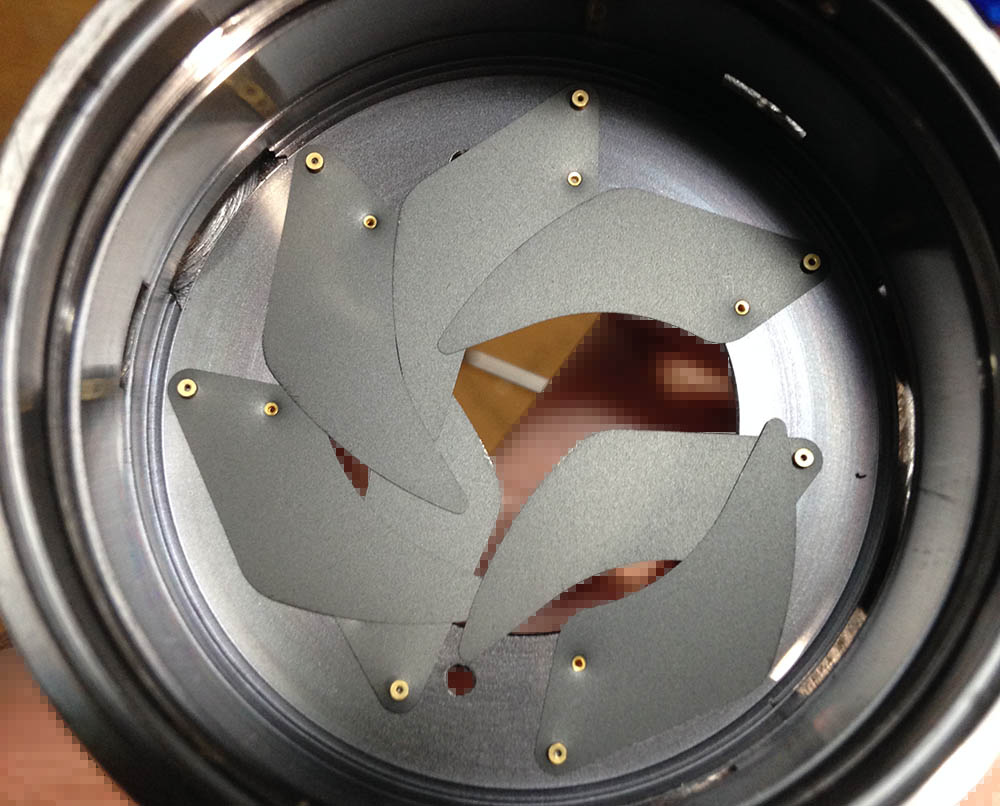
The iris is now clean. Servicing the iris is always stressful for me since the parts are so delicate.
Carefully wipe the blades with naphtha and lens tissue to clean them. You should never lubricate anything in this area, it should operate without any oil. Clean everything well and reassemble the iris. Be sure that all the parts are facing the right way so you won’t damage anything.
Conclusion:
It took me more time than usual to repair this since most of the parts were sealed. I also had to clean and then polish some of the parts in order to make them function smoothly. Repacking the bearing also take lots of time and you’ll probably spend an hour just that part alone. Putting the objective back into the barrel can be a little bit difficult as there’s very little space inside of the barrel. You’ll have to align the pegs of the iris mechanisms to their forks. This requires a bit of experience to do efficiently.
If you need to calibrate the focus read my article on adjusting a lens’ focus so you’ll know how it’s done using simple tools in a DIY setting. You’ll have to get it right since it has very thin depth-of-field.
Here’s a video from our friend, Kenneth. It shows an alternative way to adjust the focus of this lens. Please subscribe to his channel and view his useful videos.

It’s now done and it sits happily beside the Nikkor 50mm f/1.2 Ai-S. These are amazing lenses, treat them well and they will be able to take photos for decades to come.
Thanks for following my work, if you liked this article please share this with your friends so it will get more views. This site earns around $1.10 a day, it’s totally reliant on views. You can also support this site, it helps me offset the cost of maintenance and hosting. You are also helping me purchase, process and scan film. This site promotes the use of film so we’re all in this together. See you again in the next article, Ric.
Help Support this Blog:
Maintaining this requires resources to operate. If you think that this site has helped you or you want to show your support by helping with the site’s upkeep, you can make a small donation to my paypal.com account at richardHaw888@gmail.com. Money is not my prime motivation for this blog, I believe that I have enough to run this but you can help me make this site (and the companion facebook page) grow.
Buy me a roll of film or a burger?
Thank you very much for your continued support!
$2.00
Helping support this site will ensure that this will be kept going as long as I have the time and energy for this. I would appreciate it if you just leave out your name or details like your country’s name or other information so that the donations will totally be anonymous. This is a labor of love and I intend to keep it that way for as long as I can. Ric.

Feb 07, 2016 @ 22:08:15
Again, very nice work Rick.
Thanks for sharing.
While not a technically brilliant lens, it is however one of my favourites.
Feb 07, 2016 @ 23:46:18
Thank you, Ron! Simple is best, that is my motto for life.
Feb 07, 2016 @ 23:52:04
I have a particular interest in this lens, mainly due to the history and development behind it.
Here’s a shot of a collection that I have of these lenses – https://drive.google.com/file/d/0B4ev_RexsQB9YS1ueVNXV0JObEU/view?usp=sharing
Feb 08, 2016 @ 00:19:43
jesus! that’s a lot of 50mm! f/1.4s! i am not aware of the differences within the pre-Ai metal focus ring version. I am aware that there are 2. one with screws on the bayonet and one that dont’s.
Feb 08, 2016 @ 00:28:02
All of the Nikkor-S 55mm f/1.2 had screws on the bayonet mount.
Early types used 3 screws and lens from 192153 – XXXXXX (type 03, version 02) used 5 screws.
Feb 08, 2016 @ 01:17:56
I see. I really like the 55’s rendering. Very dreamy
Feb 08, 2016 @ 00:20:40
sorry, I mean the 55 f/1.2!
Mar 10, 2016 @ 03:38:15
Hi here!
Anyone any idea where to get a ring to convert the type 4 version non-ai to ai?
Mar 10, 2016 @ 04:25:51
Hello! You can try pacific camera! Search google for the email
May 02, 2016 @ 02:06:58
Brilliant!
May 02, 2016 @ 02:08:07
Thanks, Toby!
Jun 03, 2016 @ 08:54:54
AFAIK to access aperture blades on 50 f/1.2, three lenses from the front must be removed from lens barrel
Jun 03, 2016 @ 09:05:54
Hi, Charlie. If i recall it, you can remove the front optics assembly in one piece and you can access the blades. But I think you have to remove the whole objective from the lens in order to access the 3 screws holding the retention ring itself. I may be wrong, I have a 50 1.2 dust cleaning post here somewhere, might be better to just reference that.
Jun 04, 2016 @ 13:53:02
Unfortunately, i wasn’t able to find any repair manual or parts list on the web.
Jun 04, 2016 @ 13:57:05
Hi, Charlie. This should point to my 50 1.2 post. there are a couple of videos for the 50 1.2 on the net. one of the videos is only good for watching how things go where but never follow how he handled the repair as it is very bad
Jun 13, 2016 @ 04:24:14
hi
just bought a fungus ridden Zoom-Nikkor 43-86mm f/3.5.for cheap
would really love to see how you dismantle it! thanks
Jun 13, 2016 @ 06:08:19
Hi, Dan! I thought I made a tear down of that before…
You are in luck! I am going to make one for the 43-86 (3 versions), 200mm f/4 Ai and the 35mm f/2.8K in the coming weeks and months
Jun 18, 2016 @ 12:38:49
which version do you have anyway? i am going to make one next weekend.
Aug 02, 2017 @ 09:17:33
I found very cheep nikon 50 mm, but the focus ring is not so smooth, and sometimes slips without resistance. Also from the lens I can hear rattling sound it seems that few balls from ball bearing are missing. Where i can find these small metal balls and what is the size of it?
Aug 02, 2017 @ 09:19:58
Hello. Bring one of the balls to a bearing shop as a sample. Some older 50mm have rattling bearings and that is NORMAL. For the helicoids, it sounds like it is all dry. You will need to clean and lubricate that up. Ric.
Sep 07, 2017 @ 06:20:15
Hi!! I have two NIKKOR 55 1.2 AI and NonAi lenses! One of them (AI) is just slightly off for infiniti focus. I see in your description that you stated that the brass ring is used to adjust focus. How do you use the brass ring to adjust focus? I’ve been studying your pictures but don’t see how to adjust focus with the brass rings. Thank you!!!! Your site is amazing! I will be donating soon!!!
Sep 07, 2017 @ 07:24:40
Hello, Daniel.
The brass ring is used as a washer and shim to help you achieve infinity focus but that is not the only thing that does. For minor focusing adjustments, you will have to fiddle with the inner ring on the central helicoid or the screws in the focusing ring’s inner lip. Ric
Sep 07, 2017 @ 17:29:58
Ah I see, so there is no way for me to just adjust the brass spacer to adjust infinity focus then? I would have to take apart the focusing ring, which would be a little bit intimidating. ThoughI I have taken apart a few lenses before, Tamron 18-50 2.8, Tokina 20-30 2.8 and Nikkor 50-200 kit lens they were only very minor fixes such as a broken mount. The Tamron 18-50 2.3 was to adjust focus slightly, which was easy to do since there was a small plastic spacer you could rotate to slightly adjust the front element after removing the front retainer ring. Well, I guess I will need to start purchasing a set of JIS screwdrivers! I spent the better part of 5 hours cleaning a used Nikon F film camera. The Nikon F is a thing of beauty.
Sep 08, 2017 @ 01:56:05
Hello.
NEVER do anything to that brass ring. You can fix your focus by calibrating the focus ring and where it is attached. It requires a bit of work and is not an easy task because the ring underneath the focusing ring is glued so you will have to soak that ring in alcohol overnight to remove it. Alternatively, there are adjustment points under the inner lip of the focusing ring and this is what you should be looking at. Just make sure that your lens is not tampered or improperly put back. Ric.
Sep 08, 2017 @ 21:28:27
Thank you! I will not do anything to the brass ring. I’ll look for the screws in the inner lip first and if that does’t work, I’ll have to buy a lot of alcohol! As an aside, I have two of these lenses, the 55 1.2 latest additions you have here with the white script “Lens Made In Japan” with the Blue and Green coatings and I also have the older serial number 201566 Nippon Kogaku branded lens 55 1.2. I read on one site that the last few years that they made the older lens before switching to the Nikon branded lens was the first lens that had multi coatings similar to or possibly the same as the S.C. lenses. In this article I read it seemed as if it was not definitive if the multi amber coatings were added to the lenses in 1969, though it mentions a Nikon brochure that states it’s the first lens that had multi coatings In which case I’m in luck. Mine has a very deep amber coating that is striking and beautiful. I’m reaching out to Mr. Nico Van Dijk with photos, since he seems to be the person to know and can add to the history of this amazing lens.
Sep 09, 2017 @ 00:59:36
Hello. I have made 2 guides for the 55/1.2 lenses, one for the metal one and another one for the rubber gripped one.
I recall that the older one has an amber coating while the new one has a greenish hue. Ric.
Jun 12, 2018 @ 07:44:22
Thanks for another great article, Richard!
Got a late production version of 55 f/1.2 with completely stuck helicoid. Now its back to normal!
By the way, i will be visiting Japan next week for a conference, do you know any good shop for tools in Tokyo?
Jul 11, 2019 @ 18:31:34
Hi rick. Recently I brought a Nikon 55mm f1.2 as same as the version in this post. But I have faced the veiling flare on the frame starting f2 and getting worse at 1.4 and 1.2. when at f2 the picture taking become soft and slight veiling. When at 1.2 or 1.4 the focus become very very soft and serious veiling flare on the whole frame. However it is sharp and good contrast starting from f2.8 . I have tried to disassembly to realign the spacer ring and blackening the edge of the rear elements ( due to same damage on the edge of the rear elements ) . But so far nothing helps. Do you have similar experiences or any suggestions on what to be taken next? Thanks and regards.
Jan 07, 2020 @ 23:41:38
Hi There,
I recently acquired an AI version of the 55mm f1.2 (#42xxxx). It’s in great condition except that my D850 does not recognize aperture f1.4; that is, it jumps directly from f1.2 to f2.0. There is a definite “stop” between f1.2 and f1.4 when I turn the aperture ring and I can physically see the aperture changing when I inspect the lens off camera so it seems that the indexing is slightly off. All the other apertures work correctly. It’s not the camera as I don’t have any problems with my similar 50mm 1.2 AIS. Has anyone on this site encountered similar indexing problems with the 55mm AI or other AI lenses? Is it better to live with it or attempt a repair?