
Hello, everybody! I haven’t updated anything for a weeks now and it looks like it’s going to be that way for the rest of this month. I am currently very busy with visiting family and a friend who also happens to be my dog food supplier. I will resume our normal schedule on November when things slow down a bit, until then please enjoy this little article.
Introduction:
Some earlier Nikkors have a thin aperture enough ring that doesn’t even touch the aperture coupling tab of modern Nikon cameras. Converting these to Ai is much easier compared to the ones that have a thicker aperture ring wherein you need to grind off any material that is in the way of the tab.
Today, I will show you how I make these lenses work with any Ai interface so that you can enjoy these old lenses with your modern Nikon cameras and get aperture priority metering with it.
 The Nikkor-H 50mm f/2 is one such lens. This is an easy mod since the tab needed for this is not as big as the ones needed for slower lenses.
Most older pre-Ai Nikkors will need to mechanically modified by removing some material from the aperture ring and for those type of Nikkor lenses you would want to read/follow this Ai conversion guide instead.
The mod illustrated here is nondestructive so that you will still retain the aesthetics and resale value of your lens but as mentioned this mod will only work with lenses with thin aperture ring.
Before We Begin:
If this is the first attempt at opening a lens then I suggest that you read my previous posts regarding screws & drivers, grease and other things. Also read regarding the tools that you will need in order to fix your Nikkors.
I highly suggest that you read these primers before you begin (for beginners):
- Essential tools
- Best practices 1
- Best practices 2
- Best practices 3
- Ai conversion
- Working with Helicoids
Reading these primers should lessen the chance of ruining your lens if you are a beginner. Also before opening up any lens, always look for other people who have done so in Youtube and the internet. Information is scarce, vague and scattered (that is why I started this) but you can still find some information if you search carefully.
I highly recommend that you also read my working with helicoids post because this is very important and getting it wrong can ruin your day. If I can force you to read this, I would. It is that important!
For more advanced topics, you can read my fungus removal post as a start. This post has a lot of useful information here and there and it will be beneficial for you to read this.
Making a Dummy:
Some people can actually do away with this, including me but I choose to make dummies so that I can save time later on the real thing because plastic is so much more workable than metal. You can argue that the time spent making a dummy is the same time used on trimming away bits of aluminium. While that statement is true, time is not the only thing in consideration here as you will soon see when you make one yourself.
Important!
Got this important message from Roland Vink and he has this to say for the positioning of the hook:
- For any lens with max aperture f/2 or slower, the AI tab starts 4 2/3 stops down from the max aperture setting.
- For any lens f/1.8 or faster, the AI tab starts 5 stops down from the max aperture setting.
This means f/2 and f/1.8 lenses have the AI tab in the same location, even though there is a 1/3 stop difference between the two.
Fast lenses (for f/2 and faster) are probably indexed a little differently due to the way they interact with the camera meter so some compensation is required to provide consistent metering compared to slower lenses.
Below is a table with the lens max aperture (Left) and the position of the AI tab (Right):
4 2/3 stops down (Slower lenses):
- f5.6 (f22 +2/3)
- f4.5 (f22)
- f4.0 (f16 +2/3)
- f3.5 (f16 +1/3)
- f2.8 (f11 +2/3)
- f2.5 (f11 +1/3)
- f2.0 (f8 +2/3)
5 stops down (Fast lenses):
- f1.8 (f8 +2/3)
- f1.4 (f8)
- f1.2 (f5.6 +1/2)
Thanks to Roland for this very informative table that he shared to us over at nikongear.com. Use this table as a guide as to where you should position your tab/hook and trim away any excess plastic and test it to see if you are getting what you want. It will affect metering so you would want to be very careful.
 I would usually make a dummy out of plastic to test out and see how it would work. I would then refine the design later and trim away anything that will touch the aperture coupling tab as well as decide if the design would hold up when it’s time to use aluminium for the real thing. Remember, aluminium is a soft metal so I always keep this in mind. I may use stainless steel in the future but so far aluminium is good enough so long as the tab doesn’t get snagged and bent, compromising the integrity of the metal.
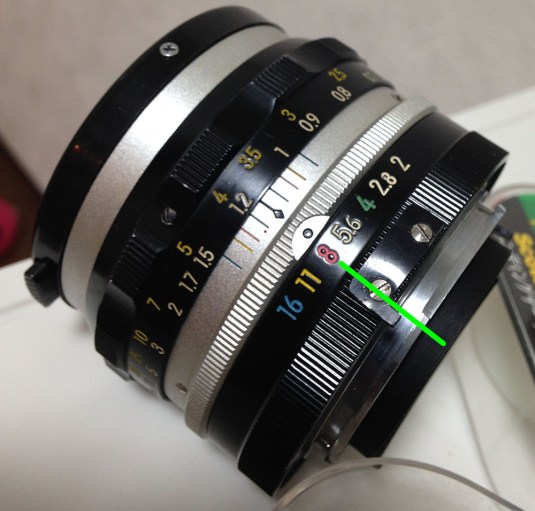
I would trim little bits of plastic away until the hook ends up where I wanted it to be. For f/2, it should lineup exactly where the number “8” should be on the aperture ring. Here is a guide that I made for converting Nikkors to Ai spec and read how we determine where the notch/hook should be.
I would use this plastic dummy for days until I am satisfied. Test the plastic dummy tab by rotating the aperture ring and see if the numbers reflect the correct f-stop in your Nikon’s display. If something doesn’t feel right then you have to go back a few steps.
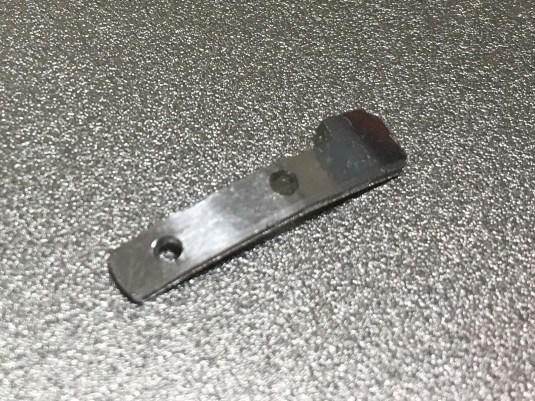
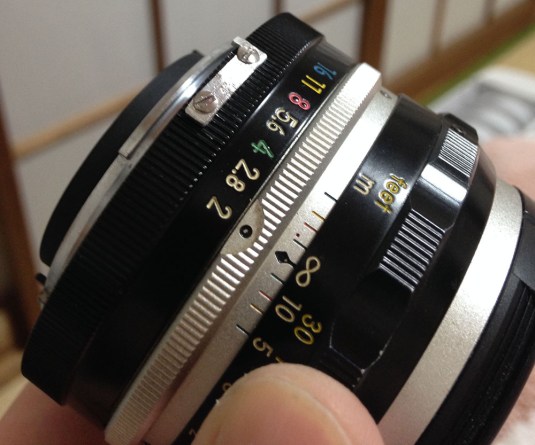 And here is the finished product. I handmade this thing out of a strip of 1mm aluminium that was ground and filed to shape. The first thing I would do is drill 2 holes for the screws and then shape the aluminium by hand. Finishing is done with 2000grit emery paper to give it a brushed metal look and to get rid of burrs and sharp corners.
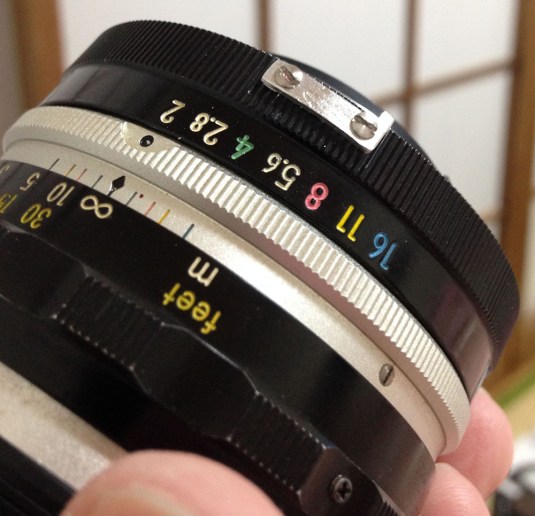 Here it is from another angle. This would probably take you around an hour to make if you are not a pro. I am too lazy to be bothered to improve upon this design but if I have all the time in the world I would integrate the pincers (ears) into the design as well so that I can also use this with my Nikkormat and Photomic finders.
Other examples:
I will now show you how the claw should look like on other lenses that are capable of using this technique. This is also a continuation of the previous portion.
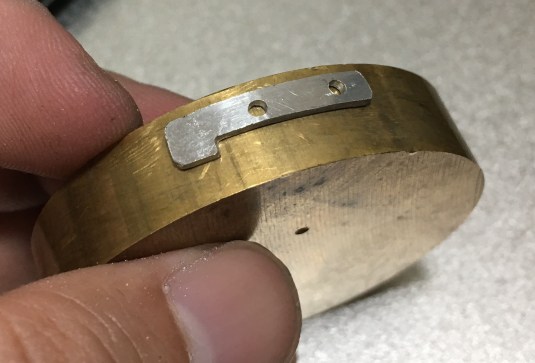 To get the aluminium strip to bend into shape, I hammered it on a length of brass rod that I use as my anvil until it lies flat to the surface. A metal pipe with the right outer diameter will also be a very good alternative for an anvil. Be sure to use a rubber mallet to hammer this thing or else you will scar the surface of your aluminium tab. Please note that this is not for the Nikkor-H 50mm f/2 but for another lens.
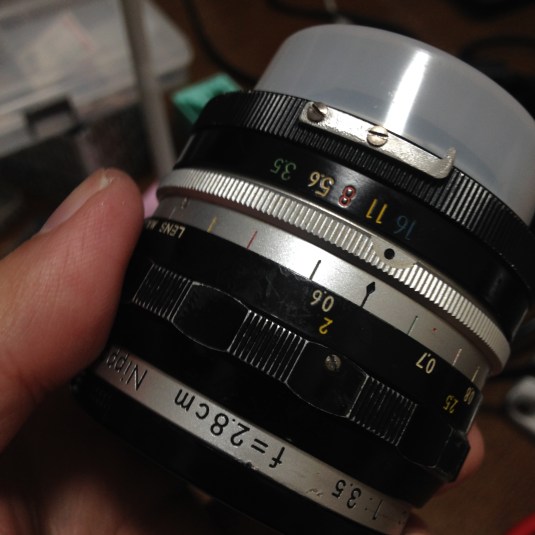 Here is another example, the Nikkor-H 2.8cm f/3.5 needed a longer hook. This design held up pretty well but I would definitely like to attempt this again but using a stronger type of metal instead of aluminium.
 Here is the dummy for the Nikkor-S 3.5cm f/2.8. I used this dummy for months until I found the time to make one from aluminium. If you are happy with the dummy then you can just leave it that way, but I like the tab to match the look of the older Nikkors so there is no way that I cannot avoid using metal for this.
 Here is a close-up of the newly milled hook for the Nikkor-S 3.5cm f/3.5. see how delicate it is so handle these with care.
Conclusion:
This is easy enough for a beginner to do in an hour so long as you have the right items and a good design to begin with. Always remember that the aperture coupling tab should never be impeded by this and should only touch the claw at the end and nothing else. If you ever made this too thick then it might damage that mechanism and the delicate FRE under it so keep that in mind.
As mentioned before, you can also integrate pincers into this design. I am planning on one at this moment but I can only start working on it around early spring of next year. You can get really creative with this with your choice of materials,etc.
I hope that you enjoyed this short blog post. I may not be publishing a lot this month due to my super busy schedule and everything should go back to normal around December. It can take a lot of effort to maintain a blog and that is something that I did not see coming when I started this blog but I promise you that I will do my best. In the meantime, to get updates on wether something has been published or just talk to other people regarding lens problems you can “like” our companion facebook page. Until next time, Ric.
Help Support this Blog:
Maintaining this blog requires money to operate. If you think that this site has helped you or you want to show your support by helping with the upkeep of this site, you can simple make a small donation to my paypal.com account (richardHaw888@gmail.com). Money is not my prime motivation for this blog and I believe that I have enough to run this but you can help me make this site (and the companion facebook page) grow.
Helping support this site will ensure that this will be kept going as long as I have the time and energy for this. I would appreciate it if you just leave out your name or details like your country and other information so that the donations will totally be anonymous it is at all possible. This is a labor of love and I intend to keep it that way for as long as I can. Ric.

Feb 11, 2019 @ 15:54:14
I have just converted a 50mm H C Nikkor and noticed that there are notches on the inside of the aperture ring that appear to correspond to the AI cutout location so it may be worth checking if other late pre AIs are similarly marked.
Feb 11, 2019 @ 16:18:02
Having looked at a 1.4 l should say I’m not referring to the cutout that limit’s the travel of the aperture scale! On the 50/2 these align so CHECK first.
Mar 23, 2022 @ 09:23:17
hi, can i just put light meter coupling (bunny ear) on nikon afd lens aperture ring so the body (nikomat ftn) ligth meter will read this lens? thankyou before
Feb 03, 2025 @ 23:58:51
I have this exact lens and I’d like to use it on my D200 body. I’m not concerned about the aesthetic so I’m happy just to grind off the protruding metal from the aperture ring. However I’m struggling to remove the aperture ring. I’ve removed the five screws which hold down the bayonet mounting ring which allows that to lift away easily. I’ve set the aperture to f2 and removed the securing pin/screw which goes through the aperture ring itself. I was expecting the aperture ring to then lift away and separate from the lens body. However it is not budging. Am I missing something? Thanks 👍🏻