
Hello, everybody! How are you today? I just took the family out to a Korean restaurant. I know that there are a couple of cheap eats there and I thought it would also be good for the family to see the other cheap deals at the vicinity. There are many things that we can get for cheap and being cheap doesn’t always have to be bad. In fact, some cheap things are just as good or even better than the more expensive things just like Stolichnaya when you compare it to the top-shelf vodkas. Today, I’m going to introduce to you a cheap and very good Nikkor that many people started out with and many pros used these,too.
Introduction:
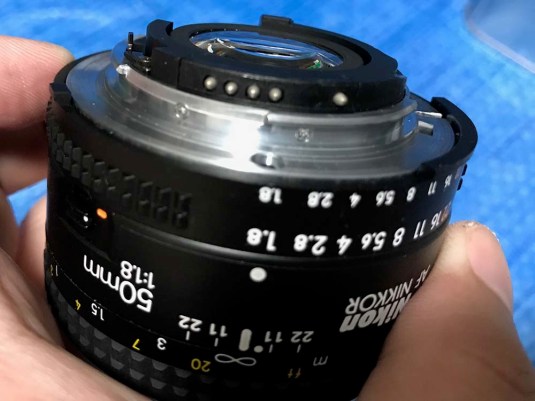
Today, we will talk about a lens that almost every Nikon photographer owned because it was cheap and it exceeded expectations, the AF-Nikkor 50mm f/1.8 lens! This lens was a big hit for Nikon because of its great price/performance ratio. The lens is “Made in China” and it lowered the production cost even more. I will show you what’s inside this thing so you will know how and why Nikon kept its cost down.
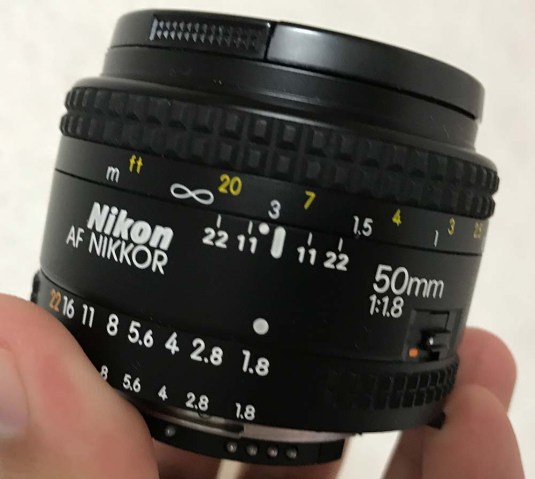 The AF-Nikkor 50mm f/1.8 is the original “plastic fantastic” lens for Nikon users back in the days. Many photographers started with one, built their portfolio with one and made a lot of money using one. They are also very easily sold soon after as they usually lust for a faster f/1.4 lens so these were very plentiful back then and maybe even to this day.
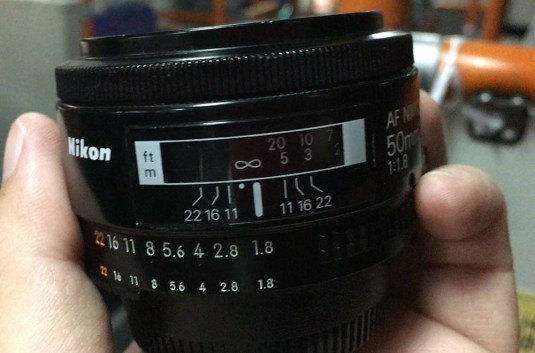 Here is the earlier version. Notice that it has a proper distance scale window and a better DOF scale. The lens is also better-built overall and the helicoid has a longer focus throw. It is almost indistinguishable from the manual focus version when it comes to how long the focus throw is. These were “Made in Japan” and the quality shows. I also find that it’s sharper than the later version wide-open. This is what you will want for personal use!
I will not write a lot of things about this lens because the internet is already full of great reviews and sample pictures from this lens. Making one is pointless and it goes against the philosophy of our blog, which is to bring obscure information to the general masses. Let’s begin with the teardown and clean away that disgusting fungi!
IMPORTANT:
This is ONLY for the AF version, the AF-D version is similar but the electronics aren’t the same! You will have to be aware about which version your lens is! This is the earlier AF!
Before We Begin:
If this is the first attempt at opening a lens then I suggest that you read my previous posts regarding screws & drivers, grease and other things. Also read regarding the tools that you will need in order to fix your Nikkors.
I highly suggest that you read these primers before you begin (for beginners):
- Essential tools
- Best practices 1
- Best practices 2
- Best practices 3
- Ai conversion
- Working with Helicoids
Reading these primers should lessen the chance of ruining your lens if you are a beginner. Also before opening up any lens, always look for other people who have done so in Youtube and the internet. Information is scarce, vague and scattered (that is why I started this) but you can still find some information if you search carefully.
I highly recommend that you also read my working with helicoids post because this is very important and getting it wrong can ruin your day. If I can force you to read this, I would. It is that important!
For more advanced topics, you can read my fungus removal post as a start. This post has a lot of useful information here and there and it will be beneficial for you to read this.
Disassembly (Front):
Working with an AF-Nikkor lens is different from working with a manual focus lenses. It is very different in the sense that autofocus lenses were engineered to be lite so that the motor driving the focusing mechanism will not easily worn and expire prematurely. One more thing that’s different is that you only clean what you need. Autofocus lenses aren’t made as robust as manual focus lenses and some may even be damaged as you remove a lens element for cleaning. If something will not come off then just leave that alone, that’s how it was made to be and you will just have to live with it. Since keeping weight low is a top priority, adhesives may be used here and there so that is also another consideration.
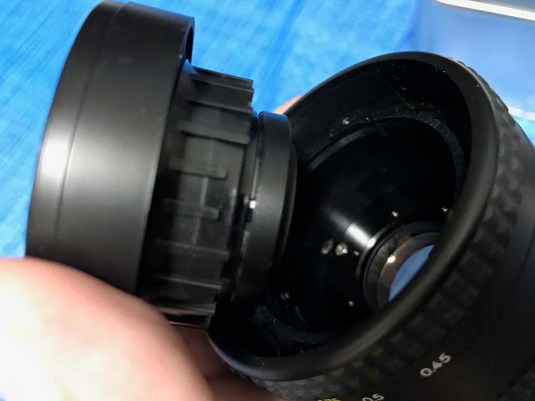
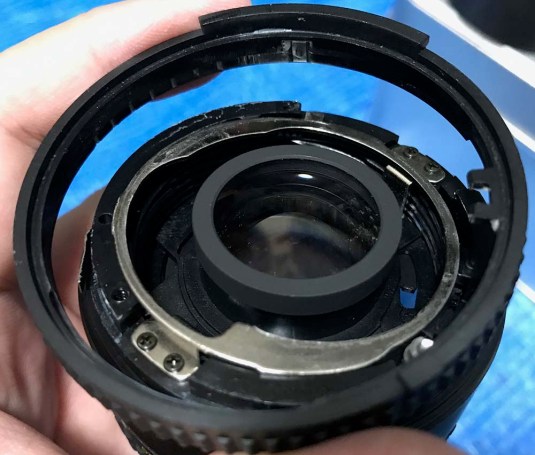
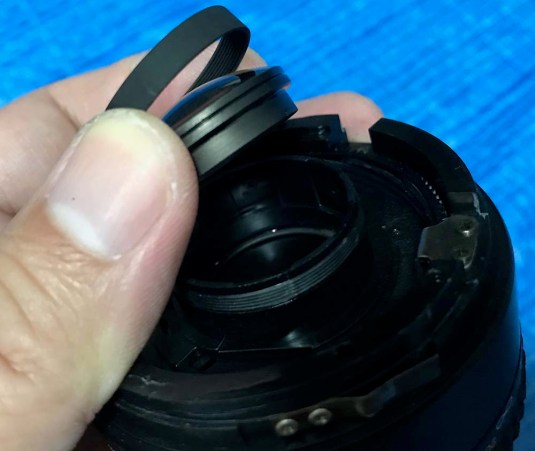
 First, remove the front cover by using a rubber stopper and turn it counter-clockwise. As typical with Nikkors made in this era, this part is made of plastic. Be careful when you’re turning this and if it seems stuck, just place a drop of alcohol or acetone into the seam so it can soften up whatever was used to secure it and try your luck again after awhile.
 You can now access these screws once that is gone. The 3 screws secure the front barrel to the inner helicoid which also happens to be the casing for the objective. I am not sure but I think this ring is not symmetrical underneath so to be safe just take some notes.
 The front barrel also acts as the front elements assembly’s casing. Nikon had to design it this way to make the lens as lite as possible to prevent camera body’s motor from stress.
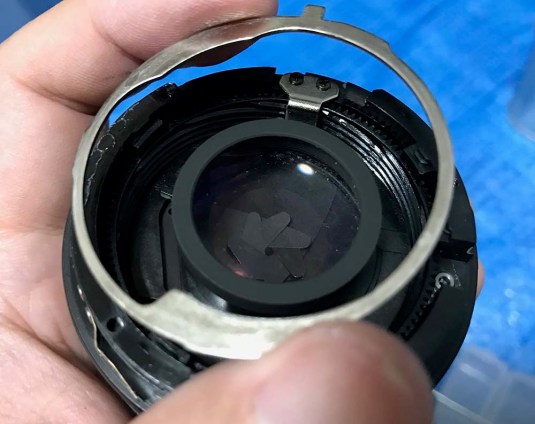
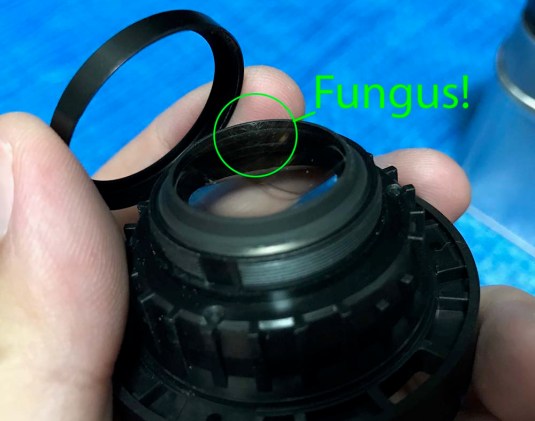 You can now access the individual elements found on the front elements assembly. This collar can be unscrewed but you may need to place a drop of alcohol on the threads since this is usually secured with lacquer at the factory. See the fungus in the picture? Yuck!
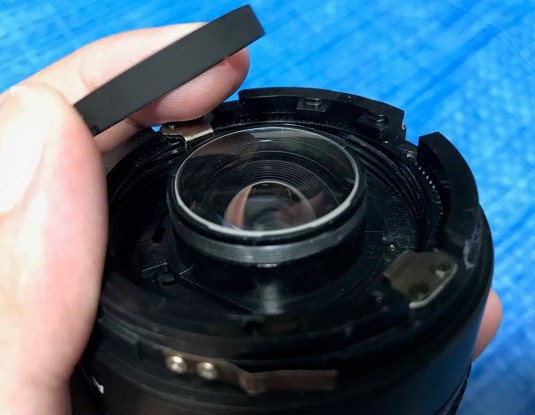
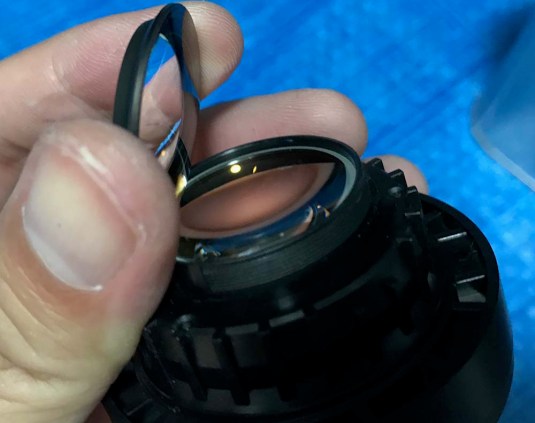 The 3rd element can now be extracted with you fingers. This is can fall to the ground and is easily cracked so make sure that you secure this as soon as you got rid of the collar.
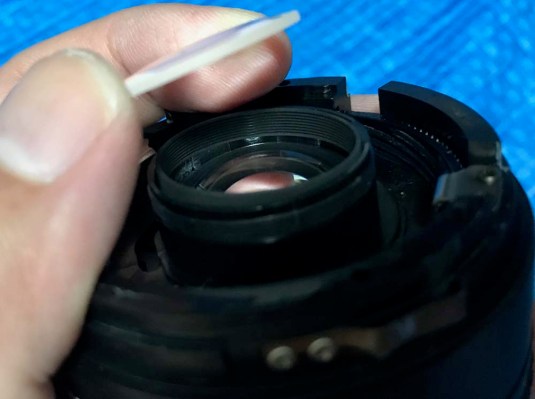
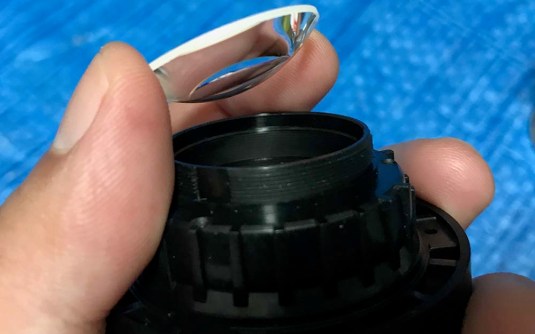 The 2nd element can then be extracted this way. You can use a lens sucker for this but I just dropped it into my fingertips. For lens elements like this or the one before where the shape is not ambiguous, you do not need to mark the edge with a marker to remind you later which side should face where. If you are having trouble determining the direction of a lens element by sight alone then you should us a marker to mark the front edge. The front element is permanently secured in-place and you cannot remove it without ruining the plastic lip that holds it down. I suspect that it is crimped in place with a special die at the factory. You do not need to remove the front element to clean both of it’s surfaces.
 The glass in the middle can now be easily accessed at this point but the fungus lies on the other side! If you want to clean the exposed surface, use a Q-tip and be careful with your iris blades. Always wide towards the direction of the iris blades and not the other way or the Q-tip might snag on one of the blades and permanently damaging the iris!
If your lens has fungi on the front elements then this is as far as you would want to go. If you disassemble any further than this then you are just wasting your effort.
Disassembly (Rear):
The rear part houses the rear elements group. This part contains the mote delicate parts of the lens such as the electronics, main drive gear and the exposed parts of the helicoids and the AF drive mechanism. Discharge any static electricity first before you touch this!
 To access the rear elements group you must remove the rear bayonet. See these pins on the contact block? Be careful not to damage any of these while you work on the lens. This lens is the non-D version and for the AF-D version, you will want to unscrew the 2 screws on the contact block so you can remove the bayonet plate without damaging the circuitry underneath it. The AF-D version has more electronics inside of it.
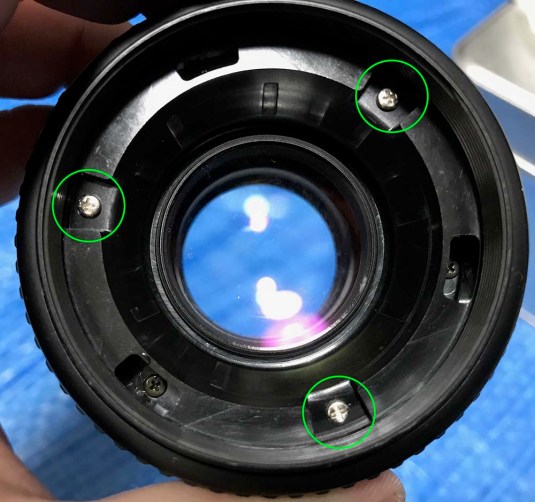
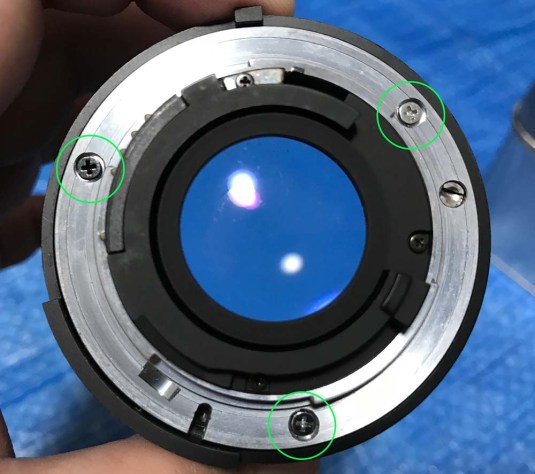 The rear bayonet can be removed by removing these 3 screws. Note that the screw at the 12 o’clock position of the lens is black. Most, if not all AF-D lenses have this for some odd reason. This is probably designed like this so you it coincides with the white dot found on the camera’s body to indicate where you should align this screw when you need to mate a lens to the camera. I have encircled the 3 screws to save you from being confused.
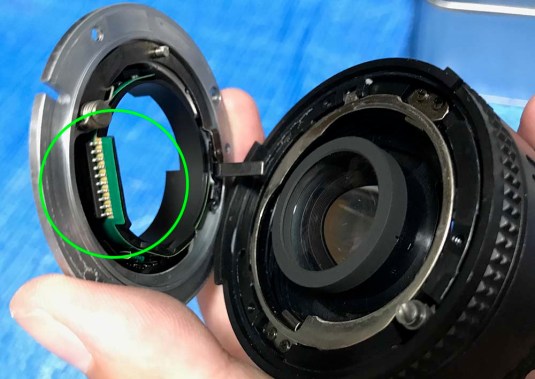 The bayonet plate comes off just like this. The bayonet plate also contains the stop-down lever mechanism as well as all of the electronic parts of this lens (encircled). In the AF-D version, the electronic parts go all the way to the focusing ring. You have to be careful to not damage the flex cable for the AF-D version or your lens is as good as junk.
 Be very careful not to damage anything found on this part. Never clean these parts with anything and never even touch any of the electronics. Your lens’ AF function is as good as gone when the electronics of this lens is damaged in anyway. Static electricity is deadly!
 The aperture ring should come off easily. This is just made of plastic so be careful with it.
 This ring connects to the iris mechanism via the stop-down lever so it limits the aperture of the iris as you open or close it down by turning the aperture ring.
 Now that all obstructions are gone, you can now remove the collar that secures the rear element. Again, this may be secured with lacquer just like the one with the 3rd element.
 The rear element can now be picked-up with your fingertips. Note that the convex side is the one facing the rear (outward). Do not put this back facing the other way.
 The doublet can then be removed but first, you will have to remove a spacer on top of it. I will mark the spacer with a small mark to remind me which side should be facing where. These spacers aren’t symmetrical in most cases so it’s always best to mark these things.
When it comes to the usual fungus and dirt cleaning, this is as far as you want to go. You do not need to open up the helicoids unless you have a very good reason to do so. Inside this, you will find that most of the parts inside were made of brittle plastic so be careful.
Disassembly (Iris Assembly):
It’s rare that you will have to work on the iris of an AF lens because the lubricant used on the helicoids isn’t as much as you would find in a manual focus lens. This isn’t saying that the iris on an AF lens will never get oily but the chances of one getting oily is very slim. If yours is oily then this step will be very helpful to you!
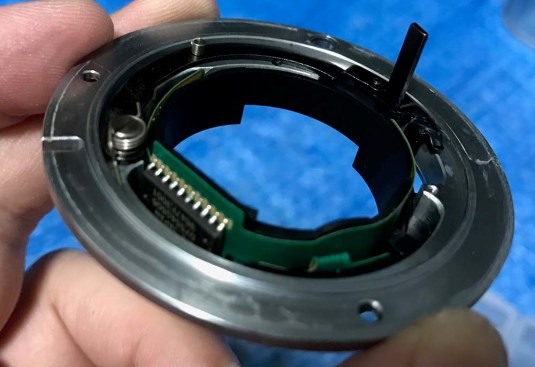
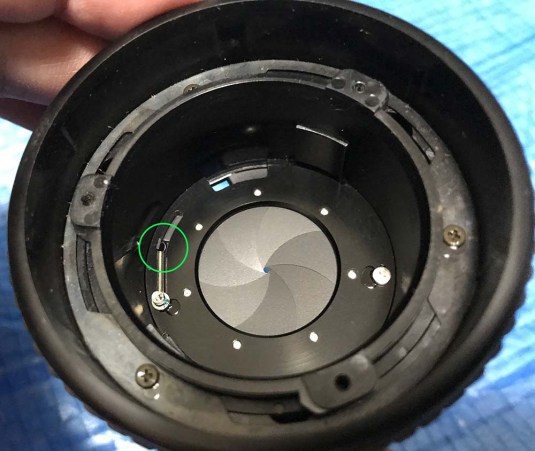 First, uncouple this end of the spring to prevent any damage to it. This spring makes sure that the iris is always closed. One end of the spring is connected a screw that you need to remove. Again, Nikon had to do this to cut cost and weight. Very clever.
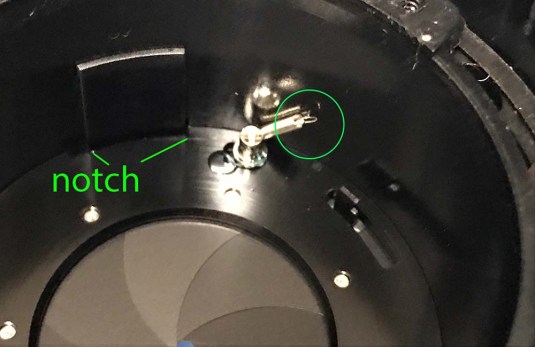 The spring will be dangling like this but it’s OK. See the notch found on the inner walls of the objective’s housing and the iris assembly’s housing? These are guides so that you will never put this back in the wrong orientation. Keep this in mind when you reinstall this.
 Once the 2 screws holding the iris is gone, you can now extract the iris assembly. Careful not to accidentally open this thing up as you extract it or else you will be picking the iris blades up from the floor or worse, they can get damaged!
That’s it for now. I do not have anything to work on the iris so I didn’t bother opening it.
Conclusion:
This should be easy enough for an experienced repairman to do in less than an hour. I’m not interested in this lens’ optics so I didn’t bother cleaning them because all I want is the focusing unit of this lens. The lens elements and iris are now in my spares box. For those who want to clean their lenses then don’t worry because this lens is easy to put back and as long as you took enough notes then you should be perfectly fine.
The lenses from the AF line of autofocus Nikkor lenses do not have to be stripped to their bare parts and overhauled. If ever there is fungus or junk inside the lens, all you have to do is clean the affected elements and leave the rest alone. These lenses are usually very delicate inside and the best thing to do is to just leave the focusing mechanisms alone.
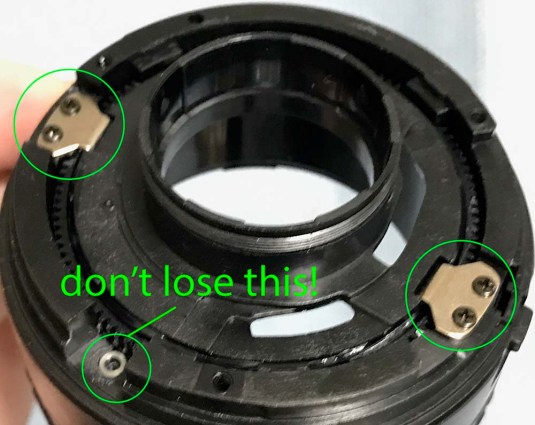 These are the helicoid keys that keep the helicoids in sync. Do not bother with any of the helicoid keys. There is also a small metal washer-like thing that you should never bother with. It can be easily be misplaced so keep an eye on that little thing!
The only time you will want to mess around with the helicoids is when the lens will not focus smoothly because it is jammed or if some dirt has fouled the helicoids, making the focusing feel a bit “gritty”. The usual procedure for cleaning helicoids still apply and the article I wrote about how to work with helicoids will be useful.
After you have cleaned the helicoids and reassembled them back together, you will need to calibrate the infinity focus of this lens so that it focuses perfectly to infinity. There are 3 screws that you will have to loosen up to do this and those screws can be found inside the rectangular openings in this picture. The 3 screws encircled on this picture shouldn’t be touched as they have nothing to do with adjusting the focusing ring. Open your iris to its maximum aperture (f/1.8) and you are ready to calibrate your lens’ focusing ring!
Once you have loosened the 3 screws a bit, the focusing ring can now be turned while the helicoids stay-put. Manually focus the lens on something really far like a pylon or house that is more than 10km away and when the focusing indicator dot inside the viewfinder lights up, take a picture. Check and see if that far-away object is in perfect focus and do another series of images until you are satisfied that you have a very clear image of your subject. Without moving the helicoids, rotate the focusing ring until the infinity symbol is just about 1mm past the center of the scale. Tighten up the 3 screws and then focus again on the far-away object using autofocus this time. If you got it correctly then you are good to go! If you have been following my blog for some time then you will think that I made a mistake on advising you to focus past the center of the infinity symbol by a millimeter. I do this because this is an autofocus lens and these lenses sometimes require a little bit of slack at infinity to give it room to adjust to each individual camera’s AF accuracy. This is not a standard operating procedure and I just do this for my own lenses. The scale on an autofocus lens is near useless so getting it perfect will not matter much at all. The most important thing is that the camera’s AF module has enough slack to compensate and the AF module does the job of focusing the lens so might as well just let it do the job for you.
This is a little different from our usual manual focus lens articles so I hope that you have learned something here. This is easy enough for an amateur to work on but if you don’t have the experience, skills or tools to do this then just let the professionals clean this for you. With this article, you will know if the repairman did a good job or if he was “fucking the dog” so to speak. Having this cleaned should not take plenty of money anyway and if time means money to you then you might as well pay the right person to do the job!
Thank you guys again for continually supporting my blog. If you love my work, please do me a favour my sharing this on social media and to your real-world friends! I monetized my site now and every visit gives me a fraction of a $0.1! I know it’s not much but if this site reaches the 50,000 visits per month mark then that would make me a happy man :-). See you guys again in the next article! Always keep on smiling! Ric.
Help Support this Blog:
Maintaining this blog requires money to operate. If you think that this site has helped you or you want to show your support by helping with the upkeep of this site, you can simple make a small donation to my paypal.com account (richardHaw888@gmail.com). Money is not my prime motivation for this blog and I believe that I have enough to run this but you can help me make this site (and the companion facebook page) grow.
Helping support this site will ensure that this will be kept going as long as I have the time and energy for this. I would appreciate it if you just leave out your name or details like your country and other information so that the donations will totally be anonymous it is at all possible. This is a labor of love and I intend to keep it that way for as long as I can. Ric.

Sep 08, 2017 @ 14:22:02
Thanks on your marvelous posting! I really enjoyed reading it, you could be a great author.I will
be sure to bookmark your blog and may come back very soon. I want to encourage yourself to
continue your great job, have a nice holiday weekend!
Sep 21, 2020 @ 17:59:30
Thx for the assistance, great info…
Apr 21, 2022 @ 17:16:50
Hi 🙂 I have a chinese 50mm 1.8 AF D, the one without distance window. Can I do the infinity focus adjustment as explained by you?